JVC KD-G807: OTHER MAIN FUNCTIONS
OTHER MAIN FUNCTIONS: JVC KD-G807
OTHER MAIN FUNCTIONS
Changing the general settings
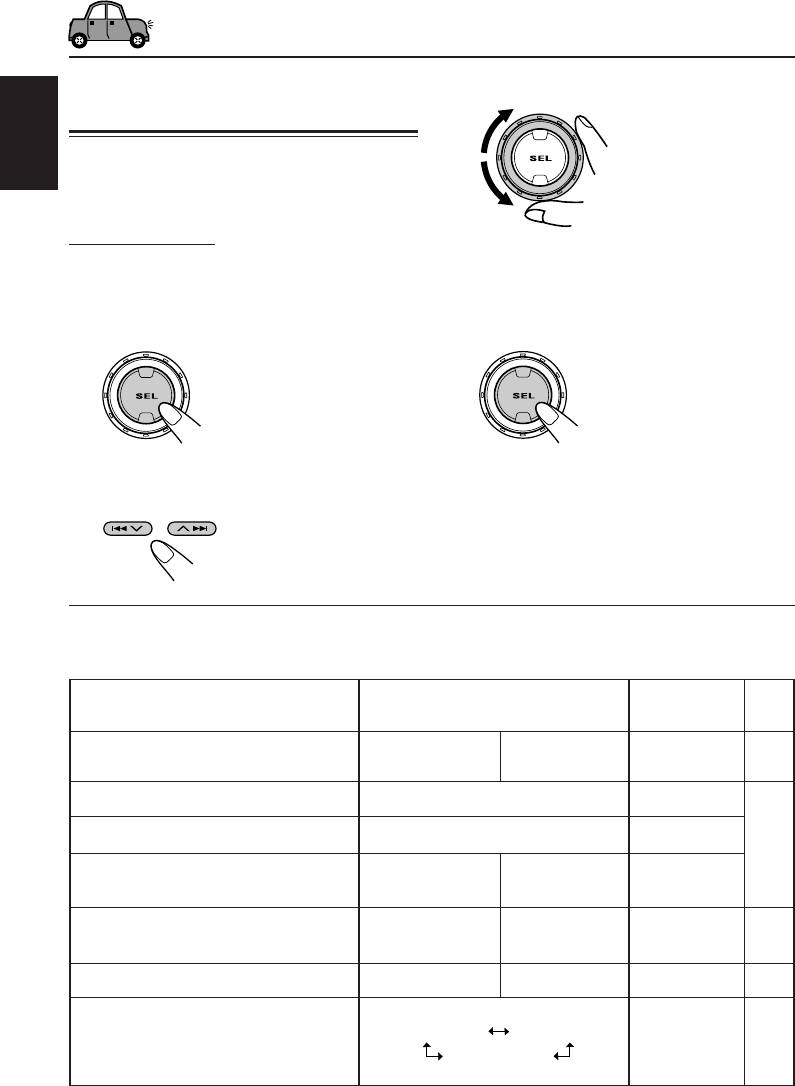
3
Adjust the PSM item selected.
(PSM)
You can change the items listed in the table
ENGLISH
below and on page 35 by using the PSM
(Preferred Setting Mode) control.
Basic Procedure
1
Press and hold SEL (select) for more
4
Repeat steps
2
and
3
to adjust the
than 2 seconds so that one of the
other PSM items if necessary.
PSM items appears on the display.
(See below and page 35.)
5
Finish the setting.
2
Select the PSM item you want to
adjust.
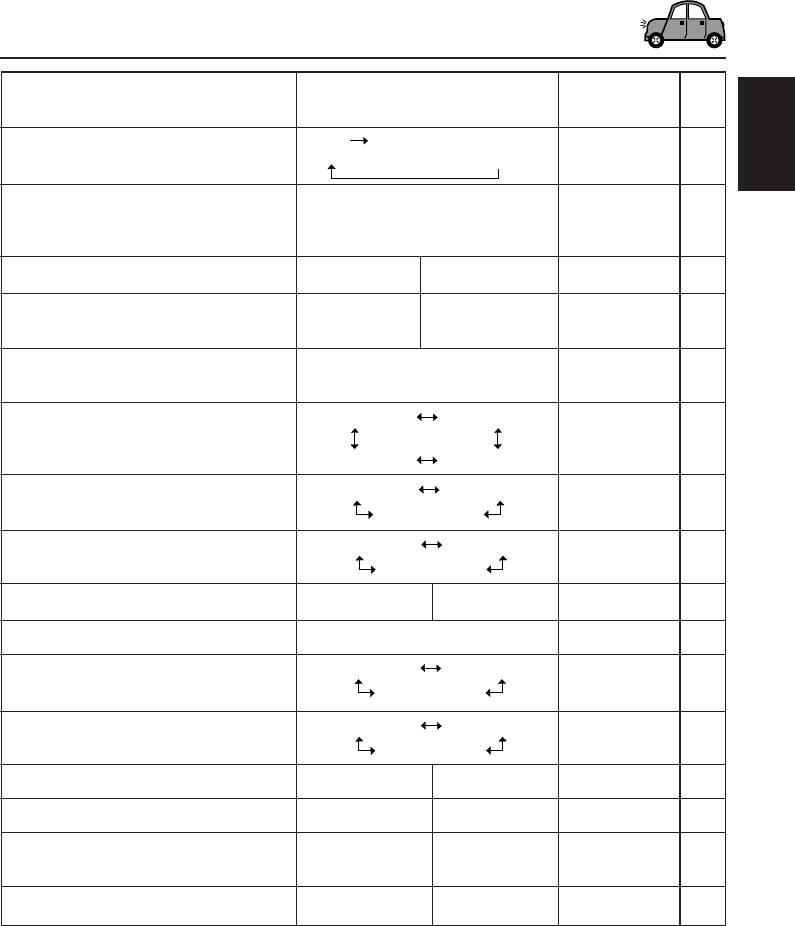
Preferred Setting Mode (PSM) items
• For detailed operations of each PSM items, refer to the pages listed in the table.
Factory-preset See
Indications Selectable values/items
settings page
DEMO MODE Display
demonstration
DEMO OFF
DEMO ON DEMO ON 8
CLOCK HOUR Hour adjustment
0 — 23 (1 — 12)
0 (0:00)
CLOCK MINUTE Minute adjustment
00 — 59
00 (0:00)
9
CLOCK24H/12H 24/12-hour time
CLOCK
CLOCK 12HOUR CLOCK 24HOUR
display
24HOUR
AUTO ADJUST Automatic clock
ADJUST OFF ADJUST ON ADJUST ON 19
setting
CLOCK DISP Clock display
CLK DISP OFF CLK DISP ON CLK DISP ON 36
AF-REG Alternative
AF ON
AF REG
frequency/
AF ON
14, 15
Regionalization
1
AF OFF*
reception
1
*
Displayed only when the “DAB AF” is set to “OFF.”
34
EN34-41_KD-G807[EE]f.p65 1/15/04, 2:11 PM34
Factory-preset See
Indications Selectable values/items
settings page
29 programme types
OFF
PTY STANDBY PTY standby
(see page 20)
OFF
16
ENGLISH
TA VOLUME Traffic
3
announcement
VOL 00 — VOL 30 or 50*
VOL 20 19
volume
P-SEARCH Programme search
SEARCH OFF SEARCH ON SEARCH OFF 19
2
DAB AF*
Alternative
AF OFF AF ON AF ON 51
frequency search
2
DAB VOL*
DAB volume
VOL –12 — VOL +12 VOL 00 51
adjustment
LEVEL 1 LEVEL 2
LEVELMETER Level meter
LEVEL 1 36
EQ & LEVELSILENT
DIMMER MODE Dimmer mode
DIMMER AUTO
DIMMER OFF
DIMMER
36
DIMMER ON
AUTO
TELEPHONE Telephone muting
MUTING OFF
MUTING 1
MUTING OFF 37
MUTING 2
BEEP SWITCH Key-touch tone
BEEP ON 37BEEP OFF BEEP ON
CONTRAST Display contrast
01 – 10
05 37
SCROLL ONCE SCROLL AUTO
SCROLL MODE Scroll mode
SCROLL
37
SCROLL OFF
ONCE
WOOFER FREQ Subwoofer
FREQ MID FREQ HIGH
FREQ MID
37
cutoff frequency
FREQ LOW
4
EXTERNAL IN*
External component
CHANGER LINE IN CHANGER 38
TAG DISPLAY Tag display
TAG DISP OFF TAG DISP ON TAG DISP ON
38
AMP.GAIN Amplifier gain
HIGH
LOW POWER HIGH POWER
38
control
POWER
SLOT LIGHT Slot light
OFF ONON 38
2
*
Displayed only when the DAB tuner is connected.
3
*
Depending on the amplifier gain control setting.
4
*
Displayed only when one of the following sources is selected—FM, AM, and CD.
35
EN34-41_KD-G807[EE]f.p65 1/15/04, 2:11 PM35
To set the clock display—CLOCK DISP
To select the level meter—LEVELMETER
You can set the clock to be shown on the lower
You can select the level meter display according
part of the display when the unit is turned on.
to your preference.
When shipped from the factory, the clock is set to
When shipped from the factory, this mode is set
ENGLISH
be shown on the display.
to “LEVEL 1.”
• CLK DISP ON: Clock display is turned on.
• LEVEL 1/LEVEL 2: Display the audio level
• CLK DISP OFF: Clock display is turned off.
meter with different
When “CLK DISP OFF” is
illumination pattern.
selected, the current source
• EQ & LEVEL: Display the equalizer
name, station band, folder
pattern and audio level
number, or disc number
meter.
appears instead of the clock
• SILENT: Display the equalizer
display (except when “LINE
pattern and volume level
IN” is selected as the source).
meter.
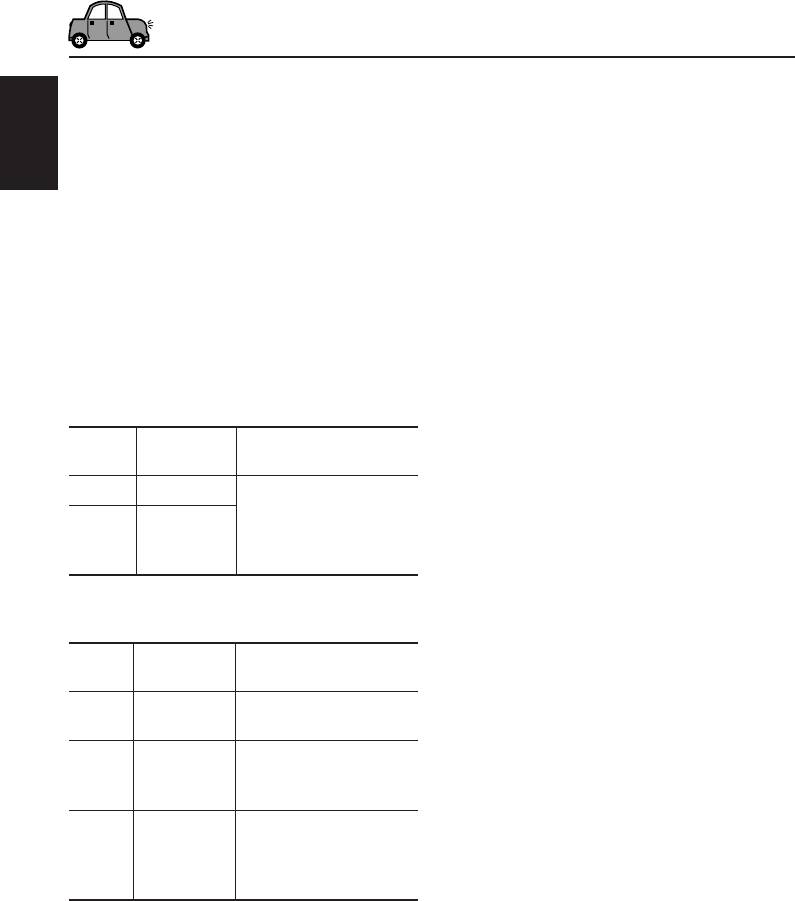
When “CLOCK DISP” is set to “CLK DISP OFF”:
To select the dimmer mode
Source Initial Pressing DISP
—DIMMER MODE
indication (display)
When you turn on the car headlights, the display
Tuner Band
automatically dims (Auto Dimmer).
Clock appears for about
CD CD, folder
When shipped from the factory, Auto Dimmer
5 seconds.
or number, or
mode is activated.
CD-CH disc number
• DIMMER AUTO: Activates Auto Dimmer.
• DIMMER OFF: Cancels Auto Dimmer.
When “CLOCK DISP” is set to “CLK DISP ON”:
• DIMMER ON: Always dims the display.
Source Initial Pressing DISP
Note:
indication (display) repeatedly
Auto Dimmer equipped with this unit may not work
correctly on some vehicles, particularly on those
Tuner Clock Band number appears
having a control dial for dimming.
for about 5 seconds.
In this case, set the dimmer mode to “DIMMER ON”
CD Clock CD, or track/file/folder
or “DIMMER OFF.”
number appears for
about 5 seconds.
CD-CH Clock Disc number, or track/
file/folder number
appears for about
5 seconds.
36
EN34-41_KD-G807[EE]f.p65 1/15/04, 2:11 PM36

To select the telephone muting
To select the scroll mode—SCROLL MODE
—TELEPHONE
You can select the scroll mode for the disc
information (when the entire text cannot be
This mode is used when a cellular phone system
shown at a time).
is connected. Depending on the phone system
When shipped from the factory, scroll mode is set
used, select either “MUTING 1” or “MUTING 2,”
ENGLISH
to “SCROLL ONCE.”
whichever mutes the sounds from this unit.
When shipped from the factory, this mode is
• SCROLL ONCE: Scrolls only once.
deactivated.
• SCROLL AUTO: Repeats the scroll (5-second
intervals in between).
• MUTING 1: Selects this if this setting can
• SCROLL OFF: Cancels scroll mode.
mute the sounds.
• MUTING 2: Selects this if this setting can
Note:
mute the sounds.
Even if the scroll mode is set to “SCROLL OFF,” you
• MUTING OFF: Cancels the telephone muting.
can scroll the display by pressing DISP (display) for
more than 1 second.
Note:
With the CD or CD changer selected as the source,
playback pauses during telephone muting.
To select the subwoofer cutoff frequency
—WOOFER FREQ
To turn the key-touch tone on or off
When a subwoofer is connected to this unit,
—BEEP SWITCH
select an appropriate cutoff frequency level for
You can deactivate the key-touch tone if you do
your subwoofer.
not want it to beep each time you press a button.
When shipped from the factory, the subwoofer
When shipped from the factory, the key-touch
cutoff frequency is set to “FREQ MID.”
tone is activated.
• FREQ LOW: Frequencies higher than 50 Hz
• BEEP ON: Activates the key-touch tone.
are cut off to the subwoofer.
• BEEP OFF: Deactivates the key-touch tone.
• FREQ MID: Frequencies higher than 80 Hz
are cut off to the subwoofer.
• FREQ HIGH: Frequencies higher than 120 Hz
To adjust the display contrast level
are cut off to the subwoofer.
—CONTRAST
Adjust the display contrast (01 – 10) to make the
display indications clear and legible.
When shipped from the factory, the display
contrast level is set at level 05.
37
EN34-41_KD-G807[EE]f.p65 1/15/04, 2:11 PM37

To select the external component to use
To select the amplifier gain control
—EXTERNAL IN
—AMP.GAIN
You can connect the external component to the
You can change the maximum volume level of
CD changer jack on the rear using the Line Input
this unit. When the maximum power of the
ENGLISH
Adapter KS-U57 (not supplied).
speakers is less than 50 W, select “LOW
To use the external component as the playback
POWER” to prevent them from being damaged.
source through this unit, you need to select
When shipped from the factory, “HIGH POWER”
which component—CD changer or external
is selected.
component—to use.
When shipped from the factory, CD changer is
• LOW POWER: You can adjust the volume
selected as the external component.
level from “VOL 00” to
“VOL 30.”
• CHANGER: To use the CD changer.
Note:
• LINE IN: To use the external component
If you change the setting from
other than CD changer.
“HIGH POWER” to “LOW
POWER” while listening at a
Note:
volume level more than 30, the
For connecting the Line Input Adapter KS-U57 and
unit automatically changes the
the external component, refer to the Installation/
volume level to “VOL 30.”
Connection Manual (separate volume).
• HIGH POWER: You can adjust the volume
level from “VOL 00” to
To turn the tag display on or off
“VOL 50.”
—TAG DISPLAY
An MP3/WMA file can contain file information
To turn the slot light on or off
called “ID3 Tag” where its album name,
performer, track title, etc. are recorded.
—SLOT LIGHT
There are two versions–ID3v1 (ID3 Tag version
You can turn off the slot light if you do not want
1) and ID3v2 (ID3 Tag version 2). If both ID3v1
the illumination each time you insert/eject the
and ID3v2 are recorded on a disc, ID3v2
disc or when you change the control panel angle.
information will be shown.
When shipped from the factory, slot light is
When shipped from the factory, “TAG DISP ON”
activated.
is selected.
• ON: Activates the illumination.
• TAG DISP ON: Turns on the ID3 tag display
• OFF: Deactivates the illumination.
while playing MP3/WMA files.
• If an MP3/WMA file does not
have ID3 tags, folder name
and file name appear.
Note:
If you change the setting from
“TAG DISP OFF” to “TAG
DISP ON” while playing an
MP3/WMA file, the tag display
will be activated when the next
file starts playing.
• TAG DISP OFF: Turns off the ID3 tag display
while playing MP3/WMA files.
(Only the folder name and file
name can be shown.)
38
EN34-41_KD-G807[EE]f.p65 1/15/04, 2:11 PM38
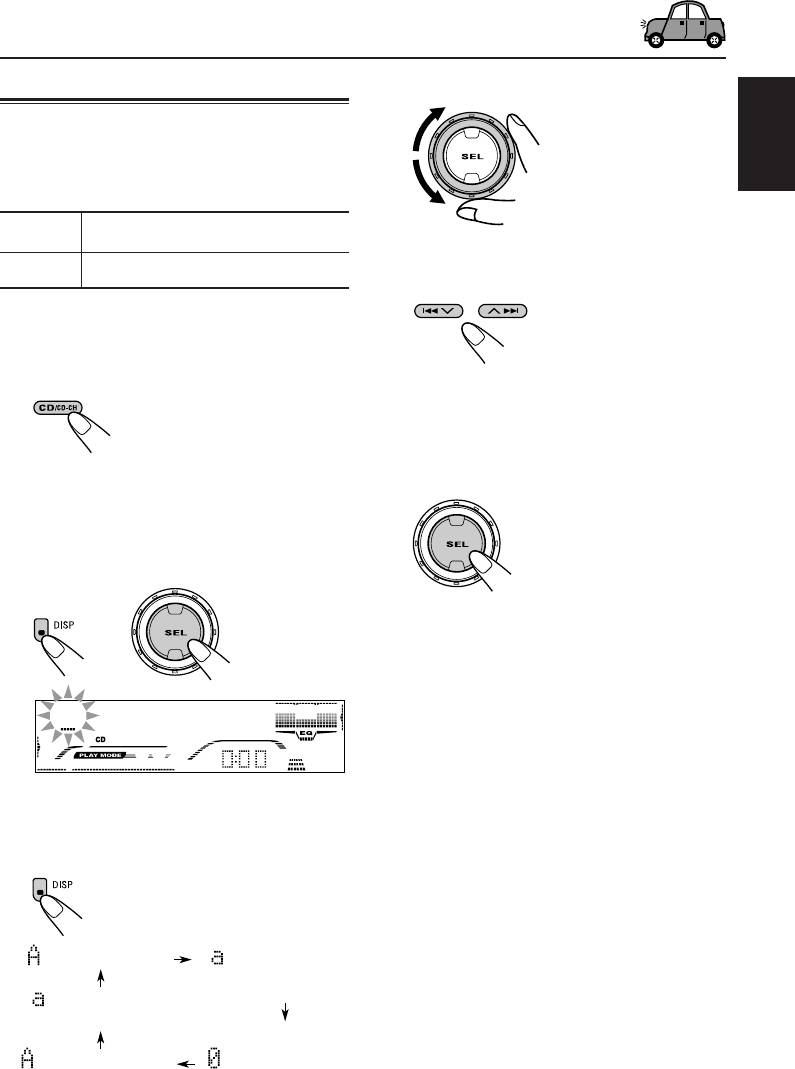
Assigning names to CDs
4
Select a character.
• About the available
You can assign names to CDs (both in this unit
characters, see page
and in the CD changer).
52.
After assigning a name, it will appears on the
ENGLISH
display when you select the source.
Source Maximum number of characters
5
Move the cursor to the next
CDs* Up to 32 characters (up to 40 discs)
(or previous) character position.
* You cannot assign a name to a CD Text or an
MP3/WMA disc.
1
Select a CD you want to assign a
name to.
6
Repeat steps
3
to
5
until you finish
entering the name.
7
Finish the procedure while the last
When you select CD as the source, the
power automatically comes on.
selected character is flashing.
2
While pressing DISP (display), press
and hold SEL (select) for more than
2 seconds.
To erase the input characters
To erase all the characters at a time, press and
hold DISP (display) for more than 1 second as
described in the procedure above.
Notes:
• When you try to assign a name to a 41st disc,
“NAME FULL” appears and you cannot enter the
3
Select the character set you want
text entry mode. In this case, delete unwanted
while the first character position is
names before assignment.
• When the CD changer is connected, you can assign
flashing.
names to CDs in the CD changer. These names can
Each time you press the button,
also be shown on the display if you insert the CDs
the character set changes as
in this unit.
follows:
(A – Z: capital)
(a – z: small)
(Russian letters:
lower case)
(Russian letters:
(0 – 9: numbers,
upper case)
and symbols)
39
EN34-41_KD-G807[EE]f.p65 1/15/04, 2:11 PM39
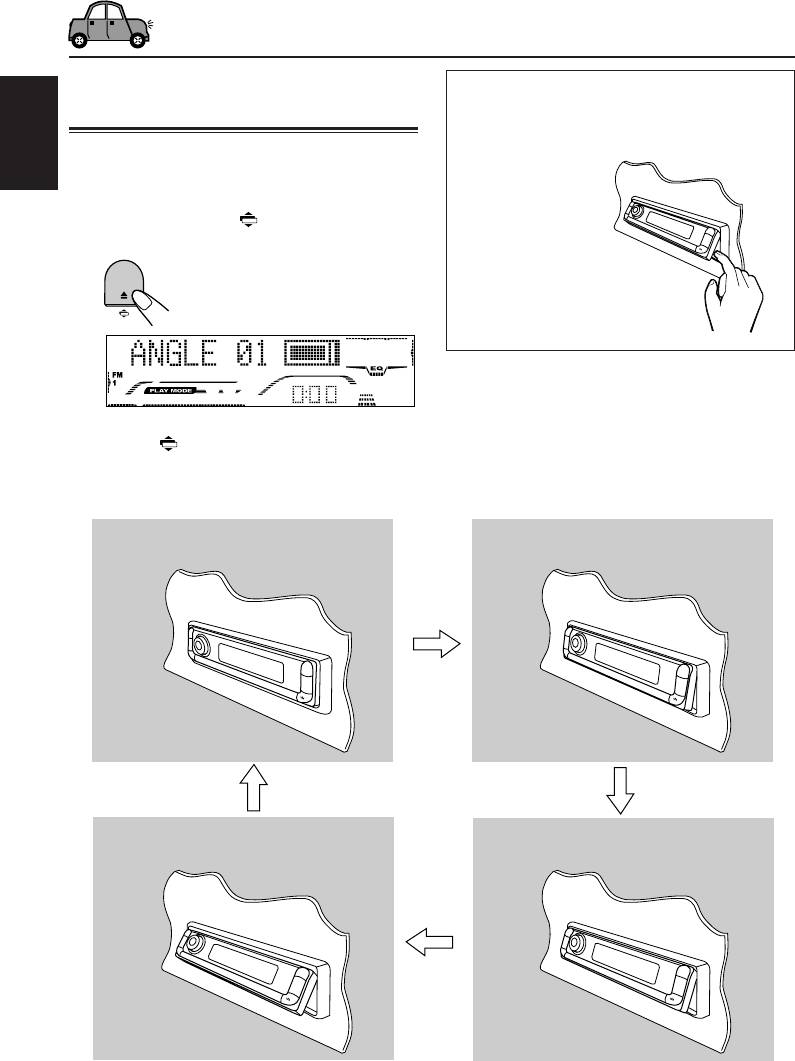
Changing the control panel
CAUTION:
angle
NEVER insert your finger in between the
control panel and the unit, as it may get
You can change the angle of the control panel in
caught or hurt.
ENGLISH
four positions.
1
Press and hold (angle) until the
angle adjustment screen appears.
2
Press (angle) repeatedly to adjust
the angle to the position you want.
The control panel angles changes as follows:
ANGLE 01
ANGLE 02
ANGLE 04
ANGLE 03
Note:
If you turn the power off, the control panel automatically returns to the closed position. Next time you turn on the
power, the control panel moves to its previous position.
40
EN34-41_KD-G807[EE]f.p65 1/15/04, 2:11 PM40

Detaching the control panel
Attaching the control panel
1
Insert the left side of the control
You can detach the control panel when leaving
panel into the groove on the panel
the car.
holder.
When detaching or attaching the control panel,
ENGLISH
be careful not to damage the connectors on the
back of the control panel and on the panel
holder.
Detaching the control panel
Before detaching the control panel, be sure to
turn off the power.
1
Unlock the control panel.
2
Press the right side of the control
panel to fix it to the panel holder.
2
Lift and pull the control panel out of
Note on cleaning the connectors:
the unit.
If you frequently detach the control panel, the
connectors will deteriorate.
To minimize this possibility, periodically wipe the
connectors with a cotton swab or cloth moistened
with alcohol, being careful not to damage the
connectors.
3
Put the detached control panel into
the provided case.
Connectors
41
EN34-41_KD-G807[EE]f.p65 1/15/04, 2:11 PM41
Оглавление
- CONTENTS
- LOCATION OF THE BUTTONS
- BASIC OPERATIONS
- RADIO OPERATIONS
- RDS OPERATIONS
- CD OPERATIONS
- MP3/WMA INTRODUCTION
- MP3/WMA OPERATIONS
- SOUND ADJUSTMENTS
- OTHER MAIN FUNCTIONS
- CD CHANGER OPERATIONS
- EXTERNAL COMPONENT OPERATIONS
- DAB TUNER OPERATIONS
- ADDITIONAL INFORMATION
- TROUBLESHOOTING
- MAINTENANCE
- SPECIFICATIONS
- СОДЕРЖАНИЕ
- РАСПОЛОЖЕНИЕ КНОПОК
- ОСНОВНЫЕ ОПЕРАЦИИ
- ОПЕРАЦИИ С РАДИОПРИЕМНИКОМ
- ОПЕРАЦИИ С RDS
- ОПЕРАЦИИ С КОМПАКТ-ДИСКАМИ
- ОБЩИЕ CВЕДЕHИЯ И ДИCKAХ MP3 И WMA
- ОПЕРАЦИИ С ДИСКАМИ MP3 И WMA
- НАСТРОЙКА ЗВУКА
- ДРУГИЕ ГЛАВНЫЕ ФУНКЦИИ
- ОПЕРАЦИИ С ВНЕШНИМ КОМПОНЕНТОМ
- ОПЕРАЦИИ С ТЮНЕРОМ DAB
- ДОПОЛНИТЕЛЬНАЯ ИНФОРМАЦИЯ
- ВЫЯВЛЕНИЕ НЕИСПРАВНОСТЕЙ
- ТЕХНИЧЕСКОЕ ОБСЛУЖИВАНИЕ
- ТЕХНИЧЕСКИЕ ХАРАКТЕРИСТИКИ
- Please reset your unit


