Asus P4P8X: 2.1 Managing and updating your BIOS
2.1 Managing and updating your BIOS: Asus P4P8X

2.1 Managing and updating your BIOS
The original BIOS file for this motherboard is in the support CD.
Copy the original BIOS to a bootable floppy disk in case you need to restore
the BIOS in the future.
2.1.1 Creating a bootable floppy disk
1. Do either one of the following to create a bootable floppy disk.
DOS environment
Insert a 1.44 MB floppy disk into the drive. At the DOS prompt, type:
format A:/S <Enter>
Windows environment
a. From your Windows desktop, click on Start, point to Settings, then click on
Control Panel.
b. Double-click on Add/Remove Programs icon from the Control Panel
window.
c. Click on the Startup Disk tab, then on Create Disk... button.
d. Insert a 1.44 MB floppy disk when prompted. Follow the succeeding screen
instructions to complete the process.
2. Copy the original (or the latest) motherboard BIOS to the bootable floppy disk.
2.1.2 Using AFUDOS to update the BIOS
Update the BIOS using the AFUDOS.EXE utility in DOS environment.
1. Visit the ASUS website (www.asus.com) to download the latest BIOS file for
your motherboard. Save the BIOS file to a bootable floppy disk.
Write down the BIOS file name to a piece of paper. You need to type the exact
BIOS file name at the prompt.
2. Copy the AFUDOS.EXE utility from the support CD to the bootable floppy disk
that contains the BIOS file.
3. Boot the system from the floppy disk.
2-2
Chapter 2: BIOS information
4. At the DOS prompt, type the command line:
afudos /i<filename>
where “filename” means the latest (or original) BIOS file that you copied to the
bootable floppy disk.
The screen displays the status of the update process.
The BIOS information on the screen is for reference only. What you see on your
screen may not be exactly the same as shown.
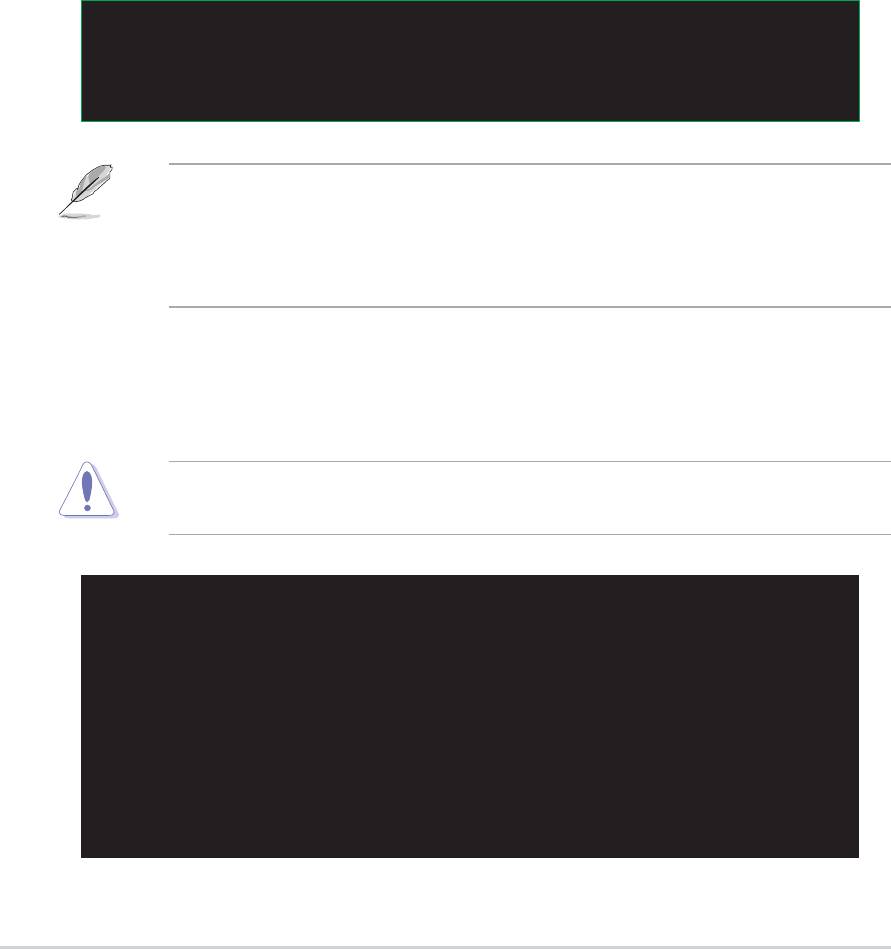
A:\>afudos /ip4p8x.rom
AMI Firmware Update Utility - Version 1.10
Copyright (C) 2002 American Megatrends, Inc. All rights reserved.
Reading file ..... done
Erasing flash .... done
Writing flash .... 0x0008CC00 (9%)
DO NOT shutdown or reset the system while updating the BIOS! Doing so may
cause system boot failure!
When the BIOS update process is complete, the utility returns to the DOS
prompt.
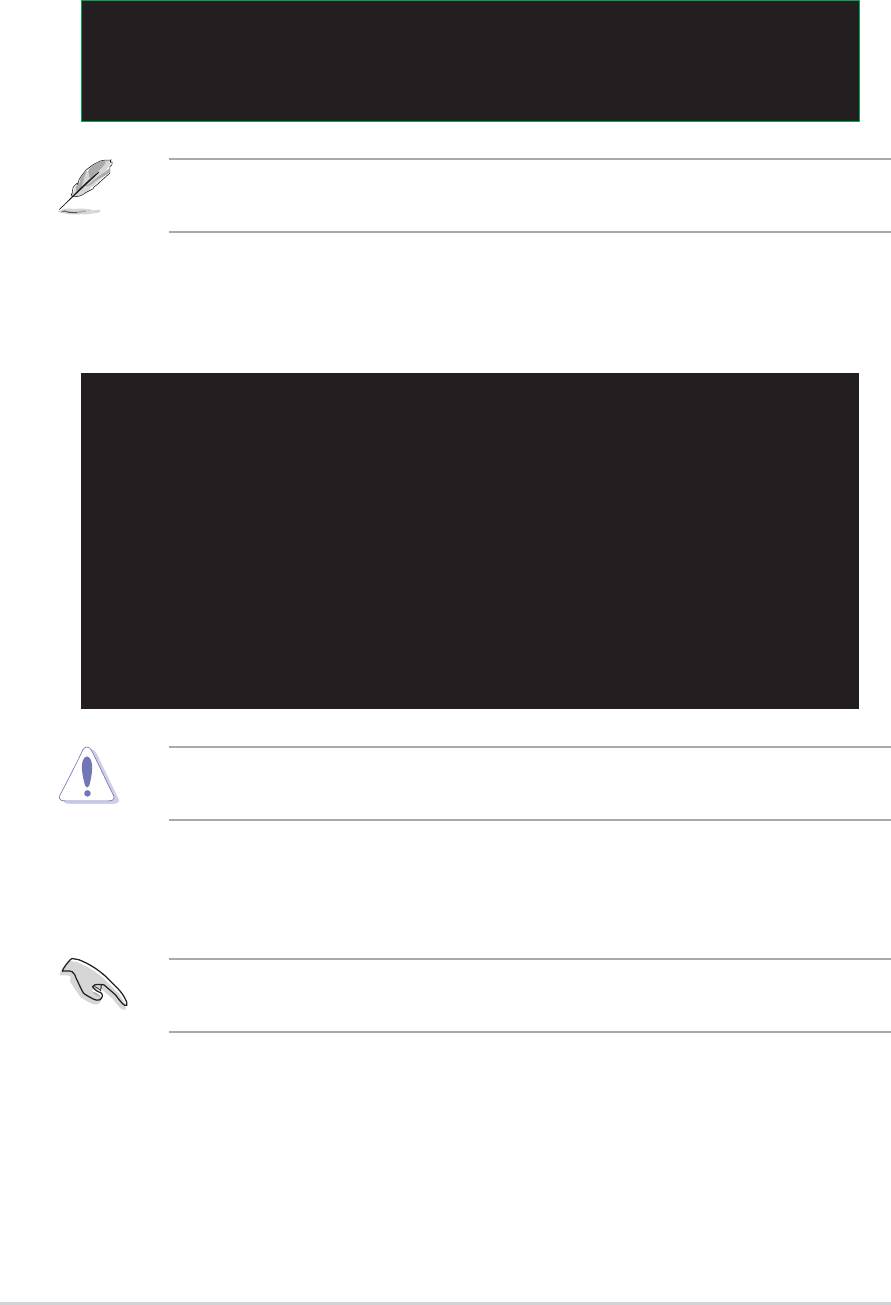
A:\>afudos /ip4p8x.rom
AMI Firmware Update Utility - Version 1.10
Copyright (C) 2002 American Megatrends, Inc. All rights reserved.
Reading file ..... done
Erasing flash .... done
Writing flash .... 0x0008CC00 (9%)
Verifying flash .. done
A:\>
5. Reboot the system from the hard disk.
ASUS P4P8X motherboard user guide
2-3
2.1.3 Using ASUS EZ Flash to update the BIOS
The ASUS EZ Flash feature allows you to easily update the BIOS without
having to go through the long process of booting from a diskette and using
a DOS-based utility. The EZ Flash is built-in the BIOS firmware so it is
accessible by simply pressing <Alt> + <F2> during the Power-On Self
Tests (POST).
To update the BIOS using ASUS EZ Flash:
1. Visit the ASUS website (www.asus.com) to download the latest BIOS file for
your motherboard and rename it to P4P8X.ROM. Save the BIOS file to a
floppy disk.
2. Reboot the system.
3. To launch EZ Flash, press <Alt> + <F2> during POST to display the following.
User recovery requested. Starting BIOS recovery...
Checking for floppy...
If there is no floppy disk found in the drive, the error message “Floppy not
found!” appears.
If the correct BIOS file is not found in the floppy disk, the error message
“P4P8X.ROM not found!”
4. Insert the floppy disk that contains the BIOS file. If the P4P8X.ROM file is
found in the floppy disk, EZ Flash performs the BIOS update process and
automatically reboots the system when done.
DO NOT shutdown or reset the system while updating the BIOS! Doing so may
cause system boot failure!
User recovery requested. Starting BIOS recovery...
Checking for floppy...
Floppy found!
Reading file “p4p8x.rom”. Completed.
Start flashing...
Flashed successfully. Rebooting.
2-4
Chapter 2: BIOS information

2.1.4 Recovering the BIOS with CrashFree BIOS 2
The CrashFree BIOS 2 auto recovery tool allows you to restore BIOS from the
motherboard support CD, or from a floppy disk that contains the BIOS file, in case
the current BIOS on the motherboard fails or gets corrupted.
1. Prepare the support CD that came with the motherboard or a floppy disk
that contains the motherboard BIOS (P4P8X.ROM) before proceeding
with the BIOS update process.
2. If you have saved a copy of the original motherboard BIOS to a bootable
floppy disk, you may also use this disk to restore the BIOS. See section
“2.1.1 Creating a bootable floppy disk.”
To recover the BIOS from a floppy disk:
1. Boot the system.
2. When a corrupted BIOS is detected, the following message appears.
Bad BIOS checksum. Starting BIOS recovery...
Checking for floppy...
3. Insert a floppy disk that contains the original, or the latest, BIOS file for
this motherboard (P4P8X.ROM). If the BIOS file that you downloaded
from the ASUS website has a different filename (e.g. P4P8X11.ROM),
rename it to P4P8X.ROM. The BIOS update process continues when
the P4P8X.ROM is found.
Bad BIOS checksum. Starting BIOS recovery...
Checking for floppy...
Floppy found!
Reading file “p4p8x.rom”. Completed.
Start flashing...
DO NOT shutdown or reset the system while updating the BIOS! Doing so may
cause system boot failure!
4. When the BIOS update process is complete, reboot the system.
ASUS P4P8X motherboard user guide
2-5
To recover the BIOS from the support CD:
1. Boot the system.
2. When a corrupted BIOS is detected, the following screen message appears.
Bad BIOS checksum. Starting BIOS recovery...
Checking for floppy...
If there is no floppy disk found in the drive, the system automatically checks the
CD-ROM.
3. Place the support CD in the CD-ROM. The support CD contains the
original BIOS for this motherboard.
Bad BIOS checksum. Starting BIOS recovery...
Checking for floppy...
Floppy not found!
Checking for CD-ROM...
CD-ROM found.
Reading file “p4p8x.rom”. Completed.
Start flashing...
DO NOT shutdown or reset the system while updating the BIOS! Doing so may
cause system boot failure!
4. When the BIOS update process is complete, reboot the system.
The recovered BIOS may not be the latest BIOS version for this motherboard.
Visit the ASUS website (www.asus.com) to download the latest BIOS file.
2-6
Chapter 2: BIOS information
Оглавление
- Contents
- Notices
- Safety information
- About this guide
- ASUS contact information
- P4P8X specifications summary
- P4P8X specifications summary
- 1.1 Welcome!
- 1.3 Special features
- 1.4 Motherboard components
- 1.5 Motherboard layout
- 1.6 Before you proceed
- 1.7 Motherboard installation
- 1.8 Central Processing Unit (CPU)
- 1.9 System memory
- 1.10 Expansion slots
- 1.11 Jumpers
- 1.12 Connectors
- 2.1 Managing and updating your BIOS
- 2.2 BIOS Setup program
- 2.3 Main menu
- 2.4 Advanced menu
- 2.5 Power menu
- 2.6 Boot menu
- 2.7 Exit menu
- 3.1 Install an operating system
- 3.3 Software information
