Olympus µ 760: Basic operation
Basic operation: Olympus µ 760
d4328_basic_e_00.book Page 11 Wednesday, December 13, 2006 10:29 AM
Basic operation
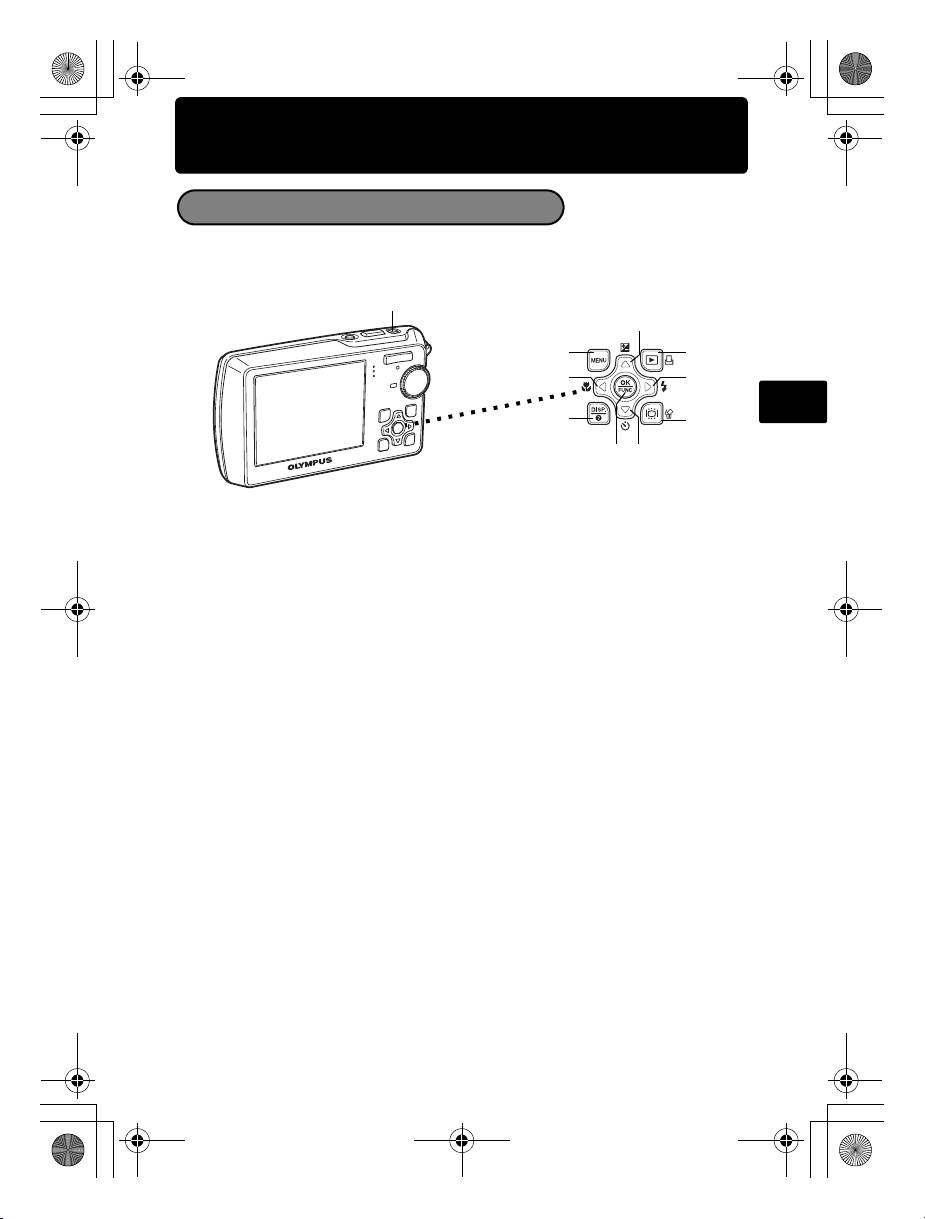
Shooting Mode Buttons
While in shooting mode, use these buttons for quick access to some of the more
commonly used features.
7
2
6
8
1
3
En
0
9
5
4
1 4& button (Macro Mode)
Use macro or super macro mode when taking close-up pictures such as of a flower.
2 1F button (Exposure Compensation)
Use this setting to overexpose (+) or underexpose (–) a picture.
3 3# button (Flash Mode)
Select from 4 flash modes – Auto, Red-eye reduction, Fill-in flash, or Flash off.
4 2Y button (Self-timer)
Select the self-timer to delay the shot approximately 12 seconds from when the
shutter button is pressed.
5 o button (OK/FUNC)
Displays the function menu and sets the functions often used in shooting mode.
Also confirms and sets your selection of menu items.
6 m button (MENU)
Press this button to display the top menu.
7 h button (Image stabilizer)
Press h in shooting mode to turn the image stabilizer on or off.
8 q/< button
Press q in shooting mode to switch to playback mode and display the last picture
taken.
9 /S button
Press in shooting mode. The monitor will be set to the brightest state set in [s]
for 10 seconds.
0 d button
Press d repeatedly to display the composition guide lines and histogram. Select
a menu item, and press d to display an explanation of its function.
11
d4328_basic_e_00.book Page 12 Wednesday, December 13, 2006 10:29 AM
s Modes (Scene)
This function allows you to switch the s (scene mode) according to the subject.
1 Set the mode dial to s.
2 Press 12 to select a scene mode, and press o.
1 PORTRAIT
B
Mode Dial
F
m button
D
o button
G
12 button
En
U
BACK
MENU
SET
OK
Shooting s (Scene) Modes
• PORTRAIT • SELF PORTRAIT • SHOOT & SELECT1
• LANDSCAPE • AVAILABLE LIGHT • SHOOT & SELECT2
• LANDSCAPE+PORTRAIT • SUNSET • BEACH & SNOW
• NIGHT SCENE • FIREWORKS • UNDER WATER WIDE1
• NIGHT+PORTRAIT • CUISINE • UNDER WATER WIDE2
• SPORT • BEHIND GLASS • UNDER WATER MACRO
• INDOOR • DOCUMENTS
• CANDLE • AUCTION
Macro Mode
& This mode lets you shoot from as close as 20 cm/7.9 in. (when the zoom is set
for the zoom-out angle) and as close as 50 cm/19.7 in. (when the zoom is set for
the zoom-in angle) to your subject.
% Use this mode to take pictures as close as 8 cm/3.2 in. to your subject. In %
mode, the position of the zoom lens is fixed.
1 Press 4&.
2 Press 12 to select [&] or [%] and press o.
12
d4328_basic_e_00.book Page 13 Wednesday, December 13, 2006 10:29 AM
Self-Timer
1 Press 2Y.
Self-Timer Lamp
2 Press 12 to select [Y ON], and press o.
3 Press the shutter button fully to take the picture.
The self-timer lamp lights for approximately 10 seconds after
the shutter button is pressed, then starts blinking. After
blinking for approximately 2 seconds, the picture is taken.
En
Flash Modes
1 Press 3#.
2 Press 12 to select the flash mode, and press o.
3 Press the shutter button halfway.
When the flash is set to fire, the # mark lights.
4 Press the shutter button completely to take the picture.
Icon Flash Mode Description
No
Auto flash The flash fires automatically in low light or backlight
indication
conditions.
Red-eye
The red-eye reduction flash mode significantly reduces
!
reduction flash
this phenomenon by emitting pre-flashes before firing
the regular flash.
#
Fill-in flash The flash fires regardless of the available light.
$ Flash off The flash does not fire even in low light conditions.
Power Save Feature
To save battery power, the camera automatically enters sleep mode and stops
operating if not used for 3 minutes in shooting mode. Press the shutter button
or zoom button to reactivate the camera.
If the camera is not operated for 15 minutes after the camera enters sleep
mode, it automatically retracts the lens and turns off. To resume operation, turn
on the power again.
13
Оглавление
- Table of Contents
- Gather these items (box contents)
- Prepare the battery
- Turn the camera on
- Set date and time
- Select a language
- Take a picture
- View pictures
- Basic operation
- Menus and settings
- Connecting the camera
- Transfer images
- OLYMPUS Master Software
- Specifications
- Safety precautions
- Содержание
- Выньте из коробки эти предметы
- Подготовьте аккумулятор
- Включите фотокамеру
- Установите дату и время
- Выберите язык
- Съемка
- Просмотр снимков
- Основные операции
- Меню и настройки
- Подсоединение фотокамеры
- Перенос изображений
- Программное обеспечение OLYMPUS Master
- Технические характеристики
- Меры предосторожности
