Asus CM6340: Chapter 6
Chapter 6: Asus CM6340
ENGLISH
Chapter 6
Using the utilities
The Support DVD and Recovery DVD may not be included in the package. You may use
ENGLISH
the Recovery Partition feature to create the Support DVD and Recovery DVD. For details,
refer to Recovering your system in this chapter.
ASUS AI Suite II
ASUS AI Suite II is an all-in-one interface that integrates several ASUS utilities and allows
users to launch and operate these utilities simultaneously.
This utility is pre-installed on some models. For models without an operating system, follow
the steps below to install this utility.
Installing AI Suite II
To install AI Suite II:
1. Place the support DVD in the optical drive. The Drivers installation tab appears if
Autorun is enabled.
2. Click the
Utilities tab, then click ASUS AI Suite II.
3. Follow the onscreen instructions to complete the installation.
Using AI Suite II
®
AI Suite II automatically starts when you enter the Windows
operating system. The AI Suite
®
II icon appears in the Windows
notication area. Click the icon to open the AI Suite II main
menu bar.
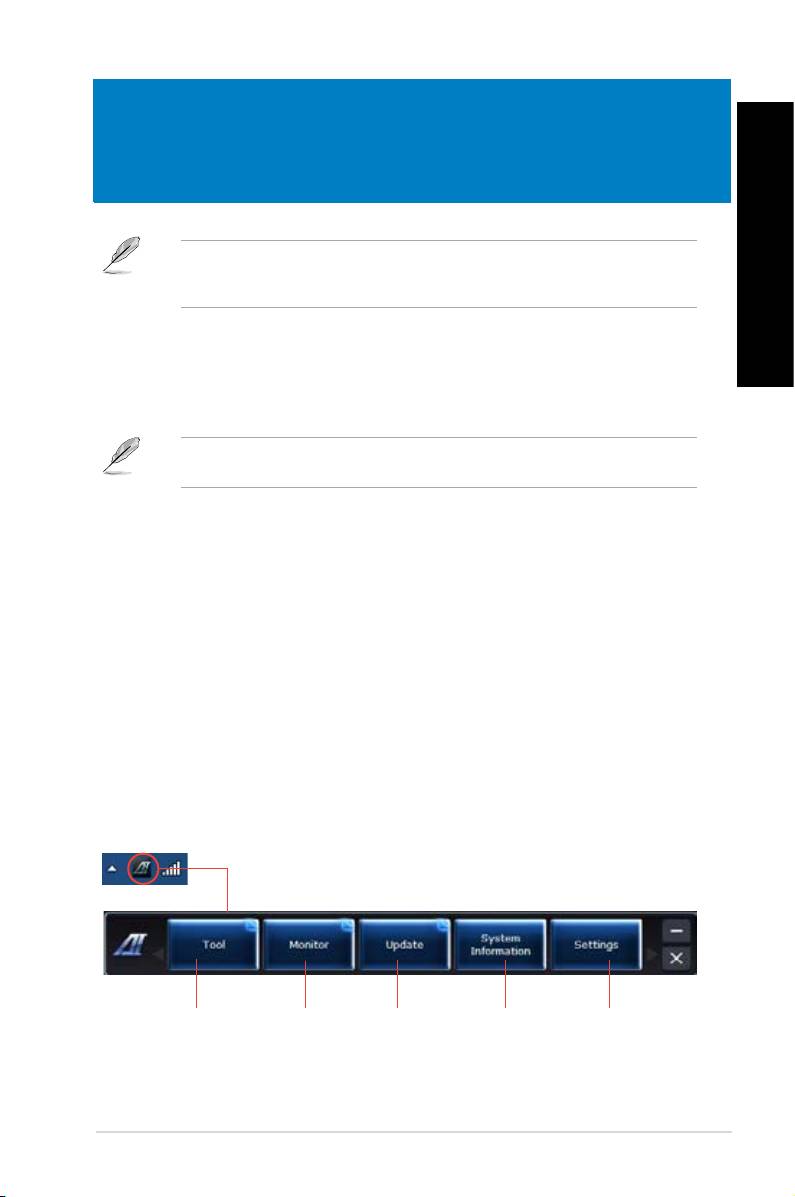
Click each button to select and launch a utility, to monitor the system, to update the
motherboard BIOS, to display the system information, and to customize the settings of AI
Suite II.
Click to select a
Click to monitor
Click to update the
Click to show
Click to customize
utility
sensors or CPU
motherboard BIOS
the system
the interface
frequency
information
settings
ASUS CM6340 47
ENGLISH
ENGLISH
48 Chapter 6: Using the utilities
ENGLISH
ENGLISH
The Tool menu
The Tool menu includes the EPU, Probe II, and Sensor Recorder panels.
Launching EPU
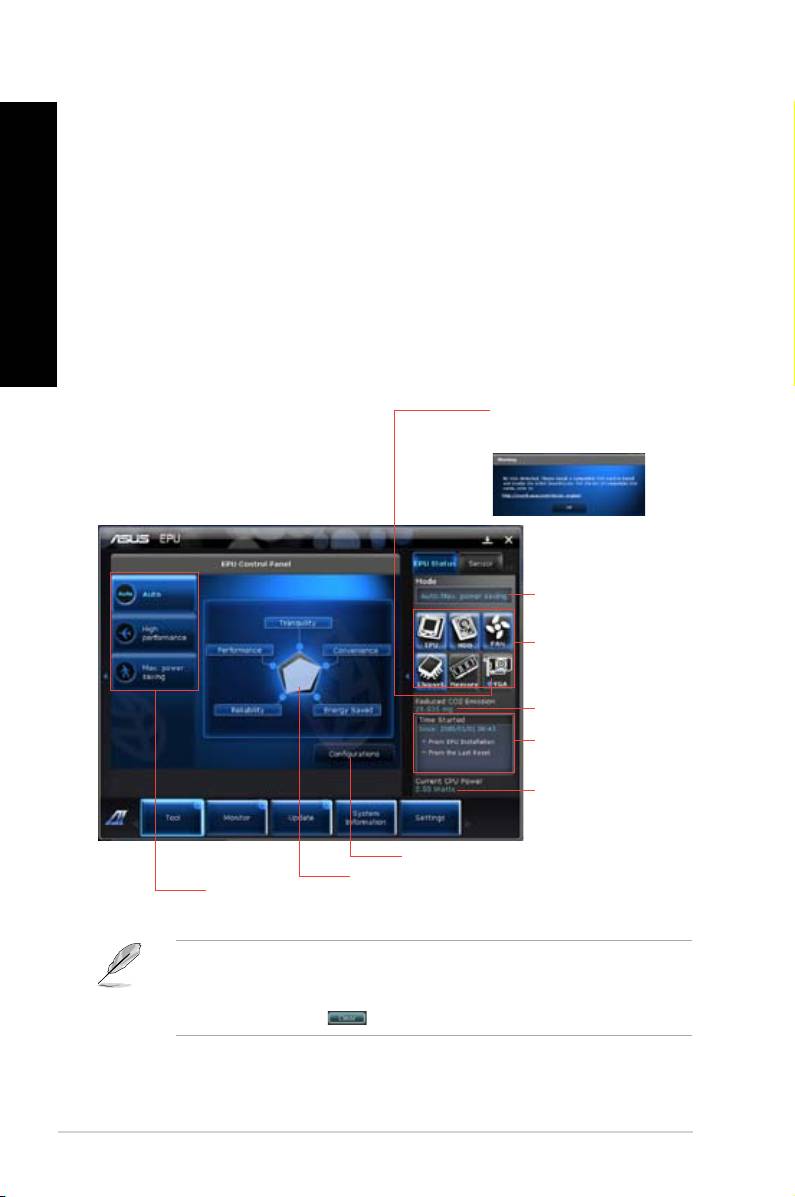
EPU is an energy-efcient tool that provides you with a total power-saving solution. It detects
the current loading and intelligently adjusts the power usage in real-time. When you select
the Auto mode, the system changes modes automatically according to the current system
status. It allows you to customize each mode through conguring the settings such as CPU
frequency, vCore Voltage, and Fan Control.
To launch EPU:
• Click
Tool > EPU on the AI Suite II main menu bar.
Displays the following message
if no VGA power saving engine is
detected.
Displays current mode
The items lighting up
means power saving
engine is activated
Displays the amount
of CO2 reduced
*Shifts between the
display of Total and
Current CO2 reduced
Displays the current
CPU power
Advanced settings for each mode
Displays the system
Multiple system
properties of each mode
operating modes
• * Select From EPU Installation to show the CO2 that has been reduced since you
installed EPU.
• *
Select From the Last Reset to show the total CO2 that has been reduced since you
click the Clear button .
ENGLISH
ENGLISH
Launching and conguring Probe II
ENGLISH
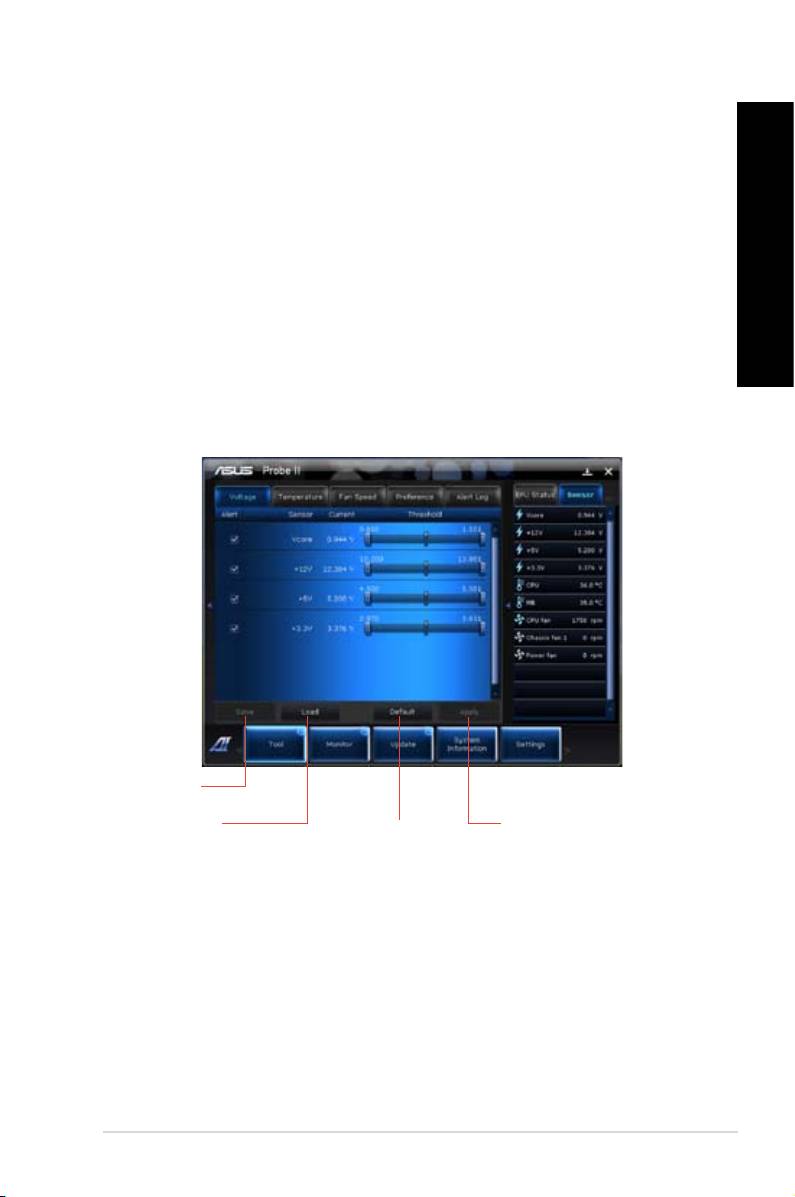
Probe II is a utility that monitors the computer’s vital components, and detects and alerts you
of any problem with these components. Probe II senses fan rotations, CPU temperature,
and system voltages, among others. With this utility, you are assured that your computer is
always at a healthy operating condition.
To launch Probe II:
• Click
Tool > Probe II on the AI Suite II main menu bar.
ENGLISH
To congure Probe II:
• Click the
Voltage/Temperature/Fan Speed tabs to activate the sensors or to adjust the
sensor threshold values.
• The
Preference tab allows you to customize the time interval of sensor alerts, or
change the temperature unit.
Saves your
conguration
Loads your saved
Applies your
Loads the default
conguration
changes
threshold values
for each sensor
ASUS CM6340 49
ENGLISH
ENGLISH
50 Chapter 6: Using the utilities
ENGLISH
ENGLISH
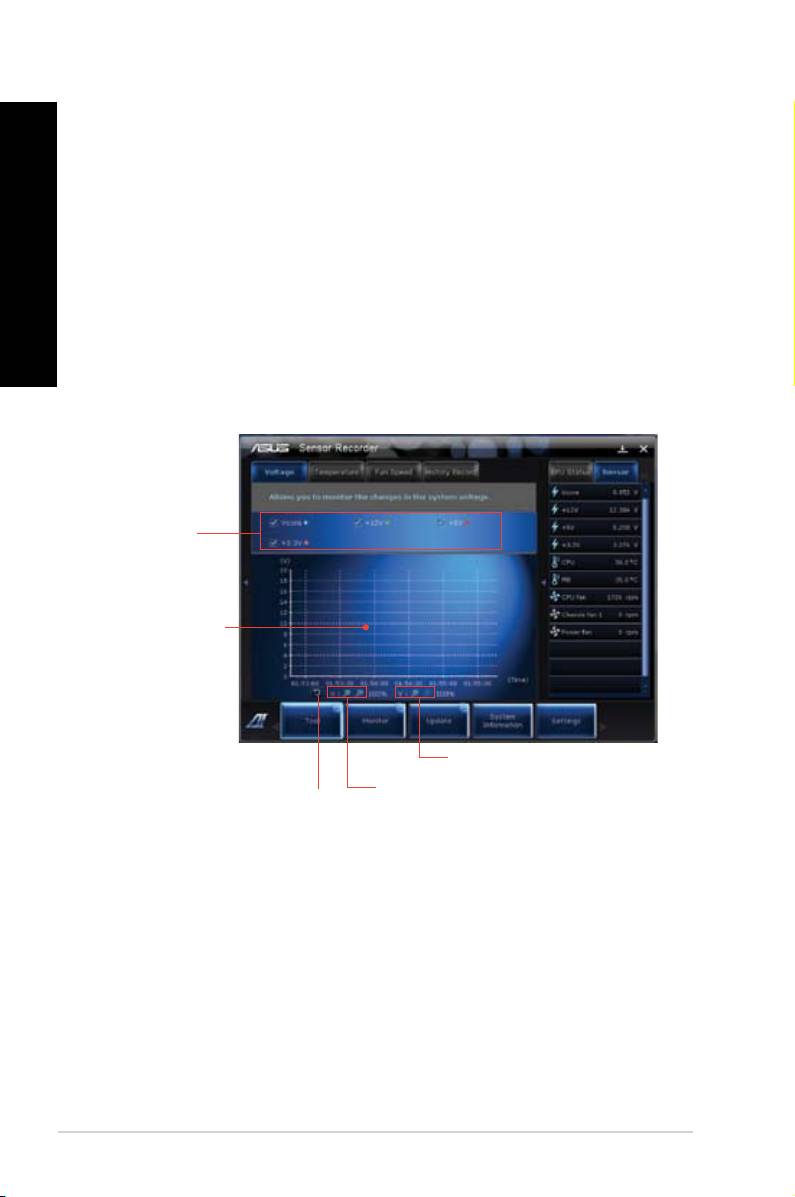
Launching and conguring Sensor Recorder
Sensor Recorder allows you to monitor the changes in the system voltage, temperature, and
fan speed, as well as recording the changes.
To launch Sensor Recorder:
• Click
Tool > Sensor Recorder on the AI Suite II main menu bar.
To congure Sensor Recorder:
• Click the
Voltage/Temperature/Fan Speed tabs and select the sensors that you want
to monitor.
• The
History Record tab allows you to record the changes in the sensors that you
enable.
Select the
sensors that you
want to monitor
Drag to view the
status during a
certain period
of time
Click to zoom in/out
the Y axis
Click to zoom in/out
Click to return to
the X axis
the default mode

ENGLISH
ENGLISH
The Monitor menu
ENGLISH
The Monitor menu includes the Sensor and CPU Frequency panels.
Launching Sensor
The Sensor panel displays the current value of a system sensor such as fan rotation, CPU
temperature, and voltages.
ENGLISH
To launch Sensor:
• Click
Monitor > Sensor on the AI Suite II main menu bar.
Launching CPU Frequency
The CPU Frequency panel displays the current CPU frequency and CPU usage.
To launch CPU frequency:
• Click
Monitor > CPU Frequency on the AI Suite II main menu bar.
The Update menu
The Update menu allows you to update the motherboard BIOS and the BIOS boot logo with
the ASUS designed update utilities.
ASUS Update
The ASUS Update is a utility that allows you to manage, save, and update the motherboard
®
BIOS in Windows
OS. The ASUS Update utility allows you to update the BIOS directly
from the Internet, download the latest BIOS le from the Internet, update the BIOS from an
updated BIOS le, save the current BIOS le or view the BIOS version information.
Updating the BIOS through the Internet
To update the BIOS through the Internet:
1. From the ASUS Update screen, select
Update BIOS from le, then click Next.
2. Select the ASUS FTP site nearest you to avoid network trafc.
Tick the two items if you want to enable the BIOS downgradable and Auto-BIOS
backup functions.
3. Select the BIOS version that you want to download, then click
Next.
When no updated version is detected, a message is displayed informing you that there
is no new BIOS le from the BIOS server.
4. Click
Yes if you want to change the boot logo, which is the image appearing on screen
during the Power-On Self-Tests (POST). Otherwise, click
No.
5. Follow the onscreen instructions to complete the update process.
ASUS CM6340 51

ENGLISH
ENGLISH
52 Chapter 6: Using the utilities
ENGLISH
ENGLISH
Updating the BIOS through a BIOS le
To update the BIOS through a BIOS le:
1. From the ASUS Update screen, select
Update BIOS from le, then click Next.
2. Locate the BIOS le from the Open window, click
Open, and click Next.
3. Click
Yes if you want to change the boot logo, which is the image appearing on screen
during the Power-On Self-Tests (POST). Otherwise, click No.
4. Follow the onscreen instructions to complete the update process.
The System Information screen
The System Information screen displays the information about the motherboard, CPU, and
memory slots.
• Click the
MB tab to see the details on the motherboard manufacturer, product name,
version, and BIOS.
• Click the
CPU tab to see the details on the processor and the Cache.
• Click the
SPD tab and then select the memory slot to see the details on the memory
module installed on the corresponding slot.
The Settings screen
The Settings screen allows you to customize the main menu bar settings and the interface’s
skin.
• Application allows you to select the application that you want to enable.
• Bar allows you to modify the bar setting,
• Skin allows you to customize the interface’s contrast, brightness, saturation, hue, and
gamma.
ENGLISH
ENGLISH
ASUS AI Manager
ENGLISH
ASUS AI Manager is a utility which gives you quick and easy access to frequently-used
applications.
This utility is pre-installed on some models. For models without an operating system, follow
the steps below to install this utility.
ENGLISH
Installing AI Manager
To install AI Manager:
1. Place the support DVD in the optical drive. If Autorun is enabled, the Drivers installation
wizard appears.
If Autorun is disabled, double-click the setup.exe le from the ASUS AI Manager folder in
the support DVD.
2. Click the Utilities tab, then click ASUS AI Manager.
3. Follow the onscreen instructions to complete the installation.
Launching AI Manager
®
To launch the AI Manager from the Windows
desktop, click
Start > All Programs > ASUS >
AI Manager > AI Manager 1.xx.xx
. The AI Manager quick bar appears on the desktop.
®
After launching the application, the AI Manager icon appears in the Windows
taskbar.
Right-click this icon to switch between the quick bar and the main window, and to launch the
AI Manager either from the quick bar or taskbar.
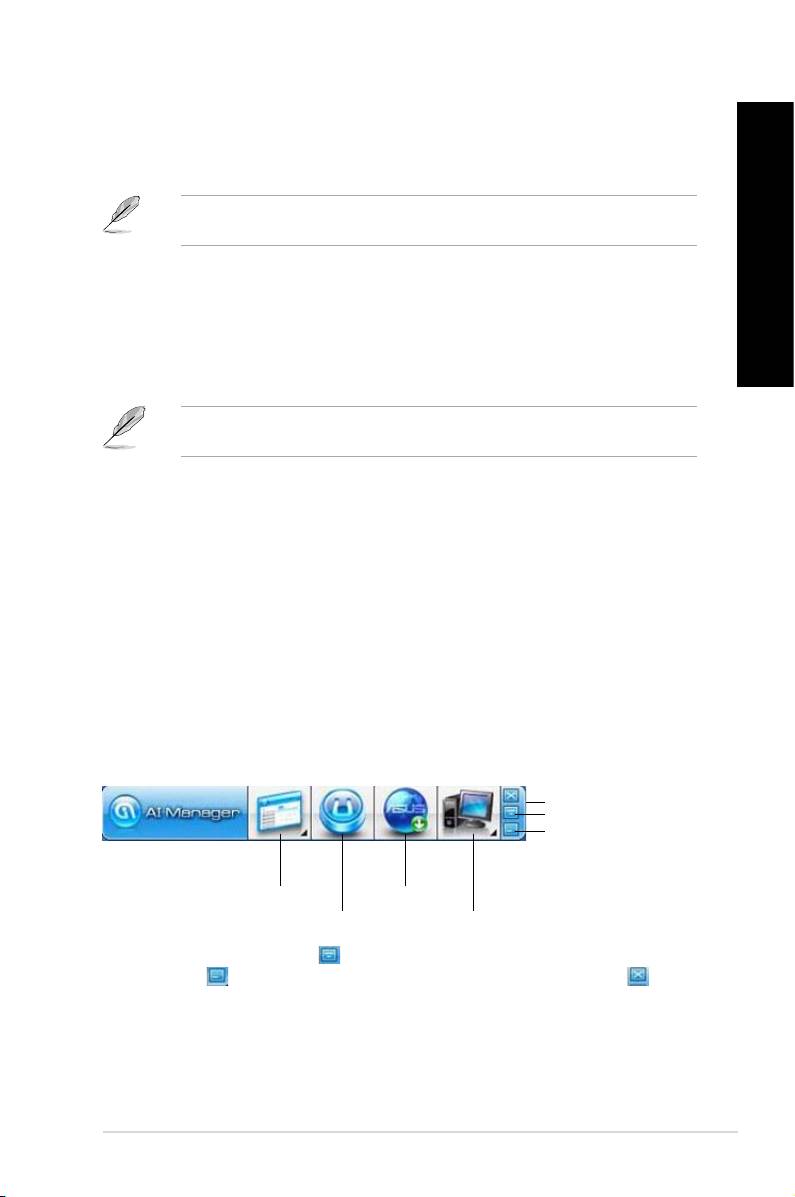
AI Manager quick bar
The AI Manager quick bar saves the desktop space and allows you to launch the ASUS
utilities or display system information easily. Click any of the Main, My Favorites, Support or
Information tab to display the menu’s contents.
Exit button
Switch to main Window
Add to ToolBar
Main
Support
My Favorites
Information
Click the Maximize/restore button to switch between full window and quick bar. Click the
Minimize button to keep the AI Manager on the taskbar. Click the Close button to quit
the AI Manager.
Main
The Main menu contains three utilities: AI Disk, AI Security, and AI Booting. Click the arrow
on the Main menu icon to browse through the utilities in the main menu.
ASUS CM6340 53

ENGLISH
ENGLISH
54 Chapter 6: Using the utilities
ENGLISH
ENGLISH
AI Disk
AI Disk allows you to easily clear temporary IE les, IE cookies, IE URLs, IE history,
or the Recycle Bin. Click the AI Disk icon on the quick bar to display the full AI Disk
window and select the items you want to clear. Click Apply when done.
AI Security
AI Security enables you to set a password to secure your devices, such as USB ash
disks and CD/DVD disks, from unauthorized access.
To lock a device:
1. When using AI Security for the rst time, you are asked to set a password. Key in
a password with at most 20 alphanumeric characters.
2. Conrm the password.
3. Key in the password hint (recommended).
4. When done, click
Ok.
5. Select the device you want to lock, then click
Apply.
6. Key in the password you have set previously, then click
Ok.
To unlock the device:
1. Deselect the locked device, then click
Apply.
2. Key in the password you have set previously, then click
Ok.
To change the password:
• Click
Change Password, then follow the onscreen instructions to change
password.
AI Booting
AI Booting allows you to specify the boot device priority sequence.
To specify the boot sequence:
1. Select a device, then click the left/right button to specify the boot sequence.
2. When done, press
Apply.

ENGLISH
ENGLISH
My Favorites
ENGLISH
My Favorites allows you to add applications that you frequently use, saving you from
searching for the applications throughout your computer.
To add an application:
1. Click
Add, then locate the application you want to add to My Favorites.
2. Click
Open on the le location window. The application is added to My Favorites list.
ENGLISH
Right click on the application icon to launch, delete, or rename the selected application. You
can also double click to launch the selected application.
Support
Click any links on the Support window to go to the ASUS website, technical support website,
download support website, or contact information.
Information
Click the tab on the Information window to see the detailed information about your system,
motherboard, CPU, BIOS, installed device(s), and memory.
Ai Charger
Ai Charger is a unique software that allows you to quickly charge your Apple devices such as
iPod, iPhone, and iPad on your ASUS computer’s USB 2.0 / USB 3.0 port.
• There is no setting screen for Ai Charger. After its installation on your computer, the Ai
®
Charger icon appears on the Windows
taskbar.
• The Ai Charger icon (
) shows if an Apple device is connected on your computer’s
USB port.
• Your Apple device can only be detected if its Apple USB driver is properly installed in it.
• The current Apple devices only support USB 2.0 performance. Even when you plug your
Apple device into a USB 3.0 port, the maximum charging rate is still 500mA, which is the
USB 2.0 maximum charging rate. Ai Charger can increase this limit to 700mA~900mA.
• There is no BIOS, hardware, or chipset requirements for Ai Charger.
ASUS CM6340 55
ENGLISH
ENGLISH
56 Chapter 6: Using the utilities
ENGLISH
ENGLISH
ASUS Webstorage
ASUS webstorage is designed to help you retrieve your data to your notebooks, smartphones
or tablets wherever there is internet connection.
This utility is pre-installed on some models. For models without an operating system, follow
the steps below to install this utility.
Installing webstorage
To install webstorage:
Place the support DVD in the optical drive. Double-click the setup.exe le from the ASUS
WebStorage folder in the Software folder in the support DVD.
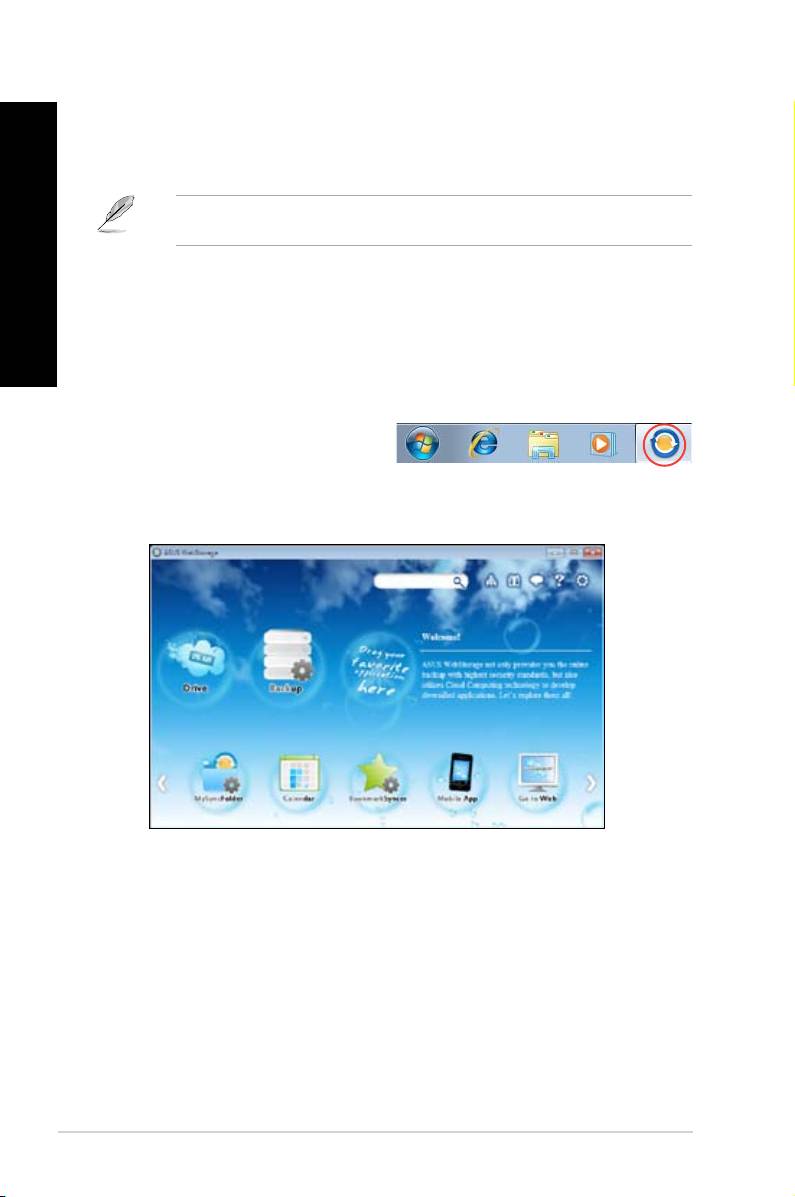
Launching Webstorage
To launch the WebStorage from the
®
Windows
desktop, click
Start > All
Programs > ASUS > Webstorage
. The
webstorage quick bar appears in the
®
Windows
taskbar. Right-click this icon to switch between the quick bar and the main window
Drive
Allows your to retrieve all your backups, synced les, share groups and password protected
data from here. Right-click the mouse to preview les before downloading or generating a
sharing URL.
Backup
To backup your most important data with simple steps: preset a backup shcedule with your
preferences in cloud storage; or select “Auto Backup” for complete data backup.
ENGLISH
ENGLISH
MySyncFolder
ENGLISH
To store the updated les to MySyncFolder for easy access and share of all types of les
without the limitation of location or device.
Calendar
ASUS WebStorage automatically syncs the most updated calendar events to all personal
computers so that you know the exact events no matter which PC is in use.
BookmarkSyncer
ENGLISH
The convenient BookmarkSyncer keeps our browser preference and bookmark to the cloud
automatically synchronized in multiple computer.
MobileApp
ASUS WebStorage mobile applications sync your les between multiple devices. It also
supports transcoding technology that allows preview and les streaming on your mobile
phone.
Go to Web
Experience the value-added cloud service through ASUS WebStorage, without the risk of
losing data.
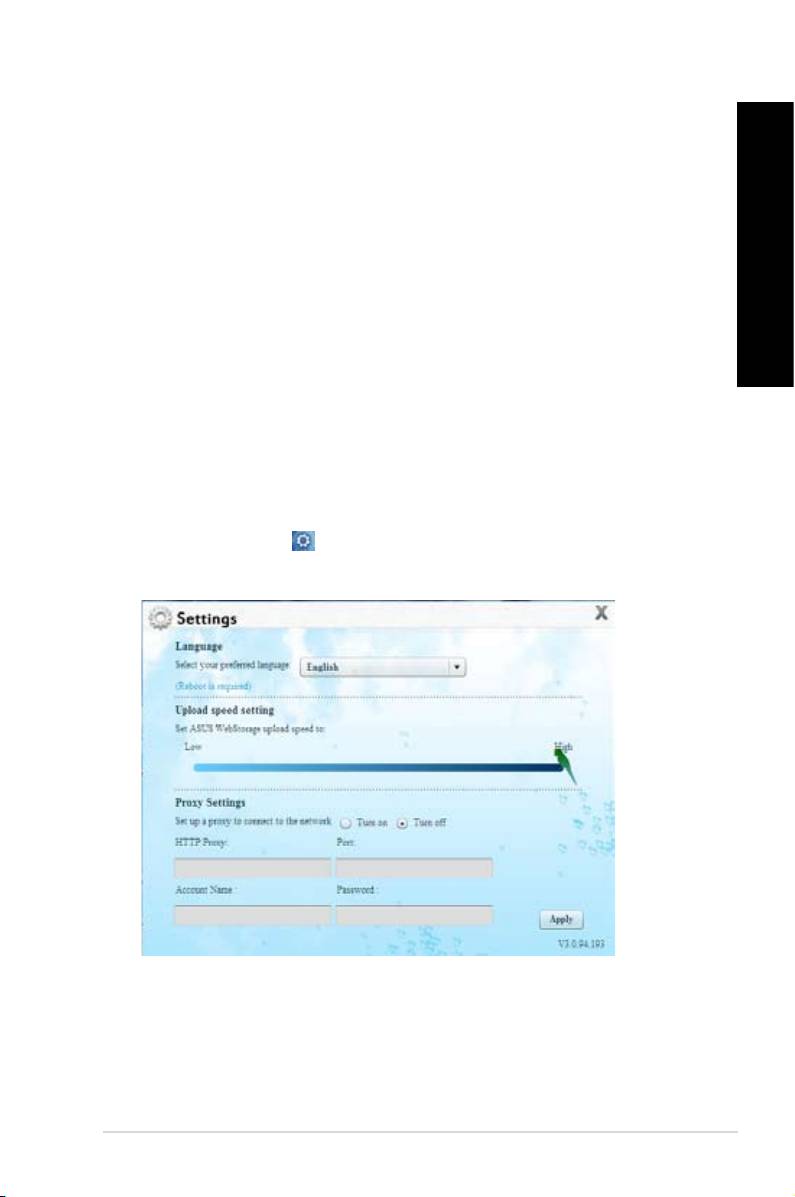
Settings
1. Click the Settings icon , the settings interface appears.
2. Follow the onscreen instructions to complete the conguration.
ASUS CM6340 57
ENGLISH
ENGLISH
58 Chapter 6: Using the utilities
ENGLISH
ENGLISH
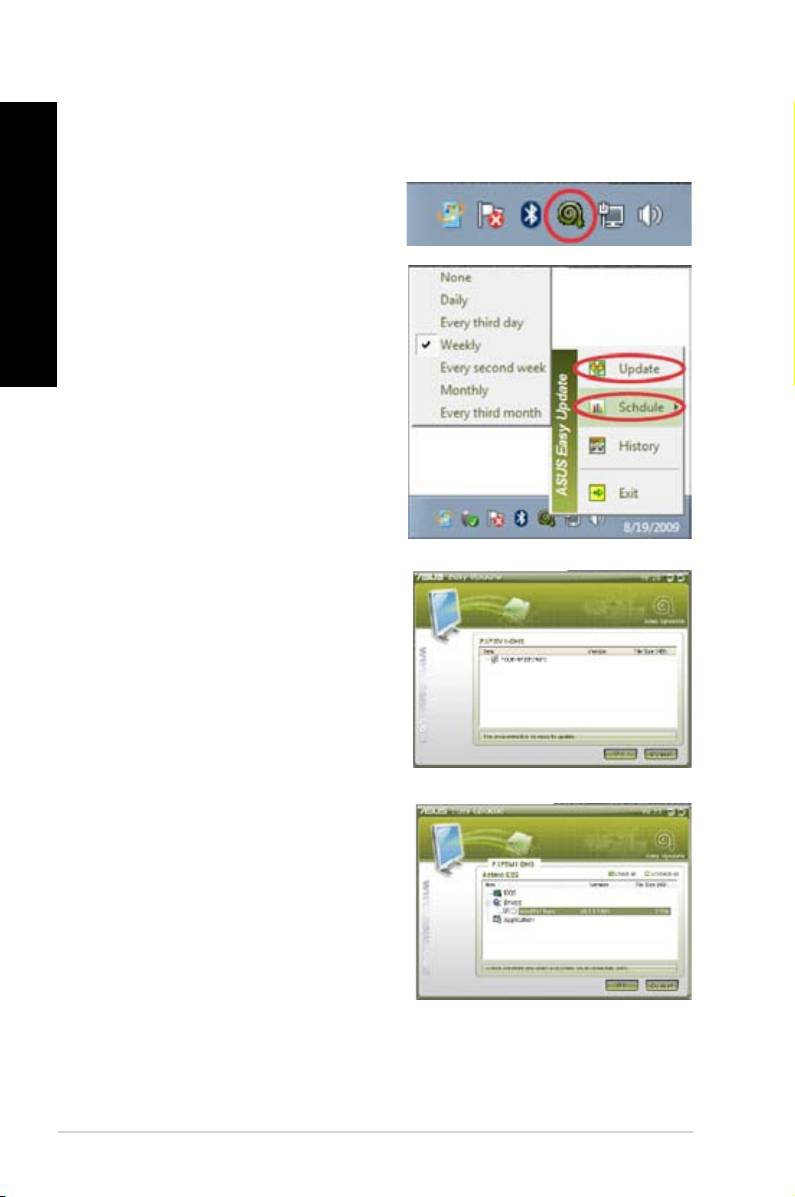
ASUS Easy Update
ASUS Easy Update is a software tool that automatically detects the latest drivers and
applications for your system.
®
1. From the Windows
notication area,
right-click the ASUS Easy Update icon.
2. Select
Schedule to set how often you
want to update your system.
3. Select
Update to activate the update.
4. Click OK to display the items you can
download.
5. Check the item(s) you want to download,
and then click OK.
ENGLISH
ENGLISH
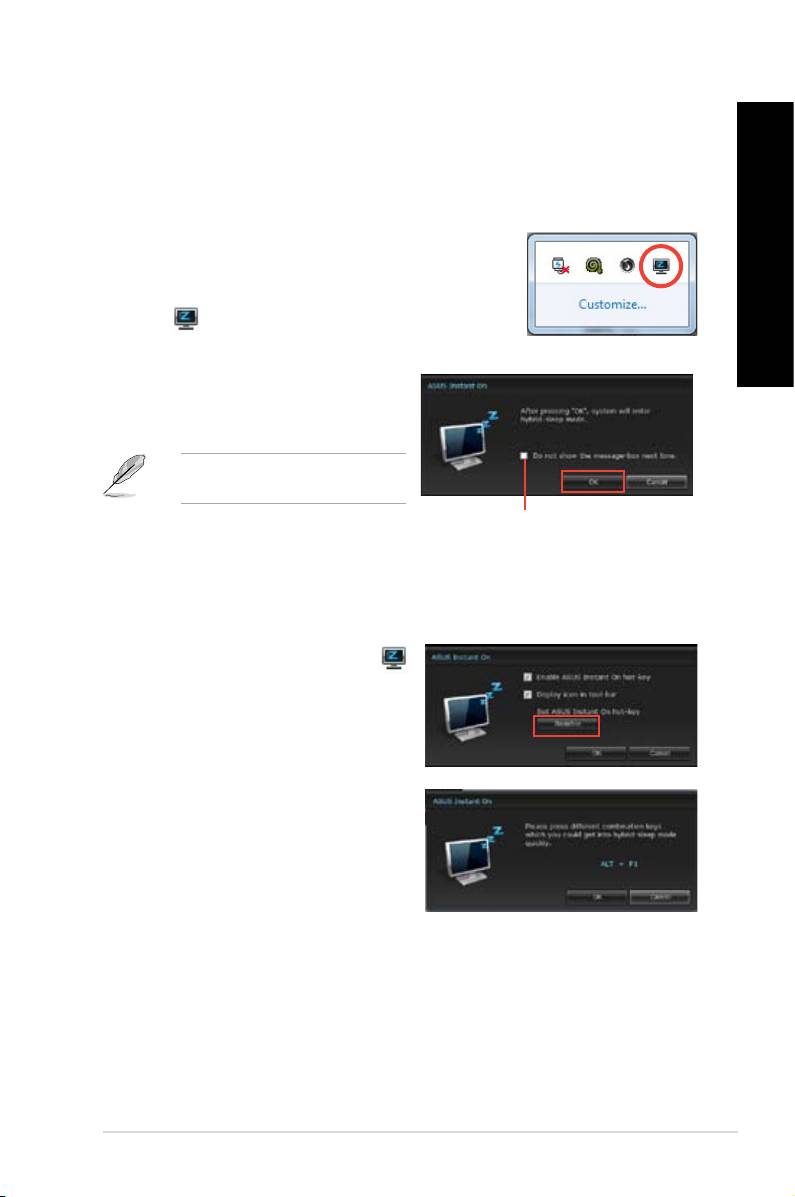
ASUS Instant On
ENGLISH
ASUS Instant On gives you with a quick access to the Hybrid Sleep mode.
Using ASUS Instant On
To use ASUS Instant On:
The Instant On utility is pre-installed on your computer and
automatically launches after starting up your computer.
ENGLISH
1. When starting up your computer, you can see the utility
icon from Windows taskbar.
2. Press <
Alt + F1> and then click OK on
the conrmation message. Your system
will enter the Hybrid Sleep mode.
The default hotkey is <Alt + F1>. To
change it, see the section below.
Tick to not show this message next time.
Setting up ASUS Instant On
To set up ASUS Instant On:
1. Right-click the ASUS Instant On icon
from Windows taskbar. The main settings
screen appears.
You can choose to enable/disable ASUS
Instant On hotkey, and show/hide ASUS
Instant On icon from Windows taskbar.
2. Click
Redene from the main settings
screen. The hotkey settings screen
appears.
3. Key in the combination keys you want to
use for ASUS Instant On hotkey.
4. Click OK to save your changes, and
Cancel to discard the changes you made.
ASUS CM6340 59

ENGLISH
ENGLISH
60 Chapter 6: Using the utilities
ENGLISH
ENGLISH
Nero 9
Nero 9 allows you to create, copy, burn, edit, share, and update different kinds of data
Installing Nero 9
To install Nero 9:
1. Insert the Nero 9 DVD into your optical drive.
2. If Autorun is enabled, the main menu appears automatically.
If Autorun is disabled, double-click the SeupX.exe le from the main directory of your Nero
9 DVD.
3. From the main menu, click Nero 9 Essentials.
4. Select the language you want to use for Installation Wizard. Click
Next.
5. Click
Next to continue.
6. Tick
I accept the License Conditions. When done, click Next.
7. Select
Typical then click Next.
8. Tick
Yes, I want to help by sending anonymous application data to Nero then click
Next.
9. When done, click
Exit.
Burning les
To burn les:
1. From the main menu, click
Data Burning > Add.
2. Select the les that you want to burn. When done, click
Add.
3. After selecting les that you want to burn, click
Burn to burn the les to a disc.
For more details about using Nero 9, refer to the Nero website at www.nero.com

ENGLISH
ENGLISH
Recovering your system
ENGLISH
Using the system recovery partition
The system recovery partition quickly restores your Desktop PC’s software to its original
working state. Before using the system recovery partition, copy your data les (such as
Outlook PST les) to USB storage devices or to a network drive and make note of any
customized conguration settings (such as network settings).
About the system recovery partition
ENGLISH
The system recovery partition is a reserved space on your hard disk drive used to restore the
operating system, drivers, and utilities installed on your Desktop PC at the factory.
DO NOT delete the system recovery partition, which is the partition without volume label
on Disk 0. The system recovery partition is created at the factory and cannot be restored if
deleted. Take your Desktop PC to an authorized ASUS service center if you have problems
with the recovery process.
Using the system recovery partition:
1. Press <
F9> during bootup.
2. Highlight Windows Setup [EMS Enabled] and press
<Enter>.
3. From the Recover system to a partition screen, click
<Next>.
4. Follow the onscreen instructions to complete the recovery process.
Visit the ASUS website at www.asus.com for updated drivers and utilities.
ASUS CM6340 61
Using the Recovery DVD (on selected models)
ENGLISH
Prepare 1~3 blank writable DVDs as instructed to create the Recovery DVD.
Remove the external hard disk drive before performing system recovery on your Desktop
PC. According to Microsoft, you may lose important data because of setting up Windows on
the wrong disk drive or formatting the incorrect drive partition.
ENGLISH
To use the Recovery DVD:
1. Insert the Recovery DVD into the optical drive. Your Desktop PC needs to be powered
ON.
2. Restart the Desktop PC and press <
F8> on bootup and select the optical drive (may be
labeled as “CD/DVD”) and press <Enter> to boot from the Recovery DVD.
3. Select OK to start to restore the image.
4. Select OK to conrm the system recovery.
Restoring will overwrite your hard drive. Ensure to back up all your important data before
the system recovery.
5. Follow the onscreen instructions to complete the recovery process.
DO NOT remove the Recovery disc, unless instructed to do so, during the recovery process
or else your partitions will be unusable.
Visit the ASUS website at www.asus.com for updated drivers and utilities.
62 Chapter 6: Using the utilities
