Pioneer A-20-S: Controls and displays
Controls and displays: Pioneer A-20-S
Table of contents
- IMPORTANT
- Contents
- Before you start
- Connecting up
- Controls and displays
- Operation
- Additional information
Controls and displays
03
7
En
English
Deutsch
Français
Nederlands
Italiano
Español
Ру
сский
Chapter 3:
Controls and displays
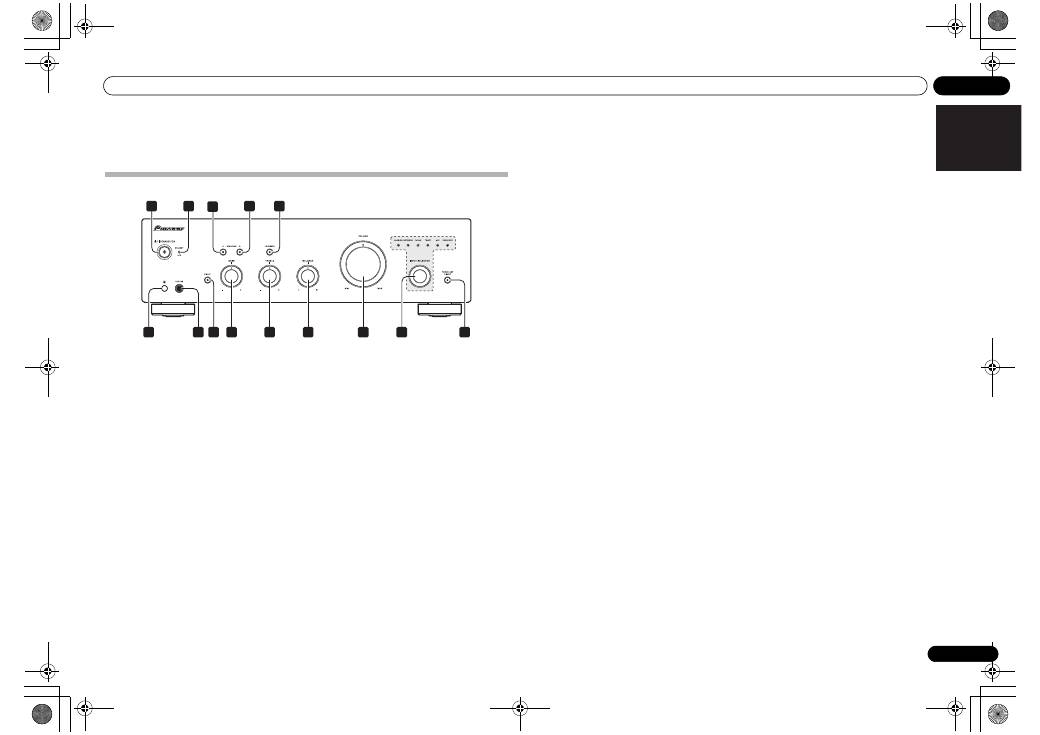
Front panel
1
/I STANDBY/ON
Switches the amplifier between off and on.
When power is turned on, the power indicator in the
center of the button will light.
• On the A-10 model, this switches the amplifier
between standby and on.
2
STANDBY/APD indicator
When power is set to standby, the indicator lights red.
When the Auto Power Down (APD) function is on, the
indicator lights green (page 11).
3
SPEAKERS A button/indicator
Use this button to listen to the speaker system
connected to
SPEAKERS A
terminals.
On
: The indicator lights. Sound is heard from the
speaker system. (Sound will also be produced from the
PHONES
jack.)
Off
: The indicator goes off. No sound is heard from the
speaker system. Set to this position when listening with
headphones.
4
SPEAKERS B button/indicator
Use this button to listen to the speaker system
connected to
SPEAKERS B
terminals.
On
: The indicator lights. Sound is heard from the
speaker system. (Sound will also be produced from the
PHONES
jack.)
Off
: The indicator goes off. No sound is heard from the
speaker system. Set to this position when listening with
headphones.
5
LOUDNESS button/indicator
Use when listening at low volume levels.
On
: The indicator lights: Boosts low and high
frequencies to give added punch to playback even at a
low volume level.
Off
: The indicator goes off: Should normally be left in
this position.
• This button does not operate when the
DIRECT
button is in the on position.
• When sound volume is raised, the amount of
change produced by the
LOUDNESS
circuit is
reduced.
3
1
6
2
5
4
7
13
14
9
10
11
12
8
A-30
6
Remote sensor (Except A-10)
Receives the signals from the remote control (page 4).
7
PHONES jack
Use to connect headphones. No sound is produced
when the
POWER AMP DIRECT
button is ON.
8
DIRECT button/indicator
On
: The indicator lights: When this button is set to ON,
sound signals are output directly, without being passed
through the various adjustment circuits (
BASS
,
TREBLE
,
BALANCE
,
LOUDNESS
). This allows reproduction of the
signals with greater fidelity, but it disables any settings
made with the
BASS
,
TREBLE
,
BALANCE
or
LOUDNESS
controls.
Off
: The indicator goes off: The signal passes through
the various frequency adjusting circuits. When the
indicator is OFF, adjustments can be made with the
BASS
,
TREBLE
,
BALANCE
, and
LOUDNESS
controls.
9
BASS tone control
Use to adjust the low-frequency tone. The center position
is the flat (normal) position. When turned to the right,
low-frequency tones are emphasized; when turned to the
left, low-frequency tones are de-emphasized.
• This button does not operate when the
DIRECT
button is in the on position.
10 TREBLE tone control
Use to adjust the high-frequency tone. The center
position is the flat (normal) position. When turned to the
right, high-frequency tones are emphasized; when
turned to the left, high-frequency tones are de-
emphasized.
• This button does not operate when the
DIRECT
button is in the on position.
11 BALANCE control
Should normally be left in the center position. Adjust
balance if the sound is louder from one of the speakers.
If the right side is louder, turn toward the L (left) position
and if the left side is louder, turn toward the R (right)
position.
• This button does not operate when the
DIRECT
button is in the on position.
12 VOLUME control
Use to adjust the volume level. (Also allows adjustment
of the headphone sound volume.)
13 INPUT SELECTOR knob/indicators
Turn the knob clockwise or counterclockwise so that the
indicator lights for your desired input source. Turning
the knob clockwise causes the lit indicator to right.
Turning counterclockwise causes it to left. When the
remote control’s
MUTE
button is pressed to mute the
sound, the indicator for the input source selected with
the
INPUT SELECTOR
knob flashes.
14 POWER AMP DIRECT button/indicator
(A-30 only)
Press this button when the A-30 is to be used as a power
amplifier (page 10).
A30_SYXE8.book 7 ページ 2012年2月16日 木曜日 午前8時58分
03
Controls and displays
8
En
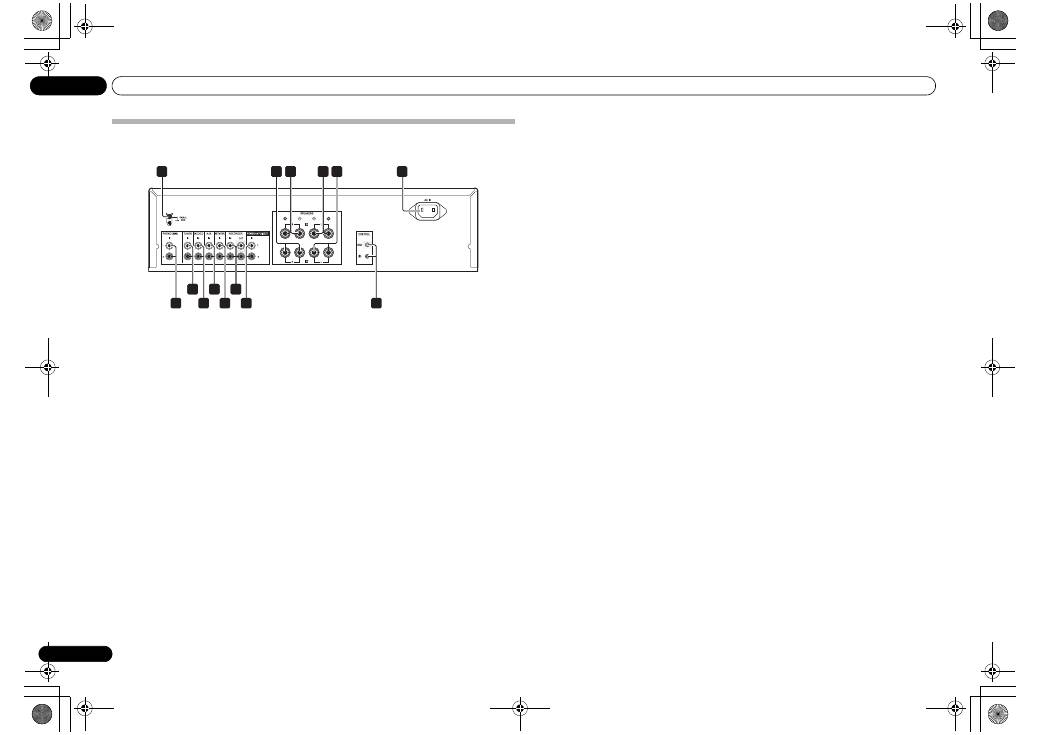
Rear panel
See pages 5-6 for details regarding connections.
1
GND (Turntable ground) terminal
This ground terminal is designed to help reduce noise
when a turntable is connected. It is not a safety ground.
2
SPEAKERS A terminals (Right channel)
3
SPEAKERS B terminals (Right channel)
4
SPEAKERS B terminals (Left channel)
5
SPEAKERS A terminals (Left channel)
6
AC IN jack
Connect power cord to here and an AC wall socket.
7
PHONO (MM) IN terminals
8
TUNER IN terminals
9
SACD/CD IN terminals
10 AUX IN terminals
11 NETWORK IN terminals
12 RECORDER IN/OUT terminals
13 POWER AMP DIRECT IN terminals (A-30
only)
When using the A-30 as a power amplifier, connect the
pre-amplifier here (page 10).
14 CONTROL IN/OUT jack (Except A-10)
A-30
1
6
7
2
8
2
10
9
13
11
2
12
2
14
2
2
3
2
4
2
5
A30_SYXE8.book 8 ページ 2012年2月16日 木曜日 午前8時58分

Controls and displays
03
9
En
English
Deutsch
Français
Nederlands
Italiano
Español
Ру
сский
Remote control (Except A-10)
STANDBY/ON
DIMMER
SACD/CD NETWORK
PHONO
TUNER
OPTION
AUX
RECORDER
VOLUME
MUTE
LOUDNESS
SPEARKERS
A
B
NETWORK AUDIO PLAYER
ENTER
SOUND
SETUP
APD
DIRECT
RETURN
HOME MENU
FUNC
INPUT
SACD PLAYER
FUNC
NETWORK AUDIO PLAYER
1
8
9
10
12
11
13
2
3
4
6
4
7
5
A-30
8
5
7
3
10
11
1
2
3
4
3
4
3
4
3
12
A-20
6
1
STANDBY/ON
Switches the amplifier between standby and on.
2
Input selector buttons
Press to select an input source. These select the
component connected to the corresponding input on the
rear panel.
• When the A-30 is connected, the
OPTION
button is
disabled.
3
SACD PLAYER control buttons
Use to control Pioneer SACD player.
(Cannot be used to perform playback/pause on the
PD-D6/PD-D6MK2/PD-D9/PD-D9MK2 models.)
4
NETWORK AUDIO PLAYER control
buttons
Use to control Pioneer network audio player.
5
LOUDNESS
Use to set the loudness circuit ON/OFF (page 7).
6
MUTE
Mutes/unmutes the sound.
7
DIRECT
Press to access Direct listening (page 7).
8
DIMMER
This button allows the illumination of the unit's front
panel indicators to be set in three levels (does not affect
the
STANDBY
indicator).
9
INPUT +/–
Use to change the input source. The source changes as
below.
SACD/CD
NETWORK
PHONO
TUNER
AUX
RECORDER
Return to the beginning.
10 SPEAKERS A button/indicator
Use this button to listen to the speaker system
connected to
SPEAKERS A
terminals.
11 SPEAKERS B button/indicator
Use this button to listen to the speaker system
connected to
SPEAKERS B
terminals.
12 VOLUME +/–
Use to set the listening volume.
13 APD
Use to set the Auto Power Down function to ON/OFF
(page 11).
A30_SYXE8.book 9 ページ 2012年3月6日 火曜日 午前11時13分


