Asus P5QL: 2.2 BIOS setup program
2.2 BIOS setup program: Asus P5QL
2.2 BIOS setup program
This motherboard supports a programmable Serial Peripheral Interface (SPI) chip that you
can update using the provided utility described in section 2.1 Managing and updating your
BIOS.
Use the BIOS Setup program when you are installing a motherboard, reconguring your
system, or prompted to “Run Setup.” This section explains how to congure your system
using this utility.
Even if you are not prompted to use the Setup program, you can change the conguration of
your computer in the future. For example, you can enable the security password feature or
change the power management settings. This requires you to recongure your system using
the BIOS Setup program so that the computer can recognize these changes and record them
in the CMOS RAM of the SPI chip.
The SPI chip on the motherboard stores the Setup utility. When you start up the computer,
the system provides you with the opportunity to run this program. Press <Del> during the
Power-On Self-Test (POST) to enter the Setup utility; otherwise, POST continues with its test
routines.
If you want to enter Setup after POST, reboot the system by doing any of the following
procedures:
• Restart using the OS standard shut-down procedure.
• Press
<Ctrl>+<Alt>+<Del> simultaneously.
• Press the reset button on the system chassis.
• Press the power button to turn the system off then back on.
Using the power button, reset button, or the <Ctrl>+<Alt>+<Del> keys to force
reset from a running operating system can cause damage to your data or system. We
recommend that you always shut down the system properly from the operating system.
The Setup program is designed to make it as easy to use as possible. Being a menu-driven
program, it lets you scroll through the various sub-menus and make your selections from the
available options using the navigation keys.
• The default BIOS settings for this motherboard apply to most conditions to ensure
optimum performance. If the system becomes unstable after changing any BIOS
settings, load the default settings to ensure system compatibility and stability. Select the
Load Setup Defaults item under the Exit menu. See section 2.9 Exit Menu.
• The BIOS setup screens in this section are for reference only. They may not exactly
match what you see on your screen.
• Visit the ASUS website at www.asus.com to download the latest BIOS le for this
motherboard.
2-6 Chapter 2: BIOS information
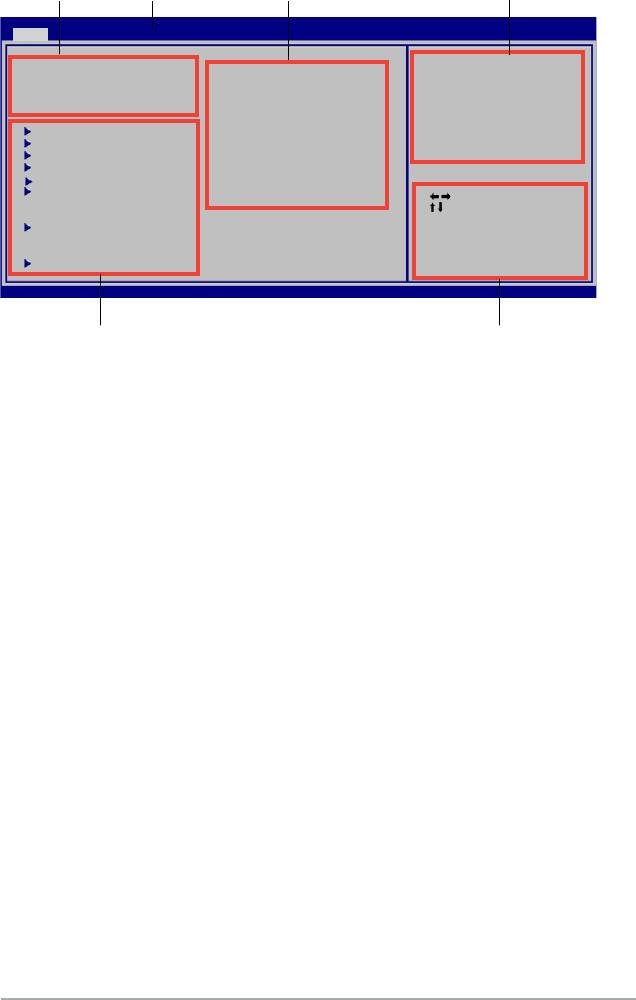
2.2.1 BIOS menu screen
Menu bar
Conguration eldsMenu items
General help
BIOS SETUP UTILITY
Main Ai Tweaker Advanced Power Boot Tools Exit
Use [ENTER], [TAB] or
System Time [
14:14:35]
[SHIFT-TAB] to select
System Date [Wed 04/16/2008]
a eld.
Legacy Diskette A [1.44M, 3.5 in]
Use [+] or [-] to
congure system time.
SATA 1 [Not Detected]
SATA 2 [Not Detected]
SATA 3 [Not Detected]
SATA 4 [Not Detected]
SATA 5 [Not Detected]
SATA 6 [Not Detected]
Select Screen
Select Item
+- Change Field
Storage Conguration
Tab Select Field
F1 General Help
F10 Save and Exit
System Information
ESC Exit
v02.61 (C)Copyright 1985-2008, American Megatrends, Inc.
Navigation keys
Submenu items
2.2.2 Menu bar
The menu bar on top of the screen has the following main items:
Main For changing the basic system conguration
Ai Tweaker For conguring system performance settings
Advanced For changing the advanced system settings
Power For changing the advanced power management (APM) conguration
Boot For changing the system boot conguration
Tools For conguring options for special functions
Exit For selecting the exit options and loading default settings.
To select an item on the menu bar, press the right or left arrow key on the keyboard until the
desired item is highlighted.
ASUS P5QL 2-7

2.2.3 Navigation keys
At the bottom right corner of a menu screen are the navigation keys for that particular menu.
Use the navigation keys to select items in the menu and change the settings.
Some of the navigation keys differ from one screen to another.
2.2.4 Menu items
The highlighted item on the menu
BIOS SETUP UTILITY
Main Ai Tweaker Advanced Power Boot Tools Exit
bar displays the specic items for
System Time [14:14:35]
Use [ENTER], [TAB] or
System Date [Wed 04/16/2008]
[SHIFT-TAB] to select
that menu. For example, selecting
Legacy Diskette A [1.44M, 3.5 in]
a eld.
Use [+] or [-] to
Main shows the Main menu items.
SATA 1 [Not Detected]
congure system
SATA 2 [Not Detected]
Time.
The other items (Ai Tweaker,
SATA 3 [Not Detected]
SATA 4 [Not Detected]
SATA 5 [Not Detected]
Advanced, Power, Boot, Tools, and
SATA 6 [Not Detected]
Select Screen
Select Item
Exit) on the menu bar have their
+- Change Field
Storage Conguration
Tab Select Field
F1 General Help
respective menu items.
F10 Save and Exit
System Information
ESC Exit
v02.61 (C)Copyright 1985-2008, American Megatrends, Inc.
Main menu items
2.2.5 Submenu items
A solid triangle before each item on any menu screen means that the iteam has a sub-menu.
To display the submenu, select the item and press <Enter>.
2.2.6 Conguration elds
These elds show the values for the menu items. If an item is user- congurable, you can
change the value of the eld opposite the item. You cannot select an item that is not user-
congurable.
A congurable eld is enclosed in brackets, and is highlighted when selected. To change the
value of a eld, select it then press <Enter> to display a list of options. Refer to 2.2.7 Pop-up
window.
2.2.7 Pop-up window
BIOS SETUP UTILITY
Select a menu item then press
Main Ai Tweaker Advanced Power Boot Tools Exit
<Enter> to display a pop-up window
System Time [14:14:35]
Use [ENTER], [TAB] or
System Date [Wed 04/16/2008]
[SHIFT-TAB] to select
Legacy Diskette A [1.44M, 3.5 in]
a eld.
with the conguration options for
Use [+] or [-] to
that item.
SATA 1 [Not Detected]
congure system
SATA 2 [Not Detected]
Time.
SATA 3 [Not Detected]
Options
Disabled
SATA 4 [Not Detected]
720K, 3.5 in.
1.44M, 3.5 in.
SATA 5 [Not Detected]
SATA 6 [Not Detected]
Select Screen
Select Item
2.2.8 Scroll bar
+- Change Field
Storage Conguration
Tab Select Field
F1 General Help
F10 Save and Exit
A scroll bar appears on the right side
System Information
ESC Exit
v02.61 (C)Copyright 1985-2008, A m e r i c a n Megatrends, Inc.
of a menu screen when there are
items that do not t on the screen.
Pop-up window
Press the <Up> / <Down> arrow
Scroll bar
keys or <Page Up> /<Page Down>
keys to display the other items on the
screen.
2-8 Chapter 2: BIOS information
Оглавление
- Contents
- Contents
- Contents
- Notices
- Safety information
- P5QL specications summary
- 1.1 Welcome!
- 1.4 Before you proceed
- 1.5 Motherboard overview
- 1.6 Central Processing Unit (CPU)
- 1.7 System memory
- 1.8 Expansion slots
- 1.9 Jumpers
- 1.10 Connectors
- 1.11 Software support
- 2.1 Managing and updating your BIOS
- 2.2 BIOS setup program
- 2.3 Main menu
- 2.4 Ai Tweaker menu
- 2.5 Advanced menu
- 2.6 Power menu
- 2.7 Boot menu
- 2.8 Tools menu
- 2.9 Exit menu
