Asus P5QL: 2.3 Main menu
2.3 Main menu: Asus P5QL
2.2.9 General help
At the top right corner of the menu screen is a brief description of the selected item.
2.3 Main menu
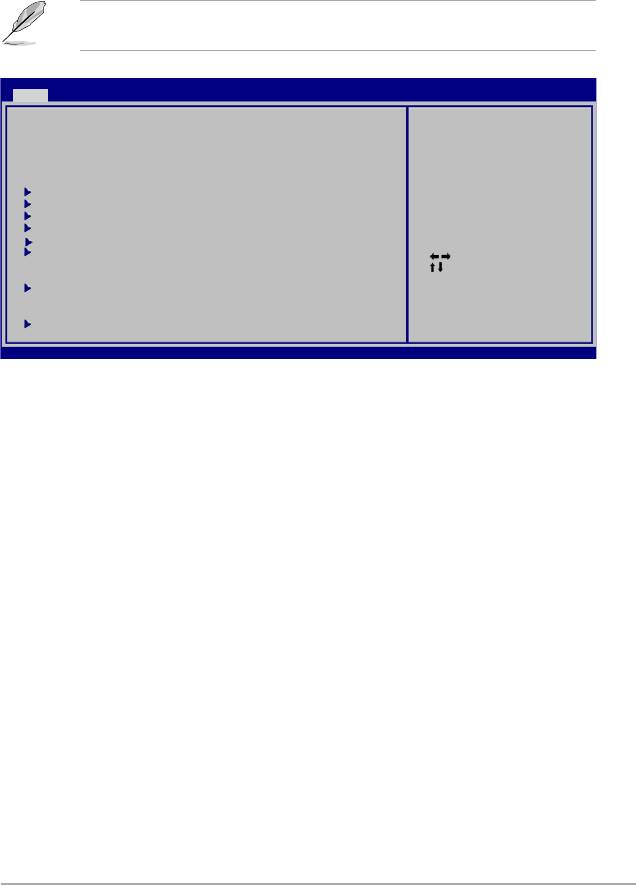
When you enter the BIOS Setup program, the Main menu screen appears, giving you an
overview of the basic system information.
Refer to section 2.2.1 BIOS menu screen for information on the menu screen items and
how to navigate through them.
BIOS SETUP UTILITY
Main Ai Tweaker Advanced Power Boot Tools Exit
Use [ENTER], [TAB] or
System Time [14:14:35]
[SHIFT-TAB] to select
System Date [Wed 04/16/2008]
a eld.
Legacy Diskette A [1.44M, 3.5 in]
Use [+] or [-] to
congure system time.
SATA 1 [Not Detected]
SATA 2 [Not Detected]
SATA 3 [Not Detected]
SATA 4 [Not Detected]
SATA 5 [Not Detected]
SATA 6 [Not Detected]
Select Screen
Select Item
+- Change Field
Storage Conguration
Tab Select Field
F1 General Help
F10 Save and Exit
System Information
ESC Exit
v02.61 (C)Copyright 1985-2008, American Megatrends, Inc.
2.3.1 System Time [xx:xx:xx]
Allows you to set the system time.
2.3.2 System Date [Day xx/xx/xxxx]
Allows you to set the system date.
2.3.3 Legacy Diskette A [1.44M, 3.5 in.]
Sets the type of oppy drive installed. Conguration options: [Disabled] [720K, 3.5 in.]
[1.44M, 3.5 in.]
ASUS P5QL 2-9

2.3.4 SATA 1-6
While entering Setup, the BIOS automatically detects the presence of Serial ATA (SATA)
devices. There is a separate submenu for each SATA device. Select a device item then press
<Enter> to display the SATA device information.
The BIOS automatically detects the values opposite the dimmed items (Device, Vendor, Size,
LBA Mode, Block Mode, PIO Mode, Async DMA, Ultra DMA, and SMART Monitoring). These
values are not user-congurable. These items show N/A if no SATA device is installed in the
system.
Type [Auto]
Selects the type of IDE drive. Setting to [Auto] allows automatic selection of the appropriate
IDE device type. Select [CDROM] if you are specically conguring a CD-ROM drive. Select
[ARMD] (ATAPI Removable Media Device) if your device is either a ZIP, LS-120, or MO drive.
Conguration options: [Not Installed] [Auto] [CDROM] [ARMD]
LBA/Large Mode [Auto]
Enables or disables the LBA mode. Setting to [Auto] enables the LBA mode if the device
supports this mode, and if the device was not previously formatted with LBA mode disabled.
Conguration options: [Disabled] [Auto]
Block (Multi-sector Transfer) M [Auto]
Enables or disables data multi-sectors transfers. When set to [Auto], the data transfer from
and to the device occurs multiple sectors at a time if the device supports multi-sector transfer
feature. When set to [Disabled], the data transfer from and to the device occurs one sector
at a time. Conguration options: [Disabled] [Auto]
PIO Mode [Auto]
Selects the PIO mode. Conguration options: [Auto] [0] [1] [2] [3] [4]
DMA Mode [Auto]
Selects the DMA mode. Conguration options: [Auto]
SMART Monitoring [Auto]
Sets the Smart Monitoring, Analysis, and Reporting Technology.
Conguration options: [Auto] [Disabled] [Enabled]
32Bit Data Transfer [Enabled]
Enables or disables 32-bit data transfer. Conguration options: [Disabled] [Enabled]
2.3.5 Storage Conguration
The items in this menu allow you to set or change the congurations for the SATA devices
installed in the system. Select an item then press <Enter> if you want to congure the item.
SATA Conguration [Enhanced]
Conguration options: [Disabled] [Compatible] [Enhanced]
Configure SATA as [IDE]
Sets the conguration for the Serial ATA connectors supported by the Southbridge chip.
Conguration options: [IDE] [AHCI]
Due to Intel chipset driver support regulation, the AHCI mode is not supported in Windows
XP environment. The AHCI mode is only supported by Windows Vista with OS built-in
driver.
2-10 Chapter 2: BIOS information
Оглавление
- Contents
- Contents
- Contents
- Notices
- Safety information
- P5QL specications summary
- 1.1 Welcome!
- 1.4 Before you proceed
- 1.5 Motherboard overview
- 1.6 Central Processing Unit (CPU)
- 1.7 System memory
- 1.8 Expansion slots
- 1.9 Jumpers
- 1.10 Connectors
- 1.11 Software support
- 2.1 Managing and updating your BIOS
- 2.2 BIOS setup program
- 2.3 Main menu
- 2.4 Ai Tweaker menu
- 2.5 Advanced menu
- 2.6 Power menu
- 2.7 Boot menu
- 2.8 Tools menu
- 2.9 Exit menu
