Asus P5QL: 2.1 Managing and updating your BIOS
2.1 Managing and updating your BIOS: Asus P5QL

Chapter 2
BIOS information
2.1 Managing and updating your BIOS
Save a copy of the original motherboard BIOS le to a oppy disk or a USB ash disk in
case you need to restore the BIOS in the future. Copy the original motherboard BIOS using
the ASUS Update or AFUDOS utilities.
2.1.1 Creating a bootable oppy disk
Create a bootable oppy disk using a different computer.
To create a bootable oppy disk:
1. Insert a formatted, high density 1.44MB oppy disk into the oppy disk drive.
2. Follow the instructions based on your system environment.
DOS environment
a. At the DOS prompt, type format A:/S then press <Enter>.
®
Windows
XP environment
®
a. From the Windows
desktop, click Start > My Computer.
b. Select the 3 1/2 Floppy Drive icon.
c. Click
File from the menu bar, then select Format. A Format 3 1/2 Floppy window
appears.
d. Select
Create an MS-DOS startup disk from the format options eld, then click
Start.
®
Windows
Vista environment
®
a. From the Windows
desktop, click > Computer.
b. Right-click
Floppy Disk Drive then click Format to display the Format 3 1/2
Floppy dialog box.
c. Select the
Create an MS-DOS startup disk check box.
d. Click
Start.
ASUS P5QL 2-1

2.1.2 ASUS Update utility
The ASUS Update is a utility that allows you to manage, save, and update the motherboard
®
BIOS in Windows
environment.
• ASUS Update requires an Internet connection either through a network or an Internet
Service Provider (ISP).
• This utility is available in the Support DVD that comes with the motherboard package.
Installing ASUS Update
To install ASUS Update:
1. Place the Support DVD into the optical drive. The
Drivers menu appears.
2. Click the
Utilities tab, then click Install ASUS Update.
3. Follow the onscreen instructions to complete the installation.
®
Quit all Windows
applications before you update the BIOS using this utility.
Updating the BIOS
To update the BIOS:
®
1. From the Windows
desktop, click Start > Programs > ASUS > ASUSUpdate >
ASUSUpdate to launch the ASUS Update utility.
2. From the dropdown list, select either of the updating processes:
Updating from the Internet
a. Select Update BIOS from the Internet, then click Next.
b. Select the ASUS FTP site nearest you to avoid network trafc, or click Auto
Select
then click Next.
c. From the FTP site, select the BIOS version that you want to download then click
Next.
The ASUS Update utility is capable of updating itself through the Internet. Always update
the utility to get all its features.
Updating from a BIOS file
a. Select Update BIOS from a le, then click Next.
b. Locate the BIOS le from the
Open window, then click Open.
3. Follow the onscreen instructions to complete the updating process.
2-2 Chapter 2: BIOS information
2.1.3 ASUS EZ Flash 2 utility
The ASUS EZ Flash 2 feature allows you to update the BIOS without using an OS-based
utility.
Download the latest BIOS le from the ASUS website at www.asus.com.
To update the BIOS using EZ Flash 2:
1. Insert the oppy disk or the USB ash disk that contains the latest BIOS le to the
oppy disk drive or a USB port, then launch EZ Flash 2 in either of these two ways:
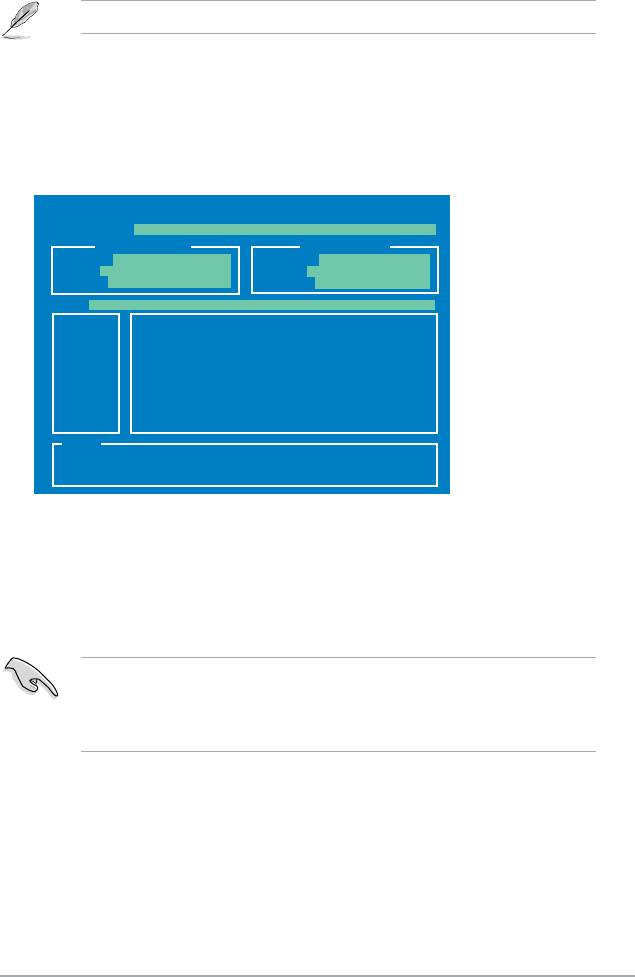
• Press
<Alt> + <F2> during POST to display the following:
ASUSTek EZ Flash 2 BIOS ROM Utility V3.24
FLASH TYPE: MXIC 25L8005
Current ROM
Update ROM
BOARD: P5QL
BOARD: Unknown
VER: 0304 (H:00 B:00)
VER: Unknown
DATE: 09/01/2008
DATE: Unknown
PATH: A:\
A:
Note
[Enter] Select or Load [Tab] Switch [V] Drive Info
[Up/Down/Home/End] Move [B] Backup [ESC] Exit
• Enter the BIOS setup program. Go to the Tools menu to select EZ Flash 2 and
press <Enter> to enable it.
2. Press
<Tab> to locate the correct BIOS le. Press <Enter>.
When the correct BIOS le is found, EZ Flash 2 performs the BIOS updating process and
automatically reboots the system when done.
• Only a USB ash disk with FAT 32/16 format and single partition supports the ASUS EZ
Flash 2 utility.
• DO NOT shut down or reset the system while updating the BIOS to prevent system boot
failure!
ASUS P5QL 2-3

2.1.4 AFUDOS utility
The AFUDOS utility allows you to update the BIOS le in DOS environment using a bootable
oppy disk. This utility also allows you to copy the current BIOS le that you can use as
backup when the BIOS fails or gets corrupted during the updating process.
• Ensure that you prepare two oppy disks: the bootable oppy disk and the oppy disk
containing the AFUDOS utility and the latest BIOS le.
• Ensure that the oppy disk is not write-protected and has enough space to save both the
AFUDOS and BIOS les.
• The succeeding BIOS screens are for reference only. The actual BIOS screen displays
may not be the same as shown.
Updating the BIOS le
To update the BIOS le using the AFUDOS utility:
1. Insert the bootable oppy disk into the oppy disk drive to boot the system in DOS
mode.
2. Replace the bootable oppy disk and insert the oppy disk that contains the AFUDOS
utility and the latest BIOS le.
• Obtain the AFUDOS utility (afudos.exe) from the bundled support DVD and the latest
BIOS le from the ASUS website at www.asus.com.
• We recommend that you write the BIOS lename on a piece of paper. You will need to
key in the exact BIOS lename at the DOS prompt later.
3. At the DOS prompt, key in afudos /i[lename]
where [lename] is the BIOS le in the oppy disk.
A:\>afudos /iP5QL.ROM
Press <Enter>.
DO NOT shut down or reset the system while updating the BIOS to prevent system boot
failure!
4. The utility returns to the DOS prompt after the BIOS updating process is completed.
Reboot the system from the hard disk drive.
2-4 Chapter 2: BIOS information

2.1.5 ASUS CrashFree BIOS 3 utility
The ASUS CrashFree BIOS 3 is an auto recovery tool that allows you to restore the BIOS le
when it fails or gets corrupted during the updating process. You can update a corrupted BIOS
le using the motherboard Support DVD, a oppy disk, or a USB ash disk that contains the
updated BIOS le.
• Prepare the motherboard Support DVD, the oppy disk, or the USB ash disk containing
the updated motherboard BIOS before using this utility.
• Updating from a PATA optical drive is not supported on this motherboard.
• Always connect the SATA cable to the SATA1/2/3/4 connector. Otherwise, the utility will
not function.
Recovering the BIOS
To recover the BIOS:
1. Turn on the system.
2. Insert the oppy disk, Support DVD, or USB ash disk containing the BIOS le to the
disk drive or port.
The utility displays the following message and automatically checks the oppy disk,
Support DVD, or USB ash disk for the BIOS le.
Bad BIOS checksum. Starting BIOS recovery...
Checking for oppy...
When the BIOS le is found, the utility reads it and starts erasing the corrupted BIOS
le.
Bad BIOS checksum. Starting BIOS recovery...
Checking for oppy...
Floppy found!
Reading le “P5QL.ROM”. Completed.
Start erasing...
3. Restart the system after the utility completes the updating process.
• Only the USB ash disk with FAT 32/16 format and single partition supports ASUS
CrashFree BIOS 3. The device size should be smaller than 8GB.
• DO NOT shut down or reset the system while updating the BIOS! Doing so can cause
system boot failure!
• The utility automatically checks the oppy disk rst. If no oppy disk is found, the utility
then checks the optical drive and the USB ash disk.
• The recovered BIOS may not be the latest BIOS version for this motherboard. Download
the latest BIOS le from the ASUS website at www.asus.com.
ASUS P5QL 2-5
Оглавление
- Contents
- Contents
- Contents
- Notices
- Safety information
- P5QL specications summary
- 1.1 Welcome!
- 1.4 Before you proceed
- 1.5 Motherboard overview
- 1.6 Central Processing Unit (CPU)
- 1.7 System memory
- 1.8 Expansion slots
- 1.9 Jumpers
- 1.10 Connectors
- 1.11 Software support
- 2.1 Managing and updating your BIOS
- 2.2 BIOS setup program
- 2.3 Main menu
- 2.4 Ai Tweaker menu
- 2.5 Advanced menu
- 2.6 Power menu
- 2.7 Boot menu
- 2.8 Tools menu
- 2.9 Exit menu
