Pioneer X-CM31-T: Connecting antennas Plugging in
Connecting antennas Plugging in: Pioneer X-CM31-T
Table of contents
- IMPORTANT VENTILATION CAUTION Operating Environment
- Information for users on collection and disposal of old equipment and used batteries
- Contents
- Chapter 1: Before you start What’s in the box Loading the batteries in the remote control
- Chapter 2: Part names and functions Remote control
- Part names and functions 02 Speaker system
- Front panel
- Top panel
- Chapter 3: Connections Connecting a TV Speaker connection
- Connecting antennas Plugging in
- Chapter 4: Getting started General control Setting the clock
- Sound controls Setting the wake-up timer
- Using Headphones Using the sleep timer
- Chapter 5: iPod/iPhone/iPad playback Confirming what iPod/iPhone/iPad models are supported Connecting your iPod/iPhone/iPad
- Connecting iPod/iPhone to the top panel
- Watching iPod/iPhone videos on your Playing iPad Playing iPod/iPhone
- Chapter 6: Disc playback Playing discs or files
- Advanced CD or MP3/WMA disc playback
- Programmed play (CD or MP3/WMA) About downloading MP3/WMA About folder playback order
- Specify the folder to play Switch the display contents
- Chapter 7: USB playback Playing USB storage devices
- Playing in the desired order (Programmed Play)
- Chapter 8: Using the tuner Listening to the radio broadcasts
- Using the Radio Data System (RDS) Searching for RDS programs An introduction to RDS
- Information provided by RDS Notes for RDS operation Using the Auto Station program Memory (ASPM)
- Chapter 9: Other connections Connecting auxiliary components
- Chapter 10: Additional information Troubleshooting General problem Problem Check Remedy
- When a USB storage device is connected Problem Check Remedy When an iPod/iPhone/iPad is connected Problem Remedy
- Playable discs and formats Cautions on use
- Handling discs
- About iPod/iPhone/iPad
- Specifications
Connections 03
11
En
English Français Español
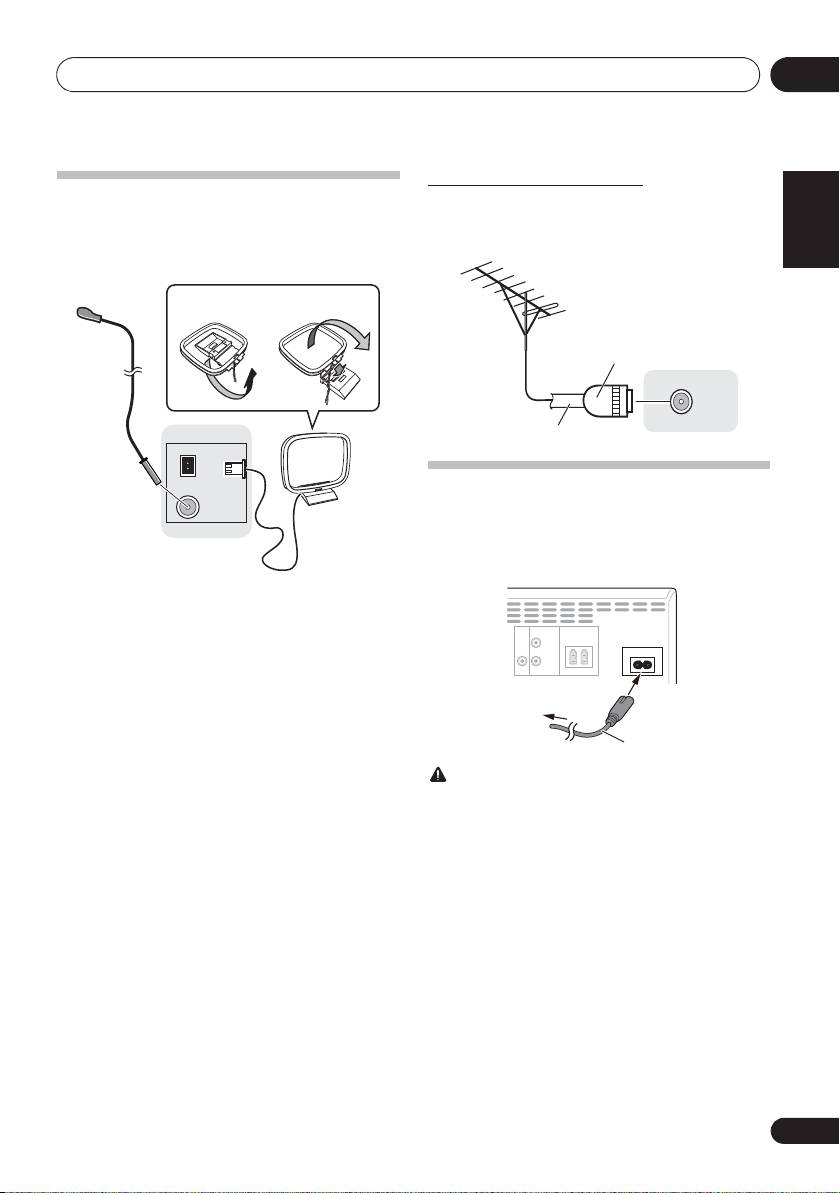
Using external antennas
Connecting antennas
To improve FM reception
Connect the AM loop antenna and the FM wire antenna as
Use a PAL connector (not supplied) to connect an external
shown below. To improve reception and sound quality,
FM antenna.
connect external antennas (see Using external antennas
below).
fig. a
fig. b
One-touch PAL
connector
ANTENNA
FM
UNBAL 75 Ω
75 :coaxial
2
cable
ANTENNA
AM
1
LOOP
4
Plugging in
FM
UNBAL 75 Ω
Before making or changing the connections, switch off the
3
power and disconnect the power cord from the AC outlet.
After you’ve finished making all connections, plug the unit
into an AC outlet.
1 Connect the AM antenna wires.
Holding the connector to connect.
VIDEO LINE
SPEAKERS
OUT IN
2 Fix the AM loop antenna to the attached
R
AC IN
stand.
L
RL
To fix the stand to the antenna, bend in the direction indicated
by the arrow (fig. a) then clip the loop onto the stand (fig. b).
3 Place the AM antenna on a flat surface and
in a direction giving the best reception.
4 Connect the FM wire antenna into the FM
CAUTION
antenna socket.
• Do not use any power cord other than the one supplied
For best results, extend the FM antenna fully and fix to a wall
with this unit.
or door frame. Don’t drape loosely or leave coiled up.
• Do not use the supplied power cord for any purpose
other than that described below.
This unit’s rear panel
To AC outlet
Power cord
;&0B6<;(B(QERRN࣮࣌ࢪ㸰㸮㸯㸱ᖺ㸲᭶㸶᪥ࠉ᭶᭙᪥ࠉ༗๓㸯㸯㸲㸷ศ
