Pioneer SC-LX88-S: Using Built-in AVNavigator Connecting to the network through Connecting to a wireless LAN LAN interface Turning the power on Plugging in the receiver
Using Built-in AVNavigator Connecting to the network through Connecting to a wireless LAN LAN interface Turning the power on Plugging in the receiver: Pioneer SC-LX88-S
Table of contents
- Quick Start Guide
- English Connection and initial setup
- Using Built-in AVNavigator Connecting to the network through Connecting to a wireless LAN LAN interface Turning the power on Plugging in the receiver
- Launching the built-in AVNavigator Using iPad/iPhone/iPod touch Operating environment Using Mac Using Windows PC
- About using Wiring Navi Using Android device
- Connecting up Connecting the speakers
- Connecting a TV and playback components Connecting antennas Plugging in the receiver
- Initial Setup Before you start Automatically setting up for surround sound (MCACC)
- Basic playback Multichannel playback Listening to the radio Saving station presets Listening to station presets
- Playing an iPod Listening to Internet radio stations
Using Built-in AVNavigator
ask your nearest Pioneer authorized independent service
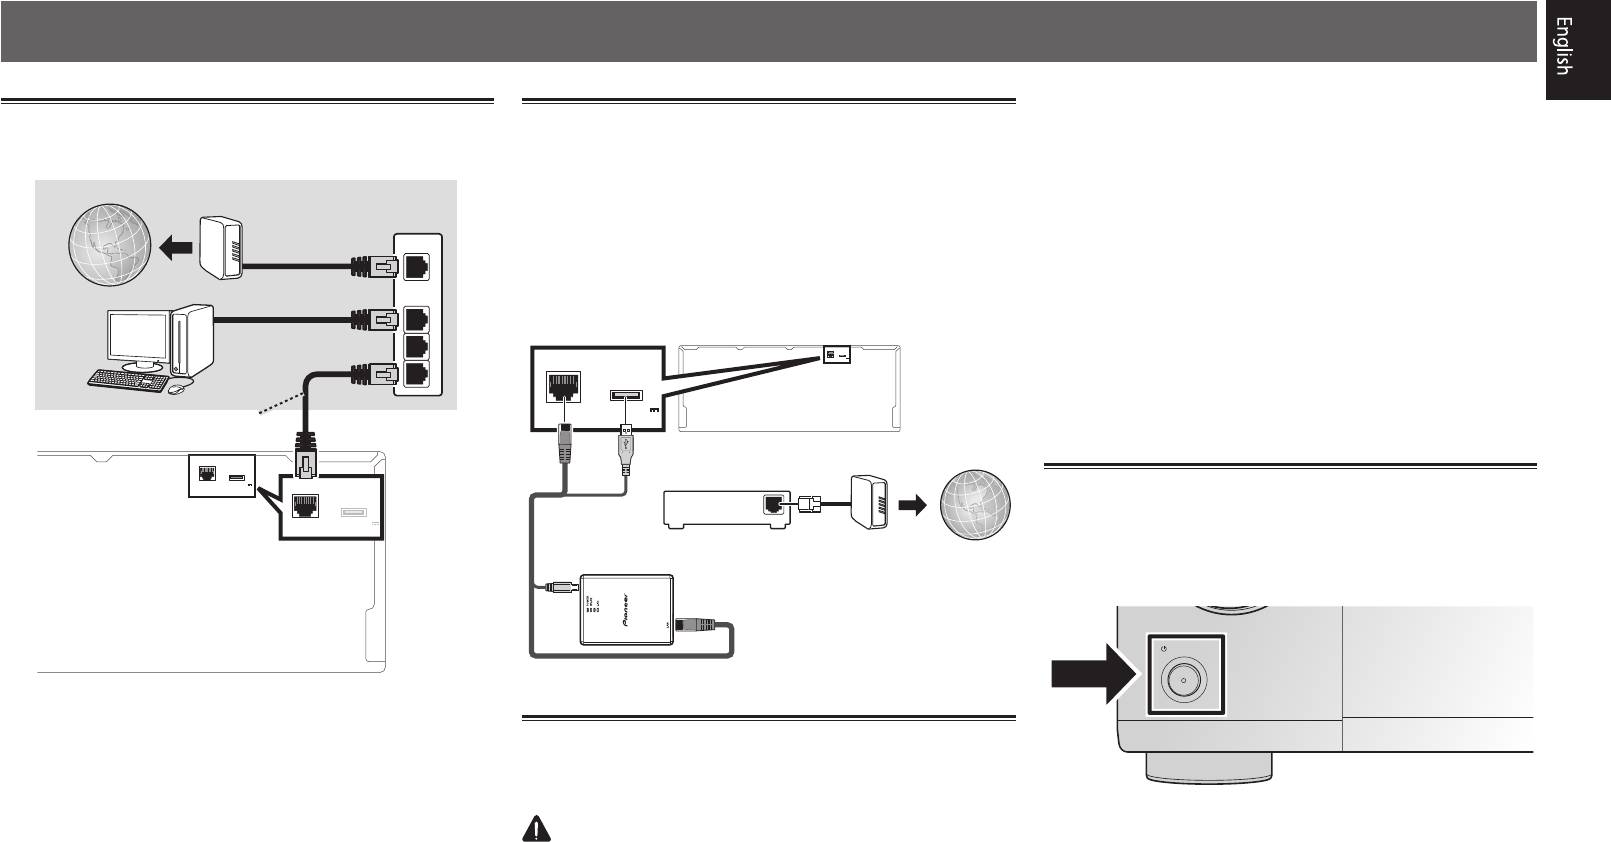
Connecting to the network through
Connecting to a wireless LAN
company for a replacement.
LAN interface
The wireless LAN converter can be connected to connect this
• Do not use any power cord other than the one supplied
unit to a network wirelessly. Use the included AXF7031 for
with this unit.
Internet
Modem
connection.
• Do not use the supplied power cord for any purpose other
Router
• Use only the furnished accessory connecting cable.
than that described below.
WAN
• Certain settings are required to use a wireless LAN
• The receiver should be disconnected by removing the
converter (AXF7031). For instructions on making these
mains plug from the wall socket when not in regular use,
Computer
LAN
settings, see the operating instructions included with the
e.g., when on vacation.
1
wireless LAN converter (AXF7031).
• Make sure the blue
u
STANDBY/ON
light has gone out
2
LAN
(
10/100
)
for WIRELESS LAN
DC OUTPUT
before unplugging.
LAN
(
10/100
)
DC OUTPUT
(
OUTPUT 5 V
0.6 A MAX
)
3
for WIRELESS LAN
1
Plug the supplied power cord into the AC IN
(
OUTPUT 5 V
socket on the back of the receiver.
LAN cable (sold separately)
0.6 A MAX
)
2
Plug the other end into a power outlet.
LAN
10/100
(
)
for WIRELESS LAN
DC OUTPUT
Modem
Internet
OUTPUT 5 V
(
LAN
(
10/100
)
Router
0.6 A MAX
)
for WIRELESS LAN
DC OUTPUT
Turning the power on
OUTPUT 5 V
(
WAN
Press
u
STANDBY/ON
to switch on the receiver and your
0.6 A MAX
)
computer.
Wait a few minutes after turning the power on before
performing the following operation.
STANDBY/ON
Wireless LAN converter (AXF7031)
Plugging in the receiver
After connecting to a LAN, connect the power cord of the
receiver to a power outlet.
CAUTION
• Handle the power cord by the plug part. Do not pull out
the plug by tugging the cord, and never touch the power
cord when your hands are wet, as this could cause a short
circuit or electric shock. Do not place the unit, a piece of
furniture, or other object on the power cord or pinch the
cord in any other way. Never make a knot in the cord or tie
it with other cables. The power cords should be routed so
that they are not likely to be stepped on. A damaged power
cord can cause a fire or give you an electric shock. Check
the power cord once in a while. If you find it damaged,
3
SELECTOR
