Pioneer DEH-150MP: Troubleshooting Error messages
Troubleshooting Error messages: Pioneer DEH-150MP
Table of contents
- About this unit Head unit In case of trouble Display indication Set up menu
- Frequently used menu operations Basic operations
- Tuner
- Audio adjustments CD/CD-R/CD-RW
- System menu
- Switching the dimmer setting System menu Initial menu
- Connections Using an AUX source
- Installation DIN front/rear mount
- Troubleshooting Error messages
- Handling guidelines Compressed audio compatibility
- Specifications Russian character chart Copyright and trademark Sequence of audio files
Section
03
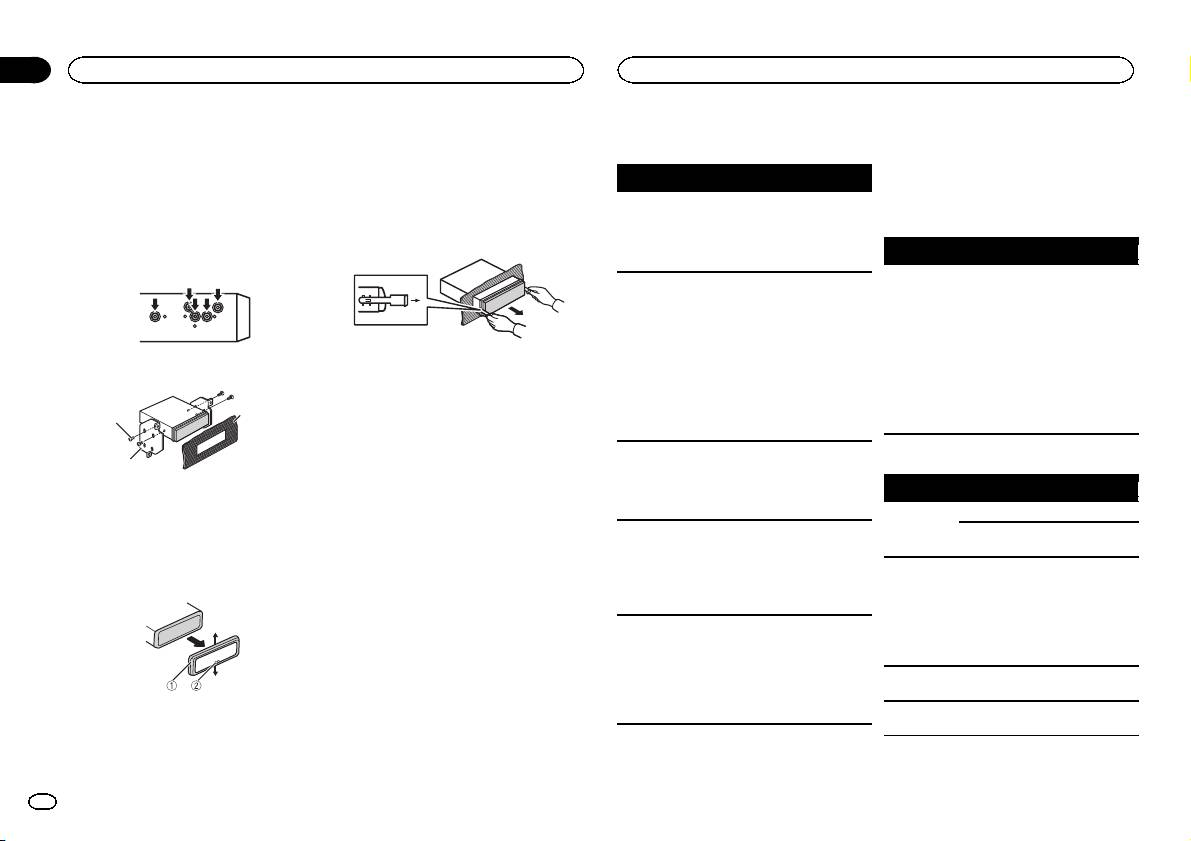
Installation
Additional information
2 Mounting sleeve
! When reattaching the trim ring, point the
Troubleshooting
Error messages
# Make sure that the unit is installed securely in
side with the notched tab down.
place. An unstable installation may cause skipping
When you contact your dealer or your nearest
or other malfunctions.
2 Insert the supplied extraction keys into
Symptom Cause Action
Pioneer Service Center, be sure to note the error
both sides of the unit until they click into
message.
The display
You did not per-
Perform operation
place.
DIN Rear-mount
automatically
form any opera-
again.
Common
returns to the
tion within
1 Determine the appropriate position
3 Pull the unit out of the dashboard.
ordinary dis-
about 30 sec-
where the holes on the bracket and the side
Message Cause Action
play.
onds.
of the unit match.
AMP ERROR Unit fails to op-
Check the speak-
The repeat
Depending on
Select the repeat
erate or speaker
er connection. If
play range
the repeat play
play range again.
connection is
the message fails
changes un-
range, the se-
incorrect; pro-
to disappear even
expectedly.
lected range
tective circuit is
after the engine is
may change
activated.
switched off/on,
when another
contact your deal-
2 Tighten two screws on each side.
Removing and re-attaching the front
folder or track is
er or an author-
panel
being selected
ized Pioneer
or during fast
You can remove the front panel to protect your
Service Station
3
1
forwarding/re-
unit from theft.
for assistance.
versing.
Press the detach button and push the front
panel upward and pull it toward you.
A subfolder is
Subfolders can-
Select another re-
2
For details, refer to Removing the front panel to
not played
not be played
peat play range.
CD player
protect your unit from theft and Re-attaching the
back.
when FLD (fold-
Message Cause Action
1 Tapping screw (5 mm × 8 mm)
front panel on page 3.
er repeat) is se-
2 Mounting bracket
lected.
ERROR-07,
The disc is dirty. Clean the disc.
3 Dashboard or console
NO XXXX ap-
There is no em-
Switch the display
11, 12, 17, 30
The disc is
Replace the disc.
pears when a
bedded text in-
or play another
scratched.
Removing the unit
display is
formation.
track/file.
ERROR-07,
There is an elec-
Turn the ignition
changed (NO
1 Remove the trim ring.
10, 11, 12,
trical or me-
switch OFF and
TITLE, for ex-
15, 17, 30,
chanical error.
back ON, or
ample).
A0
switch to a differ-
The unit is
You are using a
Move electrical
ent source, then
malfunction-
device, such as
devices that may
back to the CD
ing.
a cellular
be causing the in-
player.
There is inter-
phone, that
terference away
ERROR-15 The inserted
Replace the disc.
ference.
transmits elec-
from the unit.
disc is blank.
tric waves near
1 Trim ring
the unit.
ERROR-23 Unsupported
Replace the disc.
2 Notched tab
CD format.
! Releasing the front panel allows easier ac-
cess to the trim ring.
10
En
