Pioneer X-HM20-S: System connections
System connections: Pioneer X-HM20-S
Table of contents
- Operating Environment VENTILATION CAUTION
- Condensation
- Introduction Accessories CONTENTS
- Precautions Controls and indicators
- Controls and indicators (continued)
- System connections
- System connections (continued) Remote control
- General control
- Setting the clock (Remote control only) (continued)
- Listening to the iPod, iPhone or iPad (X-HM20 only) (continued)
- Listening to the iPod, iPhone or iPad (X-HM20 only) (continued)
- Listening to a CD or MP3/WMA disc
- Advanced CD or MP3/WMA disc playback
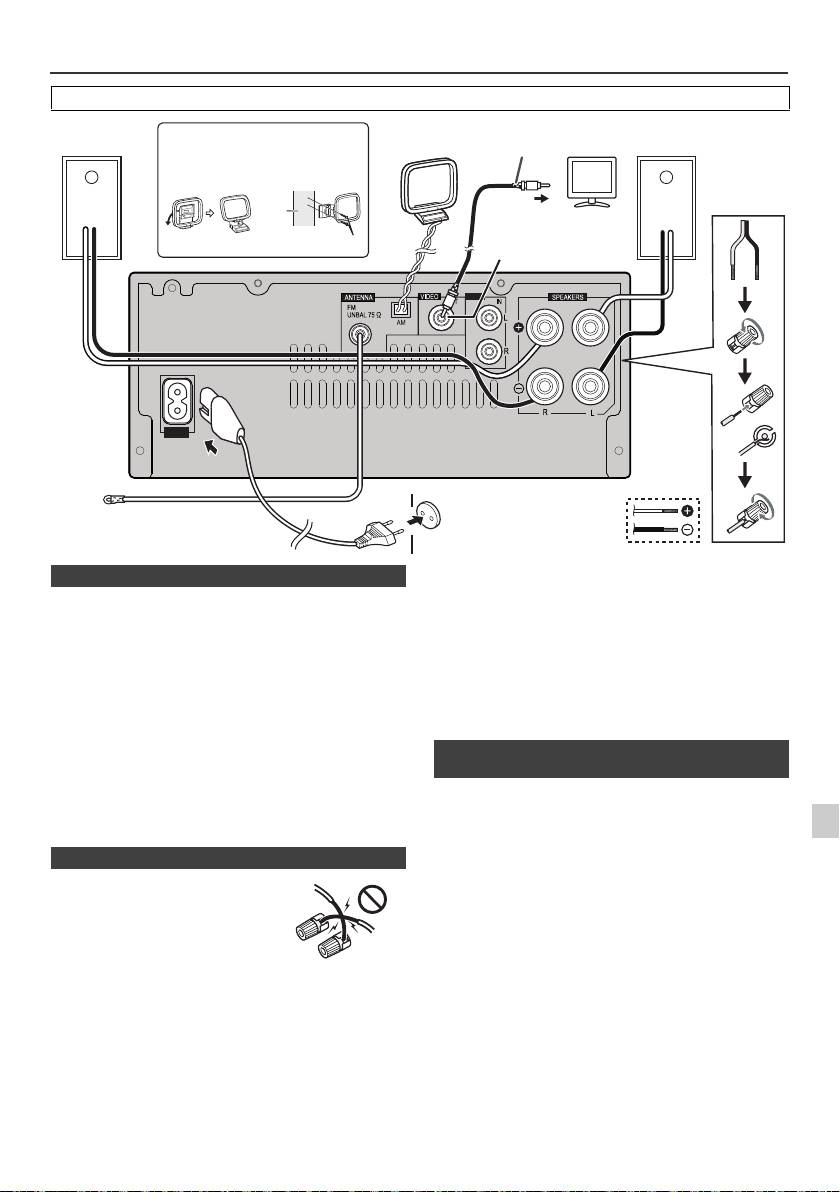
System connections
Before making or changing the connections, switch off the power and disconnect the power cord from the AC outlet.
Supplied FM aerial:
Connect the FM aerial wire to the FM 75 ohms socket and
position the FM aerial wire in the direction where the
strongest signal can be received.
External FM aerial:
Use an external FM aerial (75 ohms coaxial cable) for
better reception. When an external FM aerial is used,
disconnect the supplied FM aerial wire.
Supplied AM loop aerial:
Connect the AM loop aerial to the AM terminal. Position
the AM loop aerial for optimum reception. Place the AM
loop aerial on a shelf, etc., or attach it to a stand or a wall
with screws (not supplied).
Note:
Placing the aerial on the unit or near the AC power lead
Photo and video files from iPod or iPhone can be viewed
may cause noise pickup. Place the aerial away from the
by connecting the system to TV/monitor.
unit for better reception.
If the TV/monitor has a video input, connect it to the
1
VIDEO OUT socket at the back of the unit and set the TV
Out on the iPod or iPhone unit to “ON” position.
2
Note:
Please make sure to set iPod unit to either NTSC or PAL
to match your TV signal. Please visit Apple’s homepage
3
for further information.
4
5
6
7
8
9
En-7
11/5/25 X-HM10_20_En.fm
LINE
AUX
LOOP
AC IN
Video cable
Right
Installing the AM loop aerial
AM loop
Left
TV
(not supplied)
speaker
aerial
speaker
< Attaching
< Assembling >
to the wall >
wall
To video input socket
Video out socket
screws (not supplied)
(X-HM20 only)
Wall socket
(AC 220 V to 240 V,
FM aerial
50 Hz/60 Hz)
n Aerial connection
n Speaker connection
l
Twist exposed wire strands together.
l Connect the red wire to the plus
(+) terminal, and other wire to the
minus (–) terminal.
l Use speakers with an impedance
of 4 ohms ohms, as lower
impedance speakers can damage
the unit.
Incorrect
l
These speaker terminals carry HAZARDOUS LIVE voltage.
To prevent the risk of electric shock when connecting or
disconnecting the speaker cables, disconnect the power
cord before touching any uninsulated parts.
l Do not attach these speakers to the wall or ceiling, as
they may cause injury in the event of a fall.
l
Do not mistake the right and the left channels. The right
speaker is the one on the right side when you face the
unit.
l Do not let the bare speaker wires touch each other.
l Do not allow any objects to fall into or to be placed in
the bass reflex ducts.
l
Do not stand or sit on the speakers. You may be injured.
n Connecting iPod or iPhone to TV
(X-HM20 only)
