Pioneer X-HM20-S: Advanced CD or MP3/WMA disc playback
Advanced CD or MP3/WMA disc playback: Pioneer X-HM20-S
Table of contents
- Operating Environment VENTILATION CAUTION
- Condensation
- Introduction Accessories CONTENTS
- Precautions Controls and indicators
- Controls and indicators (continued)
- System connections
- System connections (continued) Remote control
- General control
- Setting the clock (Remote control only) (continued)
- Listening to the iPod, iPhone or iPad (X-HM20 only) (continued)
- Listening to the iPod, iPhone or iPad (X-HM20 only) (continued)
- Listening to a CD or MP3/WMA disc
- Advanced CD or MP3/WMA disc playback
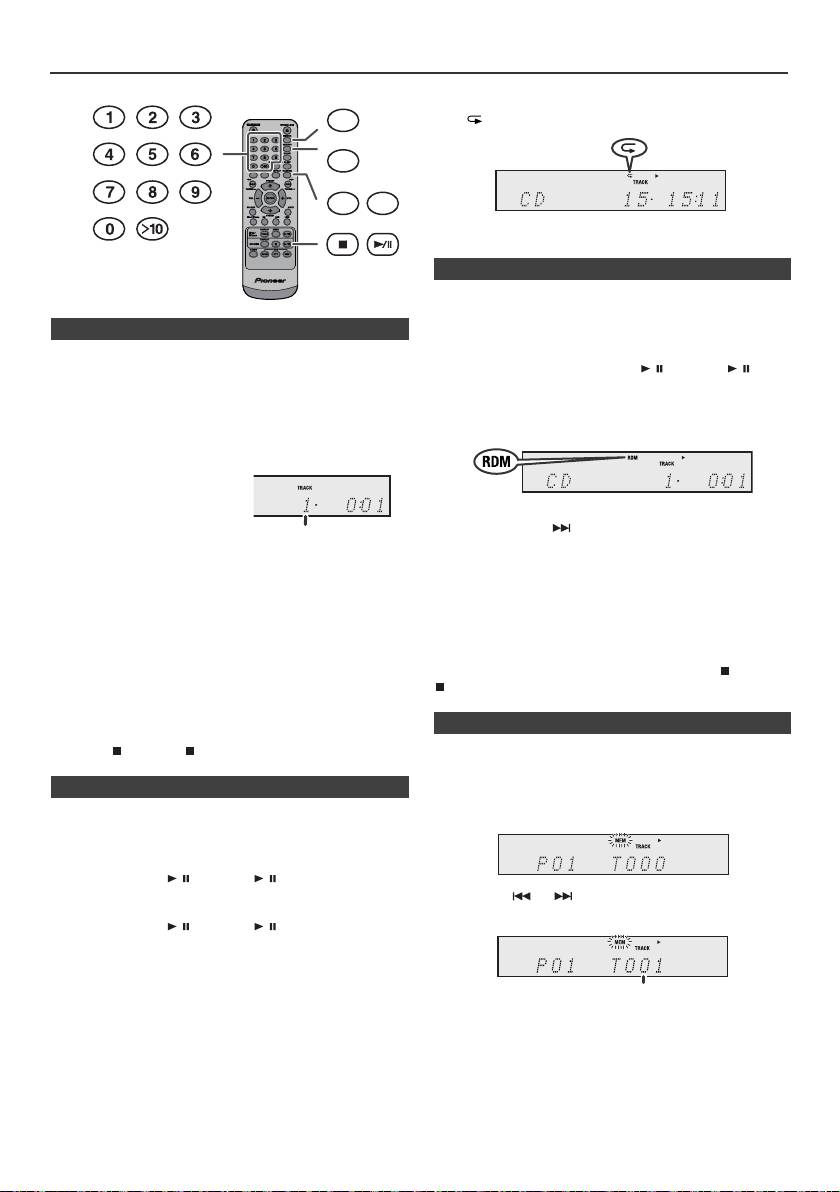
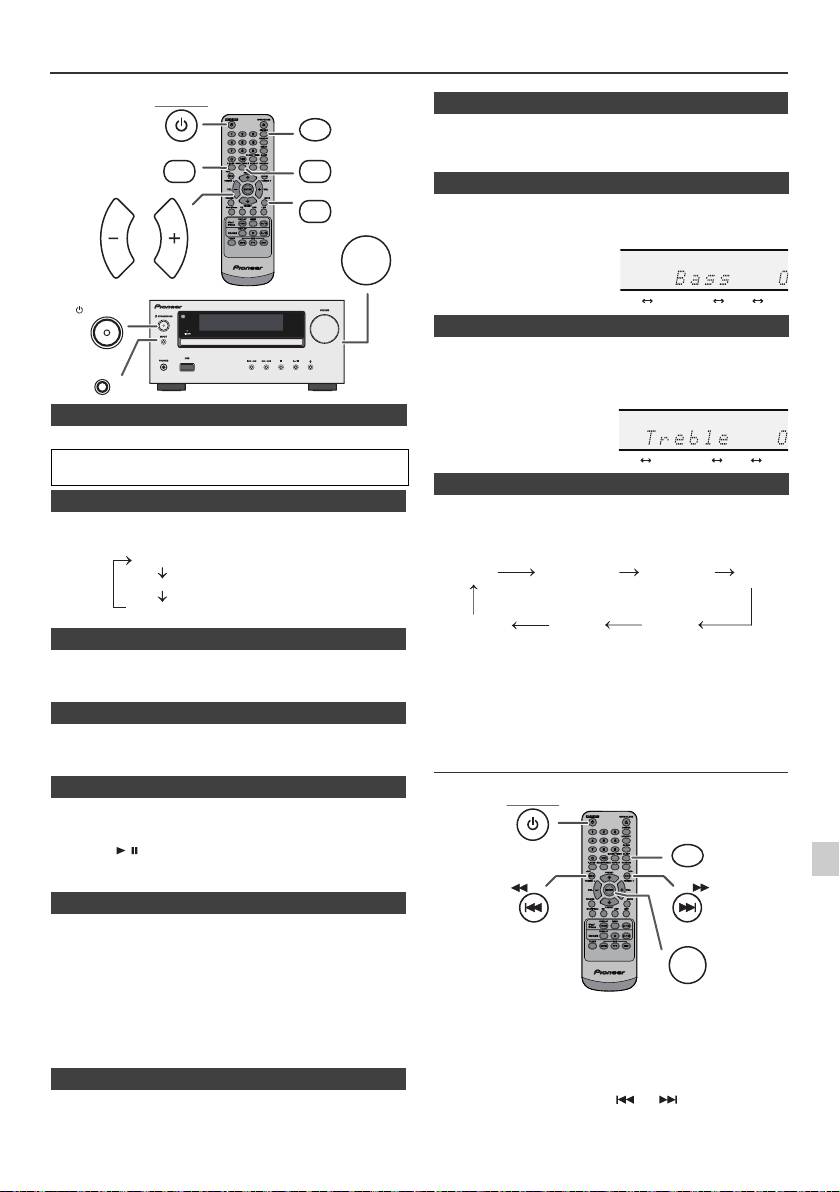
Advanced CD or MP3/WMA disc playback
To cancel repeat play:
DIMMER
Press the REPEAT button repeatedly until “Normal” appears
and “ ” disappears.
MEMORY
REPEAT
RANDOM
Note:
During repeat play, random play is not possible.
The tracks on the disc can be played in random order
automatically.
n Direct track search
To random play all tracks:
By using the Numeric buttons, the desired tracks on the
Press and hold down RANDOM button on the remote control
current disc can be played.
until “Random” appears. Press the / (CD/USB / )
Use the Numeric buttons on the remote control to select
button.
the desired track whilst playing the selected disc.
To cancel random play:
l
The Numeric buttons allow you to select up to number 9.
Press the RANDOM button until “RDM” indicator disappears.
l
When selecting number 10 or higher, use the “>10”
button.
A. For example, to choose 13
1
Press the “>10” button once.
2
Press the “1” button.
Notes:
l
If you press the button during random play, you can
3
Press the “3” button.
move to the track selected next by the random operation.
On the other hand, the button does not allow you to move
B. For example, to choose 130
to the previous track. The beginning of the track being
1
Press the “>10” button twice.
played will be located.
l
In random play, the unit will select and play tracks
2
Press the “1” button.
automatically. (You cannot select the order of the tracks.)
3
Press the “3” button.
l
During random play, repeat play is not possible.
4
Press the “0” button.
Caution:
Notes:
After performing repeat play, be sure to press the (CD/USB
l
A track number higher than the number of tracks on the
) button. Otherwise, the disc will play continuously.
disc cannot be selected.
l
During random play, direct search is not possible.
To stop playback:
Press the (CD/USB ) button.
You can choose up to 32 selections for playback in the order
you like.
n Repeat play
Repeat play can play one track, all tracks or a programmed
sequence continuously.
To repeat one track:
Press the REPEAT button repeatedly until “Repeat One”
appears. Press the / (CD/USB / ) button.
To repeat all tracks:
Press the REPEAT button repeatedly until “Repeat All”
appears. Press the / (CD/USB / ) button.
To repeat desired tracks:
Perform steps 1 - 5 in “Programmed play” section on this
page and then press the REPEAT button repeatedly until
“Repeat All” appears.
En-14
11/5/25 X-HM10_20_En.fm
Selected track number
n Random play
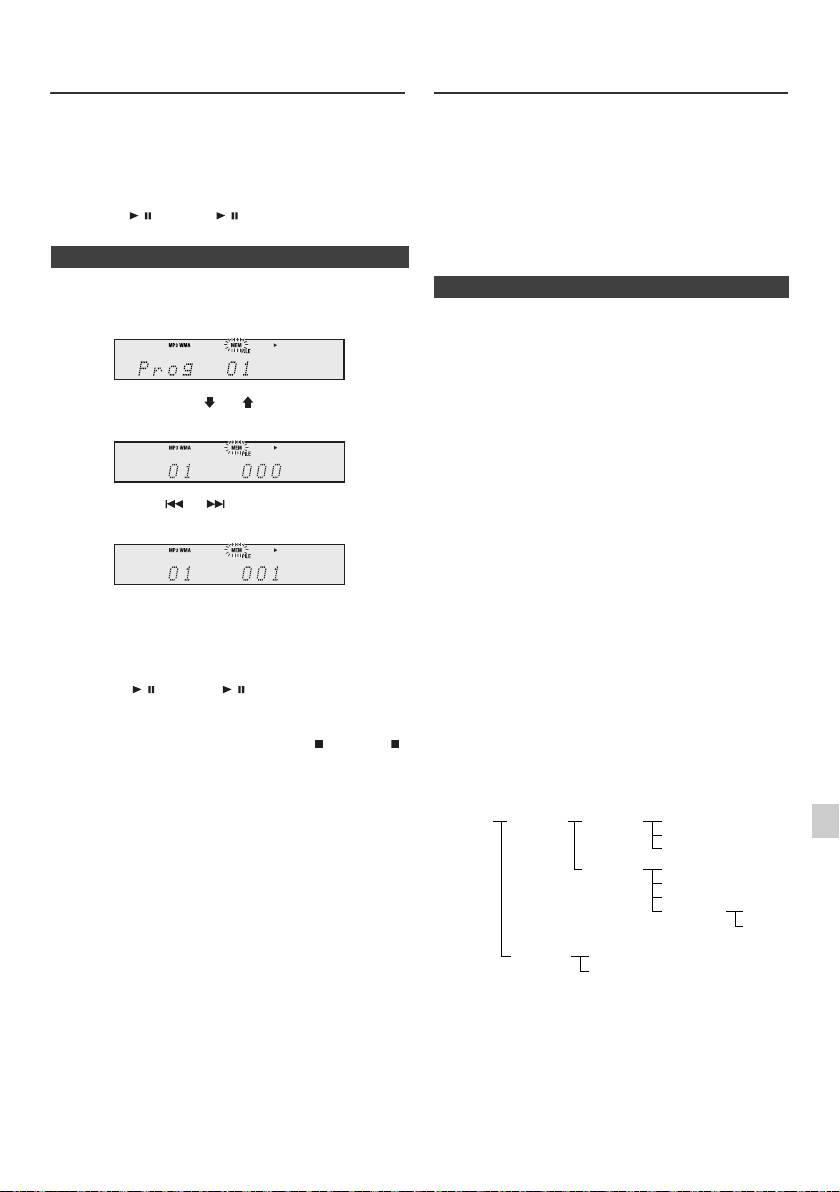
n Programmed play (CD)
1
Whilst in the stop mode, press the MEMORY button on the
remote control to enter the programming save mode.
2
Press the or buttons on the remote control to
select the desired track.
3
Press the MEMORY button to save the track number.
Selected track number
Advanced CD or MP3/WMA disc
MP3/WMA folder mode (only for MP3/
playback (continued)
WMA files)
To play back MP3/WMA (Windows Media Audio) file
4 Repeat steps 2 - 3 for other tracks. Up to 32 tracks can
There are many music sites on the internet that you can
be programmed. If you want to check the programmed
download MP3/WMA (Windows Media Audio) music files.
tracks, press the MEMORY button repeatedly. If you
Follow the instructions from the website on how to
make a mistake, the programmed tracks can be cleared
download the music files. You can then play back these
by pressing the CLEAR button.
downloaded music files by burning them to a CD-R/RW
disc.
5
Press the / (CD/USB / ) button to start playback.
l Your downloaded song/files are for personal use only.
Any other usage of the song without owner’s
permission, is against the law.
n Programmed play (MP3/WMA)
n About folder playback order
1
Whilst in the stop mode, press the MEMORY button to
enter the programming save mode.
If MP3/WMA files are recorded in several folders, a folder
number will be set to each folder automatically.
These folders can be selected by the FOLDER button on
the remote control. If there is no supported file formats
inside the selected folder, the folder is skipped and the
2 Press the PRESET
(
or
)
button on the remote
next folder will be selected.
control to select the desired folder.
Example: How to set folder number if MP3/WMA format
files are recorded as below figure.
1
ROOT folder is set as folder 1.
2 As for folders inside ROOT folder (Folder A and Folder
Then press the or button on the remote control
B), the folder which is recorded earlier on the disc will be
to select the desired tracks.
set as folder 2 and folder 3.
3 As for folder inside Folder A (Folder C and Folder D), the
folder which is recorded earlier on the disc will be set as
folder 4 and folder 5.
3 Press the MEMORY button to save the folder and track
4 Folder E that is inside Folder D will be set as folder 6.
number.
l The folder and file order information which is recorded
4 Repeat steps 2 - 3 for other folder/tracks. Up to 32
on the disc depends on the writing software. There
tracks can be programmed.
maybe possibilities that this unit will playback the files
not according to our expected playback order.
5 Press the / (CD/USB / ) button to start playback.
l For CD MP3/WMA, 99 numbers of folders and 999 files
inclusive of the folders which have non playable files
can be read.
To cancel the programmed play mode :
During programmed stop mode, press the (CD/USB )
Folder mode on/off can be operated by the FOLDER
button. The display will show “Memory Clear” and all the
button on the remote control. Files that are played when
programmed contents will be cleared.
folder mode is set to the on position, may differ from those
played back when folder mode is turned off.
Adding tracks to the programme:
If a programme has been previously stored, the “MEM”
1
indicator will be displayed. Press the MEMORY button.
Then follow steps 2 - 3 to add tracks.
2
Notes:
l When a disc is ejected, the programme is automatically
3
cancelled.
l If you press the STANDBY/ON button to enter the
stand-by mode or change the function from CD to
4
another, the programmed selections will be cleared.
l During the programme operation, random play is not
possible.
5
6
7
8
9
En-15
11/5/25 X-HM10_20_En.fm
ROOT
FOLDER A
FOLDER C
FILE 3
(FOLDER 1)
(FOLDER 2)
(FOLDER 4)
FILE 4
FILE 5
FOLDER D
FILE 6
(FOLDER 5)
FILE 7
FILE 8
FOLDER E
FILE 9
(FOLDER 6)
FILE 10
FOLDER B
FILE 1
(FOLDER 3)
FILE 2
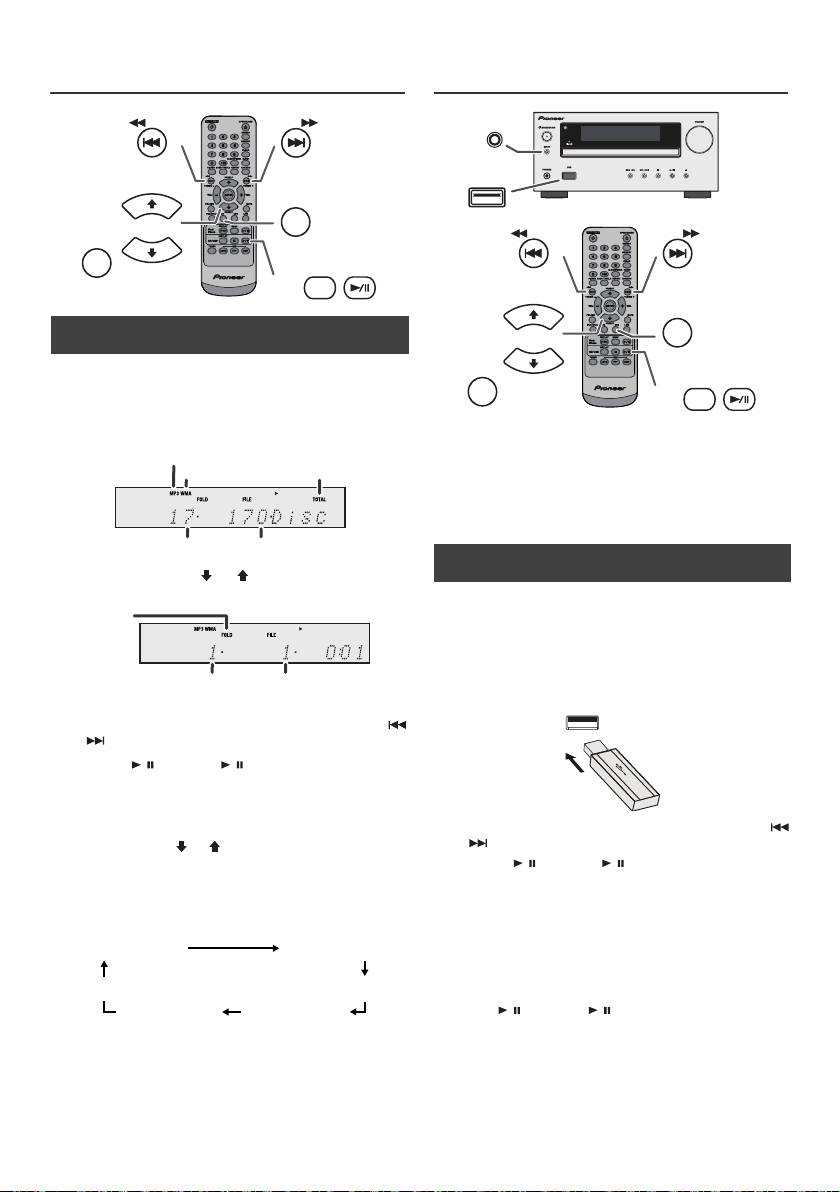
MP3/WMA folder mode (only for MP3/
Listening to USB mass storage
WMA files) (continued)
device/MP3 player
TUNING −
TUNING +
PRESET
CD
FOLDER
PRESET
DISPLAY
CD/USB
n Procedure to playback MP3/WMA disc with
folder mode on
To play back CD-R/RW.
1
Press the CD button, and load an MP3/WMA disc.
Press the FOLDER button and disc info will be
Notes:
displayed.
l This product is not compatible with MTP and AAC file
systems from USB mass storage device or MP3
player.
l Some external storage devices may not operate with
this system.
l Operation of external storage devices (USB memory
devices, external hard disks, etc.) is not guaranteed.
2 Press the PRESET
(
or
)
button to select desired
playback folder. (Folder mode on)
3 Select desired file to be played back by pressing the
or button.
4 Press the / (CD/USB / ) button. Playback will start
and file name will be displayed.
l Title, Artist and Album name are displayed if they are
recorded on the disc.
l In case of playback with the folder mode on, press
the PRESET
(
or
)
button, and the folder can be
selected even though it is in playback/pause mode.
It will continue playback/pause mode in the 1st track
of the selected folder.
l Display content can be changed by pressing the CD/
USB DISPLAY button.
Note:
To pause playback:
Press the / (CD/USB / ) button.
Note:
If “Not Support” is displayed, it means “Copyright
protected WMA file” or “Not supported playback file” is
selected.
En-16
11/5/25 X-HM10_20_En.fm
MP3 indicator
WMA indicator
TOTAL indicator
Total number of folder
Total number of files
FOLDER
indicator
FOLDER number
First track number
in the folder
File name display Folder display
Counter display
Title display
Album display
Artist display
n To play back USB/MP3 player with folder
mode off
1
Press the USB button on the remote control or INPUT
button repeatedly on main unit to select USB function.
Connect the USB memory device that has MP3/WMA
format files on the unit. When the USB memory is
connected to the main unit, the device information will
be displayed.
2 Select desired file to be played back by pressing the
or button.
3 Press the / (CD/USB / ) button. Playback will start
and the file name will be displayed.
l Title, Artist and Album name are displayed if they are
recorded in the USB memory device.
l Display content can be changed by pressing the CD/
USB DISPLAY button.
INPUT
USB
TUNING −
TUNING +
PRESET
USB
FOLDER
PRESET
DISPLAY
CD/USB
l This product can play WMA and MP3 files. It will
Listening to USB mass storage
automatically detect the file type being played. If
device/MP3 player (continued)
unplayable file is played on this product, “Not Support”
is indicated and the file will be automatically skipped.
This will take a few seconds. If abnormal indications
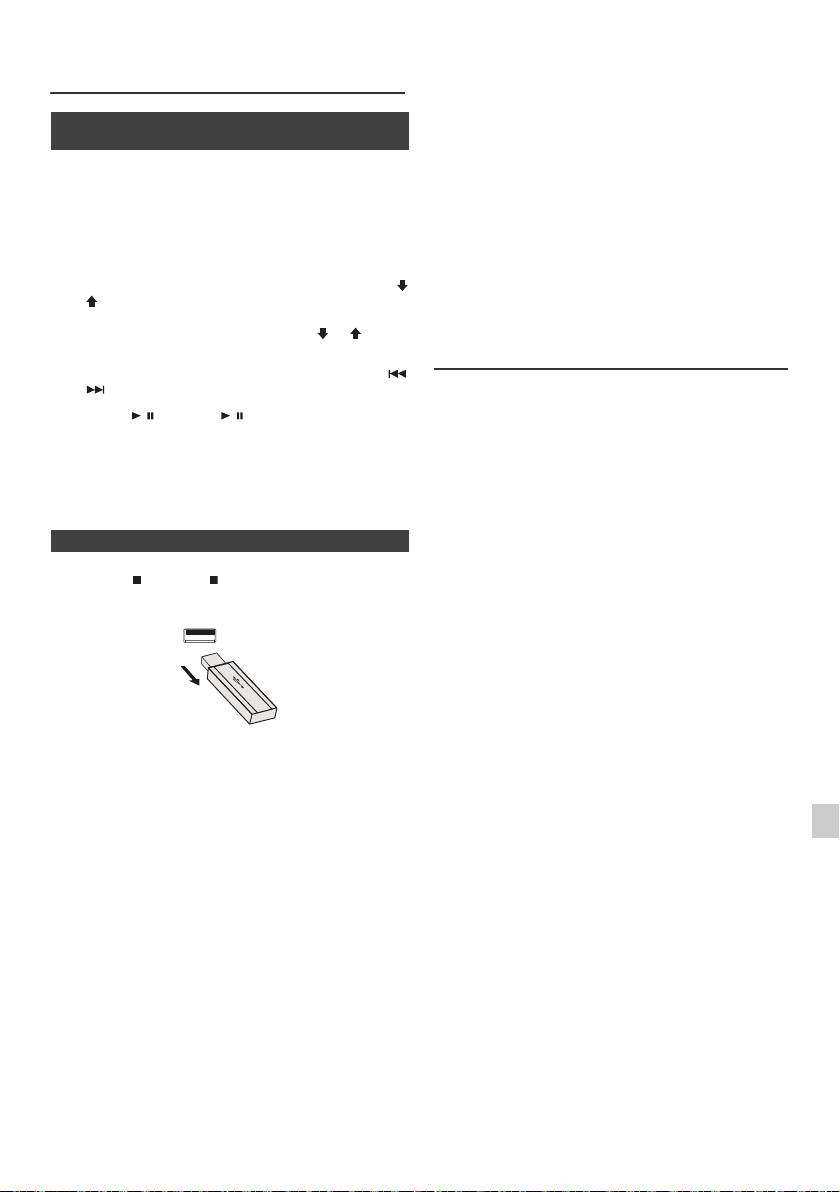
n To play back USB/MP3 player with folder
appear on the display due to the unspecified file, turn
mode on
off the unit and then turn it on again.
l This product relates to USB mass storage devices and
1
Press the USB button on the remote control or INPUT
MP3 players. It may however face some irregularities
button repeatedly on main unit to select USB function.
due to various unforeseen reasons from some devices.
Connect the USB memory device that has MP3/WMA
Should this happen, turn off the unit and then turn it on
format files on the unit. When the USB memory is
again.
connected to the main unit, the device information will
l The USB port is only intended for direct connection to
be displayed.
a USB memory device without any cable.
2 Press the FOLDER button, and press the PRESET
(
l During CD function, MP3 player will not be charging.
or
)
button to select desired playback folder. To start
l “Not support” will be displayed if you connect an iPod
playback with folder mode on, go to step 4. To change
to USB terminal when the USB function is selected.
the playback folder, press the PRESET
(
or
)
button
to select another folder.
Advanced USB playback
3 Select desired file to be played back by pressing the
or button.
The following functions are the same as CD
operations:
4 Press the / (CD/USB / ) button. Playback will start
Page
and the file name will be displayed.
Direct track search . . . . . . . . . . . . . . . . . . . . . . . . . . .14
l Title, Artist and Album name are displayed if they are
Repeat play . . . . . . . . . . . . . . . . . . . . . . . . . . . . . . . . .14
recorded in the USB memory device.
Random play . . . . . . . . . . . . . . . . . . . . . . . . . . . . . . . .14
Programmed play (MP3/WMA). . . . . . . . . . . . . . . . . .15
l Display content can be changed by pressing the CD/
USB DISPLAY button.
Notes:
l If USB memory device is not connected, “USB No
Media” will be shown on the display.
n To remove USB memory device
l This unit only supports “MPEG-1 Audio Layer-3”
format. (Sampling Frequency is 32 kHz, 44.1 kHz, 48
1
Press the (CD/USB ) button to stop playback.
kHz)
l Playback order for MP3 files may differ depending on
2 Disconnect USB memory device from the USB terminal.
the writing software used during file download.
l Bitrate which is supported by MP3 is 32 kbps to 320
kbps, WMA is 64 kbps to 160 kbps.
l For MP3/WMA files, please put “.MP3” “.WMA”
extension. Files cannot be played back if there is no
MP3/WMA extension.
l Playlists are not supported on this unit.
l This unit can display Folder Name or File Name up to
32 characters.
l Maximum total number of MP3/WMA files is 999.
Notes:
l Total number of folders read is 99 including folder with
l PIONEER will not be held liable for the loss of data
non-playable file. However, the display shows only
whilst the USB memory device is connected to the
folder with MP3 files.
audio system.
l The display playback time may not be displayed
l Files compressed in MP3 and/or WMA format can be
correctly when playing back a variable bitrate file.
played back when connected to the USB terminal.
1
l The ID3TAG information supported are TITLE,
l This USB memory’s format supports FAT 16 or FAT
ARTIST and ALBUM only. Title name, artist name and
32.
album name can be displayed by pressing the
2
l PIONEER cannot guarantee that all USB memory
DISPLAY button during file playback or pause mode.
devices will work on this audio system.
l WMA meta tag also supports title, artist and album
l USB cable is not recommended for use in this audio
3
name which are recorded in WMA files. Copyright
system to connect to USB memory device. Use of the
protected WMA files cannot be played back.
USB cable will affect the performance of this audio
system.
4
l This USB memory cannot be operated via USB hub.
l The USB terminal in this unit is not intended for a PC
5
connection but is used for music streaming with a USB
memory device.
6
l External HDD-storage cannot be played back via USB
terminal.
l If the data inside the USB memory is large, it may take
7
longer time for the data to be read.
8
9
En-17
11/5/25 X-HM10_20_En.fm
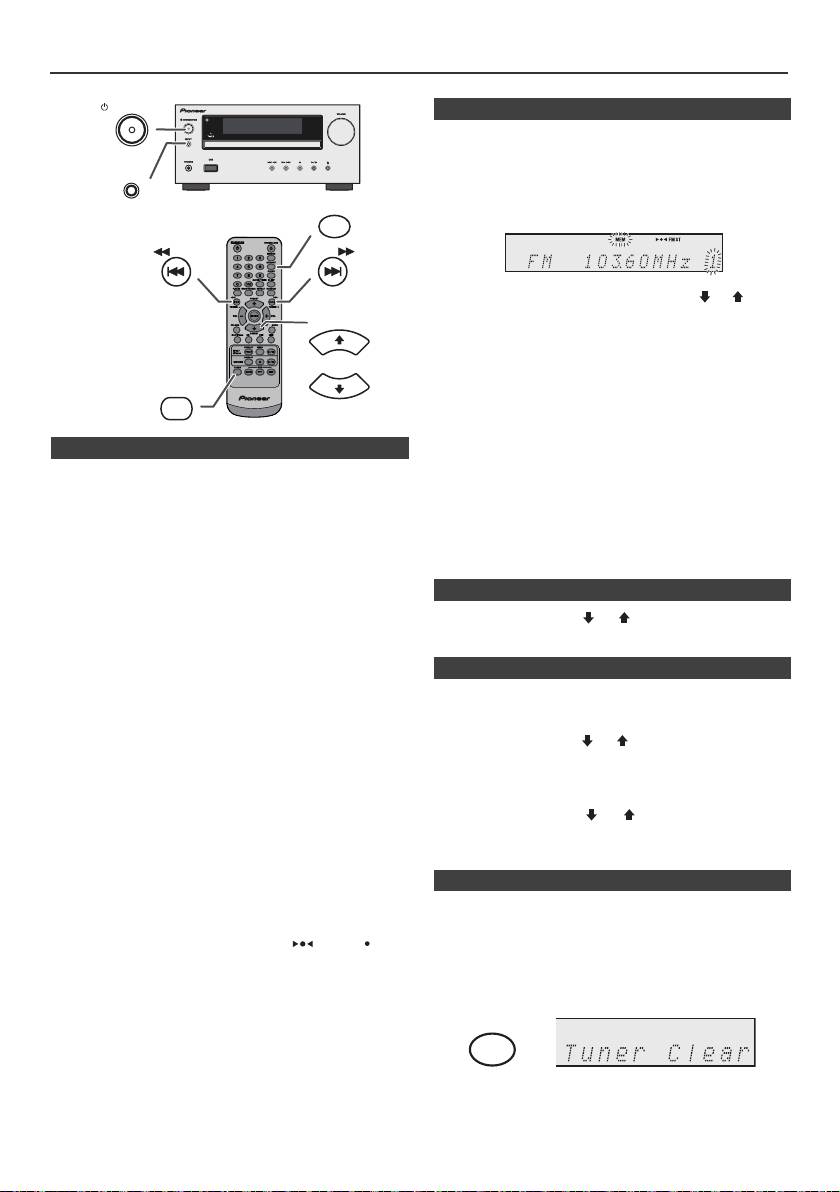
Listening to the radio
STANDBY/ON
n Memorising a station
You can store 40 AM and FM stations in memory and
recall them at the push of a button. (Preset tuning)
INPUT
1
Perform steps 1 - 3 in “Tuning”.
MEMORY
2 Press the MEMORY button.
TUNING −
TUNING +
3 Within 30 seconds, press the PRESET
(
or
)
button
to select the preset channel number. Store the stations
PRESET
in memory, in order, starting with preset channel 1.
4 Within 30 seconds, press the MEMORY button to store
that station in memory. If the “MEMORY” and preset
number indicators disappear before the station is
TUNER
PRESET
memorised, repeat the operation from step 2.
5 Repeat steps 1 - 4 to set other stations, or to change a
preset station. When a new station is stored in the
n Tuning
memory, the station previously memorised for that
preset channel number will be erased.
1
Press the STANDBY/ON button to turn the power on.
Note:
2 Press the TUNER button repeatedly to select the
The backup function protects the memorised stations for a
desired frequency band (FM or AM).
few hours should there be a power failure or the AC power
3 Press the TUNING + or - button on the remote control to
lead become disconnected.
tune in to the desired station.
l Manual tuning:
n To recall a memorised station
Press the TUNING
+
or - button repeatedly to tune in
1 Press the PRESET
(
or
)
button for less than 0.5
to the desired station.
seconds to select the desired station.
l Auto tuning:
When the TUNING + or - button is pressed for more
n To scan the preset stations
than 0.5 seconds, scanning will start automatically
and the tuner will stop at the first receivable
The stations saved in the memory can be scanned
broadcast station.
automatically. (Preset memory scan)
Notes:
1
Press the PRESET
(
or
)
button for more than 0.5
l When radio interference occurs, auto scan tuning may
seconds. The preset number will flash and the
stop automatically at that point.
programmed stations will be tuned in sequentially, for 5
l Auto scan tuning will skip weak signal stations.
seconds each.
l To stop the auto tuning, press the TUNING + or - button
again.
2 Press the PRESET
(
or
)
button again when the
l When an RDS (Radio Data System) station is tuned in,
desired station is located.
the frequency will be displayed first, and then the RDS
indicator will light up. Finally, the station name will
appear.
l Full auto tuning can be achieved for RDS stations
n To erase entire preset memory
“ASPM”, see page 19.
To receive an FM stereo transmission:
1
Press the TUNER button on remote control or press the
l Press the TUNER button to select stereo mode and
INPUT button on main unit repeatedly to select Tuner
“ST” indicator will be displayed. “ ” and “ ” will
function.
appear when an FM broadcast is in stereo.
l If the FM reception is weak, press the TUNER button
2 In Tuner function, press the CLEAR button until “Tuner
to extinguish the “ST” indicator. The reception changes
Clear“ appears.
to monaural, and the sound becomes clearer.
En-18
11/5/25 X-HM10_20_En.fm
CLEAR
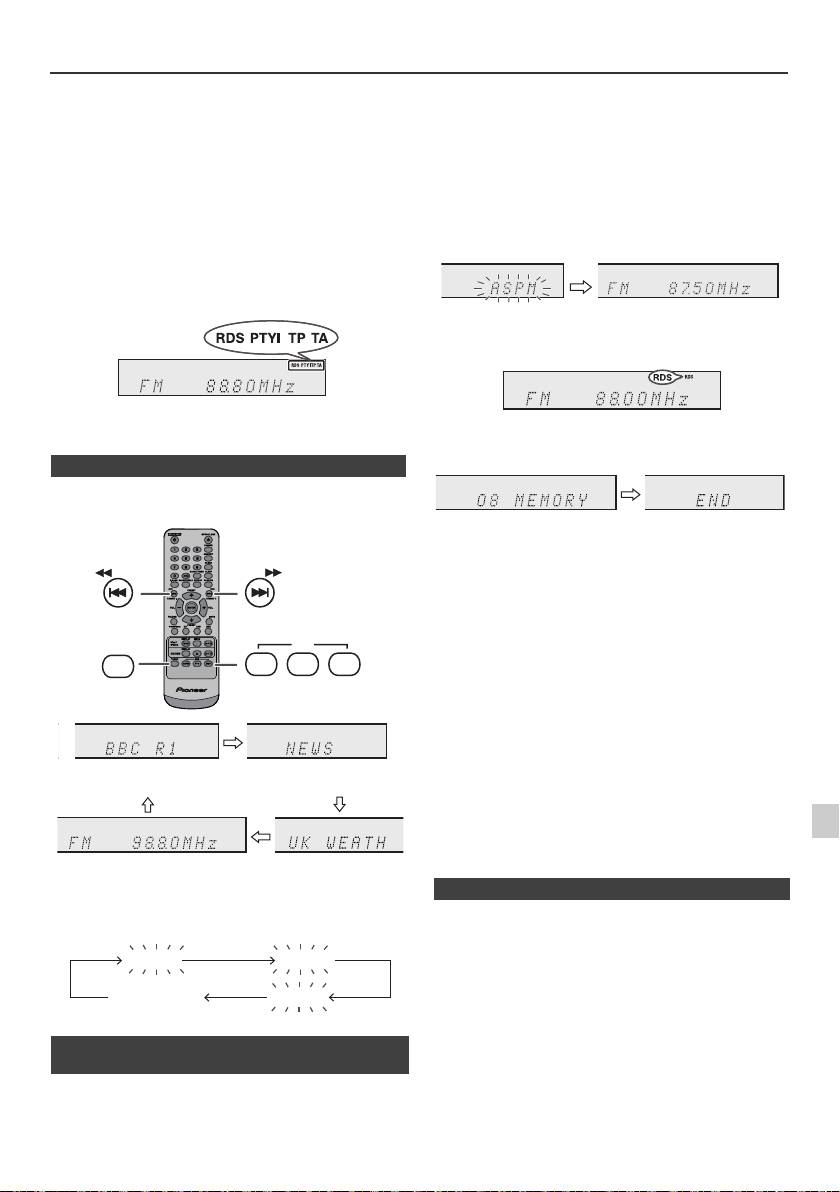
Using the Radio Data System (RDS)
RDS is a broadcasting service which a growing
If you have already stored some stations in memory, the
number of FM stations provide. These FM stations
number of new stations you can store will be less.
send additional signals along with their regular
programme signals. They send their station names,
and information about the type of programme such as
sport, music, etc.
When tuned to an RDS station, “RDS” and the station
name will be displayed.
“TP” (Traffic Programme) will appear on the display when
the received broadcast carries traffic information, and “TA”
(Traffic Announcement) will appear whilst a traffic
information is on air.
“PTYI” (Dynamic PTY Indicator) will appear whilst the
Dynamic PTY station is received.
You can control the RDS by using the buttons on the
remote control only.
n Information provided by RDS
Each time the RDS DISPLAY button is pressed, the
display will switch as follows:
To stop the ASPM operation before it is complete:
Press the RDS ASPM button whilst it is scanning for
stations.
The stations which are already stored in memory will be
kept there.
Notes:
l If the same station is broadcasting on different
frequencies, the strongest frequency will be stored in
memory.
l Any station which has the same frequency as the one
stored in memory will not be stored.
l If 40 stations have already been stored in memory, the
scan will be aborted. If you want to redo the ASPM
operation, erase the preset memory.
l If no station have been stored in memory, “END” will
appear for about 4 seconds.
l If the RDS signals are very weak, station names may
not be stored in memory.
l The same station name can be stored in different
1
channels.
l In a certain area or during certain time periods, the
station names may temporarily be different.
2
When tuning in to a station other than an RDS station or
to an RDS station which sends weak signal, the display
3
If any of the following events occur, it does not mean
will change in the following order:
that the unit is faulty:
4
l “PS”, “No PS” and a station name appear alternately,
and the unit does not operate properly.
l If a particular station is not broadcasting properly or a
5
station is conducting tests, the RDS reception function
may not work properly.
6
l When you receive an RDS station whose signal is too
weak, information like the station name may not be
n Using the Auto Station Programme
displayed.
7
Memory (ASPM)
l “No PS”, “No PTY” or “No RT” will flash for about 5
seconds, and then the frequency will be displayed.
Whilst in the ASPM operation mode, the tuner will
8
automatically search for new RDS stations. Up to 40
stations can be stored.
9
En-19
11/5/25 X-HM10_20_En.fm
TUNING −
TUNING +
RDS
TUNER
ASPM PTY DISP
Station name (PS) Programme type (PTY)
Frequency Radio text (RT)
No PS No PTY
FM 98.80 MHz
No RT
1 Press the TUNER button on the remote control or
INPUT button repeatedly on the main unit to select
TUNER function.
2 Press and hold down the RDS ASPM button on the
remote control.
1 After “ASPM” has flashed for about 4 seconds,
scanning will start (87.50 - 108.00 MHz).
2 When an RDS station is found, “RDS” will appear
for a short time and the station will be stored in
memory.
3 After scanning, the number of stations stored in
memory will be displayed for 4 seconds, and then
“END” will appear for 4 seconds.
n Notes for RDS operation
Using the Radio Data System (RDS) (continued)
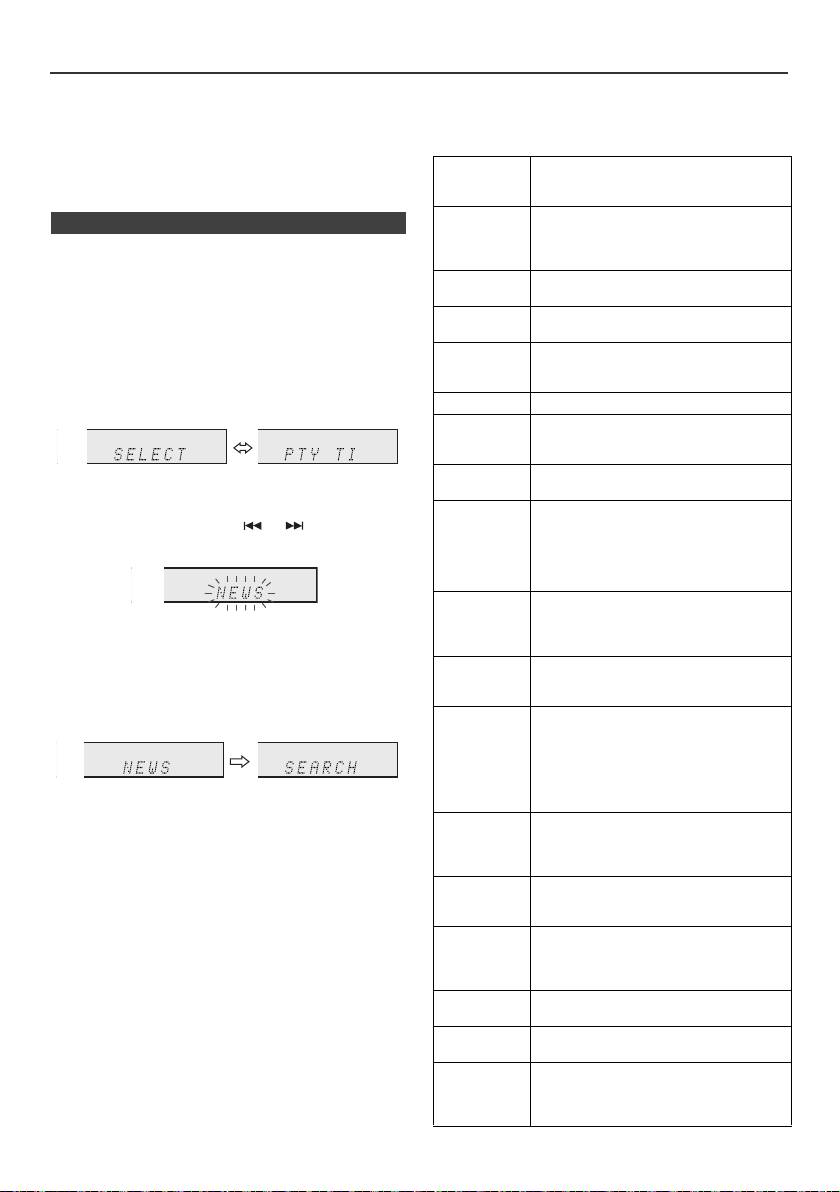
Notes for radio text:
Descriptions of the PTY (Programme Type) codes, TP
l The first 14 characters of the radio text will appear for
(Traffic Programme) and TA (Traffic Announcement)
4 seconds and then they will scroll across the display.
You can search for and receive the following PTY, TP and
l If you tune in to an RDS station which is not
TA signals.
broadcasting any radio text, “No RT” will be displayed
when you switch to the radio text position.
NEWS Short accounts of facts, events and
publicly expressed views, reportage and
l Whilst radio text data is received or when the text
actuality.
contents change, “RT” will be displayed.
AFFAIRS Topical programme expanding or
n To recall stations in memory
enlarging upon the news, generally in
different presentation style or concept,
To specify programmed types and select stations
including debate, or analysis.
(PTY search):
You can search a station by specifying the programme
INFO Programmes whose purpose is to impart
advice in the widest sense.
type (news, sports, traffic programme, etc. ... see page 20)
from the stations in memory.
SPORT Programme concerned with any aspect of
sport.
1
Press the TUNER button on the remote control or
EDUCATE Programme intended primarily to
INPUT button repeatedly on the main unit to select
educate, of which the formal element is
TUNER function.
fundamental.
2 Press the RDS PTY button on the remote control.
DRAMA All radio plays and serials.
CULTURE Programmes concerned with any aspect
of national or regional culture, including
language, theatre, etc.
SCIENCE Programmes about the natural sciences
“SELECT” and “PTY TI” will appear alternately for
and technology.
about 6 seconds.
VARIED Used for mainly speech-based
3 Within 6 seconds, press the or button to select
programmes usually of light-
entertainment nature, not covered by
the programme type.
other categories. Examples include:
quizzes, panel games, personality
interviews.
POP M Commercial music, which would
generally be considered to be of current
Each time the button is pressed, the programme type
popular appeal, often featuring in current
will appear. If the button is held down for more than
or recent record sales charts.
0.5 seconds, the programme type will appear
ROCK M Contemporary modern music, usually
continuously.
written and performed by young
musicians.
4 Whilst the selected programme type is flashing (within
6 seconds), press the RDS PTY button again.
EASY M Current contemporary music considered
to be “easy-listening”, as opposed to Pop,
Rock or Classical, or one of the
specialised music styles, Jazz, Folk or
Country. Music in this category is often
but not always, vocal, and usually of short
After the selected programme type has been lit for 2
duration.
seconds, “SEARCH” will appear, and the search
LIGHT M Classical music for general, rather than
operation will start.
specialist appreciation. Examples of
music in this category are instrumental
Notes:
music, and vocal or choral works.
l If the display has stopped flashing, start again from
CLASSICS Performances of major orchestral works,
step 2. If the unit finds a desired programme type, the
corresponding channel number will lit for about
symphonies, chamber music, etc., and
8 seconds, and then the station name will remain it.
including Grand Opera.
l If you want to listen to the same programme type of
OTHER M Musical styles not fitting into any of the
another station, press the RDS PTY button whilst the
other categories. Particularly used for
channel number or station name is flashing. The unit
specialist music of which Rhythm & Blues
will look for the next station.
and Reggae are examples.
l If no station can be found, “NOT FOUND” will appear
WEATHER Weather reports and forecasts and
for 4 seconds.
meteorological information.
If you select the traffic programme:
FINANCE Stock Market reports, commerce, trading,
If you select the traffic programme (TP) in step 3, “TP” will
etc.
appear.
CHILDREN For programmes targeted at a young
(This does not mean that you can listen to the traffic
audience, primarily for entertainment and
information at that time.)
interest, rather than where the objective is
When the traffic information is broadcast, “TA” will appear.
to educate.
En-20
11/5/25 X-HM10_20_En.fm
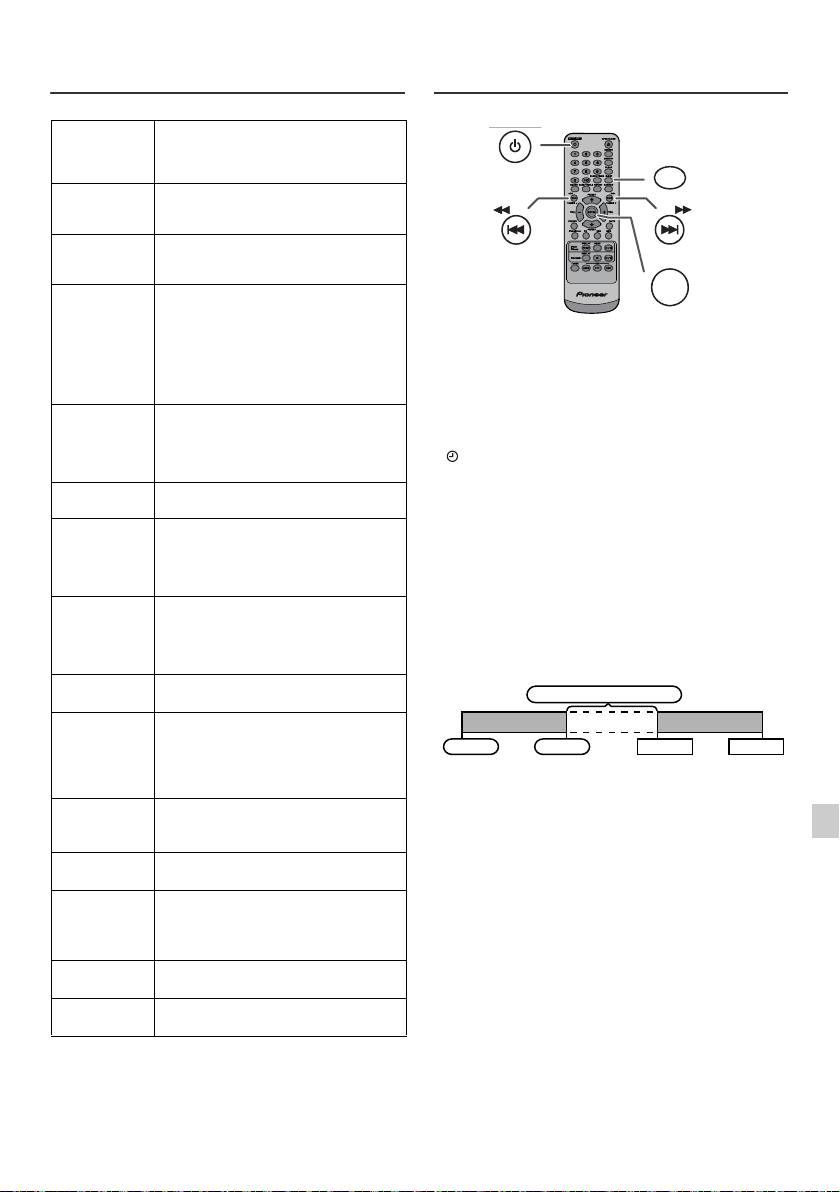
Using the Radio Data System (RDS)
Timer and sleep operation (Remote
(continued)
control only)
SOCIAL Programmes about people and things
that influence them individually or in
groups. Includes: sociology, history,
geography, psychology and society.
RELIGION Any aspect of beliefs and faiths,
involving a God or Gods, the nature of
existence and ethics.
PHONE IN Involving members of the public
expressing their views either by phone
or at a public forum.
TRAVEL Features and programmes concerned
with travel to near and far destinations,
package tours and travel ideas and
Timer playback:
opportunities. Not for use for
The unit turns on and plays the desired source (CD,
announcements about problems,
delays, or roadworks affecting
TUNER, USB, iPod, LINE IN) at a preset time.
immediate travel where TP/TA should
This unit has 2 types of timer: ONCE TIMER and
be used.
DAILY TIMER.
LEISURE Programmes concerned with
Once timer:
recreational activities in which the
listener might participate. Examples
Once timer play works for one time only at a preset time.
include, Gardening, Fishing, Antique
(“ ” indicator).
collecting, Cooking, Food & Wine, etc.
Daily timer:
JAZZ Polyphonic, syncopated music
Daily timer play works at the same preset time every day
characterised by improvisation.
that we set. For example, set the timer as a wake-up call
COUNTRY Songs which originate from, or continue
every morning.
the musical tradition of the American
(“DAILY” indicator).
Southern States. Characterised by a
straightforward melody and narrative
Using the once timer and daily timer in combination:
story line.
For example, use the once timer to listen to a radio
programme, and use the daily timer to wake up.
NATION M Current Popular Music of the Nation or
Region in that country's language, as
opposed to International “Pop” which is
1 Set the daily timer (page 21).
usually US or UK inspired and in
2 Set the once timer (page 21).
English.
OLDIES Music from the so-called “golden age” of
popular music.
FOLK M Music which has its roots in the musical
culture of a particular nation, usually
played on acoustic instruments. The
narrative or story may be based on
historical events or people.
DOCUMENT Programme concerned with factual
matters, presented in an investigative
1
style.
TEST Broadcast when testing emergency
2
broadcast equipment or receivers.
ALARM Emergency announcement made under
3
exceptional circumstances to give
warning of events causing danger of a
4
general nature.
TP Broadcasts which carry traffic
5
announcements.
TA Traffic announcements are being
6
broadcast.
7
8
9
En-21
11/5/25 X-HM10_20_En.fm
STANDBY/ON
CLOCK/TIMER
TUNING −
TUNING +
ENTER
1 minute or more
Daily timer
Once timer
Start
Stop
Start
Stop
Timer and sleep operation (Remote control only) (continued)
Once timer:
n Timer playback
The timer will be cancelled.
Before setting timer:
Daily timer:
l Check that the clock is set to the correct time (refer to
The timer operates at the same time every day. It will
page 9). If it is not set, you cannot use the timer
continue until the daily timer setting is cancelled.
function.
Cancel the daily timer when it is not in use.
l For timer playback: Plug in USB or load discs or dock
iPod to be played.
Notes:
l When performing timer playback using another unit
connected to the USB terminal, select “USB” or “LINE
IN” in step 5.
1 Press the STANDBY/ON button to turn the power on.
l This unit will turn on or enter the power stand-by mode
2 Press and hold the CLOCK/TIMER button.
automatically. However, the connected unit will not turn
on or off. To stop the timer playback, follow step
3 Within 30 seconds, press the or button to
“Cancelling the timer setting” of this page.
select “Once” or “Daily”, and press the ENTER button.
Checking the timer setting:
4 Within 30 seconds, press the or button to
1 Turn the power on and press and hold down the
select "Timer set", and press the ENTER button.
CLOCK/TIMER button.
5 To select the timer playback source (CD, TUNER, USB,
2 Within 30 seconds, press the or button to select
iPod, LINE IN), press the or button. Press the
“Once” or “Daily”, and press the ENTER button.
ENTER button.
3 Within 30 seconds, press the or button to select
When you select the tuner, select a station by pressing
"Timer Call", and press the ENTER button.
the or button, and then press the ENTER
button. If a station has not been programmed, “No
Cancelling the timer setting:
Preset” will be displayed and timer setting will be
cancelled.
1 Turn the power on and press and hold down the
CLOCK/TIMER button.
6 To adjust the day, press the or button and then
press the ENTER button.
2 Within 30 seconds, press the or button to select
“Once” or “Daily”, and press the ENTER button.
7 Press the ENTER button to adjust the hour. Press the
or button and then press the ENTER button.
3 Within 30 seconds, press the or button to select
"Timer Off", and press the ENTER button. Timer will be
8 To adjust the minutes, press the or button and
cancelled (the setting will not be cancelled).
then press the ENTER button.
9 Set the time to finish as in steps 7 and 8 above.
Reusing the memorised timer setting:
The timer setting will be memorised once it is entered. To
10 Adjust the volume using the
VOL (+ or –)
button, and
reuse the same setting, perform the following operations.
then press the ENTER button. Do not turn the volume
up too high.
1 Turn the power on and press and hold down the
CLOCK/TIMER button.
11 Press the STANDBY/ON button to enter the power
stand-by mode. The “TIMER” indicator lights up and
2 Within 30 seconds, press the or button to select
the unit is ready for timer playback.
“Once” or “Daily”, and press the ENTER button.
3 Within 30 seconds, press the or button to select
"Timer On", and press the ENTER button.
4 Press the STANDBY/ON button to enter the power
stand-by mode.
Note:
The clock setting will reset if the power cord is pulled out
12 When the preset time is reached, playback will start.
or when there is a blackout.
The volume will increase gradually until it reaches the
preset volume. The timer indicator will blink during
timer playback.
13 When the timer end time is reached, the system will
enter the power stand-by mode automatically.
En-22
11/5/25 X-HM10_20_En.fm

Timer and sleep operation (Remote
Headphones
control only) (continued)
n Sleep operation
The radio, compact disc, iPod, USB and Line In can all be
turned off automatically.
1
Play back the desired sound source.
2 Press the SLEEP button.
3 Within 5 seconds, press the Numeric button to set the
time (1 minute - 99 minutes)
4 “SLEEP” will appear.
l Do not turn the volume on to full at switch on and listen
5 The unit will enter the power stand-by mode
to music at moderate levels. Excessive sound pressure
automatically after the preset time has elapsed. The
from earphones and headphones can cause hearing
loss.
volume will be turned down 1 minute before the sleep
l Before plugging in or unplugging the headphone,
operation finishes.
reduce the volume.
l Be sure your headphone has a 3.5 mm diameter plug
To confirm the remaining sleep time:
and impedance between 16 and 50 ohms. The
recommended impedance is 32 ohms.
1 Whilst “SLEEP” is indicated, press the SLEEP button.
l Plugging in the headphone disconnects the speakers
automatically. Adjust the volume using the VOLUME
To cancel the sleep operation:
control.
Press the STANDBY/ON button whilst “SLEEP” is
l X-HM20 only: Audio from the iPod/iPhone cannot be
heard via the headphones connected to the unit. “HP
indicated. To cancel the sleep operation without setting the
INVALID” will be displayed if you connect the
unit to the stand-by mode, proceed as follows.
headphones when the iPod/iPhone function is
selected.
1 Whilst “SLEEP” is indicated, press the SLEEP button.
2 Within 5 seconds, press the “0” button twice until
“SLEEP 00” appears.
n To use timer and sleep operation together
Sleep and timer playback:
For example, you can fall asleep listening to the radio and
wake up to CD in the next morning.
1
Set the sleep time (see above, steps 1 - 5).
2 Whilst the sleep timer is set, set the timer playback
(steps 2 - 9, page 22).
1
2
3
4
5
6
7
8
9
En-23
11/5/25 X-HM10_20_En.fm
Sleep timer
Timer playback
End
setting
setting
time
Desired time1-99 minutes
Sleep operation will
Timer playback
automatically stop
start time

Troubleshooting chart
Many potential problems can be resolved by the owner
n USB
without calling a service technician.
If something is wrong with this product, check the following
before calling your authorized PIONEER dealer or service
Symptom Possible cause
centre.
l Device cannot
l Is there any MP3/WMA file
be detected.
available?
n General
l
Is the device properly connected?
l Is it an MTP device?
Symptom Possible cause
l Does the device contain AAC
file only?
l The clock is not set
l Did a power failure occur?
to the correct time.
Reset the clock. (Refer to
l Playback does
l Is it a copyright protected
page 9)
not start.
WMA file?
l Is it a false MP3 file?
l When a button is
l Set the unit to the power
pressed, the unit
stand-by mode and then
l Wrong time
l Is Variable Bitrate file being
does not respond.
turn it back on.
display.
played back?
l If the unit still malfunctions,
l Wrong file name
l
Is the File Name written in
reset it. (Refer to page 25)
display.
Chinese or Japanese characters?
l No sound is heard. l Is the volume level set to
“Min”?
n iPod and iPhone (X-HM20 only)
l Are the headphones
connected?
l Are the speaker wires
Symptom Possible cause
disconnected?
l No sound is
l
The iPod or iPhone is not playing.
produced.
l The iPod or iPhone is not
No image
properly connected to the unit.
n CD player
l Is the AC power lead of the
appears on the
unit plugged in?
TV/monitor.
Symptom Possible cause
l The video cable is not properly
connected.
l Playback does not
l Is the disc loaded upside
l The TV/monitor’s input
start.
down?
selection is not properly set.
l The iPod TV out feature has
l Playback stops in
l Does the disc satisfy the
not been set to output video.
the middle or is not
standards?
l
Audio from the iPod/iPhone cannot
performed properly.
l Is the disc distorted or
be heard via the headphones
scratched?
connected to the unit.
l Playback sounds are
l Is the unit located near
skipped, or stopped
excessive vibrations?
l iPod or iPhone
l The iPod or iPhone is not
will not charge.
making full contact with the
in the middle of a
l Is the disc very dirty?
connector.
track.
l Has condensation formed
rd
l Using iPod (3
generation).
inside the unit?
l The iPod or iPhone is not
supported. Refer to page 10
for compatible models.
n Remote control
l The iPod or iPhone unit cannot
be charged whilst the main unit
is in USB mode.
Symptom Possible cause
l
“This accessory is
l The iPhone battery is low.
l The remote control
l Is the AC power lead of the
not made to work
Please charge the iPhone.
does not operate.
unit plugged in?
with iPhone” or
l iPhone is not properly docked.
l Is the battery polarity
“This accessory is
correct?
not supported by
l Is the battery dead?
iPhone” appears
l Is the distance or angle
on iPhone screen.
incorrect?
l Does the remote control
sensor receive strong
light?
n Tuner
Symptom Possible cause
l The radio makes
l Is the unit placed near the
unusual noises
TV or computer?
continuously.
l Is the FM aerial or AM loop
aerial placed properly?
Move the aerial away from
the AC power lead if it is
located nearby.
En-24
11/5/25 X-HM10_20_En.fm
Troubleshooting chart (Continued)
n Care of compact discs
Compact discs are fairly resistant to damage, however
n Condensation
mistracking can occur due to an accumulation of dirt on
Sudden temperature changes, storage or operation in an
the disc surface. Follow the guidelines below for maximum
extremely humid environment may cause condensation
enjoyment from your CD collection and player.
inside the cabinet (CD pickup, etc.) or on the transmitter
l Do not write on either side of the disc, particularly the
on the remote control. Condensation can cause the unit to
non-label side from which signals are read. Do not
malfunction. If this happens, leave the power on with no
mark this surface.
disc in the unit until normal playback is possible (about 1
l Keep your discs away from direct sunlight, heat, and
hour). Wipe off any condensation on the transmitter with a
excessive moisture.
soft cloth before operating the unit.
l Always hold the CDs by the edges. Fingerprints, dirt, or
water on the CDs can cause noise or mistracking. If a
n If problem occurs
CD is dirty or does not play properly, clean it with a soft,
dry cloth, wiping straight out from the centre, along the
When this product is subjected to strong external
radius.
interference (mechanical shock, excessive static
electricity, abnormal supply voltage due to lightning, etc.)
or if it is operated incorrectly, it may malfunction.
If such a problem occurs, do the following:
1 Set the unit to the stand-by mode and turn the power on
again.
2
If the unit is not restored in the previous operation, unplug
Maintenance
and plug in the unit again, and then turn the power on.
Note:
If neither operation above restores the unit, clear all the
n Cleaning the cabinet
memory by resetting it.
Periodically wipe the cabinet with a soft cloth and a diluted
soap solution, then with a dry cloth.
n Factory reset, clearing all memory
Caution:
1
Press the STANDBY/ON button to turn the power on.
l Do not use chemicals for cleaning (petrol, paint thinner,
etc.). It may damage the cabinet.
2 Press the LINE button button on the remote control or
l Do not apply oil to the inside of the unit. It may cause
INPUT button repeatedly on the main unit to select
malfunctions.
LINE IN function.
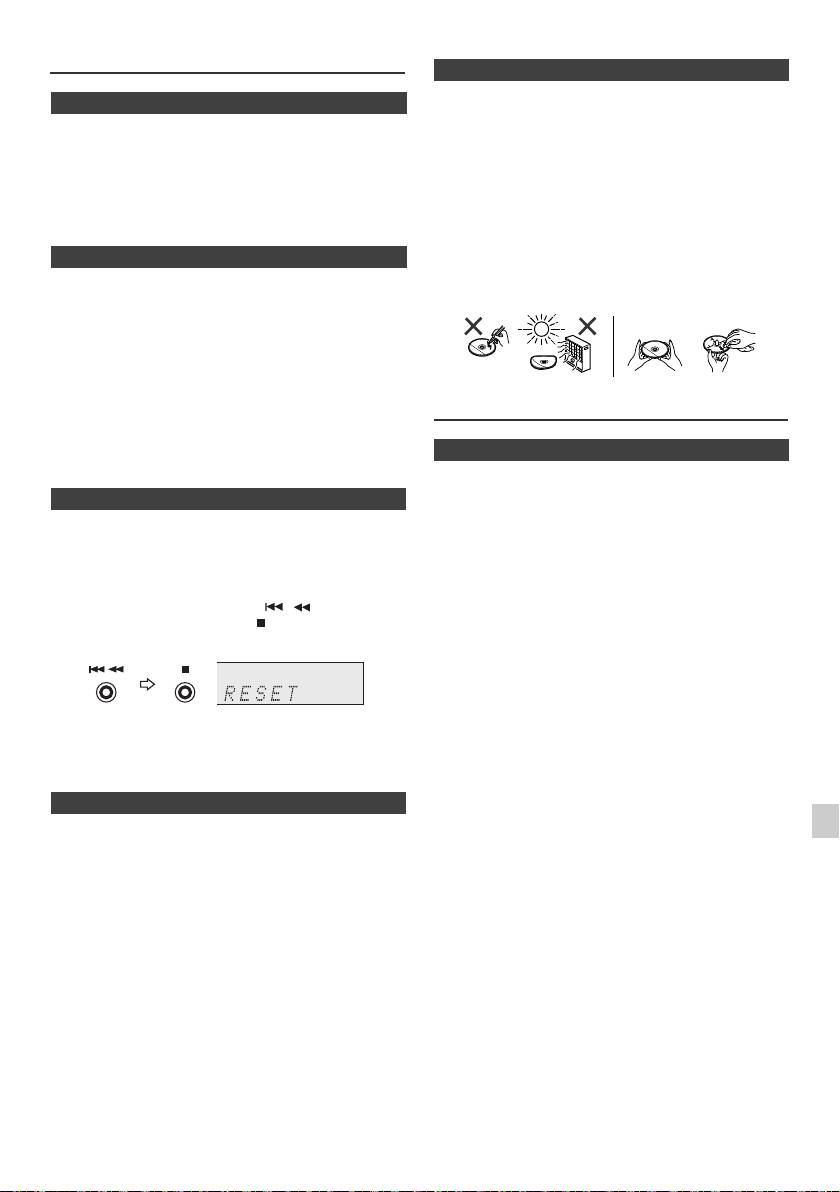
3 In LINE IN function, press the button on the
main unit press and hold the button until "RESET"
appears.
Caution:
This operation will erase all data stored in memory
including clock, timer settings, tuner preset, and CD
programme.
n Before transporting the unit
Remove the iPod, USB memory device and disc from the
1
unit. Then, set the unit to the power stand-by mode.
Carrying the unit with iPod or USB memory device left
2
docked or discs left inside might damage the unit.
3
4
5
6
7
8
9
En-25
11/5/25 X-HM10_20_En.fm
NO YES
Correct

Specifications
As part of our policy of continuous improvement,
n USB
PIONEER reserves the right to make design and
specification changes for product improvement without
USB host interface l Complies with USB 1.1 (Full
prior notice. The performance specification figures
Speed)/2.0 Mass Storage
indicated are nominal values of production units. There
Class.
may be some deviations from these values in individual
l Support Bulk only and CBI
units.
protocol.
n General
Support file l MPEG 1 Layer 3
l WMA (Non DRM)
Bitrate support l MP3 (32 kbps to 320 kbps)
Power source AC 220 V to 240 V, 50 Hz/60 Hz
l WMA (64 kbps to 160 kbps)
Power
Power on:
Other l Maximum total number of
consumption
45 W (X-HM20)
MP3/WMA files is 999.
30 W (X-HM10)
l Maximum total number of
Power stand-by: 0.4 W
folders is 99 INCLUSIVE of
root directory.
Dimensions Width: 215 mm
l The ID3TAG information
Height: 99 mm
supported are TITLE, ARTIST
Depth: 300 mm
and ALBUM only.
Weight 3.8 kg (X-HM20)
l Supports ID3TAG version 1
3.7 kg (X-HM10)
and version 2.
File system
l Support USB devices with
support
Microsoft Windows/DOS/FAT
n Amplifier
12/FAT 16/ FAT 32.
l 2 kbyte block length for sector.
Output power RMS: 15 W + 15 W (1 kHz, 10 %
T.H.D., 4 ohms)
n Tuner
Output terminals Speakers: 4 ohms
20 Hz to 20 kHz
Video output (X-HM20 only): 1 Vp-p
Frequency range FM: 87.5 MHz to 108 MHz
Headphones: 16 ohms
AM: 522 kHz to 1,620 kHz
(recommended: 32 ohms)
Preset 40 (FM and AM station)
Input terminals Line in (Analog input):
500 mV/47 k ohms
n Speaker
n CD player
X-HM20
Type Single disc multi-play compact disc
Type 2-way type speaker system
player
5 cm Tweeter
10 cm Woofer
Signal readout Non-contact, 3-beam
semiconductor laser pickup
Maximum input
15 W
power
D/A converter Multi bit D/A converter
Impedance 4 ohms
Frequency
20 Hz to 20 000 Hz
response
Dimensions Width: 132 mm
Height: 260 mm
Dynamic range 90 dB (1 kHz)
Depth: 173 mm
Weight 2.0 kg/each
X-HM10
Type 2-way type speaker system
Piezoelectric Tweeter
10 cm Woofer
Maximum input
15 W
power
Impedance 4 ohms
Dimensions Width: 132 mm
Height: 260 mm
Depth: 158 mm
Weight 1.6 kg/each
En-26
11/5/25 X-HM10_20_En.fm

Notice
About iPod/iPhone/iPad:
"Made for iPod", "Made for iPhone" and "Made for iPad" mean that
an electronic accessory has been designed to connect specifically
to iPod, iPhone, or iPad, respectively, and has been certified by the
developer to meet Apple performance standards. Apple is not
responsible for the operation of this device or its compliance with
safety and regulatory standards. Please note that the use of this
accessory with iPod, iPhone, or iPad may affect wireless
performance.
iPad, iPhone and iPod are trademarks of Apple Inc., registered in
the U.S. and other countries.
1
2
3
4
5
6
7
© 2011 PIONEER CORPORATION.
All rights reserved.
8
9
En-27
11/5/25 X-HM10_20_En.fm
AVERTISSEMENT
Milieu de fonctionnement
Cet appareil n’est pas étanche. Pour éviter les risques
d’incendie et de décharge électrique, ne placez près de
lui un récipient rempli d’eau, tel qu’un vase ou un pot
de fleurs, et ne l’exposez pas à des gouttes d’eau, des
éclaboussures, de la pluie ou de l’humidité.
D3-4-2-1-3_A1_Fr
AVERTISSEMENT
Avant de brancher l’appareil pour la première, lisez
attentivement la section suivante.
Si la fiche d’alimentation secteur de cet appareil ne
La tension de l’alimentation électrique disponible
convient pas à la prise secteur à utiliser, la fiche doit
varie selon le pays ou la région. Assurez-vous que
être remplacée par une appropriée. Ce
la tension du secteur de la région où l’appareil sera
remplacement et la fixation d’une fiche secteur sur le
utilisé correspond à la tension requise (par ex. 230
cordon d’alimentation de cet appareil doivent être
V ou 120 V), indiquée sur le panneau arrière.
effectués par un personnel de service qualifié. En cas
D3-4-2-1-4*_A1_Fr
de branchement sur une prise secteur, la fiche de
coupure peut provoquer une sérieuse décharge
électrique. Assurez-vous qu’elle est éliminée
AVERTISSEMENT
correctement après sa dépose.
Pour éviter les risques d’incendie, ne placez aucune
L’appareil doit être déconnecté en débranchant sa
flamme nue (telle qu’une bougie allumée) sur
fiche secteur au niveau de la prise murale si vous
l’appareil.
D3-4-2-1-7a_A1_Fr
prévoyez une période prolongée de non utilisation
(par exemple avant un départ en vacances).
D3-4-2-2-1a_A1_Fr
PRÉCAUTION DE VENTILATION
Lors de l’installation de l’appareil, veillez à laisser un
espace suffisant autour de ses parois de manière à
ATTENTION
améliorer la dissipation de chaleur (au moins 10 cm sur
L’interrupteur STANDBY/ON de cet appareil ne
le dessus, 10 cm à l’arrière et 10 cm de chaque côté).
coupe pas complètement celui-ci de sa prise secteur.
Comme le cordon d’alimentation fait office de
10 cm 10 cm
dispositif de déconnexion du secteur, il devra être
10 cm
débranché au niveau de la prise secteur pour que
l’appareil soit complètement hors tension. Par
conséquent, veillez à installer l’appareil de telle
manière que son cordon d’alimentation puisse être
facilement débranché de la prise secteur en cas
10 cm
d’accident. Pour éviter tout risque d’incendie, le
AVERTISSEMENT
cordon d’alimentation sera débranché au niveau de
Les fentes et ouvertures du coffret sont prévues pour la
la prise secteur si vous prévoyez une période
ventilation, pour assurer un fonctionnement stable de
prolongée de non utilisation (par exemple avant un
l’appareil et pour éviter sa surchauffe. Pour éviter les
départ en vacances).
D3-4-2-2-2a*_A1_Fr
risques d’incendie, ne bouchez jamais les ouvertures et
ne les recouvrez pas d’objets, tels que journaux, nappes
ou rideaux, et n’utilisez pas l’appareil posé sur un tapis
épais ou un lit.
D3-4-2-1-7b*_A1_Fr
11/5/25 X-HM10_20_Anki_Fr.fm
T
empérature et humidité du milieu de fonctionnement :
De +5 °C à +35 °C (de +41 °F à +95 °F) ; Humidité
relative inférieure à 85 % (orifices de ventilation non
obstrués)
N’installez pas l’appareil dans un endroit mal ventilé ou
un lieu soumis à une forte humidité ou en plein soleil
(ou à une forte lumière artificielle).
D3-4-2-1-7c*_A1_Fr
Ce produit est destiné à une utilisation domestique
générale. Toute panne due à une utilisation autre qu'à
des fins privées (comme une utilisation à des fins
commerciales dans un restaurant, dans un autocar
ou sur un bateau) et qui nécessite une réparation
sera aux frais du client, même pendant la période de
garantie.
K041_A1_Fr
1
Condensation
2
Si vous transportez sans transition le lecteur d’un
endroit froid dans un pièce chaude (en hiver, par
exemple), ou si la température de la pièce où se trouve
3
le lecteur augmente rapidement, des gouttelettes d’eau
(condensation) peuvent se former à l’intérieur du
4
lecteur (sur les pièces et la lentille). En cas de
condensation, le lecteur ne fonctionne pas
5
correctement et la lecture n’est pas possible. Laissez le
lecteur en service pendant 1 ou 2 heures à la
6
température ambiante (pour que l’humidité ait le temps
de s’évaporer). Les gouttelettes d’eau se dissiperont et
la lecture sera de nouveau possible.
7
De la condensation peut aussi se former en été si le
lecteur est exposé à l’air d’un climatiseur. Dans ce cas,
8
éloignez le lecteur du climatiseur.
S005_A1_Fr
9
F-3
11/5/25 X-HM10_20_Anki_Fr.fm
FRANÇAIS
l Micro chaîne CD X-HM10/X-HM20, composé d'une unité principale et d'enceintes.
Introduction
Nous vous remercions d’avoir porté votre choix sur ce produit PIONEER. Pour en tirer le meilleur parti, veuillez lire ce
mode d’emploi très attentivement. Il vous guidera dans l’utilisation de votre produit PIONEER.
Note spéciale
La fourniture de ce produit ne procure pas de licence et n'implique aucun droit de distribution de contenu créé avec ce
produit par un système de transmission (terrestre, satellite, câble et/ou d'autres canaux de distribution) commercial, par
des applications de « streaming » (par l'intermédiaire de l'internet, des intranets et/ou d'autres réseaux) commerciales,
par d'autres systèmes de distribution de contenu (applications audio à la demande et similaires) commerciaux, ou sur
des médias physiques (disques compacts, DVD, circuits intégrés, disques durs, cartes mémoire et similaires)
engrangeant des revenus. Pour de tels usages, une license séparée est exigée. Pour les détails, veuillez visiter http://
mp3licensing.com.
Technologie audio de codage MPEG Layer-3 licenciée par Fraunhofer IIS et Thomson.
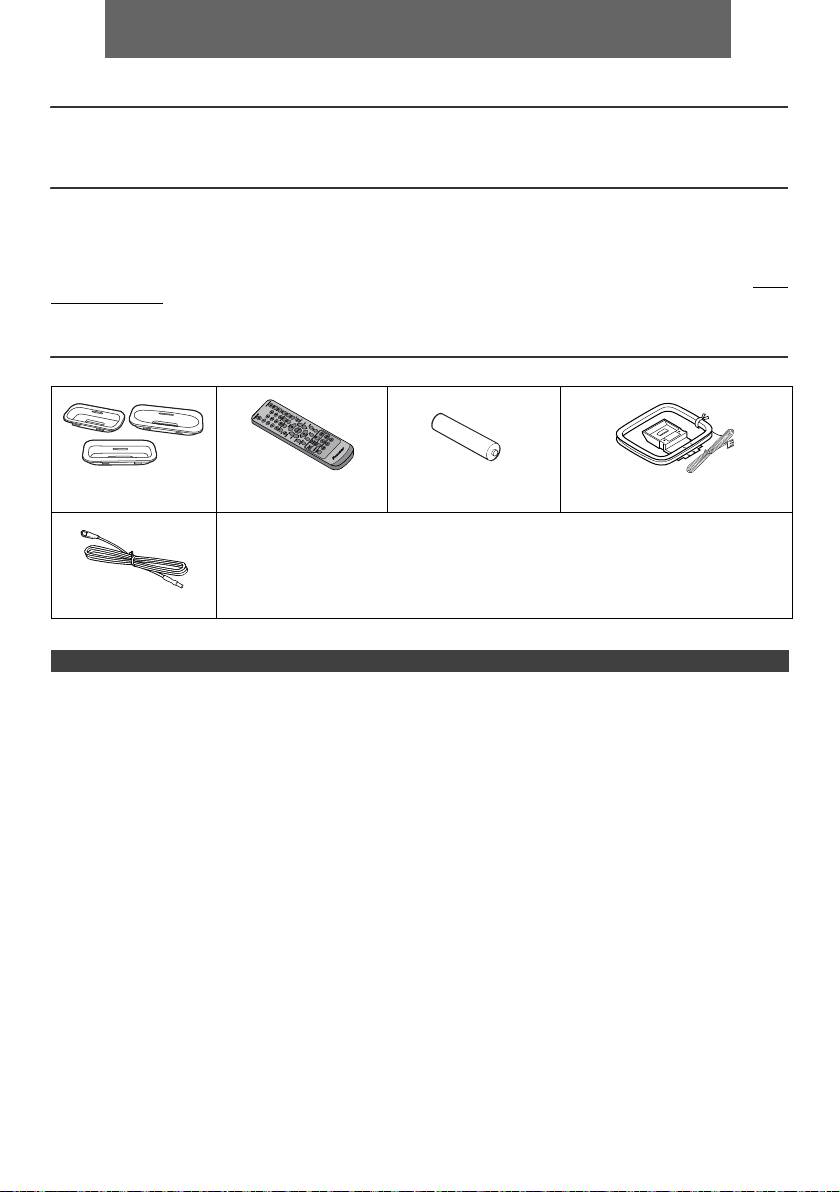
Accessoires
Veuillez vérifier la présence des accessoires suivants.
Adaptateurs iPhone x 3
Télécommande x 1 Pile « AA » x 1 Cadre-antenne PO x 1
(X-HM20 uniquement)
Cordon d’alimentation
Carte de garantie
Ce mode d’emploi
Antenne FM x 1
TABLE DES MATIÈRES
Page
Page
USB
Informations générales
Lecture mémoire de grande capacité
Précautions . . . . . . . . . . . . . . . . . . . . . . . . . . . . . . . . . 5
USB/lecteur MP3 . . . . . . . . . . . . . . . . . . . . . . . . . 16 - 17
Commandes et voyants . . . . . . . . . . . . . . . . . . . . . . 5 - 6
Lecture USB avancée . . . . . . . . . . . . . . . . . . . . . . . . .17
Avant l’utilisation
Raccordement du système . . . . . . . . . . . . . . . . . . . 7 - 8
Radio
Télécommande . . . . . . . . . . . . . . . . . . . . . . . . . . . . . . . 8
Écoute de la radio . . . . . . . . . . . . . . . . . . . . . . . . . . . .18
Fonctionnement de base
Commande générale . . . . . . . . . . . . . . . . . . . . . . . . . . 9
Fonctions avancées
Réglage de l’horloge
Utilisation du système RDS (Radio Data
System) . . . . . . . . . . . . . . . . . . . . . . . . . . . . . . . . 19 - 21
(Seulement par télécommande) . . . . . . . . . . . . . . . 9 - 10
Opérations programmées et mise en arrêt différée
iPod, iPhone et iPad
(Seulement par télécommande) . . . . . . . . . . . . . 21 - 23
Lecture à partir d’un iPod, iPhone ou iPad
Casque . . . . . . . . . . . . . . . . . . . . . . . . . . . . . . . . . . . 23
(X-HM20 uniquement). . . . . . . . . . . . . . . . . . . . . . 10 - 12
Références
Lecture de disques MP3/WMA ou CD
Dépannage . . . . . . . . . . . . . . . . . . . . . . . . . . . . . 24 - 25
Écoute d’un CD ou d’un disque MP3/WMA . . . . . . . . 13
Entretien . . . . . . . . . . . . . . . . . . . . . . . . . . . . . . . . . . 25
Lecture avancée de disques MP3/WMA ou
Spécifications . . . . . . . . . . . . . . . . . . . . . . . . . . . . . . .26
CD. . . . . . . . . . . . . . . . . . . . . . . . . . . . . . . . . . . . . 14 - 15
Avis. . . . . . . . . . . . . . . . . . . . . . . . . . . . . . . . . . . . . . . .27
Mode dossier MP3/WMA (seulement pour des fichiers
MP3/WMA) . . . . . . . . . . . . . . . . . . . . . . . . . . . . . . 15 - 16
Fr-4
11/5/25 X-HM10_20_Fr.fm
Précautions
l Ne pas ôter l’enveloppe, on s’exposera à la
n Général
secousse électrique. Pour toute réparation interne,
s’adresser au revendeur PIONEER.
l Installer l’appareil sur un socle stable, horizontal et
l Veiller à ne pas couvrir les ouvertures de ventilation de
exempt de vibrations.
journaux, de nappes, de rideaux, etc.
l Placer les enceintes à une distance d’au moins 30 cm
l Ne poser aucune source de flamme nue, telle qu’une
de tout téléviseur CRT afin d’éviter les variations de
bougie, sur l’appareil.
couleurs à travers l’écran du téléviseur. Si les
l Il faut traiter une pile usée selon la réglementation
variations persistent, éloigner les enceintes du
téléviseur. Le téléviseur LCD n’est pas enclin à de
environnementale.
telles variations.
l L’appareil est conçu pour une utilisation en climat
l Mettre l’appareil à l’abri du soleil, du champ
tempéré.
magnétique, de la poussière excessive ou de
Avertissement :
l’humidité. On l’écartera aussi d’un appareil
Respecter la tension indiquée sur l’appareil. Le
électronique (ordinateur domestique, télécopieur, etc.)
fonctionnement sur une tension plus élevée est
qui provoquerait des parasites.
dangereux et risque de provoquer un incendie ou tout
l Ne rien placer sur l’appareil.
autre type d’accident. PIONEER ne sera pas tenu pour
l Mettre l’appareil à l’abri de l’humidité, de la chaleur
excessive (supérieure à 60°C) ou du froid excessif.
responsable des dommages causés par le non-respect de
l Si le système ne fonctionne pas correctement,
la tension spécifiée.
débrancher et rebrancher le système. Rebrancher le
système et le rallumer.
n Commande de volume
l En cas d’orage, débrancher l’appareil.
Le niveau sonore émis à un réglage donné du volume
l Débrancher le cordon d’alimentation en le tenant par la
dépend, entre autres facteurs, du rendement des
fiche pour ne pas abîmer les fils internes.
enceintes et du lieu d’utilisation. Il est conseillé d’éviter
l La prise CA est utilisée comme dispositif de
l’exposition à des niveaux de volume élevés. Éviter de trop
déconnexion et doit rester aisément accessible.
élever le volume. Écoutez de la musique à des niveaux
modérés. Un volume sonore excessif émis par les
écouteurs et le casque peut endommager l’ouïe.
Commandes et voyants
Les fonctions iPod/iPhone sont disponibles sur le modèle X-HM20 uniquement.
1
2
3
Page
Page
4
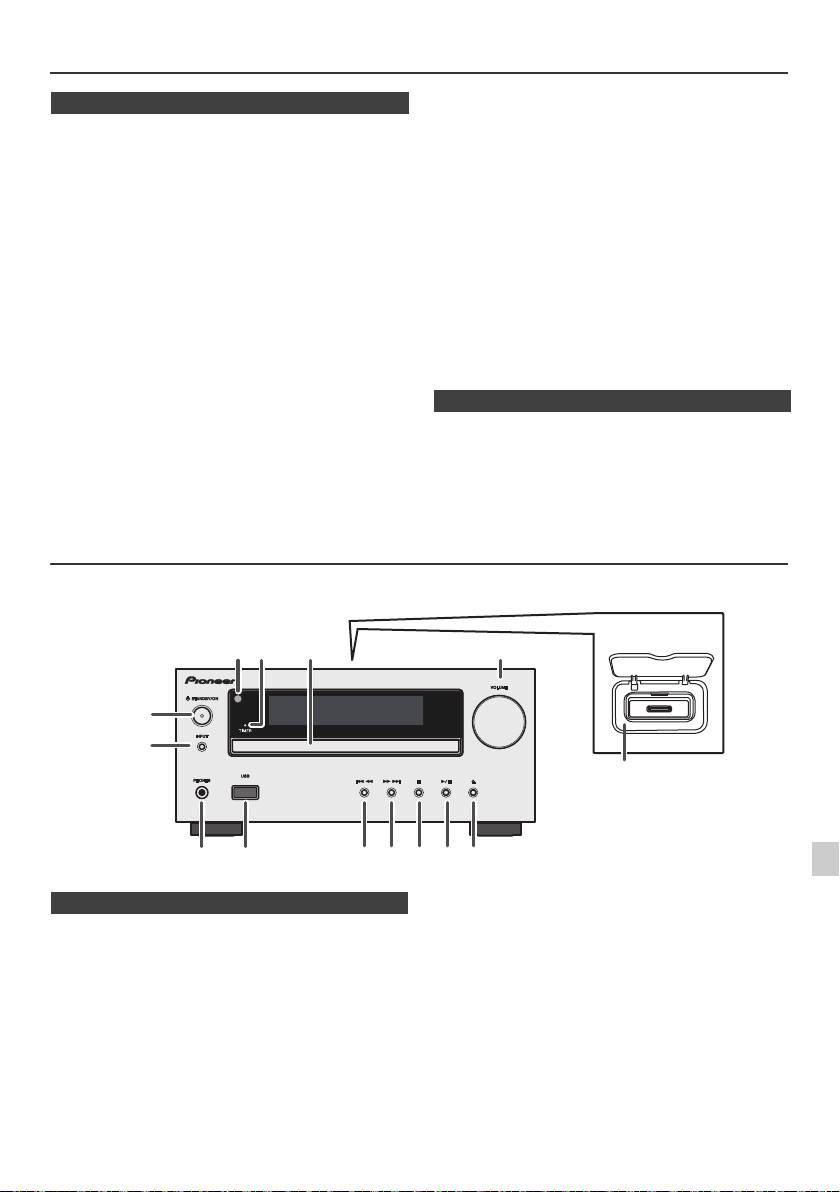
1. Capteur de télécommande. . . . . . . . . . . . . . . . . . 8
10. Préréglage bas du tuner, plage CD/USB bas,
2. Voyant de minuterie . . . . . . . . . . . . . . . . . . . . . . 22
saut de l’iPod/iPhone bas . . . . . . . . . . . . . . .12, 13
3. Tiroir de disque . . . . . . . . . . . . . . . . . . . . . . . . . 13
11. Préréglage haut du tuner, plage CD/USB haut,
5
4. Station d'accueil pour iPod ou iPhone . . . . . . . 11
saut de l’iPod/iPhone haut . . . . . . . . . . . . . .12, 13
5. Commande de volume . . . . . . . . . . . . . . . . . . . . . 9
12. Touche d’arrêt Disque / USB. . . . . . . . . . . . .12, 13
6. Touche STANDBY/ON. . . . . . . . . . . . . . . 11, 13, 18
13. Touche de lecture ou de pause du disque/USB/
6
7. Touche de INPUT . . . . . . . . . . . . . 9, 11, 13, 16, 18
iPod/iPhone . . . . . . . . . . . . . . . . . . . . . . . . . .12, 13
8. Prise de casqu . . . . . . . . . . . . . . . . . . . . . . . . . . 23
14. Touche d’ouverture/fermeture de tiroir de
7
9. Borne USB . . . . . . . . . . . . . . . . . . . . . . . . . . . . . 16
disque . . . . . . . . . . . . . . . . . . . . . . . . . . . . . . . . . .13
8
9
Fr-5
11/5/25 X-HM10_20_Fr.fm
1
52 3
6
7
4
8 10 11 12 13 14
9
X-HM20
uniquement
n Façade
Commandes et voyants (suite)
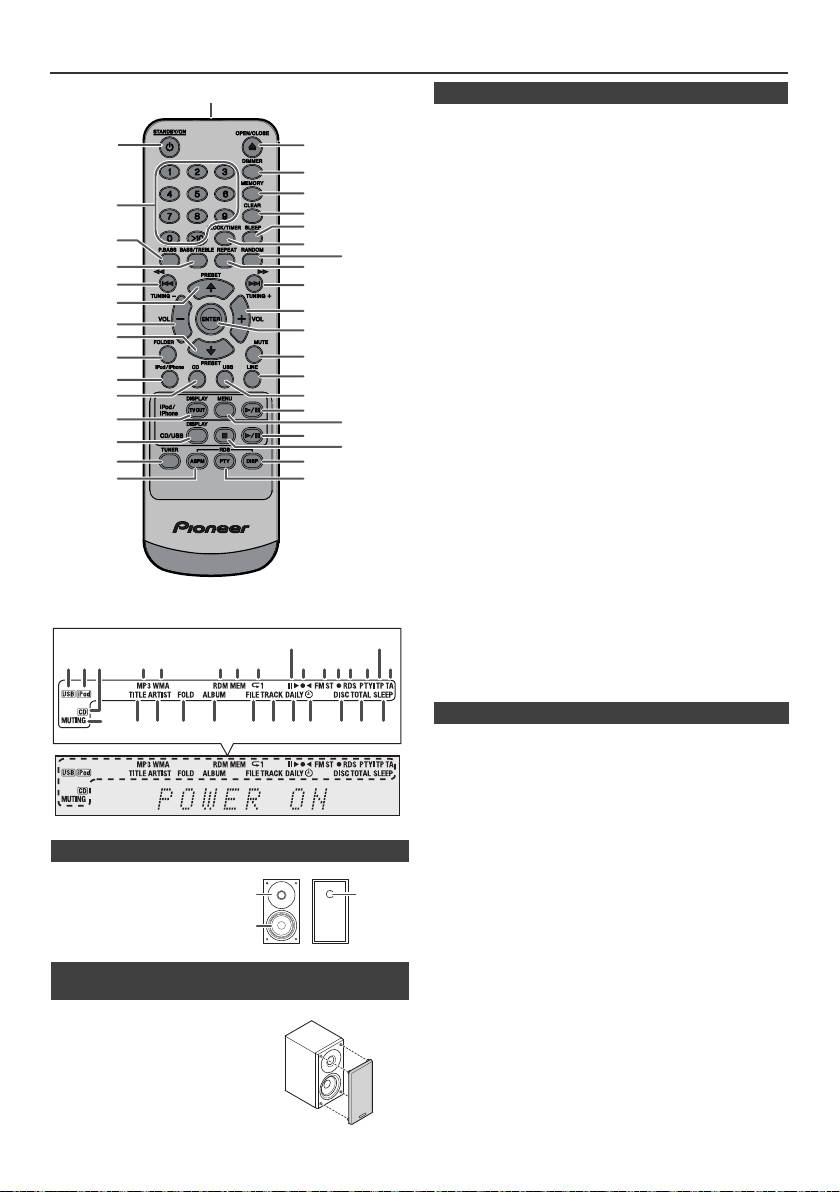
1
Page
1. Émetteur de télécommande . . . . . . . . . . . . . . . . .8
2
17
2. Touche STANDBY/ON . . . . . . . . . . . . .9, 11, 13, 21
3. Touches numérotées . . . . . . . . . . . . . . . . . . . . . .14
18
4. Touche P.Bass . . . . . . . . . . . . . . . . . . . . . . . . . . . .9
5. Touche des graves/aigus . . . . . . . . . . . . . . . . . . .9
19
6. Touche de syntonisation bas, saut bas, inversion
3
20
rapide, temps bas . . . . . . .9, 12, 13, 16, 18, 19, 21
21
7. Touche de préréglage haut du tuner,
4
22
curseur haut iPod. . . . . . . . . . . . . . . .11, 12, 16, 18
23
8. Touche de volume bas . . . . . . . . . . . . . . . . . . . . 9
5
24
9. Touche de préréglage bas du tuner, curseur bas
6
25
iPod . . . . . . . . . . . . . . . . . . . . . . . . . . .11, 12, 16, 18
10. Touche de répertoire . . . . . . . . . . . . . . . . . . . . . .16
7
26
11. Touche iPod/iPhone. . . . . . . . . . . . . . . . . . . . . . .11
8
12. Touche CD . . . . . . . . . . . . . . . . . . . . . . . . . . . . . .13
27
9
13. Touche iPod/iPhone DISPLAY TV OUT. . . . .11, 12
14. Touche CD/USB DISPLAY . . . . . . . . . . . . . . . . . .16
10
28
15. Touche de la source radio. . . . . . . . . . . . . . .18, 19
29
11*
16. Touche RDS ASPM . . . . . . . . . . . . . . . . . . . . . . .19
30
12
17. Touche d’ouverture/fermeture . . . . . . . . . . . . . .13
31*
18. Touche gradateur . . . . . . . . . . . . . . . . . . . . . . . . . .9
13*
32*
19. Touche de mémoire . . . . . . . . . . . . . . . . . . . .14, 18
33
14
20. Touche d’annulation . . . . . . . . . . . . . . . . . . .14, 18
34
21. Touche de sommei. . . . . . . . . . . . . . . . . . . . . . . .23
15
35
22. Touche d’horloge/minuterie . . . . . . . . . . . . . .9, 21
16
36
23. Touche de lecture aléatoire. . . . . . . . . . . . . .12, 14
24. Touche de lecture répétée. . . . . . . . . . . . . . .12, 14
25. Touche de syntonisation haut, saut haut, avance
rapide, temps haut. . . . . . .9, 12, 13, 16, 18, 19, 21
26. Touche volume haut . . . . . . . . . . . . . . . . . . . . . . .9
27. Touche ENTER . . . . . . . . . . . . . . . . . . . . . .9, 11, 12
28. Touche de silence . . . . . . . . . . . . . . . . . . . . . . . . .9
29. Touche de la source ligne . . . . . . . . . . . . . . . .8, 25
30. Touche USB . . . . . . . . . . . . . . . . . . . . . . . . . . . . .16
31. Touche lecturee/pause iPod/iPhone. . . . . . . . . .12
32. Touche Menu de l’iPod/iPhone . . . . . . . . . . . . . .12
33. Touche lecture/pause CD/USB . . . . . . . .12, 13, 14
34. Touche d’arrêt CD/USB . . . . . . . . . . . . . . . . .13, 14
35. Touche d’affichage RDS . . . . . . . . . . . . . . . . . . .19
36. Touche RDS PTY . . . . . . . . . . . . . . . . . . . . . . . . .19
Page
1. Voyant USB . . . . . . . . . . . . . . . . . . . . . . . . . . . . .16
2. Voyant iPod. . . . . . . . . . . . . . . . . . . . . . . . . . . . . .10
3. Voyant CD . . . . . . . . . . . . . . . . . . . . . . . . . . . . . . .13
4. Voyant MP3 . . . . . . . . . . . . . . . . . . . . . . . . . . . . . .13
5. Voyant WMA . . . . . . . . . . . . . . . . . . . . . . . . . . . . .13
6. Voyant RDM (Lecture aléatoire) . . . . . . . . . . . . .14
7. Voyant MEM (Mémoire) . . . . . . . . . . . . . . . . . . . .14
n Enceinte acoustique
8. Voyant de répétition . . . . . . . . . . . . . . . . . . . . . . .14
9. Voyant de lecture/pause . . . . . . . . . . . . . . . . . . .12
1. Haut-parleur d’aigus
10. Voyant de syntonisation FM/AM . . . . . . . . . . . . .18
2. Woofer
11. Voyant de mode FM stéréo . . . . . . . . . . . . . . . . .18
3. Évent de baffle
12. Voyant de la station stéréo . . . . . . . . . . . . . . . . .18
réflex
13. Voyant RDS. . . . . . . . . . . . . . . . . . . . . . . . . . . . . .19
14. Voyant PTY . . . . . . . . . . . . . . . . . . . . . . . . . . . . . .19
15. Voyant TP . . . . . . . . . . . . . . . . . . . . . . . . . . . . . . .19
16. Voyant TA . . . . . . . . . . . . . . . . . . . . . . . . . . . . . . .19
n Les grilles des enceintes peuvent être
17. Voyant de sourdine . . . . . . . . . . . . . . . . . . . . . . . .9
retirées (X-HM20 uniquement)
18. Voyant de titre. . . . . . . . . . . . . . . . . . . . . . . . . . . .16
19. Voyant de l’artiste. . . . . . . . . . . . . . . . . . . . . . . . .16
Veiller à ce que rien n’entre en contact
20. Voyant de dossier . . . . . . . . . . . . . . . . . . . . . . . .16
21. Voyant de l’album. . . . . . . . . . . . . . . . . . . . . . . . .16
avec les membranes de haut-parleurs
22. Voyant du fichier . . . . . . . . . . . . . . . . . . . . . . . . .16
lorsque les grilles sont retirées.
23. Voyant de plage . . . . . . . . . . . . . . . . . . . . . . . . . .14
24. Voyant de programmation quotidienne . . . . . . .21
25. Voyant de programmation unique . . . . . . . . . . .21
26. Voyant de disque . . . . . . . . . . . . . . . . . . . . . . . . .13
27. Voyant de total . . . . . . . . . . . . . . . . . . . . . . . . . . .16
28. Voyant de mise en arrêt différée . . . . . . . . . . . .23
Fr-6
11/5/25 X-HM10_20_Fr.fm
*Les touches 11, 13, 31, 32 sont disponibles sur le modèle X-HM20
uniquement.
9
15
1 4 5 6 7
2 3
8
10 11 1312 14
16
17
28272624 2523221918 2120
n Télécommande
n Affichage
1
3
2
Raccordement du système
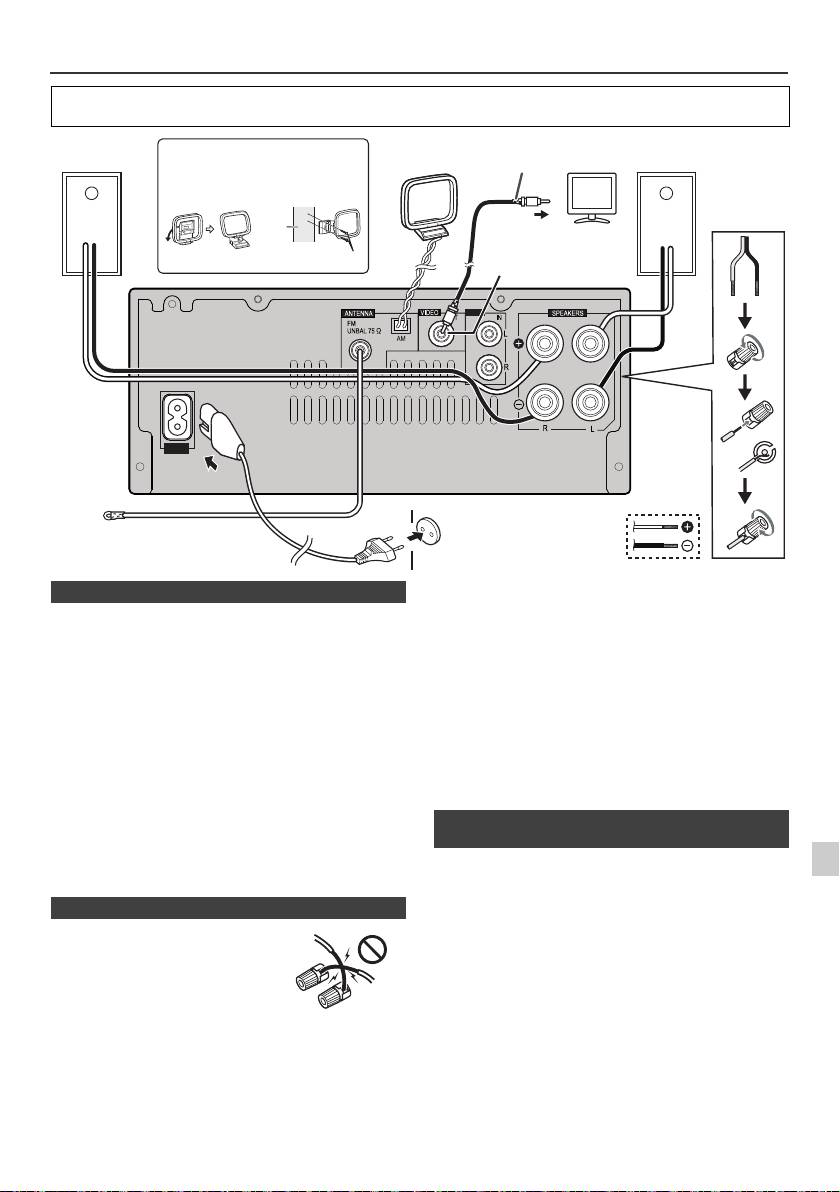
Avant d'effectuer ou de modifier les raccordements, mettez l'appareil hors tension et débranchez le cordon
d'alimentation au niveau de la prise secteur.
Antenne FM fournie :
Raccorder l’antenne FM à la prise FM 75 OHMS et diriger
l’antenne FM vers la direction qui assure la meilleure
réception.
Antenne extérieure FM :
Utiliser une antenne extérieure FM (câble coaxial
75 ohms) pour obtenir une meilleure réception.
Déconnecter le câble d’antenne FM fourni lorsqu’on utilise
une antenne FM extérieure.
Cadre-antenne PO fourni :
Raccorder le cadre-antenne PO à la prise AM. Orientez le
cadre antenne PO de manière à obtenir une réception
optimale. Le positionner, par exemple, sur une étagère ou
l’attacher sur un support ou à un mur au moyen de vis (non
incluses).
Note :
Éloigner l’antenne de l’appareil ou du cordon
1
d’alimentation pour assurer une meilleure réception.
Placez l’antenne loin de l’unité pour une meilleure
Les fichiers photo et vidéo de iPod ou iPhone peuvent être
2
réception.
visualisés en raccordant le système à un téléviseur/écran.
Si le téléviseur/écran est équipé d’une entrée vidéo, la
3
connecter à la prise VIDEO OUT au dos de l’appareil et
placer le commutateur TV Out de iPod ou iPhone en
position « On ».
4
Note :
Vérifier que le réglage de l’appareil iPod, soit NTSC soit
5
PAL, est le même que celui du signal du téléviseur. Visiter
la page d’accueil d’Apple pour plus d’informations.
6
7
8
9
Fr-7
11/5/25 X-HM10_20_Fr.fm
LINE
AUX
LOOP
AC IN
Câble vidéo
Enceinte
Mise en place du cadre PO
Cadre-
Enceinte
Téléviseur
(non fourni)
droite
antenne PO
gauche
< Fixation
< Montage >
au mur >
Mur
Vers la prise d’entrée vidéo
Prise de sortie vidéo
vis (non fournies)
(X-HM20 uniquement)
Prise murale
(220 V à 240 V CA,
Antenne FM
50 Hz/60 Hz)
n Raccordement des antennes
n Raccordement des enceintes
l
Torsadez ensemble les brins de fils
dénudés.
l Connectez le fil rouge à la borne
plus (+) et l'autre fil à la borne
moins (–).
l Utilisez des enceintes de 4 ohms
d'impédance ; des enceintes
d'impédance inférieure pourraient
endommager l'appareil.
Incorrect
l
Les bornes des haut-parleurs sont sous une tension
DANGEREUSE. Pour éviter tout risque de décharge
électrique lors du branchement et du débranchement des
câbles de haut-parleur, débranchez le cordon
d’alimentation avant de toucher des parties non isolées.
l N'installez pas ces enceintes au mur ou au plafond, car
elles pourraient provoquer des blessures en cas de
chute.
l
Ne pas prendre le canal droit pour le canal gauche.
L’enceinte de droite est celle située à droite quand on se
place devant le système.
l Ne pas laisser se toucher les fils dénudés des
enceintes.
l Ne rien placer ou laisser pénétrer dans l’évent de baffle
réflex.
l
Éviter de monter (ou s’asseoir) sur les enceintes. On
risque de se blesser en tombant.
n Branchement d’un iPod ou d’un iPhone au
téléviseur (X-HM20 uniquement)

Raccordement du système (suite)
Télécommande
n Branchement du cordon d’alimentation
Après avoir vérifié tous les raccordements, brancher
l’appareil.
Note :
Débrancher le cordon d’alimentation secteur de la prise
murale si l’appareil doit rester inutilisé pendant une longue
période.
Attention :
l Tenez le cordon d’alimentation par sa prise lorsque
vous le manipulez. Ne débranchez pas l’appareil en
tirant sur le cordon et ne touchez jamais le cordon
d’alimentation avec les mains mouillées ; vous pourriez
provoquer un court-circuit ou prendre un choc
électrique. Ne placez pas l’appareil, un meuble ou tout
autre objet sur le cordon d’alimentation, et évitez de le
pincer de toute autre manière. Ne faites jamais de
Avertissement :
nœud dans le cordon et ne le liez jamais avec d’autres
l N’utilisez pas et ne conservez pas les piles en les
câbles. Les cordons d’alimentation doivent être
laissant exposées à la lumière directe du soleil ou dans
acheminés de façon à ce qu’on ne puisse pas marcher
un endroit excessivement chaud, tel qu’une voiture ou
dessus. Un cordon d’alimentation endommagé peut
à proximité d’un appareil de chauffage. La pile
provoquer un incendie ou un choc électrique. Vérifiez
risquerait de fuir, de surchauffer, d'exploser ou de
l’état du cordon de temps à autre. Si le cordon est
s'enflammer. Leur durée de vie ou leur performance
endommagé, demandez-en le remplacement auprès
pourrait également être réduite.
du service après-vente agréé Pioneer le plus proche.
Attention :
l Utilisez uniquement le cordon d’alimentation fourni
l
Retirez la pile de l’appareil si vous prévoyez de ne pas
avec cet appareil.
utiliser ce dernier pendant une longue période. Ceci
l N’utilisez pas le cordon d’alimentation fourni pour un
évitera les dégâts potentiels dus à une fuite des piles.
usage autre que celui décrit ci-dessus.
l
N’utilisez pas de pile rechargeable (pile nickel-cadmium,
etc.).
l
Une pile mal installée peut causer un mauvais
n Raccordement d’un téléviseur, etc.
fonctionnement de l’appareil.
Raccorder au téléviseur à l’aide d’un câble audio
.
Notes sur l’utilisation :
l
Remplacez la pile lorsque la distance de fonctionnement
de la télécommande est réduite ou lorsque cette dernière
ne répond plus correctement. Achetez une pile de type
« AA ».
l
Avec un chiffon doux, nettoyer régulièrement l’émetteur
de la télécommande et le capteur de l’appareil.
l
L’exposition du capteur de l’appareil à une lumière forte
peut interférer avec le fonctionnement. Si ce problème
arrive, changer la luminosité ou la direction de l’appareil.
l
Mettre la télécommande à l’abri de l’humidité, la chaleur,
le choc et les vibrations.
l Pour vous débarrasser des piles usagées, veuillez
vous conformer à la réglementation et aux instructions
relatives à l’environnement en vigueur dans votre pays
ou région.
Vérifier la télécommande après avoir fait correctement tous
les raccordements.
Diriger la télécommande vers le capteur placé sur l’appareil.
La télécommande peut être utilisée dans le rayon illustré ci-
dessous :
Pour sélectionner la fonction d'entrée de ligne :
l
Sur l'appareil principal : Appuyer sur la touche INPUT à
plusieurs reprises jusqu'à ce que Line In s'affiche.
l
Sur la télécommande : Appuyez de manière répétée sur
la touche LINE jusqu’à ce que l’indication Line In s’affiche.
Fr-8
11/5/25 X-HM10_20_Fr.fm
LINE
AUX
LOOP
AC IN
Téléviseur
Vers les prises de
sortie audio
Câble audio
(disponible dans
le commerce)
Signal audio
Vers les
prises
Appareil
d’entrée LINE
n Mise en place des pile
1
Ouvrir le couvercle des piles.
2
Insérez la pile fournie dans le sens indiqué sur le
compartiment de la pile.
Pour insérez ou retirer la pile, poussez-la en direction de la
borne (–).
3
Fermer le couvercle.
n Essai de la télécommande
STANDBY/ON
Capteur de
télécommande
7 m
Commande générale
STANDBY/ON
DIMMER
Lors de la première mise sous tension de l’appareil, le mode P.bass
est activé. Ce mode accentue les fréquences graves. Pour annuler le
P.BASS
BASS/TREBLE
mode P.bass, appuyez sur la touche P.BASS de la télécommande.
MUTE
1
Appuyer sur la touche BASS/TREBLE pour sélectionner « Bass ».
2
Avant 5 secondes, appuyer sur la touche VOL (+ ou –) pour
VOLUME
VOL VOL
ajuster les graves.
STANDBY/ON
1
Appuyer sur la touche BASS/TREBLE pour sélectionner
« Treble ».
INPUT
2
Avant 5 secondes, appuyer sur la touche VOL (+ ou –) pour
ajuster les aigus.
n Pour allumer l’appareil
Appuyer sur la touche STANDBY/ON pour allumer l’appareil.
Après utilisation :
Appuyer sur la touche STANDBY/ON pour passer en veille.
n Contrôle de la luminosité de l’affichage
Une pression sur la touche INPUT de l’appareil principal
Pour atténuer la luminosité de l'affichage, appuyer sur la touche
fait passer de la fonction en cours à un autre mode.
DIMMER de la télécommande.
Appuyer sur la touche INPUT à plusieurs reprises pour
sélectionner la fonction désirée.
Dimmer 1
Dimmer 2
Dimmer Off
n Réglage automatique du volume initial
Si vous mettez en marche ou si vous arrêtez l'appareil avec le
Note :
volume réglé au niveau 17 ou supérieur, le volume se règle
La fonction de sauvegarde protègera le mode de fonction
automatiquement sur 16.
mémorisé pendant quelques heures en cas de panne de
n Commande de volume
courant ou de débranchement du cordon d’alimentation CA.
Tourner le bouton du volume vers VOLUME (sur l’appareil principal)
Réglage de l’horloge (Seulement par
ou appuyer sur VOL +/– (sur la télécommande) pour augmenter ou
baisser le volume.
télécommande)
n Fonction de mise en route automatique
À la pression de l’une des touches suivantes, l’appareil s’allume.
l
iPod / iPhone, CD, USB, LINE, TUNER de la télécommande : La
1
fonction sélectionnée est activée.
l
Touche / de l’appareil principal : L’appareil s’allume et la
lecture de la dernière fonction démarre (CD, TUNER, USB, iPod,
2
LINE IN)
n Fonction mise en arrêt automatique
3
L'appareil principal entrera en mode de veille (lorsque l'iPod/iPhone
n'est pas raccordé) après 15 minutes d'inactivité pendant:
4
iPod/iPhone : Pas de connexion.
CD / USB : En mode d’arrêt.
5
LINE IN : Pas de signal d'entrée détecté ou niveau sonore très faible.
Note :
Dans cet exemple, l’horloge est réglée sur l’affichage 24
X-HM20 uniquement : Cependant, si l'iPod/iPhone est raccordé,
6
heures (00:00).
l'appareil commencera à se recharger.
L'indication « Charge Mode » s'affiche lorsque l'appareil est en mode
veille.
7
n Silence
8
Le son est coupé temporairement quand on appuie sur la touche
MUTE de la télécommande. Appuyer de nouveau pour restaurer le
volume.
9
Fr-9
11/5/25 X-HM10_20_Fr.fm
(La luminosité est faible).
(La luminosité est encore plus faible).
(La luminosité est vive).
n Touche P.Bass
n Commande des graves
n Contrôle des aigus
n Fonction
1
Appuyer sur la touche STANDBY/ON pour allumer l’appareil.
2
Appuyer sur la touche CLOCK/TIMER.
3
Avant 10 secondes, appuyer sur la touche ENTER. Pour régler
les jour, appuyer sur la touche ou puis appuyer sur la
touche ENTER.
........
-5 -4 +4 +5
........
-5 -4 +4 +5
CD AM
FM STEREO
FM MONO
Line In
iPod
USB
(X-HM20 uniquement)
STANDBY/ON
CLOCK/TIMER
TUNING −
TUNING +
ENTER
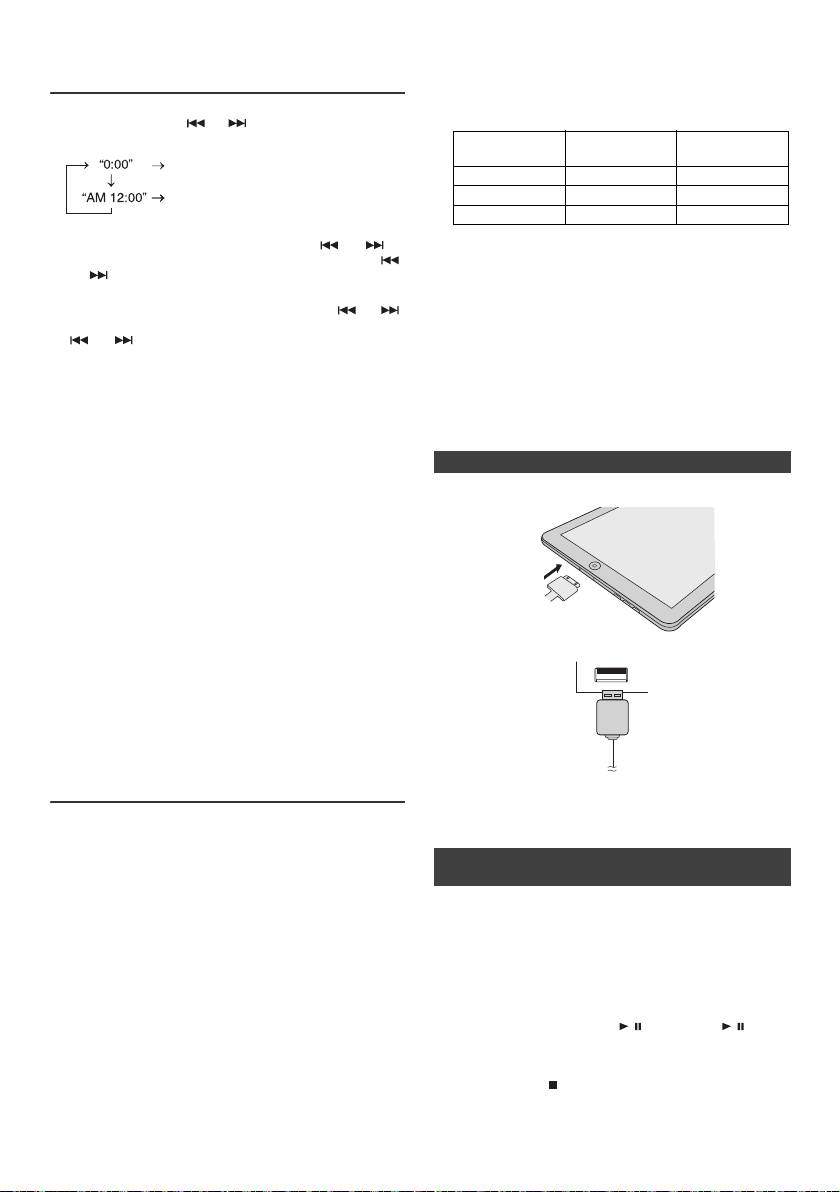
l L’installation sur votre iPod/iPhone/iPad de versions
Réglage de l’horloge (Seulement par
de logiciel autres que celles indiquées sur le site Web
télécommande) (suite)
de Pioneer peut provoquer des problèmes
d’incompatibilité avec ce système.
l Prise de recharge pour iPod, iPhone et iPad :
4
Appuyer sur la touche ou pour sélectionner le système
24 ou 12 heures et presser la touche ENTER.
Station
État
Prise USB
d'accueil
L’affichage sur 24 heures apparaît.
(00:00 - 23:59)
Fonction USB NON OUI
L’affichage sur 12 heures apparaît.
Autre fonction OUI NON
(AM 12:00 - PM 11:59)
Veille OUI NON
5
Pour régler l’heure, appuyer sur la touche ou et
l Le message « Cet accessoire n'est pas prévu pour être
appuyer sur la touche ENTER. Appuyer sur la touche
utilisé avec un iPhone » ou un message similaire peut
ou une fois pour avancer de 1 heure. Pour avancer
apparaître sur l'écran de l'iPhone lorsque :
rapidement, on la maintiendra enfoncée.
- la batterie est déchargé.
- l'iPhone n'est pas correctement installé sur la station
6
Pour régler les minutes, appuyer sur la touche ou
d'accueil (par ex. : de travers).
et appuyer sur la touche ENTER. Appuyer sur la touche
Si cela se produit, retirez puis reconnectez l'iPhone
ou pour avancer de 1 minute.
sur la station d'accueil.
Pour vérifier l’heure :
l
Ce produit est conçu pour fonctionner avec l'iPhone.
Appuyer sur la touche CLOCK/TIMER. L’afficheur indiquera
Pour éviter les problèmes d'interférences lorsqu'un
l’heure pour 5 secondes environ.
iPod/iPhone est connecté, la sortie casque est
désactivée et l'indication « HP INVALID » s'affiche.
Note :
Il peut y avoir de brèves interférences durant les
Remettre l'horloge à l'heure lorsque l'alimentation est rétablie
appels d’arrivée
après que l'appareil ait été rebranché ou après une panne
d'électricité (page 9).
n Connexion d'un iPad (Prise USB)
Pour remettre l’horloge à l’heure :
1
Insérez le connecteur dans l'iPod, l'iPhone ou l'iPad.
Suivre « Réglage de l’horloge » depuis l’étape 1. Si « Clock »
n’apparaît pas à l’étape 2, sauter l’étape 4 (sélection de
l’affichage 24 ou 12 heures).
Pour passer à l’affichage 24 heures ou 12 heures :
1 Effacer tous les contenus programmés. [Pour plus de
détails, se reporter à « Réinitialisation des réglages
d’usine, effacement de toute la mémoire » à la page
25.]
2 Raccordez l’iPad à l’appareil via la prise USB.
2 Effectuer le « Réglage de l’horloge » à partir de l’étape
1.
Note :
Le réglage du minuteur est réinitialisé lorsque le cordon
d'alimentation est débranché ou en cas de panne de courant.
Lecture à partir d’un iPod, iPhone ou
iPad (X-HM20 uniquement)
Note :
La prise USB ne prend pas en charge la sortie vidéo.
Modèles d’iPod, iPhone et iPad pris en charge :
l
iPad
l
iPhone 4
n Lecture à partir d'un iPod, iPhone ou iPad
l
iPhone 3GS
(prise USB)
l
iPhone 3G
l
iPhone
1 Appuyez sur le bouton STANDBY/ON pour mettre
ème
l
iPod touch (4
génération)
ème
l'appareil sous tension.
l
iPod touch (3
génération)
ème
2 Appuyez de manière répétée sur la touche USB de la
l
iPod touch (2
génération)
ème
télécommande ou utilisez le bouton INPUT de l'appareil
l
iPod touch (1
génération)
pour sélectionner la fonction USB.
l
iPod classic
ème
3 Connectez l'iPod, l'iPhone ou l'iPad à l'appareil.
l
iPod nano (6
génération)
ème
L'indication « iPod » s'affiche.
l
iPod nano (5
génération)
ème
l
iPod nano (4
génération)
4 Appuyez sur la touche / (CD/USB / ) pour
ème
l
iPod nano (3
génération)
commencer la lecture.
ème
l
iPod nano (2
génération)
Note :
Notes :
La touche d'arrêt ( ) est désactivée pendant la lecture à
l Ce système a été développé et testé pour la version du
partir d'un iPod, iPhone ou iPad.
logiciel iPod/iPhone/iPad indiquée sur le site Web de
Pioneer (http://pioneer.jp/homeav/support/ios/eu).
Fr-10
11/5/25 X-HM10_20_Fr.fm
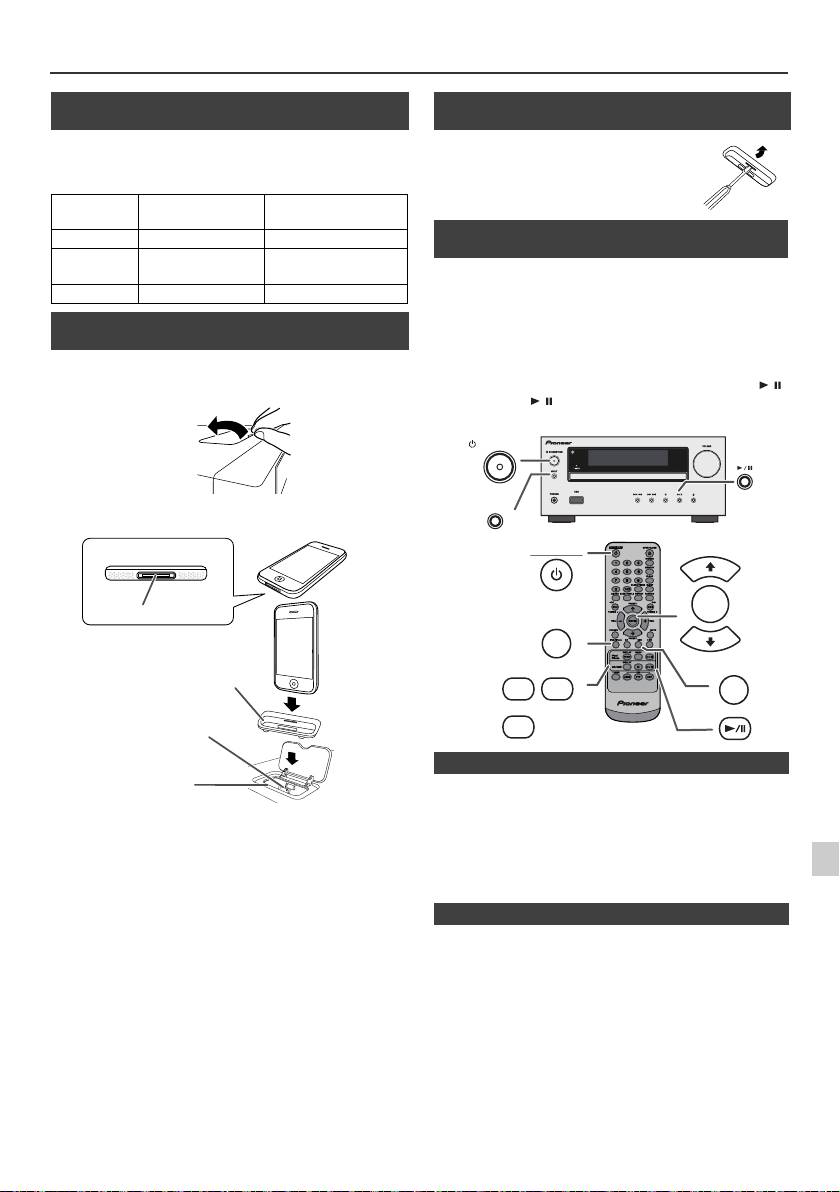
Lecture à partir d’un iPod, iPhone ou iPad (X-HM20 uniquement) (suite)
n Connexion de l’adaptateur iPod et iPhone
(Station d’accueil)
Note :
S’il vous plaît utilisez l’adaptateur fourni avec votre iPod ou
iPhone.
Adaptateur
Description de
Capacité
iPhone n°
l’iPhone
12 iPhone 4GB & 8GB & 16GB
15 iPhone 3G,
8GB & 16GB & 32GB
iPhone 3GS
19 iPhone 4 16GB & 32GB
n Pour insérer l’adaptateur iPod ou iPhone
(Station d’accueil)
1
Ouvrez la station d'accueil pour iPod/iPhone en tirant
vers le haut.
2 Insérez l'adaptateur pour iPod/iPhone dans l'appareil
et connectez votre iPod ou iPhone.
l
Le son n’est transmis de iPhone à l’appareil principal qu’une
fois le processus d’authentification terminé, dans les
Attention :
10 secondes environ.
1
Débranchez tous les accessoires du iPod ou du iPhone avant
l
Les appels entrant mettent la lecture en pause.
de l’insérer dans le logement.
l
Une fois le téléphone décroché, la conversation ne peut
s’entendre qu’à travers le hautparleur intégré de iPhone.
2
Activez le hautparleur de iPhone ou retirez iPhone du
logement pour commencer la conversation.
3
Retirez simplement l'iPod ou l'iPhone de la station d'accueil ou
4
l'iPad de la prise USB. Il n’y a aucun danger à le faire même
pendant la lecture.
5
6
7
8
9
Fr-11
11/5/25 X-HM10_20_Fr.fm
iPhone
iPhone (bas)
Connecteur du logement
Adaptateur pour iPhone
Connecteur
pour iPhone
Station d'accueil
pour iPhone
n Pour retirer l'adaptateur pour iPod ou
iPhone (Station d’accueil)
Insérer la pointe d’un tournevis (« – »
type, petit) dans l’orifice de l’adaptateur
comme indiqué et lever vers le haut
pour le retirer.
n Lecture à partir d'un iPod ou iPhone
(Station d’accueil)
1
Appuyer sur la touche STANDBY/ON pour allumer l’appareil.
2
Appuyer sur la touche iPod/iPhone de la télécommande ou
sur la touche INPUT à plusieurs reprises sur l’appareil
principal pour sélectionner la fonction iPod.
3
Insérer l’appareil iPod ou iPhone dans le logement iPod de
l’appareil principal.
4
Pour déclencher la lecture, appuyer sur la touche /
(iPod/iPhone / ).
STANDBY/ON
INPUT
STANDBY/ON
PRESET
ENTER
iPod/iPhone
PRESET
DISPLAY
MENU
USB
iPod/
TV OUT
iPhone
DISPLAY
CD/USB
n Lecture de l’iPhone
n Pour débrancher l'iPod, iPhone ou iPad

Lecture à partir d’un iPod, iPhone ou iPad
(X-HM20 uniquement) (suite)
n Regarder des vidéos sur une TV connectée
n Fonctions iPod, iPhone et iPad
à iPod ou iPhone
Fonction
Appareil
Télécommande
Opération
1
Appuyer sur la touche DISPLAY TV OUT pendant plus de
principal
Logement
USB
2 secondes. « TV Display » va s’afficher.
Lecture
iPod/
CD/USB
Appuyer pour
2
Appuyer sur la touche ENTER pour démarrer la lecture.
iPhone
passer en mode
Notes :
pause.
l
Si le paramètre Sortie TV est déjà activé dans le menu vidéo,
la vidéo va s’afficher automatiquement sur l’écran de TV
lorsque la touche ENTER sera pressée.
Pause
iPod/
CD/USB
Presser en mode
l
L'affichage vidéo vers un téléviseur n'est pas pris en charge
iPhone
de lecture.
par la prise USB. (iPad)
l
Pour revenir au visionnage vidéo sur l’écran de l’iPod ou
iPhone, appuyer sur la touche MENU pour accéder au menu
vidéo. Puis appuyez sur la touche DISPLAY TV OUT
Plage
Appuyer pour
pendant 2 secondes jusqu’à ce que apparaisse « iPod
haut/bas
passer en mode
Display ».
lecture ou pause.
l
Pendant la lecture vidéo de l’iPod ou iPhone, le fait d’appuyer
Si l’on appuie sur
sur la touche DISPLAY TV OUT ne fera pas basculer
la touche en
l’affichage vidéo entre l’iPod et le téléviseur.
mode pause,
appuyer sur la
Attention :
touche / pour
l
Débrancher tous les accessoires de l’iPod ou iPhone avant
lancer la plage
de l’insérer dans le logement iPod.
désirée.
l La touche Stop ( ) de l’appareil est inactive pendant
Avance
Presser en mode
que la fonction iPod est utilisée.
rapide/
de lecture et la
maintenir
n Navigation dans les menus de l’iPod,
inversion
enfoncée.
iPhone ou iPad
Relâcher la
touche pour
1
Appuyez sur le bouton MENU de l'iPod/iPhone/iPad pour
reprendre la
afficher le menu sur l'iPod/iPhone/iPad. Appuyez de nouveau
lecture.
dessus pour revenir au menu précédent.
Affichage
____
iPod/
____
Appuyez sur la
2
Utilisez la touche PRESET (
ou
) pour sélectionner un
iPhone
touche pendant
champ dans le menu et puis appuyez sur la touche ENTER.
plus de
2 secondes pour
Note :
permuter
Pendant la navigation dans le menu de l’iPod, iPhone ou iPad
l'affichage vidéo
avec la télécommande, ne manipuler aucune touche sur
entre l'iPod et le
l’appareil iPod ou iPhone. Le niveau du volume est réglé en
téléviseur.
appuyant sur la touche VOL (+ ou –) de l’appareil principal ou de
Répétition
____
Appuyez pour
la télécommande. Le réglage du volume sur l'iPod/iPhone/iPad
confirmer la
est sans effet.
sélection.
Fonctionnement de l’iPod et iPhone :
Lecture
____
Appuyez pour
Les opérations décrites ci-dessous dépendent de la génération
aléatoire
basculer en
d’iPod et iPhone utilisée.
mode aléatoire.
Système en fonctionnement :
Menu
____
iPod/
iPod/
Appuyez pour
Lorsque l'appareil est sous tension, le fait de raccorder un iPod,
iPod
iPhone
iPhone
voir le menu iPod
durant la fonction
iPhone ou iPad à l'appareil met automatiquement l'iPod, l'iPhone
iPod.
ou l'iPad en marche.
Arrêt du système (mise en veille) :
Entrer
____
Appuyez pour
Lorsque l'appareil est mis en pause, l'iPod/iPhone branché sur la
iPod
confirmer la
station d'accueil ou l'iPad connecté à l'appareil passe
sélection.
automatiquement en mode veille.
Curseur
____
Appuyez pour
haut /
sélectionner le
menu iPod.
bas iPod
Fr-12
11/5/25 X-HM10_20_Fr.fm
TUNING −
TUNING +
TUNING −
TUNING +
TUNING −
TUNING +
TUNING −
TUNING +
REPEAT
REPEAT
RANDOM
RANDOM
PRESET
PRESET
PRESET
PRESET
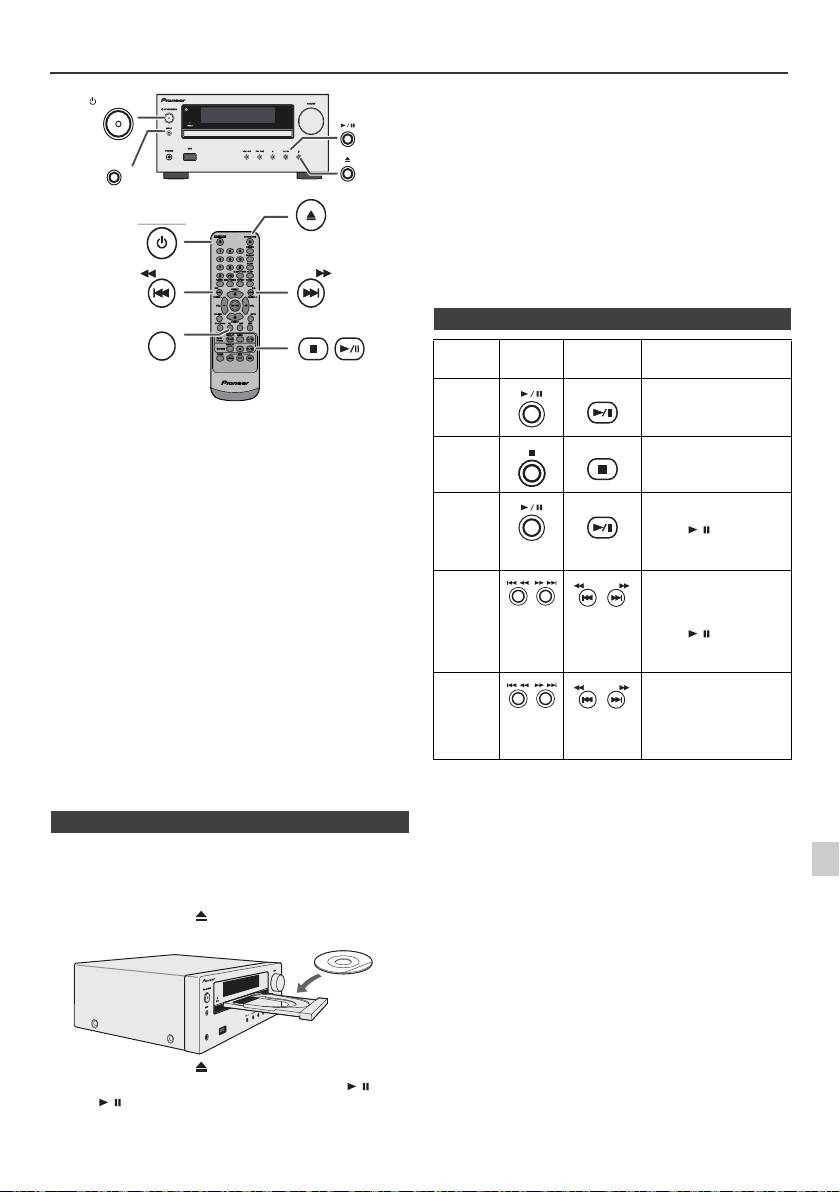
Écoute de disques MP3/WMA ou CD
Attention :
STANDBY/ON
l
Ne placez pas deux disques dans un seul tiroir de disque.
l
Ne pas utiliser de disques de formes spéciales (coeur,
octogone, etc.). Ce dernier peut mal fonctionner.
l
Ne pas pousser le tiroir en cours de mouvement.
INPUT
l
S’il se produit une panne de courant alors que le tiroir est
ouvert, attendre le rétablissement du courant.
OPEN/CLOSE
l
En cas de parasites sur télévision ou radio au cours de
l’utilisation de disques, éloigner l’appareil du téléviseur ou du
STANDBY/ON
poste de radio.
l
Penser à placer le disque de 8 cm au centre du tiroir de
disque.
l
L’appareil prend plus de temps (environ 20 à 90 secondes)
pour lire un disque MP3/WMA qu’un CD ordinaire à cause de
la structure de ses informations.
TUNING −
TUNING +
CD
Ce système peut lire un disque CD standard, un disque CD-R/
RW en format CD et un CD-R/RW avec un fichier MP3 ou WMA,
mais ne peut pas enregistrer sur ces types de CD. Certains
disques audio CD-R et CD-RW peuvent être illisibles à cause de
l’état du disque ou du dispositif utilisé pour l’enregistrement.
MP3 :
MP3 est un format de compression. Il s’agit de l’acronyme
de MPEG Audio Layer 3. MP3 est un code audio qui permet
de compresser des données audio de façon significative
sans altérer la qualité sonore.
l
Ce système supporte les fichiers MPEG 1 Layer 3 et VBR.
l
Pendant la lecture d’un fichier VBR, le compteur sur l’afficher
peut différer du temps de lecture en cours.
l
Le débit binaire supporté par MP3 est de 32 kbps à 320 kbps.
WMA :
Les fichiers WMA sont des fichiers Advanced System
format qui comprennent des fichiers audio compressés à
l’aide du codec Windows Media Audio. WMA est développé
par Microsoft comme étant un fichier sonore compatible
avec Windows Media Player.
l
Le voyant « MP3 » et « WMA » s’allumera après la lecture
des informations sur un disque MP3 ou WMA.
l
Le débit binaire supporté par WMA est de 64 kbps à
160 kbps.
n Lecture de disque
1
1
Appuyer sur la touche STANDBY/ON pour allumer l’appareil.
2
Appuyez sur la touche CD de la télécommande ou sur la
2
touche INPUT à plusieurs reprises sur l’appareil principal pour
sélectionner la fonction de CD.
3
3
Appuyer sur la touche pour ouvrir le tiroir de disque.
4
Mettre le disque sur le tiroir, côté étiqueté vers le haut.
4
5
6
7
5
Appuyer sur la touche pour fermer le tiroir de disque.
6
Pour déclencher la lecture, appuyer sur la touche
/
(CD/
8
USB
/
). Après la lecture de la dernière plage, l’appareil
s’arrête automatiquement.
9
Fr-13
11/5/25 X-HM10_20_Fr.fm
USB
PHONES
n Diverses fonctions de disque
Fonction Appareil
Télécomm
Opération
principal
ande
Lecture
CD/USB
Presser en mode d’arrêt.
Arrêt
CD/USB
Presser en mode de
lecture.
Pause
CD/USB
Presser en mode de
lecture. Appuyer sur la
touche / pour
reprendre la lecture
depuis le point d’arrêt.
Plage
Presser en mode de
haut/bas
lecture ou d’arrêt. Si vous
appuyez sur ces touches
à l’arrêt, appuyez sur la
touche / pour
commencer la lecture de
la piste souhaitée.
Avance
Presser en mode de
rapide/
lecture et la maintenir
enfoncée.
inversion
Relâcher la touche pour
reprendre la lecture.
TUNING −
TUNING +
TUNING −
TUNING +
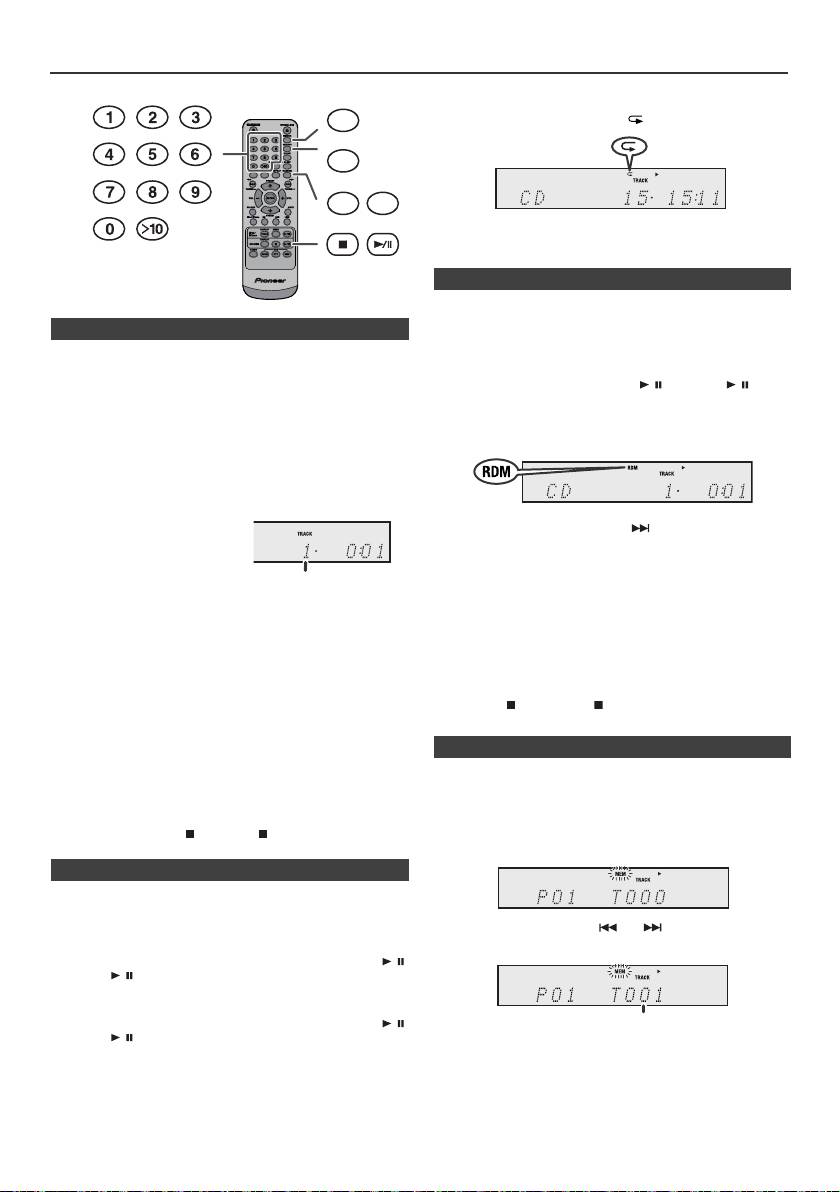
Lecture avancée de disques MP3/WMA ou CD
Pour annuler la répétition :
DIMMER
Pressez plusieurs fois la touche REPEAT ce qu’apparaisse
« Normal » et que disparaisse « ».
MEMORY
REPEAT
RANDOM
Note :
Pendant la lecture de r
é
p
é
tition, la lecture au hasard est
indisponible.
Les plages du disque peuvent être lues automatiquement en
ordre aléatoire.
n Recherche directe de morceaux
Pour lire tous les morceaux dans un ordre aléatoire :
Vous pouvez utiliser les touches numérotées pour
Appuyez sur la touche RANDOM de la télécommande sans
sélectionner et lire les pistes souhaitées du disque inséré
la relâcher jusqu’à ce que l’indication « Random »
dans le lecteur.
apparaisse. Appuyer sur la touche / (CD/USB / ).
Utilisez les touches numérotées de la télécommande
Pour annuler la lecture aléatoire :
pour sélectionner la piste souhaitée pendant que
Appuyez sur la touche RANDOM jusqu’à ce que l’indication «
l’appareil est en train de lire le disque.
RDM » disparaisse.
l
Les touches numérotées permettent de sélectionner un
numéro de piste jusqu’à 9.
l
Pour sélectionner le numéro 10 ou supérieur, utiliser la
touche « >10 ».
A. Par exemple, pour choisir
Notes :
13
l
Si l’on appuie sur la touche pendant la lecture au
hasard, il est possible d’aller à la plage suivante dans la
1
Appuyer une fois sur la
sélection de la lecture au hasard. Cependant, la touche
touche « >10 ».
ne permet pas de revenir à la plage précédente. Le début
de la plage courante sera repéré.
2
Appuyer sur la touche « 1 ».
l
Lors de la lecture au hasard, l’appareil reproduit des
3
Appuyer sur la touche « 3 ».
morceaux dans un ordre aléatoire. (Il est impossible de
spécifier un ordre.)
B. Par exemple, pour choisir 130
l
Pendant la lecture au hasard, la lecture de répétition est
1
Appuyer deux fois sur la touche « >10 ».
indisponible.
2
Appuyer sur la touche « 1 ».
Attention :
Après avoir effectué une lecture répétée, veiller à appuyer sur
3
Appuyer sur la touche « 3 ».
la touche (CD/USB ). Sinon, le disque sera lu
4
Appuyer sur la touche « 0 ».
continuellement.
Notes :
l
Un numéro de plage supérieur au nombre de plages sur
le disque ne peut pas être sélectionné.
On peut sélectionner 32 morceaux (maxi) pour la lecture
l
La recherche directe n'est pas possible en mode de
dans un ordre souhaité.
lecture aléatoire.
Arrêt de la lecture :
Appuyer sur la touche (CD/USB ).
n Lecture répétée
Avec répétition lecture, l’appareil peut relire continuellement
un piste, tous les pistes ou une séquence programmée.
Pour répéter la lecture d’un piste :
Pressez plusieurs fois la touche REPEAT jusqu’à ce
qu’apparaisse « Repeat One ». Appuyer sur la touche /
(CD/USB / ).
Pour répéter tous les morceaux :
Pressez plusieurs fois la touche REPEAT jusqu’à ce
qu’apparaisse « Repeat All ». Appuyer sur la touche /
(CD/USB / ).
Pour répéter des morceaux souhaités :
Suivre les étapes 1 - 5 dans le chapitre « Lecture des
morceaux programmés » sur cette page, puis appuyer sur la
touche REPEAT à plusieurs reprises jusqu’à ce que « Repeat
All » s’affiche.
Fr-14
11/5/25 X-HM10_20_Fr.fm
Numéro de la plage
choisie
n Lecture aléatoire
n Lecture des morceaux programmés (CD)
1
En mode d’arrêt, appuyer sur la touche MEMORY de la
télécommande pour passer en mode de sauvegarde de
programme.
2
Appuyer sur les touches ou de la télécommande
pour sélectionner la plage souhaitée.
3
Appuyer sur la touche MEMORY pour stocker le numéro
de morceau.
Numéro de la plage choisie
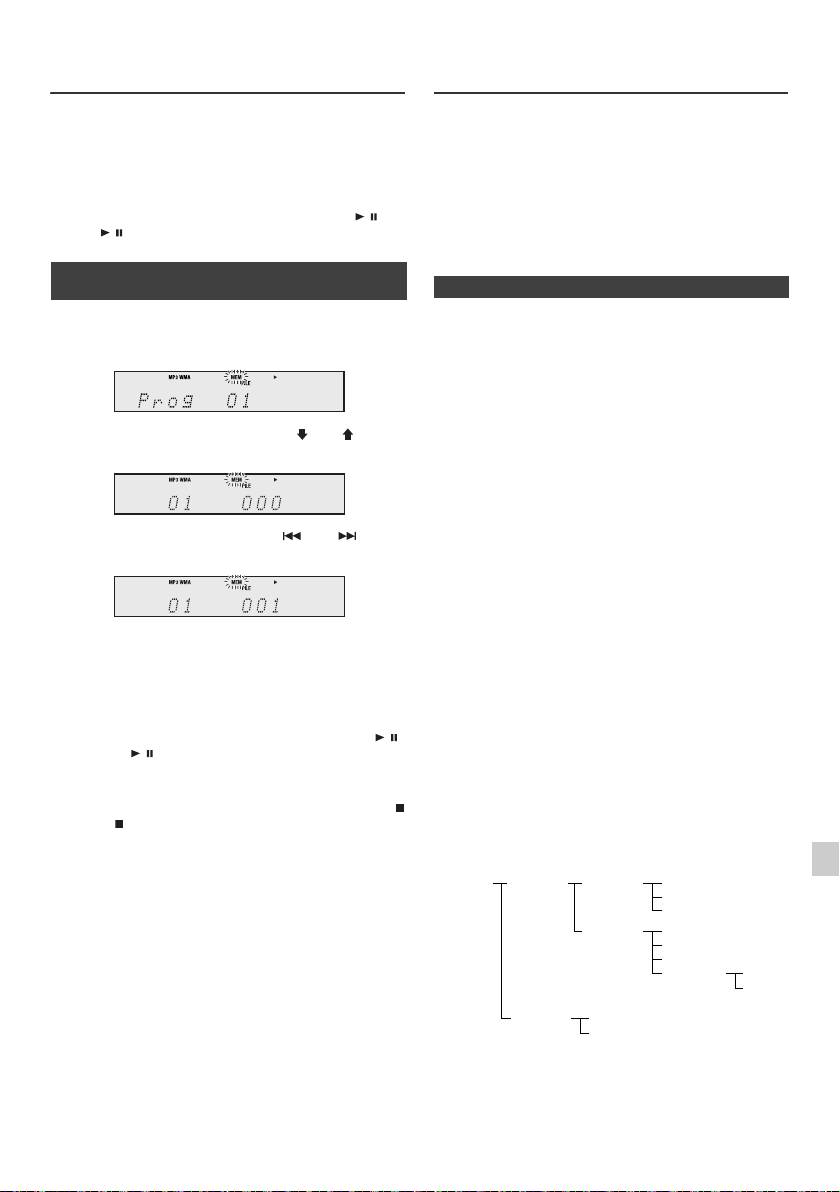
Lecture avancée de disques MP3/
Mode dossier MP3/WMA (seulement
WMA ou CD (suite)
pour des fichiers MP3/WMA)
Pour lire un fichier MP3/WMA (Windows Media Audio)
4
Renouveler les étapes 2 - 3 pour d’autres morceaux.
Il y a de nombreux sites de musique sur l’Internet d’où on
32 plages au total sont programmables. Pour vérifier les
peut télécharger des fichiers musicaux MP3/WMA
plages programmées, appuyer à plusieurs reprises sur la
(Windows Media Audio). Suivre les instructions de ces
touche MEMORY. En cas d’erreur, les plages
programmées peuvent être effacées en appuyant sur la
sites pour télécharger ce type de fichiers. Il est alors
touche CLEAR.
possible de lire ces fichiers musicaux téléchargés en les
gravant sur un disque CD-R/RW.
5
Pour déclencher la lecture, appuyer sur la touche / (CD/
l Les chansons/fichiers téléchargés sont pour usage
USB / ).
personnel seulement. Toute autre utilisation d’une
chanson sans la permission du propriétaire est illégale.
n Lecture des morceaux programmés
(MP3/WMA)
n Sur l’ordre de lecture des dossiers
Si des fichiers MP3/WMA sont présents dans plusieurs
1
En mode d’arrêt, appuyer sur la touche MEMORY pour
dossiers, un nombre sera automatiquement attribué à
entrer en mode d’enregistrement de programme.
chaque dossier.
On peut sélectionner les dossiers à l’aide de la touche
FOLDER sur la télécommande. Si le dossier sélectionné
contient des formats de fichier qui ne sont pas supportés,
le dossier est sauté et le dossier suivant est sélectionné.
2 Appuyer sur la touche PRESET
(
ou
)
de la
Exemple : Attribution des nombres de dossier si des
télécommande pour sélectionner le dossier souhaité.
fichiers MP3/WMA sont présents, tel que dans la figure ci-
dessous.
1
Le dossier ROOT est programmé comme dossier 1.
2 Quant aux dossiers dans le dossier ROOT (dossiers A
Appuyer ensuite sur la touche ou de la
et B), celui qui est enregistré le premier sur le disque
télécommande pour sélectionner la plage souhaitée.
sera programmé comme dossier 2 et 3.
3 Pour ce qui est des dossiers dans le dossier A (dossiers
C et D), celui qui est enregistré le premier sur le disque
sera programmé comme dossier 4 et 5.
3 Appuyer sur la touche MEMORY pour stocker le
4 Le dossier E dans le dossier D sera programmé comme
numéro du dossier et de la plage.
dossier 6.
4 Répéter les étapes 2 - 3 pour programmer d’autres
l L’information relative à l’ordre des dossiers et des
dossiers/plages. 32 plages au total sont
fichiers écrits sur le disque dépend du logiciel
programmables.
d’écriture. Il est possible que l’appareil ne lise pas les
fichiers selon l’ordre prévu.
5 Pour déclencher la lecture, appuyer sur la touche /
l Pour les CD contenant des fichiers MP3/WMA,
(CD/USB / ).
l'appareil peut gérer et lire jusqu'à 99 dossiers et
999 fichiers, en incluant les dossiers qui contiennent
des fichiers non lisibles.
Pour annuler la lecture des morceaux programmés :
En mode d’arrêt programmé, appuyez sur la touche
L’activation/désactivation du mode dossier peut s’effectuer
(CD/USB ). L’indication « Memory Clear » apparaît sur
via la touche FOLDER de la télécommande. Les fichiers
1
l’écran et tous les contenus programmés sont effacés.
qui sont lus avec mode dossier activé diffèrent de ceux lus
avec mode dossier désactivé.
Ajout de morceaux au programme :
2
Si un programme a été précédemment mémorisé, le
voyant « MEM » s’affiche. Appuyez sur la touche
3
MEMORY. Puis suivez les étapes 2 et 3 pour ajouter des
pistes.
4
Notes :
l Lorsqu’un disque est éjecté, le programme est
5
automatiquement annulé.
l Si vous appuyez sur la touche STANDBY/ON pour
entrer en mode de veille ou pour passer de la fonction
6
CD à une autre, les sélections programmées seront
effacées.
7
l La lecture au hasard n’est pas utilisable pour la lecture
des morceaux programmés.
8
9
Fr-15
11/5/25 X-HM10_20_Fr.fm
ROOT
FOLDER A
FOLDER C
FILE 3
(FOLDER 1)
(FOLDER 2)
(FOLDER 4)
FILE 4
FILE 5
FOLDER D
FILE 6
(FOLDER 5)
FILE 7
FILE 8
FOLDER E
FILE 9
(FOLDER 6)
FILE 10
FOLDER B
FILE 1
(FOLDER 3)
FILE 2
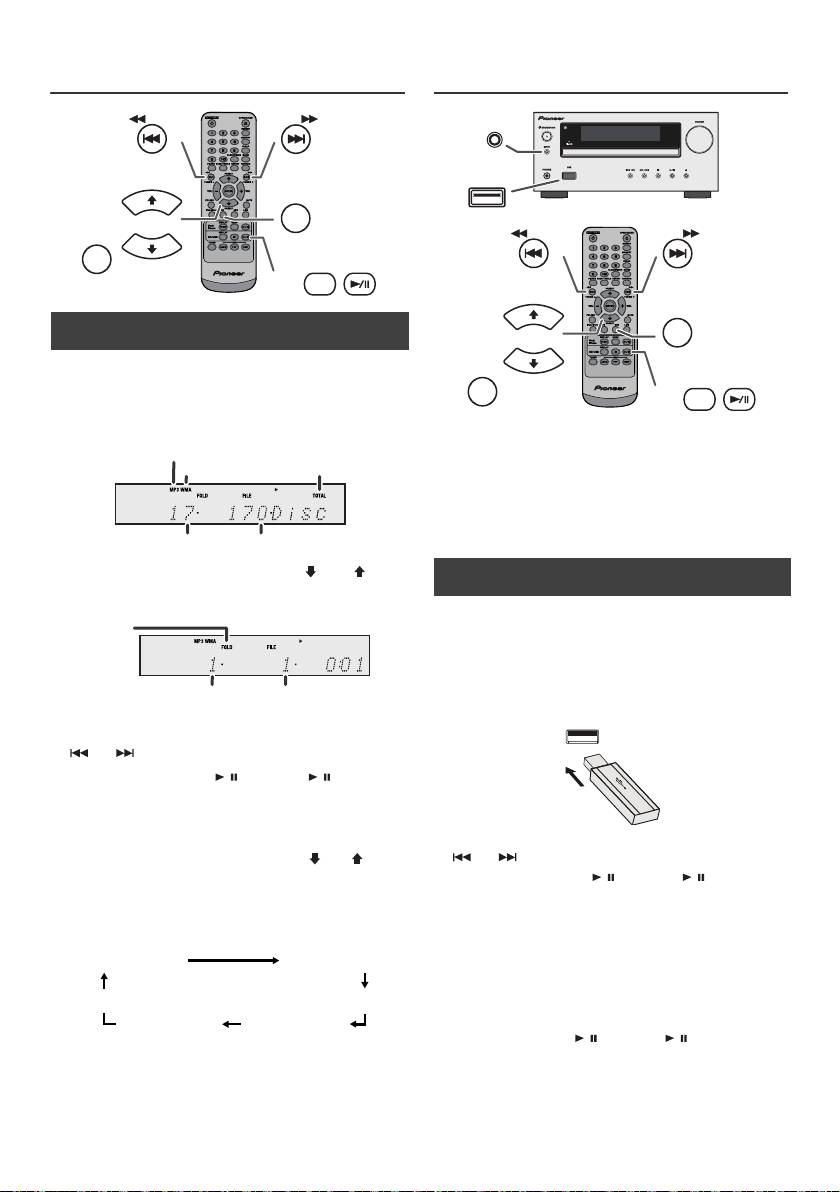
Mode dossier MP3/WMA (seulement
Lecture mémoire de grande capacité
pour des fichiers MP3/WMA) (suite)
USB/lecteur MP3
n Procédure de lecture de disques MP3/
WMA avec le mode dossier activé
Pour lire des CD-R/RW.
1
Appuyer sur la touche CD et charge un disque MP3/
WMA. Appuyer sur la touche FOLDER et les données
du disque s'afficheront.
Notes :
l Ce produit n'est pas compatible avec les systèmes de
fichiers MTP et AAC utilisés sur certains périphériques
de stockage de masse USB ou lecteurs MP3.
l Certains périphériques de stockage externe peuvent
ne pas fonctionner avec ce système.
l Le fonctionnement des périphériques de stockage
externe (clés mémoires USB, disques durs externes,
etc.) n'est pas garanti.
2 Appuyer sur la touche PRESET
(
ou
)
pour
sélectionner le dossier de lecture de votre choix. (Mode
dossier activé)
3 Sélectionner le fichier à lire en appuyant sur la touche
ou .
4 Appuyer sur la touche / (CD/USB / ). La lecture
commence et le nom du fichier s’affiche.
l Les noms du titre, de l’artiste et de l’album s’affichent
s’ils sont enregistrés sur le disque.
l En cas de lecture avec le mode FOLDER activé,
appuyez sur la touche PRESET
(
ou
)
, et le
dossier pourra être sélectionné même l’appareil est
en mode lecture/pause. Le mode lecture/pause
reprendra à la première piste du dossier sélectionné.
l Les informations affichées peuvent être changées
en appuyant sur la touche CD/USB DISPLAY.
Note :
Pour mettre en pause la lecture :
Appuyer sur la touche / (CD/USB / ).
Note :
Si « Not support » s’affiche, cela signifie qu’on a
sélectionné « Copyright protected WMA file » (fichier
WMA protégé par copyright) ou « Not supported playback
file » (le fichier à lire n’est pas supporté).
Fr-16
11/5/25 X-HM10_20_Fr.fm
TUNING −
TUNING +
PRESET
CD
FOLDER
PRESET
DISPLAY
CD/USB
Voyant MP3
Voyant WMA
Voyant TOTAL
Nombre total de dossier
Nombre total de fichiers
Voyant
FOLDER
Nombre de
Premier numéro de
Dossier
plage dans le dossier
Affichage du nom du fichier
Affichage du dossi
Affichage Counter
Affichage du title
Affichage de
Affichage de
l’artiste
l’album
n Lecture à partir d’un dispositif USB/MP3
avec le mode dossier désactivé
1
Appuyer sur la touche USB de la télécommande ou sur
la touche INPUT à plusieurs reprises sur l’appareil
principal pour sélectionner la fonction de USB. Brancher
à l’appareil le dispositif Mémoire USB ayant les fichiers
MP3/WMA. Après le branchement, les informations du
dispositif s’affichent.
2 Sélectionner le fichier à lire en appuyant sur la touche
ou .
3 Appuyer sur la touche / (CD/USB / ). La lecture
commence et le nom du fichier s’affiche.
l Le titre, le nom de l’artiste et de l’album s’affichent
s’ils sont enregistrés dans le dispositif de mémoire
USB.
l Les informations affichées peuvent être changées
en appuyant sur la touche CD/USB DISPLAY.
INPUT
USB
TUNING −
TUNING +
PRESET
USB
FOLDER
PRESET
DISPLAY
CD/USB
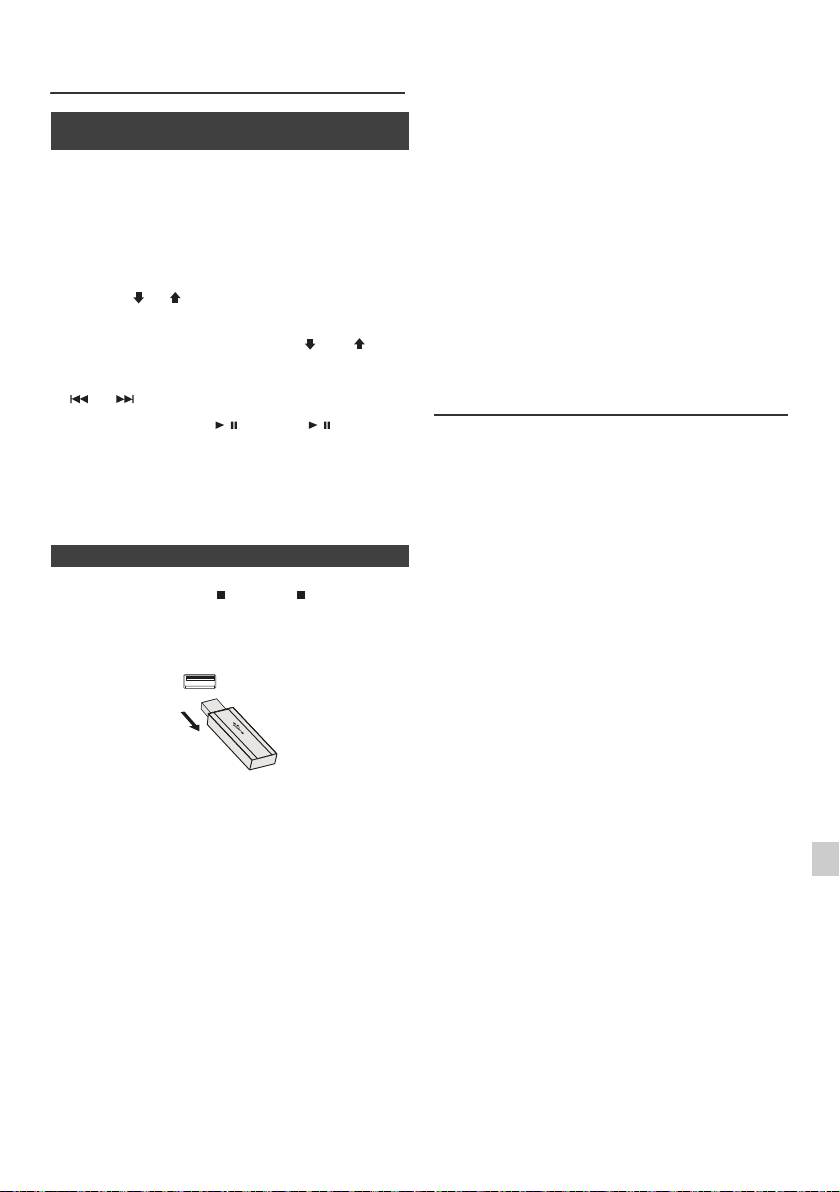
l Ce produit peut lire les fichiers WMA et MP3. Il
Lecture mémoire de grande capacité
détectera automatiquement le type de fichier en cours
USB/lecteur MP3 (suite)
de lecture. En cas de fichier illisible, « Not Support »
est indiqué et le fichier est automatiquement ignoré.
Cela peut prendre quelques secondes. Si des
n Lire à partir d’un dispositif USB/MP3 avec
indications anormales apparaissent sur l’afficheur à
le mode dossier activé
cause d’un fichier non spécifié, éteindre l’appareil et le
rallumer.
1
Appuyer sur la touche USB de la télécommande ou sur
l Ce produit se relie à des dispositifs de stockage de
la touche INPUT à plusieurs reprises sur l’appareil
masse USB et des lecteurs MP3. Toutefois, certaines
principal pour sélectionner la fonction de USB. Brancher
irrégularités peuvent se produire pour diverses raisons
à l’appareil le dispositif Mémoire USB ayant les fichiers
imprévues pour certains dispositifs. Si cela se produit,
MP3/WMA. Après le branchement, les informations du
éteindre l’appareil et le rallumer.
dispositif s’affichent.
l La borne USB est uniquement prévue pour la
2 Appuyer sur la touche FOLDER et puis sur la touche
connexion directe au dispositif de mémoire USB sans
PRESET
(
ou
)
pour sélectionner le dossier désiré.
câble.
Pour commencer la lecture avec le mode dossier activé,
l Le lecteur MP3 ne se chargera pas en fonction CD.
passer à la sixième étape. Pour changer le dossier lu,
l L’indication « Not Support » s’affiche si vous connectez
appuyer sur la touche PRESET
(
ou
)
pour
un iPod à la prise USB lorsque la fonction USB est
sélectionner un autre dossier.
sélectionnée.
3 Sélectionner le fichier à lire en appuyant sur la touche
ou .
Lecture USB avancée
4 Appuyer sur la touche / (CD/USB / ). La lecture
Les fonctions suivantes sont les mêmes que pour les
commence et le nom du fichier s’affiche.
CD :
l Le titre, le nom de l’artiste et de l’album s’affichent
Page
s’ils sont enregistrés dans le dispositif de mémoire
Recherche directe de morceaux . . . . . . . . . . . . . . . .14
USB.
Lecture répétée. . . . . . . . . . . . . . . . . . . . . . . . . . . . . .14
l Les informations affichées peuvent être changées
Lecture au hasard. . . . . . . . . . . . . . . . . . . . . . . . . . . .14
en appuyant sur la touche CD/USB DISPLAY.
Lecture des morceaux programmés (MP3/WMA) . .15
Notes :
n Enlever le dispositif de mémoire USB
l Si le dispositif de mémoire USB n’est pas connecté,
« USB No Media » s’affichera sur l’écran.
l Le seul format supporté par cet appareil est « MPEG-
1
Appuyer sur la touche (CD/USB ) pour arrêter la
1 Audio Layer 3 ». (La fréquence d’échantillonnage est
lecture.
32 kHz, 44,1 kHz, 48 kHz)
2 Débrancher le dispositif de mémoire USB de la borne
l L’ordre de lecture des fichiers MP3 peut varier en
USB.
fonction du logiciel d’écriture utilisé lors du
téléchargement des fichiers.
l Le débit binaire supporté par le MP3 est compris entre
32 kbps à 320 kbps et entre 64 kbps à 160 kbps pour
le WMA.
l Veuillez ajouter l’extension « .MP3 » ou « .WMA » pour
les fichiers MP3/WMA. Les fichiers ne peuvent pas
être sans extension MP3/WMA.
l Les listes de lecture ne sont pas supportées par cet
appareil.
Notes :
l Le nombre maximum de caractères du nom d’un
l PIONEER ne pourra être tenu pour responsable de la
dossier ou d’un fichier pouvant être affiché par cet
perte de données lorsque le dispositif de mémoire USB
appareil est 99.
1
est raccordé au système audio.
l Le nombre maximum total de fichiers MP3/WMA est de
l Les fichiers compressés au format MP3 et/ou WMA
999.
peuvent être lus une fois raccordés à la borne USB.
2
l Le nombre total de dossiers gérés et lus par l'appareil
l Ce format USB supporte FAT 16 ou FAT 32.
est de 99, en incluant les dossiers qui contiennent des
l PIONEER ne garantit pas le fonctionnement de tous
fichiers non lisibles. Toutefois, seuls les dossiers
3
les dispositifs de mémoire USB avec ce système
contenant des fichiers MP3 et WMA sont affichés.
audio.
l Le temps de lecture de l’affichage peut ne pas être
l Il est déconseillé d’utiliser un câble USB pour
4
affiché correctement lors de la lecture d’un fichier à
raccorder un dispositif de mémoire USB à ce système
débit binaire variable.
audio. L’utilisation d’un câble USB affecterait les
performances du système audio.
l Les informations d’ID3TAG supportées sont
5
l Ce dispositif USB ne peut pas fonctionner via un hub
uniquement TITLE, ARTIST et ALBUM. Il est possible
USB.
d’afficher le nom du titre, le nom de l’artiste et le nom
de l’album en appuyant sur la touche DISPLAY
6
l La borne USB de cet appareil n’est pas prévue pour
une connexion à un ordinateur, mais est utilisée pour
pendant la lecture du fichier ou en mode pause.
la lecture de musique avec un dispositif de mémoire
l La fonction méta repère WMA est compatible avec les
7
USB.
noms de titre, d’artiste et de l’album enregistrés dans
l La mémoire HDD externe ne peut pas être lue via la
les fichiers WMA. Les fichiers WMA protégés par
borne USB.
copyright ne peuvent pas être lus.
8
l Si les données contenues dans le dispositif de
mémoire USB sont volumineuses, la lecture peut
prendre plus de temps.
9
Fr-17
11/5/25 X-HM10_20_Fr.fm
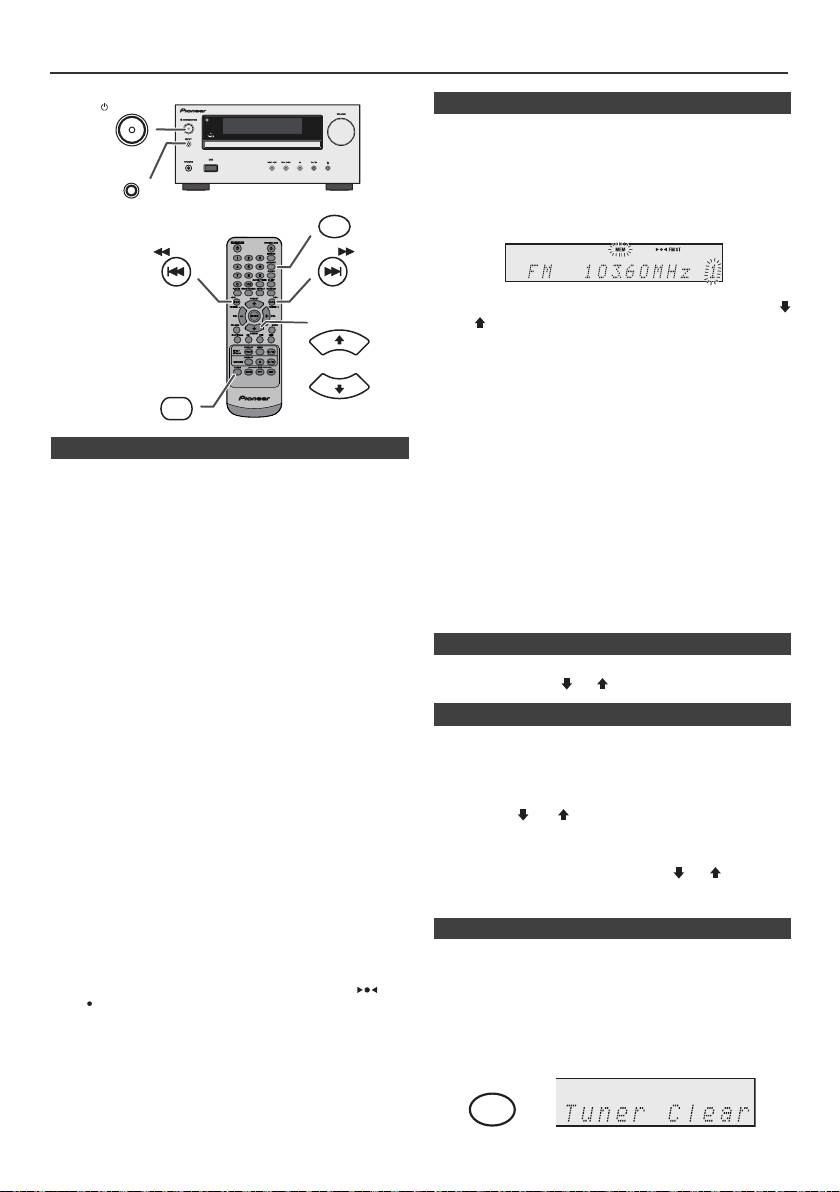
Écoute de la radio
STANDBY/ON
n Mise en mémoire d’une station
Il est possible de stocker 40 stations en PO et en FM et de
les rappeler par la simple pression d’une touche. (Accord
de présélection)
INPUT
1
Suivre les étapes 1 - 3 dans « Accord ».
MEMORY
2 Appuyer sur la touche MEMORY.
TUNING −
TUNING +
3 Avant 30 secondes, appuyer sur la touche PRESET
(
PRESET
ou
)
pour sélectionner le numéro de présélection.
Stocker des stations en mémoire dans l’ordre à partir du
canal de présélection 1.
4 Avant 30 secondes, appuyer sur la touche MEMORY
TUNER
pour mettre la station en mémoire. Si les voyants «
PRESET
MEMORY » et le numéro de préréglage disparaissent
avant la mémorisation de la station, répéter l’opération
à partir de l’étape 2.
n Accord
5 Renouveler les étapes 1 - 4 pour mémoriser d’autres
1
Appuyer sur la touche STANDBY/ON pour allumer
stations ou remplacer une station mise en mémoire.
l’appareil.
Lorsqu’une nouvelle station est mémorisée, la station
mémorisée auparavant sur le même numéro de chaîne
2 Appuyer à plusieurs reprises sur la touche TUNER pour
sera effacée.
sélectionner une gamme d’ondes souhaitée (FM ou
AM).
Note :
La fonction de protection conserve les stations en
3 Appuyer sur la touche TUNING + ou - sur la
mémoire pendant plusieurs heures même s’il se produit
télécommande pour faire l’accord sur la station
une panne de courant ou un débranchement de l’appareil.
souhaitée.
l Accord manuel :
n Rappel d’une station mémorisée
Appuyer plusieurs fois sur la touche TUNING + ou -
1 Sélectionner la station souhaitée en appuyant sur la
pour syntoniser la station désirée.
touche PRESET
(
ou
)
moins de 0,5 seconde.
l Accord automatique :
Si on presse la touche TUNING + ou - plus de 0,5
n Pour balayer les stations préréglées
seconde, le tuner part en recherche et se cale sur la
première station qu’il capte.
On peut balayer les stations mises en mémoire
automatiquement. (Balayage dans la mémoire de
Notes :
présélection)
l La recherche automatique s’arrêtera dès qu’il se
produira des parasites.
1
Appuyer pendant plus de 0,5 seconde sur la touche
l Le balayage automatique sautera des stations à faible
PRESET
(
ou
)
. Les numéros de présélection se
puissance.
mettent à clignoter et l’appareil se cale sur chaque
l Pour arrêter la syntonisation automatique, réappuyer
station pendant 5 secondes.
sur la touche TUNING + ou - .
l Lorsque le tuner capte une station RDS (Radio Data
2 Réappuyer sur la touche PRESET
(
ou
)
lorsque la
System), la fréquence en est affichée, puis le voyant
station souhaitée est localisée.
RDS s’allume. Le nom de la station apparaît ensuite.
l L’accord automatique s’achève complètement pour la
mémorisation automatique (ASPM) de stations RDS
n Pour effacer toute la mémoire
(voir page 19).
Pour recevoir une émission FM stéréo :
1
Appuyez de manière répétée sur la touche TUNER de
l Appuyer sur la touche TUNER pour sélectionner le
la télécommande ou utilisez le bouton INPUT sur
mode stéréo, et l’indicateur « ST » s’affiche. « » et
l'appareil pour sélectionner la fonction Tuner.
« » apparaît lorsque l’émission FM captée est en
stéréo.
2 Lorsque la fonction Tuner est sélectionnée, appuyez sur
l Si la réception en FM n’est pas bonne, appuyer sur la
la touche CLEAR jusqu'à ce que l'indication « Tuner
touche TUNER pour éteindre « ST ». La réception
Clear » apparaisse.
passe en mono, mais le son devient plus clair.
Fr-18
11/5/25 X-HM10_20_Fr.fm
CLEAR
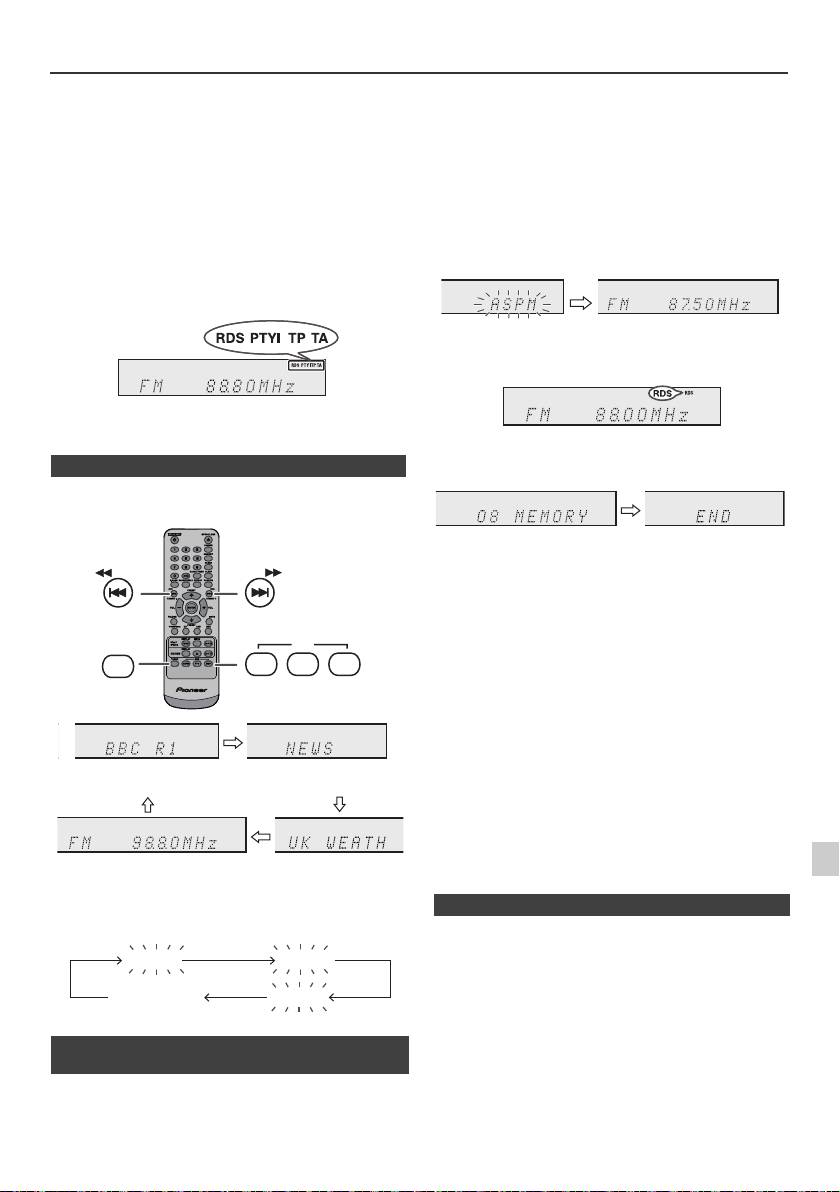
Utilisation du système RDS (Radio Data System)
RDS est un service de radiodiffusion qu’offrent de
S’il y a des stations déjà mises en mémoire, le nombre de
plus en plus de stations FM. Elles peuvent diffuser
stations mémorisables est réduit d’autant.
leurs programmes avec signaux supplémentaires tels
que leur nom de station. Sont envoyés le nom de la
station et les informations concernant le type de
programme, tel que sport, musique, etc.
Lorsque l’appareil capte une station RDS, les lettres
« RDS » et le nom de station s’inscrivent sur l’afficheur.
« TP » (programme routier) s’affiche lorsque l’émission
captée porte des informations routières et « TA »
(annonce routière) apparaît lorsque l’information routière
est en cours de diffusion.
« PTYI » (Voyant PTY dynamique) apparaît pendant la
réception d’une station PTY dynamique.
On peut commander le RDS seulement à l’aide des
touches de la télécommande.
n Informations données par RDS
Chaque fois que la touche RDS DISPLAY est pressée,
l’affichage change comme suit :
Pour interrompre l’opération ASPM en cours :
Appuyer sur la touche RDS ASPM pendant le balayage
des stations.
Les stations préalablement mises en mémoire restent
inchangées.
Notes :
l Si une station diffuse sur deux fréquences différentes,
la plus forte sera mise en mémoire.
l L’appareil ignore une station utilisant la même
fréquence que celle de la station déjà mise en
mémoire.
l S’il y a 40 stations déjà stockées en mémoire, la
recherche sera annulée. Pour refaire l’opération
ASPM, effacer des stations.
l Si aucune stations n’est mise en mémoire, l’appareil
affiche « END » pendant 4 secondes environ.
l Si des signaux RDS sont faibles, le nom de station peut
ne pas être mémorisé.
1
l Il est possible de stocker une station dans deux canaux
différents.
l Selon la région ou l’époque de l’année, les noms de
2
stations peuvent changer.
Lorsqu’il s’agit d’une station non-RDS ou d’une station
RDS portant de faibles signaux, l’affichage change
3
comme suit :
Il ne s’agit pas d’un mauvais fonctionnement même si
4
l’un des cas suivants se présente :
l L’appareil affiche alternativement « PS », « No PS » et
un nom de station.
5
l Lorsqu’il s’agit d’une station ne diffusant pas
correctement ou d’une station en cours d’essai, la
6
fonction RDS ne fonctionne pas de façon souhaitée.
l S’il s’agit d’une station RDS portant de faibles signaux,
n Mémorisation automatique de stations
l’appareil n’arrive pas à afficher le nom de la station.
7
(ASPM)
l « No PS », « No PTY » ou « No RT » clignote environ
5 secondes et la fréquence s’affiche.
En mode ASPM, le tuner recherche automatiquement de
8
nouvelles stations RDS. Jusqu’à 40 stations
programmables.
9
Fr-19
11/5/25 X-HM10_20_Fr.fm
TUNING −
TUNING +
RDS
TUNER
ASPM PTY DISP
Nom de station (PS)
Type de programme (PTY)
Fréquence Texte radio (RT)
No PS No PTY
FM 98.80 MHz
No RT
1 Appuyez sur la touche TUNER de la télécommande ou
sur la touche INPUT à plusieurs reprises sur l’appareil
principal pour sélectionner la fonction de TUNER.
2 Appuyer sur la touche RDS ASPM de la
télécommande et la maintenir enfoncée.
1 Le voyant « ASPM » clignote pendant environ 4
secondes, et le balayage démarre (87,50 - 108,00
MHz).
2 Lorsqu’une station RDS est détectée, « RDS »
s’affiche un instant et la station est mise en
mémoire.
3 Une fois le balayage terminé, le nombre de stations
mémorisées s’affiche pendant 4 secondes, puis
« END » apparaît pendant 4 secondes.
n Notes pour le fonctionnement RDS
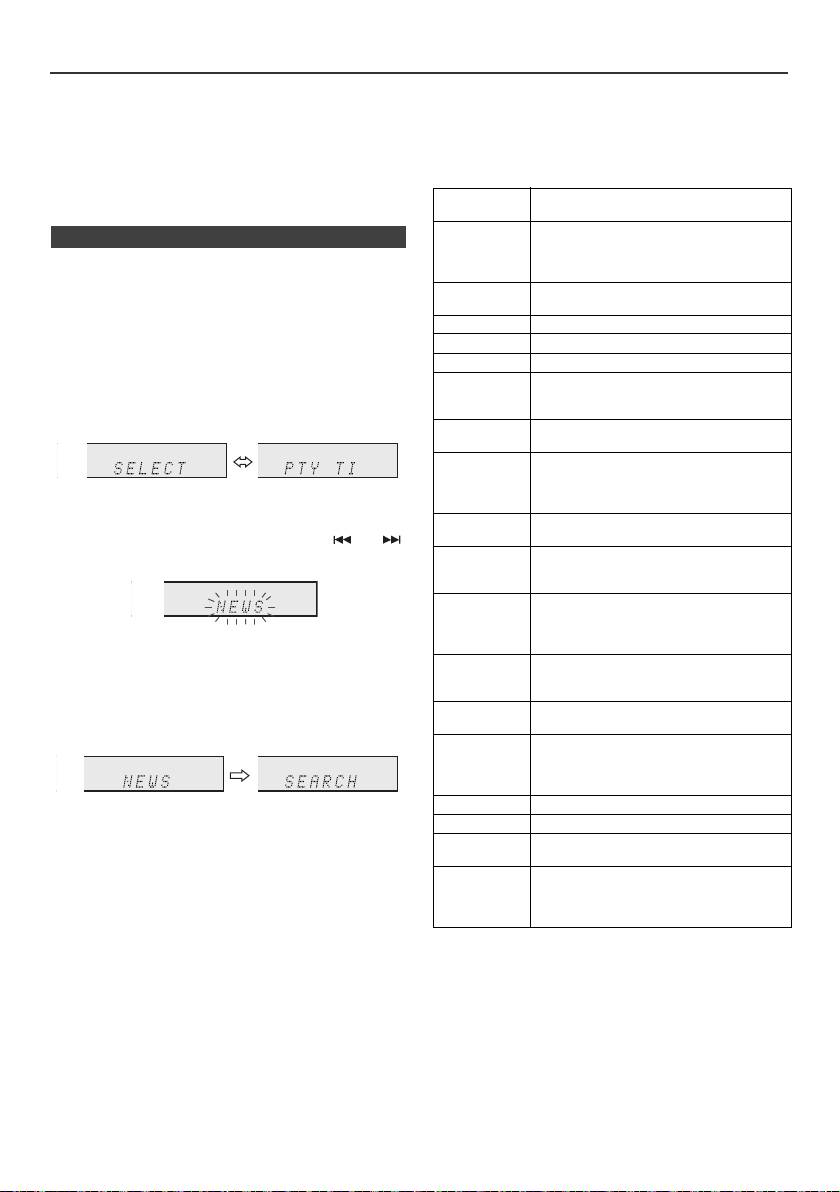
Utilisation du système RDS (Radio Data System) (suite)
Notes pour le texte radio :
Si les informations routières sont en cours de diffusion,
l Les 14 premiers caractères de text radio restent
« TA » apparaît.
affichés pendant 4 secondes, puis ils se déplacent sur
Codes PTY (type de programme), TP (information
l’afficheur.
routière) et TA (annonce routière)
l Si on capte une station RDS n’émettant pas de texte
On peut rechercher et recevoir les signaux PTY, TP et TA
radio, l’appareil affiche « No RT » au passage en
suivants.
position de texte radio.
l L’appareil affiche « RT » pendant la réception de texte
NEWS Programme d’informations, dépêches,
radio ou chaque fois que le texte change.
événements, reportages et actualités.
AFFAIRS Programmes approfondis sur actualités,
n Pour rappeler une station en mémoire
généralement avec une présentation ou
conception différente, y compris un
Pour écouter une station souhaitée en spécifiant le
débat ou une analyse.
type de programme (recherche PTY) :
INFO Programme pour conseils dans un sens
On peut rechercher une des stations mises en mémoire
très large.
en désignant le type de programme (actualités, sports,
informations routières, etc. ... voir page 20).
SPORT Programme sur les sports.
EDUCATE Programme éducatif, fondamental.
1
Appuyez sur la touche TUNER de la télécommande ou
DRAMA Feuilletons.
sur la touche INPUT à plusieurs reprises sur l’appareil
CULTURE Programmes de la culture nationale ou
principal pour sélectionner la fonction de TUNER.
régionale, comprenant les langues, le
théâtre, etc.
2 Appuyer sur la touche RDS PTY sur la télécommande.
SCIENCE Programmes sur la science naturelle et
la technologie.
VARIED Programmes de conversation de type
divertissement, non classables dans
d’autres catégories. Par exemple, jeux,
« SELECT » et « PTY TI » apparaîtront en alternance
interview, etc.
pendant environ 6 secondes.
POP M Programmes musicaux, variétés, hit-
parade, etc.
3 Avant 6 secondes, appuyer sur la touche ou
pour sélectionner le type de programme.
ROCK M Musiques modernes contemporaines,
écrites et jouées par de jeunes
musiciens.
EASY M Musique contemporaine de type
« écoute facile », opposée à pop, rock,
classique. La musique de cette catégorie
Chaque fois que la touche est pressée, le type de
est souvent vocale et de courte durée.
programme se modifie. Si on maintient la touche
LIGHT M Musique classique générale, non
enfoncée plus de 0,5 seconde, le type affiché change
spécialisée. Instrumentale, vocale ou
rapidement.
choeur.
CLASSICS Musique orchestrale, symphonies,
4 Pendant le clignotement du type de programme (c.-à-
musique de chambre, opéra, etc.
d. avant 6 secondes), appuyer sur la touche RDS PTY.
OTHER M Musique non classable comme Rhythm
& Blues, Reggae, etc. Particulièrement
utilisés pour la musique spécialisée,
comme le Rhythm & Blues ou le Reggae.
WEATHER Programme météo.
Le type de programme sélectionné reste éclairé
pendant 2 secondes, puis « SEARCH » apparaît et
FINANCE Commerce, marketing, stocks, etc.
l'opération de recherche démarre.
CHILDREN Programmes visés aux jeunes,
divertissement, renseignements utiles.
Notes :
SOCIAL Programmes sur les personnages et les
l Si l’affichage arrête de clignoter, renouveler l’opération
choses, y compris la sociologie,
depuis l’étape 2. Lorsque l’appareil trouve le type de
l’histoire, la géographie, la psychologie et
programme souhaité, le numéro du canal
la société.
correspondant s’allume pour 8 secondes et le nom de
station reste allumé ensuite.
l Pour écouter le même type de programme d’une autre
station, appuyer sur la touche RDS PTY avant que le
numéro de canal (ou le nom de station) ne cesse de
clignoter. L’appareil recherche alors une autre station.
l Si aucune station n’est trouvée, « NOT FOUND »
apparaît pendant 4 secondes.
Si on choisit le programme d’informations routières :
Si on désigne le programme routier (TP) à l’étape 3, « TP
» apparaît.
(Cela ne signifie pas que les informations routières sont
en cours de diffusion.)
Fr-20
11/5/25 X-HM10_20_Fr.fm
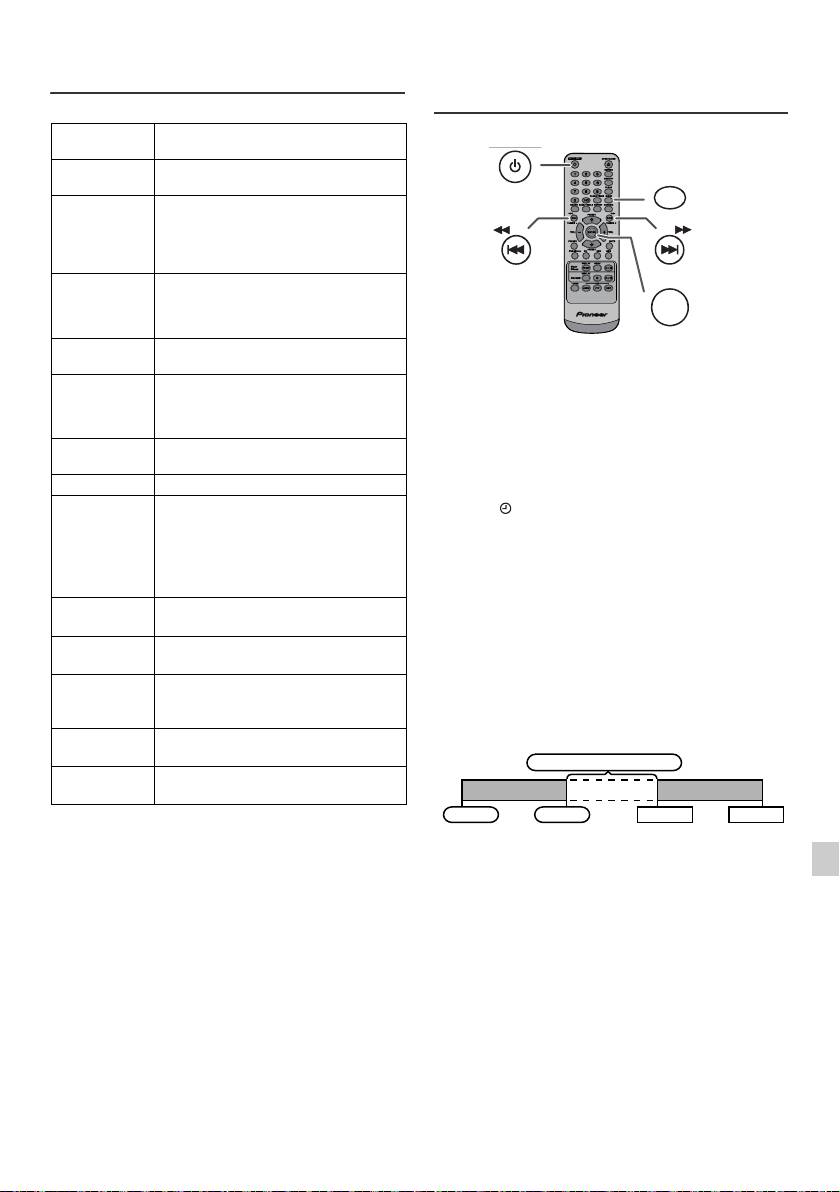
Utilisation du système RDS (Radio
Opérations programmées et mise en
Data System) (suite)
arrêt différée (Seulement par
télécommande)
RELIGION Programmes relatifs aux religions. Foi,
Dieu, dieux, l’existence et l’éthique.
PHONE IN Programmes ouverts au public.
Entretien par téléphone ou au forum.
TRAVEL Programmes sur tous les types de
voyages : proximité, lointain, forfait,
astuce, etc. Non pour les informations
routières (travaux, délai, etc.) affectant
un voyage immédiat qui utilise TP/TA.
LEISURE Programmes concernant les loisirs
auxquels les auditeurs peuvent
participer. Jardinage, pêche, antiquités,
cuisine, vins, etc.
JAZZ Musique polyphonique et syncopée,
Lecture programmée :
caractérisée par improvisation.
L’appareil s’allume et lance la lecture de la source (CD,
COUNTRY Musique populaire issue de la tradition
TUNER, USB, iPod, LINE IN) désirée à une heure
musicale dans le sud des États-Unis.
prédéfinie.
Caractérisée par une mélodie directe et
une façon narrative.
Cet appareil dispose de 2 types de minuteries : ONCE
TIMER et DAILY TIMER.
NATION M Musique populaire du monde en version
originale et non en anglais.
Programmation unique :
La programmation unique se déroule une seule fois à
OLDIES Musique populaire, vieux succès.
l’heure programmée.
FOLK M Musique qui a l’origine de la culture
(Voyant « »).
musicale d’un pays particulier, souvent
Programmation quotidienne :
accompagnée d’instruments
La programmation quotidienne se déroule tous les jours à
acoustiques. Les paroles peuvent être
la même heure. Par exemple, régler la minuterie pour se
basées sur une affaire historique ou le
réveiller chaque matin.
peuple.
(Voyant «DAILY»).
DOCUMENT Programme documentaire, présenté
dans un style d’enquête.
Programmations unique et quotidienne à la fois :
Par exemple, utiliser la programmation unique pour
TEST Émission pour l’essai d’un émetteur ou
écouter une émission de radio et la programmation
d’un récepteur d’urgence.
quotidienne comme réveil.
ALARM Annonce urgente, dans un cas
exceptionnel, qui avertit d’un danger à
1 Effectuer la programmation quotidienne (page 21).
venir.
2 Réglez l’alarme unique (page 21).
TP Indique qu’il s’agit d’une station
émettant des informations routières.
TA Informations routières en cours de
diffusion.
1
2
3
4
5
6
7
8
9
Fr-21
11/5/25 X-HM10_20_Fr.fm
STANDBY/ON
CLOCK/TIMER
TUNING −
TUNING +
ENTER
1 minute ou plus
Programmation unique
Programmation quotidienne
Départ
Arrêt
Départ
Arrêt

Opérations programmées et mise en arrêt différée
(Seulement par télécommande) (suite)
Programmation unique :
n Lecture programmée
L’opération programmée s’annule.
Avant de régler la minuterie :
Programmation quotidienne :
l Vérifier que l’horloge est à l’heure (voir page 9). Si
La minuterie fonctionne à la même heure chaque jour.
l’horloge n’est pas à l’heure, on ne peut pas
Il continuera jusqu’à ce que le paramétrage quotidien
programmer une opération.
soit annulé. Annuler celle-ci si elle n’est plus
l Pour la lecture programmée : Connecter un dispositif
nécessaire.
USB ou charger les disques ou installer l’iPod à lire.
Notes :
l Lors de l’utilisation de la fonction de minuterie d’arrêt
avec un équipement connecté à la prise USB,
1 Appuyer sur la touche STANDBY/ON pour allumer
sélectionnez « USB » ou « LINE IN » à l’étape 5.
l’appareil.
l L’appareil entre automatiquement en mode de veille.
Toutefois, l’unité connectée ne se met pas sous/hors
2 Maintenir la touche CLOCK/TIMER enfoncée.
tension. Pour arrêter la lecture programmée, suivre les
étapes « Effacer le réglage de l’alarme » décrites
3 Avant 30 secondes, appuyer sur la touche ou
dans cette page.
pour sélectionner « Once » ou « Daily » et presser sur
Vérification du réglage de l’alarme :
la touche ENTER.
1 Allumer le système et maintenir la touche CLOCK/
4 Avant 30 secondes, appuyer sur la touche ou
TIMER enfoncée.
pour sélectionner « Timer set » et presser sur la touche
ENTER.
2 Avant 30 secondes, appuyer sur la touche ou
pour sélectionner « Once » ou « Daily » et presser sur
5 Pour sélectionner une source pour la lecture
la touche ENTER.
programmée (CD, TUNER, USB, iPod, LINE IN),
3 Dans les 30 secondes, appuyez sur la touche ou
appuyer sur la touche ou . Appuyer sur la
pour sélectionner l'option « Timer Call », puis
touche ENTER.
appuyez sur la touche ENTER.
S’il s’agit du tuner, sélectionner une station en agissant
sur la touche ou et appuyer sur la touche
ENTER. Si aucune station n’a été programmée, « No
Effacer le réglage de l’alarme :
Preset » s’affiche et la programmation s’annule.
1 Allumer le système et maintenir la touche CLOCK/
6 Pour régler les jour, appuyer sur la touche ou
TIMER enfoncée.
puis appuyer sur la touche ENTER.
2 Avant 30 secondes, appuyer sur la touche ou
pour sélectionner « Once » ou « Daily » et presser sur
7 Appuyez sur la touche ENTER pour régler l’heure.
la touche ENTER.
Appuyez sur la touche ou , puis appuyez sur la
touche ENTER.
3 Dans les 30 secondes, appuyez sur la touche ou
pour sélectionner l'option « Timer Off », puis
8 Pour régler les minutes, appuyer sur la touche ou
appuyez sur la touche ENTER. L’opération programmée
et appuyer sur la touche ENTER.
s’annule (le contenu de la programmation restera
9 Programmer l’heure d’arrêt comme décrit dans les
valable).
étapes 7 et 8.
Réutilisation de l’opération programmée en mémoire :
10 Réglez le volume à l'aide des touches VOL (+ ou -),
Le paramétrage du programmateur sera mémorisé une
puis appuyez sur la touche ENTER. Éviter de trop
fois entré. Pour réutiliser le même paramétrage, faites les
élever le volume.
opérations suivantes.
11 Appuyer sur la touche STANDBY/ON pour passer en
veille. Le voyant « TIMER » s’allume, indiquant que
1 Allumer le système et maintenir la touche CLOCK/
l’appareil est prêt à la lecture programmée.
TIMER enfoncée.
2 Avant 30 secondes, appuyer sur la touche ou
pour sélectionner « Once » ou « Daily » et presser sur
la touche ENTER.
3 Dans les 30 secondes, appuyez sur la touche ou
pour sélectionner l'option « Timer On », puis
appuyez sur la touche ENTER.
12 À l’heure programmée, la lecture ou l’enregistrement
4 Appuyer sur la touche STANDBY/ON pour passer en
se déclenche. Le volume augmente graduellement
veille.
jusqu’au niveau préréglé. Le voyant de la minuterie
clignotera pendant la lecture programmée.
Note :
Le réglage de l'horloge est réinitialisé lorsque le cordon
13 À l’heure de fin, le système se met en veille
d'alimentation est débranché ou en cas de panne de
automatiquement.
courant.
Fr-22
11/5/25 X-HM10_20_Fr.fm

Opérations programmées et mise en
Casque
arrêt différée (Seulement par
télécommande) (suite)
n Mise en arrêt différée
La lecture des sources radio, CD, iPod, USB et Line In
peuvent être arrêtées automatiquement.
1
Allumer la source souhaitée.
2 Appuyer sur la touche SLEEP.
3 Utilisez les touches numérotées dans un délai de
5 secondes pour régler l’heure. (1 minute ~ 99 minutes)
l Ne pas tourner le volume à fond à la mise en route et
4 « SLEEP » apparaît.
écouter la musique à des niveaux modérés. Un volume
sonore excessif émis par les écouteurs et le casque
5 Le temps préréglé écoulé, l’appareil entrera
peut endommager l’ouïe.
automatiquement en attente. Le niveau sonore baisse
l Avant de brancher ou de débrancher le casque,
dans la dernière minute de la lecture programmée.
réduire le niveau sonore.
l Utiliser un casque muni d’une fiche de 3,5 mm de
diamètre et ayant une impédance de 16 à 50 ohms.
Pour vérifier la durée pour la mise en arrêt différée :
L’impédance préconisée est de 32 ohms.
1 Pendant « SLEEP » est affiché, appuyer sur la touche
l Le branchement du casque déconnecte
automatiquement les enceintes. Régler le volume en
SLEEP.
agissant sur la commande VOLUME.
l X-HM20 uniquement: Le son d'un iPod/iPhone
Annulation de la mise en arrêt différée :
connecté à l'appareil ne peut pas être écouté au
Appuyer sur la touche STANDBY/ON pendant l’affichage
moyen d'un casque ou d'écouteurs branché(s) sur la
de « SLEEP ». Pour annuler la mise en arrêt différée sans
prise casque de l'appareil. L’indication
mettre le système en attente, procéder comme suit.
« HP INVALID » s’affiche si vous connectez un casque
ou des écouteurs lorsque la fonction iPod/iPhone est
1 Pendant « SLEEP » est affiché, appuyer sur la touche
sélectionnée.
SLEEP.
2 Avant 5 secondes, appuyer sur la touche « 0 » à deux
reprises jusqu’à ce que « SLEEP 00 » apparaisse.
n Pour utiliser l’opération programmée et la
mise en arrêt différée
Mise en arrêt différée et lecture programmée :
Par exemple, on peut s’endormir en écoutant la radio et se
réveiller le lendemain matin avec un CD favori.
1
Régler la durée pour la mise en arrêt différée (voir ci-
dessus , étapes 1 - 5).
2 Alors que le minuteur de mise en sommeil est réglé,
lecture programmée (étapes 2 - 9, page 22).
1
2
3
4
5
6
7
8
9
Fr-23
11/5/25 X-HM10_20_Fr.fm
Déclenchement de
la mise en arrêt
Programmation de
Fin d’opération
différée
la lecture
1-99 minutes
Durée programmée
La mise en arrêt
Heure de départ pour
différée s’arrête
la lecture programmée

Dépannage
De nombreux problèmes potentiels peuvent être résolus
n USB
par l’utilisateur avant de faire appel à un technicien de
service.
Problème Cause
Si le cas se présente, se reporter au tableau ci-dessous
avant de prendre contact avec un revendeur ou un centre
l Impossible de
l Des fichiers MP3/WMA sont-t-
de réparation agréés par PIONEER.
détecter le
ils disponibles ?
périphérique.
l
Le périphérique est-il
n Général
correctement raccordé ?
l Le périphérique est-il de type
Problème Cause
MTP ?
l Le périphérique ne contient-il
l L’horloge n’est pas à
l Y a-t-il eu une panne de
que des fichiers AAC ?
l’heure.
courant ?
l La lecture ne
l Le fichier WMA est-il protégé
Remettre l’horloge à
démarre pas.
par un copyright ?
l’heure. (Voir page 9)
l Le fichier MP3 est-il
l L’appareil ne répond
l Mettre l’appareil en veille
endommagé ?
pas à la pression
et le rallumer.
l Affichage de
l Un fichier à débit binaire
d’une touche.
l S’il fonctionne toujours
l’heure erroné.
variable est-il en cours de
mal, réinitialiser. (Voir
l Affichage du
lecture ?
page 25)
nom du fichier
l
Le nom de fichier apparaît-il
l Aucun son n’est
l Le volume est-il réglé sur
erroné.
caractères chinois ou japonais ?
entendu.
« Min » ?
l Le casque est-il branché ?
n iPod et iPhone (X-HM20 uniquement)
l Les fils des enceintes sont-
ils débranchés ?
Problème Cause
l Aucun son n’est
l
iPod ou iPhone n’est pas lu.
n Lecteur CD
produit. Aucune
l iPod ou iPhone n’est pas
image n’apparaît
correctement raccordé à
l’appareil.
Problème Cause
sur le téléviseur/
l L’appareil est-il branché sur
écran.
secteur ?
l La lecture ne
l Le disque est-il mis à
l Le câble vidéo n’est pas
démarre pas.
l’envers ?
correctement raccordé.
l La lecture s’arrête au
l Le disque satisfait-il à la
l La sélection d’entrée
milieu ou ne se fait
norme ?
télévision/écran n’est pas
pas correctement.
l Le disque est-il déformé ou
correctement réglée.
rayé ?
l La fonction de sortie TV de
l’iPod n’a pas été réglée pour
l La lecture est
l L’appareil subit-il des
la sortie vidéo.
intermittente ou
vibrations?
l Le son d'un iPod/iPhone
s’arrête.
l Le disque est-il encrassé ?
connecté à l'appareil ne peut
l Une condensation est-elle
pas être écouté au moyen d'un
formée dans l’appareil ?
casque ou d'écouteurs
branché(s) sur la prise casque
n Télécommande
de l'appareil.
l L’iPod ou iPhone
l Le contact entre iPod ou
Problème Cause
ne se charge
iPhone et le connecteur n’est
pas.
pas complet.
l La télécommande ne
l L’appareil est-il branché
ème
l L’iPod utilisé est de (3
fonctionne pas.
sur secteur ?
génération).
l Les polarités des pile sont-
l L’iPod ou l’iPhone n’est pas
elles respectées ?
pris en charge. Pour des
modèles compatibles, se
l La pile est-elle hors
reporter à la page 10.
d’usage ?
l L'iPod/iPhone ne peut pas être
l La distance et l’angle sont-
rechargé lorsque l'unité
ils corrects ?
principale est en mode USB.
l Le capteur de
télécommande reçoit-il
l
« This accessory
l La batterie de iPhone est
faible. Veuillez recharger
une forte lumière ?
is not made to
iPhone.
work with iPhone »
l L’iPhone n’est pas raccordé
ou « This
n Tuner
correctement.
accessory is not
supported by
Problème Cause
iPhone » apparaît
sur l’écran de
l L’émission
l L’appareil se trouve-t-il à
iPhone.
radiodiffusée est
proximité d’un téléviseur
parasitée
ou d’un PC ?
consécutivement.
l L’antenne FM ou le cadre-
antenne PO est-il placé à
proximité ? Éloigner
l’antenne du cordon
d’alimentation.
Fr-24
11/5/25 X-HM10_20_Fr.fm
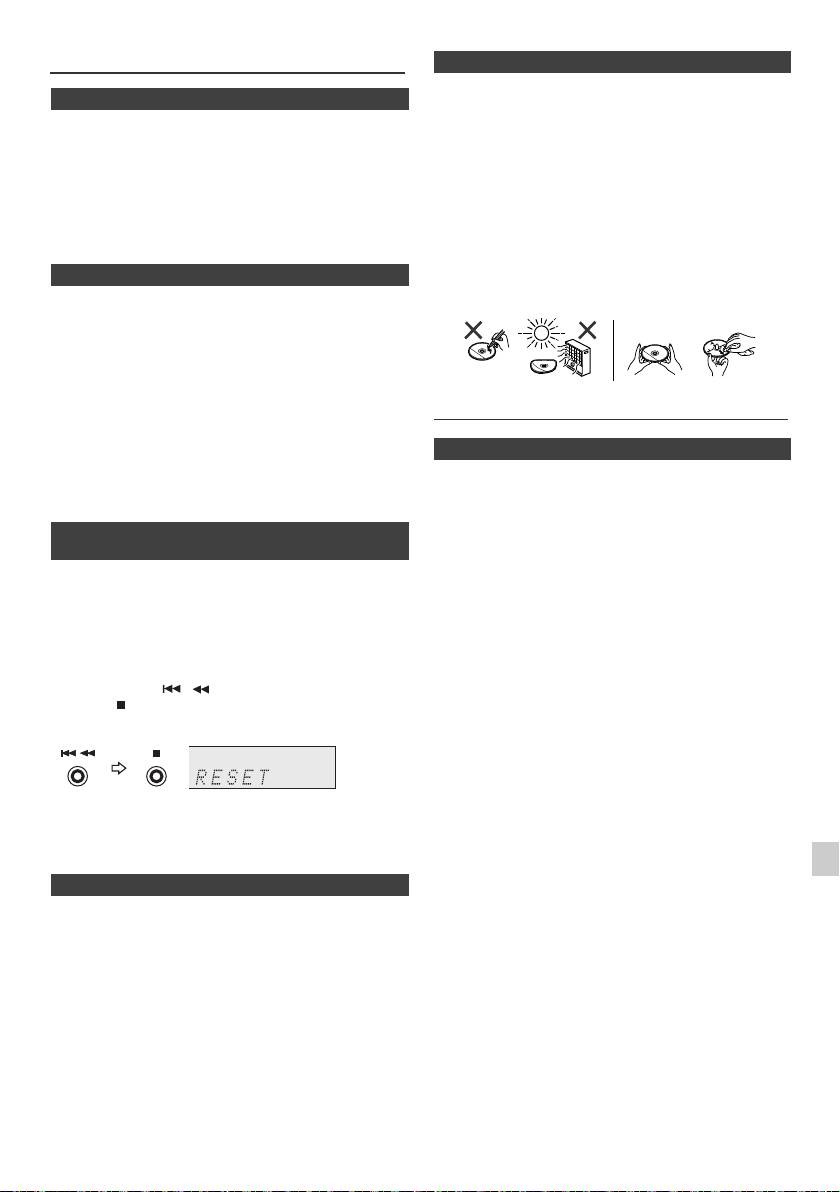
Dépannage (suite)
n Entretien de disques compact
Le compact disc résiste bien aux dommages, mais il peut
n Condensation
se produire un mauvais alignement dû à l’encrassement
Un changement brusque de température et la
de la surface du disque. Afin de profiter au maximum des
conservation ou l’utilisation dans un lieu très humide
disques et de ce lecteur, suivre les conseils ci-dessous.
peuvent occasionner une formation de condensation à
l Éviter d’écrire sur le disque, notamment sur la face non
l’intérieur de l’appareil (cellule porte-laser CD, etc.) ou sur
munie d’une étiquette. La lecture se fait sur cette face.
l’émetteur de la télécommande. La condensation peut
l Éviter d’exposer les disques directement au soleil, à la
provoquer des dysfonctionnements de l’appareil. Si cela
chaleur et à l’humidité.
se produit, laisser l’appareil allumé sans disque jusqu’à ce
l Tenir le compact disc par les bords. Les traces de
qu’une lecture normale redevienne possible (environ
doigts, la saleté et l’eau sur le compact disc sont à
1 heure). Essuyer toute condensation sur l’émetteur avec
l’origine de bruit ou d’un alignement erroné. Si le
un chiffon doux avant de faire fonctionner l'appareil.
compact disc est encrassé ou ne fonctionne pas
correctement, nettoyer le disque avec un chiffon doux
n Si le problème survient
et sec. Essuyer du centre vers la périphérie, en ligne
droite.
Si l’appareil a subi une force extérieure (chocs, électricité
statique, surtension due à un foudre, etc.) ou une
mauvaise manipulation, il peut mal fonctionner.
Si un tel problème survient, procéder comme suit :
1 On mettra l’appareil en attente et le rallumera.
2
Si la démarche précédente ne permet pas le retour à un
Entretien
fonctionnement normal de l’appareil, débranchez-le de la
prise de courant et rebranchez-le et enfin rallumer
l’appareil.
n Nettoyage du coffret
Note :
Essuyer régulièrement le coffret à l’aide d’un chiffon doux
Si l’appareil n’est toujours pas remis en état, il faut le
et d’une solution d’eau savonneuse, puis essuyer à l’aide
réinitialiser pour effacer toute la mémoire.
d’un chiffon sec.
n Réinitialisation des réglages d’usine,
Attention :
l Éviter d’utiliser des produits chimiques (essence,
effacement de toute la mémoire
diluant, etc.) pour le nettoyage. Cela pourrait
endommager l’enveloppe.
1
Appuyez sur la touche STANDBY/ON pour mettre
l Ne pas lubrifier l’appareil. Ce dernier peut mal
l'appareil sous tension.
fonctionner.
2 Appuyez de manière répétée sur la touche LINE de la
télécommande ou sur le bouton INPUT de l'appareil
pour sélectionner la fonction LINE IN.
3 Lorsque la fonction LINE IN est sélectionnée, appuyez
sur le bouton de l'appareil et maintenez le
bouton enfoncé jusqu'à ce que l'indication
« RESET » soit affichée.
Attention :
Cette opération efface toutes les données en mémoire :
1
réglages pour horloge, minuterie, présélection de tuner et
programmes CD.
2
n Avant de transporter l’appareil
3
Retirer l’iPod, le dispositif de mémoire USB et le disque de
l’appareil. Puis mettez l’appareil en mode de veille.
4
Transporter l’appareil alors que l’iPod ou le dispositif de
mémoire USB est installé ou que des disques sont restés
à l’intérieur peut endommager l’appareil.
5
6
7
8
9
Fr-25
11/5/25 X-HM10_20_Fr.fm
NON OUI
Correct
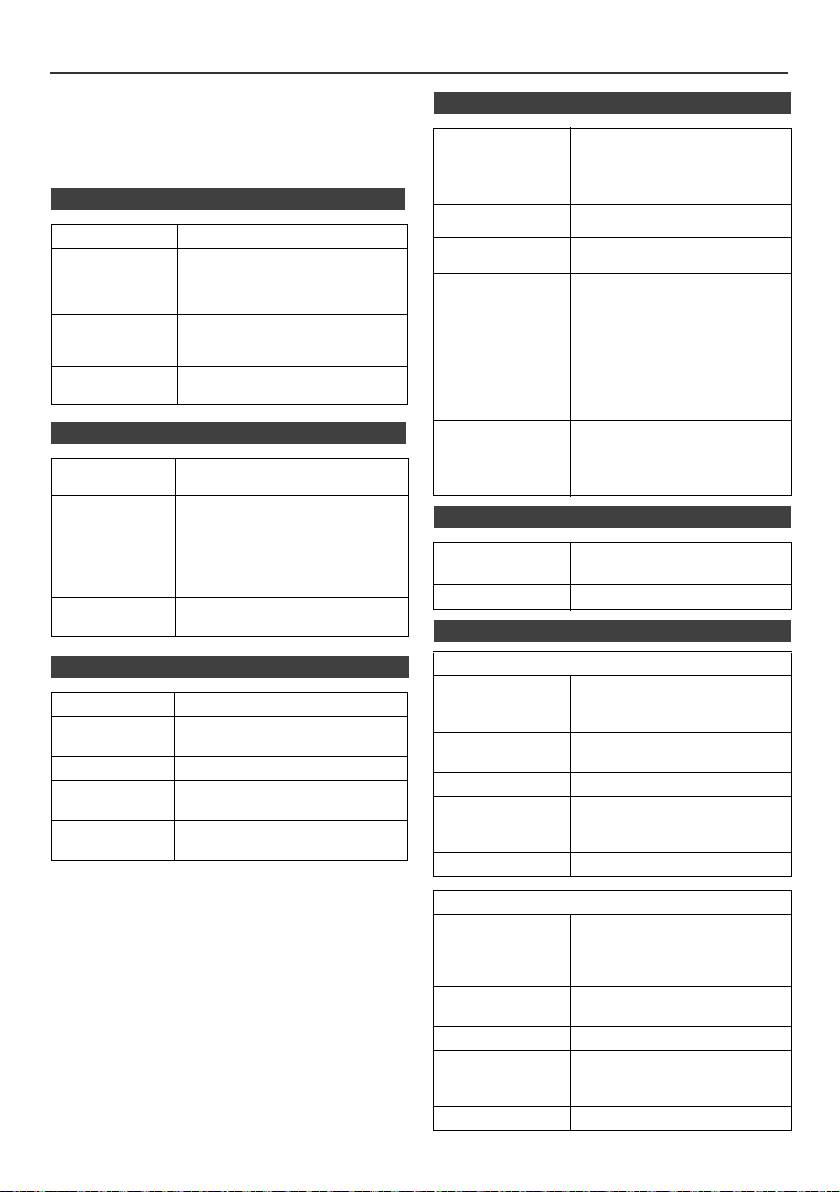
Spécifications
PIONEER se réserve le droit d’apporter des modifications
n USB
à la présentation et aux caractéristiques des appareils à
fin d’amélioration. Les chiffres des spécifications de
Interface hôte USB l Conforme au standard USB
performance donnés sont les valeurs nominales des
1.1 (Vitesse pleine)/2.0
appareils à la production. Ces valeurs peuvent être
Mémoire de grande capacité.
légèrement différentes en fonction de chaque appareil.
l Support Bulk uniquement et
protocole CBI.
n Général
Fichier supporté l MPEG 1 Layer 3
l WMA (Non DRM)
Alimentation 220 V à 240 V CA, 50 Hz/60 Hz
Débit binaire
l MP3 (32 kbps à 320 kbps)
Consommation Allumé :
supporté
l WMA (64 kbps à 160 kbps)
45 W (X-HM20)
Autres l
Le nombre maximal total de
30 W (X-HM10)
fichiers MP3/WMA est de 999.
En veille : 0,4 W
l Le nombre maximal total de
Dimensions Largeur : 215 mm
dossiers est de 99, répertoire
Hauteur : 99 mm
racine COMPRIS.
Profondeur : 300 mm
l Les informations d’ID3TAG
supportées sont uniquement
Poids 3,8 kg (X-HM20)
TITLE, ARTIST et ALBUM.
3,7 kg (X-HM10)
l Support des ID3TAG version 1
et version 2.
Support du
l Support des dispositifs USB
n Amplificateur
système de
avec Microsoft Windows/DOS/
FAT 12/ FAT 16/ FAT 32.
fichiers
Puissance de
RMS : 15 W + 15 W (1 kHz, 10% de
l Longueur de bloc 2 Ko pour le
sortie
D.H.T.,4 ohms )
secteur.
Bornes de sortie Enceintes : 4 ohms
n Tuner
20 Hz à 20 kHz
Sortie vidéo (X-HM20 uniquement):
1 Vc-c
Gamme de
FM : 87,5 MHz à 108 MHz
Casque : 16 ohms
fréquences
AM : 522 kHz à 1 620 kHz
(recommandé : 32 ohms)
Préréglage 40 (station FM et AM)
Bornes d’entrée Entrée de ligne (entrée analogique) :
500 mV/ 47 k ohms
n Enceinte
X-HM20
n Lecteur CD
Type Enceinte à 2 voies
Type Lecteur de disque simple compacts
Haut-parleur d'aigus – 5 cm
Haut-parleur de graves de 10 cm
Procédé de
Sans contact, par laser à semi-
lecture
conducteur à 3 faisceaux
Puissance d’entrée
15 W
maximale
N/A Convertisseur N/A multi-bits
Impédance 4 ohms
Réponse en
20 Hz à 20 000 Hz
fréquence
Dimensions Largeur : 132 mm
Hauteur : 260 mm
Gamme
90 dB (1 kHz)
Profondeur : 173 mm
dynamique
Poids 2,0 kg /chacune
X-HM10
Type Enceinte à 2 voies
Haut-parleur d’aigus
piézoélectrique
Haut-parleur de graves de 10 cm
Puissance d’entrée
15 W
maximale
Impédance 4 ohms
Dimensions Largeur : 132 mm
Hauteur : 260 mm
Profondeur : 158 mm
Poids 1,6 kg /chacune
Fr-26
11/5/25 X-HM10_20_Fr.fm

Avis
À propos de l'iPod/iPhone/iPad :
Les accessoires électroniques portant la mention « Made for iPod »,
« Made for iPhone » et « Made for iPad » ont été conçus pour
fonctionner respectivement avec un iPod, un iPhone ou un iPad et
sont certifiés conformes aux exigences d’Apple par le fabricant.
Apple n’est pas responsable pour le fonctionnement de cet appareil
ou de sa compatibilité avec les normes réglementaires et de
sécurité. Veuillez noter que l’emploi de cet accessoire avec un iPod,
iPhone ou iPad peut affecter les performances sans fil.
iPad, iPhone et iPod sont des marques commerciales d’Apple Inc.,
déposées aux États-Unis et dans d’autres pays.
1
2
3
4
5
6
© 2011 PIONEER CORPORATION.
7
Tous droits de reproduction et de traduction
réservés.
8
9
Fr-27
11/5/25 X-HM10_20_Fr.fm

ADVERTENCIA
Entorno de funcionamiento
Este aparato no es impermeable. Para evitar el riesgo
Temperatura y humedad del entorno de funcionamiento
de incendio y de descargas eléctricas, no ponga ningún
+5 °C a +35 °C; menos del 85 % de humedad relativa
recipiente lleno de líquido (como pueda ser un vaso o
(rejillas de refrigeración no obstruidas)
un florero) cerca del aparato ni lo exponga a goteo,
No instale este aparato en un lugar mal ventilado, ni en
salpicaduras, lluvia o humedad.
lugares expuestos a alta humedad o a la luz directa del
D3-4-2-1-3_A1_Es
sol (o de otra luz artificial potente).
D3-4-2-1-7c*_A1_Es
ADVERTENCIA
Antes de enchufar el aparato a la corriente, lea la sección
Si la clavija del cable de alimentación de CA de este
siguiente con mucha atención.
aparato no se adapta a la toma de corriente de CA
La tensión de la red eléctrica es distinta según el
que usted desea utilizar, deberá cambiar la clavija por
país o región. Asegúrese de que la tensión de la
otra que se adapte apropiadamente. El reemplazo y
alimentación de la localidad donde se proponga
montaje de una clavija del cable de alimentación de
utilizar este aparato corresponda a la tensión
CA sólo deberá realizarlos personal de servicio
necesaria (es decir, 230 V ó 120 V) indicada en el
técnico cualificado. Si se enchufa la clavija cortada a
panel posterior.
una toma de corriente de CA, puede causar fuertes
D3-4-2-1-4*_A1_Es
descargas eléctricas. Asegúrese de que se tira de la
forma apropiada después de haberla extraído.
El aparato deberá desconectarse desenchufando la
ADVERTENCIA
clavija de la alimentación de la toma de corriente
Para evitar el peligro de incendio, no ponga nada con
cuando no se proponga utilizarlo durante mucho
fuego encendido (como pueda ser una vela) encima del
tiempo (por ejemplo, antes de irse de vacaciones).
aparato.
D3-4-2-2-1a_A1_Es
D3-4-2-1-7a_A1_Es
PRECAUCIÓN PARA LA VENTILACIÓN
PRECAUCIÓN
Cuando instale este aparato, asegúrese de dejar
El interruptor de la alimentación STANDBY/ON de
espacio en torno al mismo para la ventilación con el fin
este aparato no corta por completo toda la
de mejorar la disipación de calor (por lo menos 10 cm
alimentación de la toma de corriente de CA. Puesto
encima, 10 cm detrás, y 10 cm en cada lado).
que el cable de alimentación hace las funciones de
dispositivo de desconexión de la corriente para el
10 cm 10 cm
aparato, para desconectar toda la alimentación del
aparato deberá desenchufar el cable de la toma de
10 cm
corriente de CA. Por lo tanto, asegúrese de instalar el
aparato de modo que el cable de alimentación pueda
desenchufarse con facilidad de la toma de corriente
de CA en caso de un accidente. Para evitar correr el
10 cm
peligro de incendio, el cable de alimentación también
deberá desenchufarse de la toma de corriente de CA
ADVERTENCIA
cuando no se tenga la intención de utilizarlo durante
Las ranuras y aberturas de la caja del aparato sirven
mucho tiempo seguido (por ejemplo, antes de irse de
para su ventilación para poder asegurar un
vacaciones).
D3-4-2-2-2a*_A1_Es
funcionamiento fiable del aparato y para protegerlo
contra sobrecalentamiento. Para evitar el peligro de
incendio, las aberturas nunca deberán taparse ni
Este producto es para tareas domésticas generales.
cubrirse con nada (como por ejemplo, periódicos,
Cualquiera avería debida a otra utilización que tareas
manteles, cortinas) ni ponerse en funcionamiento el
domésticas (tales como el uso a largo plazo para
aparato sobre una alfombra gruesas o una cama.
motivos de negocios en un restaurante o el uso en un
D3-4-2-1-7b*_A1_Es
coche o un barco) y que necesita una reparación hará
que cobrarla incluso durante el período de garantía.
K041_A1_Es
11/5/25 X-HM10_20_Anki_Es.fm
Acerca de la condensación
1
Si el reproductor se traslada repentinamente de un
lugar frío a una habitación caliente (en invierno, por
ejemplo) o si la temperatura de la habitación donde
2
está instalado el reproductor sube repentinamente
debido a una calefacción, etc., en el interior del aparato
3
(en las piezas de funcionamiento y en la lente) podrán
formarse gotas de agua (condensación). Cuando haya
4
condensación, el reproductor no funcionará bien y la
reproducción no será posible. Deje sin funcionar el
reproductor a la temperatura ambiental durante 1 ó 2
5
horas con la alimentación conectada (el tiempo
depende de la cantidad de condensación). Las gotas de
6
agua se disiparán y será posible reproducir. La
condensación se puede producir también en el verano
7
si el reproductor se expone a la salida de aire frío de un
acondicionador de aire. Si pasa esto, traslade el
8
reproductor a un lugar diferente.
S005_A1_Es
9
S-3
11/5/25 X-HM10_20_Anki_Es.fm
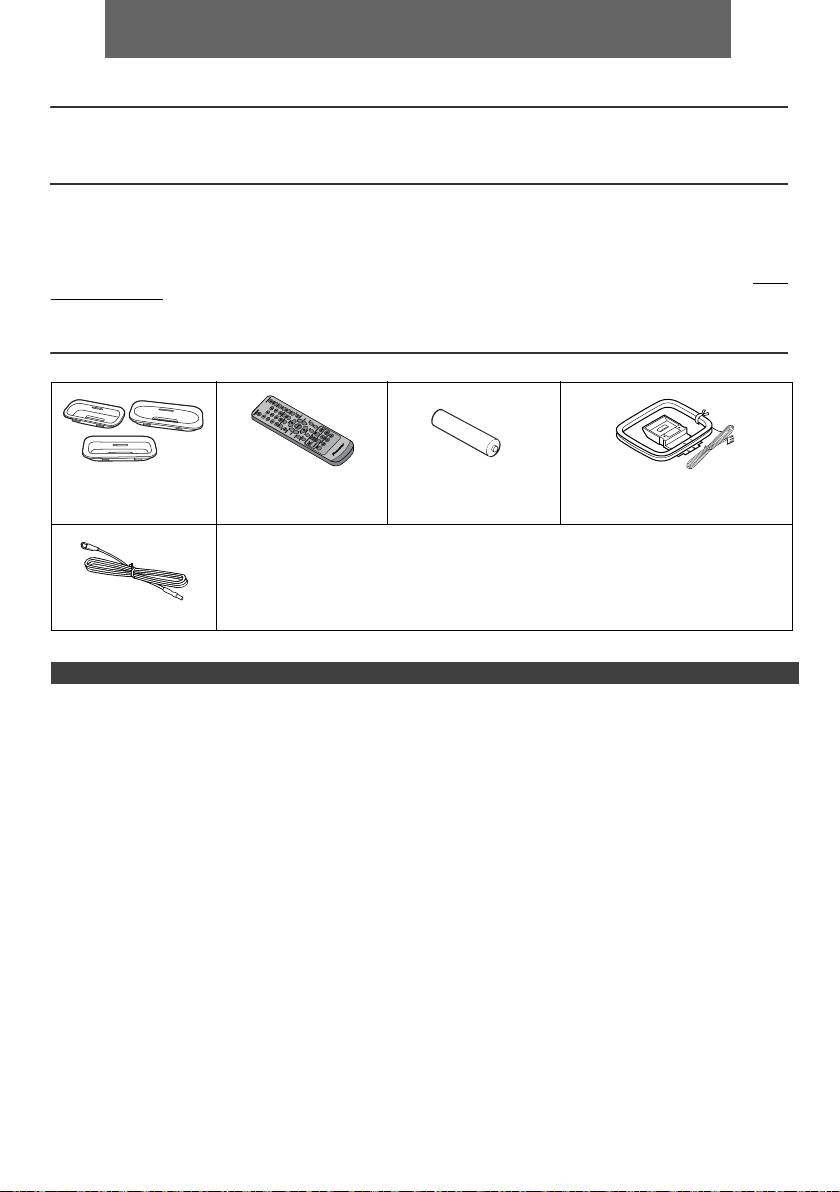
ESPAÑOL
l Sistema receptor de CD X-HM10/X-HM20, consistente en una unidad principal y un sistema de altavoces.
Introducción
Muchas gracias por haber adquirido este producto PIONEER. Lea atentamente este manual para conseguir el mejor
rendimiento del aparato. Le servirá también como guía operativa de este producto PIONEER.
Notas especiales
El suministro de este producto no transmite una licencia ni implica algun derecho de distribución del contenido creado
con este producto por medio de entradas provenientes de los sistemas de radiodifución (terrestre, satelitar, cable y/u
otros canales de distribución), entradas provenientes del uso de la red (vía Internet, intranets y/o otras redes), otros de
los sistemas de distribución regulados (aplicaciones pay-audio o audio-on-demand y similares) o a travès de material
mediático (discos compactos, discos digitales reescribibles, semiconductor chips, disco duro, tarjetas de memoria y
similares). Se requiere una licencia independiente para dichos usos. Para màs detalles, visite por favor el sito http://
mp3licensing.com
Tecnología de codificación del audio MPEG Layer-3 licenciada por Fraunhofer IIS y Thomson.
Accesorios
Verifique que estén incluidos los accesorios siguientes.
Adaptadores del
Controlador remoto x 1 Pila del tamaño “AA” x 1 Antena de cuadro de AM x 1
iPhone x 3
(sólo X-HM20)
Cable de alimentación
Tarjeta de garantía
Estas instrucciones de funcionamiento
Antena de FM x 1
ÍNDICE
Página
Página
USB
Información general
Escuchando a través del dispositivo de almacenamiento
Precauciones . . . . . . . . . . . . . . . . . . . . . . . . . . . . . . . . 5
USB/ player MP3 . . . . . . . . . . . . . . . . . . . . . . . . . 16 - 17
Controles e indicadores . . . . . . . . . . . . . . . . . . . . . . 5 - 6
Reproducción avanzada USB . . . . . . . . . . . . . . . . . . .17
Preparación para su utilización
Radio
Conexiones del sistema . . . . . . . . . . . . . . . . . . . . . . 7 - 8
Audición de la radio . . . . . . . . . . . . . . . . . . . . . . . . . . .18
Controlador remoto . . . . . . . . . . . . . . . . . . . . . . . . . . . 8
Características avanzadas
Funcionamiento básico
Empleo del sistema
Control general . . . . . . . . . . . . . . . . . . . . . . . . . . . . . . . 9
de datos radiofónicos (RDS) . . . . . . . . . . . . . . . . 19 - 21
Ajuste del reloj (Solamente del control remoto) . . . 9 - 10
Operación del temporizador y de desconexión automática
iPod, iPhone y iPad
(Solamente del control remoto) . . . . . . . . . . . . . . 21 - 23
Auriculares . . . . . . . . . . . . . . . . . . . . . . . . . . . . . . . . . 23
Audición de un iPod, iPhone o iPad
(sólo X-HM20). . . . . . . . . . . . . . . . . . . . . . . . . . . . 10 - 12
Referencias
Cuadro para localización de averías . . . . . . . . . . 24 - 25
Reproducción de CD o disco de MP3/WMA
Mantenimiento . . . . . . . . . . . . . . . . . . . . . . . . . . . . . . .25
Escuchando un CD o disco de MP3/WMA . . . . . . . . . 13
Especificaciones técnicas . . . . . . . . . . . . . . . . . . . . . .26
Reproducción avanzada de CD o disco de
Nota . . . . . . . . . . . . . . . . . . . . . . . . . . . . . . . . . . . . . . .27
MP3/WMA . . . . . . . . . . . . . . . . . . . . . . . . . . . . . . . 14 - 15
Modo de carpeta del MP3/WMA (solamente para los
ficheros de MP3/WMA) . . . . . . . . . . . . . . . . . . . . . 15 - 16
Es-4
11/5/25 X-HM10_20_Es.fm

Precauciones
l No quite la tapa exterior dado que pueden
n Generalidades
producirse descargas eléctricas. Solicite el
servicio técnico a un centro de servicio local
l Use el aparato sobre una superficie nivelada y firme,
PIONEER.
en un lugar que no esté expuesto a vibraciones.
l La ventilación no debe impedirse al cubrir las
l Ubique los altavoces al menos a 30 cm de distancia de
aberturas de ventilación con cosas como periódicos,
cualquier TV CRT para evitar las variaciones de color
tapetes, cortinas, etc.
en la pantalla del TV. Si la variación persiste, mueva los
l Las fuentes de llamas abiertas, tales como velas
altavoces más lejos del TV. El TV con pantalla LCD no
encendidas no deben colocarse encima del aparato.
es susceptible a tal variación.
l Deberá prestarse atención a los aspectos del medio
l Mantenga el aparato apartado de la luz directa del sol,
ambiente al deshacerse de las pila.
fuertes campos magnéticos, polvo excesivo, humedad
y de equipos electrónicos/eléctricos (computadoras
l El aparato está diseñado para funcionar en climas
del hogar, facsímiles, etc.) que generan ruido eléctrico.
moderados.
l No ponga nada encima del aparato.
Advertencia:
l No exponga el aparato a la humedad, a temperaturas
Se debe usar la misma tensión que la especificada en el
superiors a 60° ni a temperaturas muy bajas.
aparato. Si usa este aparato con una tensión más alta que
l Si su sistema no funciona correctamente, desconecte
la especificada, es peligroso y puede provocar incendios
el cable de alimentación de CA de la toma de CA.
o accidentes que causen daños. PIONEER no asumirá
Enchufe otra vez el cable de alimentación de CA, y
responsabilidad alguna por cualquier daño de este
luego conecte la alimentación del sistema.
aparato que resulte del uso de una tensión distinta a la
l Si se produce una tormenta con rayos, desenchufe el
aparato por razones de seguridad.
especificada.
l Sujete la clavija de alimentación de CA al quitar esta
clavija del tomacorriete. Si la quita tirando del cable
n Control de volumen
puede romper o estropear los hilos y conexiones
internas.
El nivel de sonido como una función del volumen depende
de eficiencia del altavoz, de la localización, y de otros
l El enchufe de la corriente CA es utilizado como un
factores. Es recomendable evitar la exposición a altos
dispositivo de desconexión y seguirá siendo siempre
niveles de volumen. No ponga el volumen al máximo
fácil de operar.
cuando lo encienda. Escuche música a niveles
moderados. La presión acústica excesiva de los
auriculares y los cascos puede causar la pérdida del
sentido auditivo.
Controles e indicadores
Las funciones de iPod/iPhone sólo están disponibles para X-HM20.
1
2
3
4
Página
Página
5
1. Sensor remoto . . . . . . . . . . . . . . . . . . . . . . . . . . . 8
10. Preconfiguración del sintonizador descendente,
2. Indicador del temporizador . . . . . . . . . . . . . . . 22
pista de CD/USB hacia abajo, saltear iPod/iPhone
3. Bandejas de discos . . . . . . . . . . . . . . . . . . . . . . 13
hacia abajo . . . . . . . . . . . . . . . . . . . . . . . . . . .12, 13
6
4. Estación de acoplamiento para iPod o
11. Preconfiguración del sintonizador ascendente,
iPhone . . . . . . . . . . . . . . . . . . . . . . . . . . . . . . . . . 11
pista de CD/USB hacia arriba, saltear iPod/iPhone
7
5. Control de volumen . . . . . . . . . . . . . . . . . . . . . . . 9
hacia arriba. . . . . . . . . . . . . . . . . . . . . . . . . . .12, 13
6. Botón de STANDBY/ON . . . . . . . . . . . . . 11, 13, 18
12. Botón de paro de Disco/USB . . . . . . . . . . . .12, 13
7. Botón de INPUT . . . . . . . . . . . . . . 9, 11, 13, 16, 18
13. Botón de pausa o reproducción del disco/USB/
8
8. Toma de auriculares . . . . . . . . . . . . . . . . . . . . . 23
iPod/iPhone . . . . . . . . . . . . . . . . . . . . . . . . . .12, 13
9. Terminal USB . . . . . . . . . . . . . . . . . . . . . . . . . . . 16
14. Botón de abertura/cierre de la bandeja de
discos . . . . . . . . . . . . . . . . . . . . . . . . . . . . . . . . . .13
9
Es-5
11/5/25 X-HM10_20_Es.fm
1
52 3
6
7
4
8 10 11 12 13 14
9
Sólo X-HM20
n Panel frontal
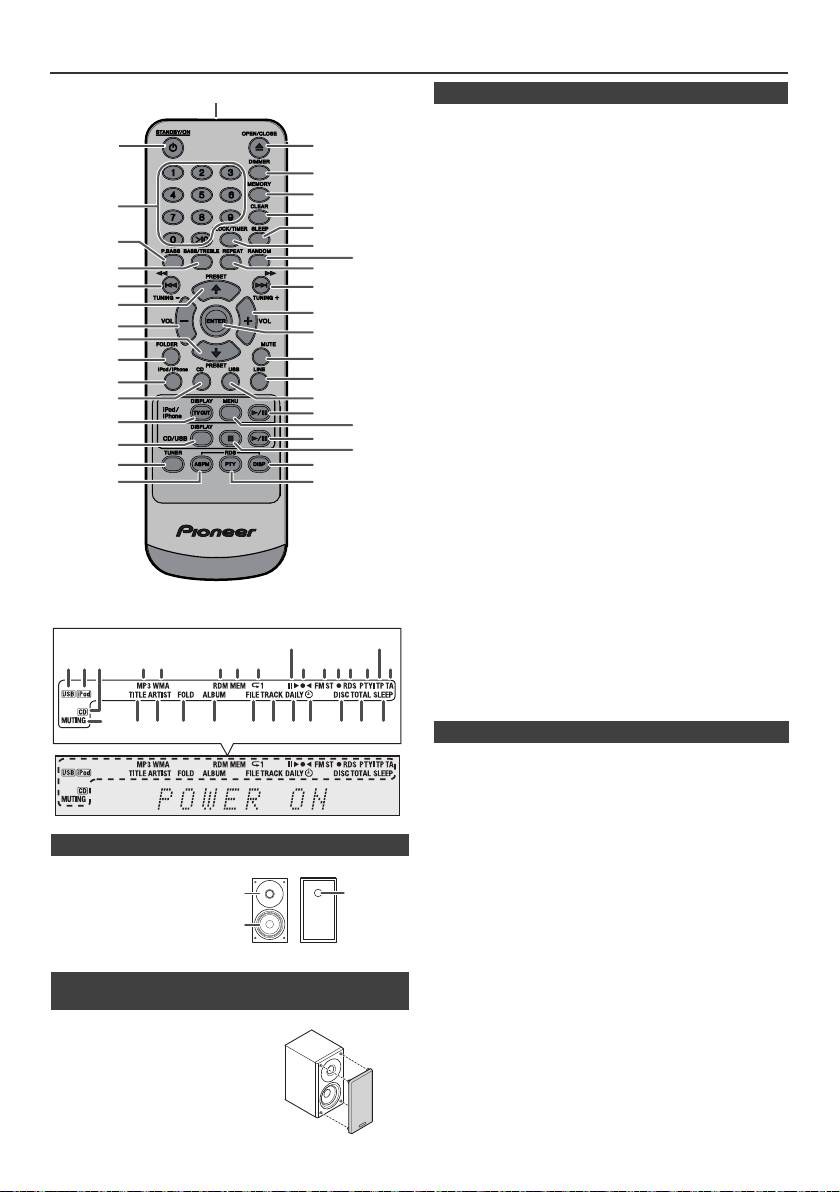
Controles e indicadores (continuación)
Página
1. Transmisor de control remoto . . . . . . . . . . . . . . .8
2. Botón de STANDBY/ON . . . . . . . . . . . .9, 11, 13, 21
3. Botones numéricos . . . . . . . . . . . . . . . . . . . . . . .14
4. Botón de P.Bass . . . . . . . . . . . . . . . . . . . . . . . . . .9
5. Botón triple/graves . . . . . . . . . . . . . . . . . . . . . . . .9
6. Botón de sintonización descendente, saltear
hacia abajo, retroceso rápido, reducción del
tiempo . . . . . . . . . . . . . . . . .9, 12, 13, 16, 18, 19, 21
7. Botón de preconfiguración del sintonizador
ascendente, cursor del iPod hacia arriba
. . . . . . . . . . . . . . . . . . . . . . . . . . . . . . .11, 12, 16, 18
8. Botón bajar volumen . . . . . . . . . . . . . . . . . . . . . 9
9. Botón de preconfiguración del sintonizador
descendente, cursor
del iPod hacia abajo. . . . . . . . . . . . . .11, 12, 16, 18
10. Botón de carpeta . . . . . . . . . . . . . . . . . . . . . . . . 16
11. Botón de iPod/iPhone . . . . . . . . . . . . . . . . . . . . .11
12. Botón de CD . . . . . . . . . . . . . . . . . . . . . . . . . . . .13
13. Botón de iPod/iPhone DISPLAY TV OUT . . .11, 12
14. Botón CD/USB DISPLAY . . . . . . . . . . . . . . . . . . .16
15. Botón Tuner . . . . . . . . . . . . . . . . . . . . . . . . . .18, 19
16. Botón de RDS ASPM . . . . . . . . . . . . . . . . . . . . . .19
17. Botón Abrir/Cerrar . . . . . . . . . . . . . . . . . . . . . . . .13
18. Botón de regulador . . . . . . . . . . . . . . . . . . . . . . . .9
19. Botón de memoria . . . . . . . . . . . . . . . . . . . . .14, 18
20. Botón de Borrado . . . . . . . . . . . . . . . . . . . . .14, 18
21. Botón dormir . . . . . . . . . . . . . . . . . . . . . . . . . . . .23
22. Botón del reloj/temporizador . . . . . . . . . . . . .9, 21
23. Botón Random . . . . . . . . . . . . . . . . . . . . . . . .12, 14
24. Botón Repeat . . . . . . . . . . . . . . . . . . . . . . . . .12, 14
25. Botón de sintonización ascendente, saltear hacia
arriba, avance rápido, incremento
del tiempo . . . . . . . . . . . . .9, 12, 13, 16, 18, 19, 21
26. Botón subir volumen . . . . . . . . . . . . . . . . . . . . . .9
27. Botón Enter. . . . . . . . . . . . . . . . . . . . . . . . .9, 11, 12
28. Botón silenciador. . . . . . . . . . . . . . . . . . . . . . . . . .9
29. Botón Line . . . . . . . . . . . . . . . . . . . . . . . . . . . .8, 25
30. Botón de USB . . . . . . . . . . . . . . . . . . . . . . . . . . .16
31. Botón de reproducir/pausa del iPod / iPhone . .12
32. Botón del menú del iPod/iPhone . . . . . . . . . . . .12
33. Botón de CD/reproducción
USB/pausa . . . . . . . . . . . . . . . . . . . . . . . .12, 13, 14
34. Botón de paro de CD/USB. . . . . . . . . . . . . . .13, 14
35. Botón de visualización RDS . . . . . . . . . . . . . . . .19
36. Botón de RDS PTY. . . . . . . . . . . . . . . . . . . . . . . .19
Página
1. Indicador USB . . . . . . . . . . . . . . . . . . . . . . . . . . .16
2. Indicador iPod . . . . . . . . . . . . . . . . . . . . . . . . . . .10
3. Indicador de CD . . . . . . . . . . . . . . . . . . . . . . . . . .13
4. Indicador de MP3 . . . . . . . . . . . . . . . . . . . . . . . . .13
5. Indicador de WMA . . . . . . . . . . . . . . . . . . . . . . . .13
6. Indicador de RDM (Aleatorio) . . . . . . . . . . . . . . .14
n Sistema de altavoces
7. Indicador de MEM (Memoria) . . . . . . . . . . . . . . .14
8. Indicador de reproducción . . . . . . . . . . . . . . . . .14
1. Altavoz de agudos
9. Indicador reproducir/Pausa . . . . . . . . . . . . . . . .12
2. Altavoz de graves
10. Indicador de sintonizar FM/AM. . . . . . . . . . . . . .18
3. Conducto de
11. Indicador del modo de FM en estéreo . . . . . . . .18
12. Indicador de la estación estéreo . . . . . . . . . . . .18
reflexión de graves
13. Indicador RDS . . . . . . . . . . . . . . . . . . . . . . . . . . .19
14. Indicador de PTY . . . . . . . . . . . . . . . . . . . . . . . . .19
15. Indicador de TP . . . . . . . . . . . . . . . . . . . . . . . . . .19
16. Indicador de TA . . . . . . . . . . . . . . . . . . . . . . . . . .19
n Las rejillas de los altavoces son extraíbles
17. Indicador de silencio . . . . . . . . . . . . . . . . . . . . . . .9
18. Indicador de título . . . . . . . . . . . . . . . . . . . . . . . .16
(sólo X-HM20)
19. Indicador de artista . . . . . . . . . . . . . . . . . . . . . . .16
20. Indicador de carpeta . . . . . . . . . . . . . . . . . . . . . .16
Asegúrese de que no haya nada en
21. Indicador de álbum . . . . . . . . . . . . . . . . . . . . . . .16
contacto con los diafragmas de los
22. Indicador de archivo . . . . . . . . . . . . . . . . . . . . . .16
altavoces al retirar las rejillas.
23. Indicador de pista . . . . . . . . . . . . . . . . . . . . . . . .14
24. Indicador del temporizador diario . . . . . . . . . . .21
25. Indicador del temporizador para una vez . . . . .21
26. Indicador de discos . . . . . . . . . . . . . . . . . . . . . . .13
27. Indicador total . . . . . . . . . . . . . . . . . . . . . . . . . . .16
28. Indicador de desconexión automática . . . . . . .23
Es-6
11/5/25 X-HM10_20_Es.fm
1
2
17
18
19
3
20
21
4
22
23
5
24
6
25
7
26
8
27
9
10
28
29
11*
30
12
31*
13*
32*
33
14
34
15
35
16
36
*Los botones 11, 13, 31, 32 sólo están disponibles para X-HM20.
9
15
1 4 5 6 7
2 3
8
10 11 1312 14
16
17
28272624 2523221918 2120
1
3
2
n Controlador remoto
n Pantalla
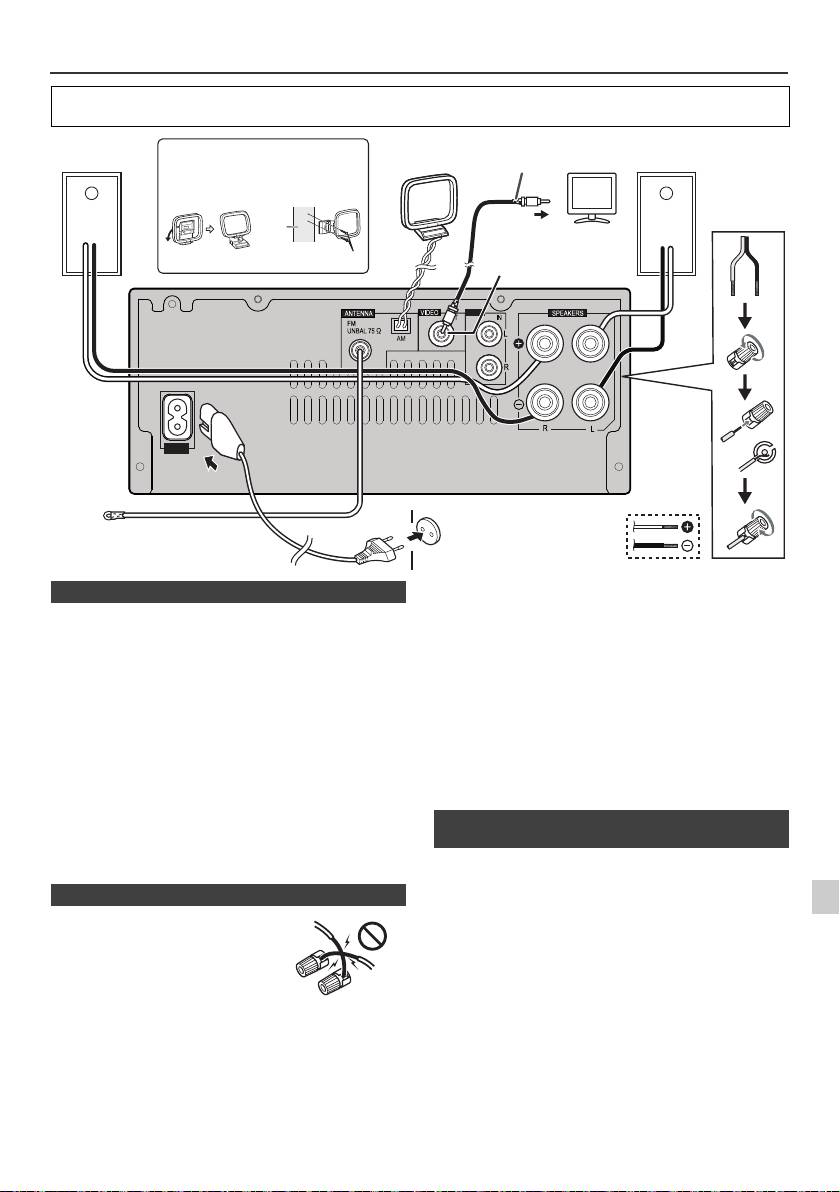
Conexiones del sistema
Antes de realizar o cambiar las conexiones, apague el sistema y desenchufe el cable de alimentación de la toma de
CA.
Antena de FM suministrada:
Conecte el cable de la antena de FM a la toma FM
75 OHMS y oriente el cable de la antena de FM en la
dirección que proporcione la mejor recepción posible.
Antena externa de FM:
Utilice una antena de FM externa (cable coaxial de
75 ohmios) para obtener una mejor recepción. Cuando se
utilice una antena externa de FM, desconecte el cable de
antena que viene con el aparato.
Antena de cuadro de AM suministrada:
Conecte la antena de lazo al terminal de AM. Coloque el
lazo antena AM de forma tal que la recepción sea óptima.
Posisionela en un estante, etc., o únala a un soporte o una
pared con la ayuda de tornillos (no provistos).
Nota:
Si pone la antena sobre el aparato o cerca del cable de
alimentación de CA, podrá causarse generación de ruido.
1
Ponga la antena separada del aparato para obtener una
recepción mejor.
Se pueden ver fotografías y vídeo del iPod o iPhone
2
conectando el sistema a una TV/monitor. Si el TV/monitor
posee una entrada de video, conéctelo a la toma de
3
VIDEO OUT en la parte trasera de la unidad y establezca
la salida del TV en la unidad de iPod o iPhone en la
posición “ON”.
4
Nota:
Asegúrese de ajustar la unidad iPod a NTSC o PAL para
5
coincidir con su señal de televisión. Visite la página
principal de Apple para obtener más información.
6
7
8
9
Es-7
11/5/25 X-HM10_20_Es.fm
LINE
AUX
LOOP
AC IN
Cable de vídeo
Altavoz
Instalación de la antena de
Antena de
Altavoz
Televisor
(no suministrados)
derecho
cuadro de AM
cuadro de AM
izquierdo
< Fijación a
< Montaje >
la pared >
pared
A la toma de entrada de vídeo
Toma de salida de
Tornillos (no suministrados)
vídeo (sólo X-HM20)
Toma de pared
(220 V a 240 V de
FM Antena
CA, 50 Hz/60 Hz)
n Conexión de la antena
n Conexión de los altavoces
l
Enrolle los filamentos del cable
sobre sí mismos.
l Conecte el cable rojo al terminal
positivo (+), y el otro cable al
terminal negativo (–).
l Utilice altavoces con una
impedancia de 4 ohms; si utiliza
altavoces con una impedancia
inferior, podría dañar la unidad.
Incorrecto
l
Por estos terminales de altavoz circula tensión ACTIVA
que es PELIGROSA. Para evitar el peligro de descargas
eléctricas al conectar o desconectar los cables de altavoz,
desenchufe el cable de alimentación antes de tocar las
partes de los cables que no están aisladas.
l No instale estos altavoces en la pared ni en el techo,
ya que si se desprendieran podrían lastimar a alguien.
l
No confunda los canales derecho e izquierdo. El altavoz
derecho es el que está en el lado derecho cuando se mira
el aparato desde delante.
l No deje que los cables desnudos de los altavoces se
pongan en contacto entre sí.
l No deje que ningún objeto caiga en el interior de los
conductos de reflejo de graves, y no ponga nada en
ellos.
l
No se suba ni se siente encima de los altavoces. Podría
herirse.
n Conexión de un iPod o iPhone al televisor
(sólo X-HM20)

Conexiones del sistema
Controlador remoto
(continuación)
n Conexión de la alimentación de CA
Después de comprobar que se hayan hecho correctamente
todas las conexiones, enchufe el cable de alimentación de CA de
este aparato en la toma de la pared.
Nota:
Desenchufe el cable de corriente CA del toma de la pared si no
se utilizará la unidad durante un largo período de tiempo.
Precaución:
l
Sujete el cable de alimentación por la parte del enchufe. No
desconecte la clavija tirando del cable; nunca toque el cable
de alimentación con las manos mojadas, ya que esto puede
causar cortocircuitos o descargas eléctricas. No coloque el
equipo, un mueble ni ningún objeto encima del cable de
alimentación. No dañe el cable de alimentación. No anude el
cable ni lo ate a otros cables. Los cables de alimentación
Advertencia:
deben ser tendidos de manera tal que la probabilidad de que
l No utilice ni guarde las pilas en lugares expuestos a la
alguien los pise sea mínima. Un cable de alimentación
luz solar directa o en lugares con un calor excesivo,
dañado puede causar incendios y descargas eléctricas.
como el interior de un coche o cerca de un calefactor.
Revise el cable de alimentación cada cierto tiempo. Si
Ello podría ocasionar la fuga del electrolito de la pila, o
encuentra que está dañado, pida un cable de recambio al
que la misma se sobrecalentara, explotara o ardiera.
representante autorizado de Pioneer más cercano.
También puede reducir la vida o el rendimiento de las
l
No utilice un cable de alimentación distinto del que se
mismas.
suministra con esta unidad.
Precaución:
l
No utilice el cable de alimentación suministrado con la
l
Quite las pilas cuando no utilice la unidad durante
unidad para ningún propósito excepto el descrito más arriba.
períodos largos de tiempo. Así prevendrá daños
potenciales debido a pérdidas de las pila.
l
No utilice pilas recargables (pila de níquel-cadmio, etc.).
n Conectar una TV, etc.
l
Si las pilas no se instalan correctamente, pueden causar
Conectar a la TV con un cable de audio
.
fallos de funcionamiento de la unidad.
Notas sobre el uso:
l
Cambie la pila si la distancia operativa se reduce o el
funcionamiento es errático. Adquiera una pila de tamaño
“AA”.
l
Limpie periódicamente el transmisor del controlador
remoto y el sensor del aparato con un paño suave.
l
Exponer el sensor de la unidad a una luz muy fuerte
podría interferir con el funcionamiento. Cambie la fuente
de luz o la ubicación de la unidad si esto ocurre.
l
Mantenga el controlador remoto en lugares sin excesiva
humedad o calor y no lo someta a golpes ni vibraciones.
l Cuando se deshaga de las pilas usadas, asegúrese de
cumplir las disposiciones gubernamentales o las
normas de las instituciones medioambientales
públicas que rijan en su país o región.
Compruebe el controlador remoto después de haber
comprobado todas las conexiones.
Oriente directamente el controlador remoto al sensor remoto
del aparato. Se podrá emplear el controlador remoto dentro
del alcance mostrado a continuación:
Para seleccionar la función Línea de entrada:
l
En la unidad principal: Pulse el botón INPUT
repetidamente hasta que aparezca Línea de entrada.
l
En el controlador remoto: Pulse repetidamente el botón
LINE hasta que aparezca Line In en pantalla.
Es-8
11/5/25 X-HM10_20_Es.fm
LINE
AUX
LOOP
AC IN
Televisor
A las tomas de
salida de audio
Cable de audio
(comercialment
e disponible)
Señal de audio
A las tomas
de entrada
Unidad principal
LINE
n Instalación de las pila
1
Abra la cubierta de las baterías.
2
Introduzca la pila suministrada con el equipo siguiendo la
dirección indicada en el compartimiento de las pilas.
Al introducir o extraer las pilas, empújelas hacia el terminal
(–) de la pila.
3
Cierre la cubierta.
n Prueba del controlador remoto
STANDBY/ON
Sensor remoto
7 m
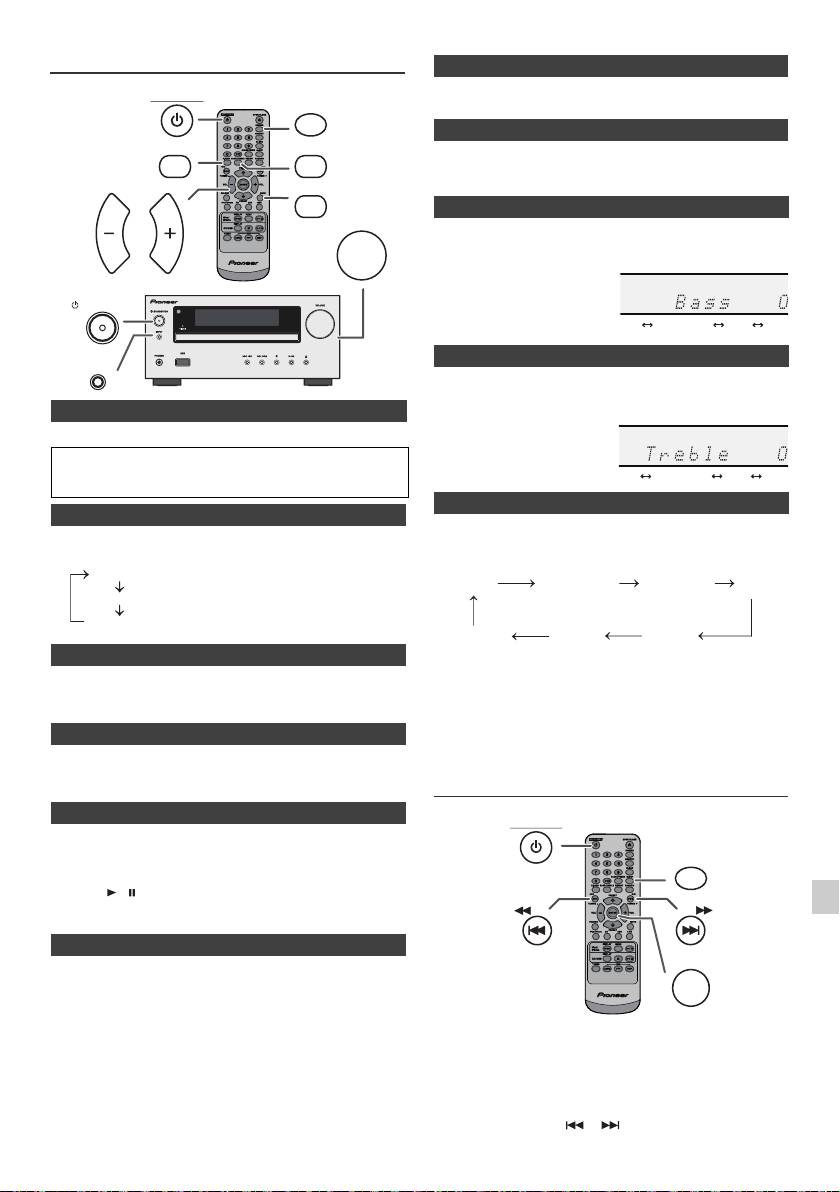
Control general
El volumen se silencia temporalmente cuando pulsa el botón MUTE
STANDBY/ON
DIMMER
del telemando. Pulse otra vez para restablecer el volumen.
P.BASS
BASS/TREBLE
Cuando se activa la alimentación por primera vez, la unidad entrará en
modo P.bass, que enfatiza las frecuencias de bajos. Para cancelar el
modo P.bass, pulse el botón P.BASS del mando a distancia.
MUTE
VOLUME
1
Pulse el botón BASS/TREBLE para seleccionar “Bass”.
VOL VOL
2
Durante 5 segundos, pulse el botón VOL (+ o –) para ajustar los
graves.
STANDBY/ON
INPUT
1
Pulse el botón BASS/TREBLE para seleccionar “Treble”.
2
Dentro de los 5 segundos siguientes, pulse el botón VOL (+ o –)
para ajustar los agudos.
n Para conectar la energía
Pulse el botón STANDBY/ON para conectar la alimentación.
Después del uso:
Pulse el botón STANDBY/ON para entrar en el modo de reserva de
alimentación.
n Control de brillo de pantalla
Cuando pulse el botón INPUT o la unidad principal, la función actual
Para atenuar el brillo de la pantalla pulse el botón DIMMER en el
cambiará a un modo diferente. Pulse el botón INPUT repetidamente
mando a distancia.
para seleccionar la función deseada.
n Fijación automática del volumen
Si apaga la unidad principal cuando el volumen se encuentra en la
Nota:
posición 17 o un valor superior, al encenderla de nuevo el volumen
La función de copia de seguridad protegerá el modo de función
estará en la posición 16.
memorizado durante algunas horas en caso de fallo de electricidad
o de desconexión del cable de alimentación CA.
n Control de volumen
Gire el botón del volumen hacia VOLUME (en la unidad principal) o
Ajuste del reloj (Solamente del
presione VOL +/– (en el control remoto) para aumentar o disminuir
el volumen.
control remoto)
n Función de activación automática
1
Cuando pulsa alguno de los botones siguientes, se conecta la
alimentación del aparato.
l
iPod / iPhone, CD, USB, LINE, TUNER en el control remoto: Se
2
activa la función seleccionada.
l
Botón / de la unidad principal: La unidad se enciende y se
3
iniciará la reproducción de la última función (CD, TUNER, USB,
iPod, LINE IN).
4
n Función de apagado automático
La unidad principal entrará en modo de espera (cuando el iPod/
5
iPhone no está conectado) al cabo de 15 minutos de inactividad
durante:
iPod/iPhone: Sin conexión.
6
CD / USB: En el modo de parada.
En este ejemplo, el reloj está ajustado para la visualización de
LINE IN: no se detecta ninguna señal de entrada o la audibilidad del
24 horas (00:00).
sonido es muy débil.
7
Nota:
Sólo X-HM20: Sin embargo, cuando el iPod/iPhone está conectado,
8
la unidad comenzará a cargarse.
Durante el modo de espera se mostrará “Charge Mode”.
9
Es-9
11/5/25 X-HM10_20_Es.fm
Dimmer 1
Dimmer 2
Dimmer Off
(La pantalla del display se muestra atenuada).
(La pantalla del display se muestra más atenuada).
(La pantalla del display se muestra muy iluminada).
n Silencio
n Control P.Bass
n Control de graves
n Control de agudos
n Función
1
Pulse el botón STANDBY/ON para conectar la alimentación.
2
Pulse el botón CLOCK/TIMER.
3
Dentro de los siguientes 10, pulse el botón ENTER. Para ajustar
el día, pulse el botón o y, luego, el botón ENTER.
........
-5 -4 +4 +5
........
-5 -4 +4 +5
CD AM
FM STEREO
FM MONO
Line In
iPod
USB
(sólo X-HM20)
STANDBY/ON
CLOCK/TIMER
TUNING −
TUNING +
ENTER
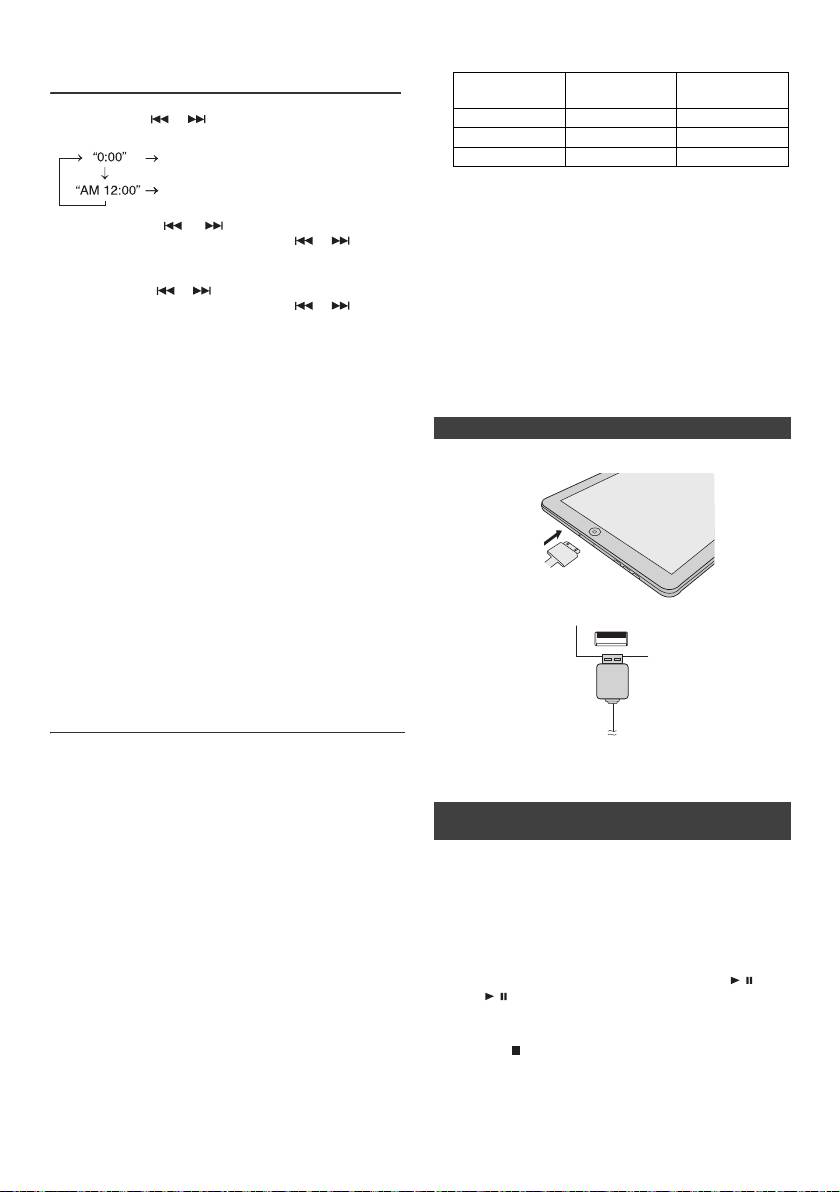
l Terminal de carga para iPod, iPhone e iPad:
Ajuste del reloj (Solamente del
control remoto) (continuación)
Estación de
Condición
Terminal USB
acoplamiento
4
Pulse el botón o para seleccionar la visualización de
Función USB NO SÍ
24 horas o la de 12 horas y luego pulse el botón ENTER.
Otra función SÍ NO
Aparecerá el visualizador de 24 horas.
Modo de espera SÍ NO
(00:00 - 23:59)
Aparecerá el visualizador de 12 horas.
l Es posible que en la pantalla del iPhone se muestre
(AM 12:00 - PM 11:59)
“Este accesorio no ha sido diseñado para funcionar
con un iPhone”, u otro mensaje similar, cuando:
5
Pulse el botón o para ajustar la hora y luego
- la pila esté agotándose
pulse el botón ENTER. Pulse el botón o una vez
- el iPhone no se haya colocado correctamente en la
para adelantar la hora en 1 hora. Manténgalo pulsado
estación de acoplamiento (por ej., esté inclinado).
para adelantarla continuamente.
En tal caso, retire el iPhone de la estación de
6
Pulse el botón o para ajustar los minutos y luego
acoplamiento y vuelva a colocarlo.
pulse el botón ENTER. Pulse el botón o una vez
l
Este producto ha sido diseñado para ser utilizado con
para avanzar la hora en 1 minuto.
un iPhone. Para impedir una interferencia aleatoria
Para comprobar la visualización de la hora:
cuando el iPod/iPhone se encuentre en la estación de
Pulse el botón CLOCK/TIMER. Aparecerá la visualización de
acoplamiento, la salida de auriculares queda
desactivada, al tiempo que se muestra “HP INVALID”.
la hora durante unos 5 segundos.
Puede también experimentar una breve interferencia
Nota:
de sonido durante las llamadas entrantes.
Cuando se restablece la alimentación eléctrica después de
volver a conectar la unidad o después de un fallo eléctrico,
n Conexión de un iPad (terminal USB)
configure el reloj (página 9).
1
Introduzca el conector en el iPod, iPhone o iPad.
Para reajustar el reloj:
Efectúe “Ajuste del reloj” desde el paso 1. Si “Clock” no
aparece en el paso 2, se saltará el paso 4 (para
seleccionar la visualización de 24 horas o de 12 horas).
Para cambiar la visualización de 24 horas o de 12 horas:
1 Borre todo el contenido programado. [Para más
detalles, consulte “Reinicio de Fábrica, Limpiando
Toda la Memoria” de la página 25.]
2 Efectúe “Ajuste del reloj” desde el paso 1 en adelante.
2 Conecte el iPad a la unidad mediante un conector USB.
Nota:
Si extrae el cable de alimentación o se produce un
apagón, el temporizador se reinicializará.
Audición de un iPod, iPhone o iPad
(sólo X-HM20)
Modelos soportados de iPod, iPhone e iPad:
Nota:
l
iPad
El conector USB no soporta salida de VIDEO.
l
iPhone 4
l
iPhone 3GS
l
iPhone 3G
n Reproducción de un iPod, iPhone o iPad
l
iPhone
(terminal USB)
a
l
iPod touch (4
generación)
a
l
iPod touch (3
generación)
1 Pulse el botón STANDBY/ON para encender el
a
l
iPod touch (2
generación)
aparato.
a
l
iPod touch (1
generación)
2 Pulse el botón USB del mando a distancia o pulse
l
iPod classic
repetidamente el botón INPUT de la unidad principal
a
l
iPod nano (6
generación)
para seleccionar la función USB.
a
l
iPod nano (5
generación)
3 Conecte el iPod, iPhone o iPad a la unidad. Se
a
l
iPod nano (4
generación)
mostrará “iPod”.
a
l
iPod nano (3
generación)
4 Para iniciar la reproducción, pulse el botón / (CD/
a
l
iPod nano (2
generación)
USB / ).
Notas:
Nota:
l Este sistema se ha desarrollado y probado para la
Durante la reproducción de un iPod, iPhone o iPad, el
versión de software de iPod/iPhone/iPad indicada en
botón Stop ( ) no es válido.
la página web de Pioneer (http://pioneer.jp/homeav/
support/ios/eu).
l Si instala versiones de software distintas de las
indicadas en la página web de Pioneer en su iPod/
iPhone/iPad, puede derivar en la incompatibilidad con
este sistema.
Es-10
11/5/25 X-HM10_20_Es.fm
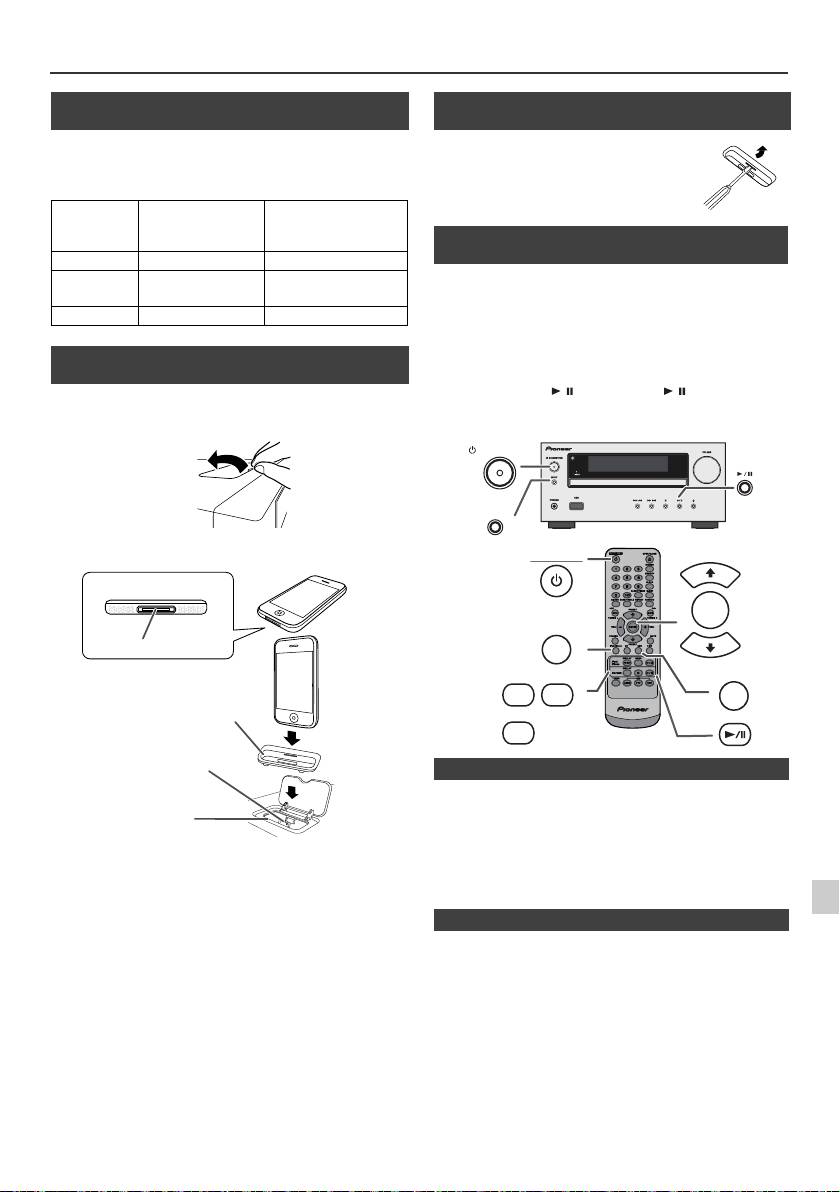
Audición de un iPod, iPhone o iPad (sólo X-HM20) (continuación)
n Conexión de adaptador iPod y iPhone
(Estación de acoplamiento)
Nota:
Utilice el adaptador proporcionado con su unidad iPod o
iPhone.
N°.
Descripción
Adaptador
Capacidad
iPhone
iPhone
12 iPhone 4GB & 8GB & 16GB
15 iPhone 3G,
8GB & 16GB & 32GB
iPhone 3GS
19 iPhone 4 16GB & 32GB
n Para inserter el adaptador iPod y iPhone
(Estación de acoplamiento)
1
Abra la estación de acoplamiento para iPod e iPhone
tirando de ella hacia arriba.
2 Introduzca el adaptador de iPod e iPhone en la unidad,
y conecte su iPod o iPhone.
l
El sonido sólo cambiará del iPhone a la unidad principal
después de que se completa el proceso de autenticación en
aproximadamente 10 segundos.
1
l
Las llamadas entrantes interrumpirán la reproducción.
Precaución:
l
Cuando las llamadas son respondidas, la conversación sólo
Desconecte todos los accesorios de iPod o iPhone antes de
se puede escuchar por el altavoz incorporado del iPhone.
2
insertarlo en el puerto.
Encienda el altavoz del iPhone o desconecte el iPhone para
comenzar la conversación.
3
4
Basta con retirar el iPod o iPhone de la estación de
acoplamiento, o el iPad del terminal USB. Es seguro hacerlo así
incluso durante la reproducción.
5
6
7
8
9
Es-11
11/5/25 X-HM10_20_Es.fm
iPhone
iPhone (inferior)
Dock conector
Adaptador de iPhone
Conector de iPhone
Estación de
acoplamiento para
iPhone
n Para retirar el adaptador de iPod o iPhone
(Estación de acoplamiento)
Inserte la punta de un destornillador (de
tipo “–”, pequeño) en el agujero del
adaptador del tal y como se indica y
levántelo hacia arriba para retirarlo.
n Reproducción de un iPod o iPhone
(Estación de acoplamiento)
1
Pulse el botón STANDBY/ON para conectar la alimentación.
2
Pulse el botón iPod/iPhone en el control remoto o el botón
INPUT repetidamente en la unidad principal para
seleccionar la función de iPod.
3
Inserte la unidad iPod o iPhone en el puerto del iPod de la
unidad principal.
4
Pulse el botón / (iPod/iPhone / ) para iniciar la
reproducción.
STANDBY/ON
INPUT
STANDBY/ON
PRESET
ENTER
iPod/iPhone
PRESET
DISPLAY
MENU
USB
iPod/
TV OUT
iPhone
DISPLAY
CD/USB
n Reproducción de iPhone
n Desconexión de un iPod, iPhone o iPad
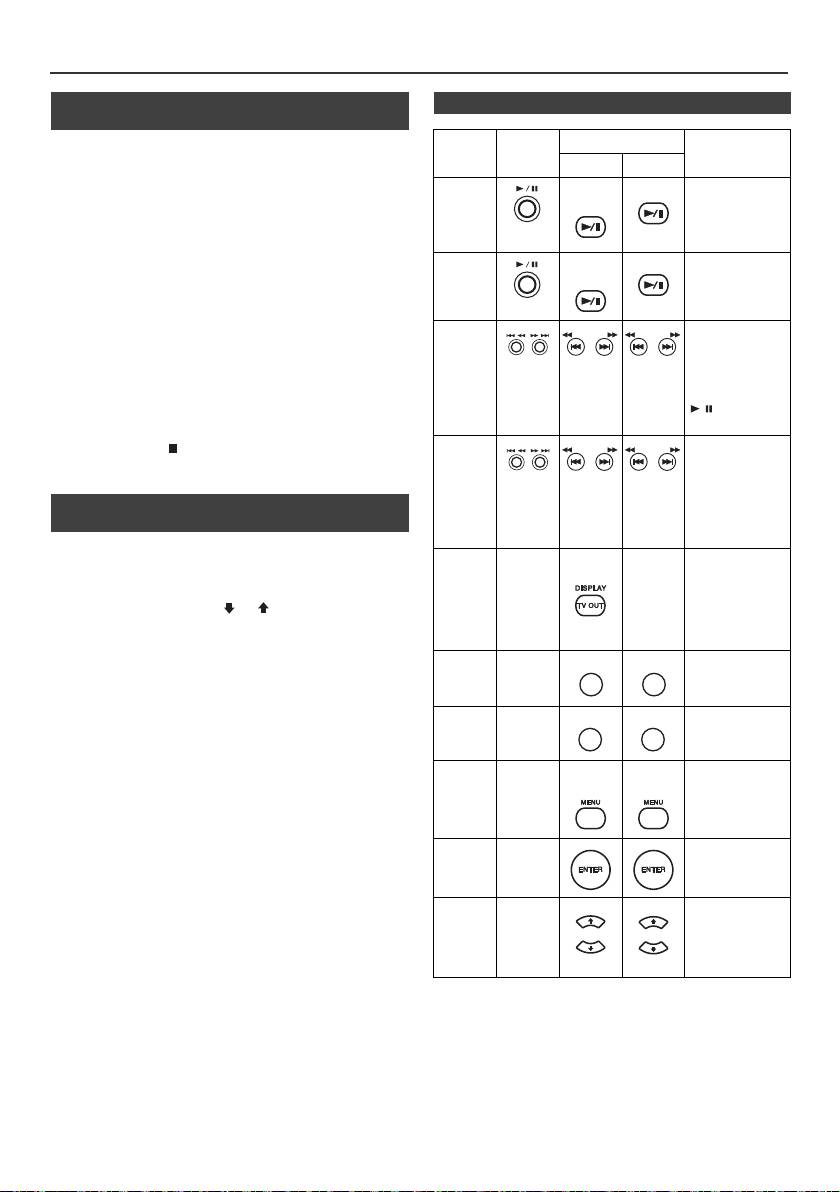
Audición de un iPod, iPhone o iPad
(sólo X-HM20) (continuación)
n Ver vídeos en un televisor conectado al
n Diversas funciones del iPod, iPhone e iPad
iPod o iPhone
Función Unidad
Controlador remoto
Funcionamiento
1
Pulse el botón DISPLAY TV OUT durante más de
principal
Dock USB
2 segundos. Aparecerá “TV Display” en pantalla.
Reproducción
iPod/
CD/USB
2
Pulse el botón ENTER para iniciar la reproducción.
Púlselo en el
iPhone
modo pausa.
Notas:
l
Si la configuración de salida de TV ya se encuentra activada
en el menú del vídeo, el vídeo aparecerá automáticamente
en la pantalla del televisor cuando pulse la tecla ENTER.
Pausa
iPod/
CD/USB
Pulse en el modo
l
El terminal USB no permite la visualización a través del
iPhone
de reproducción.
televisor. (iPad)
l
Para volver a la visualización del vídeo en la pantalla del iPod
o iPhone, pulse el botón MENU para entrar en el menú de
vídeo. Luego presione el botón DISPLAY TV OUT durante
Pista
Pulse en el modo
más de 2 segundos hasta que aparezca “iPod Display”.
siguiente/
de reproducción
l
Durante la reproducción del vídeo de iPod o iPhone, si pulsa
TUNING −
TUNING +
TUNING −
TUNING +
o pausa. Si pulsa
anterior
el botón DISPLAY TV OUT no alternará la visualización de
el botón en el
salida de vídeo entre el iPod y el televisor.
modo de pausa,
pulse el botón
Precaución:
/ para iniciar
l
Desconecte todos los accesorios del iPod o iPhone antes de
la pista deseada.
insertarlo en el puerto del iPod.
l El botón Stop ( ) de la unidad principal no es válido
Avance
Pulse y
mientras opera un iPod.
rápido/
mantenga
pulsado el modo
Retroceso
de reproducción.
rápido
n Navegación de los menús de iPod, iPhone
Suéltelo para
o iPad
volver a la
reproducción.
1
Para ver el menú en el iPod, iPhone o iPad, pulse el botón
Pantalla
____
iPod/
____
Pulse esta tecla
MENU del iPod/iPhone. Púlselo de nuevo para volver al
iPhone
durante más de
menú anterior.
dos segundos
para cambiar la
2
Utilice el botón PRESET (
o
) para seleccionar una
pantalla de salida
opción del menú y luego pulse el botón ENTER.
de vídeo entre el
iPod y el televisor.
Nota:
Al navegar por el menú del iPod, iPhone o iPad con el control
Repetir
____
Pulse para to
remoto, no opere ninguno de los botones de la unidad iPod o
cambiar el modo
repetir.
iPhone. El nivel de volumen se ajusta cuando pulsa el botón VOL
(+ o –) de la unidad principal o del controlador remoto. El ajuste
Aleatorio
____
Pulse para
de volumen en el iPod, iPhone o iPad no surtirá ningún efecto.
cambiar al modo
aleatorio.
Funcionamiento del iPod y iPhone:
Las operaciones descritas abajo dependen de la generación del
Menú
____
iPod/
iPod/
Pulse para ver el
iPod y iPhone que esté utilizando.
iPod
iPhone
iPhone
menú del iPod
durante la
Sistema en funcionamiento:
function del iPod.
Cuando la unidad principal esté encendida, el iPod, iPhone o
iPad se encenderán automáticamente al ser colocados en la
Entrada
____
Pulse para
estación de acoplamiento.
al iPod
confirmar la
selección.
Sistema apagado (funcionamiento en espera):
Cuando coloque la unidad principal en modo de espera, el iPod
iPod
____
Pulse para
e iPhone que haya en la estación de acoplamiento, o el iPad
cursor
seleccionar el
conectado, se colocarán automáticamente en modo de espera.
arriba/
menú del iPod.
abajo
Es-12
11/5/25 X-HM10_20_Es.fm
TUNING −
TUNING +
TUNING −
TUNING +
REPEAT
REPEAT
RANDOM
RANDOM
PRESET
PRESET
PRESET
PRESET
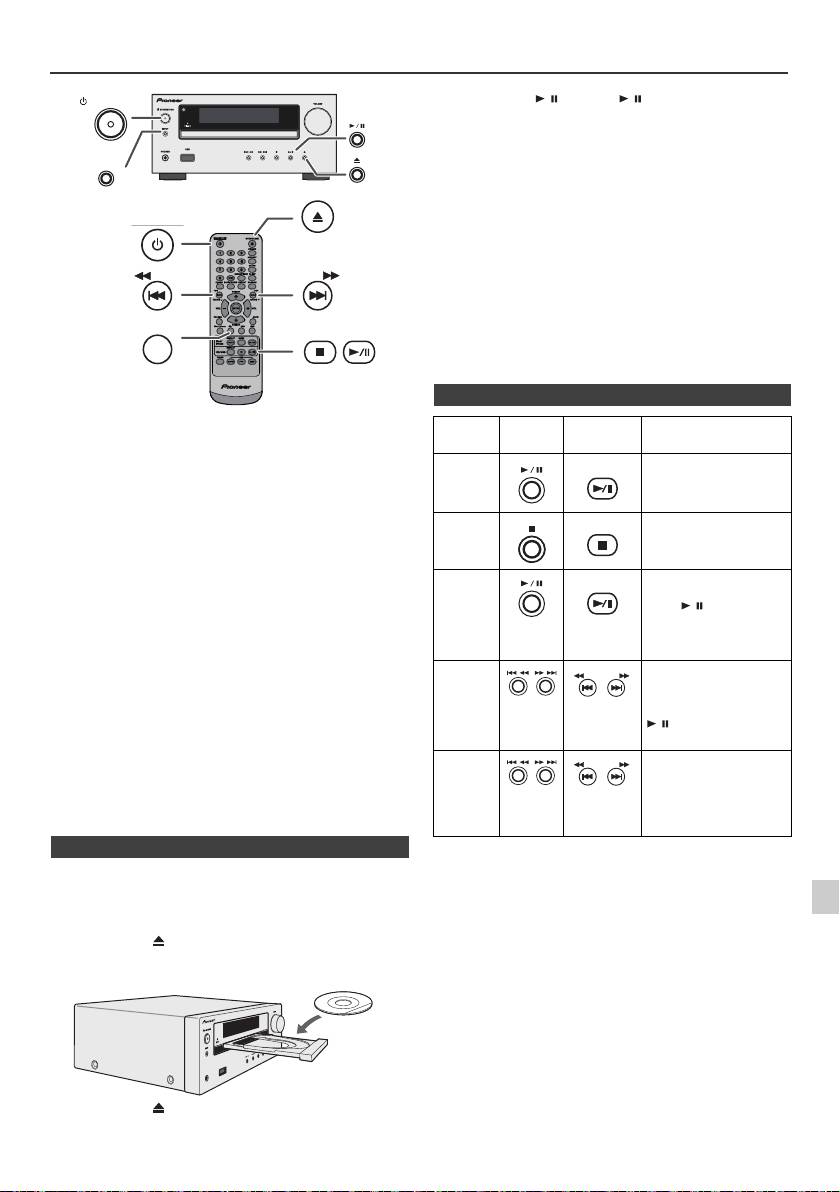
Escuchando un CD o disco de MP3/WMA
STANDBY/ON
Precaución:
INPUT
l
No ponga dos discos en una misma bandeja de disco.
l
No reproduzca discos de formas especiales (en forma de
OPEN/CLOSE
corazón, octagonales. etc.). Podría causar mal
funcionamiento.
STANDBY/ON
l
No empuje la bandeja de discos mientras está moviendo.
l
Si hay un corte de alimentación eléctrica mientras la bandeja
está abierta, espere a que se restaure la alimentación.
l
Si hay interferencias de televisión o radio durante el
funcionamiento del reproductor de CD, coloque el aparato
alejado de la televisión o de la radio.
TUNING −
l
Asegúrese de poner el disco de 8 cm en el centro de las
TUNING +
CD
bandejas de discos.
l
Debido a la estructura de la información del disco, tarda más
en leer un disco MP3/WMA que un disco CD normal
(aproximadamente 20 a 90 segundos).
Este sistema puede reproducir un CD estándar, CD-R/RW en el
formato CD y CD-R/RW con archivos MP3 o WMA, pero no
puede grabar en ellos. Es posible que algunos discos CD-R y
CD-RW de audio no puedan reproducirse debido al estado del
disco o al aparato utilizado para su grabación.
MP3:
MP3 es una forma de compresión. Es un acrónimo que
significa MPEG Audio Layer 3. MP3 es un tipo de código de
audio que se procesa mediante compresión significante
desde la fuente de audio original con muy poca pérdida en
la calidad del sonido.
l
El sistema soporta archivos MPEG 1 Layer 3 y VBR.
l
Durante la reproducción de archivos VBR, el contador de
tiempo del visualizador podría diferir del tiempo real de
reproducción.
l
Bitrate soportado por MP3 tiene 32 kbps a 320 kbps.
WMA:
Los archivos WMA son un formato de sistema avanzado de
archivos que incluye archivos de audio que están
comprimidos con un codec de audio de Windows. El WMA
fue desarrollado por Microsoft como un formato de audio
para el reproductor Windows Media.
l
El indicador “MP3” y “WMA” se encenderá después de que
la unidad lea información en un disco de MP3 o WMA.
l
Bitrate soportado por WMA tiene 64 kbps a 160 kbps.
1
n Reproducción de discos
2
1
Pulse el botón STANDBY/ON para conectar la alimentación.
2
Pulse el botón CD en el control remoto o el botón INPUT
repetidamente en la unidad principal para seleccionar la
3
función de CD.
3
Pulse el botón para abrir la bandeja de discos.
4
4
Ponga el disco en la bandeja de discos, con la cara de la
etiqueta hacia arriba.
5
6
7
8
5
Pulse el botón para cerrar la bandeja de discos.
9
Es-13
11/5/25 X-HM10_20_Es.fm
USB
PHONES
6
Pulse el botón
/
(CD/USB
/
) para iniciar la
reproducción. Después de la última pista del disco, la unidad
parará automáticamente.
n Distintas funciones de los discos
Función Unidad
Controlador
Funcionamiento
principal
remoto
Reproducción
CD/USB
Pulse el modo de parada.
Parada
CD/USB
Pulse en el modo de
reproducción.
Pausa
CD/USB
Pulse en el modo de
reproducción. Pulse el
botón / para reanudar
la reproducción a partir
del punto en el que se
pausó.
Pista
Púlselo en el modo de
siguiente/
reproducción o parada. Si
TUNING −
TUNING +
pulsa el botón en modo
anterior
de parada, pulse el botón
/ para empezar la
pista deseada.
Avance
Pulse y mantenga
rápido/
pulsado el modo de
TUNING −
TUNING +
reproducción.
Retroceso
rápido
Suéltelo para volver a la
reproducción.

Reproducción avanzada de CD o disco de MP3/WMA
Para cancelar la repetición de la reproducción:
Presione varias veces el botón REPEAT hasta que aparezca
“Normal” y desparezca “ ”.
Nota:
Durante la repetición de reproducción, la reproducción
aleatoria no es posible.
Las pistas del disco se pueden reproducir en orden aleatorio
n Búsqueda directa de pistas
automáticamente.
Para reproducir aleatoriamente todas las pistas:
Puede reproducir las pistas deseadas del disco actual
Pulse y mantenga presionado el botón RANDOM del mando
mediante los botones numéricos.
a distancia hasta que aparezca “Random”. Presione el botón
Utilice los botones numéricos del mando a distancia
/ (CD/USB /).
para seleccionar la pista deseada mientras se reproduce
el disco seleccionado.
Para cancelar la reproducción aleatoria:
l
Los botones numéricos le permiten elegir hasta el número
Pulse el botón RANDOM hasta que desaparezca el indicador
9.
“RDM”.
l
Para seleccionar el número 10 o superior, emplee el
botón “>10”.
A. Por ejemplo, para
seleccionar 13
Notas:
1
Pulse una vez el botón “>10”.
l
Si usted presiona el botón durante la reproducción
2
Pulse el botón “1”.
aleatoria, usted puede ir a la próxima pista seleccionada
por la operación aleatoria. Por otra parte, el botón no
3
Pulse el botón “3”.
permite ir a la pista anterior. El principio de la pista a leeer
B. Por ejemplo, para seleccionar 130
será localizado.
l
En la reproducción aleatoria, la unidad seleccionará y
1
Pulse el botón “>10” dos veces.
reproducirá las pistas automáticamente. (No puede
2
Pulse el botón “1”.
seleccionar el orden de las pistas.)
l
Durante la reproducción aleatoria, la repetición de
3
Pulse el botón “3”.
reproducción no es posible.
4
Pulse el botón “0”.
Precaución:
Notas:
Después de realizar la repetición, asegúrese de apretar el
l
No puede seleccionar un número de pista más alto que el
botón (CD/USB ). De lo contrario, el disco se reproducirá
número de pistas en el disco.
continuamente.
l
Durante la reproducción aleatoria no es posible utilizar la
búsqueda directa.
Para detener la reproducción:
Podrá seleccionar hasta 32 selecciones para la reproducción
Presione el botón (CD/USB ).
en el orden que usted prefiera.
n Repetición de la reproducción
La repetición de lectura de una pista se puede realizar, todas
las pistas o una secuencia programada continuamente.
Para escuchar nuevamente una pista:
Presione varias veces el botón REPEAT hasta que aparezca
“Repeat One”. Presione el botón / (CD/USB / ).
Para repetir todas las pistas:
Presione varias veces el botón REPEAT hasta que aparezca
“Repeat All”. Presione el botón / (CD/USB / ).
Para repetir las pistas deseadas:
Efectúe los pasos 1 - 5 de la sección “Reproducción
programada” de esta página y luego pulse repetidamente el
botón REPEAT hasta que aparezca “Repeat All”.
Es-14
11/5/25 X-HM10_20_Es.fm
DIMMER
MEMORY
REPEAT
RANDOM
Número de la pista
seleccionada
n Reproducción aleatoria
n Reproducción programada (CD)
1
Durante el modo de stop, presione el botón de MEMORY
del control remoto para introducir el modo y salvar la
programación.
2
Presione los botones o en el mando a distancia
para seleccionar la pista deseada.
3
Pulse el botón MEMORY para almacenar el número de pista.
Número de la pista seleccionada
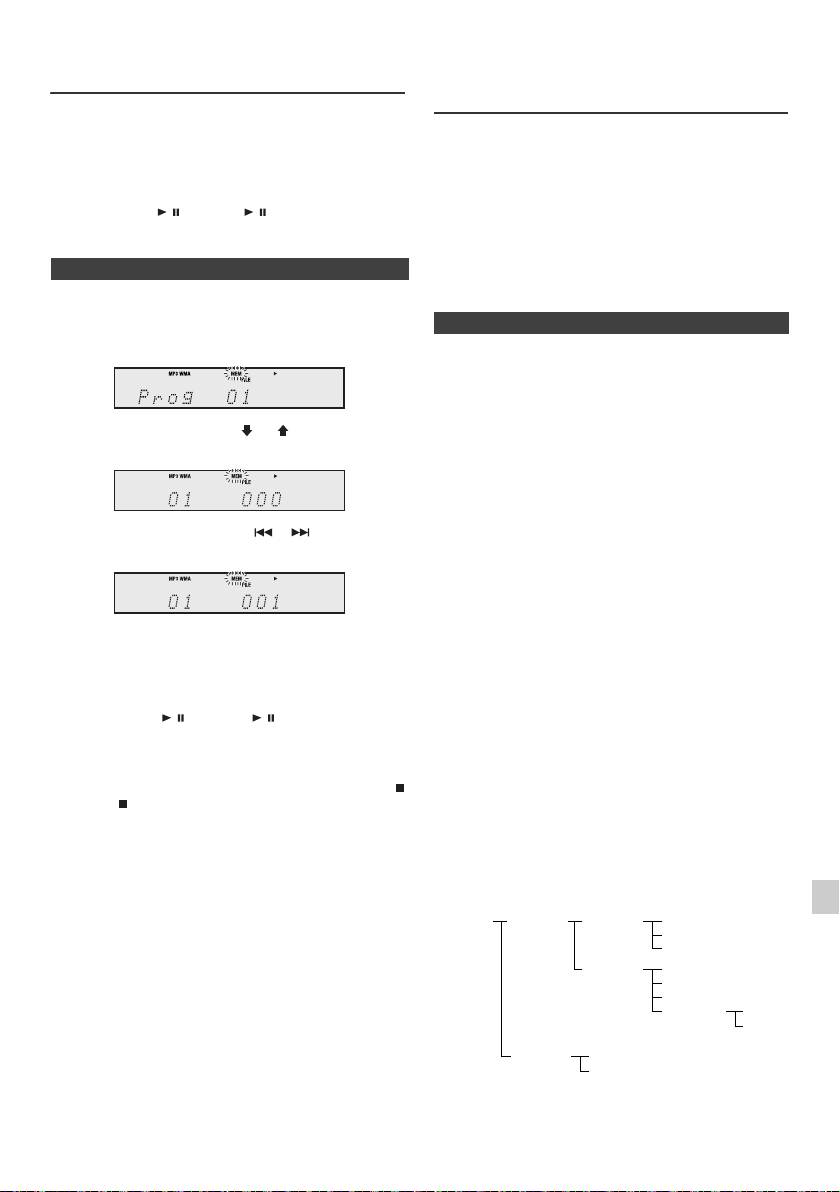
Reproducción avanzada de CD o
Modo de carpeta del MP3/WMA
disco de MP3/WMA (continuación)
(solamente para los ficheros de MP3/
WMA)
4
Repita los pasos 2 - 3 para otras pistas. Podrán
Para escuchar los ficheros MP3/WMA (Windows
programarse hasta 32 pistas. Si desea verificar las pistas
Media Audio)
programadas, pulse repetidamente el botón MEMORY. Si
Existen muchos sitos internet donde usted puede
se ha cometido un error, se pueden borrar las pistas
descargar ficheros de música MP3/WMA (Audio de los
programadas pulsando el botón CLEAR.
Medios de Windows). Siga las instrucciones del website
5
Pulse el botón / (CD/USB / ) para iniciar la
acerca de cómo descargar los archivos de la música.
reproducción.
Podrá reproducir estos archivos de música descargados
grabándolos en un disco CD-R/RW.
l Sus cansiones/ficheros descargados son solamente
n Reproducción programada (MP3/WMA)
para uso personal. Cualquier otro uso de la canción sin
la autorización del dueño es contra la ley.
1
Mientras esté en el modo de parada, pulse el botón
MEMORY para entrar en el modo de almacenamiento
n Sobre el orden de playback de la carpeta
de programación.
Si los archivos de MP3/WMA están registrados en varias
carpetas, el número de cada una será fijado
automáticamente.
Estas carpetas se pueden seleccionar a través del botón
FOLDER del mando a distancia. Si no son soportados los
2 Pulse el botón PRESET
(
o
)
en el mando a
formatos del fichero en el interior de la carpeta
distancia para seleccionar la carpeta deseada.
seleccionada, se saltará y se seleccionará la próxima.
Ejemplo: Cómo fijar número de la carpeta si el formato de
los archivos MP3/WMA están registrados como en la
figura de abajo.
A continuación pulse el botón o en el mando a
1
La carpeta de ROOT se fija como carpeta 1.
distancia para seleccionar las pistas deseadas.
2 Así como para las carpetas situadas dentro de la
carpeta ROOT (la carpeta A y B), la carpeta que sea
grabada antes en el disco se establecerá como carpeta
2 y carpeta 3.
3 De las carpetas incluidas en la carpeta A (carpeta C y
3 Pulse el botón MEMORY para guardar la carpeta y el
carpeta D), la carpeta que se registre primero en el
número de pista.
disco será agregada como carpeta 4 y carpeta 5.
4 Repita los pasos 2 – 3 para otras carpetas/pistas.
4 La carpeta E que esta dentro de la D será renominada
Podrán programarse hasta 32 pistas.
carpeta 6.
5 Pulse el botón / (CD/USB / ) para iniciar la
reproducción.
l El orden de la información registrada en la carpeta y el
archivo del disco dependen del software de escritura.
Es posible que esta unidad lea los archivos no en base
Para cancelar el modo de reproducción programada:
al orden previsto de lectura que esperamos.
Durante el modo de parada programada, pulse el botón
l Para CD MP3/WMA, pueden leerse 99 números de
(CD/USB ). La pantalla mostrará “Memory Clear” y
carpetas y 999 archivos, incluyendo las carpetas que
todos los contenidos programados se borrarán.
no contengan archivos reproducibles.
1
Para añadir pistas al programa:
El modo carpeta on/off puede ser operado a través del
Si un programa ha sido almacenado anteriormente, el
botón FOLDER del mando a distancia. Los archivos que
2
indicador “MEM” se visualizará. Pulse el botón MEMORY.
se leen en el modo de encendido se diferencian de los
Después, para añadir pistas, siga los pasos 2 – 3.
leídos en el modo apagado.
3
Notas:
l Cuando se expulsa un disco, el programa se cancela
4
automáticamente.
l Si pulsa el botón STANDBY/ON para entrar en el
modo de reserva o cambia la función desde CD a otra
5
función, se borrarán las selecciones programadas.
l Durante el funcionamiento programado, no es posible
6
la reproducción aleatoria.
7
8
9
Es-15
11/5/25 X-HM10_20_Es.fm
ROOT
FOLDER A
FOLDER C
FILE 3
(FOLDER 1)
(FOLDER 2)
(FOLDER 4)
FILE 4
FILE 5
FOLDER D
FILE 6
(FOLDER 5)
FILE 7
FILE 8
FOLDER E
FILE 9
(FOLDER 6)
FILE 10
FOLDER B
FILE 1
(FOLDER 3)
FILE 2
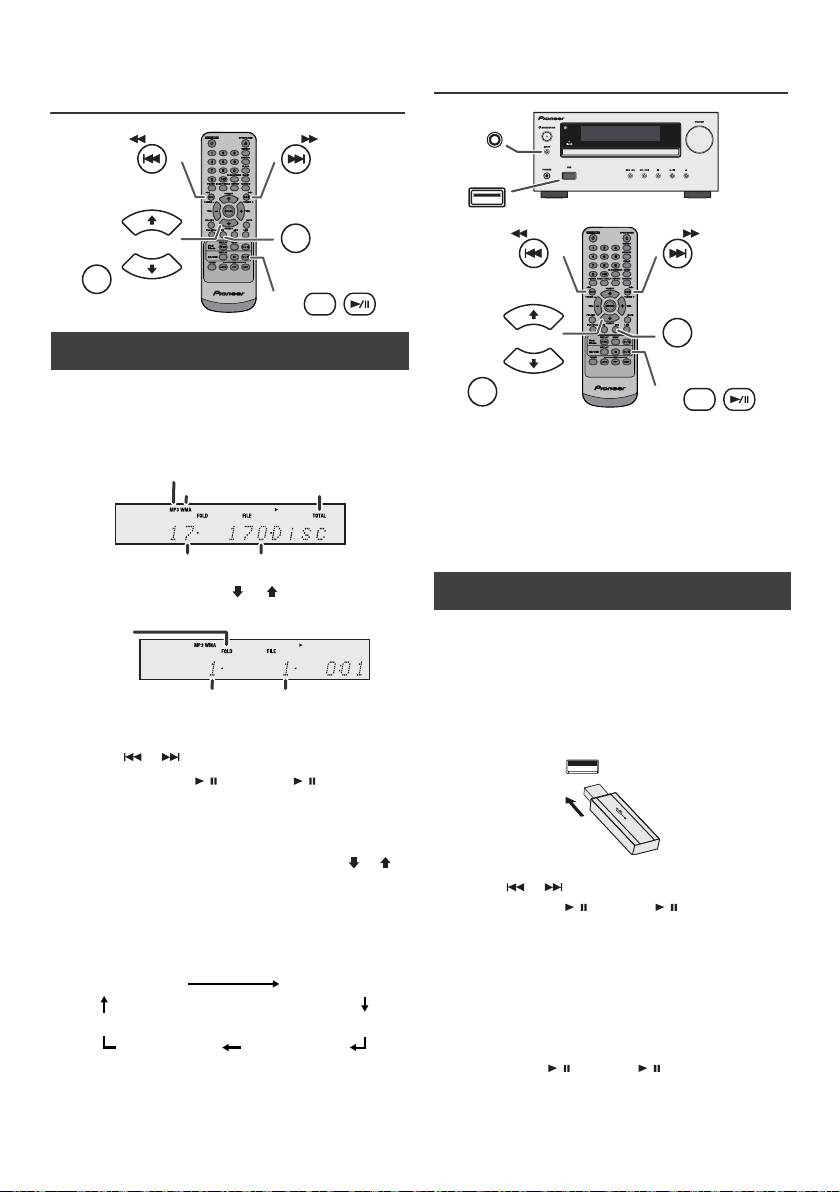
Modo de carpeta del MP3/WMA
Escuchando a través del dispositivo
(solamente para los ficheros de MP3/
de almacenamiento USB/ player MP3
WMA) (continuación)
TUNING −
TUNING +
PRESET
CD
FOLDER
PRESET
DISPLAY
CD/USB
n
Procedimiento para escuchar el disco del
MP3/WMA con el modo de carpeta activado
Para reproducir CD-R/RW.
1
Presione el botón CD y cargue un disco de MP3/WMA.
Notas:
Pulse el botón FOLDER para visualizar la información del
l Este producto no es compatible con sistemas de
disco.
archivos MTP y AAC procedentes de un dispositivo de
almacenamiento masivo USB o de un reproductor
MP3.
l
Es posible que algunos dispositivos de almacenamiento
externo no funcionen con este sistema.
l No se garantiza el funcionamiento de dispositivos de
almacenamiento externo (dispositivos de memoria
USB, discos duros externos, etc.).
2
Pulse el botón PRESET ( o ) para seleccionar el
fichero que desea a reproducir. (Modo carpeta activado)
3 Seleccione el archivo a escuchar deseado presionando
el botón o .
4 Presione el botón / (CD/USB / ). El playback
iniciará y el nombre del archivo será visualizado.
l Se mostrará el título, artista y nombre del álbum si
esa información está registrada en el disco.
l En el caso de la reproducción con el modo de
carpeta activo, pulse el botón PRESET
(
o
)
y
podrá seleccionar la carpeta aunque se encuentre
en modo de reproducción/pausa. Seguirá en modo
de reproducción/pausa en la primera pista de la
carpeta seleccionada.
l El contenido del display puede ser cambiado
presionando el botón de CD/USB DISPLAY.
Nota:
Para detener el playback:
Presione el botón / (CD/USB / ).
Nota:
Si no se visualiza “Not Support”, significa que está
seleccionado “Copyright protected WMA file” o “Not
supported playback file”.
Es-16
11/5/25 X-HM10_20_Es.fm
Indicador de MP3
Indicador de
Indicador de WMA
TOTAL
Número total de carpetas
Número total de archivos
Indicador de
la CARPETA
Número de la
Primer número de
CARPETA
pista en la carpeta
Nombre del archivo
Visualización de la carpeta
visualizado
Visualización del contador
Visualización del título
Visualización
Visualización del
del album
artista
n Reproducir reproductor USB/MP3 con el
modo carpeta desactivado
1
Pulse el botón USB del controlador remoto o el botón
INPUT de la unidad principal repetidamente para
seleccionar la función de USB. Conecte el dispositivo
de memoria del USB a la unidad con los archivos con el
formato MP3/WMA. Cuando la memoria del USB está
conectada a la unidad principal, la información del
dispositivo será visualizada.
2 Seleccione el archivo a escuchar deseado presionando
el botón o .
3 Presione el botón / (CD/USB / ). El playback
iniciará y el nombre del archivo será visualizado.
l Se visualizan el nombre del título, del artista y del
álbum si están registrados en el dispositivo de
memoria del USB.
l El contenido del display puede ser cambiado
presionando el botón de CD/USB DISPLAY.
INPUT
USB
TUNING −
TUNING +
PRESET
USB
FOLDER
PRESET
DISPLAY
CD/USB
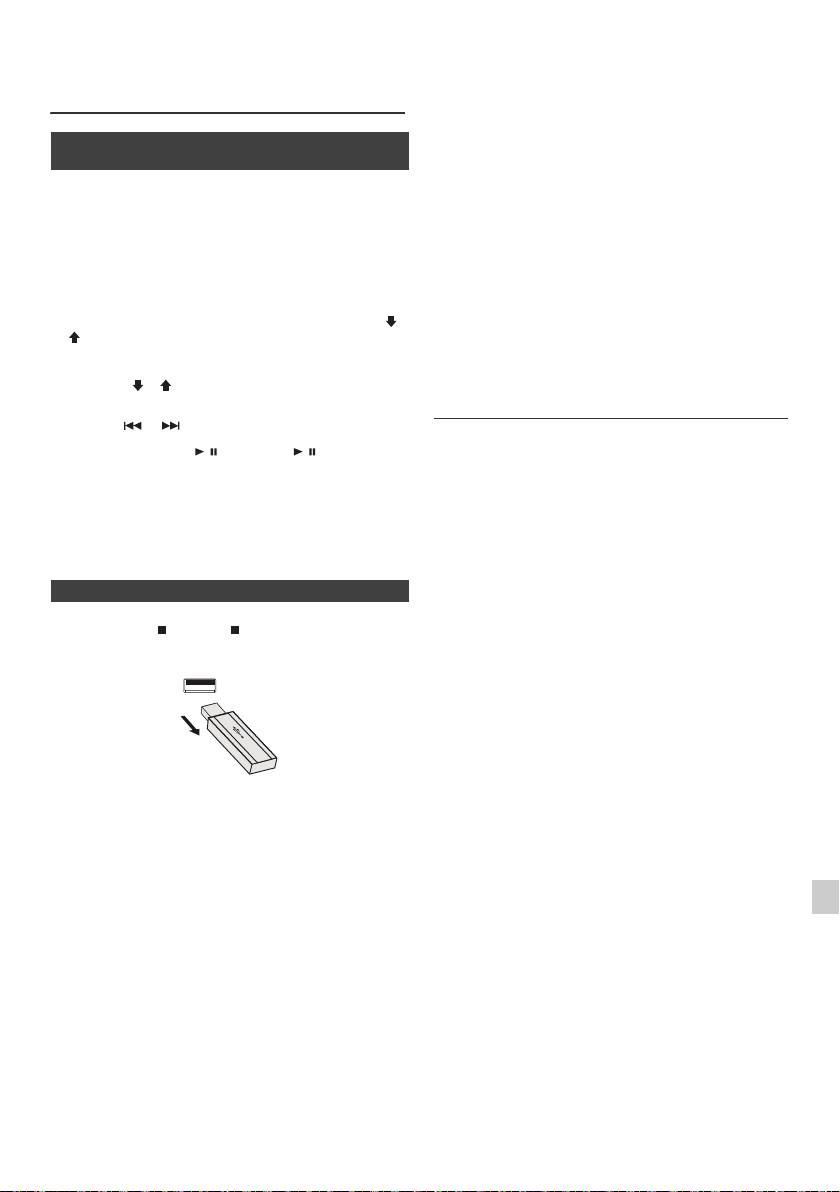
l Este producto puede reproducir archivos WMA y MP3.
Escuchando a través del dispositivo
Detectará automáticamente el tipo de archivo que se
de almacenamiento USB/ player MP3
está reproduciendo. Si se reproduce un archivo
(continuación)
inejecutable en este producto, aparecerá la indicación,
“Not Support” y se omitirá automáticamente el archivo.
Esto tardará unos cuantos segundos. Si aparecen
n Reproducir reproductor USB/MP3 con el
indicaciones en la pantalla debido a un archivo no
modo carpeta activado
especificado, apague la unidad y vuélvala a encender.
l Este producto hace referencia a dispositivos de
1
Pulse el botón USB del controlador remoto o el botón
almacenamiento masivo USB y reproductores MP3.
INPUT de la unidad principal repetidamente para
Sin embargo puede afrontar algunas irregularidades
seleccionar la función de USB. Conecte el dispositivo
debido a diferentes razones improvistas de algunos
de memoria del USB a la unidad con los archivos con el
dispositivos. En caso de que esto ocurra, apague la
unidad y vuélvala a encender.
formato MP3/WMA. Cuando la memoria del USB está
conectada a la unidad principal, la información del
l El dispositivo de memoria USB se conecta
dispositivo será visualizada.
directamente al puerto USB sin necesidad de ningún
cable.
2
Pulse el botón FOLDER, y pulse el botón PRESET ( o
l Durante la función de CD, el reproductor de MP3 no se
) para seleccionar la carpeta que se desea escuchar.
cargará.
Para iniciar la reproducción en el modo fichero, siga al
l Si conecta un iPod a un terminal USB y la función USB
paso 4. Para cambiar la carpeta a escuchar, presione
ha sido seleccionada, se mostrará “Not Support”.
PRESET ( o ) para seleccionar otra.
Reproducción avanzada USB
3 Seleccione el archivo a escuchar deseado presionando
el botón o .
Las funciones siguientes son las mismas que las
4 Presione el botón / (CD/USB / ). El playback
operaciones de CD:
iniciará y el nombre del archivo será visualizado.
Página
l Se visualizan el nombre del título, del artista y del
Búsqueda directa de pistas. . . . . . . . . . . . . . . . . . . .14
álbum si están registrados en el dispositivo de
Repetición de la reproducción . . . . . . . . . . . . . . . . .14
memoria del USB.
Reproducción aleatoria . . . . . . . . . . . . . . . . . . . . . . .14
Reproducción programada (MP3/WMA). . . . . . . . . .15
l El contenido del display puede ser cambiado
presionando el botón de CD/USB DISPLAY.
Notas:
l Si el dispositivo de memoria USB no esta conectado,
aparecera “USB No Media” en pantalla.
n
Para quitar el dispositivo de la memoria USB
l Esta unidad soporta solamente el formato “MPEG-1
Audio Layer-3”. (La frecuencia de muestreo son
32 kHz, 44,1 kHz, 48 kHz)
1
Pulse el botón (CD/USB ) para parar la reproducción.
l El orden de reproducción para archivos MP3 puede
variar dependiendo del software de escritura utilizado
2
Desconecte el dispositivo de memoria USB del terminal.
durante la descarga del archivo.
l El Bitrate que es admitido por el MP3 es 32 kbps a
320 kbps, el WMA es 64 kbps a 160 kbps.
l Para los archivos de MP3/WMA, por favor ponga la
extensión del “.MP3” y del “.WMA”. Los archivos no
pueden se pueden leer si no tienen la extensión MP3/
WMA.
l Las listas de reproducción no se admiten en esta
unidad.
Notas:
l Esta unidad puede visualizar el Nombre de la Carpeta
o del Archivo hasta 32 caracteres.
l PIONEER no se hará responsabile de la pérdida de
datos durante la conexión del dispositivo de memoria
l El número total máximo de archivos MP3/WMA es de
1
del USB al sistema audio.
999.
l Los archivos comprimidos en formato MP3 y/o WMA
l El número total de carpetas leídas es de 99,
2
se pueden reproducir cuando están conectados al
incluyendo la carpeta con archivos no reproducibles.
terminal USB.
Sin embargo, en la pantalla del display únicamente se
mostrará la carpeta con archivos MP3.
l Esta memoria USB soporta formatos FAT 16 o FAT 32.
3
l El tiempo de reproducción puede no visualizarse
l PIONEER no puede garantizar que todos los
correctamente cuando se reproduce un archivo bitrate
dispositivos de memoria USB funcionarán en esté
variable.
4
sistema audio.
l La información ID3TAG permitida es sólo la de TITLE,
l No se recomienda el uso de cables USB en este
ARTIST y ALBUM. Puede visualizarse el nombre del
sistema de audio así como la conexión a un dispositivo
5
título, del álbum y del artista pulsando el botón
de memoria USB. El uso de un cable USB afectará el
DISPLAY durante la reproducción del archivo o modo
funcionamiento de su sistema audio.
de pause.
l Esta memoria USB no se puede operar por medio del
6
l La etiqueta de meta WMA tiene también el título, el
hub USB.
artista y el nombre del álbum que está registrado en los
l El terminal USB en esta unidad no esta destinado a
archivos del WMA. Los archivos WMA protegidos por
7
una conexión de PC sino para reproducción de música
copyright no se pueden reproducir.
con un dispositivo de memoria USB.
l El almacenamiento HDD externo no se puede
8
reproducir via USB.
l En caso que sean tantos los datos en el interior de la
memoria USB, pueden tomar más tiempo su lectura.
9
Es-17
11/5/25 X-HM10_20_Es.fm
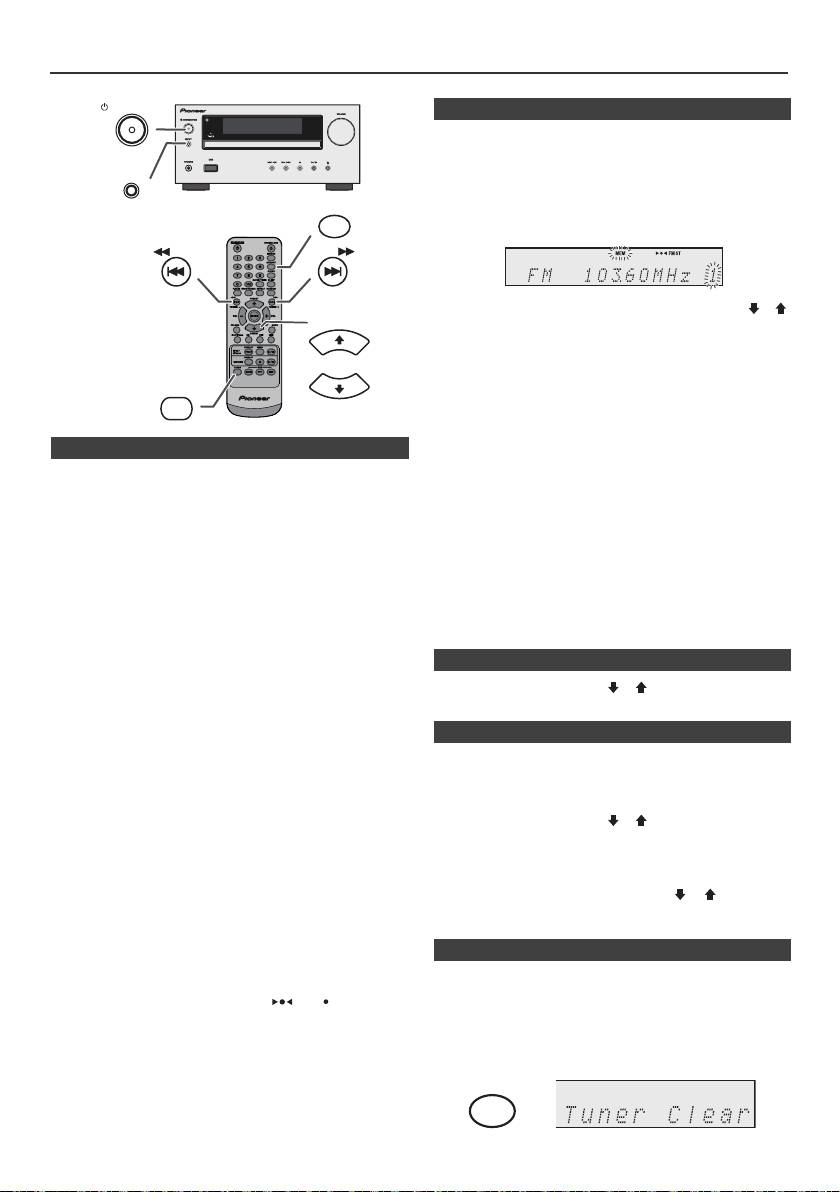
Audición de la radio
STANDBY/ON
n Memorización de una emisora
Podrá almacenar 40 emisoras de AM y FM en la memoria
y llamarlas pulsando un botón. (Sintonización
preajustada)
INPUT
1
Realice los pasos 1 - 3 en “Sintonización”.
MEMORY
2 Pulse el botón MEMORY.
TUNING −
TUNING +
3 Antes de 30 segundos, pulse el botón PRESET
(
o
)
PRESET
para seleccionar el número de canal predefinido.
Almacene las emisoras en la memoria por orden,
empezando por el canal preconfigurado 1.
4 Antes de 30 segundos, pulse el botón MEMORY para
TUNER
almacenar esa emisora en la memoria. Si desaparecen
PRESET
los indicadores del número preconfigurado y de
“MEMORY” antes de memorizarse la emisora, repita la
operación desde el paso 2.
n Sintonización
5 Repita los pasos 1 - 4 para configurar otras emisoras o
1
Pulse el botón STANDBY/ON para conectar la
para cambiar una emisora preconfigurada. Cuando una
alimentación.
nueva estación es almacenada en la memoria, la
estación memorizada previamente para ese número de
2 Pulse repetidamente el botón TUNER para seleccionar
canal será borrada.
la banda de frecuencia deseada (FM o AM).
Nota:
3 Presione el botón TUNING + o – del mando a distancia
La función de seguridad protege todas las emisoras
para seleccionar la estación deseada.
memorizadas durante algunas horas en el caso de una
l Sintonización manual:
falla de alimentación o de la desconexión del cable de
Pulse el botón TUNING + o – repetidamente para
alimentación de CA.
sintonizar la emisora deseada.
l Sintonización automática:
n Para llamar una emisora memorizada
Cuando se pulse el botón TUNING + o – durante más
1 Pulse el botón PRESET
(
o
)
durante menos de
de 0,5 segundos, la exploración se iniciará
0,5 segundos para seleccionar la emisora deseada.
automáticamente y el sintonizador se parará en la
primera emisora difusora que pueda recibirse.
n Para explorar las emisoras preajustadas
Notas:
Las emisoras almacenadas en la memoria pueden
l Cuando ocurren interferencias de radio, la
sintonización por exploración automática puede
explorarse automáticamente. (Exploración de memoria
detenerse automáticamente en este punto.
preconfigurada)
l La sintonización por exploración automática saltará las
emisoras que tengan señales débiles.
1
Pulse el botón PRESET
(
o
)
durante más de
l Para detener la sintonización automática, pulse de
0,5 segundos. El número preconfigurado parpadeará y
nuevo el botón TUNING + o –.
se recibirán consecutivamente las emisoras
l Cuando se haya sintonizado una emisora RDS
programadas durante 5 segundos cada una.
(sistema de datos radiofónicos), la frecuencia se
visualizará primero, y luego se encenderá el indicador
2 Pulse de nuevo el botón PRESET
(
o
)
cuando se
RDS. Finalmente, aparecerá el nombre de la emisora.
localice la emisora deseada.
l La sintonización completamente automática se puede
realizar para “ASPM” de emisoras RDS, vea la página
19.
n
Para borrar toda la memoria preconfigurada
Para recibir una transmisión de FM en estéreo:
1 Pulse el botón TUNER del mando a distancia o pulse
l Pulse el botón TUNER para seleccionar modo stereo y
se mostrará el indicador “ST”. “ ” y “ ” aparecerá
repetidamente el botón INPUT de la unidad principal
cuando una difusión de FM sea en estéreo.
para seleccionar la función Tuner.
l Si la recepción de FM es débil, pulse el botón TUNER
2 Desde la función Tuner, pulse el botón CLEAR hasta
para que se apague el indicador “ST”. La recepción
cambia a monoaural, y el sonido se hace más claro.
que se muestre “Tuner Clearr”.
Es-18
11/5/25 X-HM10_20_Es.fm
CLEAR
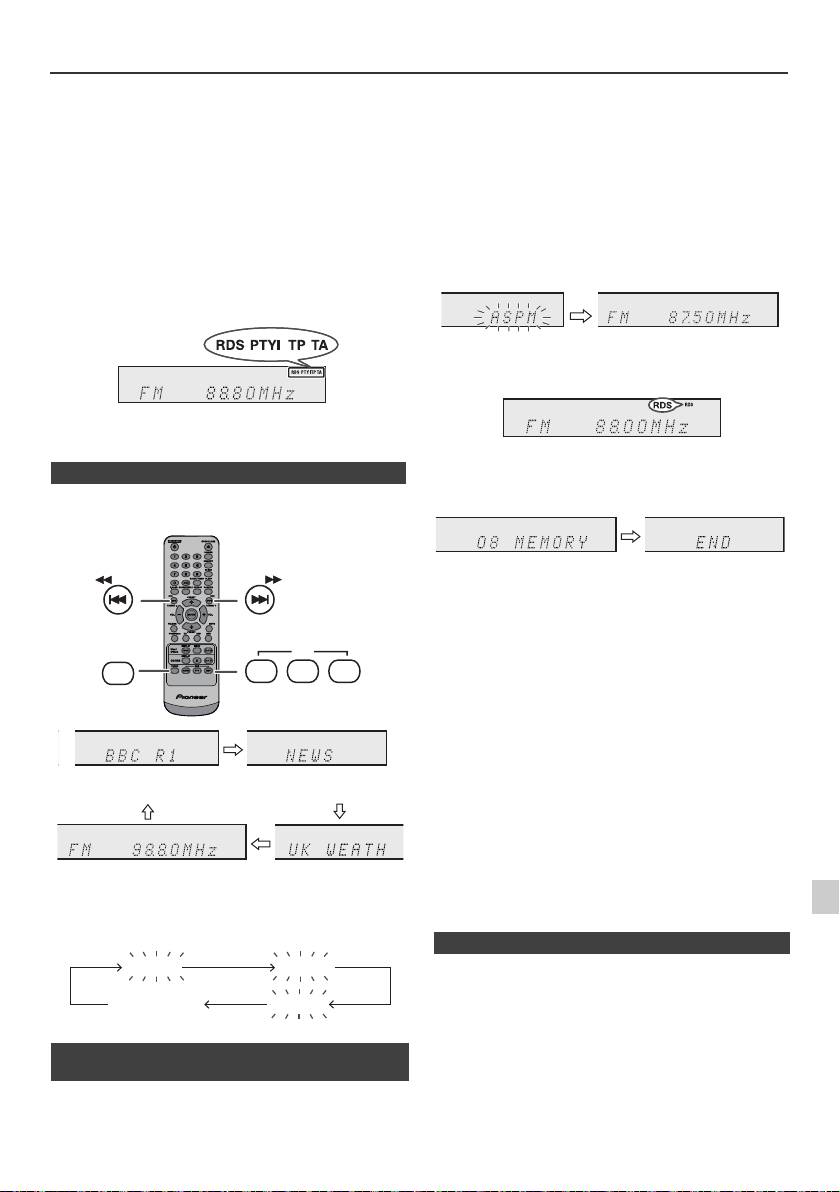
Empleo del sistema de datos radiofónicos (RDS)
RDS es un servicio de radiodifusión proporcionado
Si usted ya ha almacenado algunas emisoras en la
por un número cada día mayor de emisoras de FM.
memoria, el número de emisoras nuevas que podrán
Estas emisoras de FM emiten señales adicionales al
almacenarse será inferior.
mismo tiempo que las señales normales del
programa. Emiten los nombres de emisoras e
información sobre el tipo de programa, como por
ejemplo los deportivos, musicales, etc.
Cuando se sintonice una emisora RDS, se visualizará
“RDS” y el nombre de la emisora.
Aparecerá “TP” (programa de tráfico) en el visualizador
cuando la difusión recibida tenga información de tráfico, y
aparecerá “TA” (anuncios de tráfico) mientras se esté
difundiendo información del tráfico.
Aparecerá “PTYI” (indicador PTY dinámico) mientras se
reciba una emisora con PTY dinámico.
Usted puede controlar el RDS usando solamente los
botones del mando a distancia.
n Información proporcionada por RDS
Cada vez que se pulse el botón RDS DISPLAY, la
visualización cambiará del modo siguiente:
Para parar la operación de ASPM antes de que haya
finalizado:
Pulse el botón RDS ASPM durante la exploración de
emisoras.
Las emisoras que ya están almacenadas en la memoria
seguirán igual.
Notas:
l
Si se está difundiendo la misma emisora en distintas
frecuencias, la frecuencia más potente se almacenará en la
memoria.
l
No se almacenarán las emisoras que tengan la misma
frecuencia que la que está almacenada en la memoria.
l
Si ya se han almacenado 40 emisoras en la memoria, se
interrumpirá la exploración. Si desea volver a realizar la
operación de ASPM, borre la memoria de preajustes.
l
Si no se han almacenado emisoras en la memoria,
aparecerá “END” durante unos 4 segundos.
1
l
Si las señales RDS son muy débiles, es posible que los
nombres de emisora no se almacenen en la memoria.
l
El mismo nombre de emisora puede almacenarse en
2
distintos canales.
Cuando sintonice una emisora que no sea una emisora
l
Es posible que en ciertas áreas o durante ciertos períodos de
tiempo, los nombres de emisora sean momentáneamente
3
RDS, o una emisora RDS que emite señales débiles, la
distintos.
visualización cambiará en el orden siguiente:
4
Si ocurre algo de lo que se menciona a continuación,
5
no significa que el aparato esté averiado:
l
Aparecerán “PS”, “No PS” y el nombre de una emisora
alternadamente, y el aparato no funcionará correctamente.
6
l
Si una emisora en particular no está difundiendo
correctamente o una emisora está realizando pruebas, la
función de recepción RDS no funcionará correctamente.
n Empleo de la memoria de programación
7
l
Cuando reciba una emisora RDS cuya señal sea demasiado
automática de emisoras (ASPM)
débil, es posible que no se visualice información tal como la
8
Mientras esté en el modo de operación del ASPM, el
del nombre de emisora.
sintonizador buscará automáticamente las nuevas
l
“No PS”, “No PTY” o “No RT” parpadearán durante unos 5
segundos, y entonces se visualizará la frecuencia.
emisoras RDS. Podrán memorizarse hasta 40 emisoras.
9
Es-19
11/5/25 X-HM10_20_Es.fm
TUNING −
TUNING +
RDS
TUNER
ASPM PTY DISP
Nombre de la emisora (PS)
Tipo de programa (PTY)
Frecuencia Texto de radio (RT)
No PS No PTY
FM 98.80 MHz
No RT
1 Pulse el botón TUNER del control remoto o el botón
INPUT de la unidad principal repetidamente para
seleccionar la función de TUNER.
2 Mantenga pulsado el botón de RDS ASPM del mando
a distancia.
1 Después de haber parpadeado “ASPM” durante
unos 4 segundos, se iniciará la exploración
(87,50 - 108,00 MHz).
2 Cuando se encuentre una emisora RDS, aparecerá
“RDS” durante un momento, y la emisora se
almacenará en la memoria.
3 Después de la exploración, se visualizará el
número de emisoras almacenadas en la memoria
durante 4 segundos, y luego aparecerá “END”
durante 4 segundos.
n Notas sobre la operación RDS
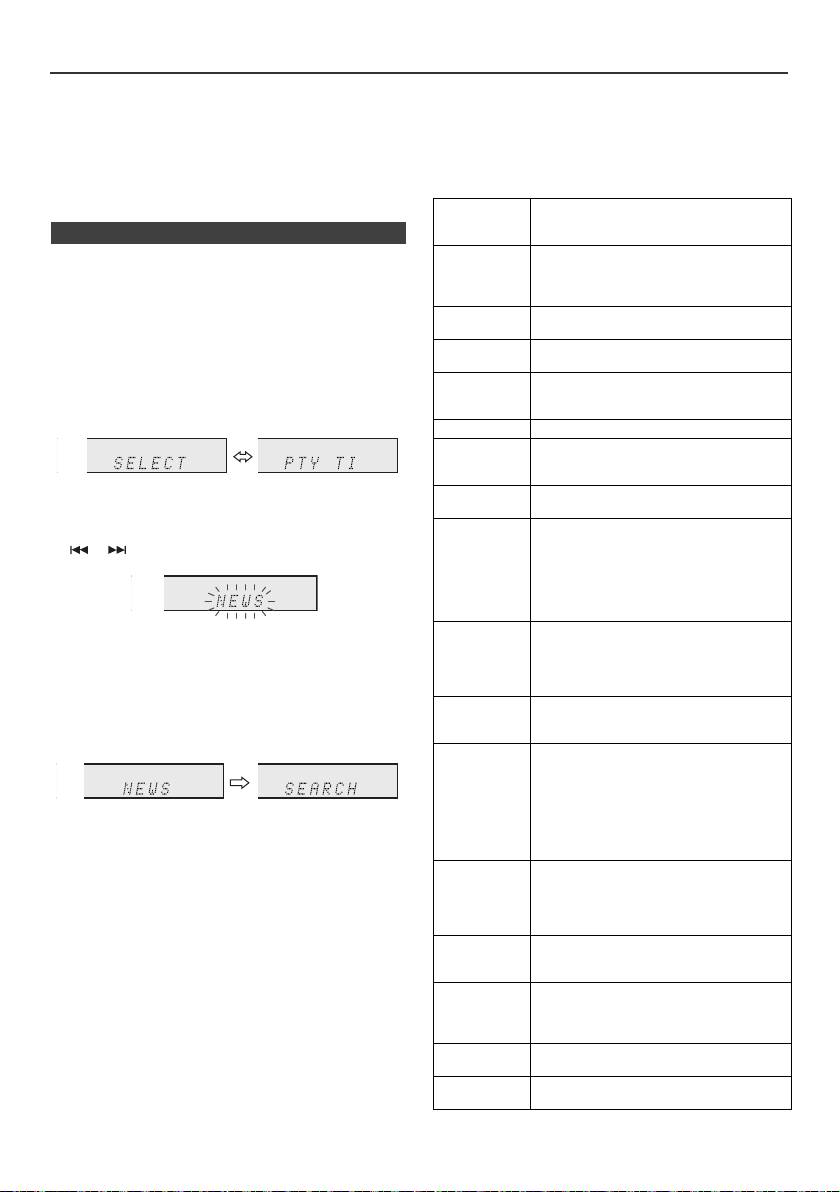
Empleo del sistema de datos radiofónicos (RDS) (continuación)
Notas para el texto de radio:
Cuando se esté difundiendo información de tráfico,
l Los prime
ros 14 caracteres del texto radiofónico se
aparecerá “TA”.
visualizarán durante 4 segundos y luego se desplazarán
Descripciones de los códigos de PTY (tipo de
por el visualizador.
programa), de TP (programa de tráfico), y de TA
l
Si sintoniza una emisora RDS que no está difundiendo
(anuncio de tráfico)
texto de radio, se visualizará “No RT” cuando usted
Podrá buscar y recibir las siguientes señales PTY, TP, y
cambie a la posición del texto de radio.
TA .
l
Mientras se están recibiendo datos de texto radiofónico o
cuando cambia el contenido del texto, se visualiza “RT”.
NEWS Menciones cortas de acontecimientos,
puntos de vista de eventos y publicidad,
n Para llamar emisoras de la memoria
informes y actualidad.
AFFAIRS Programación de tópicos que abarca
Para especificar tipos programados y seleccionar
noticias, generalmente en distinto estilo
emisoras (búsqueda de PTY):
o concepto de presentación, incluyendo
Podrá buscar una emisora especificando el tipo de
debates o análisis.
programa (noticias, deportes, programas de tráfico, etc.;
INFO Programe el propósito que aconseje de
vea la página 20) entre las emisoras memorizadas.
la mejor forma en el sentido más amplio.
SPORT Programa relacionado con cualquier
1
Pulse el botón TUNER del control remoto o el botón
aspecto deportivo.
INPUT de la unidad principal repetidamente para
EDUCATE Programa cuyo objetivo principal es la
seleccionar la función de TUNER.
educación, en el que el elemento formal
2 Presione el botón de RDS PTY del mando a distancia.
es fundamental.
DRAMA Todas las novelas y seriales de radio.
CULTURE Programas relacionados con cualquier
aspecto de cultura nacional o regional,
incluyendo idioma, teatro, etc.
“SELECT” y “PTY TI” aparecerán alternativamente
SCIENCE Programas sobre ciencias naturales y
durante unos 6 segundos.
tecnología.
VARIED Se emplea principalmente para
3 Antes de que transcurran 6 segundos, pulse el botón
programas que se basan en
o para seleccionar el tipo de programa.
conversación, normalmente de ligera
naturaleza de entretenimiento, y que no
están cubiertos en otras categorías. Por
ejemplo: Adivinanzas, juegos de grupo,
entrevistas con personalidades.
Cada vez que pulse el botón, el tipo de programa
POP M Música comercial, que generalmente
aparecerá. Si mantiene pulsado el botón durante más
puede considerarse como de agrado
actual popular, que normalmente se
de 0,5 segundos, el tipo de programa aparecerá
refleja en las listas de discos más
continuamente.
vendidos.
4 Mientras esté parpadeando el tipo de programa
ROCK M Música moderna contemporánea,
seleccionado (antes de 6 segundos), pulse de nuevo el
normalmente escrita e interpretada por
botón RDS PTY.
músicos jóvenes.
EASY M Música contemporánea actual
considerada como de “fácil audición”, en
contraste con la música pop, rock, o
clásica, o uno de los estilos musicales
especializados, jazz, folk, o country. La
Después de que el tipo de programa seleccionado
música de esta categoría es la mayor
haya estado encendido durante 2 segundos,
parte de veces de vocalistas, y
aparecerá “SEARCH” y se iniciará la operación de
normalmente de corta duración.
búsqueda.
LIGHT M Música clásica de apreciación general,
más que de especialistas. Los ejemplos
Notas:
musicales de esta categoría son música
l Si la pantalla ha dejado de parpadear, empiece de
instrumental, y trabajos de vocalistas y
nuevo desde el paso 2. Si la unidad encuentra un tipo
corales.
de programa deseado, el número de canal
CLASSICS Interpretaciones de grandes trabajos
correspondiente se iluminará durante 8 segundos y el
orquestales, sinfonías, música de
nombre de la emisora permanecerá encendido.
cámara, etc. incluyendo la gran ópera.
l Si desea escuchar el mismo tipo de programa de otra
emisora, pulse el botón RDS PTY mientras parpadea
OTHER M Los estilos musicales que no entran en
el número de canal o el nombre de emisora. El aparato
ninguna otra categoría. En particular, se
buscará la siguiente emisora.
emplea para música especializada de
l Si no se encuentra ninguna emisora, aparecerá “NOT
Rhythm & Blues y Reggae.
FOUND” durante 4 segundos.
WEATHER Informes del tiempo e información y
Si selecciona el programa de tráfico:
predicciones meteorológicas.
Si ha seleccionado el programa de tráfico (TP) en el paso
FINANCE Informes del mercado de la bolsa,
3, aparecerá “TP”.
comercio, etc.
(Esto no significa que usted pueda escuchar la
información de tráfico en ese momento.)
Es-20
11/5/25 X-HM10_20_Es.fm
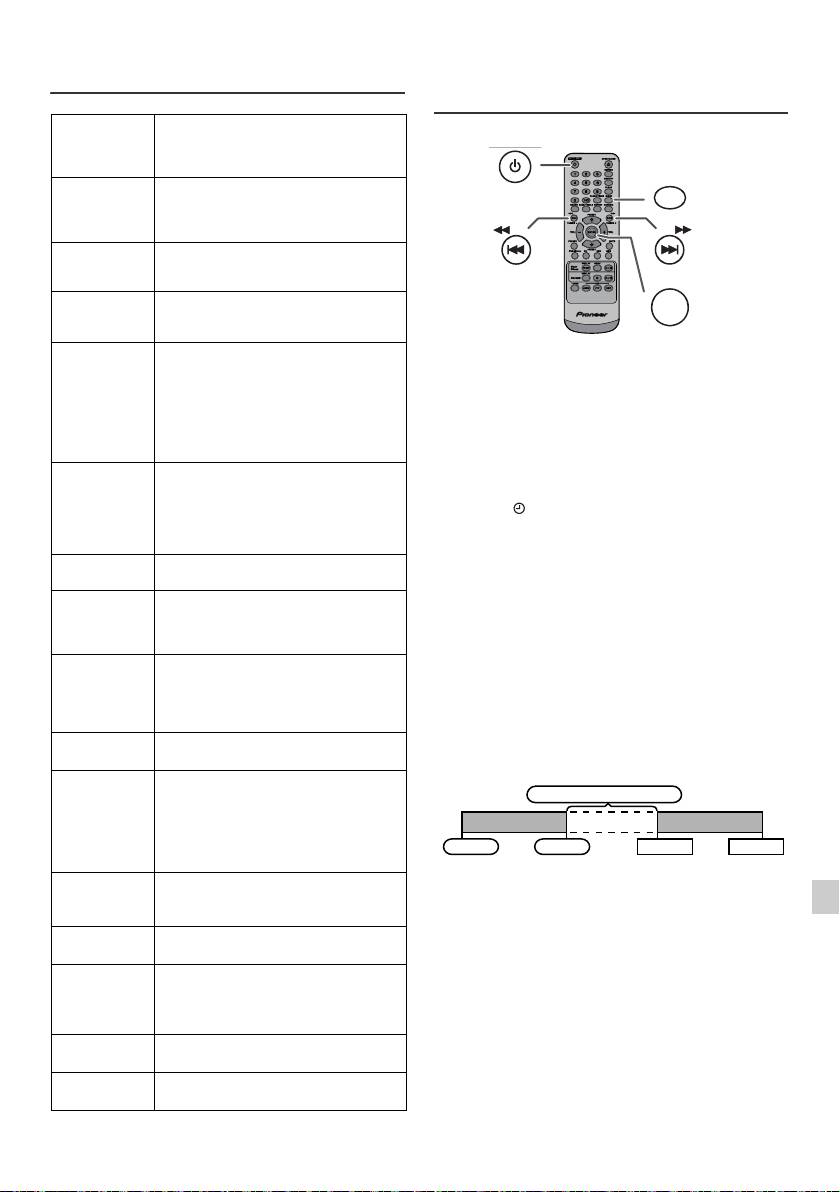
Empleo del sistema de datos
Operación del temporizador y de
radiofónicos (RDS) (continuación)
desconexión automática (Solamente
del control remoto)
CHILDREN Para programas orientados a
audiencias jóvenes, principalmente
para entretenimiento e interés, en lugar
de ser educativos.
SOCIAL Programas sobre gente e influencias
individuales o de grupos. Incluye:
sociología, historia, geografía,
psicología, y sociedad.
RELIGION Cualquier aspecto de creencias y fe,
sobre Dios o dioses, la naturaleza de la
existencia y ética.
PHONE IN Incluye a miembros del público que
expresan sus puntos de vista ya sea por
teléfono o en un foro público.
TRAVEL
Características y programas relacionados
Reproducción con temporizador:
con los viajes a destinos cercanos o
La unidad se enciende y reproduce la fuente deseada
lejanos, viajes de grupos, e ideas y
(CD, TUNER, USB, iPod, LINE IN) a la hora
oportunidades de viajes. No se incluyen
predeterminada.
anuncios sobre problemas, retardos, ni
obras en carreteras que afectan el
Este aparato tiene 2 tipos de temporizadores: ONCE
desplazamiento inmediato donde deben
TIMER y DAILY TIMER.
usarse las emisoras TP/TA.
Temporizador para una vez:
LEISURE Programas relacionados con
El timer funciona por una vez solamente a la hora
actividades de recreo en las que los
memorizada.
oyentes pueden participar. Como
(Indicador “ ”).
ejemplo se incluyen la jardinería, pesca,
colección de antigüedades, cocina,
Temporizador diario:
comidas y vinos, etc.
El temporizador diario de la escucha funciona a la misma
JAZZ Música polifónica síncopa
hora preconfigurada cada día que establezcamos. Por
caracterizada por la improvisación.
ejemplo, ajuste el temporizador para despertarse cada
mañana.
COUNTRY Canciones que se originan o continúan
la tradición musical de los estados
(Indicador “DAILY”).
americanos del sur. Se caracteriza por
Empleo combinado del temporizador para una vez y el
una melodía directa y línea narrativa.
temporizador diario:
NATION M Música popular actual del país o región
Por ejemplo, emplee el temporizador para una vez para
en el idioma nacional, en contraste con
escuchar un programa de radio, y emplee el temporizador
la música “Pop” internacional que
diario para despertar.
normalmente está inspirada en la de
EE.UU. o Inglaterra y es en inglés.
1 Ajuste el temporizador diario (página 21).
OLDIES Música de la denominada “época de
oro” de la música popular.
2 Ajuste el temporizador puntual (página 21).
FOLK M Música que se arraiga en la cultura
musical de un país en particular,
normalmente tocada con instrumentos
acústicos. La narrativa o la letra pueden
1
basarse en acontecimientos históricos
o en gente.
2
DOCUMENT Programas relacionados con asuntos
reales, presentados en estilo de
3
investigación.
TEST Difusión para programar equipos o
4
receptores de difusión de emergencia.
ALARM Anuncios de emergencia hechos en
5
circunstancias excepcionales o avisos
de acontecimientos que causan peligro
6
de naturaleza general.
TP Programas en los que se ofrecen
7
anuncios sobre el tráfico.
TA En este momento se están difundiendo
8
anuncios de tráfico.
9
Es-21
11/5/25 X-HM10_20_Es.fm
STANDBY/ON
CLOCK/TIMER
TUNING −
TUNING +
ENTER
1 minuto o más
Temporizador para una vez
Temporizador diario
Inicio
Parada
Inicio
Parada
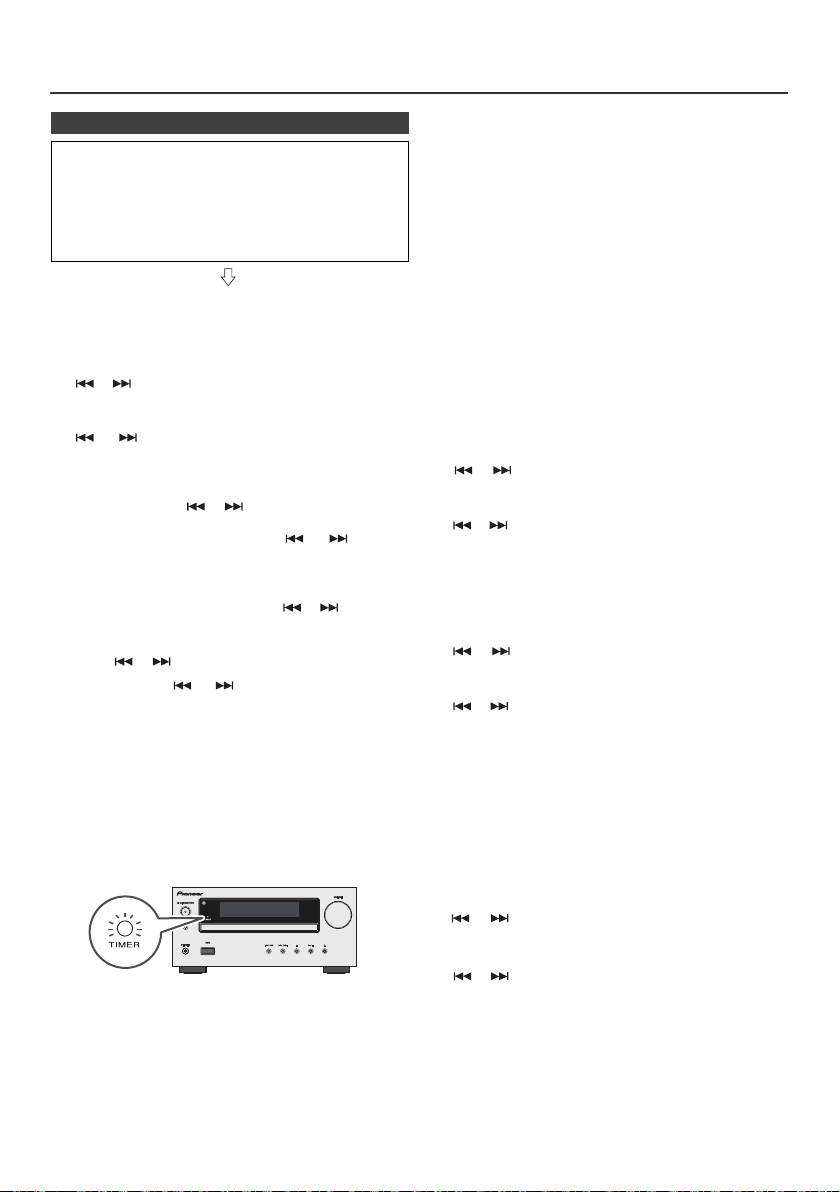
Operación del temporizador y de desconexión automática (Solamente del
control remoto) (continuación)
Temporizador para una vez:
n Reproducción con temporizador
Se cancelará el temporizador.
Antes de ajustar el temporizador:
Temporizador diario:
l Compruebe que el reloj esté ajustado a la hora
El temporizador funciona a la misma hora cada día.
correcta (vea la página 9). Si no está ajustado, no
Continuará hasta que se cancele el ajuste del
podrá emplear la función del temporizador.
temporizador diario. Cancele el temporizador diario
l Para reproducción con temporizado: Inserte el USB o
cuando no lo emplee.
cargue discos o conecte el puerto del iPod para
reproducirlos.
Notas:
l Cuando realice la reproducción por temporizador
utilizando otra unidad conectada al terminal USB,
seleccione “USB” o “LINE IN” en el paso 5.
1 Pulse el botón STANDBY/ON para conectar la
l Esta unidad se activará o accederá al modo de espera
alimentación.
automáticamente. No obstante, la unidad conectada
no se encenderá ni apagará. Para detener la
2 Pulse y mantenga pulsado el botón CLOCK/TIMER.
reproducción del temporizador, siga el paso
“Cancelar la configuración del temporizador” de
3 Antes de que transcurran 30 segundos, pulse el botón
esta página.
o para seleccionar “Once” o “Daily”, y pulse el
Comprobar las características del temporizador:
botón ENTER.
1 Encienda el equipo y pulse y mantenga pulsado el
4 Antes de que transcurran 30 segundos, pulse el botón
botón CLOCK/TIMER.
o para seleccionar “Timer set”, y pulse el
botón ENTER.
2 Antes de que transcurran 30 segundos, pulse el botón
o para seleccionar “Once” o “Daily”, y pulse el
5 Para seleccionar la fuente de temporizador de
botón ENTER.
reproducción (CD, TUNER, USB, iPod, LINE IN),
presione el botón o . Pulse el botón ENTER.
3 Antes de que transcurran 30 segundos, pulse el botón
Cuando haya seleccionado el sintonizador, seleccione
o para seleccionar “Timer Call”, y pulse el botón
una emisora pulsando el botón o , y luego
ENTER.
pulse el botón ENTER. Si no se ha programado
ninguna emisora, se visualizará “No Preset” y se
Cancelar la configuración del temporizador:
cancelará la hora ajustada.
1 Encienda el equipo y pulse y mantenga pulsado el
6 Para ajustar el día, pulse el botón o y, luego, el
botón CLOCK/TIMER.
botón ENTER.
2 Antes de que transcurran 30 segundos, pulse el botón
7 Pulse el botón ENTER para ajustar la hora. Pulse el
o para seleccionar “Once” o “Daily”, y pulse el
botón o y luego pulse el botón ENTER.
botón ENTER.
8 Pulse el botón o para ajustar los minutos y
3 Antes de que transcurran 30 segundos, pulse el botón
luego pulse el botón ENTER.
o para seleccionar “Timer Off”, y pulse el botón
9 Ajuste el tiempo de finalización como en los pasos 7 y
ENTER. Se cancelará el temporizador (no se cancelará
8 de arriba.
el contenido ajustado).
10 Ajuste el volumen mediante el botón VOL (+ o –), y a
Reutilización del ajuste memorizado del
continuación pulse el botón ENTER. No aumente
temporizador:
demasiado el volumen.
El ajuste del temporizador se memorizará una vez se haya
11 Pulse el botón STANDBY/ON para entrar en el modo
introducido. Para emplear de nuevo el mismo ajuste,
de reserva de alimentación. El indicador del “TIMER”
efectúe las operaciones siguientes.
se enciende y la unidad está lista para temporizar el
playback.
1 Encienda el equipo y pulse y mantenga pulsado el
botón CLOCK/TIMER.
2 Antes de que transcurran 30 segundos, pulse el botón
o para seleccionar “Once” o “Daily”, y pulse el
botón ENTER.
3 Antes de que transcurran 30 segundos, pulse el botón
o para seleccionar “Timer On”, y pulse el botón
12 Cuando se alcanza el tiempo actual, el playback
ENTER.
iniciará a funcionar. El volumen se incrementará
4 Pulse el botón STANDBY/ON para entrar en el modo de
gradualmente hasta que se llegue al volumen
reserva de alimentación.
preajustado. El indicador del temporizador parpadeará
durante la reproducción del temporizador.
Nota:
13 Cuando se llegue al final de la hora de parada del
Si extrae el cable de alimentación o se produce un
temporizador, el sistema se establecerá
apagón, el reloj se reinicializará.
automáticamente en el modo de reserva de alimentación.
Es-22
11/5/25 X-HM10_20_Es.fm
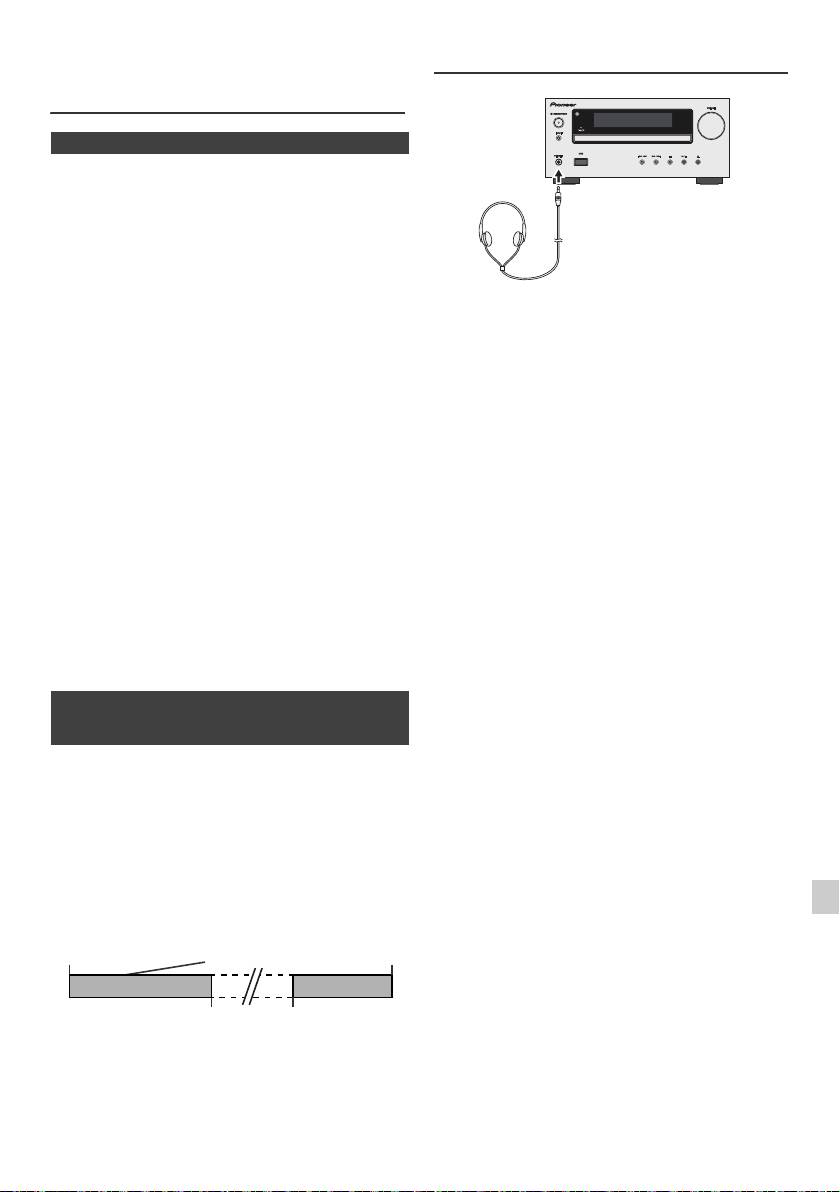
Operación del temporizador y de
Auriculares
desconexión automática (Solamente
del control remoto) (continuación)
n Operación de desconexión automática
Tanto la radio como el CD, iPod, USB y Line In pueden
apagarse automáticamente.
1
Reproduzca la fuente de sonido deseada.
2 Pulse el botón SLEEP.
3 Antes de 5 segundos, pulse el botón numérico para
ajustar la hora. (1 minuto ~ 99 minutos)
l No gire el interruptor de volumen al máximo y escuche
4 “SLEEP” aparecerá.
la música a niveles moderados. La presión acústica
excesiva de los auriculares y los cascos puede causar
5 El aparato se establecerá automáticamente en el modo
la pérdida del sentido auditivo.
de reserva de la alimentación después de haber
l Antes de enchufar o desenchufar los auriculares, baje
transcurrido el tiempo preajustado. El volumen se
el volumen.
reducirá 1 minuto antes de terminar la operación de
l Asegúrese de que sus auriculares tengan una clavija
desconexión automática.
de 3,5 mm de diámetro y una impedancia de
16 ohmios a 50 ohmios. La impedancia recomendada
es de 32 ohmios.
Para confirmar el tiempo remanente de desconexión
l Si se enchufan los auriculares, se desconectan
automática:
automáticamente los altavoces. Ajuste el volumen
empleando el control VOLUME.
1 Mientras se indica “SLEEP”, pulse el botón SLEEP.
l Sólo X-HM20: El audio procedente del iPod/iPhone no
puede escucharse a través de los auriculares
Para cancelar la operación de desconexión
conectados a la unidad. Si conecta los auriculares
automática:
cuando la función de iPod/iPhone ha sido
Pulse el botón STANDBY/ON mientras se indique
seleccionada, se mostrará “HP INVALID”.
“SLEEP”. Para cancelar la operación de desconexión
automática sin ajustar el sistema en el modo de reserva,
realice lo siguiente.
1 Mientras se indica “SLEEP”, pulse el botón SLEEP.
2 Durante 5 segundos, pulse dos veces el botón “0” hasta
que aparezca “SLEEP 00”.
n Para utilizar simultáneamente la operación
del temporizador y de desconexión
automática
Desconexión automática y reproducción con
temporizador:
Por ejemplo, podrá irse a dormir escuchando la radio y
despertarse con el sonido de un CD la mañana siguiente.
1
1
Ajuste el tiempo de desconexión automática (véase
más arriba, los pasos 1 - 5).
2
2 Mientras se ajusta el temporizador de dormir, fije la
alarma de reproducción (pasos 2 - 9, página 22).
3
4
5
6
7
8
9
Es-23
11/5/25 X-HM10_20_Es.fm
Ajuste del temporizador
de desconexión
Ajuste del
Hora de
automática
playback
parada
1-99 minutos
Hora deseada
La función de
Se detiene
desconexión
automáticamente la
automática se parará
operación de
automáticamente
desconexión automática

Cuadro para localización de averías
Muchos posibles problemas podrán ser solucionados por el
propietario sin tener que llamar al técnico en reparaciones.
n Sintonizador
Si parece que falla algo en este producto, compruebe la
Síntoma Causa posible
tabla siguiente antes de llamar a su concensionario
PIONEER autorizado o a un centro de reparaciones.
l
La radio produce
l
¿Está el aparato cerca del
continuamente
televisor o de una
n Generalidades
ruido anormal.
computadora?
l
¿La antena de FM o la antena
de cuadro de AM están
Síntoma Causa posible
correctamente situadas?
l El reloj no está
l ¿Se ha producido un corte
Separe la antena del cable de
ajustado a la hora
de la alimentación?
alimentación de CA está
correcta.
Reajuste el reloj. (Consulte
demasiado cerca.
la página 9)
l Cuando se pulsa un
l Ponga el aparato en el
n USB
botón, el aparato no
modo de reserva de
responde.
alimentación y entonces
Síntoma Causa posible
vuelva a conectar la
alimentación del aparato.
l
No se detecta el
l
¿Hay algún archivo MP3/WMA
l Si el aparato funciona
dispositivo.
disponible?
defectuosamente,
l
¿Está el dispositivo conectado
repóngalo. (Consulte la
correctamente?
página 25)
l
¿Es un dispositivo MTP?
l
¿El dispositivo contiene sólo
l No se oye ningún
l ¿Se ha ajustado el nivel de
sonido.
volumen a “Min”?
archivos AAC?
l ¿Están enchufados los
l
La reproducción
l
¿Está el un archivo WMA
auriculares?
no se inicia.
protegido por copyright?
l ¿Están desconectados los
l
¿Es el MP3 falso?
cables de los altavoces?
l
Hora en pantalla
l
¿Se está reproduciendo un
errónea.
archivo de velocidad variable?
n Reproductor de CD
l
Nombre de
l
¿El nombre del archivo está
archivo en
escrito con caracteres chinos o
pantalla errónea.
japoneses?
Síntoma Causa posible
l
La reproducción no
l
¿Se ha insertado el disco al
se inicia.
revés?
n iPod e iPhone (sólo X-HM20)
l
La reproducción se
l
¿Satisface el disco las
detiene a mitad o no
normas?
Síntoma Causa posible
se lleva a cabo
l
¿Está deformado o rayado
l
No se produce
l
No se está reproduciendo el
correctamente.
el disco?
ningún sonido.
iPod o iPhone.
No aparece
l
El iPod o iPhone no está
l
Se producen saltos
l
¿Está el aparato situado
ninguna imagen
conectado adecuadamente a la
en el sonido de
cerca de vibraciones
en el televisor/
unidad.
reproducción o se
excesivas?
monitor.
l
¿Está enchufado el cable de
detiene el sonido de
l
¿Está muy sucio el disco?
alimentación de CA del
reproducción a mitad
l
¿Se ha formado
aparato?
de una pista.
condensación de humedad
l
El cable de vídeo no está
en el interior del aparato?
conectado adecuadamente.
l
La selección de televisor/
monitor de entrada no está
fijada adecuadamente.
n Controlador remoto
l
La función salida de iPod TV no
ha sido establecida para salida
Síntoma Causa posible
de video.
l
El audio procedente del iPod/
l El control remoto no
l
¿Está enchufado el cable
iPhone no puede escucharse a
través de los auriculares
funciona.
de alimentación de CA del
conectados a la unidad.
aparato?
l
¿Se respeta la polaridad de
l
iPod o iPhone no
l
El iPod o iPhone no hace
la pila?
se cargará.
contacto total con el conector.
a
l
¿Se han agotado las pilas?
l
Utilizando un iPod (3
l
¿Es la distancia o ángulo
generación).
incorrecto?
l
No es compatible con el iPod o
l
¿Está el sensor de control
iPhone. Consulte la página 7
para obtener información sobre
remoto recibiendo una luz
los modelos compatibles.
fuerte?
l
Si la unidad principal está en el
modo USB, el iPod o el iPhone
no podrán cargarse.
l
“This accessory is
l
La batería del iPhone es baja.
not made to work
Cargue el iPhone.
with iPhone” o “
l
El iPhone no está
This accessory is
correctamente conectado al
not supported by
puerto.
iPhone” Aparece
en la pantalla del
iPhone.
Es-24
11/5/25 X-HM10_20_Es.fm
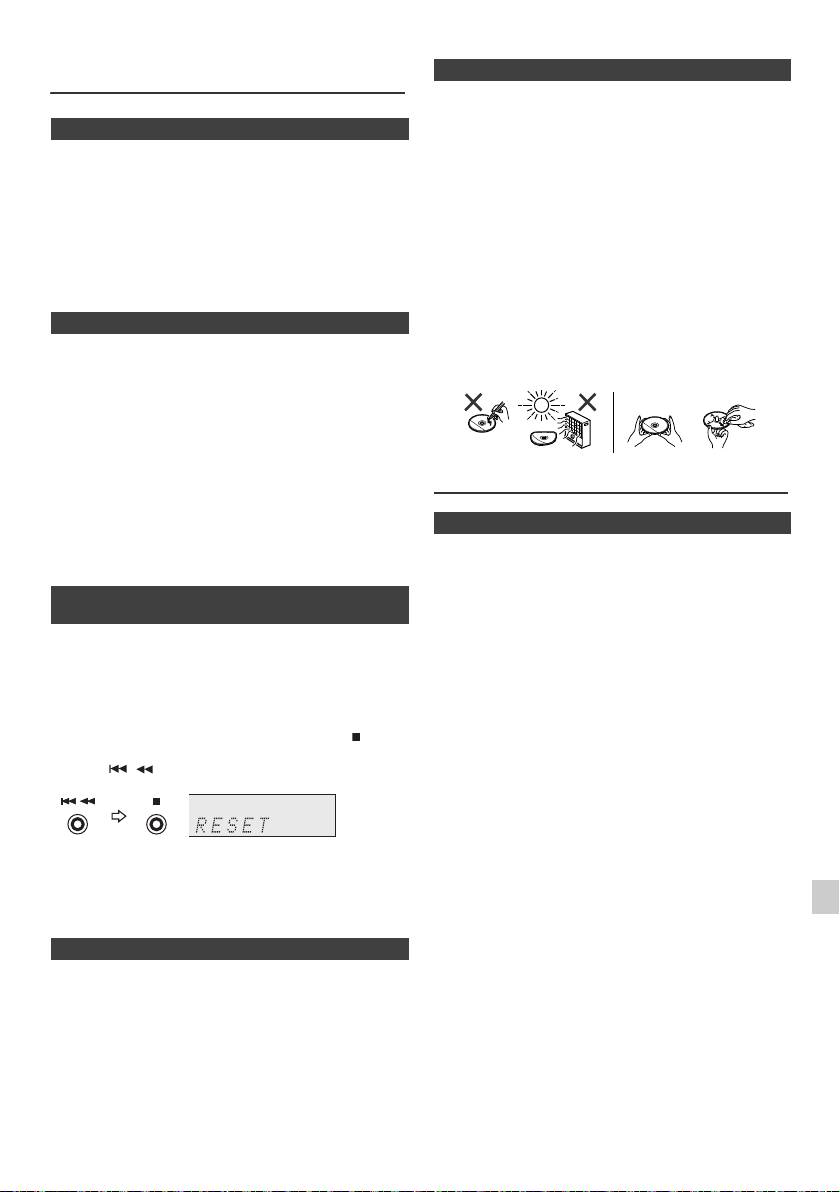
Cuadro para localización de averías
n Cuidados de los discos compactos
(continuación)
Los discos compactos son bastante resistentes a posibles
daños, sin embargo se puede producir un mal
n Condensación
seguimiento de la pista debido a una acumulación de
polvo en la superficie de los discos. Tenga presente las
Los cambios súbitos de la temperatura, y el almacenaje u
instrucciones siguientes para poder disfrutar lo máximo
operación en lugares muy húmedos pueden causar
posible de su colección de discos compactos y de este
condensación de humedad dentro de la caja (Lectura del
CD, etc.) o en el transmisor del controlador remoto. La
reproductor.
condensación puede provocar que el aparato funcione
l No escriba en ninguna cara del disco, particularmente
incorrectamente. Si así sucede, deje la alimentación
en la cara que no tiene etiqueta donde se leen las
conectada sin ningún disco en el aparato hasta que sea
señales musicales. No estropee esta superficie.
posible la reproducción normal (aproximadamente 1
l Mantenga los discos alejados de los rayos directos del
hora). Frote la humedad condensada en el transmisor con
sol, de focos de calor y de humedad excesiva.
un paño suave antes de poner el aparato en
l Sujete siempre los discos por sus bordes. Huellas
funcionamiento.
digitales, polvo o agua en los discos compactos
pueden causar ruidos o un mal seguimiento de la pista.
n Si ocurre algún problema
Si un disco compacto está sucio o no se reproduce
adecuadamente, límpielo con un paño seco y suave,
Si se somete este producto a fuertes interferencias
pasándolo en dirección del centro hacia afuera a lo
externas (golpes mecánicos, electricidad estática
largo del radio.
excesiva, tensión de alimentación anormal debido a
rayos, etc.) o si se opera incorrectamente, puede
funcionar mal.
Si ocurre uno de estos problemas, haga lo siguiente:
1 Ponga el aparato en el modo de reserva y conecte de
nuevo la alimentación.
2
Si no se restaura la unidad en la operación previa,
Mantenimiento
desenchufe y vuelva a enchufar la unidad, a continuación
encienda la unidad.
n Limpieza del mueble
Nota:
Limpie periódicamente el mueble con un paño suave y
Si el aparato no se repone con ninguna de las operaciones
una solución jabonosa diluida, y luego séquelo con un
anteriores, borre toda la memoria reponiéndolo.
paño seco.
n Reinicio de Fábrica, Limpiando Toda la
Precaución:
Memoria
l No use productos químicos para la limpieza (gasolina,
diluyentes de pintura, etc.). Podría dañar el mueble.
1
Para encender el aparato, pulse el botón STANDBY/
l No aplique aceite al interior del aparato. Podría causar
ON.
mal funcionamiento.
2 Para seleccionar la función LINE IN, pulse el botón
LINE del mando a distancia o pulse repetidamente el
botón INPUTde la unidad principal.
3 Desde la función LINE IN, pulse el botón de la
unidad principal y pulse y mantenga presionado el
botón hasta que se muestre “RESET”.
1
Precaución:
2
Esta operación borrará todos los datos almacenados en la
memoria incluyendo los ajustes del reloj y del
temporizador, preajustes del sintonizador, y el programa
3
de CD.
4
n Antes de transportar el aparato
Retire el dispositivo de memoria USB, el iPod y el disco de
5
la unidad. Luego, coloque la unidad en modo de ahorro de
energía. Transportar la unidad con el dispositivo de
6
memoria del USB o el iPod conectado o con discos
adentro de ella puede provocar daños en la unidad.
7
8
9
Es-25
11/5/25 X-HM10_20_Es.fm
NO SÍ
Correcto
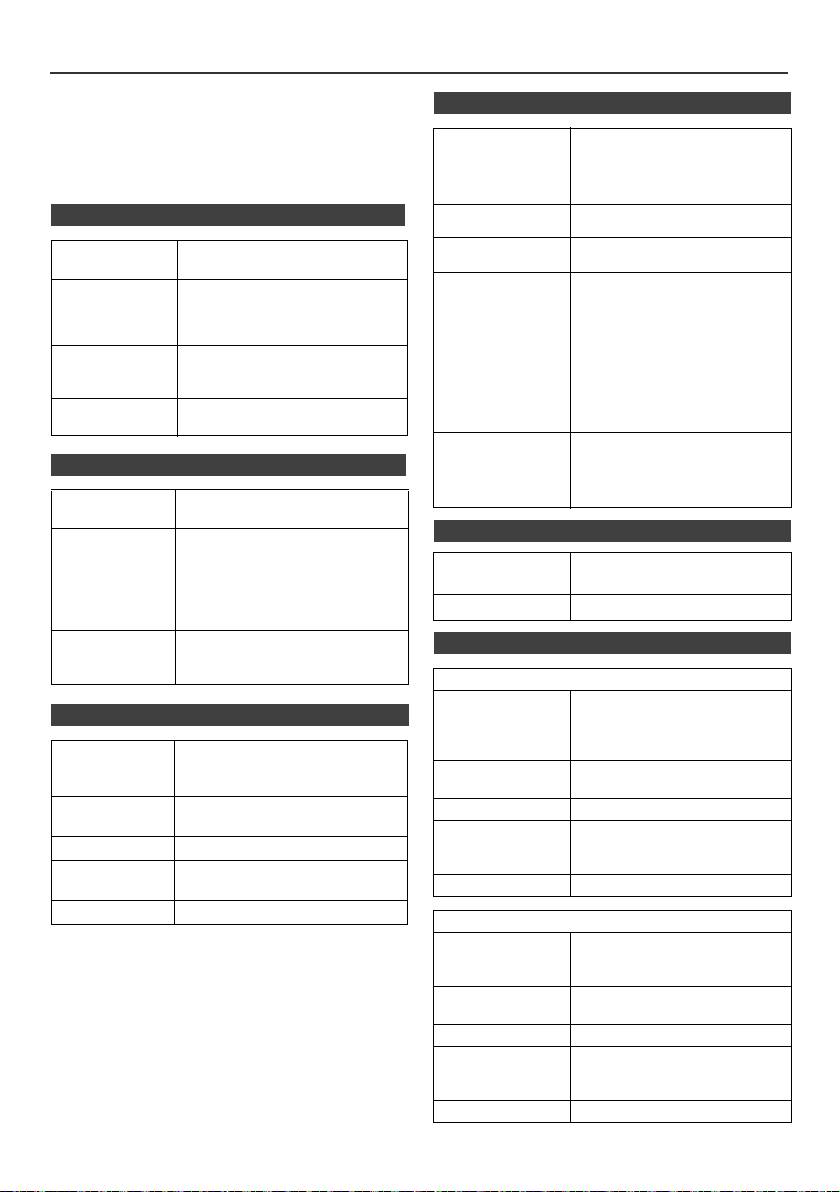
Especificaciones técnicas
Como parte de la política de mejoras continuas,
n USB
PIONEER se reserva el derecho de realizar cambios en el
diseño y especificaciones para la mejora del producto sin
Interfaz host USB l Cumple con la clase de
previo aviso. Las figuras indicadas que especifican el
almacenamiento en masa de
rendimiento son valores nominales de los aparatos de
USB 1.1 (Alta Velocidad)/ 2.0.
producción. Puede haber algunas desviaciones de estos
l Sólo Volumen de Soporte y
valores en los aparatos individuales.
protocolo CBI.
n Generalidades
Fichero de ayuda l MPEG 1 Layer 3
l WMA (No DRM)
Bitrate soporte l MP3 (32 kbps a 320 kbps)
Fuente de
220 V a 240 V de CA, 50 Hz/60 Hz
l WMA (64 kbps a 160 kbps)
alimentación
Otros l
El número total máximo de
Consumo de
Alimentación conectada:
archivos MP3/WMA es de 999.
potencia
45 W (X-HM20)
l El número total máximo de
30 W (X-HM10)
carpetas es de 99
Reserva de alimentación: 0,4 W
INCLUYENDO las del
directorio raíz.
Dimensiones Ancho: 215 mm
l La información ID3TAG
Alto: 99 mm
permitida es sólo la de TITLE,
Profundo: 300 mm
ARTIST y ALBUM.
Peso 3,8 kg (X-HM20)
l Admite la versión 1 y 2 de
3,7 kg (X-HM10)
ID3TAG.
Soporte de
l Admite dispositivos USB con
sistema de
Microsoft Windows/DOS/FAT
n Amplificador
12/ FAT 16/ FAT 32.
archivos
l Longitud de bloqueo de
2 kbytes por sector.
Potencia de
RMS: 15 W + 15 W
salida
(1 kHz,10% de DA, 4 ohmios)
n Sintonizador
Terminales de
Altavoces: 4 ohmios
salida
20 Hz a 20 kHz
Gama de
FM: 87,5 MHz a 108 MHz
Salida de vídeo (sólo X-HM20):
frecuencias
AM: 522 kHz a 1.620 kHz
1 Vp-p
Auriculares: 16 ohmios
Predeterminado 40 (Estación de FM y AM)
(recomendada: 32 ohmios)
Terminales de
Línea de entrada (entrada
n Altavoz
entrada
analógica):
500 mV/ 47 k ohmios
X-HM20
Tipo
Sistema de altavoces del tipo de 2 vías
n Reproductor de CD
Altavoz para frecuencias altas de
5 cm
Altavoz de bajos de 10 cm
Tipo Reproductor de discos compactos
con reproducción múltiple de un
Potencia máxima
15 W
único disco
de entrada
Lectura de las
Fonocaptor de láser semiconductor
Impedancia 4 ohmios
señales
de 3 rayos, sin contacto
Dimensiones Ancho: 132 mm
Convertidor D/A Conversor de multi bit D/A
Alto: 260 mm
Profundo: 173 mm
Respuesta de
20 Hz a 20.000 Hz
Peso 2,0 kg/cada uno
frecuencia
Gama dinámica 90 dB (1 kHz)
X-HM10
Tipo
Sistema de altavoces del tipo de 2 vías
Altavoz piezoeléctrico de agudos
Altavoz de bajos de 10 cm
Potencia máxima
15 W
de entrada
Impedancia 4 ohmios
Dimensiones Ancho: 132 mm
Alto: 260 mm
Profundo: 158 mm
Peso 1,6 kg/cada uno
Es-26
11/5/25 X-HM10_20_Es.fm

Nota
Acerca de iPod/iPhone/iPad:
“Made for iPod”, “Made for iPhone” y “Made for iPad” significan que
un accesorio electrónico ha sido diseñado para ser conectado
específicamente a un iPod, iPhone o iPad, respectivamente, y ha
sido homologado por quien lo desarrolló para cumplir con las
normas de funcionamiento de Apple. Apple no es responsable del
funcionamiento de este aparato ni de que cumpla con las normas
de seguridad y reguladoras. Tenga presente que el empleo de este
accesorio con un iPod, iPhone o iPad puede afectar la operación
inalámbrica.
iPad, iPhone e iPod son marcas comerciales de Apple Inc.,
registradas en los EE.UU. y en otros países.
1
2
3
4
5
6
7
© 2011 PIONEER CORPORATION.
8
Todos los derechos reservados.
9
Es-27
11/5/25 X-HM10_20_Es.fm
WARNUNG
Dieses Gerät ist nicht wasserdicht. Zur Vermeidung der
Gefahr von Brand und Stromschlag keine Behälter mit
Flüssigkeiten (z.B. Blumenvasen und -töpfe) in die
Nähe des Gerätes bringen und dieses vor Tropfwasser,
Spritzwasser, Regen und Nässe schützen.
D3-4-2-1-3_A1_De
WARNUNG
Vor dem erstmaligen Anschluss des Gerätes an das
Stromnetz bitte den folgenden Hinweis sorgfältig
beachten.
Die Netzspannung ist je nach Land verschieden.
Vor der Inbetriebnahme des Gerätes sicherstellen,
dass die örtliche Netzspannung mit der auf dem
Typenschild an der Rückwand des Gerätes
angegebenen Nennspannung (z.B. 230 V oder 120
V) übereinstimmt.
D3-4-2-1-4*_A1_De
WARNUNG
Keine Quellen offener Flammen (z.B. eine brennende
Kerze) auf dieses Gerät stellen.
D3-4-2-1-7a_A1_De
VORSICHTSHINWEIS ZUR BEL
11/5/25 X-HM10_20_Anki_De.fm
Ü
Betriebsumgebung
Betriebstemperatur und Betriebsluftfeuchtigkeit:
+5 °C bis +35 °C, 85 % rel. Feuchte max.
(Ventilationsschlitze nicht blockiert)
Eine Aufstellung dieses Gerät an einem unzureichend
belüfteten, sehr feuchten oder heißen Ort ist zu
vermeiden, und das Gerät darf weder direkter
Sonneneinstrahlung noch starken Kunstlichtquellen
ausgesetzt werden.
D3-4-2-1-7c*_A1_De
Falls der Netzstecker des Netzkabels dieses Gerätes
nicht in die Zusatzsteckdose einer anderen
Komponente passt, muss er gegen einen Netzstecker
der geeigneten Ausführung ausgewechselt werden.
Ein derartiger Austausch des Netzsteckers muss vom
Kundendienstpersonal vorgenommen werden. Wenn
der vom Netzkabel abgeschnittene ursprüngliche
Netzstecker in eine Netzsteckdose eingesteckt wird,
besteht akute Stromschlaggefahr! Daher ist
unbedingt dafür zu sorgen, dass der abgeschnittene
Netzstecker sofort vorschriftsmäßig entsorgt wird.
Vor einem längeren Nichtgebrauch des Gerätes,
beispielsweise während des Urlaubs, sollte der
Netzstecker aus der Netzsteckdose gezogen werden,
um das Gerät vollständig vom Netz zu trennen.
D3-4-2-2-1a_A1_De
FTUNG
Bei der Aufstellung dieses Gerätes muss für einen
ausreichenden Freiraum gesorgt werden, um eine
ACHTUNG
einwandfreie Wärmeabfuhr zu gewährleisten
Der STANDBY/ON-Schalter dieses Gerätes trennt das
(mindestens 10 cm oberhalb des Gerätes, 10 cm hinter
Gerät nicht vollständig vom Stromnetz. Um das Gerät
dem Gerät und jeweils 10 cm an der Seite des Gerätes).
vollständig vom Netz zu trennen, muss der Netzstecker
aus der Netzsteckdose gezogen werden. Daher sollte
10 cm 10 cm
das Gerät so aufgestellt werden, dass stets ein
10 cm
unbehinderter Zugang zur Netzsteckdose gewährleistet
ist, damit der Netzstecker in einer Notsituation sofort
abgezogen werden kann
. Um Brandgefahr
auszuschließen, sollte der Netzstecker vor einem
längeren Nichtgebrauch des Gerätes, beispielsweise
10 cm
während des Urlaubs, grundsätzlich von der
WARNUNG
Netzsteckdose getrennt werden .
D3-4-2-2-2a*_A1_De
Im Gerätegehäuse sind Ventilationsschlitze und andere
Öffnungen vorgesehen, die dazu dienen, eine
Dieses Gerät ist für den Heimgebrauch vorgesehen.
Überhitzung des Gerätes zu verhindern und einen
Falls bei Einsatz zu einem anderem Zweck (z.B.
zuverlässigen Betrieb zu gewährleisten. Um
Langzeitgebrauch zu gewerblichen Zwecken in einem
Brandgefahr auszuschließen, dürfen diese Öffnungen
Restaurant oder Betrieb in einem Fahrzeug bzw. Schiff)
auf keinen Fall blockiert oder mit Gegenständen (z.B.
eine Funktionsstörung auftritt, die eine Reparatur des
Zeitungen, Tischdecken und Gardinen) abgedeckt
Gerätes erforderlich macht, werden die Reparaturkosten
werden, und das Gerät darf beim Betrieb nicht auf
dem Kunden selbst dann in Rechnung gestellt, wenn
einem dicken Teppich oder Bett aufgestellt sein.
D3-4-2-1-7b*_A1_De
die Garantiefrist noch nicht abgelaufen ist.
K041_A1_De
1
2
3
4
5
6
7
8
9
G-3
11/5/25 X-HM10_20_Anki_De.fm
Ü
ACHTUNG
Bei diesem Gerät handelt es sich zwar um ein Laserprodukt der Klasse 1, das entsprechend dem Standard
Sicherheit für Laserprodukte IEC 60825-1:2007 klassifiziert ist, doch enthält es eine Laserdiode einer höheren Klasse
als 1. Um einen stets sicheren Betrieb zu gewährleisten, weder irgendwelche Abdeckungen entfernen, noch
versuchen, sich zum Geräteinneren Zugang zu verschaffen.
Wartungsarbeiten sind grundsätzlich dem Kundendienstpersonal zu überlassen.
Das Gehäuse ist mit dem unten abgebildeten Warnaufkleber versehen.
Lage des Aufklebers: innen im Gerät
ber Kondensation
Wenn der Spieler plötzlich aus der Kälte in einen
warmen Raum gebracht wird (z. B. im Winter) oder
wenn die Temperatur in dem Raum, in dem der Spieler
aufgestellt ist, plötzlich aufgrund eines Heizlüfters usw.
ansteigt, können sich im Inneren des Geräts
Wassertropfen (Kondensation) bilden (auf beweglichen
Teilen und der Linse). Wenn es zu Kondensation
kommt, arbeitet der Spieler nicht ordnungsgemäß, und
die Wiedergabe ist nicht möglich. Lassen Sie den
Spieler für 1 bis 2 Stunden bei Raumtemperatur
eingeschaltet (die erforderliche Dauer hängt vom
Ausmaß der Kondensation ab). Die Wassertropfen
verdampfen und die Wiedergabe ist wieder möglicht.
Zu Kondensation kann es auch im Sommer kommen,
wenn der Spieler direkt dem Luftzug aus einer
Klimaanlage ausgesetzt wird. Stellen Sie den Spieler in
diesem Fall an einem anderen Ort auf.
S005_A1_De
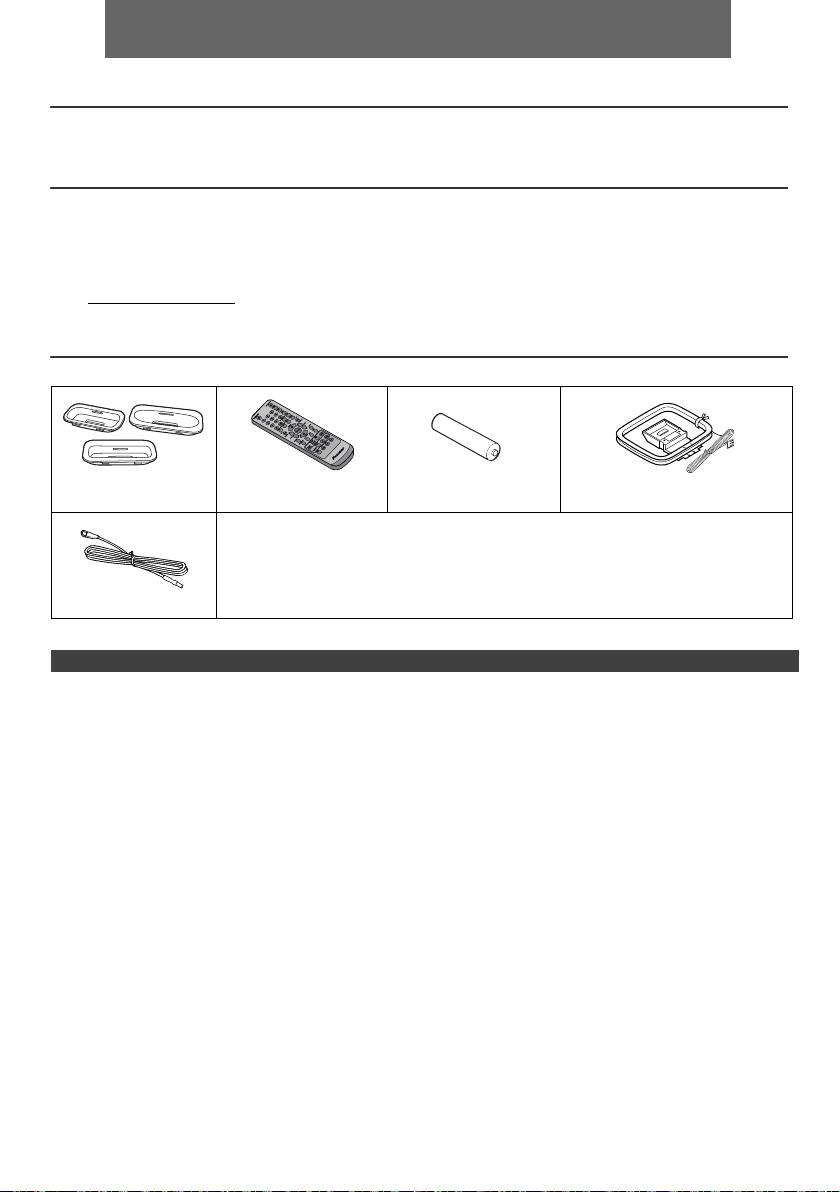
DEUTSCH
l Das CD-Receiversystem X-HM10/X-HM20 besteht aus der Haupteinheit und dem Lautsprechersystem.
Einführung
Vielen Dank für den Kauf dieses PIONEER-Produktes. Lesen Sie dieses Handbuch sorgfältig durch, um eine
bestmögliche Leistung zu erreichen. Es führt Sie in den Betrieb dieses Produkts von PIONEER ein.
Besonderer Hinweis
Durch die Lieferung dieses Produktes wird weder eine direkte Lizenz noch ein implizite Recht erteilt, Inhalte die mit
diesem Produkt erstellt wurden, in kommerziellen Rundfunk Systemen (terrestrische, Satelliten, Kabel und/oder anderen
Vertriebskanälen), in kommerziellen „streaming“ Anwendungen (via Internet, Intranet und/ oder andere Netzwerke),
anderen kommerziellen Inhalte vermittelnden Systemen (Pay-Audio oder Audio-On-Demand und dergleichen) oder auf
kommerziellen körperlichen Medien (Compact Discs, DVDs, Halbleiter Bauteilen, Festplatten, Speicherkarten und
dergleichen zu verteilen). Für eine solche Nutzung ist eine eigenständige Lizenz erforderlich. Für weitere Einzelheiten,
siehe http://mp3licensing.com
MPEG Layer-3 Audiokodierungstechnologie unter Lizenz von Fraunhofer IIS und Thomson.
Zubehör
Prüfen Sie, ob die folgenden Zubehörteile vorhanden sind.
iPhone-Adaptern x 3
Fernbedienung x 1 „AA“-Batterie x 1 MW-Rahmenantenne x 1
(nur X-HM20)
Netzkabel
Garantiekarte
Die vorliegende Bedie
UKW-Antenne x 1
INHALT
Seite
Seite
USB
Allgemeine Informationen
Hören von USB-Massenspeicher MP3-Player . . . 16 - 17
Zur Beachtung . . . . . . . . . . . . . . . . . . . . . . . . . . . . . . . 5
Fortgeschrittene USB-Wiedergabe . . . . . . . . . . . . . . .17
Bedienungselemente und Anzeigen . . . . . . . . . . . . 5 - 6
Vorbereitung für die Inbetriebnahme
Rundfunk
Anschluß des Systems . . . . . . . . . . . . . . . . . . . . . . . 7 - 8
Rundfunkempfang . . . . . . . . . . . . . . . . . . . . . . . . . . . .18
Fernbedienung . . . . . . . . . . . . . . . . . . . . . . . . . . . . . . . 8
Grundbedienung
Weitere Funktionen
Allgemeine Bedienungen . . . . . . . . . . . . . . . . . . . . . . . 9
Benutzen des Radio-Daten-Systems (RDS) . . . . 19 - 21
Einstellen der Uhr (Nur Fernbedienung) . . . . . . . . . 9 - 10
Timer- und Sleep-Funktion
(Nur Fernbedienung) . . . . . . . . . . . . . . . . . . . . . . 21 - 23
iPod, iPhone und iPad
Kopfhörer . . . . . . . . . . . . . . . . . . . . . . . . . . . . . . . . . . 23
Anhören von iPod, iPhone oder iPad
(nur X-HM20) . . . . . . . . . . . . . . . . . . . . . . . . . . . . 10 - 12
Referenzen
Fehlersuchtabelle . . . . . . . . . . . . . . . . . . . . . . . . . 24 - 25
Wiedergabe von CDs oder MP3/WMA-Discs
Wartung . . . . . . . . . . . . . . . . . . . . . . . . . . . . . . . . . . . 25
Hören einer CD oder MP3/WMA-Disk . . . . . . . . . . . . 13
Technische Daten . . . . . . . . . . . . . . . . . . . . . . . . . . . .26
Weitere Wiedergabe von CDs oder MP3/WMA-
Hinweis . . . . . . . . . . . . . . . . . . . . . . . . . . . . . . . . . . . . .27
Discs . . . . . . . . . . . . . . . . . . . . . . . . . . . . . . . . . . . 14 - 15
MP3/WMA-Ordnermodus (nur bei MP3/WMA-
Dateien). . . . . . . . . . . . . . . . . . . . . . . . . . . . . . . . . 15 - 16
De-4
11/5/25 X-HM10_20_De.fm
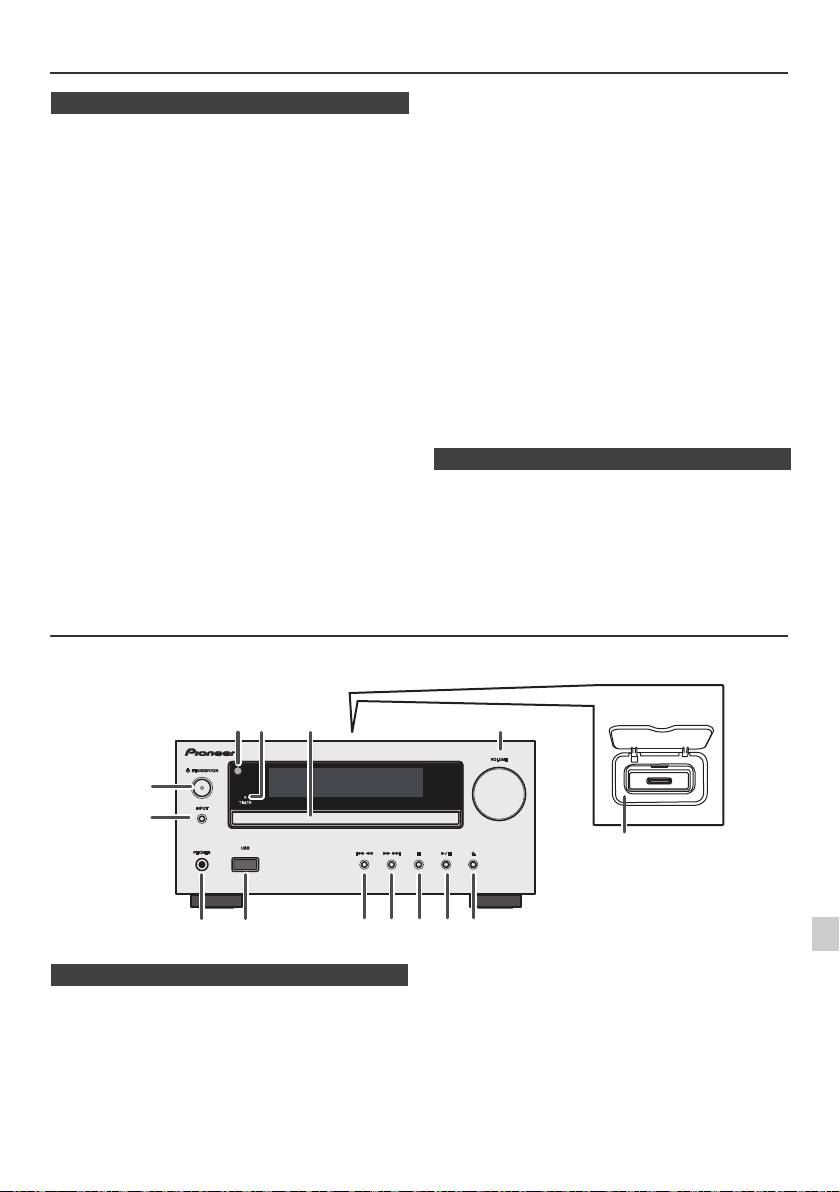
Zur Beachtung
l Die Abdeckung nicht entfernen, weil dies zu einem
n Allgemeines
elektrischen Schlag führen kann. Interne Wartung
sollte von Ihrem PIONEER-Kundendienstzentrum
l Das Gerät auf eine feste, ebene und
ausgeführt werden.
erschütterungsfreie Unterlage stellen.
l Durch Bedecken der Belüftungsöffnungen mit
l Stellen Sie die Lautsprecher mind. 30 cm vom CRT-TV-
Gegenständen wie Zeitungen, Tischtüchern,
Gerät auf, um Farbabweichungen auf dem
Vorhängen usw. wird die Belüftung blockiert und sollte
Fernsehbildschirm zu vermeiden. Wenn es weiterhin
vermieden werden.
zu Abweichungen kommt, vergrößern Sie den Abstand
l Es sollten keine unbedeckten Flammenquellen wie
zwischen Lautsprechern und TV-Gerät noch mehr.
angezündete Kerzen auf dem Gerät abgestellt werden.
LCD TV ist für solche Abweichungen nicht anfällig.
l Sie sollten auf die Umweltaspekte bei der
l Das Gerät fernhalten von direktem Sonnenlicht,
Batterieentsorgung achten.
starken Magnetfeldern, sehr staubigen Orten,
Feuchtigkeit und elektronischen/elektrischen Geräten
l Das Gerät ist für die Verwendung in mildem Klima
(Heimcomputer, Fernkopierer usw.), die elektrisches
konstruiert.
Rauschen erzeugen.
Warnung:
l Nichts auf das Gerät stellen.
Nur mit der auf diesem Gerät angegebenen Spannung
l Das Gerät nicht Feuchtigkeit, Temperaturen von über
verwenden. Der Betrieb des Produktes mit einer
60°C oder extrem niedrigen Temperaturen aussetzen.
Spannung, die höher ist als die angegebene, ist gefährlich
l Wenn das System nicht richtig arbeitet, das Netzkabel
und kann zu einem Brand oder anderen Unfällen mit
von der Netzsteckdose trennen. Das Netzkabel wieder
Beschädigung führen. PIONEER kann nicht für Schäden
anschließen und dann das System einschalten.
verantwortlich gemacht werden, die aus dem Betrieb mit
l Bei einem Gewitter ist es am sichersten, wenn das
Netzkabel herausgezogen wird.
einer unvorschriftsmäßigen Spannung resultieren.
l Das Netzkabel immer am Stecker aus der
Netzsteckdose ziehen, niemals am Kabel ziehen, da
n Lautstärkeregelung
das Ziehen des Kabels innere Kabellitzen beschädigen
kann.
Bei einer gegebenen Lautstärkeeinstellung hängt der
Schallpegel von der Effizienz und der Anordnung der
l Der Stromstecker wird benutzt, um das Gerät vom
Lautsprecher sowie von weiteren Faktoren ab. Es wird
Stromnetz zu trennen und muss zu jeder Zeit bequem
empfohlen, sich nicht hohen Schallpegeln auszusetzen.
erreichbar sein.
Schalten Sie das Gerät nicht bei voller Lautstärke ein.
Hören Sie Musik bei geringer Lautstärke. Überhöhter
Schalldruck von den Kopfhörern kann zu einem
Hörverlust führen.
Bedienungselemente und Anzeigen
iPod-/iPhone-Funktionen stehen nur für X-HM20 zur Verfügung.
1
2
3
4
5
Seite
Seite
1. Fernbedienungssensor . . . . . . . . . . . . . . . . . . . . 8
10. Tuner Preset Down, CD-USB-Erkennung, iPod /
6
2. Timer-Anzeige. . . . . . . . . . . . . . . . . . . . . . . . . . . 22
iPhone-Skip Up. . . . . . . . . . . . . . . . . . . . . . . .12, 13
3. Disc-Schublade. . . . . . . . . . . . . . . . . . . . . . . . . . 13
11. Tuner Preset Up, CD / USB-Erkennung, iPod /
7
4. Andockstation fur iPod oder iPhone . . . . . . . . 11
iPhone-Skip Down . . . . . . . . . . . . . . . . . . . . .12, 13
5. Lautstärkeregler . . . . . . . . . . . . . . . . . . . . . . . . . 9
12. Disc / USB Stopp-Taste . . . . . . . . . . . . . . . . .12, 13
6. STANDBY/ON-Taste . . . . . . . . . . . . . . . . 11, 13, 18
13. Disc / USB / iPod / iPhone Wiedergabe-oder
8
7. INPUT-Taste. . . . . . . . . . . . . . . . . . 9, 11, 13, 16, 18
Pausetaste . . . . . . . . . . . . . . . . . . . . . . . . . . .12, 13
8. Kopfhörerbuchse . . . . . . . . . . . . . . . . . . . . . . . . 23
14. Taste zum Öffnen/Schließen der CD-
9. USB-Anschluß . . . . . . . . . . . . . . . . . . . . . . . . . . 16
Schublade. . . . . . . . . . . . . . . . . . . . . . . . . . . . . . .13
9
De-5
11/5/25 X-HM10_20_De.fm
1
52 3
6
7
4
8 10 11 12 13 14
9
Nur X-HM20
n Gerätevorderseite

Bedienungselemente und Anzeigen (Fortsetzung)
1
Seite
1. Fernbedienungssender . . . . . . . . . . . . . . . . . . . .8
2
17
2. STANDBY/ON-Taste . . . . . . . . . . . . . . .9, 11, 13, 21
3. Zifferntasten . . . . . . . . . . . . . . . . . . . . . . . . . . . . .14
18
4. P.Bass-Taste . . . . . . . . . . . . . . . . . . . . . . . . . . . . .9
5. Bass/Treble -Taste . . . . . . . . . . . . . . . . . . . . . . . . .9
19
6. Tuning Down-, Skip Down-, Schnellrücklauf-, Time
3
20
Down-taste . . . . . . . . . . . . .9, 12, 13, 16, 18, 19, 21
21
7. Tuner Preset Up Taste, iPod Curser Up
4
22
. . . . . . . . . . . . . . . . . . . . . . . . . . . . . . .11, 12, 16, 18
23
8. Taste um die Lautstärke zu reduzieren . . . . . . . 9
5
24
9. Tuner Preset down, iPod-Curser Down
6
25
. . . . . . . . . . . . . . . . . . . . . . . . . . . . . . .11, 12, 16, 18
10. Ordner-Taste . . . . . . . . . . . . . . . . . . . . . . . . . . . 16
7
26
11. iPod/iPhone-Taste . . . . . . . . . . . . . . . . . . . . . . . .11
8
12. CD-Taste . . . . . . . . . . . . . . . . . . . . . . . . . . . . . . . .13
27
9
13. iPod/iPhone DISPLAY TV OUT . . . . . . . . . . .11, 12
14. Taste CD/USB DISPLAY. . . . . . . . . . . . . . . . . . . .16
10
28
15. Tuner-Taste . . . . . . . . . . . . . . . . . . . . . . . . . . .18, 19
29
11*
16. RDS ASPM-Taste . . . . . . . . . . . . . . . . . . . . . . . . .19
30
12
17. CD-Fach Öffnen / Schließen . . . . . . . . . . . . . . . .13
31*
18. Dimmertaste . . . . . . . . . . . . . . . . . . . . . . . . . . . . . .9
13*
32*
19. Speichern . . . . . . . . . . . . . . . . . . . . . . . . . . . .14, 18
33
14
20. Löschtaste . . . . . . . . . . . . . . . . . . . . . . . . . . .14, 18
34
21. Sleep-Taste . . . . . . . . . . . . . . . . . . . . . . . . . . . . .23
15
35
22. Uhr/Timer . . . . . . . . . . . . . . . . . . . . . . . . . . . . .9, 22
16
36
23. Random-Taste . . . . . . . . . . . . . . . . . . . . . . . .12, 14
24. Repeat-Taste. . . . . . . . . . . . . . . . . . . . . . . . . .12, 14
25. Tuning Up-, Skip Up-, Schnellvorlauf-,
Time Up-taste . . . . . . . . . . .9, 12, 13, 16, 18, 19, 21
26. Taste um die Lautstärke zu erhöhen . . . . . . . . . .9
27. Enter-Taste . . . . . . . . . . . . . . . . . . . . . . . . .9, 11, 12
28. Stumm-Taste. . . . . . . . . . . . . . . . . . . . . . . . . . . . . .9
29. Line-Taste . . . . . . . . . . . . . . . . . . . . . . . . . . . . .8, 25
30. USB-Taste . . . . . . . . . . . . . . . . . . . . . . . . . . . . . .16
31. iPod /iPhone Wiedergabe- / Pausetaste. . . . . . .12
32. iPod/iPhone-Menue . . . . . . . . . . . . . . . . . . . . . . .12
33. CD-/USB-Wiedergabe-/Anhaltetaste. . . .12, 13, 14
34. CD-/USB-Stopptaste . . . . . . . . . . . . . . . . . . .13, 14
35. RDS-Anzeigetaste . . . . . . . . . . . . . . . . . . . . . . . .19
36. Taste für RDS-Programmart/
Verkehrsinformations- Suchlauf. . . . . . . . . . . . .19
Seite
1. USB-Anzeige . . . . . . . . . . . . . . . . . . . . . . . . . . . .16
2. iPod-Anzeige . . . . . . . . . . . . . . . . . . . . . . . . . . . .10
3. CD Anzeige . . . . . . . . . . . . . . . . . . . . . . . . . . . . . .13
4. MP3-Anzeige . . . . . . . . . . . . . . . . . . . . . . . . . . . .13
5. WMA-Anzeige . . . . . . . . . . . . . . . . . . . . . . . . . . .13
6. RDM (Zufallswiedergabe)-Anzeige . . . . . . . . . . .14
7. MEM (Speicher)-Anzeige . . . . . . . . . . . . . . . . . . .14
8. Wiedergabe-Anzeige . . . . . . . . . . . . . . . . . . . . . .14
n Lautsprecher
9. Wiedergabe- / Pausetaste . . . . . . . . . . . . . . . . . .12
10. Einstellen von UKW/MW-Anzeige. . . . . . . . . . . .18
1.
Hochtonlautsprecher
11. UKW-Stereo-Betriebsartenanzeige . . . . . . . . . .18
2. Tieftöner
12. Stereo-Sender-Anzeige . . . . . . . . . . . . . . . . . . . .18
3. Bassreflex-Öffnung
13. RDS-Anzeige . . . . . . . . . . . . . . . . . . . . . . . . . . . .19
14. PTY-Anzeige . . . . . . . . . . . . . . . . . . . . . . . . . . . . .19
15. TP-Anzeige . . . . . . . . . . . . . . . . . . . . . . . . . . . . . .19
16. TA-Anzeige . . . . . . . . . . . . . . . . . . . . . . . . . . . . . .19
17. Stummschaltungstaste . . . . . . . . . . . . . . . . . . . . .9
n Die Lautsprechergrills sind abnehmbar
18. Titelanzeige . . . . . . . . . . . . . . . . . . . . . . . . . . . . .16
(nur X-HM20)
19. Interpretenanzeiger . . . . . . . . . . . . . . . . . . . . . . .16
20. Ordner-Anzeige . . . . . . . . . . . . . . . . . . . . . . . . . .16
ßitle vorsichtig die Lautsprechergilter
21. Albumanzeiger . . . . . . . . . . . . . . . . . . . . . . . . . . .16
abnehmen oder aufstecken, um
22. Dateianzeiger . . . . . . . . . . . . . . . . . . . . . . . . . . . .16
23. Track-Anzeige. . . . . . . . . . . . . . . . . . . . . . . . . . . .14
Beschädigungen der Lautsprecher
24. Tägliche Timer-Anzeige. . . . . . . . . . . . . . . . . . . .21
membranen zu vermeiden!
25. Einmalige Timer-Anzeige . . . . . . . . . . . . . . . . . .21
26. Disc-Anzeiger . . . . . . . . . . . . . . . . . . . . . . . . . . . 13
27. Gesamtanzeige. . . . . . . . . . . . . . . . . . . . . . . . . . .16
28. Schlummer-Anzeige . . . . . . . . . . . . . . . . . . . . . .23
De-6
11/5/25 X-HM10_20_De.fm
*Die Tasten 11, 13, 31 und 32 sind nur für X-HM20 verfügbar.
9
15
1 4 5 6 7
2 3
8
10 11 1312 14
16
17
28272624 2523221918 2120
n Fernbedienung
n Anzeige
1
3
2

Anschluß des Systems
Schalten Sie, ehe Sie die Anschlüsse vornehmen oder ändern, den Strom aus und ziehen Sie das Netzkabel aus der
Wechselstrom-Steckdose.
Mitgelieferte UKW-Antenne:
Den UKW-Antennendraht an die Buchse FM 75 OHMS
anschließen und danach in die Richtung verlegen, wo das
stärkste Empfangssignal erhalten wird.
UKW-Außenantenne:
Verwenden Sie eine FM-Außenantenne (75 Ohm
Koaxialkabel), um einen besseren Empfang zu erhalten.
Wenn eine UKW-Außenantenne verwendet wird,
mitgeliefertes UKW-Antennenkabel abnehmen.
Mitgelieferte MW-Rahmenantenne:
Schließen Sie die MW-Rahmenantenne an die MW-
Buchsen an. Danach die MW-Rahmenantenne für
optimalen Empfang ausrichten. Die MW-Rahmenantenne
auf ein Bord usw. stellen oder an einen Ständer bzw. eine
Wand mit Schrauben (nicht mitgeliefert) anbringen.
Hinweis:
Wenn sich die Antenne auf dem Gerät oder in der Nähe
1
des Netzkabels befindet, kann Rauschen aufgefangen
werden. Für besseren Empfang die Antenne weiter vom
2
Gerät entfernt stellen.
Sie können Foto- und Videodateien vom iPod oder
iPhone-Gerät anschauen, indem Sie das Gerät an einen
3
Fernseher/Monitor anschließen. Wenn der Fernseher/
Monitor einen Video-Eingang hat, können Sie diesen mit
der VIDEO OUT Buchse auf der Rückseite des Gerätes
4
verbinden und stellen Sie den TV-Ausgang im iPod oder
iPhone auf „On“.
5
Hinweis:
Kontrollieren Sie, ob die NTSC- oder PAL-Einstellung vom
6
iPod dieselbe wie ihr Fernsehersignal ist. Besuchen Sie
die Homepage von Apple für weitere Informationen.
7
8
9
De-7
11/5/25 X-HM10_20_De.fm
LINE
AUX
LOOP
AC IN
Video-Kabel
Rechter
Installieren der MW-Rahmenantenne
MW-
Linker
Fernseher
(nicht mitgeliefert)
Lautsprecher
Rahmenantenne
Lautsprecher
< Montieren
< Montage >
an der Wand >
wand
An Video-Eingang
Video-Ausgangsbuchse
Schrauben (nicht mitgeliefert)
(nur X-HM20)
Wandsteckdose
(Wechselspannung 220 V
UKW-Antenne
bis 240 V, 50 Hz/60 Hz)
n Anschluß der Antennen
n Anschluß der Lautsprecher
l
Verdrillen Sie die freiliegenden
Drahtlitzen miteinander.
l Schließen Sie den roten Draht an
den Plus-Anschluss (+) und den
anderen Draht an den Minus-
Anschluss (–) an.
l Verwenden Sie Lautsprecher mit
einer Impedanz von 4 Ohm, da
Lautsprecher mit einer
niedrigeren Impedanz die Einheit
beschadigen konnen.
Falsch
l
An den Lautsprecherklemmen dieses Gerätes liegt eine
potentiell GEFÄHRLICHE Spannung an. Zur Vermeidung
von Stromschlaggefahr ist unbedingt darauf zu achten, den
Netzstecker beim Anschließen und Abtrennen der
Lautsprecherkabel von der Netzsteckdose zu trennen,
bevor irgendwelche nicht isolierten Teile berührt werden.
l Montieren Sie diese Lautsprecher nicht an der Wand
oder an der Decke, da sie, wenn sie herabfallen,
Verletzungen verursachen können.
l
Niemals den rechten und linken Kanal verwechseln. Der
rechte Lautsprecher befindet sich auf der rechten Seite,
wenn Sie vor dem Gerät stehen.
l Die blanken Lautsprecherkabel dürfen keinen Kontakt
aufweisen.
l Keine Gegenstände in die Bassreflex-Öffnungen fallen
lassen oder einlegen.
l
Sie sollten nicht auf den Lautsprechern stehen oder
sitzen. Sie können sich verletzen.
n Anschließen eines iPods oder iPhones an
den Fernseher (nur X-HM20)
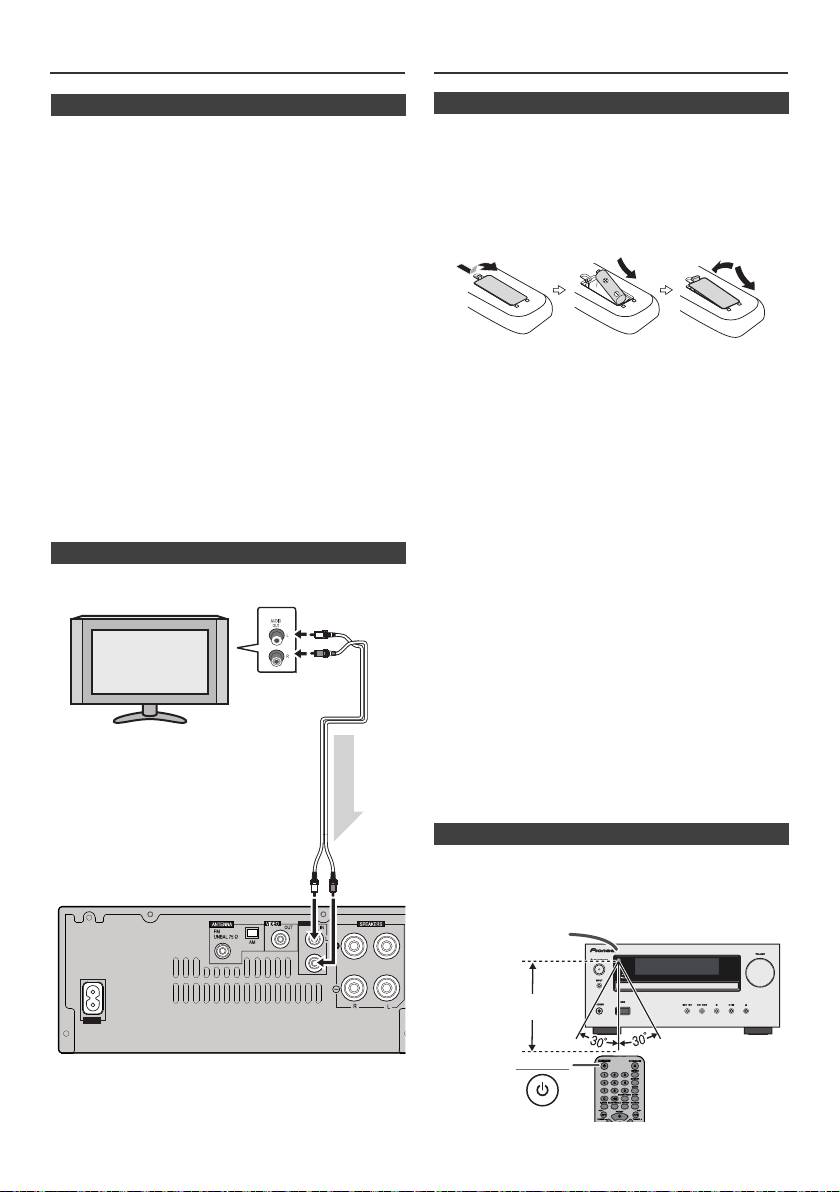
Verwendung anderer Subwoofer
Fernbedienung
n Netzanschluß
Prüfen, daß alle Anschlüsse richtig gemacht worden sind,
und dann das Netzkabel dieses Geräts an die Steckdose
anschließen.
Hinweis:
Wenn das Gerät längere Zeit nicht verwendet wird, das
Netzkabel aus der Wandsteckdose ziehen.
Vorsicht:
l Beim Anschließen und Trennen des Netzkabels immer
den Stecker anfassen. Ziehen Sie den Stecker nicht
durch Ziehen am Kabel heraus, und berühren Sie das
Netzkabel niemals mit nassen Händen, da dies einen
Kurzschluss oder einen elektrischen Schlag
verursachen könnte. Das Gerät, Möbelstücke oder
andere Gegenstände nicht auf das Netzkabel stellen
und jegliches Einklemmen des Netzkabels vermeiden.
Niemals einen Knoten ins Netzkabel machen oder es
Warnung:
an anderen Kabeln festbinden. Das Netzkabel sollte so
l Verwenden oder lagern Sie die Batterie nicht bei
verlegt werden, dass niemand darauf treten kann. Ein
direktem Sonnenlicht oder an anderen heißen Plätzen
beschädigtes Netzkabel kann einen Brand oder einen
wie beispielsweise in einem Auto oder nahe an einen
elektrischen Schlag verursachen. Überprüfen Sie das
Heizer. Dies kann dazu fuhren, dass es zu Leckagen,
Netzkabel hin und wieder. Bei Beschädigung wenden
zur Uberhitzung oder zur Explosion der Batterie oder
Sie sich bitte wegen Ersatz an die nächste Pioneer-
zu einem Brand kommt. Es kann ebenfalls die
Kundendienststelle.
Lebensdauer oder die Leistung der Batterie verringern.
l Verwenden Sie kein anderes Netzkabel als das mit
Vorsicht:
dieser Einheit mitgelieferte.
l
Entfernen Sie die Batterie, wenn die Einheit über einen
l Verwenden Sie das mitgelieferte Netzkabel für keinen
längeren Zeitraum nicht verwendet wird. Dadurch
anderen Zweck als oben beschrieben.
vermeiden Sie eventuelle Schäden durch Auslaufen der
Batterien.
l
Verwenden Sie keine wiederaufladbaren Batterien
n Anschließen eines Fernsehgeräts, usw.
(Nickel-Kadmium-Batterie usw.).
l
Falsches Installieren der Batterie kann zum Versagen der
Mit einem Audio-Kabel an das TV anschließen.
Einheit führen.
Hinweise zur Verwendung:
l
Tauschen Sie die Batterie aus, wenndie Betriebsdistanz
verringert ist oder wenn der Betrieb unregelmäßig wird.
Kaufen Sie eine Batterie der Größe „AA“.
l
Den Sender auf der Fernbedienung und den Sensor am
Gerät mit einem weichen Tuch regelmäßig reinigen.
l
Wenn der Sensor am Gerät starkem Licht ausgesetzt
wird, kann der Betrieb beeinträchtigt werden. Verändern
Sie die Beleuchtung oder die Ausrichtung des Gerätes,
wenn dies auftritt.
l
Die Fernbedienung nicht Feuchtigkeit, Hitze, Stoß oder
Erschütterungen aussetzen.
l Bitte entsorgen Sie gebrauchte Batterien
entsprechend den gesetzlichen Bestimmungen oder
den allgemein bekannten Umweltbestimmungen in
Ihrem Land oder Ihrer Region.
Alle Anschlüsse und dann die Fernbedienung überprüfen.
Die Fernbedienung direkt auf den Fernbedienungssensor am
Gerät richten. Die Fernbedienung kann im unten gezeigten
Bereich verwendet werden:
Die Funktion Line In wählen:
l
Am Hauptgerät: Drücken Sie wiederholt die INPUT -
Taste, bis Line In angezeigt wird.
l
Auf der Fernbedienung: Drücken Sie die Line-Taste
wiederholt, bis „Line In“ angezeigt wird.
De-8
11/5/25 X-HM10_20_De.fm
LINE
AUX
LOOP
AC IN
Fernseher
An Audio-
Ausgang
Audiokabel
(im Handel
erhältlich)
Audiosignal
An Video-
Hauptgerät
Eingang
n Einsetzen der Batterie
1
Öffnen Sie den Deckel des Batteriefachs.
2
Legen Sie die mitgelieferte Batterie in der Richtung in das
Batteriefach ein, die dort angezeigt ist.
Drucken Sie die Batterie beim Einlegen oder Entfernen in
Richtung des negativen Pols des Batterieanschlusses (–).
3
Schließen Sie den Deckel.
n Test der Fernbedienung
STANDBY/ON
Fernbedienungssensor
7 m
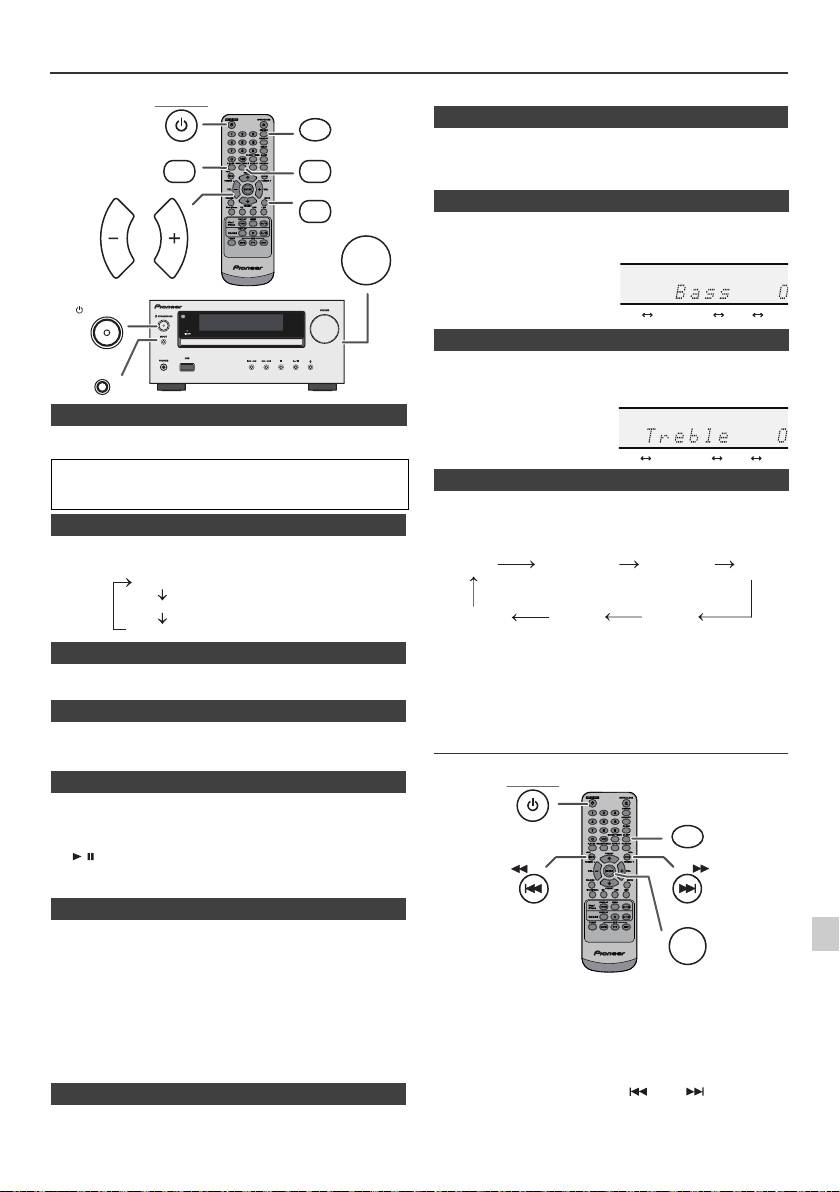
Allgemeine Bedienungen
die Taste, um die Lautstärke wieder herzustellen.
STANDBY/ON
DIMMER
Wenn der Strom erstmals eingeschaltet wird, gelangt die Einheit in
P.BASS
BASS/TREBLE
den P.Bass- Modus, in dem die Bassfrequenzen betont werden.
Drücken Sie, um den P.BASS-Modus aufzuheben, die Taste B.Bass
auf der Fernbedienung.
MUTE
1
Drücken Sie die BASS/TREBLE-Taste und wählen Sie „Bass“.
VOLUME
VOL VOL
2
Drücken Sie innerhalb von 5 Sekunden die VOL (+ oder –)-Taste
und stellen Sie den Bass ein.
STANDBY/ON
1
Drücken Sie die BASS/TREBLE-Taste und wählen Sie „Treble“.
INPUT
2
Drücken Sie innerhalb von 5 Sekunden die VOL (+ oder –)-Taste
und stellen Sie den Treble ein.
n Einschalten der Stromversorgung
Zum Einschalten der Stromversorgung die STANDBY/ON-Taste
drücken.
Nach Gebrauch:
Um in den Bereitschaftsbetrieb zu schalten, die STANDBY/ON-
Taste drücken.
Drücken sie am Hauptgerät die INPUT-Taste, so ändert
sich die aktuelle Funktion in einen anderen Modus.
n Display helligkeitsregler
Drücken Sie mehrere Male die INPUT-Taste, um die
gewünschte Funktion auszuwählen.
Um die Helligkeit der Anzeige zu verdunkeln, drücken Sie die
DIMMER-Taste auf der Fernbedienung.
Dimmer 1
Dimmer 2
Dimmer Off
n Automatische Einstellung der Lautstärke
Hinweis:
Mit der Speicherschutzfunktion bleibt die gespeicherte
Wenn Sie die Haupteinheit bei einer auf 17 oder höher eingestellten
Funktion einige Stunden erhalten, selbst wenn ein
Lautstärke aus- und einschalten, startet die Lautstärke bei 16.
Stromausfall eintreten sollte oder das AC-Netzkabel
getrennt wird.
n Lautstärkeregelung
Drehen Sie den Lautstärkeregler in Richtung VOLUME (am
Hauptgerät) oder drücken Sie die Taste VOL +/– (auf der
Einstellen der Uhr (Nur Fernbedienung)
Fernbedienung), um die Lautstärke zu erhöhen oder zu senken.
n Automatische Netzeinschaltung
Wenn Sie eine der folgenden Tasten drücken, schaltet sich das
Gerät ein.
l
iPod / iPhone, CD, USB, LINE, TUNER auf der Fernbedienung:
1
Die ausgewählte Funktion ist aktiviert.
l
/ -Taste auf dem Hauptgerät: Das Gerät schaltet ein und die
2
Wiedergabe startet von der zuletzt benutzten Funktion (CD,
TUNER, USB, iPod, LINE IN)
3
n Automatische ausschaltfunktion
Wenn die Haupteinheit 15 Minuten nicht aktiv ist, wird sie
automatisch in den Stand-By-Modus versetzt (wenn iPod/iPhone
4
nicht angedockt sind) während:
iPod/iPhone: Kein Anschluss.
5
CD / USB: Im Stop-Modus.
In diesem Beispiel ist die Uhr für die 24-Stunden-Anzeige
LINE IN: Keine Erkennung eines Input-Signals oder sehr geringe
(00:00) eingestellt.
Hörbarkeit des Tons.
6
Hinweis:
Nur X-HM20: Sobald das iPod/iPhone jedoch angeschlossen ist,
beginnt das Aufladen.
7
Während des Standby-Modus wird „Charge Mode“ angezeigt.
8
n Stummschaltung
Die Lautstärke wird kurzfristig stumm geschaltet, wenn die MUTE-
Taste auf der Fernbedienung gedrückt wird. Drücken Sie nochmals
9
De-9
11/5/25 X-HM10_20_De.fm
(Display ist gedimmt).
(Display wird gedimmt).
(Display ist hell).
n P.Bass-Regelung
n Klang einstelung (Bass)
n Klang einstelung (Höhen)
n Funktion
1
Zum Einschalten der Stromversorgung die STANDBY/ON-Taste
drücken.
2
Die CLOCK/TIMER-Taste drücken.
3
Drücken Sie innerhalb von 10 Sekunden die ENTER-Taste. Um
den Tag anzupassen, die Taste oder und dann die
ENTER-Taste drücken.
........
-5 -4 +4 +5
........
-5 -4 +4 +5
CD AM
FM STEREO
FM MONO
Line In
iPod
USB
(nur X-HM20)
STANDBY/ON
CLOCK/TIMER
TUNING −
TUNING +
ENTER
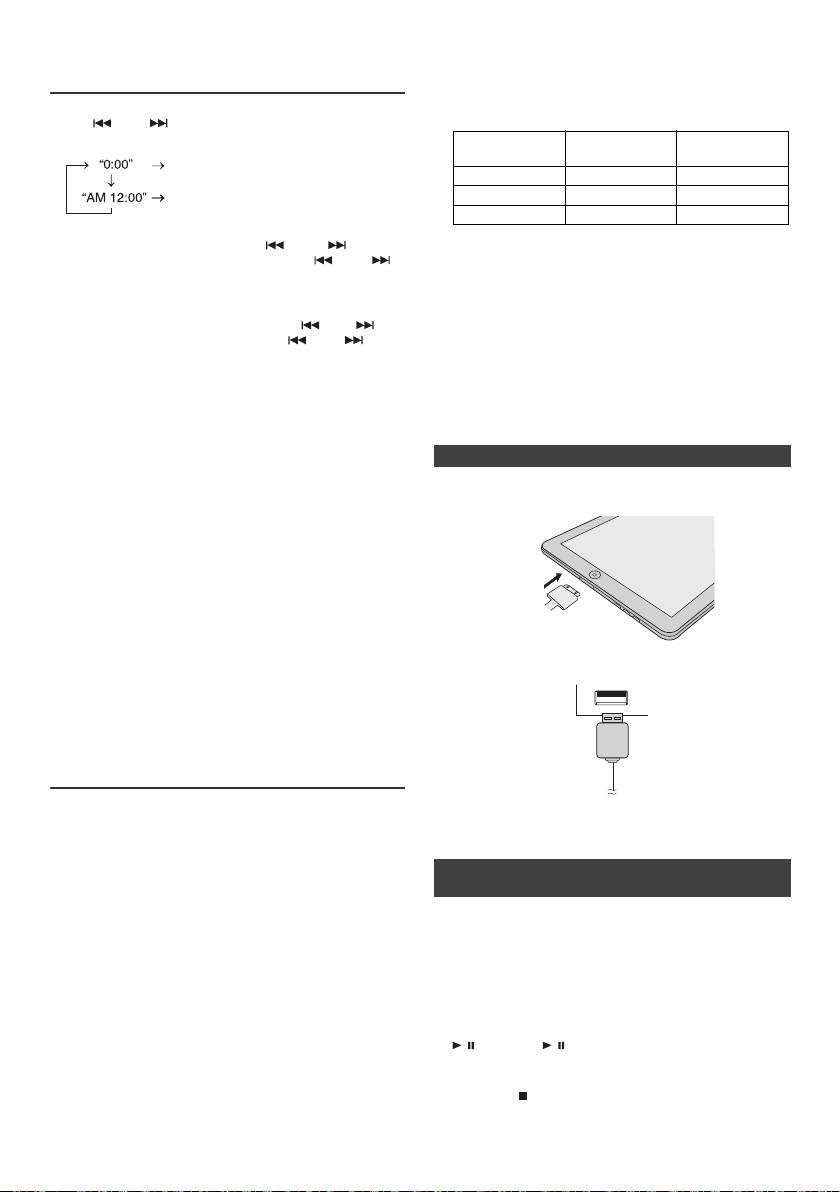
l Das Installieren von anderen Software- Versionen als
Einstellen der Uhr (Nur Fernbedienung)
den auf der Website von Pioneer angezeigten auf
(Fortsetzung)
Ihrem iPod/iPhone/iPad kann dazu führen, dass diese
inkompatibel mit diesem System werden.
l Lade-Anschluss für iPod, iPhone und iPad:
4
Die oder -Taste drücken, um 24- oder 12-Stunden-
Anzeige zu wählen, und dann die ENTER-Taste betätigen.
USB-
Bedingung Andockstation
Anschluss
Die 24-Stunden-Anzeige erscheint.
(00:00 - 23:59)
USB-Funktion NEIN JA
Die 12-Stunden-Anzeige erscheint.
Andere Funktion JA NEIN
(AM 12:00 - PM 11:59)
Standby JA NEIN
5
Stellen Sie die Stunde mit der oder ein und
l Die Meldung „Dieses Zubehör eignet sich nicht für die
bestätigen Sie mit der ENTER-Taste. Die oder -
gemeinsame Verwendung mit iPhone“ oder ähnlich
Taste einmal drücken, um die Uhrzeit um 1 Stunde
kann auf dem iPhone-Bildschirm erscheinen, wenn:
vorzustellen. Halten Sie sie gedrückt, um weiter
- die Batterie schwach ist.
vorzustellen.
- das iPhone nicht richtig angedockt ist (z. B. schief)
Wenn dies der Fall ist, entfernen Sie das iPhone und
6
Um den Minuten anzupassen, die Taste oder und
docken Sie es wieder an.
dann die ENTER-Taste drücken. Die oder -Taste
l Dieses Produkt wurde für iPhone hergestellt. Zur
einmal drücken, um die Uhrzeit um 1 Minute vorzustellen.
Vorbeugung einer zufälligen Beeinträchtigung,
Überprüfen der Zeitanzeige:
wenn das iPod/iPhone angedockt wird, werden die
Die CLOCK/TIMER-Taste drücken. Die Zeitanzeige erscheint
Kopfhörer ausgeschaltet, und „HP INVALID“
ca. 5 Sekunden lang.
(Kopfhörer deaktiviert) wird angezeigt.
Es könnten auch kurze Tonstörungen während
Hinweis:
ankommenden Anfrufen auftreten.
Wenn die Stromzufuhr nach dem erneuten Anschließen des
Gerätes oder nach einem Stromausfall wieder hergestellt ist,
n iPod-Anschluss (USB-Anschluss)
stellen Sie die Uhrzeit erneut ein (Seiten 9).
Nachstellen der Uhr:
1
Führen Sie den Anschlussstecker in das iPod/iPhone
Die Schritte im Abschnitt „Einstellen der Uhr“ ab 1
oder iPad ein.
durchführen. Wenn „Clock“ im Schritt 2 nicht erscheint, wird
der Schritt 4 (zum Anwählen der 24-Stunden- oder
12-Stunden-Anzeige) übersprungen.
Verändern der 24-Stunden- oder 12-Stunden-Anzeige:
1 All die programmierten Inhalte löschen. [Nähere
Informationen siehe „Werkseinstellung, Löschen des
Speichers“ auf Seite 25.]
2 Führen Sie die Schritte im Abschnitt „Einstellen der
2 Schließen Sie das iPad über den USB-
Uhr“ ab Schritt 1 durch.
Anschlussstecker an die Einheit an.
Hinweis:
Die Timer-Einstellung wird zurückgesetzt, wenn das
Netzkabel herausgezogen wird oder wenn es einen
Stromausfall gibt.
Anhören von iPod, iPhone oder iPad
(nur X-HM20)
Unterstützte iPod-, iPhone oder iPad-Modelle:
Hinweis:
l
iPad
Der USB-Anschlussstecker unterstützt nicht den VIDEO-Ausgang.
l
iPhone 4
l
iPhone 3GS
l
iPhone 3G
n iPod-/-iPhone- oder iPad-Wiedergabe
l
iPhone
(USB-Anschluss)
ten
l
iPod touch (4
generation)
ten
l
iPod touch (3
generation)
1 Drücken Sie zum Einschalten des Stroms die Taste
ten
l
iPod touch (2
generation)
STANDBY/ON.
ten
l
iPod touch (1
generation)
2 Drücken Sie zur Wahl der USB-Funktion die USB-Taste
l
iPod classic
auf der Fernbedienung oder wiederholt die INPUT-
ten
l
iPod nano (6
generation)
Taste auf der Haupteinheit.
ten
l
iPod nano (5
generation)
3 Schließen Sie das iPod, das iPhone oder das iPad an
ten
l
iPod nano (4
generation)
die Einheit an. Es erscheint „iPod“.
ten
l
iPod nano (3
generation)
4 Drücken Sie für den Start der Wiedergabe die Taste
ten
l
iPod nano (2
generation)
/ (CD/USB / ).
Hinweise:
Hinweis:
l Dieses System wurde für die Software- Version der auf
Während der iPod-/iPhone- oder iPad-Wiedergabe ist die
der Website von Pioneer angezeigten iPod-/iPhone
Stopp-Taste ( ) deaktiviert.
und iPad- Modelle entwickelt und getestet (http://
pioneer.jp/homeav/support/ios/eu).
De-10
11/5/25 X-HM10_20_De.fm
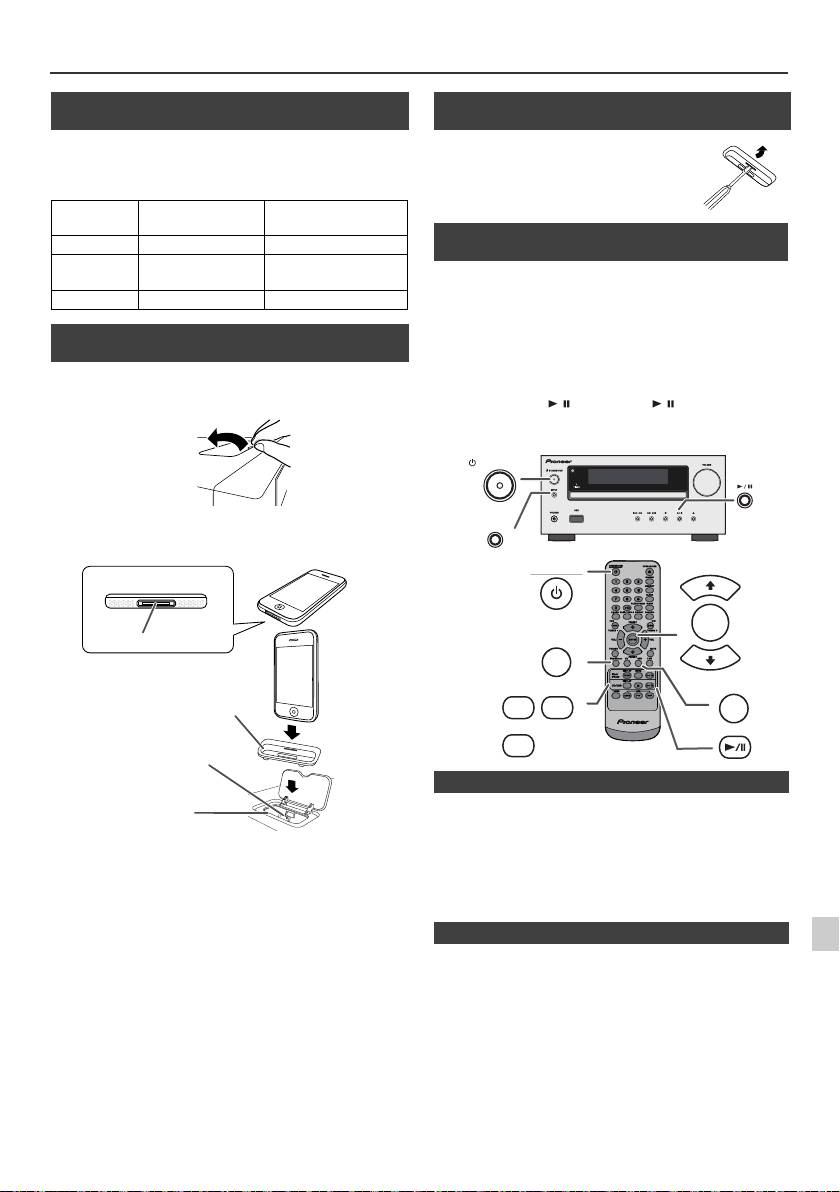
Anhören von iPod, iPhone oder iPad (nur X-HM20) (Fortsetzung)
n Anschließen des iPod und iPhone-
Adapters (Andock-Station)
Hinweise:
Bitte benutzen Sie den mit Ihrem iPod oder iPhone
mitgelieferten Adapter.
iPhone-
iPhone-
Speicherkapazität
Adapter Nr.
Beschreibung
12 iPhone 4GB & 8GB & 16GB
15 iPhone 3G,
8GB & 16GB & 32GB
iPhone 3GS
19 iPhone 4 6GB & 32GB
n Den iPod oder iPhone-Adapter einstecken
(Andock-Station)
1
Andockstation für das iPod und das iPhone durch
Hochziehen.
2 Führen Sie den Adapter für das iPod und das iPhone
in die Einheit ein und schließen Sie Ihr iPod oder
iPhone an.
l
Der Ton schaltet nur dann vom iPhone auf das Hauptgerät
um, wenn der Authentifizierungsvorgang nach ungefähr
1
10 Sekunden abgeschlossen wurde.
Vorsicht:
l
Eingehende Anrufe unterbrechen die Wiedergabe.
Ziehen Sie alle Zubehörteile aus dem iPod oder iPhone,
l
Bei Annahme der Anrufe hören Sie das Gespräch nur über
2
bevor Sie diesen in das Dock stecken.
den eingebauteniPhone-Lautsprecher. Schalten Sie den
iPhone-Lautsprecher ein oder trennen Siedas iPhone, um
3
das Gespräch zu beginnen.
4
Entfernen Sie einfach das iPod oder das iPhone von der
Andockstation oder das iPad vom USB-Anschluss. Dies ist auch
5
während der Wiedergabe sicher.
6
7
8
9
De-11
11/5/25 X-HM10_20_De.fm
iPhone
iPhone (Unterseite)
Dockanschluss
Adapter für das iPhone
Anschlussstecker
für das iPhone
Dock für das iPhone
n Entfernen des Adapters für das iPod oder
das iPhone (Andock-Station)
Stecken Sie die Spitze eines
Schraubenziehers (kleiner
Schlitzschraubenzieher „–“) wie gezeigt
in die Öffnung im Adapter und heben
Sie ihn an, um ihn zu entfernen.
n iPod- oder iPhone-Wiedergabe
(Andock-Station)
1
Zum Einschalten der Stromversorgung die STANDBY/ON-
Taste drücken.
2
Drücken Sie die iPod/iPhone-Taste auf der Fernbedienung
oder wiederholt die INPUT-Taste am Hauptgerät, um die
iPod-Funktion zu wählen.
3
Stecken Sie das iPod oder iPhone in die iPod-
Dockingstation am Hauptgerät.
4
Drücken Sie die / (iPod/iPhone / )-Taste, um mit der
Wiedergabe zu beginnen.
STANDBY/ON
INPUT
STANDBY/ON
PRESET
ENTER
iPod/iPhone
PRESET
DISPLAY
MENU
USB
iPod/
TV OUT
iPhone
DISPLAY
CD/USB
n iPhone-Wiedergabe
n iPod, iPhone oder iPad trennen

Anhören von iPod, iPhone oder iPad
(nur X-HM20) (Fortsetzung)
n Videos vom iPod oder iPhone
n Verschiedene iPod-, iPhone- und iPad-
wiedergeben
Funktionen
Funktion
Hauptgerät
Fernbedienung
Betrieb
1
Drücken Sie mindestens 2 Sekunden auf die DISPLAY TV
OUT-Taste. „TV Display“ erscheint auf der Anzeige.
Dock USB
2
Drücken Sie die ENTER-Taste, um mit der Wiedergabe zu
Wiedergabe
iPod/
CD/USB
Drücken im
beginnen.
iPhone
Pausebetrieb.
Hinweise:
l
Wenn im Video-Menü die Einstellung TV-Ausgang aktiviert
ist, wird das Video automatisch auf dem Fernsehschirm
angezeigt, wenn die ENTER-Taste gedrückt wird.
Pause
iPod/
CD/USB
Drücken während
l
Vom USB-Anschluss wird die TV-out-Anzeige nicht
iPhone
der Wiedergabe.
unterstützt. (iPad)
l
Drücken Sie die MENU-Taste, um das Video-Menü
aufzurufen und das Video erneut auf dem iPod- oder iPhone-
Bildschirm anzuzeigen. Drücken Sie dann mindestens
Nächste/
Drücken Sie hierauf
2 Sekunden auf die DISPLAY TV OUT-Taste bis „iPod
vorige
im Abspiel- oder
TUNING −
TUNING +
TUNING −
TUNING +
Pausebetrieb.
Display“ erscheint.
Nummer
Wenn Sie im
l
Während der iPod-Videowiedergabe wird durch das Dürcken
Pausebetrieb auf
der DISPLAY TV OUT-Taste nicht zwischen der Anzeige auf
die Taste drücken,
dem iPod und dem Fernseher gewechselt.
müssen Sie auf die
/-Taste
Vorsicht:
drücken, um die
l
Ziehen Sie allen Zubehörteile aus dem iPod oder iPhone,
gewünschte
bevor Sie diesen in das iPod-Dock stecken.
Nummer zu starten.
l Während der iPod-Funktion ist die Stopp- Taste ( ) an
der Haupteinheit ungültig.
Schneller
In der Wiedergabe-
Vorlauf/
Betriebsart
n Navigieren in den iPod-, iPhone- oder iPad-
TUNING −
TUNING +
TUNING −
TUNING +
gedrückt halten.
Rücklauf
Menüs
Lösen Sie die
Taste, um die
1
Drücken Sie die Menü-Taste des iPods/iPhones/iPads, um
Wiedergabe
das Menü auf der iPod-, der iPhone- oder der iPad-Einheit zu
fortzusetzen.
sehen. Drücken Sie die Taste erneut, um zum vorherigen
Anzeige
____
iPod/
____
Mehr als
Menü zurückzukehren.
iPhone
2 Sekunden lang
drücken, um die
2
Benutzen Sie die PRESET (
oder
)-Taste, um zur
Video-out-Anzeige
gewünschten Stelle im Menü zu gelangen und drücken Sie
zwischen iPod und
dann die ENTER-Taste.
TV umzuschalten.
Hinweis:
Wiederholung
____
Drücken, um zum
REPEAT
Benutzen Sie keine Taste am iPod, iPhone oder iPad selbst,
Wiederholungsbetrieb
wenn sie mithilfe der Fernbedienung durch die iPod oder iPhone-
zu schalten.
Menüs navigieren. Die Lautstärke wird durch drücken der VOL
(+ oder –) -Tasten am Hauptgerät oder auf der Fernbedienung
Abspielen in
____
Drücken
, um zum
Abspielen in
geregelt. Das Einstellen der Lautstärke auf der iPod-, der
willkürlicher
willkürlicher
iPhone- oder der iPad-Einheit hat keinen Effekt.
Reihenfolge
Reihenfolge
umzuschalten.
Betrieb von iPod und iPhone:
Die nachfolgend beschriebenen Funktionen hängen davon ab,
iPod-
____
iPod/
iPod/
Drücken, um
welche Generation iPod und iPhone Sie benutzen.
Menü
iPhone
iPhone
während der iPod-
Funktion das iPod-
System in Betrieb:
Menü aufzurufen.
Wenn die Haupteinheit eingeschaltet ist, wird die iPod-, die
iPhone- oder die iPad-Einheit eingeschaltet, wenn sie in der
iPod
____
Taste drücken, um
Einheit angedockt ist.
Eingabe
die Auswahl zu
bestätigen.
System ausgeschaltet (Bereitschaftsbetrieb):
Wenn die Haupteinheit in den Standby-Modus geschaltet wird,
iPod-
____
Antippen, um das
werden das angedockte iPod oder iPhone oder die
Cursor
iPod-Menü zu
angeschlossene iPad-Einheit automatisch in den Standby-
öffnen.
Aufwärts/
Modus geschaltet.
Abwärts
De-12
11/5/25 X-HM10_20_De.fm
REPEAT
RANDOM
RANDOM
PRESET
PRESET
PRESET
PRESET
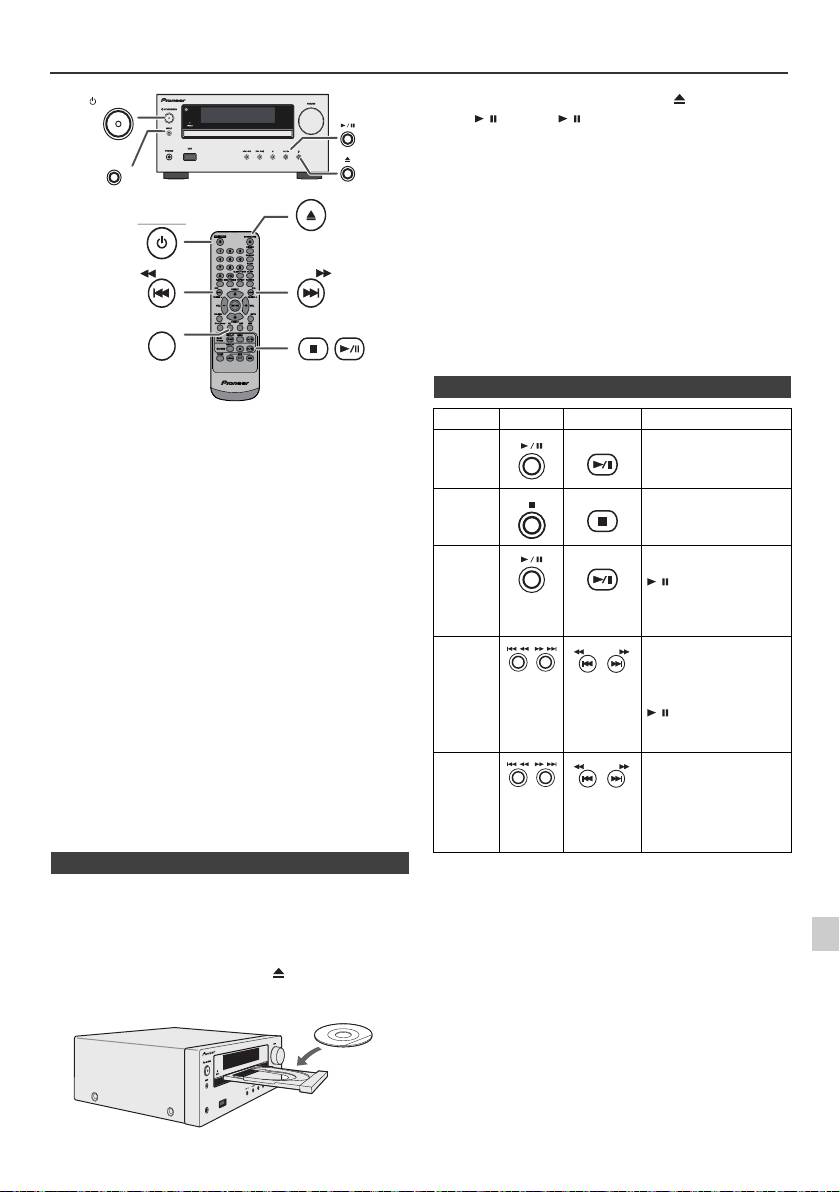
CDs oder MP3/WMA-Discs wiedergeben
STANDBY/ON
INPUT
Vorsicht:
OPEN/CLOSE
l
Legen Sie nicht zwei Discs in eine Disc-Schublade.
l
Spielen Sie keine Discs mit speziellen Formen (Herz oder
STANDBY/ON
Achteck) ab. Das kann zu Störungen führen.
l
Die Disc-Schublade nicht berühren, wenn sich diese bewegt.
l
Wenn bei offener Schublade ein Stromausfall eintritt, warten
Sie, bis die Stromversorgung wieder hergestellt wird.
l
Wenn Radio- oder Fernsehempfang durch den CD-Betrieb
gestört wird, das Gerät weiter entfernt vom Radio oder
Fernseher aufstellen.
TUNING −
TUNING +
l
8 cm-Discs unbedingt in die Mitte der Disc-Schublade legen.
CD
l
Aufgrund der Struktur seiner Disc-Information braucht es
länger zum Lesen einer MP3/WMA-Disc als bei einer
normalen CD (ungefähr 20 bis 90 Sekunden).
Diese Anlage kann Standard-CDs und -CD-R/RWs im CD-
Format sowie CD-R/RWs mit MP3- oder WMA-Dateien
wiedergeben, sie kann diese aber nicht bespielen. Einige
Audio-CD-Rs/CD-RWs können nicht abspielbar sein,
abhängend vom Zustand der zur Aufnahme verwendeten
Disc oder Vorrichtung.
MP3:
MP3 ist ein Kompressionsformat. Es ist eine Abkürzung für
MPEG Audio Layer 3. MP3 ist eine Art von Audiocode, der
durch erheblicher Datenreduzierung von der
ursprünglichen Tonquelle mit sehr geringem
Tonqualitätsverlust verarbeitet wird.
l
Dieses System unterstützt MPEG 1 Layer 3- und VBR-
Dateien.
l
Während der Wiedergabe einer VBR-Datei kann das
Zeitzählwerk im Display von ihrer tatsächlichen
Wiedergabezeit abweichen.
l
MP3 unterstützt Bitgeschwindigkeiten von 32 Kbps bis
320 Kbps.
WMA:
WMA-Dateien sind Advanced-System-Format-Dateien, die
Audiodateien enthalten, die mit dem Windows-Media-
Player-Codec komprimiert wurden. WMAs wurden von
Microsoft als Audioformatdateien für den Windows Media
Player entwickelt.
l
Die Anzeige „MP3“ und „WMA“ wird aufleuchten, nachdem
das Gerät Daten von einer MP3- bzw. einer WMA-Disc
gelesen hat.
l
WMA unterstützt Bitgeschwindigkeiten von 64 Kbps bis
1
160 Kbps.
n CD/-Wiedergabe
2
1
Zum Einschalten der Stromversorgung die STANDBY/ON-
Taste drücken.
3
2
Drücken Sie die CD-Taste auf der Fernbedienung oder
wiederholt die INPUT-Taste am Hauptgerät, um die CD-
4
Funktion zu wählen.
3
Zum Öffnen der Disc-Schublade die -Taste drücken.
5
4
Die Disc mit der Etikettenseite nach oben weisend auf die
Disc-Schublade legen.
6
7
8
9
De-13
11/5/25 X-HM10_20_De.fm
USB
PHONES
5
Zum Schließen der Disc-Schublade die -Taste drücken.
6
Die
/
(CD/USB
/
) -Taste drücken, um mit der
Wiedergabe zu begin- nen. Ist der letzte Track abgespielt,
stoppt das Gerät automatisch.
n Verschiedene Disc-Funktionen
Funktion
Hauptgerät
Fernbedienung
Betrieb
Wiedergabe
CD/USB
In der Stopp-Betriebsart
drücken.
Stopp
CD/USB
Drücken während der
Wiedergabe.
Pause
CD/USB
Drücken während der
Wiedergabe. Die Taste
/ drücken, um die
Wiedergabe ab der
unterbrochenen Stelle
fortzusetzen.
Nächste/
In der Wiedergabe- oder
vorige
Stopp-Betriebsart
TUNING −
TUNING +
drücken. Wenn Sie die
Nummer
Taste im Stopp-Modus
drücken, drücken Sie die
/ -Taste, um den
gewünschten Track zu
starten.
Schneller
In der Wiedergabe-
Vorlauf/
Betriebsart gedrückt
halten.
Rücklauf
Lösen Sie die Taste, um
die Wiedergabe
fortzusetzen.
TUNING −
TUNING +
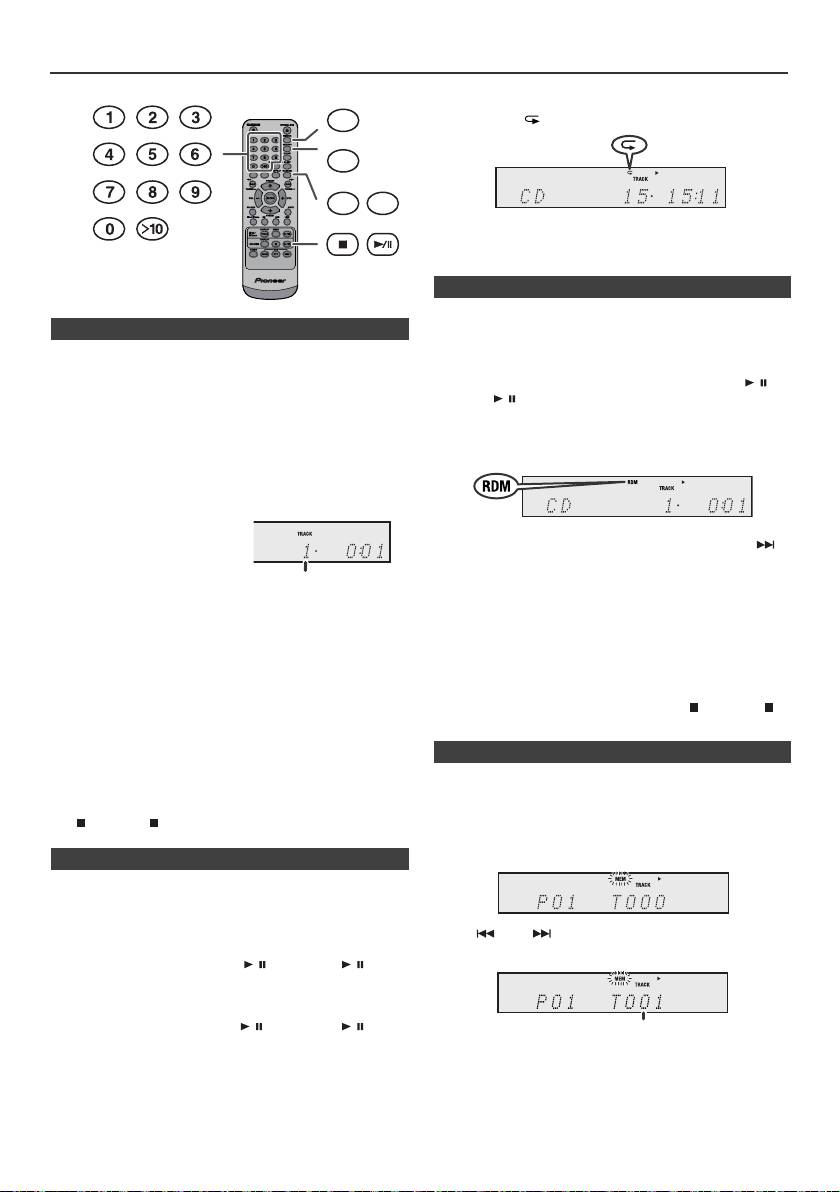
Weitere Wiedergabe von CDs oder MP3/WMA-Discs
Beenden der wiederholten Wiedergabe:
DIMMER
Drücken Sie wiederholt die REPEAT-Taste, bis „Normal“
erscheint und „ “ verschwindet.
MEMORY
REPEAT
RANDOM
Hinweise:
W
ä
hrend der wiederholten Wiedergabe ist eine
Zufallswiedergabe nicht m
ö
glich.
Die Tracks einer Disc können automatisch in der
n Direkter Titel-Suchlauf
Zufallswiedergabe abgespielt werden.
Zufallswiedergabe aller Titel:
Die gewünschten Tracks auf der momentan eingelegten Disc
Drücken Sie die RANDOM-Taste auf der Fernbedienung und
können durch Verwendung der Zifferntasten abgespielt
halten Sie sie gedrückt, bis „Random“ erscheint. Die /
werden.
(CD/USB / )-Taste drücken.
Verwenden Sie die Zifferntasten auf der Fernbedienung
zur Wahl des gewünschten Tracks, während die
Beenden der Zufallswiedergabe:
gewählte Disc abgespielt wird.
Drücken Sie die RANDOM-Taste, bis die „RDM“-Anzeige
l
Die Zifferntasten ermöglichen Ihnen die Wahl bis zur
erlischt.
Nummer 9.
l
Beim Wählen der Nummer 10 oder darüber ist die „>10“-
Taste zu verwenden.
A. Zum Beispiel Wahl von 13
Hinweise:
1
Die „>10“-Taste einmal
l
Drückt man während der Zufallswiedergabe die -
drücken.
Taste, können Sie bei der Zufallswiedergabe zum
2
Die „1“-Taste drücken.
nächsten Track springen. Die taste ermöglicht Ihnen
jedoch nicht, zum vorherigen Titel zurückzukehren. Der
3
Die „3“-Taste drücken.
Anfang des laufenden Titels wird gefunden.
l
Bei der Zufallswiedergabe wählt und spielt das Gerät
B. Zum Beispiel Wahl von 130
automatisch Titel. (Sie können die Titelfolge nicht
1
Die „>10“-Taste zweimal drücken.
auswählen.)
l
Während der Zufallswiedergabe ist eine wiederholte
2
Die „1“-Taste drücken.
Wiedergabe nicht möglich.
3
Die „3“-Taste drücken.
Vorsicht:
4
Die „0“-Taste drücken.
Drücken Sie nach einer Wiederholung die (CD/USB ) -
Taste. Sonst wird die Disc fortlaufend wiedergegeben.
Hinweise:
l
Es kann keine höhere Titelnummer als die Anzahl von
Titeln auf der Disc gewählt werden.
l
Während der Wiedergabe in zufälliger Reihenfolge ist das
Zur Wiedergabe können Sie bis zu 32 Titel in der
direkte Suchen nicht möglich.
gewünschten Reihenfolge wählen.
Beenden der Wiedergabe:
Die (CD/USB )-Taste drücken.
n Wiederholte Wiedergabe
Bei der wiederholten Wiedergabe können ein Titel, alle Titel
oder eine programmierte Reihenfolge fortlaufend abgespielt
werden.
Wiederholen eines Titels:
Drücken Sie wiederholt die Taste REPEAT, bis die Meldung
„Repeat One“ erscheint. Die / (CD/USB / )-Taste
drücken.
Wiederholen aller Titel:
Drücken Sie wiederholt die Taste REPEAT, bis die Meldung
„Repeat All“ erscheint. Die / (CD/USB / )-Taste
drücken.
Wiederholen von gewünschten Titeln:
Schritte 1 - 5 im Abschnitt „Programmierte Wiedergabe“
durchführen und dann die Taste REPEAT wiederholt
drücken, bis „Repeat All“ erscheint.
De-14
11/5/25 X-HM10_20_De.fm
Nummer des gewünschten
Tracks eingeben
n Zufallswiedergabe
n Programmierte Wiedergabe (CD)
1
In der Stopp-Betriebsart die MEMORY-Taste auf der
Fernbedienungdrücken, um in die
Programmspeicherungs-Betriebsart zuschalten.
2
Die oder -Taste auf der Fernbedienung drücken,
um den gewünschten Titel auszuwählen.
3
Die MEMORY-Taste drücken, um die Titelnummer zu
sichern.
Nummer des gewünschten Tracks eingeben
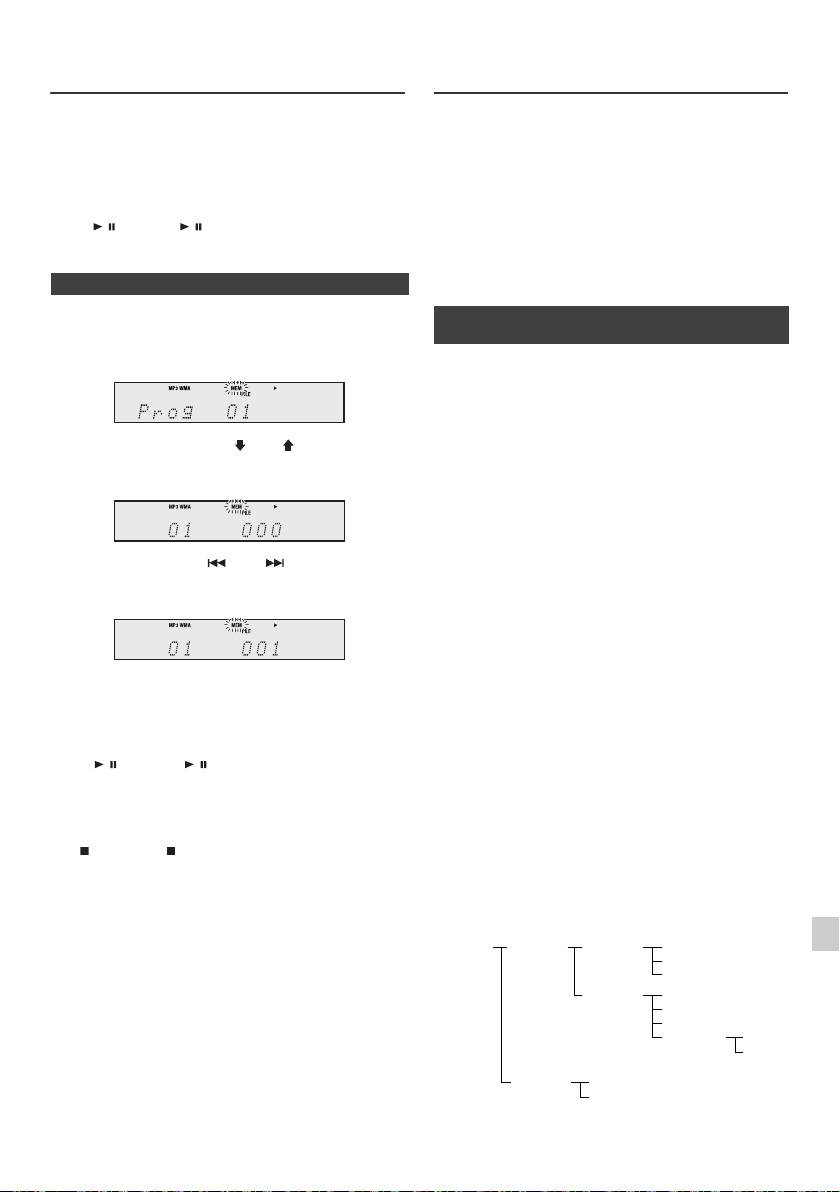
Weitere Wiedergabe von CDs oder
MP3/WMA-Ordnermodus (nur bei
MP3/WMA-Discs (Fortsetzung)
MP3/WMA-Dateien)
Wiedergabe von MP3/WMA-Dateien (Windows Media
4
Für weitere Titel die Schritte 2 - 3 wiederholen. Bis zu
Audio)
32 Titel können programmiert werden. Drücken Sie
Im Internet gibt es zahlreiche Musik-Seiten, von denen
wiederholt die MEMORY-Taste, um die eingespeicherten
man Musik-Dateien MP3/WMA (Windows Media Audio)
Titel zu überprüfen. Wenn Sie einen Fehler machen,
herunterladen kann. Befolgen Sie die Anweisungen auf
können die programmierten Titel durch Drücken der
der Website für das Herunterladen dieser Musikdateien.
CLEAR-Taste gelöscht werden.
Sie können diese heruntergeladenen Musikdateien durch
5
Die / (CD/USB / ) -Taste drücken, um mit der
Brennen einer CD-R/RW Disc abspielen.
Wiedergabe zu begin- nen.
l Die heruntergeladenen Song/Dateien sind nur für den
persönlichen Gebrauch bestimmt. Jedwede andere
Nutzung des Songs ohne Zustimmung des
n Programmierte Wiedergabe (MP3/WMA)
Eigentümers ist rechtswidrig.
n Informationen zur Ordner-
1
In der Stopp-Betriebsart die MEMORY-Taste drücken,
Wiedergabereihenfolge
um in die Programmspeicherungs-Betriebsart zu
schalten.
Bei der Aufnahme von MP3/WMA-Dateien in mehreren
Ordnern wird für jeden Ordner automatisch eine
Ordnernummer vergeben.
Diese Ordner können mit Hilfe der FOLDER-Taste auf der
Fernbedienung ausgewählt werden. Ordner, in denen
2 Drücken Sie die PRESET
(
oder
)
-Taste auf der
keine Dateien mit unterstütztem Dateiformat vorhanden
Fernbedienung, um den gewünschten Ordner
sind, werden übersprungen, und der nächste Ordner wird
auszuwählen.
ausgewählt.
Beispiel: Einstellen der Ordnernummer, wenn Dateien im
MP3/WMA-Format wie nach folgender Abbildung
aufgezeichnet werden.
1
Der ROOT-Ordner ist als Ordner 1 festgelegt.
Drücken Sie dann die oder -Taste auf der
Fernbedienung, um die gewünschten Titel
2 Wie bei Ordnern im ROOT-Ordner (Ordner A und
auszuwählen.
Ordner B) wird der zuvor auf der Disc aufgenommene
Ordner als Ordner 2 und Ordner 3 festgelegt.
3 Wie bei Ordnern im Ordner A (Ordner C und Ordner D)
wird der zuvor auf der Disc aufgenommene Ordner als
Ordner 4 und Ordner 5 festgelegt.
3 Drücken Sie die MEMORY-Taste, um die Ordner- und
Titelnummer zu speichern.
4 Ordner E in Ordner D existiert, wird als Ordner 6
festgelegt.
4 Für weitere Ordner/Titel die Schritte 2 – 3 wiederholen.
Bis zu 32 Titel können programmiert werden.
l Die Informationen zu Ordner- und Dateireihenfolge
sind von der Aufzeichnungssoftware abhängig. Es
5 Die / (CD/USB / ) -Taste drücken, um mit der
kann vorkommen, dass das Gerät die Dateien nicht in
Wiedergabe zu begin- nen.
der erwarteten Reihenfolge abspielt.
l Bei CD MP3/WMA können 99 Verzeichnisse und 999
Abbrechen der programmierten Wiedergabe:
Dateien einschließlich der Verzeichnisse, die keine
1
abspielbaren Dateien enthalten, gelesen werden.
Drücken Sie während des programmierten Stopp-Modus
die (CD/USB )-Taste. Auf der Anzeige erscheint
Der Ordnermodus kann mit der FOLDER-Taste auf der
„Memory Clear“ und alle programmierten Inhalte werden
2
Fernbedienung ein-/ausgeschaltet werden. Die bei
gelöscht.
eingeschaltetem Ordnermodus wiedergegebenen
Dateien sind andere als bei ausgeschaltetem
3
Hinzufügen von Titeln zum Programm:
Ordnermodus.
Wenn ein Programm früher abgespeichert worden ist, wird
die „MEM“-Anzeige angezeigt. Drücken Sie die Taste
4
MEMORY. Dann folgen die Schritte 2 – 3, um Tracks
hinzuzufügen.
5
Hinweise:
l Wenn eine Disc herausgenommen wird, wird das
6
Programm automatisch annulliert.
l Wenn Sie die STANDBY/ON-Taste drücken, um in die
7
Bereitschafts-Betriebsart zu schalten oder um von CD
auf eine andere Funktion umzuschalten, werden die
programmierten Titel gelöscht.
8
l Während der Programm-Operation ist
Zufallswiedergabe nicht möglich.
9
De-15
11/5/25 X-HM10_20_De.fm
ROOT
FOLDER A
FOLDER C
FILE 3
(FOLDER 1)
(FOLDER 2)
(FOLDER 4)
FILE 4
FILE 5
FOLDER D
FILE 6
(FOLDER 5)
FILE 7
FILE 8
FOLDER E
FILE 9
(FOLDER 6)
FILE 10
FOLDER B
FILE 1
(FOLDER 3)
FILE 2

MP3/WMA-Ordnermodus (nur bei
Hören von USB-Massenspeicher
MP3/WMA-Dateien) (Fortsetzung)
MP3-Player
n Wiedergabe einer MP3/WMA-CD bei
eingeschaltetem Ordnermodus
Zur Wiedergabe einer CD-R/RW.
1
CD-Taste drücken und eine MP3/WMA-Disc laden.
Drücken Sie die FOLDER-Taste und die Disc-
Information wird angezeigt.
Hinweise:
l Dieses Produkt ist mit MTP- oder AAC-Dateisystemen
von USB- Massenspeichern oder MP3-Playern nicht
kompatibel.
l Es ist möglich, dass einige externe Speichermedien
von diesem System nicht unterstützt werden.
l Das Funktionieren von externen Speichermedien
(USB-Sticks, externe Festplatten usw.) wird nicht
garantiert.
2 Drücken Sie die PRESET
(
oder
)
-Taste, um den
gewünschten Wiedergabe-Ordner zu wählen.
(Ordnermodus eingeschaltet)
3 Gewünschte, wiederzugebende Datei durch Drücken
der oder -Taste auswählen.
4 Die / (CD/USB / )-Taste drücken. Die Wiedergabe
beginnt und der Dateiname wird angezeigt.
l Wenn auf der Disc aufgenommen, werden Titel,
Künstler und Album-Name angezeigt.
l Drücken sie bei der Wiedergabe mit aktiviertem
Folder-Modus die Taste PRESET
(
oder
)
, und
der Folder kann gewählt werden, auch wenn er sich
im Wiedergabe-/Anhalte-Modus befindet. Im ersten
Track des gewählten Folders wird der Wiedergabe-/
Anhalte-Modus fortgesetzt.
l Der Anzeigeinhalt kann durch Drücken der CD/USB
DISPLAY-Taste geändert werden.
Hinweis:
Unterbrechen der Wiedergabe (Pause):
Die / (CD/USB / )-Taste drücken.
Hinweis:
Die Anzeige „Not Support“ bedeutet, dass eine
„Copyright-geschützt WMA-Date“ oder eine „Nicht
unterstützte Wiedergabedatei“ ausgewählt wurde.
De-16
11/5/25 X-HM10_20_De.fm
TUNING −
TUNING +
PRESET
CD
FOLDER
PRESET
DISPLAY
CD/USB
MP3-Anzeige
WMA-Anzeige
TOTAL-Anzeige
Gesamtzahl von Ordner
Gesamtanzahl der Dateien
Ordneranzeige
Ordnernummer
Erste Titelnummer
im Ordner
Anzeige Dateiname Ordneranzeige
Zählwerk
Anzeigetitel
Anzeige Album
Anzeige Künstler
n Wiedergabe vom USB-/MP3-Player mit
deaktiviertem Ordner-Modus
1
Die USB-Taste auf der Fernbedienung oder die INPUT-
Taste auf der Haupteinheit wiederholt drücken, um die
USB-Funktion auszuwählen. Das USB-Speichergerät
mit den gespeicherten Dateien im MP3/WMA-Format
mit dem Gerät verbinden. Wenn der USB-Speicher mit
dem Hauptgerät verbunden ist, werden die
Geräteinformationen angezeigt.
2 Gewünschte, wiederzugebende Datei durch Drücken
der oder -Taste auswählen.
3 Die / (CD/USB / )-Taste drücken. Die
Wiedergabe beginnt und der Dateiname wird angezeigt.
l Der Name des Titels, des Künstlers und des Albums
wird angezeigt, sofern diese Informationen auf dem
USB-Speichergerät gespeichert sind.
l Der Anzeigeinhalt kann durch Drücken der CD/USB
DISPLAY-Taste geändert werden.
INPUT
USB
TUNING −
TUNING +
PRESET
USB
FOLDER
PRESET
DISPLAY
CD/USB
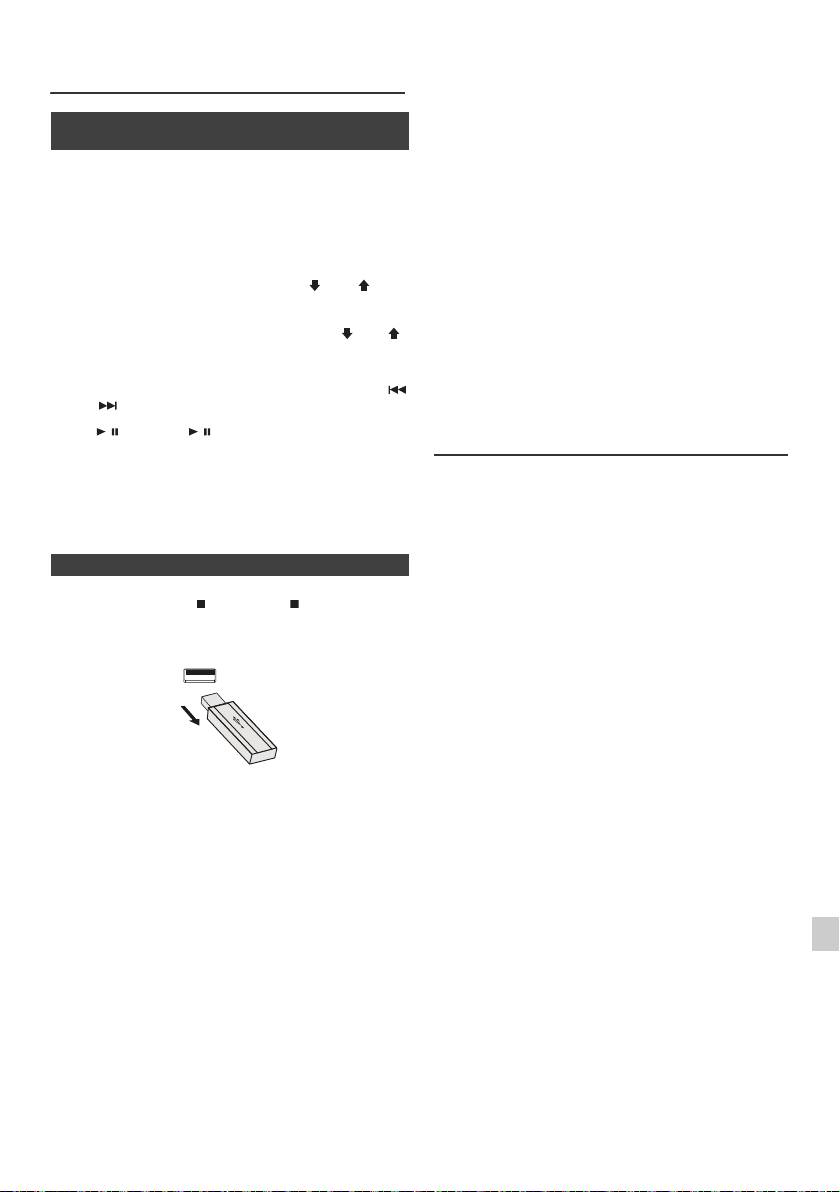
l Dieses Produkt kann WMA und MP3 Dateien
Hören von USB-Massenspeicher
wiedergeben. Es wird automatisch den
MP3-Player (Fortsetzung)
wiederzugebenden Dateityp erkennen. Falls eine nicht
wiederzugebende Datei auf diesem Gerät
wiedergegeben wird, wird „Not Support“ angezeigt und
n Wiedergabe vom USB-/MP3-Player mit
die Datei wird automatisch übersprungen. Dies dauert
aktiviertem Ordner-Modus
einige Sekunden. Falls, wegen der nicht spezifizierten
Datei eine ungewöhnliche Anzeige im Display
1
Die USB-Taste auf der Fernbedienung oder die INPUT-Taste
erscheint, schalten Sie das Gerät aus und
auf der Haupteinheit wiederholt drücken, um die USB-
anschließend wieder an.
Funktion auszuwählen. Das USB-Speichergerät mit den
l Dieses Produkt versteht USB-Massenspeichergeräte
gespeicherten Dateien im MP3/WMA-Format mit dem Gerät
und MP3-Player. Manchmal kann es aber zu
verbinden. Wenn der USB-Speicher mit dem Hauptgerät
Unregelmäßigkeiten kommen, wenn unerwartete
verbunden ist, werden die Geräteinformationen angezeigt.
Probleme an einigen Geräten auftreten. Sollte dies
vorkommen, schalten Sie das Gerät aus und
2
FOLDER-Taste drücken. Dann PRESET ( oder )-Taste
anschließend wieder an.
drücken, um den gewünschten Wiedergabeordner zu wählen.
l Die USB-Schnittstelle ist nur zur direkten Verbindung
Zur Wiedergabe im Ordnermodus mit Schritt 4 fortfahren. Zum
an ein USB-Speichermedium ohne Kabel gedacht.
Wechseln des Wiedergabeordner die PRESET ( oder )-
l Während der CD-Funktion wird der MP3-Player nicht
Taste drücken, um einen anderen Wiedergabeordner zu
geladen.
wählen.
l „Not Support“ wird angezeigt, wenn Sie bei gewählter
3
Gewünschte, wiederzugebende Datei durch Drücken der
USB-Funktion einen iPod an einen USB-Anschluss
oder -Taste auswählen.
anschließen.
4
Die / (CD/USB / )-Taste drücken. Die Wiedergabe
Fortgeschrittene USB-Wiedergabe
beginnt und der Dateiname wird angezeigt.
l
Der Name des Titels, des Künstlers und des Albums wird
Die folgenden Funktionen sind die gleichen wie für CDs:
angezeigt, sofern diese Informationen auf dem USB-
Speichergerät gespeichert sind.
Seite
Direkter Titel-Suchlauf . . . . . . . . . . . . . . . . . . . . . . . .14
l
Der Anzeigeinhalt kann durch Drücken der
CD/USB
Wiederholung . . . . . . . . . . . . . . . . . . . . . . . . . . . . . . .14
DISPLAY
-Taste geändert werden.
Zufallswiedergabe . . . . . . . . . . . . . . . . . . . . . . . . . . .14
Programmierte Wiedergabe (MP3/WMA) . . . . . . . . .15
n Entfernen der USB-Speicher
Hinweise:
l Ist kein USB-Speicher angeschlossen, so erscheint in
1
Drücken Sie die (CD/USB )-Taste, um die
der Anzeige „USB No Media“.
Wiedergabe zu stoppen.
l Dieser Gerät unterstützt nur das Format „MPEG-1
Audio Layer-3“. (Samplefrequenz fs ist 32 kHz,
2 USB-Speichergerät vom USB-Anschluß trennen.
44,1 kHz, 48 kHz)
l Die Playbackreihenfolge für MP3-Dateien kann je nach
beim Herunterladen verwendeter Software variieren.
l Die von MP3 unterstützte Bitrate beträgt 32 Kbps bis
320 Kbps, WMA ist 64 Kbps bis 160 Kbps.
l Für MP3/WMA-Dateien bitte die Dateierweiterung
„.MP3“ bzw. „.WMA“ verwenden. Dateien können nicht
wiedergegeben, wenn die Dateierweiterung nicht MP3/
WMA ist.
l Wiedergabelisten werden von diesem Gerät nicht
Hinweise:
unterstützt.
l
PIONEER ist nicht für den Verlust von Daten während
l Dieses Gerät kann Ordnernamen oder Dateiname von
des Anschlusses des USB-Speichergeräts an das
bis zu 32 Zeichen anzeigen.
1
Audiosystem verantwortlich.
l Die maximale Anzahl an MP3/WMA-Dateien beträgt
l
In MP3 und/oder WMA-Formaat komprimierte Dateien
999.
können abgespielt werden, wenn das Gerät am USB-
2
Ausgang angeschlossen ist.
l Die Gesamtzahl von gelesenen Verzeichnissen ist 99
einschließlich von Verzeichnissen mit nicht
l
Das Format dieses USB-Speichers unterstützt FAT 16
abspielbaren Dateien. Das Display zeigt jedoch nur
3
oder FAT 32.
Verzeichnisse mit MP3-Dateien.
l
PIONEER kann nicht gewährleisten, dass alle USB-
Speichergeräte mit diesem Audiosystem funktionieren.
l Bei der Wiedergabe einer Datei mit variabler Bitrate
4
wird die Wiedergabezeit möglicherweise nicht korrekt
l
Das USB-Kabel ist nicht für dieses Audio-System, da es
angezeigt.
am USB-Speichergerät angeschlossen ist. Die
Verwendung des USB-Kabels wird die Aktivität des
l TITLE, ARTIST und ALBUM sind die einzigen
5
Audio-Systems beeinflussen.
unterstützten ID3TAG Informationen. Der Name des
l
Dieser USB-Speicher kann nicht über USB-Hub
Titels, Künstlers und des Albums können während der
6
betrieben werden.
Wiedergabe der Datei oder im Pausenmodus durch
Drücken der DISPLAY-Taste angezeigt werden.
l
Der USB-Anschluß dieses Geräts ist nicht für eine PC-
Verbindung sondern für Musikstreaming mit einem
l WMA-Meta-Tag unterstützt auch Titel-, Künstler- und
7
USB-Speichergerät vorgesehen.
Albumnamen, die in WMA-Dateien gespeichert sind.
l
Externer HDD Speicher kann nicht über den USB-
Durch Copyright geschützt WMA-Dateien können nicht
Anschluß dieses Geräts wiedergegeben werden.
wiedergegeben werden.
8
l
Bei hohem Datenvolumen im USB-Speicher kann das
Lesen der Daten länger dauern.
9
De-17
11/5/25 X-HM10_20_De.fm
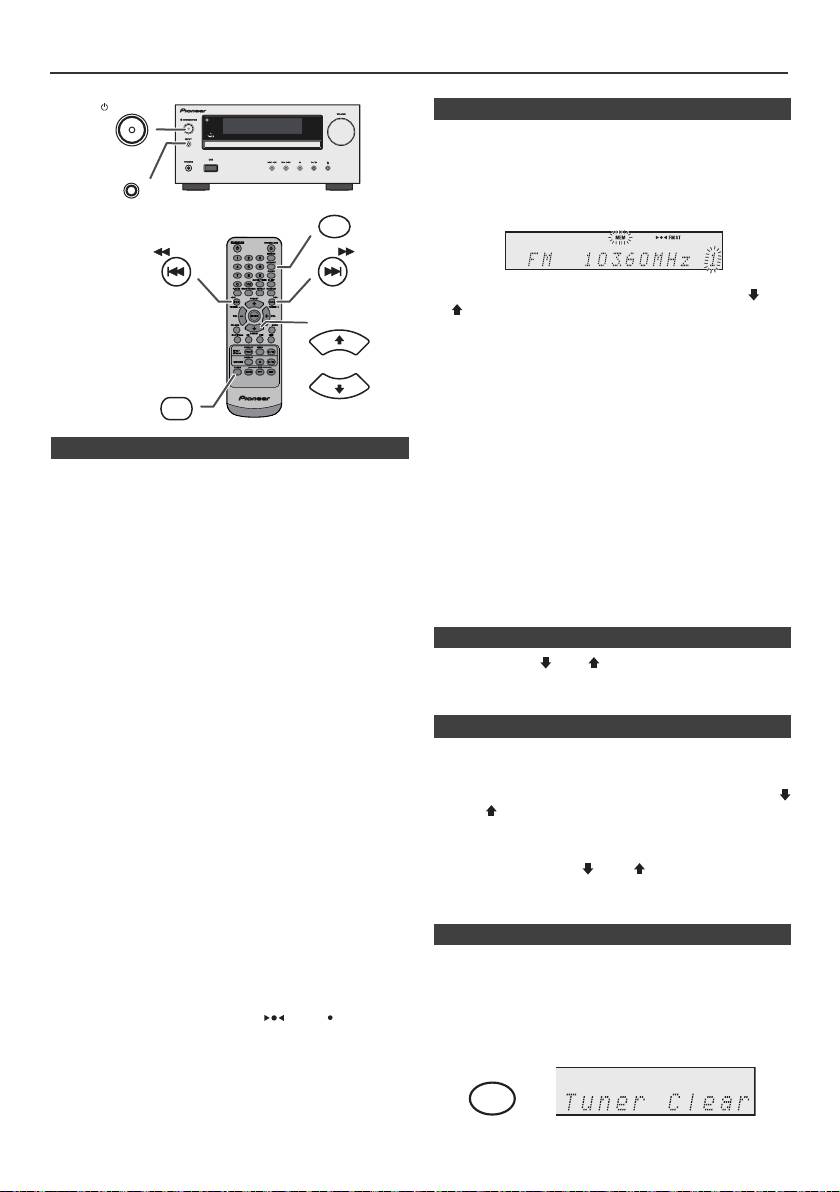
Rundfunkempfang
STANDBY/ON
n Abspeichern eines Senders
Sie können 40 MW- und UKW-Sender abspeichern und
per Tastendruck abrufen. (Vorabstimmung)
INPUT
1
Führen Sie die Schritte 1 - 3 unter „Abstimmung“ durch.
2 Die MEMORY-Taste drücken.
MEMORY
TUNING −
TUNING +
3 Innerhalb von 30 Sekunden die Taste PRESET
(
oder
)
drücken, um die Vorwahlkanalnummer anzuwählen.
PRESET
Die Sender einspeichern, und dabei der Reihe nach mit
dem Vorwahlkanal 1 beginnen.
4 Innerhalb von 30 Sekunden die MEMORY-Taste
drücken, um den Sender abzuspeichern. Wenn vor dem
TUNER
Speichern des Senders die „MEMORY“- und
PRESET
Festsendernummernanzeigen erlöschen, die mit dem
Schritt 2 beginnende Bedienung wiederholen.
n Abstimmung
5 Die Schritte 1 - 4 wiederholen, um andere Sender zu
speichern oder einen Festsender zu ändern. Wenn ein
neuer Sender gespeichert wird, wird der Sender
1
Zum Einschalten der Stromversorgung die STANDBY/
gelöscht, der vorher für diesen voreingestellten Kanal
ON-Taste drücken.
gespeichert wurde.
2 Die TUNER-Taste wiederholt drücken, um das
gewünschte Frequenzband (FM oder AM)
Hinweis:
auszuwählen.
Die Speicherschutzfunktion sorgt dafür, dass im Falle
eines Stromausfalls oder wenn die Stromzufuhr
3 Die TUNING + oder - -Taste auf der Fernbedienung
unterbrochen wird, die gespeicherten Sender für einige
drücken, um den gewünschten Sender einzustellen.
Stunden erhalten bleiben.
l Manuelle Abstimmung:
Drücken Sie wiederholt die TUNING + oder - -Taste,
n Abrufen eines gespeicherten Senders
um den gewünschten Sender einzustellen.
1 Die PRESET
(
oder
)
-Taste weniger als
l Abstimmautomatik:
0,5 Sekunden drücken, um den gewünschten Sender
Wenn die TUNING + oder - -Taste mehr als
zu wählen.
0,5 Sekunden gedrückt wird, startet der
Sendersuchlauf automatisch, und der Tuner stoppt
n Festsender-Suchlauf
am zuerst empfangbaren Rundfunksender.
Die abgespeicherten Sender können automatisch
Hinweise:
abgetastet werden. (Festsenderspeicher-Suchlauf)
l Wenn Rundfunkstörung auftritt, kann der
Sendersuchlauf im selben Augenblick automatisch
1
Drücken sie länger als 0,5 Sekunden die PRESET
(
stoppen.
oder
)
-Taste. Die Festsendernummer blinkt und die
l Der Sendersuchlauf überspringt Sender von
programmierten Sender werden nacheinander folgend
schwachem Signal.
je 5 Sekunden lang empfangen.
l Zum Stoppen der Abstimmautomatik die TUNING
+
oder - -Taste noch einmal drücken.
2 Die Taste PRESET
(
oder
)
noch einmal drücken,
l Wenn ein RDS (Radio-Daten-System)-Sender
wenn der gewünschte Sender gefunden wird.
eingestellt wird, wird die Frequenz zuerst angezeigt,
und dann leuchtet die RDS-Anzeige. Danach erscheint
der Sendername.
n Löschen aller gespeicherten Sender
l Für mit „ASPM“ gespeicherte RDS-Sender kann
vollautomatische Abstimmung erzielt werden (siehe
Seite 19).
1
Drücken Sie die TUNER-Taste auf der Fernbedienung
Empfangen einer UKW-Stereosendung:
oder wiederholt die INPUT-Taste auf der Haupteinheit,
l Drücken Sie die TUNER-Taste und wählen Sie Stereo.
um die Tuner-Funktion zu wählen.
In der Anzeige erscheint „ST“. „ “ und „ “ erscheint,
wenn eine UKW-Sendung in Stereo ist.
2 Drücken Sie in der Tuner-Funktion die CLEAR-Taste,
bis „Tuner Clear“ erscheint.
l Bei schwachem UKW-Empfang die TUNER-Taste
drücken, so daß die „ST“-Anzeige erlischt. Der
Empfang schaltet auf Mono, und der Klang wird klarer.
De-18
11/5/25 X-HM10_20_De.fm
CLEAR
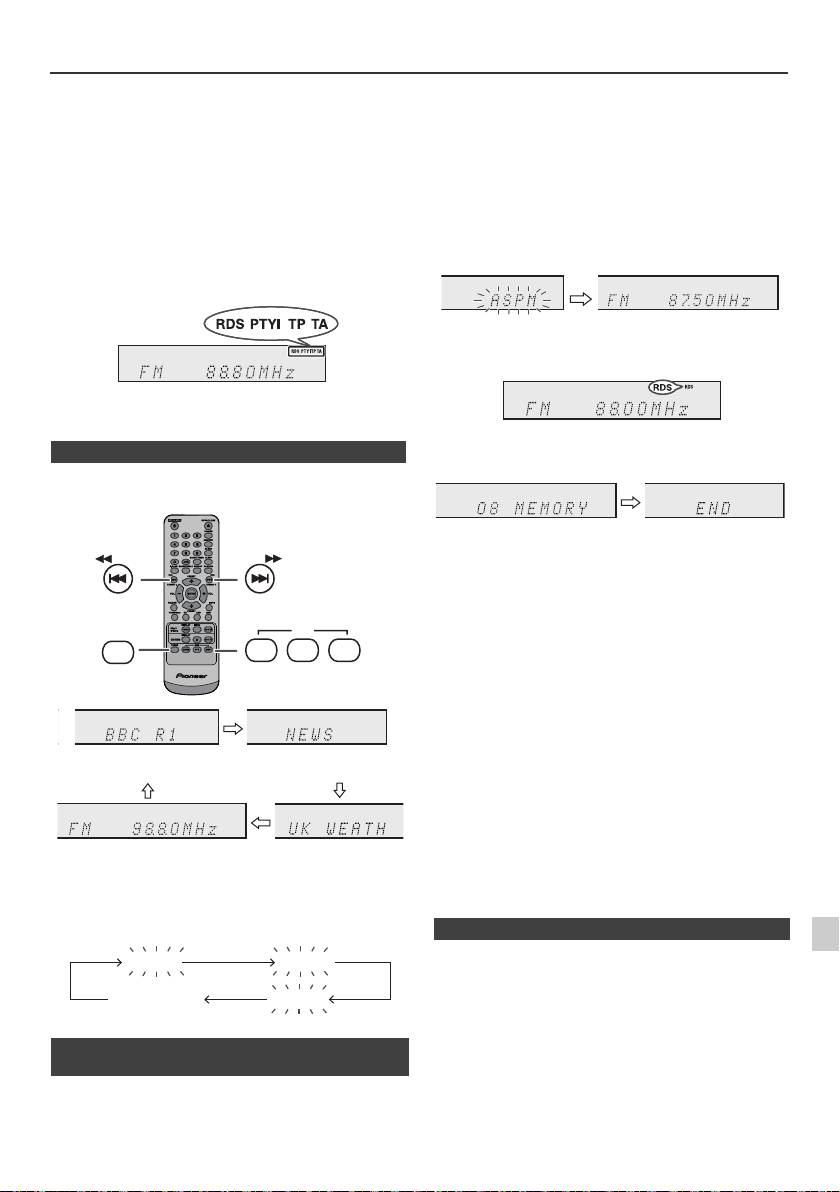
Benutzen des Radio-Daten-Systems (RDS)
RDS ist ein Rundfunkdienst, der heute von einer
Wenn einige Sender bereits abgespeichert sind, verringert
zunehmenden Zahl von UKW-Sendern angeboten
sich die Zahl der speicherbaren neuen Sender
wird. Diese UKW-Sender senden neben ihren
entsprechend.
regulären Programmsignalen zusätzliche Signale. Sie
können ihren Sendernamen und Informationen über
die Programmart wie Sport, Musik usw. senden.
Wenn ein RDS-Sender eingestellt wird, werden „RDS“
und der Sendername angezeigt.
„TP“ (Verkehrsfunkkennung) erscheint auf dem Display,
wenn die empfangene Sendung die Verkehrsinformation
trägt; „TA“ (Verkehrsdurchsagekennung) erscheint,
während eine Verkehrsinformation auf Sendung ist.
Während des Empfangs des Dynamic-PTY-Senders
erscheint „PTYI“ (Dynamic-PTY-Anzeige).
Ein RDS-Sender kann mit Hilfe der Tasten auf der
Fernbedienung eingestellt werden.
n RDS-INFORMATIONEN
Bei jedem Druck auf die RDS DISPLAY-Taste ändert
sich das Display wie folgt:
Abbrechen des ASPM Betriebes, ehe er
abgeschlossen ist:
Drücken Sie während des Sendersuchlaufs die RDS
ASPM-Taste.
Die bereits abgespeicherten Sender bleiben im Speicher.
Hinweise:
l Wenn derselbe Sender auf verschiedenen
Frequenzen sendet, wird die stärkste Frequenz
abgespeichert.
l Jeder Sender, der die gleiche Frequenz hat wie ein
bereits gespeicherter, wird nicht noch einmal
gespeichert.
l Sind bereits 40 Sender abgespeichert, wird der
Suchlauf abgebrochen. Wenn Sie die ASPM-
Operation noch einmal durchführen möchten, müssen
Sie den Festsenderspeicher löschen.
l Wenn keine Sender abgespeichert worden sind,
erscheint „END“ etwa 4 Sekunden lang.
l Bei sehr schwachen RDS-Signalen können keine
Sendernamen abgespeichert werden.
1
l Derselbe Sendername kann in verschiedenen Kanälen
gespeichert werden.
2
Wenn Sie einen anderen Sender als einen RDS-Sender
l In einem gewissen Gebiet oder in gewissen
oder einen RDS-Sender, dessen Signal schwach ist,
Zeiträumen können die Sendernamen vorübergehend
einstellen, ändert sich das Display in folgender
verschieden sein.
3
Reihenfolge:
4
Wenn eines der folgenden Ereignisse eintritt,
bedeutet dies nicht, daß das Gerät defekt ist:
5
l „PS“, „No PS“ und ein Sendername erscheinen
abwechselnd, und das Gerät funktioniert nicht richtig.
l Wenn ein spezifischer Sender nicht richtig sendet oder
6
ein Sender Prüfungen durchführt, kann die RDS-
Empfangsfunktion nicht richtig arbeiten.
n Benutzen des automatischen
7
l Wenn ein RDS-Sender, dessen Signal zu schwach ist,
Senderspeichers (ASPM)
empfangen wird, können Informationen wie z.B. der
Sendername nicht angezeigt werden.
In der ASPM-Betriebsart sucht der Tuner automatisch
8
l „No PS“, „No PTY“ oder „No RT“ blinkt etwa
nach neuen RDS-Sendern. Bis zu 40 Sender können
5 Sekunden lang, und dann wird die Frequenz
gespeichert werden.
angezeigt.
9
De-19
11/5/25 X-HM10_20_De.fm
TUNING −
TUNING +
RDS
TUNER
ASPM PTY DISP
Sendername (PS) Programmart (PTY)
Frequenz Radiotext (RT)
No PS No PTY
FM 98.80 MHz
No RT
1 Drücken Sie die TUNER-Taste auf der Fernbedienung
oder wiederholt die INPUT-Taste am Hauptgerät, um
die TUNER-Funktion zu wählen.
2 Drücken Sie die RDS ASPM-Taste auf der
Fernbedienung.
1 „ASPM“ blinkt etwa 4 Sekunden lang, dann beginnt
der Suchlauf (87,50 - 108,00 MHz).
2 Wenn ein RDS-Sender gefunden wird, erscheint
„RDS“ eine kurze Weile, und der Sender wird
abgespeichert.
3 Nach Abschluß des Suchlaufs wird die Zahl der
abgespeicherten Sender 4 Sekunden lang angezeigt
und dann erscheint „END“ 4 Sekunden lang.
n Hinweise zum RDS-Betrieb
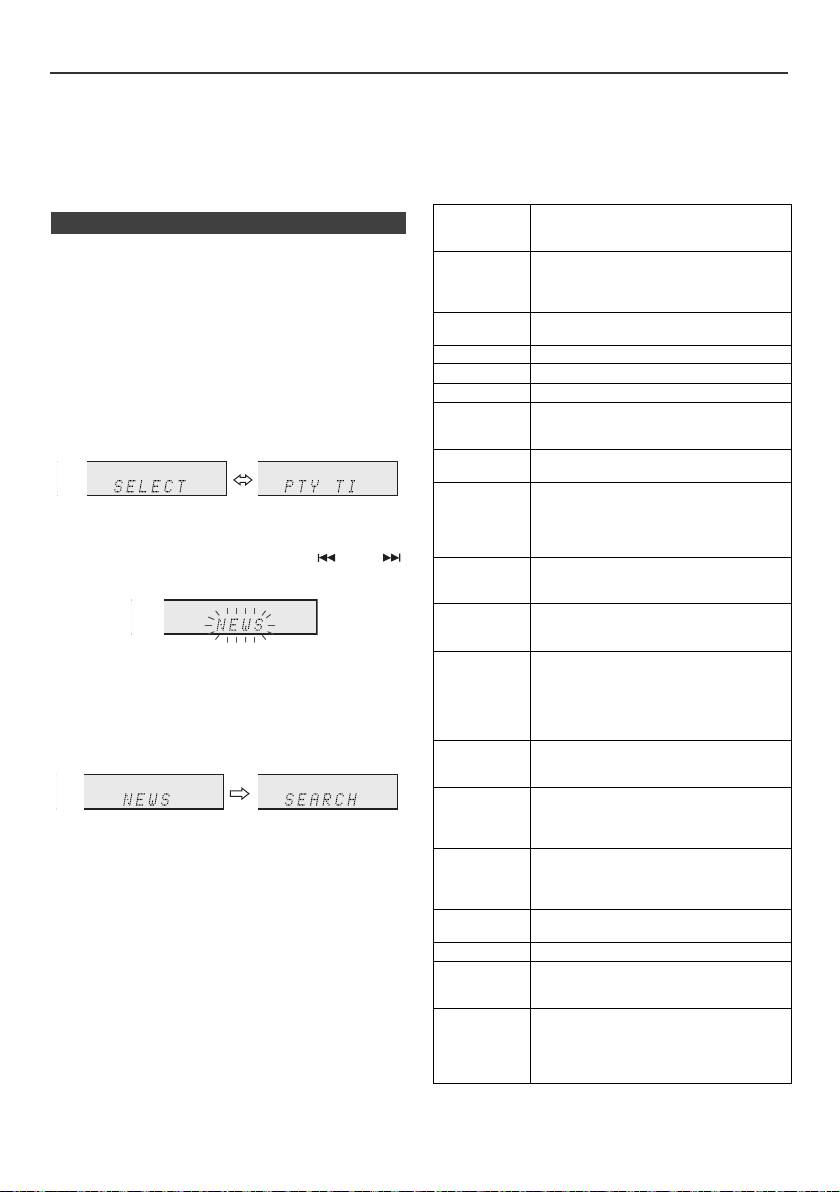
Benutzen des Radio-Daten-Systems (RDS) (Fortsetzung)
Hinweise zum Radiotext:
Wenn die Verkehrsinformation gesendet wird, erscheint
l Die ersten 14 Zeichen des Radiotextes erscheinen
„TA“.
4 Sekunden lang; danach rollen sie über das Display.
Beschreibungen der PTY (Programmartenkennung)-
l Wenn Sie einen RDS-Sender einstellen, der keinen
Codes, TP (Verkehrsfunkkennung) und TA
Radiotext sendet, wird beim Schalten in die Radiotext-
(Verkehrsdurchsagekennung)
Position „No RT“ angezeigt.
Sie können die folgenden PTY-, TP- und TA-Signale
l Während des Empfangs der Radiotext-Daten oder
suchen und empfangen.
beim Ändern des Textinhalts wird „RT“ angezeigt.
NEWS Kurze Beschreibungen über Fakten,
n Abrufen von abgespeicherten Sendern
Ereignisse und öffentlich ausgedrückte
Ansichten, Reportagen und Tatsachen.
Bestimmen von Programmarten und Wählen von
AFFAIRS Programm über aktuelle Nachrichten, im
Sendern (PTY-Suchlauf):
allgemeinen in verschiedener
Sie können einen Sender von den abgespeicherten
Behandlungsweise oder Konzeption,
Sendern suchen, indem Sie die Programmart
einschließlich Debatte oder Analyse.
(Nachrichten, Sport, Verkehrsfunk usw. ... siehe Seite 20)
INFO Beratungsprogramm (im weitesten
bestimmen.
Sinne).
SPORT Sportprogramm.
1
Drücken Sie die TUNER-Taste auf der Fernbedienung
oder wiederholt die INPUT-Taste am Hauptgerät, um
EDUCATE Bildungsprogramm (fundamental).
die TUNER-Funktion zu wählen.
DRAMA Alle Hörspiele und Serien.
CULTURE Kulturprogramme (national oder
2 Drücken Sie auf der Fernbedienung die RDS PTY-
regional, einschließlich Sprache, Theater
Tast e.
usw.)
SCIENCE Programme über Naturwissenschaft und
Technik.
VARIED Unterhaltungsprogramme, die von den
anderen Kategorien nicht abgedeckt
„SELECT“ und „PTY TI“ erscheinen etwa 6 Sekunden
werden. Beispiele: Quiz, Ratespiele,
lang abwechselnd.
Interviews mit bekannten
Persönlichkeiten.
3 Innerhalb von 6 Sekunden die Taste oder
POP M Populäre Musik, oft abhängend von den
drücken, um die Programmart auszuwählen.
gegenwärtigen oder letzten
Plattenverkaufslisten.
ROCK M Moderne Musik, normalerweise
geschrieben und aufgeführt von jungen
Musikern.
Bei jedem Tastendruck erscheint die Programmart.
EASY M Aktuelle Unterhaltungsmusik im
Wird die Taste länger als 0,5 Sekunden gedrückt
Gegensatz zu Pop, Rock oder Klassik
gehalten, erscheint die Programmart fortlaufend.
oder speziellen Musikrichtungen wie
Jazz oder Country. Die Musik dieser
4 Während die ausgewählte Programmart blinkt
Kategorie ist oft, aber nicht immer, vokal
(innerhalb von 6 Sekunden), die RDS PTY-Taste noch
und im Allgemeinen kurz.
einmal drücken.
LIGHT M Populäre, klassische Musik. Zum
Beispiel Instrumentalmusik und Vokal-
oder Chorwerke.
CLASSICS Aufführungen von hauptsächliche
Orchesterstücken, Sinfonien,
Kammermusik usw. einschließlich
Die gewählte Programmart leuchtet 2 Sekunden lang,
großer Oper.
dann erscheint „SEARCH“, und der Suchlauf beginnt.
OTHER M Musikstile, die keiner der anderen
Hinweise:
Kategorien zugeordnet werden können.
l Hat das Display zu blinken aufgehört, wiederholen Sie
Besonders spezielle Musikrichtungen
das Verfahren ab Schritt 2. Wird eine gewünschte
wie Rythm & Blues oder Reggae.
Programmart gefunden, blinkt die entsprechende
WEATHER Wetterberichte, -vorhersagen und -
Kanalnummer 8 Sekunden lang; danach leuchtet der
information.
Sendername ständig.
FINANCE Börsenberichte, Handel, Geschäft usw.
l Wenn Sie einen anderen Sender hören möchten, der
dieselbe Programmart ausstrahlt, die RDS PTY-Taste
CHILDREN Programme, die auf ein junges Publikum
drücken, während die Kanalnummer oder der
abgezielt sind (in erster Linie
Sendername blinkt. Das Gerät sucht dann nach einem
Unterhaltung und Interesse).
nächsten Sender.
SOCIAL Programme für Personen und über
l Wenn kein Sender gefunden werden kann, erscheint
Themen, die sie persönlich oder als
„NOT FOUND“ 4 Sekunden lang.
Gruppe betreffen: Zum Beispiel
Soziologie, Geschichte, Geographie,
Wenn Sie den Verkehrsfunk auswählen:
Psychologie und Gesellschaft.
Wenn Sie in Schritt 3 den Verkehrsfunk (TP) auswählen,
erscheint „TP“.
(Dies bedeutet nicht, daß Sie zu der Zeit die
Verkehrsinformation hören können.)
De-20
11/5/25 X-HM10_20_De.fm

Benutzen des Radio-Daten-Systems
Timer- und Sleep-Funktion (Nur
(RDS) (Fortsetzung)
Fernbedienung)
RELIGION Glauben einschließlich eines Gottes
oder Göttern, der Natur der Existenz
und Ethik.
PHONE IN Mitglieder der Öffentlichkeit, die ihre
Ansichten telefonisch oder im
öffentlichen Forum äußern.
TRAVEL Features und Programme über Reisen
in nahe und ferne Orte, Pauschalreisen
sowie Reiseideen und-gelegenheiten.
Nicht verwendet für Durchsagen über
Probleme, Verzögerungen oder
Straßenbauarbeiten, welche die
augenblickliche Reise beeinflussen, wo
TP/TA benutzt werden sollte.
Timer-Wiedergabe:
Das Gerät schaltet sich ein und gibt die gewünschte
LEISURE Programme über Freizeitaktivitäten, an
Quelle (CD, TUNER, USB, iPod, LINE IN) zur
denen der Hörer (die Hörerin)
voreingestellten Zeit wieder.
teilnehmen könnte. Zum Beispiel
Gartenarbeit, Fischen,
Das Gerät besitzt 2 Timer-Arten: ONCE TIMER und
Antiquitätensammlung, Kochen,
DAILY TIMER.
Nahrung & Wein usw.
Once-Timer:
JAZZ Polyphone, synkopierte Musik,
Die Once-Timer-Wiedergabe funktioniert nur einmal zu
charakterisiert durch Improvisation.
der voreingestellten Zeit.
COUNTRY Songs, die aus der musikalischen
(„ “-Anzeige).
Tradition der Südstaaten von Amerika
entstehen oder sie fortsetzen.
Daily-Timer:
Charakterisiert durch eine schlichte
Die tägliche Timer-Wiedergabe funktioniert täglich zu der
Melodie und narrative Handlung.
von uns voreingestellten Zeit. Den Timer einstellen, um
NATION M Gegenwärtige populäre Musik der
beispielsweise jeden Morgen aufzuwachen.
Nation oder des Gebiets in
(„DAILY“-Anzeige).
Muttersprache, im Gegensatz zu
internationalem „Pop“ in Englisch, der
Gemeinsame Verwendung des Once- und des Daily-
normalerweise von Amerika oder
Timers:
Großbritannien inspiriert ist.
Verwenden Sie z.B. den Once-Timer zum Aufnehmen
OLDIES Musik aus dem sogenannten „goldenen
eines Rundfunkprogramms und den Daily-Timer zum
Zeitalter“ populärer Musik.
Wecken.
FOLK M Musik, die der musikalischen Kultur
1 Den Daily-Timer einstellen (Seite 21).
einer besonderen Nation entspricht,
normalerweise gespielt auf akustischen
2 Stellen Sie den Einmal-Timer ein (Seite 21).
Instrumenten. Die Erzählung oder Story
kann sich auf geschichtliche Ereignisse
oder Leute stützen.
DOCUMENT Programme über sachliche
Angelegenheiten, präsentiert in einem
recherchierenden Stil.
1
TEST Sendung beim Prüfen von
Notsendegerät oder Empfängern.
2
ALARM Information über Naturkatastrophen.
3
TP Sendungen, in denen
Verkehrsdurchsagen gebracht werden.
4
TA Verkehrsdurchsagen sind auf Sendung.
5
6
7
8
9
De-21
11/5/25 X-HM10_20_De.fm
STANDBY/ON
CLOCK/TIMER
TUNING −
TUNING +
ENTER
1 Minute oder länger
Daily-Timer
Once-Timer
Start
Stopp
Start
Stopp
Timer- und Sleep-Funktion (Nur Fernbedienung) (Fortsetzung)
Once-Timer:
n Timer-Wiedergabe
Der Timer wird deaktiviert.
Vor dem Einstellen des Timers:
Daily-Timer:
l Prüfen, ob die Uhr richtig gestellt ist (siehe Seite 9).
Der Timer wird zur gleichen Zeit am Tag aktiv. Dies
Wenn nicht eingestellt, können Sie nicht die Timer-
dauert an, bis die Daily-Timer-Einstellung annulliert
Funktion verwenden.
wird. Bei Nichtverwendung den Daily-Timer
deaktivieren.
l Timer-Wiedergabe: Stecken Sie den USB-Kabel ein,
legen Sie die Diskette ein oder schließen Sie den
iPod an.
Hinweise:
l Wählen sie bei der Ausführung der Timer-Wiedergabe
unter Verwendung einer anderen, an den USB-
Anschluss angeschlossenen Einheit in Schritt 5 „USB“
1 Zum Einschalten der Stromversorgung die STANDBY/
oder „LINE IN“.
ON-Taste drücken.
l Dieses Gerät schaltet sich automatisch in den Stand-
by-Modus. Das angeschlossene Gerät schaltet sich
2 Halten Sie die CLOCK/TIMER-Taste gedrückt.
jedoch nicht ein oder aus. Befolgen Sie Schritt „Timer-
Einstellungen löschen“ auf dieser Seite, um die
3 Innerhalb von 30 Sekunden die Taste oder
Timer-Wiedergabe anzuhalten.
drücken, um „Once“ oder „Daily“ anzuwählen; danach
Timer-Einstellungen überprüfen:
die ENTER-Taste betätigen.
1 Schalten Sie den Strom ein und halten Sie die CLOCK/
4 Innerhalb von 30 Sekunden die Taste oder
TIMER-Taste gedrückt.
drücken, um „Timer set“ anzuwählen; danach die
ENTER-Taste betätigen.
2 Innerhalb von 30 Sekunden die Taste oder
drücken, um „Once“ oder „Daily“ anzuwählen; danach
5 Wählen Sie die Quelle für die Timer-Wiedergabe (CD,
die ENTER-Taste betätigen.
TUNER, USB, iPod, LINE IN) mit der Taste oder
3 Drücken Sie innerhalb von 30 Sekunden die Taste
. Die ENTER-Taste drücken.
oder , um „Timer Call“ zu wählen, und drücken Sie
Wenn Sie den Tuner wählen, einen Sender mit Hilfe
dann die ENTER-Taste.
der Taste oder auswählen, und dann die
ENTER-Taste drücken. Wenn kein Sender
Timer-Einstellungen löschen:
programmiert worden ist, wird „No Preset“ angezeigt,
und die Timer-Einstellung wird annulliert.
1 Schalten Sie den Strom ein und halten Sie die CLOCK/
TIMER-Taste gedrückt.
6 Um den Tag anzupassen, die Taste oder und
2 Innerhalb von 30 Sekunden die Taste oder
dann die ENTER-Taste drücken.
drücken, um „Once“ oder „Daily“ anzuwählen; danach
7 Drücken Sie, um die Stunde einzustellen, die ENTER-
die ENTER-Taste betätigen.
Taste. Drücken Sie die - oder -Taste und dann
3 Drücken Sie innerhalb von 30 Sekunden die Taste
die ENTER-Taste.
oder , um „Timer Off“ zu wählen, und drücken Sie
dann die ENTER-Taste. Der Timer wird deaktiviert (die
8 Um den Minuten anzupassen, die Taste oder
eingestellten Inhalte werden nicht annulliert).
und dann die ENTER-Taste drücken.
9 Nach den Schritten 7 und 8 die Endzeit einstellen.
Wiederverwendung der gespeicherten
Timereinstellung:
10 Stellen Sie die Lautstärke mit der VOL (+ oder -)-Taste
Die Timer-Einstellung wird abgespeichert, wenn sie
ein und drücken Sie dann die ENTER-Taste. Stellen
einmal eingegeben wird. Um dieselbe Einstellung wieder
Sie die Lautstärke nicht zu hoch ein.
zu verwenden, die folgenden Bedienungsschritte
durchführen.
11 Um in den Bereitschaftsbetrieb zu schalten, die
STANDBY/ON-Taste drücken. Die „TIMER“-Anzeige
1 Schalten Sie den Strom ein und halten Sie die CLOCK/
leuchtet auf, und das Gerät ist bereit zur Timer-
TIMER-Taste gedrückt.
Wiedergabe.
2 Innerhalb von 30 Sekunden die Taste oder
drücken, um „Once“ oder „Daily“ anzuwählen; danach
die ENTER-Taste betätigen.
3 Drücken Sie innerhalb von 30 Sekunden die Taste
oder , um „Timer On“ zu wählen, und drücken Sie
dann die ENTER-Taste.
4 Um in den Bereitschaftsbetrieb zu schalten, die
STANDBY/ON-Taste drücken.
12 Beim Erreichen der voreingestellten Zeit beginnt
Wiedergabe. Die Lautstärke erhöht sich allmählich, bis
Hinweis:
sie den voreingestellten Pegel erreicht. Während der
Die Uhr-Einstellung wird zurückgesetzt, wenn das
Timer-Wiedergabe blinkt Timer-Anzeige .
Netzkabel herausgezogen wird oder wenn es einen
13 Beim Erreichen der Timer-Endzeit schaltet das System
Stromausfall gibt.
automatisch in die Bereitschafts-Betriebsart.
De-22
11/5/25 X-HM10_20_De.fm
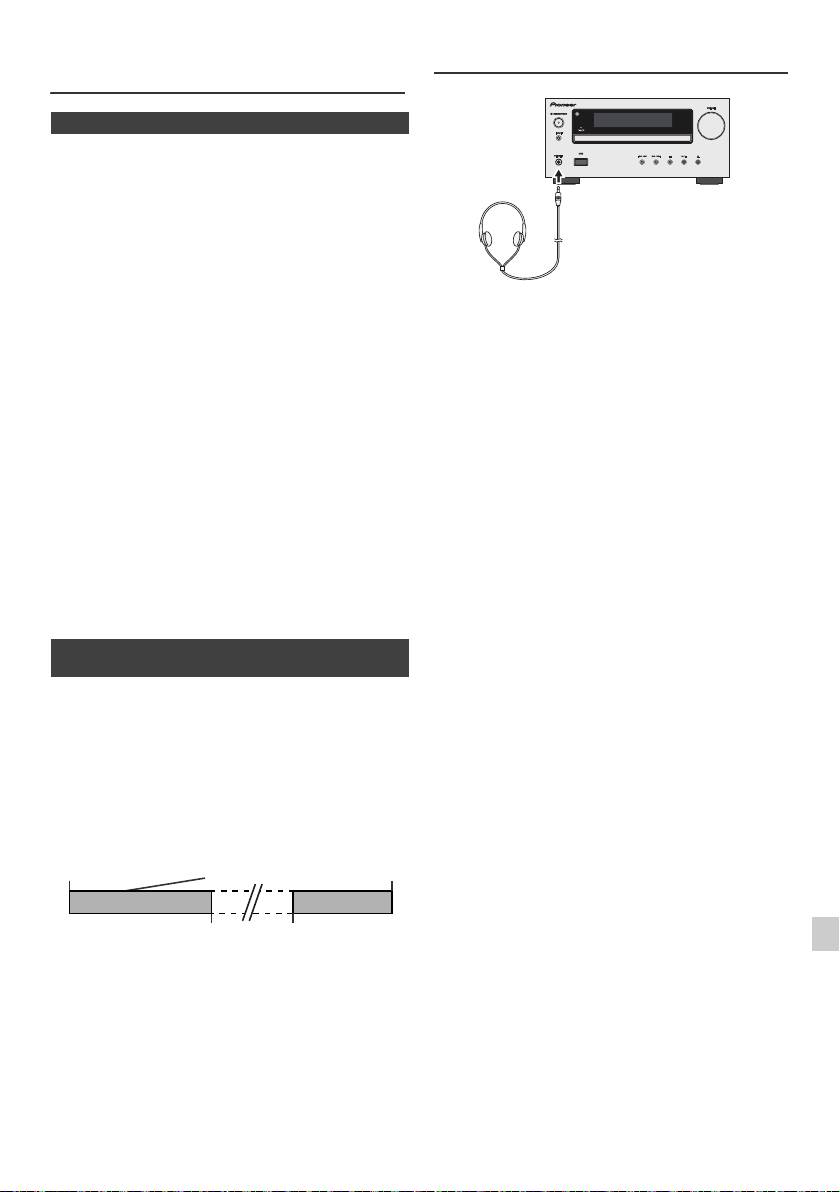
Timer- und Sleep-Funktion (Nur
Kopfhörer
Fernbedienung) (Fortsetzung)
n Sleep-Funktion
Das Radio, die CD, das iPod, USB und Line In können alle
automatisch ausgeschaltet werden.
1
Die gewünschte Tonquelle wiedergeben.
2 Drücken Sie die SLEEP-Taste.
3 Drücken Sie die Zifferntasten zur Einstellung der Zeit
innerhalb von 5 Sekunden. (1 Minute - 99 Minuten)
4 „SLEEP“ erscheint.
l Schalten Sie das Gerät nicht bei hoher
5 Nach Ablauf der voreingestellten Zeit schaltet das Gerät
Lautstärkeeinstellung ein und hören Sie der Musik in
in die Bereitschafts-Betriebsart. 1 Minute vor Abschluß
angemessener Lautstärke zu. Überhöhter Schalldruck
von den Kopfhörern kann zu einem Hörverlust führen.
der Sleep-Funktion wird die Lautstärke leiser gestellt.
l Vermindern Sie vor dem Anschließen oder Trennen
des Kopfhörers die Lautstärke.
Überprüfen der verbleibenden Einschlafzeit:
l Verwenden Sie einen Kopfhörer mit einem 3,5 mm
Stecker und 16 Ohms bis 50 Ohms Impedanz. Die
1 Während „SLEEP“ auf dem Display erscheint, die
empfohlene Impedanz ist 32 Ohm.
SLEEP-Taste drücken.
l Beim Anschließen des Kopfhörers werden die
Lautsprecher automatisch getrennt. Die Lautstärke mit
Abbrechen der Sleep-Funktion:
dem VOLUME-Regler einstellen.
Die STANDBY/ON-Taste drücken, während „SLEEP“ auf
l Nur X-HM20: Audio-Signale vom iPod/iPhone können
nicht über die an die Einheit angeschlossenen
dem Display angezeigt wird. Um die Sleep-Funktion
Kopfhörer gehört werden. Wenn Sie bei gewählter
abzubrechen, ohne das System auf die Bereitschafts-
iPod/iPhone-Funktion die Kopfhörer anschließen, wird
Betriebsart zu stellen, folgendermaßen vorgehen.
„HP INVALID“ angezeigt.
1 Während „SLEEP“ auf dem Display erscheint, die
SLEEP-Taste drücken.
2 Drücken Sie zweimal die „0“ Taste innerhalb von
5 Sekunden, bis „SLEEP 00“ erscheint.
n Gleichzeitiges Benutzen der Timer- und
Sleep-Funktion
Sleep-Timer und Timer-Wiedergabe:
Sie können beispielsweise beim Rundfunkempfang
einschlafen und nächsten Morgen durch CD-Wiedergabe
aufwachen.
1
Die Einschlafzeit einstellen (siehe oben, Schritte 1 - 5).
2 Beim Einstellen des Sleep-Timers auch die Timer-
Wiedergabe einstellen (Schritte 2 - 9, Seite 22).
1
2
3
4
5
6
7
8
9
De-23
11/5/25 X-HM10_20_De.fm
Timer-
Wiedergabe-
Sleep-Timer-
Endzeit
Einstellung
Einstellung
1-99 Minuten
Gewünschte zeit
Die Sleep-Funktion
Timer-Wiedergabe-
stoppt automatisch
Startzeit

Fehlersuchtabelle
Viele scheinbare Probleme können vom Benutzer ohne
n Tuner
Anforderung eines Kundendiensttechnikers gelöst
werden.
Symptom Mögliche Ursache
Falls mit diesem Produkt irgendetwas nicht in Ordnung zu
sein scheint, die folgenden Punkte überprüfen, bevor Sie
l Das Radio
l Befindet sich das Gerät in der
sich an einen autorisierten PIONEER-Fachhändler oder
erzeugt
Nähe des Fernsehgerätes
ungewöhnliches,
oder des Computers?
an ein PIONEER-Kundendienstzentrum wenden.
andauerndes
l Ist die UKW-Antenne oder
Rauschen.
n Allgemeines
MW-Rahmenantenne richtig
aufgestellt? Die Antenne
weiter entfernt vom Netzkabel
Symptom Mögliche Ursache
verlegen.
l Die Uhr ist nicht
l Trat ein Stromausfall ein?
richtig gestellt.
Die Uhr wieder einstellen.
n USB
(Siehe Seite 9)
l Das Gerät reagiert
l Das Gerät auf die
Symptom Mögliche Ursache
nicht auf Betätigung
Bereitschafts-Betriebsart
l Gerät kann nicht
l Steht eine MP3/WMA-Datei
einer Taste.
stellen und dann wieder
gefunden
zur Verfügung?
einschalten.
werden.
l
Ist das Gerät ordnungsgemäß
l
Wenn das Gerät noch nicht
angeschlossen?
richtig funktioniert, es
l Ist es ein MTP Gerät?
rücksetzen. (Siehe Seite 25)
l Enthält das Gerät nur die AAC-
l Kein Ton ist zu
l Ist der Lautstärkepegel auf
Datei?
hören.
„Min“ gestellt?
l Die Wiedergabe
l Ist die WMA Datei
l Ist der Kopfhörer
ist nicht aktiv.
urheberrechtlich geschützt?
angeschlossen?
l ist es eine falsche MP3-Datei?
l Sind die
Lautsprecherkabel
l Falsche
l Wird die Variable Bitrate-Datei
getrennt?
Zeitanzeige.
wiedergegeben?
l Falscher
l
Enthalt der Datei-Name
Dateinname wird
chinesische oder japanische
n CD-Player
angezeigt.
Schriftzeichen?
Symptom Mögliche Ursache
n iPod und iPhone (nur X-HM20)
l Die Wiedergabe ist
l Ist die Disc verkehrt herum
Symptom Mögliche Ursache
nicht aktiv.
eingelegt?
l Wiedergabe stoppt
l Entspricht die Disc der
l Es ist kein Ton
l
Der iPod oder iPhone spielt nicht.
in der Mitte eines
Norm?
zu hören. Auf
l Der iPod oder iPhone ist nicht
dem Fernseher/
Titels oder der Titel
l Ist die Disc verformt oder
richtig an das Gerät
Monitor
angeschlossen.
wird nicht richtig
zerkratzt?
erscheint kein
l Ist das Netzkabel des Gerätes
wiedergegeben.
Bild.
angeschlossen?
l Das Videokabel ist nicht richtig
l Während der
l Ist das Gerät übermäßigen
angeschlossen.
Wiedergabe kommt
Erschütterungen
l Die Auswahl für den
es zu Aussetzern
ausgesetzt?
Fernseher/Monitor-Eingang ist
oder Wiedergabe
l Ist die Disc sehr
nicht richtig eingestellt.
stoppt in der Mitte
schmutzig?
l Das Feature iPod TV aus
wurde nicht auf Video-
eines Titels.
l Hat sich im Gerät
Ausgabe eingestellt.
Kondensation gebildet?
l
Audio-Signale vom iPod/iPhone
können nicht über die an die
Einheit angeschlossenen
n Fernbedienung
Kopfhörer gehört werden.
l Der iPod oder
l Der iPod oder iPhone macht
Symptom Mögliche Ursache
iPhone lädt nicht.
keinen richtigen Kontakt mit
dem Anschluss.
l Die Fernbedienung
l Ist das Netzkabel des
ten
l Verwendung eines iPods (3
funktioniert nicht.
Gerätes angeschlossen?
Generation).
l Ist die Polarität der Batterie
l Der iPod oder das iPhone
richtig?
werden nicht unterstützt.
Siehe Seite 10 für kompatible
l Ist die Batterie verbraucht?
Modelle.
l Ist der Abstand oder
l iPod oder iPhone können nicht
Winkel falsch?
geladen werden, während sich
l Empfängt der
die Haupteinheit im USB-
Fernbedienungssensor
Modus befindet.
starkes Licht?
l
„This accessory is
l Die iPhone-Batterie ist
not made to work
schwach. iPhone bitte
aufladen.
with iPhone“ oder
l Das iPhone ist nicht richtig
„This accessory is
angedockt.
not supported by
iPhone“ erscheint
auf dem iPhone-
Display.
De-24
11/5/25 X-HM10_20_De.fm
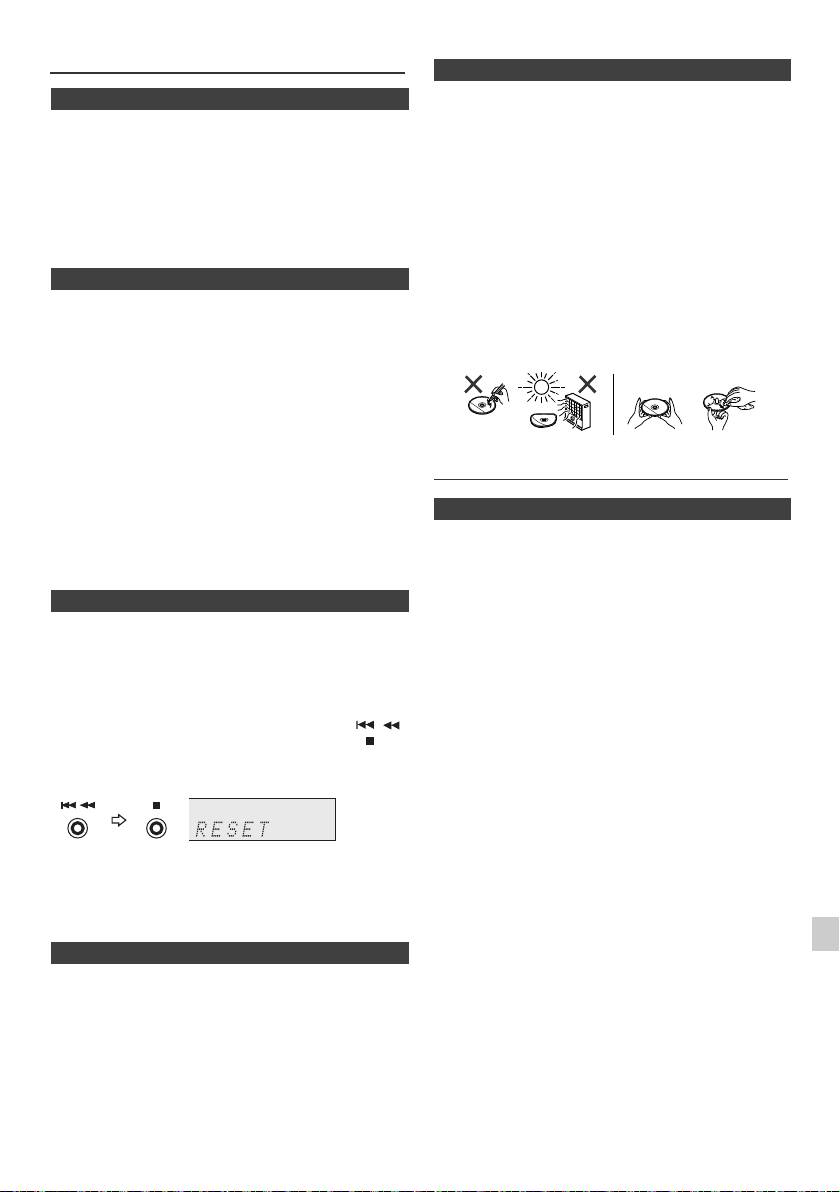
Fehlersuchtabelle (Fortsetzung)
n Pflege der Compact Discs
Compact Discs sind ziemlich widerstandsfähig gegen
n Kondensation
Beschädigungen, jedoch können infolge einer
Plötzliche Temperaturschwankungen und Lagerung oder
Staubansammlung auf der Discoberfläche
Betrieb in einer extrem feuchten Umgebung können
Falschabtastungen auftreten. Für eine optimale CD-
Kondensatbildung im Gehäuse (CD-Abtaster usw.) oder
Wiedergabe die folgenden Punkte beachten.
auf dem Sender der Fernbedienung verursachen.
Kondensat kann zu Funktionsstörungen des Geräts
l Auf die Disc darf nichts geschrieben werden,
führen. Sollte dieser Fall eintreten, das Gerät
insbesondere nicht auf die Seite ohne Etikett; hier
eingeschaltet lassen, ohne eine Disc einzulegen, bis die
werden die Tonsignale abgetastet. Beschreiben Sie
normale Wiedergabe möglich ist (ca. 1 Stunde). Vor
diese Oberfläche nicht.
Handhaben der Fernbedienung jedes Kondensat auf dem
l Die Discs nicht direkter Sonnenbestrahlung, Hitze oder
Sender mit einem weichen Tuch abwischen.
Feuchtigkeit aussetzen.
l Die CDs immer am Rand halten. Durch
n Wenn eine Störung auftritt
Fingerabdrücke, Schmutz oder Wasser auf den CDs
können Störgeräusche oder falsche Abtastungen
Wenn dieses Produkt von starker externer Interferenz
verursacht werden. Wenn eine CD schmutzig ist oder
(mechanischer Stoß, übermäßige statische Elektrizität,
nicht einwandfrei abgespielt wird, sie mit einem
anormale Speisespannung infolge von Blitz usw.)
weichen, trockenen Tuch von der Mitte dem Radius
beeinflußt oder falsch betrieben wird, kann es nicht korrekt
entlang nach Außen abwischen.
funktionieren.
Wenn derartige Störungen auftreten, wie folgt
verfahren:
1 Das Gerät auf die Bereitschafts-Betriebsart stellen und
die Stromversorgung wieder einschalten.
2
Ist das Gerät nicht in den vorherigen Zustand
zurückgesetzt, ziehen Sie den Stecker aus der
Wartung
Steckdosen, stecken Sie ihn wieder hinein und schalten
Sie das Gerät an.
n Reinigen des Gehäuses
Hinweis:
Das Gehäuse mit einem weichen Tuch und einem
Wenn die obigen Bedienungsschritte keinen Erfolg
verdünnten Seifenwasser regelmäßig reinigen und dann
aufweisen, den gesamten Speicher durch Zurücksetzen
mit einem trockenen Tuch nachwischen.
des Gerätes löschen.
Vorsicht:
n Werkseinstellung, Löschen des Speichers
l Keine Chemikalien (Benzin, Farbverdünnungsmittel
usw.) verwenden. Dies könnte das Gehäuse
1
Drücken Sie zum Einschalten des Stroms die Taste
beschädigen.
STANDBY/ON .
l Niemals das Innere des Geräts ölen. Das kann zu
Störungen führen.
2 Drücken Sie, um die Funktion LINE IN zu wählen, die
LINE-Taste auf der Fernbedienung oder wiederholt die
INPUT-Taste auf der Haupteinheit.
3 Drücken Sie in der Funktion LINE IN die Taste
auf der Haupteinheit und drücken Sie die Taste und
halten Sie sie gedrückt, bis die Anzeige „RESET“
(Zurücksetzen) erscheint.
1
Vorsicht:
2
Durch diese Bedienungsschritte werden alle
abgespeicherten Daten einschließlich Uhr- und Timer-
3
Einstellungen, Tuner-Voreinstellung sowie CD-Programm
gelöscht.
4
n Vor dem Transportieren des Geräts
Nehmen Sie den iPod, das USB-Speichergerät oder die
5
Diskette aus dem Gerät. Stellen Sie das Gerät dann in den
Stand-by-Modus. Tragen Sie das Gerät nicht mit
6
angeschlossenem iPod oder USB-Speichergerät oder mit
eingelegter Diskette, da dies zu Schäden am Gerät führen
7
kann.
8
9
De-25
11/5/25 X-HM10_20_De.fm
NEIN JA
Richtig

Technische Daten
Bedingt durch fortlaufende technische Verbesserungen
n USB
behält sich PIONEER das Recht vor, das Design und die
Spezifikationen ohne vorherige Ankündigung ändern zu
USB Hostinterface l Unterstützt USB 1.1 (Volle
können. Die angegebenen Leistungswerte stellen die
Geschwindigkeit)/ 2.0
Nennwerte einer in Serienherstellung produzierten Einheit
assenspeicher-Klasse.
dar. Geringe Abweichungen bei einzelnen Geräten sind
l Unterstützt nur Bulk und CBI-
möglich.
Protokoll.
n Allgemeines
Unterstützungsdatei
l MPEG 1 Layer 3
l WMA (Nicht DRM)
Bitratenunterstützung
l MP3 (32 Kbps bis 320 Kbps)
Spannungsversorgung
Wechselspannung 220 V bis 240 V,
l WMA (64 Kbps bis 160 Kbps)
50 Hz/60 Hz
Sonstiges l Die maximale Anzahl an MP3/
Leistungsaufnahme
Leistungsaufnahme Einschalten:
WMA-Dateien beträgt 999.
45 W (X-HM20)
l Die maximale Anzahl an
30 W (X-HM10)
Ordnern, einschließlich dem
Bereitschaft: 0,4 W
Hauptverzeichnis, beträgt 99.
l TITLE, ARTIST und ALBUM
Abmessungen Breite: 215 mm
sind die einzigen unterstützten
Höhe: 99 mm
ID3TAG Informationen.
Tiefe: 300 mm
l Unterstützt ID3TAG Version 1
Gewicht 3,8 kg (X-HM20)
und 2.
3,7 kg (X-HM10)
Dateiunterstützun
l Unterstützt USB -Geräte mit
gssystem
Microsoft Windows/DOS/FAT
12/FAT 16/FAT 32.
n Verstärker
l 2 kByte Blockläng e für den
Sektor.
Ausgangsleistung
RMS: 15 W + 15 W
(1 kHz, 10% T.H.D., 4 Ohm)
n Tuner
Ausgänge Lautsprecher: 4 Ohm
20 Hz bis 20 kHz
Videoausgang (nur X-HM20): 1 Vp-p
Frequenzbereich UKW: 87,5 MHz bis 108 MHz
Kopfhörer: 16 Ohm
MW: 522 kHz bis 1.620 kHz
(empfohlen: 32 Ohm)
Voreinstellung 40 (UKW und MW Sender)
Eingänge Line-Eingang (Analoger Eingang):
500 mV/47 k Ohm
n Lautsprecher
n CD-Player
X-HM20
Typ Single Disk Multi-Mode Compact
Typ 2-Wege-Lautsprechersystem
Disc Player
5-cm-Hochtöner
10-cm-Woofer
Signalabtastung Kontaktloser 3-Strahl-Halbleiter-
Laser-Abtaster
Max. Belastbarkeit 15 W
D/A-Umsetzer Multi-Bit-D/A-Umsetzer
Impedanz 4 Ohm
Frequenzgang 20 Hz bis 20.000 Hz
Abmessungen Breite: 132 mm
Höhe: 260 mm
Dynamikbereich 90 dB (1 kHz)
Tiefe: 173 mm
Gewicht je 2,0 kg
X-HM10
Typ 2-Wege-Lautsprechersystem
Piezoelektrischer
Hochtonlautsprecher
10-cm-Woofer
Max. Belastbarkeit 15 W
Impedanz 4 Ohm
Abmessungen Breite: 132 mm
Höhe: 260 mm
Tiefe: 158 mm
Gewicht je 1,6 kg
De-26
11/5/25 X-HM10_20_De.fm

Hinweis
Über iPod/iPhone/iPad
Die Kennzeichnungen „Made for iPod”, „Made for iPhone” und
„Made for iPad” bedeuten, dass ein elektronisches Zubehörteil
spezifisch zum Anschluss an iPod, iPhone oder iPad konstruiert
wurde und entsprechend vom Entwickler als die
Leistungsstandards von Apple erfüllend zertifiziert wurde. Apple
übernimmt keine Verantwortung für die richtige Funktion dieses
Geräts oder seine Erfüllung von Sicherheitsoder anderen
Vorschriften. Bitte beachten Sie, dass der Gebrauch dieses
Zubehörteils in Verbindung mit einem iPod oder iPhone die
drahtlose Leistung beeinträchtigen kann.
iPad, iPhone und iPod sind Markenzeichen der Apple Inc., die in
den USA und anderen Ländern eingetragen sind.
1
2
3
4
5
6
7
© 2011 PIONEER CORPORATION.
Alle Rechte vorbehalten.
8
9
De-27
11/5/25 X-HM10_20_De.fm
ATTENZIONE
Condizioni ambientali di funzionamento
Questo apparecchio non è impermeabile. Per prevenire
Gamma ideale della temperatura ed umidità
pericoli di incendi o folgorazioni, non posizionare nelle
dell’ambiente di funzionamento:
vicinanze di questo apparecchio contenitori pieni di liquidi
da +5 °C a +35 °C, umidità relativa inferiore all‘85 %
(quali vasi da fiori, o simili), e non esporre l’apparecchio a
(fessure di ventilazione non bloccate)
sgocciolii, schizzi, pioggia o umidità.
D3-4-2-1-3_A1_It
Non installare l’apparecchio in luoghi poco ventilati, o in
luoghi esposti ad alte umidità o alla diretta luce del sole (o a
ATTENZIONE
sorgenti di luce artificiale molto forti).
D3-4-2-1-7c*_A1_It
Prima di collegare per la prima volta l’apparecchio alla
sorgente di alimentazione leggere attentamente la
Se la spina del cavo di alimentazione di questo
sezione che segue.
apparecchio non si adatta alla presa di corrente alternata
La tensione della sorgente di elettricità differisce
di rete nella quale si intende inserire la spina stessa,
da Paese a Paese e da regione a regione. Verificare
questa deve essere sostituita con una adatta allo scopo.
che la tensione di rete della zona in cui si intende
La sostituzione della spina del cavo di alimentazione deve
utilizzare l’apparecchio sia quella corretta, come
essere effettuata solamente da personale di ser
vizio
indicato sul pannello posteriore dell’apparecchio
qualificato. Dopo la sostituzione, la vecchia spina, tagliata
stesso (ad es.: 230 V o 120 V).
D3-4-2-1-4*_A1_It
dal cavo di alimentazione, deve essere adeguatamente
eliminata per evitare possibili scosse o folgorazioni
ATTENZIONE
dovute all’accidentale inserimento della spina stessa in
Per evitare il pericolo di incendi, non posizionare
una presa di corrente sotto tensione. Se si pensa di non
sull’apparecchio dispositivi con fiamme vive (ad esempio
utilizzare l’apparecchio per un relativamente lungo
una candela accesa, o simili).
D3-4-2-1-7a_A1_It
periodo di tempo (ad esempio
, durante una vacanza),
staccare la spina del cavo di alimentazione dalla presa di
corrente alternata di rete.
D3-4-2-2-1a_A1_It
AVVERTENZA PER LA VENTILAZIONE
Installare l’apparecchio avendo cura di lasciare un
certo spazio all’intorno dello stesso per consentire una
AVVERTENZA
adeguata circolazione dell’aria e migliorare la
L’interruttore principale (STANDBY/ON)
dispersione del calore (almeno 10 cm sulla parte
dell’apparecchio non stacca completamente il flusso di
superiore, 10 cm sul retro, e 10 cm su ciascuno dei lati).
corrente elettrica dalla presa di corrente alternata di rete.
10 cm 10 cm
Dal momento che il cavo di alimentazione costituisce
l’unico dispositivo di distacco dell’apparecchio dalla
10 cm
sorgente di alimentazione, il cavo stesso deve essere
staccato dalla presa di corrente alternata di rete per
sospendere completamente qualsiasi flusso di corrente.
Verificare quindi che l’apparecchio sia stato installato in
10 cm
modo da poter procedere con facilità al distacco del cavo
di alimentazione dalla presa di corrente, in caso di
ATTENZIONE
necessità. Pe
r prevenire pericoli di incendi, inoltre, il
L’apparecchio è dotato di un certo numero di fessure e di
cavo di alimentazione deve essere staccato dalla presa di
aperture per la ventilazione, allo scopo di garantirne un
corrente alternata di rete se si pensa di non utilizzare
funzionamento affidabile, e per proteggerlo dal
l’apparecchio per periodi di tempo relativamente lunghi
surriscaldamento. Per prevenire possibili pericoli di incendi
(ad esempio
, durante una vacanza).
D3-4-2-2-2a*_A1_It
le aperture non devono mai venire bloccate o coperte con
oggetti vari (quali giornali, tovaglie, tende o tendaggi, ecc.),
e l’apparecchio non deve essere utilizzato appoggiandolo
Questo prodotto è destinato esclusivamente all'uso
su tappeti spessi o sul letto.
D3-4-2-1-7b*_A1_It
domestico. Eventuali disfunzioni dovute ad usi diversi
(quali uso prolungato a scopi commerciali, in ristoranti,
Questo prodotto è conforme al DM 28/8/1995, Nº548,
o uso in auto o su navi) e che richiedano particolari
ottemperando alle prescrizioni di cui al DM 25/6/1985
riparazioni, saranno a carico dell'utente, anche se nel
(par.3, all. A) e DM 27/8/1987 (All. I).
D44-8-4a_It
corso del periodo di garanzia.
K041_A1_It
11/5/25 X-HM10_20_Anki_It.fm
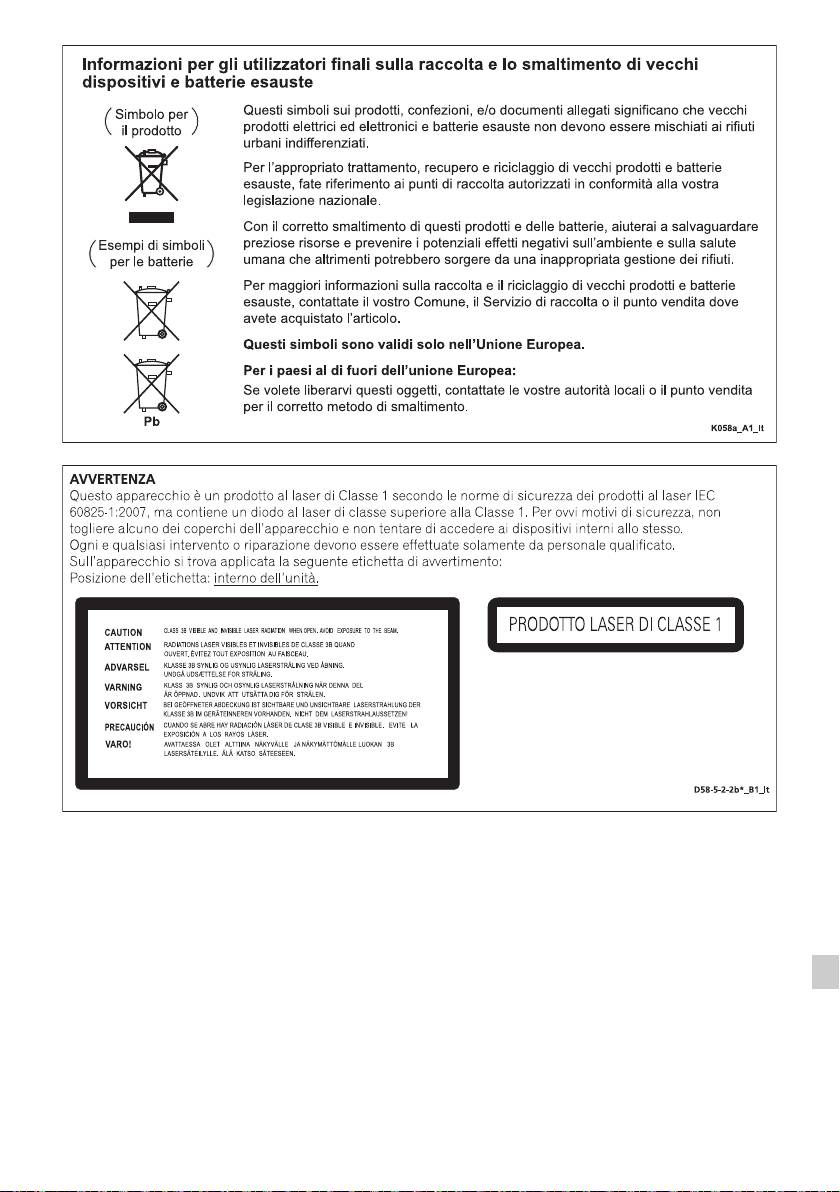
1
La condensa
Se il lettore viene improvvisamente portato da un luogo
2
freddo ad uno caldo (ad esempio d’inverno) o se la
temperatura ambiente aumenta rapidamente a causa
3
di caloriferi o altro, all’interno dell’apparecchio (parti
mobili e lenti) potrebbe formarsi condensa (gocce
d’acqua). Se della condensa si forma, il lettore non
4
funziona bene e la riproduzione non è possibile.
Lasciare riposare il lettore acceso a temperatura
5
ambiente per 1 o 2 ore (il tempo effettivamente richiesto
dipende dalla quantità di condensa presente). La
6
condensa si dissipa e la riproduzione torna ad essere
possibile. La condensa può anche avvenire d’estate se il
lettore viene investito dall’aria di un climatizzatore. Se
7
questo accade, spostare il lettore.
S005_A1_It
8
9
I-3
11/5/25 X-HM10_20_Anki_It.fm

ITALIANO
l Sistema CD con amplificatore X-HM10/X-HM20 che comprende unità principale e sistema altoparlanti.
Introduzione
Congratulazioni per l’ottimo acquisto di questo prodotto PIONEER. Per sfruttarne al meglio tutte le caratteristiche, vi
raccomandiamo di leggere attentamente il presente manuale. Vi aiuterà ad ottenere sempre il meglio dall’apparecchio.
N.B.
La fornitura di questo prodotto non da nessun diritto a una licenza et non implica il diritto di distribuire il contenuto creato
con questo prodotto via sistemi di trasmissione (terrestre, satellite, cablo e/o altri canali di distribuzione) commerciale, via
applicazioni di “streaming” (Internet, intranets e/o altri reti) via altri sistemi di distribuzione di contenuti (applicazioni per
pay-audio, applicazioni per audio a la domanda e applicazioni simile) commerciali, come pure sopra supporti fisichi (CD,
DVD, circuiti integrati a semiconduttore, hard drives, memory cards e simile) generando redditi. Per tale utilizzazione, è
necessario una licenza specifica. Per più informazioni, visita http://mp3licensing.com
La tecnologia audio di codificazione del MPEG Layer-3 è stato concessa via una licenza concesso da Fraunhofer IIS e
da Thomson.
Accessori
Accertarsi che i seguenti accessori si trovino nella confezione.
Adattatori iPhone x 3
Telecomando x 1 Pila di formato “AA” x 1 Antenna AM a telaio x 1
(solo X-HM20)
Filo corrente
Garanzia
Questo manuale di istruzioni
Antenna FM x 1
SOMMARIO
Pagina
Pagina
USB
Informazioni generali
Ascolto della periferica di memoria di massa USB/del
Precauzioni . . . . . . . . . . . . . . . . . . . . . . . . . . . . . . . . . 5
lettore . . . . . . . . . . . . . . . . . . . . . . . . . . . . . . . . . . 16 - 17
Comandi e indicatori . . . . . . . . . . . . . . . . . . . . . . . . 5 - 6
Riproduzione USB avanzata . . . . . . . . . . . . . . . . . . . .17
Preparativi per l’uso
La radio
Collegamenti del sistema . . . . . . . . . . . . . . . . . . . . . 7 - 8
Ascolto della radio . . . . . . . . . . . . . . . . . . . . . . . . . . . .18
Telecomando . . . . . . . . . . . . . . . . . . . . . . . . . . . . . . . . 8
Caratteristiche d’avanguardia
Operazioni basilari
Funzionamento di RDS (Radio Data System) . . . 19 - 21
Comando unico . . . . . . . . . . . . . . . . . . . . . . . . . . . . . . 9
Funzione di timer e autospegnimento
Regolazione dell’orologio
(Solo per telecomando) . . . . . . . . . . . . . . . . . . . . 21 - 23
(Solo per telecomando). . . . . . . . . . . . . . . . . . . . . .9 - 10
Cuffia . . . . . . . . . . . . . . . . . . . . . . . . . . . . . . . . . . . . . .23
iPod, iPhone e iPad
Riferimenti
Ascoltare da iPod, iPhone o iPad
Tabella per la soluzione di problemi . . . . . . . . . . 24 - 25
(solo X-HM20). . . . . . . . . . . . . . . . . . . . . . . . . . . . 10 - 12
Manutenzione . . . . . . . . . . . . . . . . . . . . . . . . . . . . . . .25
Dati tecnici . . . . . . . . . . . . . . . . . . . . . . . . . . . . . . . . . .26
Riproduzione di un CD o disco MP3/WMA
Avviso . . . . . . . . . . . . . . . . . . . . . . . . . . . . . . . . . . . . . .27
Ascolto di un CD o disco MP3/WMA . . . . . . . . . . . . . 13
Riproduzione d’avanguardia di un CD o disco MP3/WMA
. . . . . . . . . . . . . . . . . . . . . . . . . . . . . . . . . . . . . . . 14 - 15
Modo cartella MP3/WMA
(solo per file MP3/WMA) . . . . . . . . . . . . . . . . . . . . 15 - 16
It-4
11/5/25 X-HM10_20_It.fm
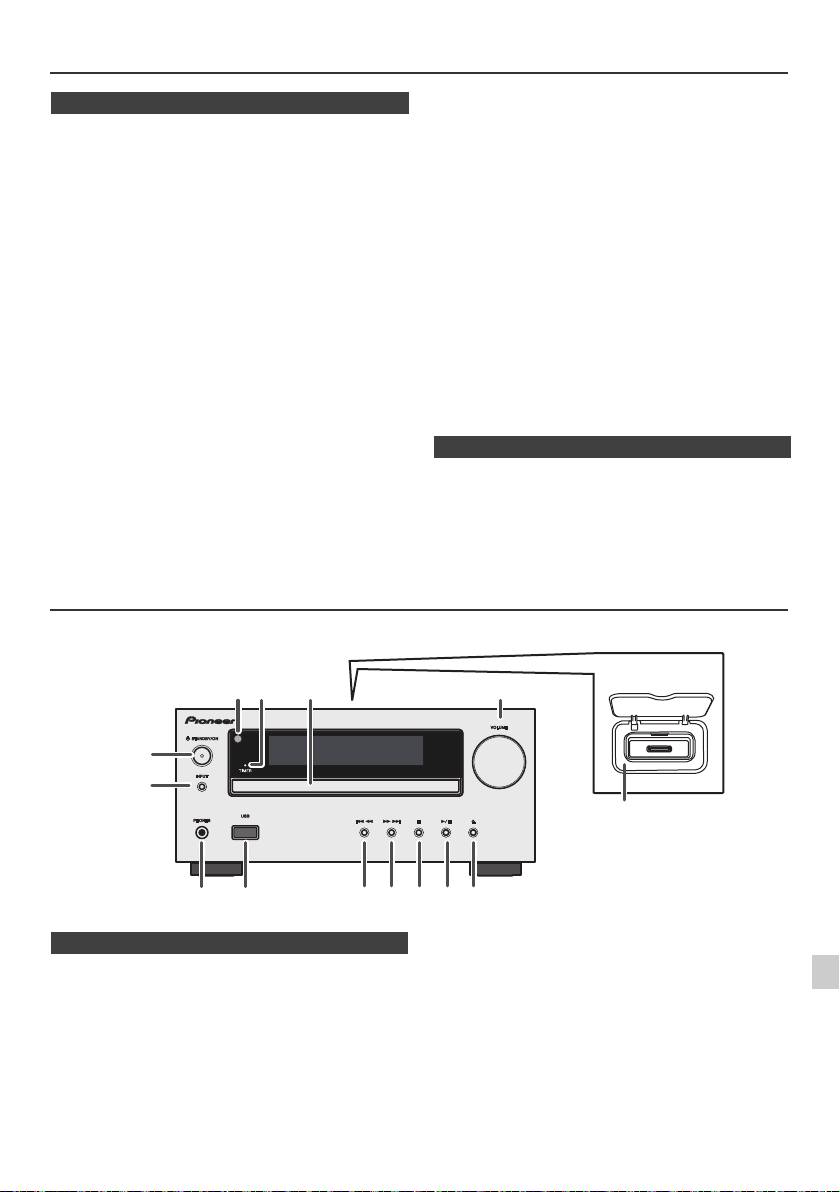
Precauzioni
l Per evitare scosse elettriche, non togliere la
n In generale
copertura esterna. Per le riparazioni all’interno
rivolgersi al più vicino centro di assitenza tecnica
l Collocare l’apparecchio su una superficie solida, piana
PIONEER.
ed esente da vibrazioni.
l Non impedire la ventilazione coprendo i fori di
l Mettere i diffusori almeno a 30 cm da qualsiasi CRT TV
ventilazione con giornali, tovaglie, tende, ecc.
per evitare variazioni di colore sullo schermo TV. Se la
l Non collocare sull’apparecchio candele accese o
variazione persiste, spostare i diffusori ancora più
simili.
lontano dalla TV. La TV LCD non è fatta per tale
l Non disperdere nell’ambiente le pile usate, e rispettare
variazione.
le leggi relative alla raccolta differenziata dei rifiuti della
l Tenere l’unità lontana dalla luce diretta del sole, da forti
campi magnetici, da polvere eccessiva, umidità e
vostra zona.
apparecchi elettronici/elettrici (computer, fax, ecc.) che
l L’apparecchio è stato disegnato per l’uso in zone
possono causare rumori elettrici.
climatiche miti.
l Non mettere niente sull’apparecchio.
Avvertenza:
l Non esporre l’unità all’umidità, a temperature che
La tensione della corrente usata deve essere quella
superano i 60°C o che raggiungono estremi troppo
prescritta per l’apparecchio. L’uso dell’apparecchio con
bassi.
una corrente a tensione più alta rispetto a quella prevista
l Se il sistema non funziona bene, disinserire il cavo di
è pericoloso e può causare un incendio o un danno. La
alimentazione c.a. dalla presa di rete. Poi, reinserirlo e
riaccendere l’apparecchio.
PIONEER non è responsabile dei danni causati dall’uso
l In caso di temporali nelle vicinanze, le norme di
dell’apparecchio con una corrente a tensione diversa da
sicurezza richiedono che venga disinserita la spina del
quella prescritta.
cavo di alimentazione dalla presa della rete elettrica.
l Per staccare il cavo di alimentazione CA dalla presa di
n Controllo di volume
rete prenderlo sempre per la spina, altrimenti si rischia
di danneggiarne i conduttori interni.
Il livello audio di una data impostazione del volume
l La presa di alimentazione CA viene usata come
dipende dall’efficienza dei diffusori, dalla loro posizione e
dispositivo di scollegamento e deve rimanere sempre
da svariati altri fattori. Si consiglia di evitare l’esposizione
funzionante.
a livelli di volume elevati. Non alzare al massimo il volume
all’accensione. Ascoltare la musica a livelli moderati. Una
pressione sonora eccessiva proveniente dalle cuffie o
dagli auricolari può causare la perdita dell’udito.
Comandi e indicatori
Le funzioni iPod/iPhone sono disponibili solo per X-HM20.
1
2
3
4
Pagina
Pagina
5
1. Sensore a distanza. . . . . . . . . . . . . . . . . . . . . . . . 8
10. Preimpostazione sintonizzatore giù, Traccia CD/
2. Indicatore del timer . . . . . . . . . . . . . . . . . . . . . . 22
USB giù, Passaggio tra iPod/iPhone giù . . .12, 13
3. Piatto disco . . . . . . . . . . . . . . . . . . . . . . . . . . . . 13
11. Preimpostazione sintonizzatore su, Traccia CD/
6
4. Base di aggancio per iPod o iPhone. . . . . . . . . 11
USB su, Passaggio tra iPod/iPhone su . . . .12, 13
5. Comando del volume . . . . . . . . . . . . . . . . . . . . . 9
12. Pulsante di arresto del disco/dell’USB . . . .12, 13
6. Tasto di STANDBY/ON . . . . . . . . . . . . . . 11, 13, 18
13. Pulsante Riproduci o Pausa Disco/USB/iPod/
7
7. Pulsante INPUT. . . . . . . . . . . . . . . 9, 11, 13, 16, 18
iPhone . . . . . . . . . . . . . . . . . . . . . . . . . . . . . . .12, 13
8. Presa per la cuffia . . . . . . . . . . . . . . . . . . . . . . . 23
14. Pulsante per apertura/chiusura del piatto
8
9. Terminale USB . . . . . . . . . . . . . . . . . . . . . . . . . . 16
disco . . . . . . . . . . . . . . . . . . . . . . . . . . . . . . . . . . .13
9
It-5
11/5/25 X-HM10_20_It.fm
1
52 3
6
7
4
8 10 11 12 13 14
9
Solo X-HM20
n Pannello anteriore
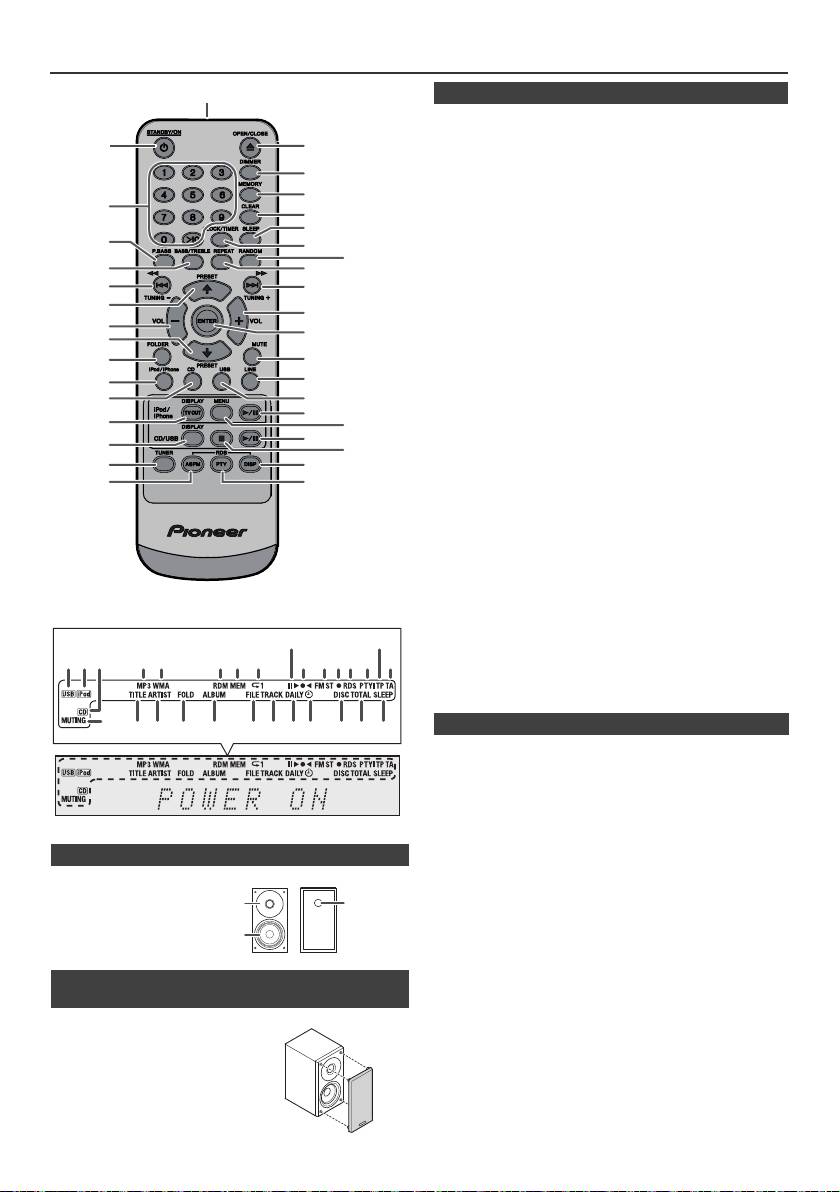
Comandi e indicatori (continua)
Pagina
1. Trasmettitore del telecomando . . . . . . . . . . . . . .8
2. Tasto di STANDBY/ON . . . . . . . . . . . . .9, 11, 13, 21
3. Tasti numerici . . . . . . . . . . . . . . . . . . . . . . . . . . . .14
4. Tasto per P.Bass. . . . . . . . . . . . . . . . . . . . . . . . . . .9
5. Tasto bassi/alti . . . . . . . . . . . . . . . . . . . . . . . . . . .9
6. Pulsante Sintonizzazione giù, Passaggio giù,
Inversione rapida, Orario giù
. . . . . . . . . . . . . . . . . . . . . . .9, 12, 13, 16, 18, 19, 21
7. Pulsante preimpostazione sintonizzatore su,
cursore iPod su . . . . . . . . . . . . . . . . . 11, 12, 16 18
8. Tasto riduzione volume . . . . . . . . . . . . . . . . . . . 9
9. Pulsante preimpostazione sintonizzatore giù,
cursore iPod giù. . . . . . . . . . . . . . . . . 11, 12, 16 18
10. Pulsante Folder . . . . . . . . . . . . . . . . . . . . . . . . . .16
11. Pulsante iPod/iPhone . . . . . . . . . . . . . . . . . . . . .11
12. Tasto per CD . . . . . . . . . . . . . . . . . . . . . . . . . . . .13
13. Tasto di iPod/iPhone DISPLAY TV OUT . . . .11, 12
14. Tasto CD/USB DISPLAY. . . . . . . . . . . . . . . . . . . .16
15. Tasto Turner . . . . . . . . . . . . . . . . . . . . . . . . . .18, 19
16. Tasto RDS ASPM . . . . . . . . . . . . . . . . . . . . . . . . .19
17. Tasto aperto/chiuso . . . . . . . . . . . . . . . . . . . . . . .13
18. Pulsante variatore di luminosità . . . . . . . . . . . . .9
19. Tasto Memory . . . . . . . . . . . . . . . . . . . . . . . . .14, 18
20. Tasto Clear . . . . . . . . . . . . . . . . . . . . . . . . . . . . . 14
21. Pulsante sleep . . . . . . . . . . . . . . . . . . . . . . . . . . .23
22. Tasto di orologio/timer . . . . . . . . . . . . . . . . . .9, 22
23. Tasto Random . . . . . . . . . . . . . . . . . . . . . . . .12, 14
24. Tasto ripetizione. . . . . . . . . . . . . . . . . . . . . . .12, 14
25. Pulsante Sintonizzazione su, Passaggio su,
Avanzamento riavvolgimento, Orario su
. . . . . . . . . . . . . . . . . . . . . . .9, 12, 13, 16, 18, 19, 21
26. Pulsante aumento volume . . . . . . . . . . . . . . . . . .9
27. Tasto immissione . . . . . . . . . . . . . . . . . . . .9, 11, 12
28. Tasto Muto . . . . . . . . . . . . . . . . . . . . . . . . . . . . . . .9
29. Tasto Line . . . . . . . . . . . . . . . . . . . . . . . . . . . . .8, 25
30. Pulsante USB . . . . . . . . . . . . . . . . . . . . . . . . . . . .16
31. Pulsante di riproduzione/pausa iPod/iPhone . .12
32. Pulsante menu iPod/iPhone . . . . . . . . . . . . . . . .12
33. Tasto riproduzione/ pausa CD/USB . . . .12, 13, 14
34. Tasto stop CD/USB . . . . . . . . . . . . . . . . . . . .13, 14
35. Tasto display RDS . . . . . . . . . . . . . . . . . . . . . . . .19
36. Tasto RDS PTY . . . . . . . . . . . . . . . . . . . . . . . . . .19
Pagina
1. Indicatore USB . . . . . . . . . . . . . . . . . . . . . . . . . .16
2. Indicatori iPod . . . . . . . . . . . . . . . . . . . . . . . . . . .10
3. Indicatore CD . . . . . . . . . . . . . . . . . . . . . . . . . . . .13
4. Indicatore MP3 . . . . . . . . . . . . . . . . . . . . . . . . . . .13
5. Indicatore WMA . . . . . . . . . . . . . . . . . . . . . . . . . .13
6. Indicatore RDM (Casuale) . . . . . . . . . . . . . . . . . .14
7. Indicatore MEM (Memoria) . . . . . . . . . . . . . . . . .14
n Diffusori
8. Indicatore di ripetizione. . . . . . . . . . . . . . . . . . . .14
9. Indicatore Riproduci/Pausa. . . . . . . . . . . . . . . . .12
1. Tweeter
10. Indicatore sintonizzazione FM/AM . . . . . . . . . . .18
2. Woofer
11. Indicatore di modo FM stereofonico . . . . . . . . .18
3. Condotto riflessione
12. Indicatore stazioni stereo . . . . . . . . . . . . . . . . . .18
bassi
13. Indicatore RDS . . . . . . . . . . . . . . . . . . . . . . . . . . .19
14. Indicatore PTY . . . . . . . . . . . . . . . . . . . . . . . . . . .19
15. Indicatore TP . . . . . . . . . . . . . . . . . . . . . . . . . . . .19
16. Indicatore TA . . . . . . . . . . . . . . . . . . . . . . . . . . . .19
n Le griglie dell’altoparlante sono rimovibili
17. Indicatore esclusione dell’audio. . . . . . . . . . . . . .9
18. Indicatore titolo . . . . . . . . . . . . . . . . . . . . . . . . . .16
(solo X-HM20)
19. Indicatore artista . . . . . . . . . . . . . . . . . . . . . . . . .16
20. Indicatore di cartella . . . . . . . . . . . . . . . . . . . . . .16
Fare in modo che niente venga a
21. Indicatore album . . . . . . . . . . . . . . . . . . . . . . . . .16
contatto con le membrane dei
22. Indicatore file . . . . . . . . . . . . . . . . . . . . . . . . . . . .16
diffusori quando le griglie sono
23. Indicatore del brano. . . . . . . . . . . . . . . . . . . . . . .14
rimosse.
24. Indicatore del timer giornaliero . . . . . . . . . . . . .21
25. Indicatore timer una sola volta . . . . . . . . . . . . . .21
26. Indicatore disco . . . . . . . . . . . . . . . . . . . . . . . . . .13
27. Indicatore totale . . . . . . . . . . . . . . . . . . . . . . . . . .16
28. Indicatore di autospegnimento . . . . . . . . . . . . .23
It-6
11/5/25 X-HM10_20_It.fm
1
2
17
18
19
3
20
21
4
22
23
5
24
6
25
7
26
8
27
9
10
28
29
11*
30
12
31*
13*
32*
33
14
34
15
35
16
36
*I tasti 11, 13, 31, 32 sono disponibili solo per X-HM20.
9
15
1 4 5 6 7
2 3
8
10 11 1312 14
16
17
28272624 2523221918 2120
1
3
2
n Telecomando
n Display
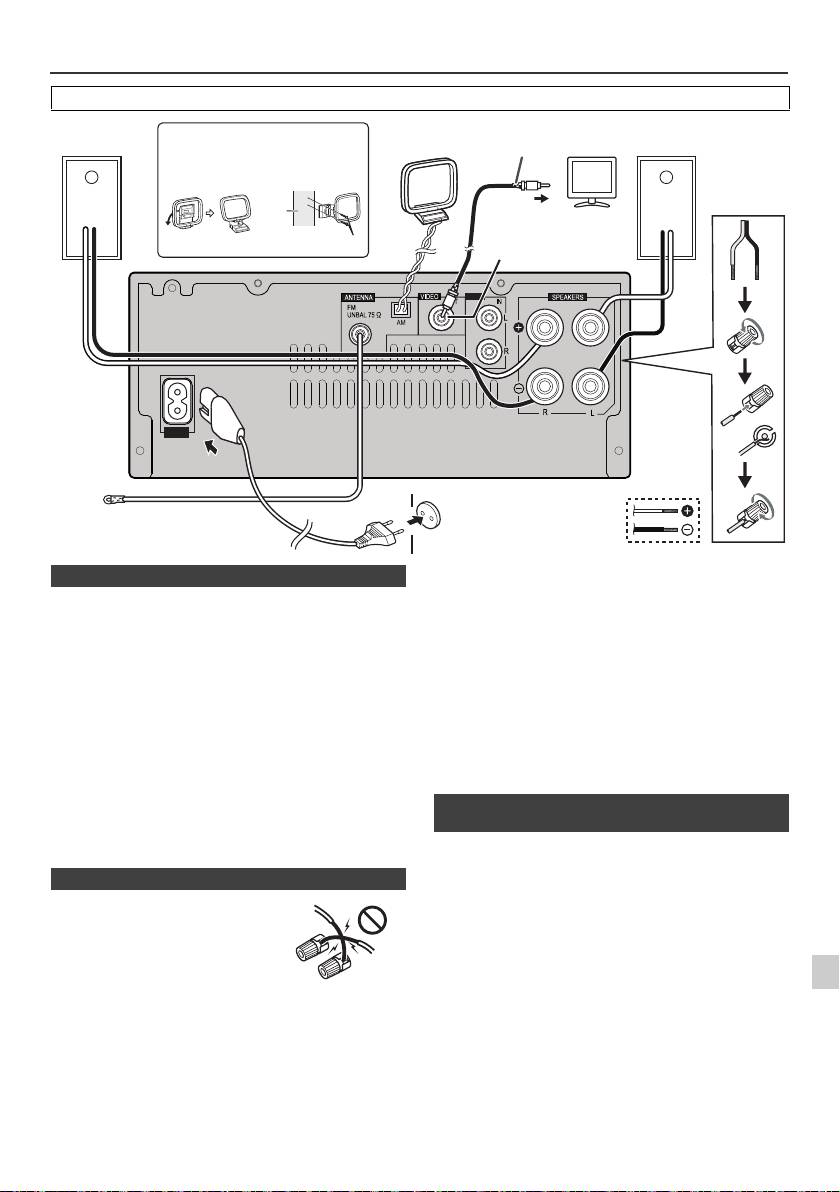
Collegamenti del sistema
Prima di eseguire o cambiare i collegamenti, spegnete l'apparecchio e scollegate la spina dalla presa AC.
Antenna FM in dotazione:
Collegare il filo dell’antenna FM alla presa FM 75 OHMS
e posizionarlo nella direzione in cui è possibile ricevere il
più forte segnale.
Antenna FM esterna:
Utilizzare un’antenna FM esterna (cavo coassiale 75 ohm)
per una migliore ricezione. Se si usa un’antenna FM
esterna, disinserire il cavo dell’antenna FM in dotazione.
Antenna a telaio AM in dotazione:
Collegare il filo dell’antenna AM a telaio al morsetto AM.
Posizionare l’antenna AM a telaio per una ricezione
ottimale. Posizionare l’antenna AM a telaio su uno
scaffale, ecc. o fissarla a un supporto o a una parere con
delle viti (non incluse nella confezione).
Nota:
Collocare l’antenna sull’apparecchio o vicino al cavo di
alimentazione potrebbe causare dei rumori. Per una
migliore ricezione collocare l’antenna lontano
1
dall’apparecchio.
I file di immagini e video dell’iPod o iPhone possono
essere visualizzati collegando il sistema all’apparecchio
2
TV/monitor. Se la TV/monitor è dotato di un ingresso
video, collegarlo alla presa VIDEO OUT sul retro dell’unità
3
e impostare l’uscita TV dell’unità iPod o iPhone sulla
posizione “ON”.
Nota:
4
Accertarsi che le impostazioni dell’unità iPod NTSC o PAL,
siano le stesse del segnale TV. Per ulteriori informazioni,
5
visitare la home page di Apple.
6
7
8
9
It-7
11/5/25 X-HM10_20_It.fm
LINE
AUX
LOOP
AC IN
Cavo video
Diffusore
Installazione dell’antenna AM a telaio
Antenna
Diffusore
TV
(non in dotazione)
destro
AM a telaio
sinistro
< Appendere
< Montaggio >
alla parete >
parete
Alla presa di ingresso video
Presa corrente video
Viti (non fornite in dotazione)
(solo X-HM20)
Presa a muro
(220 V a 240 V c.a,
Antenna FM
50 Hz/60 Hz)
n Collegamento dell’antenna
n Collegamento dei diffusori
l
Intrecciate tra loro i fili esposti.
l Collegate il filo rosso al terminale
più (+) e l’altro filo al terminale
meno (–).
l Usare gli altoparlanti con
un’impedenza di 4 ohm, infatti,
un’impedenza inferiore potrebbe
danneggiare l’unità.
Sbagliato
l
I terminali degli altoparlanti sono sotto tensione, la stessa
PERICOLOSA tensione della corrente di rete. Per
prevenire rischi di folgorazioni nel corso delle operazioni di
collegamento o di distacco dei cavi degli altoparlanti,
staccare il cavo di alimentazione principale prima di toccare
qualsiasi parte non isolata.
l Non appendete questi altoparlanti alla parete o al
soffitto, poiché potrebbero causare incidenti in caso di
caduta.
l
Non confondere il canale destro con quello sinistro. Il
diffusore destro è quello che si trova a destra quando si
osserva la parte anteriore dell’apparecchio.
l Fare in modo che i fili nudi dei diffusori non si tocchino.
l Non fare cadere e non inserire oggetti nei condotti
riflessione bassi.
l
Non sedere sui diffusori e non salirvi sopra. Vi potreste
fare male se si rompessero.
n Connettere l’iPod o l’iPhone alla TV (solo
X-HM20)

Collegamenti del sistema (continua)
Telecomando
n Collegamento di alimentazione CA
Dopo avere controllato che tutti i collegamenti sono stati
eseguiti bene, inserire la spina del cavo di alimentazione
c.a. nella presa a muro.
Nota:
Disinserire il cavo di alimentazione c.a. dalla presa a muro
se l’apparecchio non sarà usato per un lungo periodo di
tempo.
Attenzione:
l Maneggiare il cavo di alimentazione dal lato della
spina. Non estrarre la spina tirando il cavo e non
toccare mai il cavo d’alimentazione con le mani
bagnate, altrimenti si può verificare un corto circuito o
scosse elettriche. Non poggiare l’apparecchio, mobili o
altri oggetti sul cavo di alimentazione, né comprimerlo
in alcun modo. Non fare mai nodi nel cavo, né legarlo
Avvertenza:
ad altri cavi. Far passare i cavi d’alimentazione in
l Non usate o non riponete le pile alla luce diretta del
modo tale che non sia possibile calpestarli. Un cavo
sole o in altri posti eccessivamente caldi, come in
d’alimentazione danneggiato può causare un incendio
un’auto o vicino a un calorifero. Questo potrebbe
o folgorazione. Controllare il cavo d’alimentazione ogni
provocare una perdita, uno scoppio o un incendio delle
tanto. Se si dovesse trovare il cavo danneggiato,
pile. Questo potrebbe persino ridurre la durata delle
rivolgersi al più vicino centro di assistenza autorizzato
pile.
Pioneer per richiederne la sostituzione.
Attenzione:
l Non usate fili di corrente diversi da quello fornito con
l
Rimuovete le pile se l’unità non viene usata per parecchio
questa unità.
tempo. Ciò previene il danno causato da eventuali
l Non usate il filo di corrente in dotazione per scopi
perdite.
diversi da quelli descritti sopra.
l
Non usate pile ricaricabili (al nichel-cadmio e così via).
l
Se le pile non sono installate correttamente, si potrebbero
n Collegamento di un televisore, ecc.
verificare dei guasti.
Note riguardanti l’uso:
Collegare alla TV usando un cavo audio
.
l
Sostituite le pile se la distanza di operazione si riduce o se
le operazioni diventano erratiche. Acquistare pile del tipo
“AA”.
l
Pulire periodicamente il trasmettitore del telecomando e il
sensore dell’apparecchio con un panno morbido.
l
Esponendo il sensore ad una luce intensa si potrebbe
interferire con il funzionamento. Se ciò dovesse accadere,
cambiare l’illuminazione o la direzione dell’apparecchio.
l
Proteggere il telecomando da umidità, calore, colpi e
vibrazioni.
l Se dovete smaltire vecchie pile, attenetevi alle leggi
governative o ambientali e alle regole pubbliche in
vigore nel vostro paese.
Provare il telecomando dopo avere controllato tutti i
collegamenti.
Volgere il telecomando in direzione del sensore
dell’apparecchio. Il telecomando può essere usato entro il
raggio indicato qui in basso:
Per selezionare la funzione Line In:
l
Sull'unità principale: Premere ripetutamente il tasto
INPUT fino a quando non si visualizza Line In.
l
Sul telecomando: Premete il tasto LINE più volte fino a
quando non visualizzate Line In.
It-8
11/5/25 X-HM10_20_It.fm
LINE
AUX
LOOP
AC IN
TV
Alle prese di
ingresso audio
Cavo audio
(disponibile
in
commercio)
Segnali audio
Alle prese
di ingresso
Apparecchio
LINE
n Installazione della batteria
1
Aprire il coperchio del vano pile.
2
Inserite la pila in dotazione nella direzione indicata nello
scomparto pile.
Quando si inseriscono o rimuovono le pile, spingerle verso
il terminale (–) delle pile stesse.
3
Chiudere il coperchio.
n Prova del telecomando
STANDBY/ON
Sensore a distanza
7 m
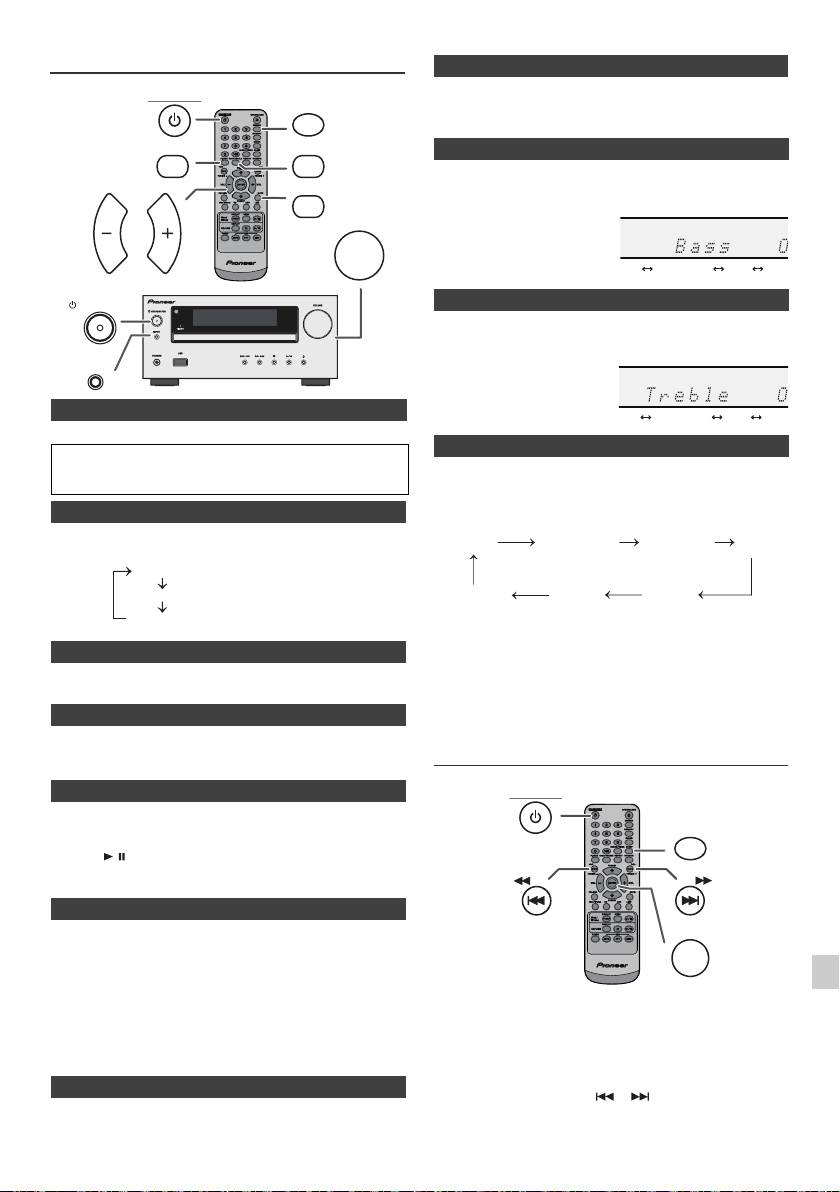
Comando unico
Quando la corrente viene accesa la prima volta, l’unità si attiva in
modalità P.bass che pone in rilievo le frequenze basse. Per annullare
la modalità P.bass, premete il tasto P.BASS sul telecomando.
1
Premere il pulsante BASS/TREBLE per selezionare “Bass”.
2
Entro 5 secondi, premere il pulsante VOL (+ o –) per regolare gli
bassi.
1
Premere il pulsante BASS/TREBLE per selezionare “Treble”.
2
Entro 5 secondi, premere il pulsante VOL (+ o –) per regolare gli
acuti.
n Per accendere l’apparecchio
Premere il pulsante STANDBY/ON per accendere l’apparecchio.
Dopo l’uso:
Premere il pulsante STANDBY/ON per porre l’apparecchio nel
Quando si preme il tasto INPUT sull’unità principale, la
modo stand-by.
funzione corrente passerà ad una modalità diversa.
Premere ripetutamente il tasto INPUT per selezionare la
n Visualizzazione del comando luminosità
funzione desiderata.
Per abbassare la luminosità del display, premere il tasto
DIMMER sul telecomando.
Nota:
n Auto-impostazione volume
La funzione di backup proteggerà la modalità di funzionamento
Se lo spegnete quando il volume dell'unità principale è impostato su
memorizzata per alcune ore nel caso d’interruzione della corrente
17 o di più, il volume parte a 16.
dovuta a un guasto o se il cavo di alimentazione viene disinserito
dalla presa della rete elettrica.
n Controllo di volume
Regolazione dell’orologio
Ruotare la manopola del volume verso VOLUME (sull’unità principale)
oppure premere VOL +/– (sul telecomando) per aumentare o diminuire
(Solo per telecomando)
il volume.
n Funzione di accensione automatica
Quando si preme uno dei seguenti pulsanti, l’apparecchio si accende.
l
iPod / iPhone, CD, USB, LINE, TUNER sul telecomando: La
1
funzione selezionata è attivata.
l
Tasto / dell’apparecchio principale: l’unità si accende e viene
2
avviata la riproduzione dell’ultima funzione (CD, TUNER, USB,
iPod, LINE IN).
3
n Funzione di spegnimento automatico
L'unità principale entrerà in modalità stand-by (quando iPod/iPhone
4
non è agganciato) dopo 15 minuti di inattività nei seguenti casi:
iPod/iPhone: Nessuna connessione.
CD / USB: Durante il modo di arresto.
5
LINE IN: Non si trova il segnale di entrata o si sente un suono
appena percepibile.
In questo esempio, l’orologio è regolato per il display di 24 ore
(00:00).
6
Nota:
Solo X-HM20: Tuttavia, se iPod/iPhone è collegato, l
’
unità inizierà il
caricamento.
7
Si visualizza “Charge Mode” durante la modalità stand-by.
n Eliminazione dell’audio
8
Il volume viene temporaneamente silenziato premendo il tasto
MUTE del telecomando. Premerlo di nuovo per ripristinare il volume.
9
It-9
11/5/25 X-HM10_20_It.fm
STANDBY/ON
DIMMER
P.BASS
BASS/TREBLE
MUTE
VOLUME
VOL VOL
STANDBY/ON
INPUT
Dimmer 1
Dimmer 2
Dimmer Off
(Lo schermo è sfocato).
(Lo schermo è oscurato).
(Lo schermo è luminoso).
n P.Bass control
n Controllo dei bassi
n Controllo degli acuti
n Funzione
1
Premere il pulsante STANDBY/ON per accendere l’apparecchio.
2
Premere il pulsante CLOCK/TIMER.
3
Entro 10 secondi, premere il pulsante ENTER. Per impostare il
giorno, premere il pulsante o e poi premere il pulsante
ENTER.
........
-5 -4 +4 +5
........
-5 -4 +4 +5
CD AM
FM STEREO
FM MONO
Line In
iPod
USB
(solo X-HM20)
STANDBY/ON
CLOCK/TIMER
TUNING −
TUNING +
ENTER
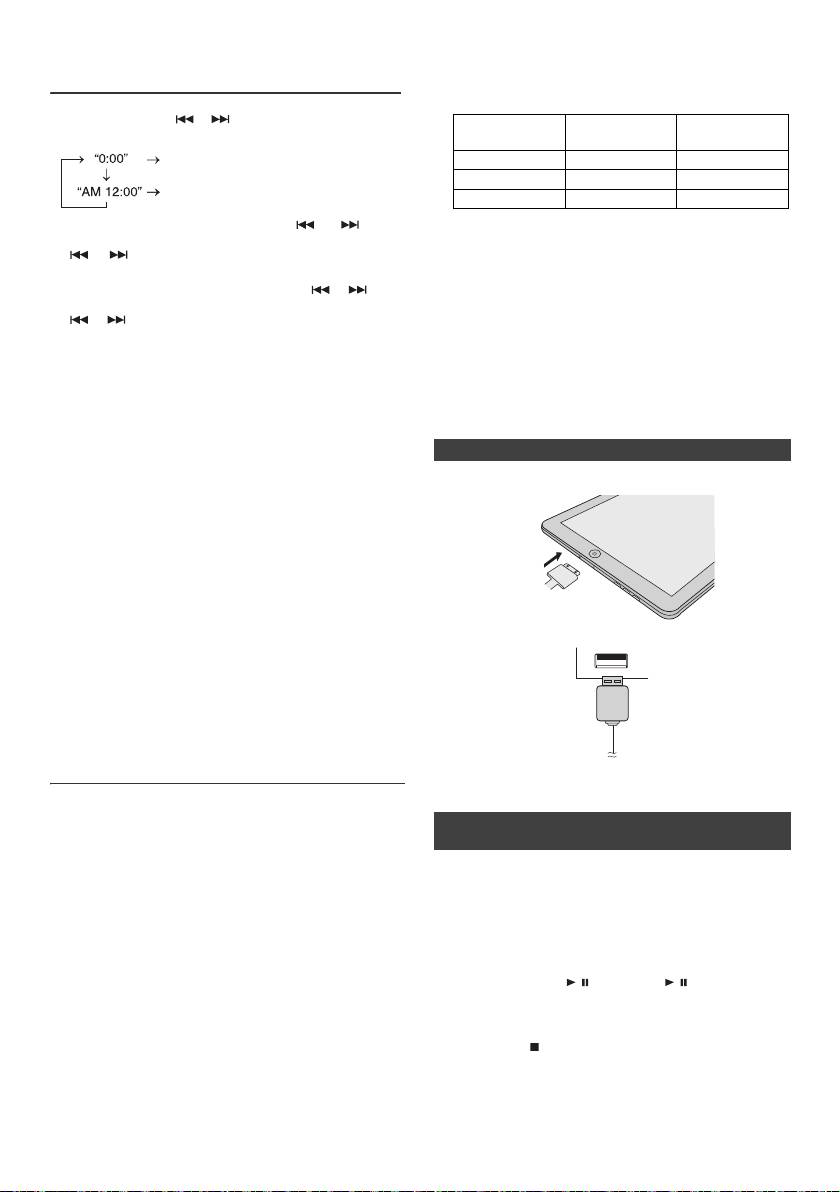
l Installare versioni software diverse da quelle indicate
Regolazione dell’orologio
dal sito web di Pioneer sul vostro iPod/iPhone/iPad
(Solo per telecomando) (continua)
potrebbe essere incompatibile con questo sistema.
l Caricare il terminale per iPod, iPhone e iPad:
4
Premere il pulsante o per selezionare il display di
Base di
24 ore o 12 ore e poi premere il pulsante ENTER.
Condizione
Terminale USB
aggancio
Appare il display di 24 ore.
Funzione USB NO SI
(00:00 - 23:59)
Altra funzione SI NO
Appare il display di 12 ore.
Stand-by SI NO
(AM 12:00:00 - PM 11:59)
5
Per regolare l’ora, premere il tasto o e poi
l Il messaggio “Questo accessorio non è stato costruito
premere il tasto ENTER. Premere una volta il pulsante
per funzionare con iPhone” o altri simili, potrebbe
o per fare avanzare l’orologio di 1 ora. Tenerlo
comparire sulla schermata dell’iPhone quando:
abbassato per farlo avanzare continuamente.
- la batteria è scarica.
6
Per regolare i minuti, premere il pulsante o e poi
- L’iPhone non è agganciato correttamente (per
premere il pulsante ENTER. Premere una volta il tasto
esempio, in pendenza).
o per fare avanzare l’orologio di 1 minuti.
Se dovesse accadere, rimuovere e poi riagganciare
Per controllare il display dell’ora:
l’iPhone.
Premere il pulsante CLOCK/TIMER. Il display dell’ora appare
l
Questo prodotto è stato costruito per l’iPhone. Per
per circa 5 secondi.
prevenire delle interferenze random quando l’iPod/
iPhone è agganciato, l’uscita degli auricolari è
Nota:
disattivata e si visualizzerà “HP INVALID”.
Quando viene ripristinata l
’
alimentazione dopo che l
’
unità è
È possibile che si senta una breve interferenza audio
durante le chiamate in entrata.
ricollegata alla corrente o dopo un black-out, eseguire il reset
dell
’
orologio (pagina 9).
n Connessione iPad (Terminale USB)
Per regolare di nuovo l’orologio:
1
Inserire il connettore nell'iPod, iPhone o iPad.
Eseguire “Regolazione dell’orologio” dal punto 1. Se “Clock”
non appare nel punto 2, il punto 4 (per la selezione del display
di 24 ore o 12 ore) sarà saltato.
Per cambiare il display di 24 ore o di 12 ore:
1 Cancellare tutti i contenuti programmati. [Per i dettagli,
fare riferimento a “Ripristino delle impostazioni
predefinite, annullamento di tutta la memoria” a pagina
25.]
2 Collegate l’iPad all’unità attraverso il connettore USB.
2 Eseguire la procedura di “Impostazione orologio” dal
punto 1 in poi.
Nota:
Le impostazioni del timer si azzerano se il cavo di corrente viene
estratto o se si verifica un blackout .
Ascoltare da iPod, iPhone o iPad
(solo X-HM20)
Nota:
Il connettore USB non supporta l’emissione VIDEO.
Modelli di iPod, iPhone e iPad supportati:
l
iPad
n Playback di iPod, iPhone o iPad (Terminale
l
iPhone 4
USB)
l
iPhone 3GS
l
iPhone 3G
1 Premere il tasto STANDBY/ON per accendere la
l
iPhone
corrente.
o
l
iPod touch (4
generazione)
2 Premere il tasto USB sul telecomando o il tasto INPUT
o
l
iPod touch (3
generazione)
ripetutamente sull’unità principale per selezionare la
o
l
iPod touch (2
generazione)
funzione USB.
o
l
iPod touch (1
generazione)
3 Connettere iPod, iPhone o iPad all’unità. Apparirà
l
iPod classic
“iPod”.
o
l
iPod nano (6
generazione)
4 Premere il tasto / (CD/USB / ) per avviare il
o
l
iPod nano (5
generazione)
playback.
o
l
iPod nano (4
generazione)
o
l
iPod nano (3
generazione)
Nota:
o
l
iPod nano (2
generazione)
Il tasto di stop ( ) non è attivato durante il playback di
Note:
iPod, iPhone o iPad.
l Questo ricevitore è stato sviluppato e testato per le
versioni software dell’iPod/iPhone/iPad indicate sul
sito web di Pioneer (http://pioneer.jp/homeav/support/
ios/eu).
It-10
11/5/25 X-HM10_20_It.fm
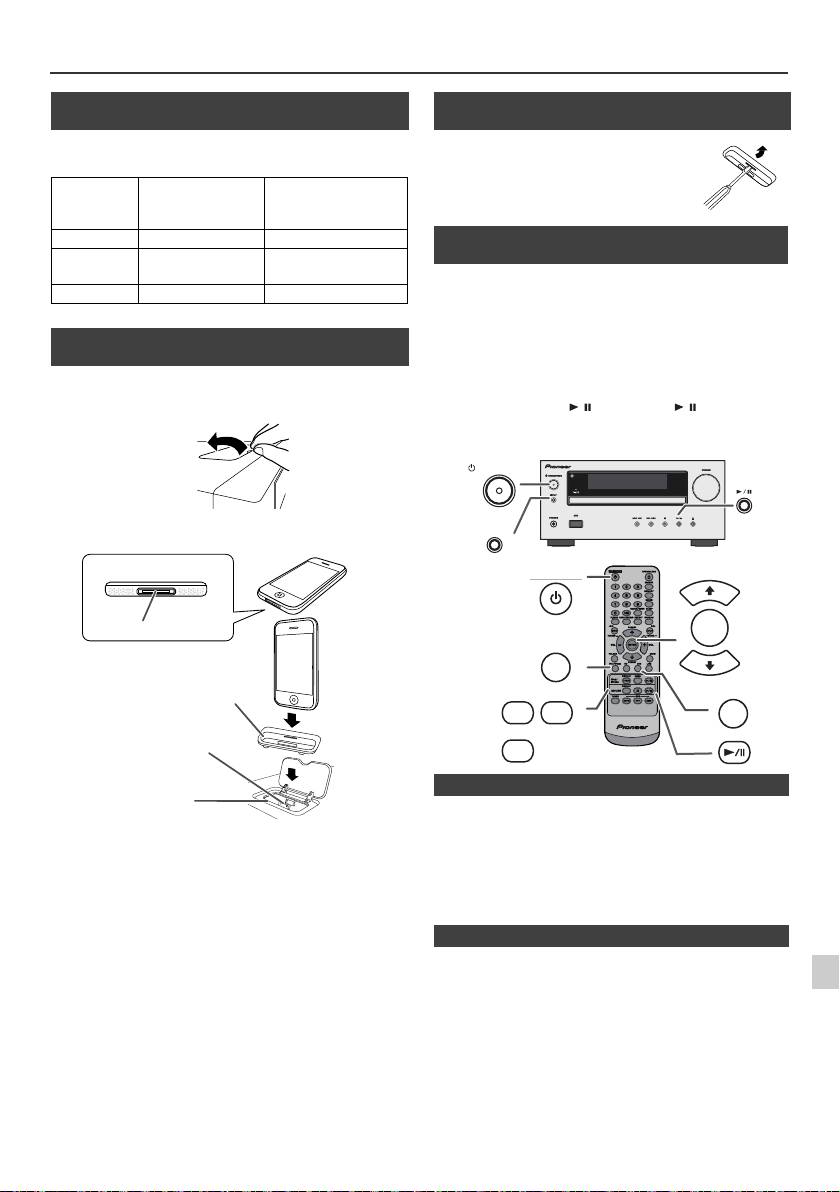
Ascoltare da iPod, iPhone o iPad (solo X-HM20) (continua)
n Connessione all’adattatore iPod e iPhone
(Base di aggancio)
Nota:
Usare l’adattatore in dotazione con l’unità iPod o iPhone.
Nr.
Descrizione
Capacità
adattatore
iPhone
iPhone
12 iPhone 4GB & 8GB & 16GB
15 iPhone 3G,
8GB & 16GB & 32GB
iPhone 3GS
19 iPhone 4 16GB & 32GB
n Come inserire l’adattatore iPod o iPhone
(Base di aggancio)
1
Aprire la base di aggancio di iPod e iPhone tirando
verso l’alto.
2 Inserire l’adattatore di iPod e iPhone nell’unità e
connettere il vostro iPod o iPhone.
l
L’audio passerà automaticamente dall’iPhone all’unità
principale solo dopo il completamento del processo di
1
Attenzione:
autenticazione dopo circa 10 secondi.
Scollegare tutti gli accessori dell’iPod o dell’iPhone prima di
l
Le chiamate in arrivo metteranno in pausa il playback.
inserire il suddetto nel dock.
2
l
Dopo aver risposto alla chiamata, la conversazione può
essere udita solo attraverso l’altoparlante incorporato
dell’iPhone. Accendere l’altoparlante dell’iPhone o
3
scollegare lo stesso per iniziare la conversazione.
4
Rimuovere semplicemente l
’
iPod o l
’
iPhone dalla base di
aggancio o l
’
iPad dal terminale USB. Questa operazione può
5
essere svolta tranquillamente anche durante la riproduzione.
6
7
8
9
It-11
11/5/25 X-HM10_20_It.fm
iPhone
iPhone (basso)
Connettore dock
Adattatore per iPhone
Connettore per iPhone
Aggancio per iPhone
n Rimuovere l’adattatore per iPod o iPhone
(Base di aggancio)
Inserire la punta di un cacciavite (tipo “–”,
piccolo) nel foro dell’adattatore come da
figura e sollevare verso l’alto per
rimuoverlo.
n Playback di iPod o iPhone
(Base di aggancio)
1
Premere il pulsante STANDBY/ON per accendere
l’apparecchio.
2
Premere il pulsante iPod/iPhone sul telecomando o il
pulsante INPUT sull’unità principale ripetutamente per
selezionare la funzione iPod.
3
Inserire l’unità iPod o iPhone nel dock iPod dell’unità
principale.
4
Premere il pulsante / (iPod/iPhone / ) per iniziare la
riproduzione.
STANDBY/ON
INPUT
STANDBY/ON
PRESET
ENTER
iPod/iPhone
PRESET
DISPLAY
MENU
USB
iPod/
TV OUT
iPhone
DISPLAY
CD/USB
n Riproduzione iPhone
n Disconnettere iPod, iPhone o iPad
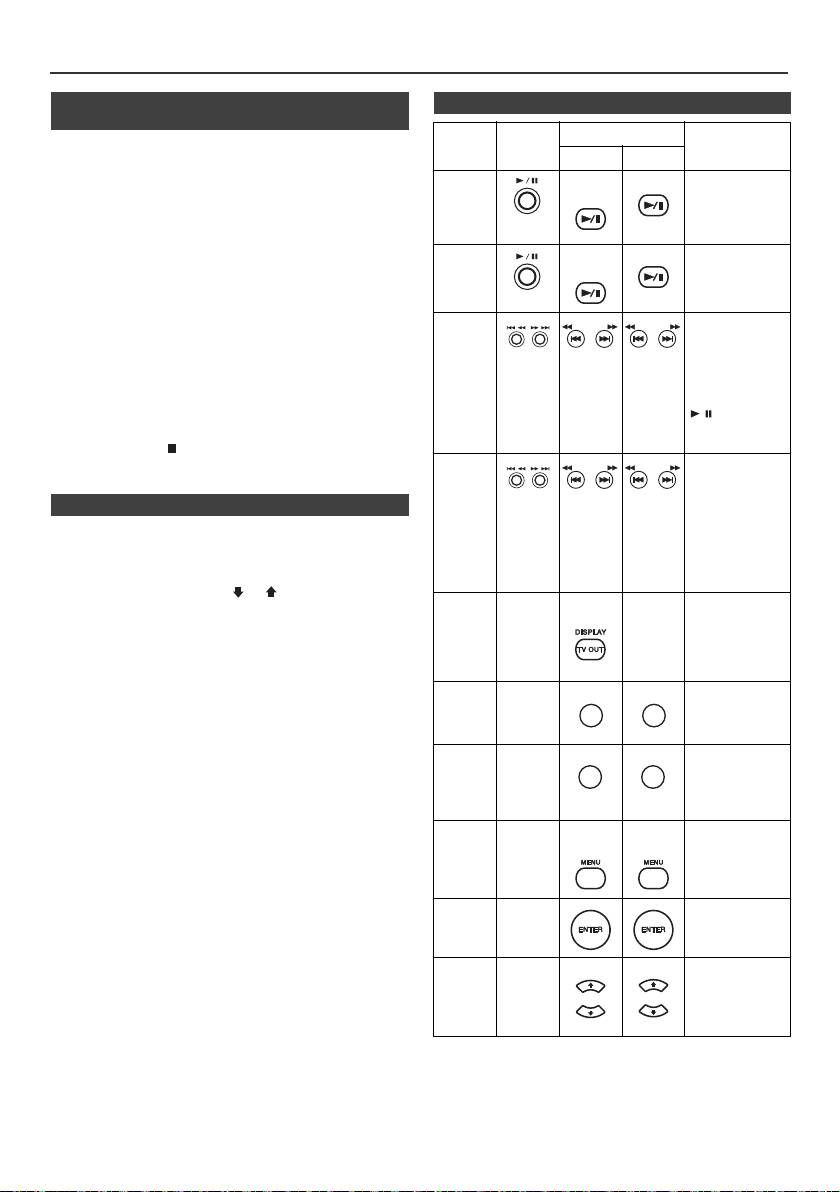
Ascoltare da iPod, iPhone o iPad
(solo X-HM20) (continua)
n Guardare video su una TV collegata
n Funzioni varie di iPod, iPhone e iPad
all’iPod o iPhone
Funzione
Apparecchio
Telecomando
Funzionamento
principale
1
Premere il pulsante DISPLAY TV OUT per più di 2 secondi.
Dock USB
Verrà visualizzato “TV Display”.
Riproduzione
iPod/
CD/USB
Premere nella
2
Premere il pulsante ENTER per avviare la riproduzione.
iPhone
modalità di pausa.
Note:
l
Se l’impostazione dell’uscita TV è già attiva nel menu
VIDEO, il video verrà visualizzato automaticamente sullo
schermo della TV quando si preme ENTER.
Pausa
iPod/
CD/USB
Premere mentre
l
La schermata in uscita dalla TV non è supportata attraverso
iPhone
l’apparecchio è nel
il terminale USB. (iPad)
modo di
riproduzione.
l
Per tornare a guardare il video sullo schermo dell’iPod o
dell’iPhone, premere il tasto MENU per accedere al menu
video. Successivamente, premere il pulsante DISPLAY TV
Brano
Premere nella
OUT per più di 2 secondi, fino a visualizzare “iPod Display”.
successivo/
modalità di
riproduzione o
l
Durante la riproduzione video iPod o iPhone, se si preme il
precedente
pausa. Se si preme
tasto DISPLAY TV OUT non si passerà dalla visualizzazione
il pulsante in
sull’iPod a quella TV e viceversa.
modalità di pausa,
premere il pulsante
Attenzione:
/ per avviare la
l
Scollegare tutti gli accessori dell’iPod o dell’iPhone prima di
riproduzione del
inserire il suddetto nel dock dell’iPod.
brano desiderato.
l Il tasto Stop ( ) sull’unità principale non funziona
durante l’attivazione dell’iPod.
Avanzamento
Premere e tenere
riavvolgimento/
abbassato mentre
l’apparecchio è nel
rapido
n Navigare nei menù di iPod, iPhone o iPad
modo di
riproduzione.
1
Premere il tasto MENU dell'iPod/iPhone per visualizzare il
Rilasciare il
menù sulle unità iPod, iPhone o iPad. Premerlo nuovamente
pulsante per
riprendere la
per tornare al menu precedente.
riproduzione.
2
Usare il pulsante PRESET (
o
) per selezionare una
voce del menu, quindi premere il pulsante ENTER.
Display
____
iPod/
____
Premere per più di
iPhone
2 secondi per
Nota:
attivare la
Quando si naviga nei menu dell’iPod, dell’iPhone o dell’iPad con
schermata di uscita
video tra l’iPod o la
il telecomando, non utilizzare alcun altro tasto sull’unità iPod o
TV.
iPhone. Per regolare il volume premere il pulsante VOL (+ o –)
sull’unità principale e il telecomando. Regolare il volume sulle
Ripeti
____
Premere per
unità iPod, iPhone o iPad non produce effetti.
attivare/disattivare
la modalità di
Funzionamento dell’iPod e dell’iPhone:
ripetizione.
Le operazioni descritte qui di seguito dipendono dalla
Riproduzione
____
Premere per
generazione dell’iPod e iPhone che si utilizza.
casuale
attivare o disattivare
la modalità di
Sistema acceso:
riproduzione
Se l
’
unità principale è attivata, le unità iPod, iPhone o iPad si
casuale.
attiveranno automaticamente se agganciate all
’
unità.
Menu
____
iPod/
iPod/
Premere per
iPhone
iPhone
visualizzare il menu
Sistema spento (funzionamento in stand-by):
iPod
iPod durante la
Se l
’
unità principale è impostata in modalità stand-by, le unità
funzione iPod.
iPod, iPhone agganciate o l
’
iPad connesso si imposteranno
automaticamente in stand-by.
Invio
____
Premere per
iPod
confermare la
selezione.
iPod
____
Premere per
cursore
selezionare il menu
iPod.
su/ giù
It-12
11/5/25 X-HM10_20_It.fm
TUNING −
TUNING +
TUNING −
TUNING +
TUNING −
TUNING +
TUNING −
TUNING +
REPEAT
REPEAT
RANDOM
RANDOM
PRESET
PRESET
PRESET
PRESET
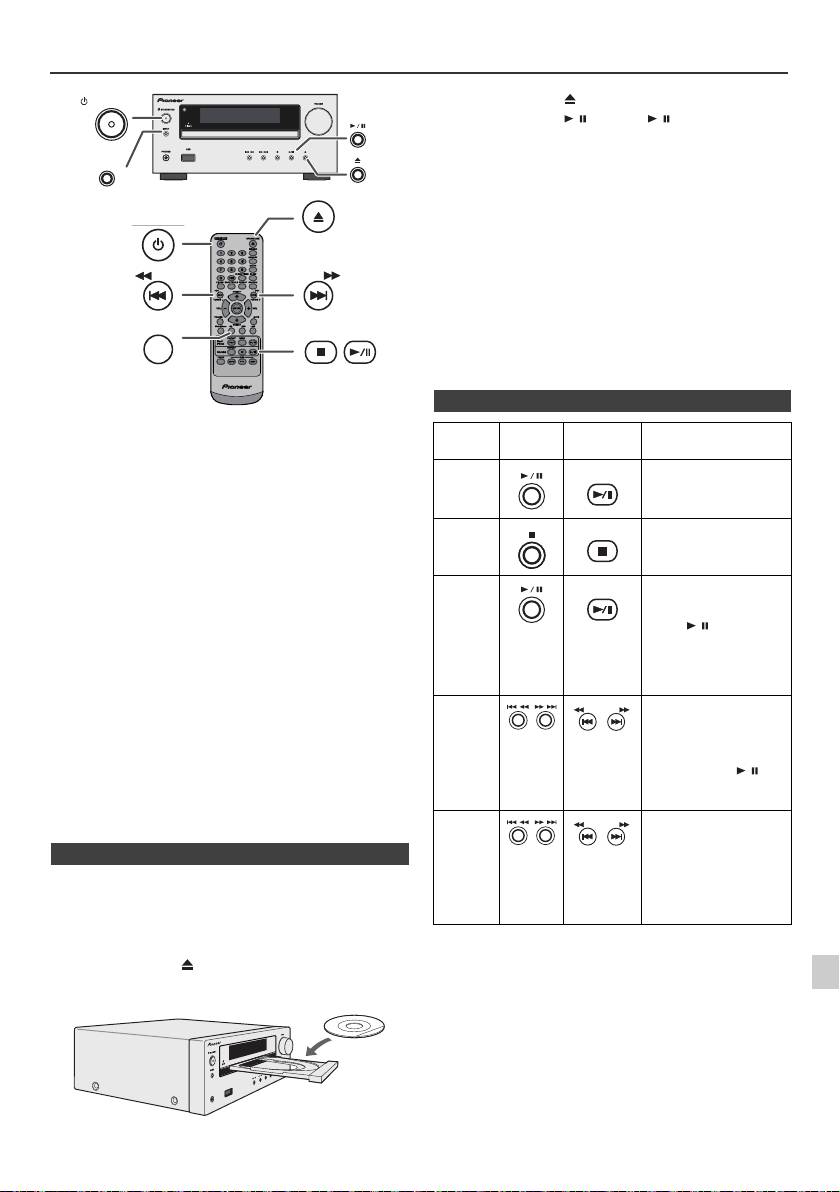
Ascolto di un CD o disco MP3/WMA
STANDBY/ON
INPUT
Attenzione:
OPEN/CLOSE
l
Non collocare due dischi su un unico piatto.
l
Non riprodurre dischi di forma speciale (cuore, ottagono,
STANDBY/ON
ecc.). Potrebbe provocare malfunzionamenti.
l
Non spingere il cassetto del disco mentre è in movimento.
l
Se la corrente viene a mancare mentre il cassetto è aperto,
aspettare fino a quando la corrente viene ripristinata.
l
Se durante il funzionamento del lettore CD si verificano
interferenze con la ricezione TV o radio, allontanare
l’apparecchio dal televisore o dalla radio.
TUNING −
TUNING +
l
Assicurarsi di collocare i dischi da 8 cm al centro del piatto
CD
disco.
l
A causa della struttura delle informazioni del disco, la lettura
di un disco MP3/WMA richiede più tempo di quella di un
normale CD (da 20 a 90 secondi circa).
Questo sistema può eseguire riproduzioni di CD standard, CD-
R/RW nel formato CD e CD-R/RW con file MP3 o WMA, ma non
può registrare su di essi. La riproduzione di alcuni CD-R e CD-
RW dischi potrebbe non essere possibile a causa delle
condizioni del disco o dell’apparecchiatura usata per la
registrazione.
MP3:
MP3 è una forma di compressione. È l’acronimo per MPEG
Audio Layer 3. MP3 è un tipo di codice audio che è
processato ad elevata compressione rispetto alla sorgente
audio originale con un trascurabile deterioramento della
qualità del suono.
l
Questo sistema supporta i file MPEG 1 Layer 3 e VBR.
l
Durante la riproduzione di file VBR, il contatore del tempo nel
display potrebbe essere diverso dal tempo di riproduzione
reale.
l
La velocità di dati supportata da MP3 è 32 kbps a 320 kbps.
WMA:
WMA sono file con formato di sistema d’avanguardia i quali
includono file audio compressi con il codice Windows
Media Audio. WMA è stato sviluppato da Microsoft come file
con formato audio per Windows Media Player.
l
L’indicatore “MP3” e “WMA” si illumina quando l’apparecchio
legge le informazioni su un disco MP3 o WMA.
l
La velocità di dati supportata da WMA è 64 kbps a 160 kbps.
1
n Riproduzione disco
2
1
Premere il pulsante STANDBY/ON per accendere
l’apparecchio.
3
2
Premere il pulsante CD nel telecomando oppure
ripetutamente il pulsante INPUT nell’unità principale per
4
selezionare la funzione CD.
3
Premere il pulsante per aprire il piatto disco.
5
4
Collocare il CD sul piatto disco, con il lato con l’etichetta rivolto
verso l’alto.
6
7
8
9
It-13
11/5/25 X-HM10_20_It.fm
USB
PHONES
5
Premere il pulsante per chiudere il piatto disco.
6
Premere il pulsante
/
(CD/USB
/
) per iniziare la
riproduzione. Dopo che l’ultima traccia è stata riprodotta,
l’unità si arresterà automaticamente.
n Varie funzioni del disco
Funzione
Apparecchio
Telecomando
Funzionamento
principale
Riproduzione
CD/USB
Premere mentre
l’apparecchio è nel modo
di arresto.
Arresto
CD/USB
Premere mentre
l’apparecchio è nel modo
di riproduzione.
Pausa
CD/USB
Premere mentre
l’apparecchio è nel modo
di riproduzione. Premere
il tasto / per
ricominciare la
riproduzione dal punto in
cui è stata eseguita la
pausa.
Brano
Premere mentre
successivo/
l’apparecchio è nel modo
TUNING −
TUNING +
di riproduzione o di
precedente
arresto. Se premete il
tasto in modalità stop, poi
premete il tasto / per
attivare la pista
desiderata.
Avanzamento
Premere e tenere
riavvolgimento/
abbassato mentre
TUNING −
TUNING +
l’apparecchio è nel modo
rapido
di riproduzione.
Rilasciare il pulsante per
riprendere la
riproduzione.
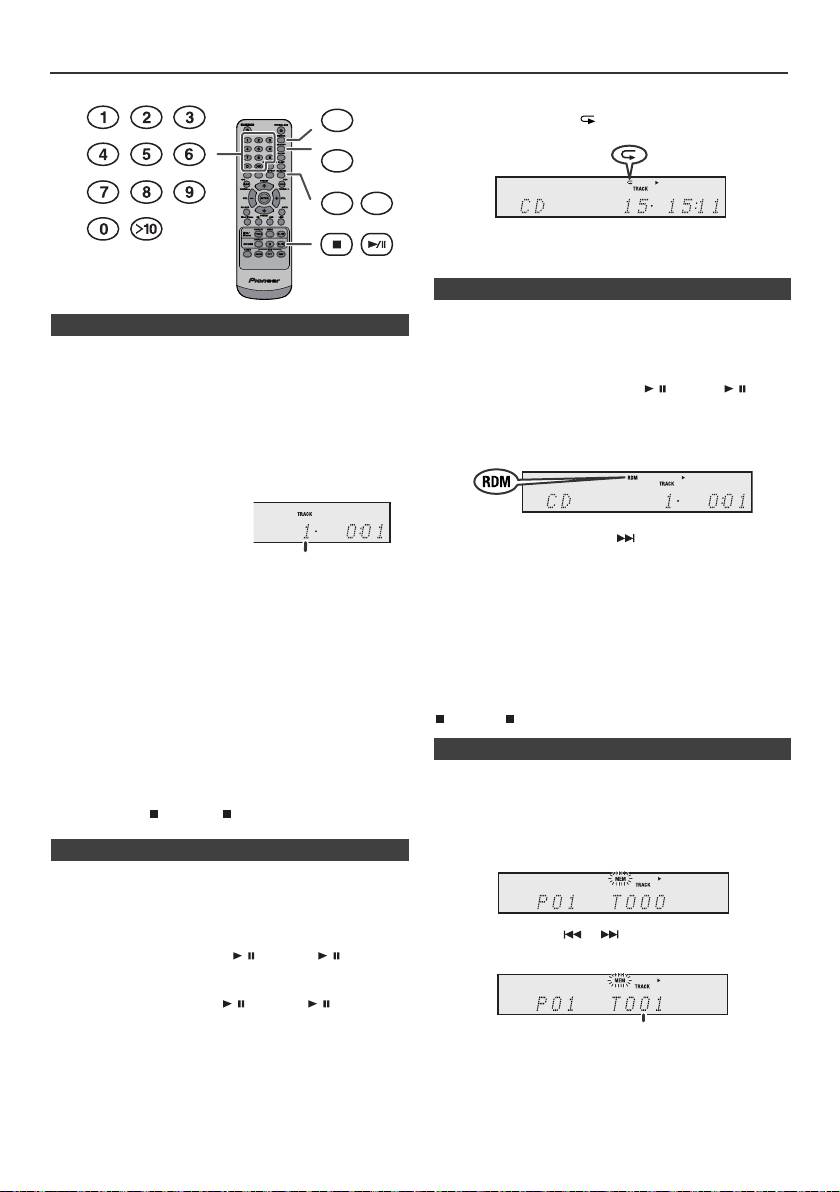
Riproduzione d’avanguardia di un CD o disco MP3/WMA
Per cancellare la ripetizione di lettura:
DIMMER
Premere ripetutamente il pulsante REPEAT fino a quando è
visualizzato “Normal” e “ ” scompare.
MEMORY
REPEAT
RANDOM
Note:
Durante la riproduzione casuale non
è
possibile
selezionare la riproduzione casuale.
È possibile riprodurre automaticamente i brani di un disco
n Ricerca diretta di un brano
secondo un ordine casuale.
Usando i tasti Numerici, le piste desiderate sul disco in
Per la riproduzione ad accesso casuale di tutti i brani:
funzione possono essere riprodotte.
Premete e tenete premuto RANDOM sul telecomando fino a quando
Usate i tasti Numerici sul telecomando per selezionare la
non appare “Random”. Premere il tasto / (CD/USB / ).
pista desiderata mentre state riproducendo il disco
selezionato.
Per cancellare la lettura casuale:
l
I tasti Numerici vi permettono di selezionare fino al
Premete il tasto RANDOM fino a quando l’indicatore “RDM”
numero 9.
non scompare.
l
Per selezionare il numero 10 o un numero maggiore,
usare il pulsante “>10”.
A. Per esempio, per scegliere
13
Note:
1
Premere una volta il pulsante
l
Se lei preme il pulsante durante la riproduzione
“>10”.
casuale si può muovere alla prossima traccia selezionata
2
Premere il pulsante “1”.
tramite l’operazione casuale. Tuttavia, il pulsante non
permetterà di andare al brano precedente. Sarà
3
Premere il pulsante “3”.
localizzato solo l’inizio del brano che si sta ascoltando.
B. Per esempio, per scegliere 130
l
La funzione di lettura casuale permette la selezione e la
lettura automatica dei brani. (Chi ascolta non potrà
1
Premere due volte il pulsante “>10”.
scegliere l’ordine di lettura dei brani.)
2
Premere il pulsante “1”.
l
Durante la riproduzione casuale non è possibile
selezionare la riproduzione ripetuta.
3
Premere il pulsante “3”.
Attenzione:
4
Premere il pulsante “0”.
Dopo aver eseguito repeat play, assicurarsi di premere pulsante
Note:
(CD/USB ). Altrimenti il disco continuerebbe a riprodursi.
l
Non è possibile selezionare un numero di brano superiore
al numero di brani sul disco.
l
Durante la riproduzione random, non è possibile la ricerca
Si possono scegliere fino a 32 selezioni da riprodurre
diretta.
nell’ordine preferito.
Per fermare la riproduzione:
Premere il tasto (CD/USB ).
n Ripetizione di lettura
La funzione di ripetizione della riproduzione permette di
eseguire la lettura continua di un brano, di tutti i brani o di una
sequenza programmata.
Per ripetere un brano:
Premere ripetutamente il pulsante REPEAT fino a visualizzare
“Repeat One”. Premere il tasto / (CD/USB / ).
Ripetizione di tutti i brani:
Premere ripetutamente il pulsante REPEAT fino a visualizzare
“Repeat All”. Premere il tasto / (CD/USB / ).
Per riascoltare i brani desiderati:
Eseguire i passi 1 - 5 nella sezione “Riproduzione
programmata” su questa pagina e poi premere ripetutamente
il pulsante REPEAT finché non compare “Repeat All”.
It-14
11/5/25 X-HM10_20_It.fm
Numero del brano selezionato
n Riproduzione ad accesso casuale
n Riproduzione programmabile (CD)
1
Mentre l’apparecchio è in modo di arresto, premere il tasto
MEMORY del telecomando per passare al modo di
memorizzazione del programma.
2
Premere i pulsanti o del telecomando per
selezionare il brano desiderato.
3
Premere il pulsante MEMORY per memorizzare il numero
di brano.
Numero del brano selezionato
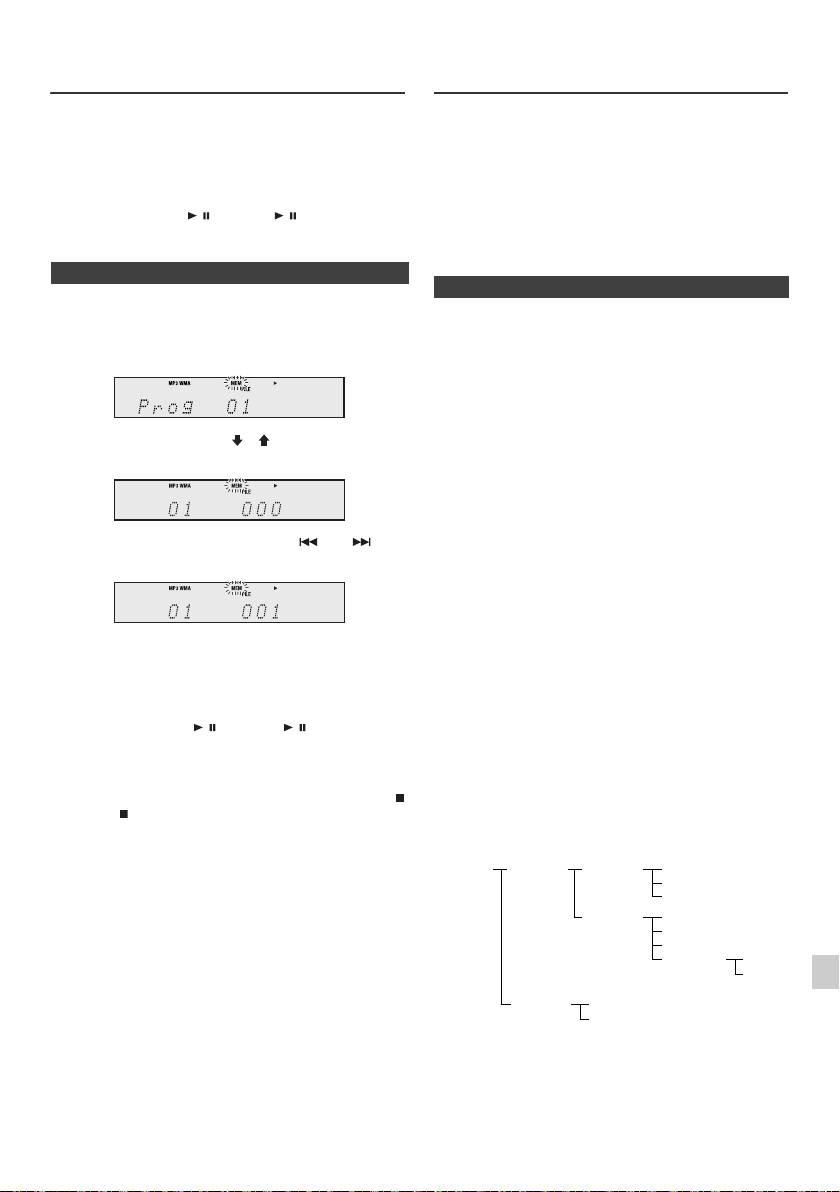
Riproduzione d’avanguardia di un CD
Modo cartella MP3/WMA (solo per file
o disco MP3/WMA (continua)
MP3/WMA)
Per riprodurre un le MP3/WMA (Windows Media
4
Ripetere il procedimento dei punti 2 - 3 per gli altri brani. Si
Audio)
possono programmare fino a 32 brani. Se si vuole
Su Internet vi sono vari siti dedicati alla musica da cui
controllare i brani programmati, premere ripetutamente il
scaricare file musicali MP3/WMA (Windows Media Audio).
pulsante MEMORY. Se si fa un errore, i brani programmati
Seguire le istruzioni del sito web per scaricare i file
possono essere cancellati premendo il tasto CLEAR.
musicali. In seguito, è possibile riprodurre i file musicali
scaricati trasferendoli su un disco CD-R/RW.
5
Premere il pulsante / (CD/USB / ) per iniziare la
l I brani/file scaricati sono destinati solo ad uso
riproduzione.
personale. Qualsiasi altro uso del brano senza il
permesso del proprietario è contrario alla legge.
n Riproduzione programmabile (MP3/WMA)
n Ordine di riproduzione della cartella
Se i file MP3/WMA sono registrati in varie cartelle, si crea
1
Mentre l’apparecchio è nel modo di arresto, premere il
automaticamente un numero per ciascuna cartella.
pulsante MEMORY per passare al modo di
memorizzazione del programma.
Le cartelle possono essere selezionare con il pulsante
FOLDER del telecomando. Se all’interno della cartella
selezionata non vi è alcun formato di file supportato,
questa cartella viene saltata e viene selezionata la
successiva.
Esempio: come creare un numero di cartella se i file in
2 Premere il tasto PRESET
(
o
)
sul telecomando per
formato MP3/WMA vengono registrati come di seguito.
selezionare la cartella desiderata.
1
La cartella ROOT è indicata come cartella 1.
2 Così come per le cartelle contenute all’interno della
cartella ROOT (Cartella A e B), la cartella registrata
precedentemente sul disco viene indicata come cartella
In seguito, premere il pulsante o sul
2 e 3.
telecomando per selezionare i brani desiderati.
3 Per quanto riguarda la cartella contenuta nella cartella
A (Cartella C e D), la cartella registrata prima nel disco
verrà impostata come cartella 4 e 5.
4 Cartella E inclusa in Cartella D verrà indicata come
3 Premere il pulsante MEMORY per salvare il numero di
cartella 6.
cartella e di brano.
4 Ripetere i punti 2 - 3 per altre/i cartelle/brani. Si
l Le informazioni registrate sul disco riguardanti l’ordine
di cartella e di file dipendono dal software di scrittura.
possono programmare fino a 32 brani.
Questo apparecchio potrebbe non riprodurre i file
5 Premere il pulsante / (CD/USB / ) per iniziare la
secondo l’ordine di riproduzione previsto.
riproduzione.
l Con CD MP3/WMA, si possono leggere fino a 99
numeri di cartelle e 999 file, comprese le cartelle che
non contengono file riproducibili.
Per aggiungere brani al programma:
È possibile attivare/disattivare il modo di cartella tramite il
Durante la modalità stop programmata, premete il tasto
pulsante FOLDER del telecomando. I file riprodotti
(CD/USB ). Sul display verrà visualizzato “Memory
durante l’attivazione del modo cartella differiscono da
1
Clear” e tutti i contenuti programmati verranno cancellati.
quelli riprodotti durante la disattivazione del modo cartella.
Per aggiungere brani al programma:
2
Se nella memoria è stato immesso precedentemente un
programma, l’indicatore “MEM” sarà visualizzato.
Premere il tasto MEMORY. Poi seguire le fasi 2 - 3 per
3
aggiungere piste.
4
Note:
l Quando un disco viene espulso, il programma viene
cancellato automaticamente.
5
l Se si preme il pulsante STANDBY/ON per porre
l’apparecchio nel modo stand-by o per passare dalla
6
funzione CD a un’altra funzione, le selezioni
programmate saranno cancellate.
l Durante la funzione di riproduzione programmata, non
7
è possibile eseguire la riproduzione ad accesso
casuale.
8
9
It-15
11/5/25 X-HM10_20_It.fm
ROOT
FOLDER A
FOLDER C
FILE 3
(FOLDER 1)
(FOLDER 2)
(FOLDER 4)
FILE 4
FILE 5
FOLDER D
FILE 6
(FOLDER 5)
FILE 7
FILE 8
FOLDER E
FILE 9
(FOLDER 6)
FILE 10
FOLDER B
FILE 1
(FOLDER 3)
FILE 2

Modo cartella MP3/WMA (solo per file
Ascolto della periferica di memoria di
MP3/WMA) (continua)
massa USB/del lettore MP3
n Procedura di riproduzione di dischi MP3/
WMA con l’attivazione modo cartella
Riproduzione dei dischi CD-R/RW.
1
Premere il tasto CD ed inserire un disco MP3/WMA.
Premendo il pulsante FOLDER verranno visualizzate le
informazioni sul disco.
Note:
l Questo prodotto non è compatibile con sistemi di file
MTP e AAC nella memoria di massa di una chiave USB
o di un lettore MP3.
l Alcuni dispositivi di memorizzazione potrebbero non
funzionare con questo sistema.
l La funzionalità dei dispositivi di memorizzazione
esterni (dispositivi di memoria USB , hard disk esterni,
ecc.) non è garantita.
2 Premere il pulsante PRESET
(
o
)
per selezionare la
cartella di riproduzione desiderata. (Attivazione modo
cartella)
3 Selezionare il file che si desidera riprodurre premendo il
pulsante o .
4 Premere il tasto / (CD/USB / ). Si avvia la
riproduzione e viene visualizzato il nome del file.
l Appaiono il titolo, l’artista e nome dell’album, se
registrati su disco.
l In caso di playback mentre la modalità cartella è
attivata, premete il tasto PRESET
(
o
)
e la
cartella potrà essere selezionata anche se in
modalità playback/pausa. La modalità playback/
pausa continuerà a essere attiva nella prima pista
della cartella selezionata.
l È possibile modificare il contenuto del display
premendo il pulsante CD/USB DISPLAY.
Nota:
Per interrompere la riproduzione:
Premere il tasto / (CD/USB / ).
Nota:
Se appare “Not Support” sul display, significa che
“Copyright protected WMA file” o “Not supported playback
file” si trova selezionato.
It-16
11/5/25 X-HM10_20_It.fm
TUNING −
TUNING +
PRESET
CD
FOLDER
PRESET
DISPLAY
CD/USB
Indicatore MP3
Indicatore
Indicatore WMA
TOTAL
Numero totale delle cartelle
Numero totale dei file
Indicatore
FOLDER
Numero FOLDER
Numero primo
brano nella cartella
Display nome file Display cartella
Display contatore
Display titolo
Display album
Display artista
n Riproduzione con lettore USB/MP3 in
modalità Cartella disattivata
1
Premere il pulsante USB nel telecomando oppure
ripetutamente il pulsante INPUT nell’unità principale per
selezionare la funzione USB. Collegare la periferica di
memoria USB con file in formato MP3/WMA
nell’apparecchio. Una volta collegata la memoria USB
all’apparecchio principale, vengono visualizzate le
informazioni sul dispositivo.
2 Selezionare il file che si desidera riprodurre premendo il
pulsante o .
3 Premere il tasto / (CD/USB / ). Si avvia la
riproduzione e viene visualizzato il nome del file.
l Appaiono il titolo, l’artista e nome dell’album, se
registrati sulla periferica di memoria USB.
l È possibile modificare il contenuto del display
premendo il pulsante CD/USB DISPLAY.
INPUT
USB
TUNING −
TUNING +
PRESET
USB
FOLDER
PRESET
DISPLAY
CD/USB
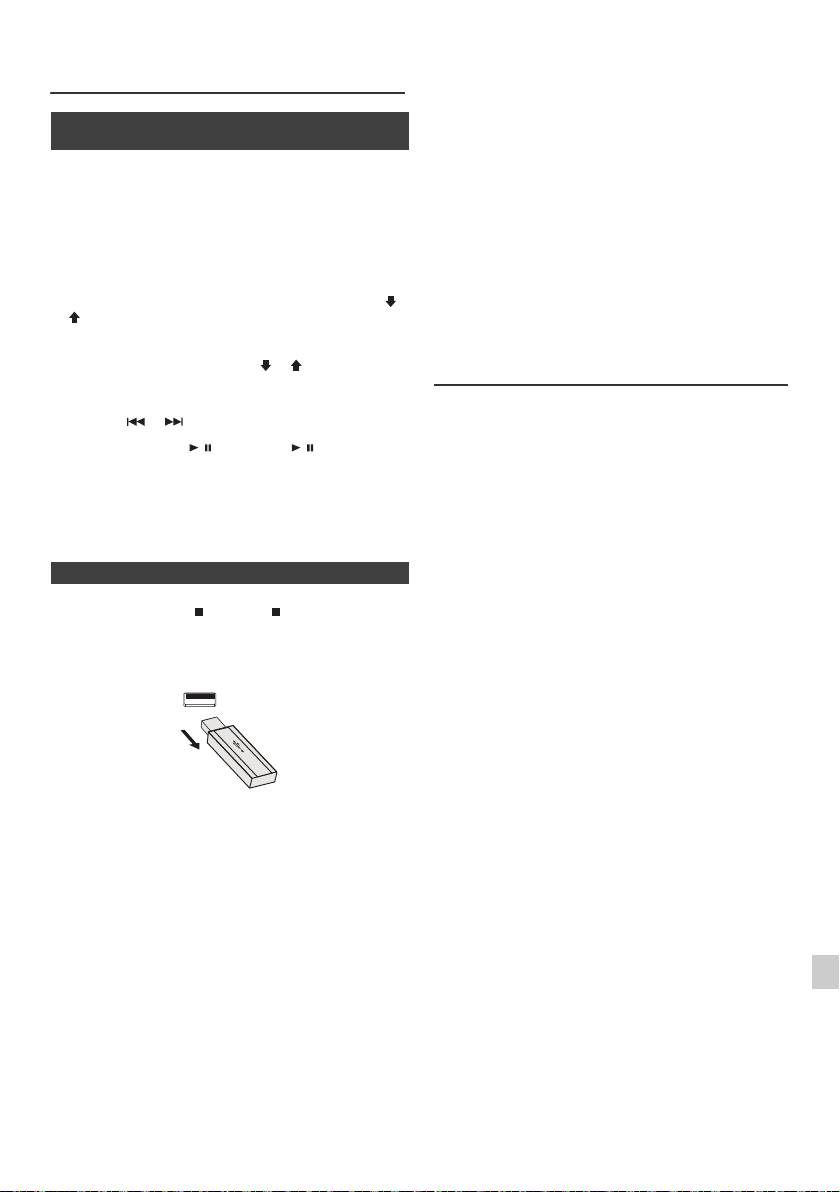
l Questo prodotto supporta la riproduzione di file WMA e
Ascolto della periferica di memoria di
MP3. Esso rileverà autenticamente il tipo di file
massa USB/del lettore (continua)
riprodotto. Se si riproduce un file non supportato, Verrà
visualizzato “Not Support” e il file sarà saltato. Questa
operazione richiederà alcuni secondi. Se nel display
n Riproduzione con lettore USB/MP3 in
vengono visualizzate delle indicazioni anormali a
modalità Cartella attiva
causa del file non specificato, spegnere e riaccendere
l’unità.
1
Premere il pulsante USB nel telecomando oppure
l Questo prodotto supporta le periferiche di memoria di
ripetutamente il pulsante INPUT nell’unità principale per
massa USB e i lettori MP3. Tuttavia, alcuni dispositivi
selezionare la funzione USB. Collegare la periferica di
potrebbero causare delle irregolarità impreviste. In tal
memoria USB con file in formato MP3/WMA
caso, spegnere e riaccendere l’unità.
nell’apparecchio. Una volta collegata la memoria USB
l Il porta USB è previsto solo per un collegamento diretto
all’apparecchio principale, vengono visualizzate le
a una periferica di memoria USB senza cavi.
informazioni sul dispositivo.
l Durante la funzione CD, il lettore MP3 non esegue il
2 Premere il tasto FOLDER, quindi il tasto PRESET
(
o
caricamento.
)
per selezionare la cartella che si desidera riprodurre.
l Si visualizzerà “Not Support” se collegate un iPod a un
Per avviare la riproduzione in modalità Cartella, andare
terminale USB, mentre la funzione USB è selezionata.
al punto 4. Per cambiare la cartella da riprodurre,
premere il pulsante PRESET
(
o
)
per selezionare
Riproduzione USB avanzata
un’altra cartella.
3 Selezionare il file che si desidera riprodurre premendo il
Le seguenti funzioni sono le stesse per operare CD:
pulsante o .
Pagina
Ricerca diretta di un brano . . . . . . . . . . . . . . . . . . . .14
4 Premere il tasto / (CD/USB / ). Si avvia la
Ripetizione di lettura . . . . . . . . . . . . . . . . . . . . . . . . .14
riproduzione e viene visualizzato il nome del file.
Riproduzione casuale . . . . . . . . . . . . . . . . . . . . . . . . .14
l Appaiono il titolo, l’artista e nome dell’album, se
Riproduzione programmata (MP3/WMA) . . . . . . . . .15
registrati sulla periferica di memoria USB.
Note:
l È possibile modificare il contenuto del display
l Se il dispositivo di memoria USB non è collegato, sul
premendo il pulsante CD/USB DISPLAY.
display apparirà “USB No Media”.
l L’apparecchio supporta solo il formato “MPEG-1 Audio
Layer-3”. (La frequenza di campionamento è 32 kHz,
n Per eliminare la periferica di memoria USB
44,1 kHz, 48 kHz)
l A seconda del software di scrittura utilizzato durante il
1
Premere il pulsante (CD/USB ) per interrompere la
download dei file, l’ordine di riproduzione dei file MP3
può variare.
riproduzione.
l La velocità di trasmissione supportata da MP3 è di
2 Disinserire la periferica di memoria USB dal terminale
32 kbps a 320 kbps, WMA è di 64 kbps a 160 kbps.
USB.
l Per i file MP3/WMA, si prega di aggiungere
l’estensione “.MP3” “.WMA”. Non è possibile riprodurre
i le privi dell’estensione MP3/WMA.
l La playlist non è supportata dal presente apparecchio.
l L’apparecchio può visualizzare un nome di cartella o
file con un massimo di 32 caratteri.
l Il limite massimo totale di file MP3/WMA è 999.
l Il numero totale di cartelle leggibili è 99, compreso
quelle che non contengono file riproducibili. Tuttavia, la
schermata visualizza solo le cartelle contenenti file
Note:
MP3.
l PIONEER non si assume alcuna responsabilità per la
1
l Il display del tempo di riproduzione non appare
perdita di dati mentre la periferica di memoria USB si
correttamente durante la riproduzione di un le con
trova collegata al sistema audio.
velocità di trasmissione variabile.
2
l È possibile riprodurre i le compressi in formato MP3 e/
l E informazioni ID3TAG supportate sono soltanto
o WMA se collegato al terminale USB.
TITLE, ARTIST e ALBUM. Per visualizzare il titolo, il
l Questo formato di memoria USB supporta FAT 16 o
nome dell’artista e il titolo dell’album premere il
3
FAT 32.
pulsante DISPLAY durante la riproduzione del file o in
l PIONEER non garantisce che tutte le periferiche di
modalità di pausa.
memoria USB funzionino con questo sistema audio.
4
l Anche i meta tag WMA supportano titolo, artista e
l I cavi USB non sono consigliati per collegare questo
impianto audio a una periferica di memoria USB. L’uso
nome dell’album registrati sui file WMA. I le WMA
dei cavi USB influenzerà le prestazioni dell’impianto.
protetti da copyright non possono essere riprodotti.
5
l La memoria USB non può essere messa in funzione
tramite un hub USB.
6
l Il terminale USB di questo apparecchio non deve
essere adoperato per il collegamento di un PC, ma per
lo streaming musicale con una periferica di memoria
7
USB.
l Non è possibile riprodurre la memoria del disco rigido
tramite la terminale USB.
8
l Nel caso i dati contenuti nella memoria USB siano di
grandi dimensioni, occorre un periodo di tempo
maggiore per la loro lettura.
9
It-17
11/5/25 X-HM10_20_It.fm
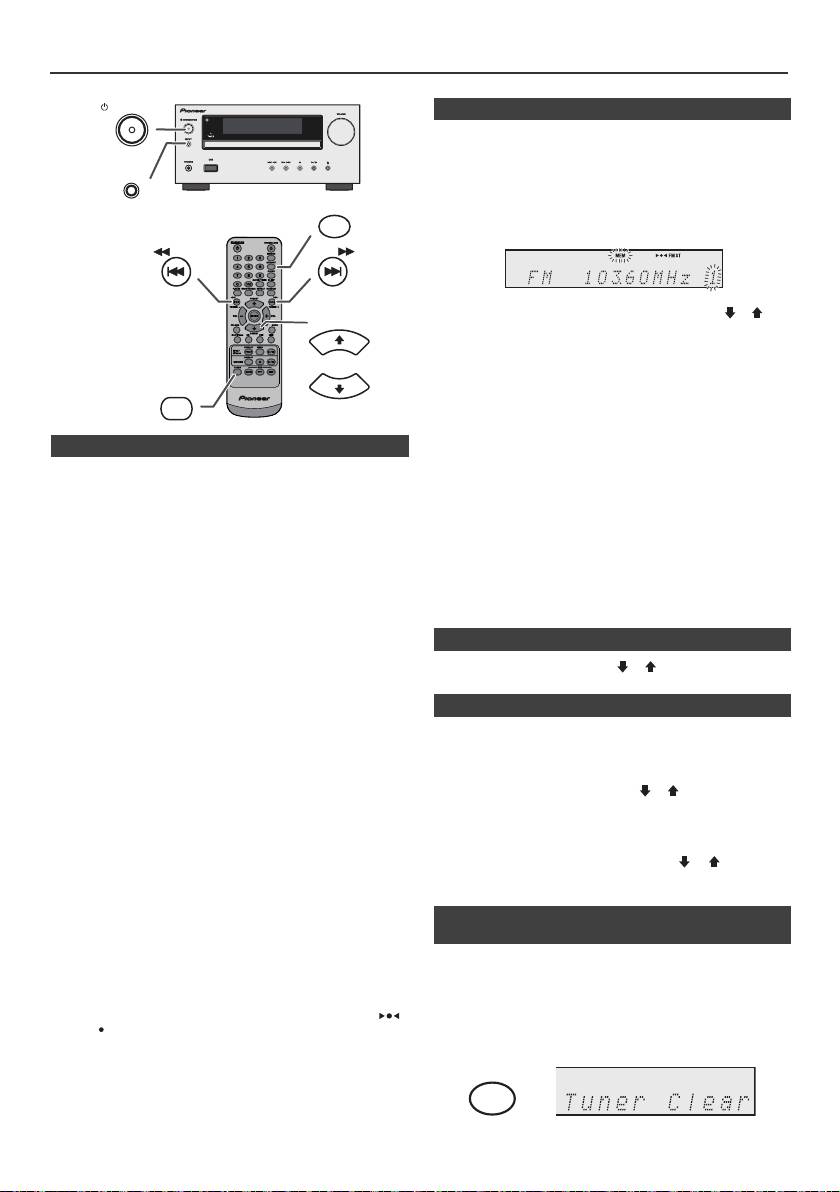
Ascolto della radio
STANDBY/ON
n Memorizzazione di una stazione
È possibile immettere nella memoria 40 stazioni AM e FM
e poi richiamarle premendo un pulsante. (Sintonizzazione
delle stazioni preselezionate)
INPUT
1
Eseguire i punti da 1 - 3 in “Sintonizzazione”.
MEMORY
2 Premere il pulsante MEMORY.
TUNING −
TUNING +
3 Entro 30 secondi, premere il tasto PRESET
(
o
)
per
PRESET
selezionare il numero di canale preregolato.
Memorizzare le stazioni, in ordine, incominciando dal
canale preregolato 1.
4 Entro 30 secondi, premere il pulsante MEMORY per
TUNER
immettere quella stazione nella memoria. Se
PRESET
“MEMORY” e gli indicatori del numero preregolato si
spengono prima che la stazione sia memorizzata,
ripetere l’operazione dal passaggio 2.
n Sintonizzazione
5
Ripetere il procedimento dei punti 1 - 4 per impostare altre
1
Premere il pulsante STANDBY/ON per accendere
stazioni, oppure per cambiare una stazione
l’apparecchio.
preselezionata. Quando viene memorizzata una nuova
stazione, la stazione memorizzata precedentemente per
2 Premere ripetutamente il pulsante TUNER per
quel numero di canale preselezionato sarà cancellato.
selezionare la banda di frequenza desiderata (FM o
Nota:
AM).
La funzione “backup” protegge le stazioni memorizzate
3 Premere il pulsante TUNING
+ o –
del telecomando per
per alcune ore nel caso d’interruzione della corrente
sintonizzarsi sulla stazione desiderata.
dovuta a un guasto o se il cavo di alimentazione viene
disinserito dalla presa della rete elettrica.
l Sintonizzazione manuale:
Premere rispettivamente il tasto TUNING
+ o –
per
n Per richiamare una stazione memorizzata
sintonizzarsi sulla stazione desiderata.
1 Premere il tasto PRESET
(
o
)
per meno di
l Sintonizzazione automatica:
0,5 secondi per selezionare la stazione desiderata.
Quando si preme il tasto TUNING
+ o –
per più di 0,5
secondi, la scansione inizierà automaticamente e il
n Scansione delle stazioni preselezionate
sintonizzatore si fermerà sulla prima stazione
Le stazioni memorizzate possono essere ricercate
ricevibile.
automaticamente. (Scansione della memoria delle
Note:
stazioni preselezionate)
l Se ci sono interferenze nella ricezione radio, la
sintonizzazione a scansione automatica potrebbe
1
Premere il pulsante PRESET
(
o
)
per più di
interrompersi in quel punto.
0,5 secondi. Il numero preselezionato lampeggerà e le
l La sintonizzazione a scansione automatica salterà le
stazioni programmate saranno sintonizzate in ordine,
stazioni dai segnali deboli.
ciascuna per 5 secondi.
l Per arrestare la sintonizzazione a scansione
+ o –
.
2 Premere di nuovo il tasto PRESET
(
o
)
quando si
automatica, premeredi nuovo il tasto TUNING
trova la stazione desiderata.
l Quando il sistema viene sintonizzato su una stazione
RDS (Radio Data System), la frequenza verrà
visualizzata per prima, e poi l’indicatore RDS si
n Per cancellare tutte le preselezioni
illuminerà. Infine, il nome della stazione apparirà.
memorizzate
l È possibile realizzare la sintonizzazione
completamente automa-tica delle stazioni RDS
“ASPM”, vedere pagina 19.
1
Premere il tasto TUNER sul telecomando o il tasto
Per la ricezione di una trasmissione FM stereo:
INPUT sull’unità principale ripetutamente per
l Premetere il pulsante TUNER per selezionare la
selezionare la funzione di sintonizzazione.
modalità stereo e l’indicatore “ST” si visualizzerà. “ ”
a “ ” apparirà quando la trasmissione FM è
2 Per la funzione Tuner, premere il tasto CLEAR fino a
stereofonica.
quando non appare “Tuner Clear“.
l Se la ricezione FM è debole, premere il pulsante
TUNER così da fare spegnere l’indicatore “ST”. La
ricezione cambia nel modo monofonico e il suono
diventa più chiaro.
It-18
11/5/25 X-HM10_20_It.fm
CLEAR
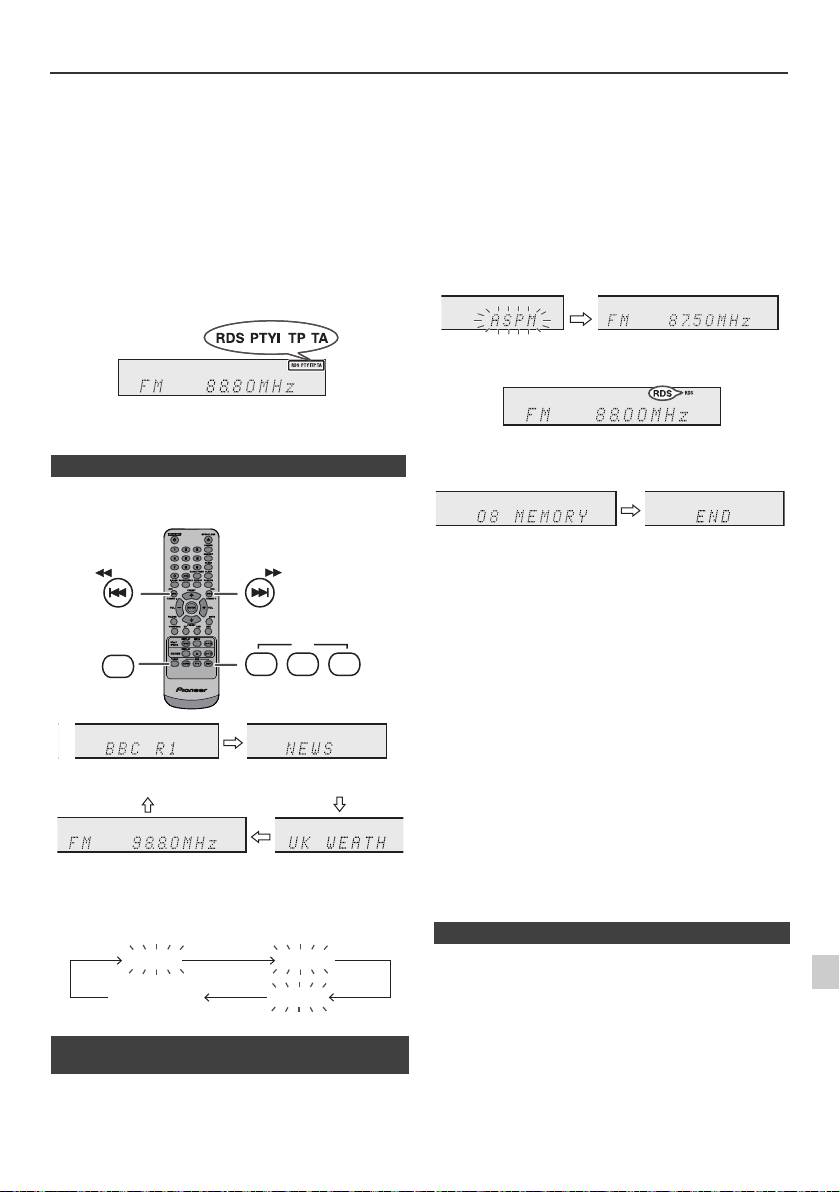
Funzionamento di RDS (Radio Data System)
RDS è un servizio radiofonico offerto adesso da un
Se delle stazioni sono già state immesse nella memoria, il
crescente numero di stazioni FM. Queste stazioni
numero delle nuove stazioni che si possono immettere
trasmettono segnali addizionali insieme con i segnali
nella memoria sarà inferiore.
dei loro programmi regolari. Per esempio, le stazioni
trasmettono il loro nome e informazioni riguardanti il
tipo di programma: sport, musica, ecc.
Quando l’apparecchio viene sintonizzato su una stazione
RDS, verranno visualizzati “RDS” e il nome della stazione.
“TP” (Programma sul traffico) apparirà sul display quando
la trasmissione radio ricevuta contiene informazioni sul
traffico, e “TA” (Annuncio sul traffico) apparirà quando
viene trasmesso un annuncio sul traffico.
“PTYI” (L’indicatore Dynamic PTY) apparirà mentre si
riceve la stazione Dynamic PTY.
RDS può essere controllato solo con i pulsanti del
telecomando.
n Informazioni fornite da RDS
Ogni volta che si preme il pulsante RDS DISPLAY, il
display cambierà nel modo seguente:
Per fermare l’operazione ASPM prima che essa sia
completata:
Premere il pulsante RDS ASPM durante la scansione
delle stazioni.
Le stazioni già memorizzate resteranno nella memoria.
Note:
l Se la stessa stazione viene trasmessa su frequenze
diverse, la frequenza più forte sarà immessa nella
memoria.
l Ogni stazione che ha la stessa frequenza di una che è
già stata memorizzata non sarà immessa nella
memoria.
l Se 40 stazioni sono già state immesse nella memoria,
la scansione sarà cancellata. Se si vuole eseguire di
nuovo l’operazione ASPM, cancellare le stazioni
memorizzate.
l Se nella memoria non è stata immessa nessuna
stazione, “END” apparirà per 4 secondi circa.
1
l Se i segnali RDS sono molto deboli, i nomi delle
stazione potrebbero non essere memorizzati.
l Lo stesso nome di stazione può essere memorizzato
2
su canali diversi.
Quando l’apparecchio viene sintonizzato su una stazione
l In alcune zone oppure in certi periodi, i nomi delle
che non è RDS oppure su una stazione RDS dai segnali
3
stazioni potrebbero essere temporaneamente diversi.
deboli, il display cambia nel seguente ordine:
4
Se si verifica uno dei seguenti problemi, questo non
significa che l’apparecchio non funziona bene:
5
l “PS”, “No PS” ed il nome di una stazione appaiono
alternativamente e l’apparecchio non funziona bene.
6
l Se una particolare stazione non trasmette bene o sta
compiendo dei test, la funzione di ricezione RDS
n Utilizzo della Memoria Automatica di
potrebbe non funzionare bene.
7
Programma delle Stazioni (ASPM)
l Quando si riceve una stazione RDS dal segnale molto
debole, l’informazione relativa al nome potrebbe non
Mentre l’apparecchio è nel modo ASPM, il sintonizzatore
essere visualizzata.
8
ricercherà automaticamente altre stazioni RDS. È
l “No PS”, “No PTY” o “No RT” lampeggeranno per circa
possibile immettere nella memoria fino a 40 stazioni.
5 secondi, e poi la frequenza sarà visualizzata.
9
It-19
11/5/25 X-HM10_20_It.fm
TUNING −
TUNING +
RDS
TUNER
ASPM PTY DISP
Nome della stazione (PS) Tipo di programma (PTY)
Frequenza Testo Radio (RT)
No PS No PTY
FM 98.80 MHz
No RT
1 Premere il pulsante TUNER sul telecomando o il
pulsante INPUT sull’unità principale ripetutamente per
selezionare la funzione TUNER.
2 Tenere premuto il pulsante RDS ASPM sul
telecomando.
1 Dopo che “ASPM” ha lampeggiato per circa
4 secondi, verrà avviata la scansione
(87,50 - 108,00 MHz).
2 Quando si trova una stazione RDS, “RDS” apparirà
per un po’ e la stazione sarà memorizzata.
3 Dopo la scansione, il numero delle stazioni
memorizzate sarà visualizzato per 4 secondi, e poi
“END” appare per 4 secondi.
n Note per il funzionamento di RDS
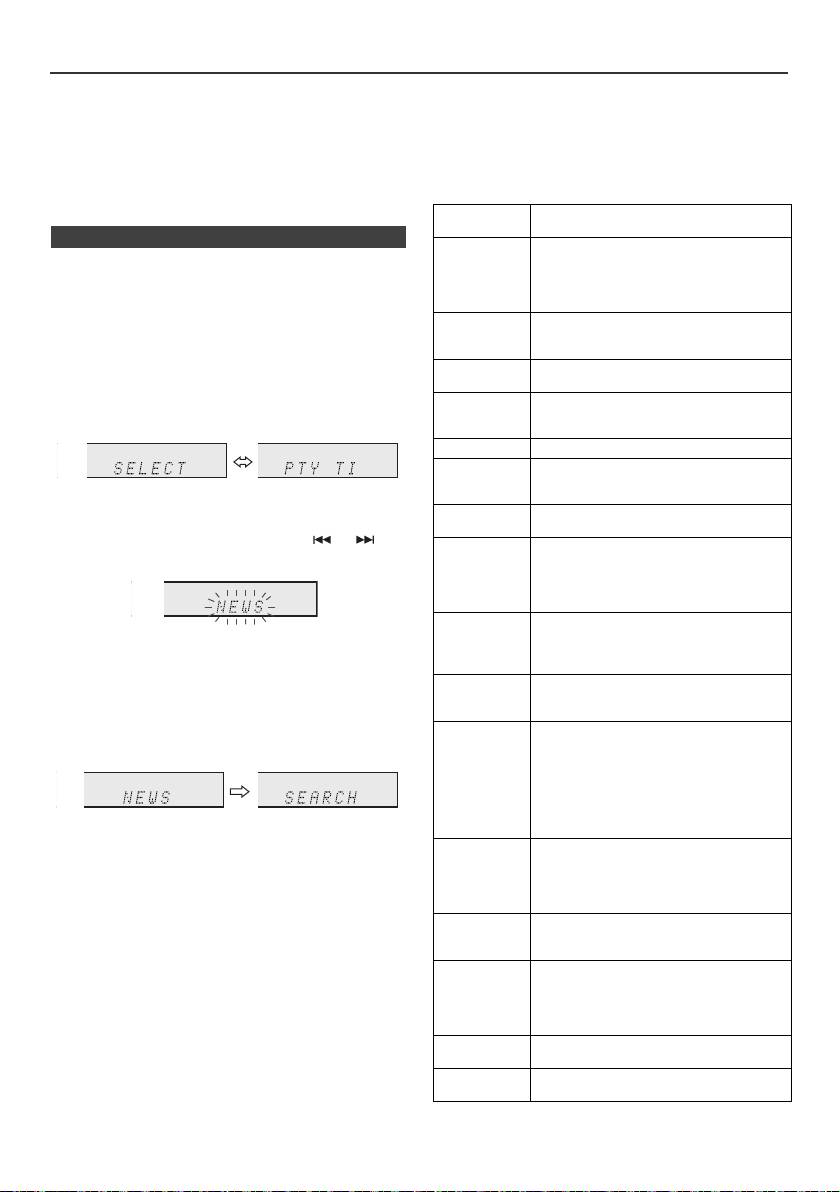
Funzionamento di RDS (Radio Data System) (continua)
Note per il testo radio:
Quando un’informazione sul traffico viene trasmessa, “TA”
l I primi 14 caratteri del testo radio saranno visualizzati
apparirà.
per 4 secondi e poi tutto il testo scorrerà sul display.
Descrizioni dei codici del PTY (Tipo di Programma),
l Se si sintonizza l’apparecchio su una stazione radio
TP (Programma sul traffico) e TA (Annuncio sul
RDS che non sta trasmettendo un testo radio, “No RT”
traffico)
sarà visualizzato quando si passerà alla posizione
È possibile cercare e ricevere i seguenti segnali PTY, TP
testo radio.
e TA.
l Mentre i dati del testo radio sono ricevuti o quando i
contenuti cambiano, “RT” sarà visualizzato.
NEWS Notizie brevi, eventi e opinioni, servizi
giornalistici e attualità.
n Per richiamare le stazioni memorizzate
AFFAIRS Programma di attualità che
Per specificare i tipi di programma e selezionare le
approfondisce e allarga le notizie già
date dal giornale radio, generalmente
stazioni (PTY search):
con uno stile o un concetto diverso, che
È possibile cercare una stazione tra quelle memorizzate
include dibattiti o indagini.
specificandone il tipo di programma (news, sports, traffic
INFO Programmi aventi lo scopo di dare
programme, ecc.. vedere pagina 20).
suggerimenti per una grande varietà di
situazioni.
1
Premere il pulsante TUNER sul telecomando o il
SPORT Programma concernente tutti gli aspetti
pulsante INPUT sull’unità principale ripetutamente per
dello sport.
selezionare la funzione TUNER.
EDUCATE Programma il cui scopo principale è
2 Premere il pulsante RDS PTY sul telecomando.
quello di educare, e che ha come
elemento principale la formalità.
DRAMA Tutti i drammi radio e i romanzi a puntate.
CULTURE Programmi riguardanti tutti gli aspetti
della cultura nazionale e regionale,
“SELECT” e “PTY TI” appariranno alternativamente
compresi linguaggio, teatro ecc.
per 6 secondi circa.
SCIENCE Programmi di scienze naturali e
tecnologia.
3 Entro 6 secondi, premere il pulsante o per
VARIED Usato per talk show di genere non molto
selezionare il tipo di programma.
impegnativo, che non rientrano in
nessuna categoria. Tra gli esempi sono
inclusi: i programmi di giochi, quiz e
interviste di personaggi famosi.
POP M Musica commerciale, generalmente
Ogni volta che il pulsante viene premuto, il tipo di
considerata in voga, che presenta dischi
che sono oppure sono stati di recente
programma appare. Se il pulsante viene tenuto
nelle classifiche dei più venduti.
abbassato per più di 0,5 secondi, il tipo di programma
non si spegnerà.
ROCK M Musica moderna contemporanea, di
solito scritta ed eseguita da giovani
4 Mentre il tipo di programma selezionato lampeggia
musicisti.
(entro 6 secondi), premere di nuovo il pulsante RDS
EASY M Musica attuale contemporanea
PTY.
considerata di “facile ascolto”, in
contrasto con quella pop, classica, rock
oppure uno dei stili di musica particolare
come quella folcloristica, jazz o country.
La musica di questa categoria è spesso,
ma non sempre, vocale, e di solito di
Dopo che il tipo di programma selezionato è rimasto
breve durata.
acceso per 2 secondi, “SEARCH” apparirà, e la ricerca
LIGHT M Musica classica per l’ascolto del pubblico
avrà inizio.
in generale e non solo per gli esperti.
Esempi di musica di questa categoria
Note:
sono quella strumentale, e vocale o
l Se il display smette di lampeggiare, ricominciare dal
corale.
punto 2. Se l’unità rileva un tipo di programma
CLASSICS Esecuzioni di importanti lavori
desiderato, il numero del canale corrispondente si
orchestrali, sinfonie, musica da camera,
illuminerà per circa 8 secondi, quindi il nome della
ecc., e grandi opere.
stazione rimarrà illuminato.
l Se si vuole ascoltare lo stesso tipo di programma su
OTHER M Stili musicali che non rientrano in
un’altra stazione, premere il pulsante RDS PTY mentre
nessuna delle altre categorie.
il numero di canale o il nome della stazione lampeggia.
Particolarmente usato per musica
L’unità cercherà la stazione successiva.
speciale come il rhythm e blues e il
l Se non può essere trovata nessuna stazione, “NOT
reggae.
FOUND” apparirà per 4 secondi.
WEATHER Comunicati sul tempo, previsioni e
informazioni metereologiche.
Se si seleziona il programma sul traffico:
Se si seleziona il programma sul traffico (TP) nel punto 3,
FINANCE Informazioni sulla borsa valori,
“TP” apparirà.
commercio ecc.
(Questo non significa che si potrà ascoltare subito
un’informazione sul traffico.)
It-20
11/5/25 X-HM10_20_It.fm

Funzionamento di RDS (Radio Data
Funzione di timer e autospegnimento
System) (continua)
(Solo per telecomando)
CHILDREN Per programmi mirati a un pubblico di
giovani, principalmente di
intrattenimento e interesse, piuttosto
che avere scopo educativo.
SOCIAL Programmi riguardanti persone e le
cose che le influenzano individualmente
o in generale. Come: sociologia, storia,
geografia, psicologia e società.
RELIGION Ogni aspetto di dottrina e fede, che
involve un Dio o più dei, la natura
dell’esistenza e l’etica.
PHONE IN
Invita le persone ad esprimere le proprie
opinioni per telefono o in pubblico.
Riproduzione con timer:
TRAVEL Servizi speciali e programmi riguardanti
L’unità si accende e riproduce la sorgente (CD, TUNER,
viaggi verso destinazioni vicine e
lontane, viaggi organizzati e idee e
USB, iPod, LINE IN) a un’ora prestabilita.
occasioni di viaggio. Da non usare per
Questo apparecchio ha 2 tipi di timer: ONCE TIMER e
annunci riguardanti problemi, ritardi,
lavori stradali che potrebbero influire sui
DAILY TIMER.
viaggi imminenti, perché in tal caso si
Timer per una volta:
dovrebbero ascoltare TP/TA.
La riproduzione con la funzione di timer per una volta può
LEISURE Programmi riguardanti attività ricreative
essere attivata solo per una volta all’ora stabilita.
a cui anche gli ascoltatori possono
(Indicatore “ ”).
partecipare. Per esempio: giardinaggio,
pesca, collezione di oggetti antichi,
Timer giornaliero:
cucina, alimenti e vini ecc.
La riproduzione timer giornaliero funziona allo stesso
orario preimpostato ogni giorno che viene impostato. Per
JAZZ Musica polifonica di stile sincopato
esempio, impostare il timer per svegliarsi ogni mattina.
caratterizzata da improvvisazione.
(Indicatore “DAILY”).
COUNTRY Canzoni che hanno avuto origine
oppure che continuano la tradizione
Utilizzare la combinazione di timer per una volta e
musicale degli stati meridionali
timer giornaliero:
dell’America. Caratterizzate da una
Per esempio, utilizzare il timer per una volta per ascoltare
melodia semplice e dalla linearità della
un programma radiofonico e utilizzare il timer giornaliero
narrativa.
per svegliarsi.
NATION M Musica popolare attuale della regione o
nazione nella lingua locale, in contrasto
1 Impostare il timer giornaliero (pagina 21).
con la musica “Pop” internazionale che
di solito è in inglese e di origini
2 Impostare il timer una volta (pagina 21).
americane o inglesi.
OLDIES Musica del periodo definito “golden age”
della musica popolare.
FOLK M Musica che ha le origini nella cultura di
una particolare nazione, di solito
suonata con strumenti acustici. Le
liriche porrebbero basarsi su fatti storici
1
o personaggi.
DOCUMENT Programmi riguardanti fatti reali,
2
presentati in uno stile inquisitivo.
TEST Trasmesso quando si provano
3
apparecchiature e ricevitori per le prove
di trasmissioni in caso di emergenza.
4
ALARM Annunci di emergenza trasmessi in
circostanze straordinarie per avvisare il
5
pubblico di eventi che possono
provocare danni di varia natura.
6
TP Trasmissioni contenenti comunicazioni
sul traffico.
7
TA Una comunicazione sul traffico sta per
essere trasmessa.
8
9
It-21
11/5/25 X-HM10_20_It.fm
STANDBY/ON
CLOCK/TIMER
TUNING −
TUNING +
ENTER
1 minuto o più
Timer giornaliero
Timer per una volta
Avvio
Arresto
Avvio
Arresto
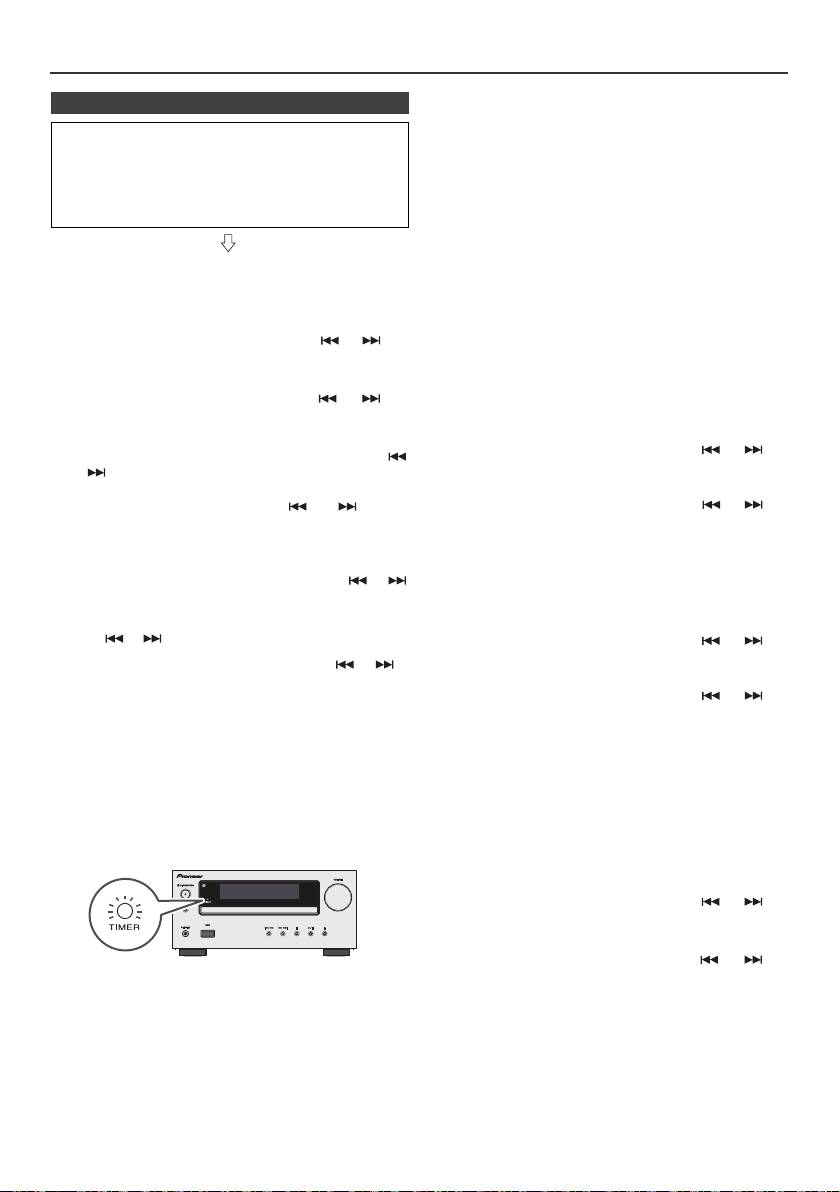
Funzione di timer e autospegnimento (Solo per telecomando) (continua)
Timer per una volta:
n Riproduzione con timer
La funzione timer sarà disattivata.
Prima di impostare il timer:
Timer giornaliero:
l Controllare che l’orologio sia regolato sull’ora esatta
La funzione timer verrà attivata ogni giorno alla stessa
(leggere a pagina 9). Se la funzione con timer non è
ora. Questo continuerà fino a quando l’impostazione
stata impostata non può essere utilizzata.
del timer giornaliero non verrà cancellata. Cancellare il
l Per la riproduzione con timer: Collegare il dispositivo
timer giornaliero quando non viene utilizzato.
USB o caricare i dischi o l’iPod da riprodurre.
Note:
l Se state eseguendo un playback timer usando un’altra
unità connessa al terminale USB, selezionate “USB” o
1 Premere il pulsante STANDBY/ON per accendere
“LINE IN” in fase 5.
l’apparecchio.
l Questa unità si accenderà o passerà automaticamente
2 Premere e tenere premuto il pulsante CLOCK/TIMER.
alla modalità di stand-by. Tuttavia, l’unità connessa
non si accenderà o spegnerà. Per interrompere la
3 Entro 30 secondi, premere il pulsante o per
riproduzione con timer, seguire il punto
selezionare “Once” o “Daily” e poi premere il pulsante
“Annullamento dell’impostazione del timer” di
questa pagina.
ENTER.
Verifica dell’impostazione del timer:
4 Entro 30 secondi, premere il pulsante o per
1 Accendere l’apparecchio e premere e tenere premuto il
selezionare “Timer Set” e poi premere il pulsante ENTER.
pulsante CLOCK/TIMER.
5 Per selezionare la fonte di riproduzione con timer (CD,
2 Entro 30 secondi, premere il pulsante o per
TUNER, USB, iPod, LINE IN), premere il pulsante
selezionare “Once” o “Daily” e poi premere il pulsante
o . Premere il pulsante ENTER.
ENTER.
Se si seleziona il sintonizzatore, selezionare una
stazione premendo il pulsante o , e poi
3 Entro 30 secondi, premere il pulsante o per
premere il pulsanteo ENTER. Se una stazione non è
selezionare “Once Call” o “Daily Call” e poi premere il
stata programmata, “No Preset” sarà visualizzato e la
pulsante ENTER.
funzione timer sarà disattivata.
Annullamento dell’impostazione del timer:
6 Per impostare il giorno, premere il pulsante o
e poi premere il pulsante ENTER.
1 Accendere l’apparecchio e premere e tenere premuto il
pulsante CLOCK/TIMER.
7 Premete il tasto ENTER per regolare l’ora. Premete i
tasti o e quindi premete il tasto ENTER.
2 Entro 30 secondi, premere il pulsante o per
selezionare “Once” o “Daily” e poi premere il pulsante
8 Per regolare i minuti, premere il pulsante o e
ENTER.
poi premere il pulsante ENTER.
3 Entro 30 secondi, premere il pulsante o per
9 Impostare l’ora di fine come nei punti 7 e 8 in precedenza.
selezionare “Timer Off” e poi premere il pulsante
ENTER. La funzione timer sarà disattivata (i contenuti
10 Regolate il volume usando i tasti VOL (+ o -) e quindi
dell’impostazione non saranno cancellati).
premete il tasto ENTER. Non alzate troppo il livello del
volume.
Usare di nuovo l’impostazione memorizzata del timer:
11 Premere il pulsante STANDBY/ON per porre
La regolazione del timer sarà memorizzata appena viene
l’apparecchio nel modo stand-by. L’indicatore “TIMER”
immessa. Per usare di nuovo la stessa regolazione,
si illumina e l’apparecchio è pronto per la riproduzione
eseguire le seguenti operazioni.
con timer.
1 Accendere l’apparecchio e premere e tenere premuto il
pulsante CLOCK/TIMER.
2 Entro 30 secondi, premere il pulsante o per
selezionare “Once” o “Daily” e poi premere il pulsante
ENTER.
3 Entro 30 secondi, premere il pulsante o per
selezionare “Timer On” e poi premere il pulsante ENTER.
12 Quando si raggiunge l’ora di inizio preselezionata, si
avvia la riproduzione. Il volume aumenterà
4 Premere il pulsante STANDBY/ON per porre
gradualmente fino a raggiungere il livello preregolato.
l’apparecchio nel modo stand-by.
L’indicatore del timer lampeggia durante la
riproduzione con timer.
Nota:
Le impostazioni del timer si azzerano se il cavo di corrente
13 Quando l’ora di fine impostata per il timer viene
viene estratto o se si verifica un blackout.
raggiunta, il sistema si pone automaticamente nel
modo stand-by.
It-22
11/5/25 X-HM10_20_It.fm

Funzione di timer e autospegnimento
Cuffia
(Solo per telecomando) (continua)
n Operazione di autospegnimento
La radio, il compact disc, l’iPod, USB e Line In possono
tutti essere spenti automaticamente.
1
Ascoltare la sorgente musicale desiderata.
2 Premere il pulsante SLEEP.
3 Entro 5 secondi, premete il tasto Numerico per
impostare l’orario. (1 minuto ~ 99 minuti)
4 Premere il pulsante ENTER. “SLEEP” apparirà.
l Non mettere il volume al massimo durante
5 L’apparecchio si porrà automaticamente nel modo
l’accensione ed ascoltare la musica a livelli moderati.
stand-by dopo che il tempo preimpostato è trascorso. Il
Una pressione sonora eccessiva proveniente dalle
cuffie o dagli auricolari può causare la perdita
volume si abbasserà 1 minuto prima che la funzione di
dell’udito.
autospegnimento finisca.
l Prima di inserire o disinserire la cuffia, diminuire il
volume.
Per controllare quanto tempo manca allo
l Usare una cuffia con una spina da 3,5 mm di diametro
spegnimento automatico:
e con un’impedenza da 16 a 50 ohm. L’impedenza
raccomandata è di 32 ohm.
1 Mentre viene indicato “SLEEP”, premere il pulsante
l Collegando la cuffia, i diffusori saranno disattivati
SLEEP.
automaticamente. Regolare il volume con il comando
VOLUME.
l Solo X-HM20: L'audio dell'iPod/iPhone non si può
Per cancellare l’operazione di autospegnimento:
ascoltare attraverso le cuffie connesse all'unità. Se
Premere il pulsante STANDBY/ON mentre “SLEEP” viene
connettete le cuffie mentre è selezionata la funzione
indicato. Per cancellare l’operazione di autospegnimento
iPod/iPhone, si visualizzerà “HP INVALID”.
senza porre il sistema nel modo stand by, fare quanto
segue.
1 Mentre viene indicato “SLEEP”, premere il pulsante
SLEEP.
2 Entro 5 secondi, premere il pulsante “0” due volte finché
non compare “SLEEP 00”.
n Per usare insieme le funzioni timer e
autospegnimento
Autospegnimento e riproduzione con timer:
Per esempio, è possibile addormentarsi ascoltando la
radio e svegliarsi il mattino dopo con la musica di un CD.
1
Regolare il tempo di autospegnimento (vedere sopra,
punti 1 - 5).
2 Impostare la riproduzione con timer mentre è impostato
1
il timer per l’autospegnimento (punti 2 - 9, pagina 22).
2
3
4
5
6
7
8
9
It-23
11/5/25 X-HM10_20_It.fm
Impostazione del timer
Impostazione della
Ora di
dell’autospegnimento
riproduzione con timer
arresto
1-99 minuti
Tempo desiderato
L’operazione di
Ora di inizio della
autospegnimento si
riproduzione con timer
arresta automaticamente

Tabella per la soluzione di problemi
Molti problemi potenziali possono essere risolti dal proprietario
n Sintonizzatore
senza l’intervento di personale di assistenza tecnica.
Se c’è qualcosa che non va con questo prodotto, controllare
quanto segue prima di contattare il vostro rivenditore o il centro
Sintomo Causa possibile
di assistenza tecnica PIONEER.
l La radio emette
l L’apparecchio è situato vicino
continuamente
a un televisore o un computer?
n In generale
rumori insoliti.
l L’antenna FM o l’antenna AM
a telaio è stata collocata bene?
Allontanare l’antenna dal cavo
Sintomo Causa possibile
di alimentazione c.a. se è
troppo vicina.
l L’orologio non è
l Si è verificata
regolato sull’ora
un’interruzione di
corretta.
corrente?
Regolare di nuovo
n USB
l’orologio. (cfr. Pagina 9)
Sintomo Causa possibile
l Quando si preme un
l Porre l’apparecchio nel
pulsante,
modo stand-by e poi
l Il dispositivo non
l Vi sono dei file MP3/WMA?
l’apparecchio non
riaccenderlo.
può essere
l
Il dispositivo è collegato
reagisce.
l
Se l’apparecchio non funziona
rilevato.
correttamente?
ancora bene, regolarlo di
l È un dispositivo MTP?
nuovo. (cfr.
Pagina
25)
l La periferica contiene solo file
AAC?
l Non c’è suono. l Il livello del volume è
regolato su “Min”?
l Non viene
l È un file WMA protetto dai
l È stata collegata la cuffia?
avviata la
diritti d’autore?
l Sono stati scollegati i fili
riproduzione.
l È un file MP3 falso?
dei diffusori?
l Visualizzazione
l È in esecuzione un file a
dell’ora
velocità di trasmissione
sbagliata.
variable?
n Lettore CD
l Visualizzazione
l
Il Nome del File è scritto in
del nome del file
caratteri cinesi o giapponesi?
Sintomo Causa possibile
sbagliato.
l Non viene avviata la
l Il disco è stato inserito
riproduzione.
capovolto?
n iPod e iPhone (solo X-HM20)
l La riproduzione si
l Il disco soddisfa i requisiti
interrompe a metà
standard?
brano oppure non è
l Il disco è distorto o
Sintomo Causa possibile
eseguita bene.
graffiato?
l Non viene
l
L’iPod o iPhone non è in
prodotto alcun
riproduzione.
l Durante la
l È l’apparecchio soggetto a
suono. Non
l L’iPod o iPhone non è
riproduzione si
eccessive vibrazioni?
appare alcuna
collegato correttamente
verificano salti di
l Il disco è molto sporco?
immagine sulla
all’unità.
suono, oppure a
l Si è formata
TV/ monitor.
l Il cavo di alimentazione c.a. è
metà brano il suono
condensazione all’interno
stato inserito nella presa di
si interrompe.
dell’apparecchio?
corrente?
l Il cavo video non è collegato
correttamente.
n Telecomando
l La selezione dell’ingresso
della TV/ monitor non è stata
effettuata correttamente.
Sintomo Causa possibile
l La funzione iPod TV out non è
stata impostata su video
l Il telecomando non
l Il cavo di alimentazione
uscita.
funziona.
c.a. è stato inserito nella
l
L'audio dell'iPod/iPhone non si può
presa di corrente?
ascoltare attraverso le cuffie
l La pila è stata inserita con
connesse all'unità.
le polarità nella direzione
giusta?
l L’iPod o iPhone
l L’iPod o iPhone non entra in
l La pila è esaurita?
non si carica.
pieno contatto con il
l La distanza (o l’angolo) è
connettore.
sbagliata?
°
l Utilizzo di iPod (3
l Il sensore del telecomando
generazione).
è illuminato da una forte
l iPod o iPhone non è
luce?
supportato. Fare riferimento a
pagina 10 per i modelli
compatibili.
l Le unità iPod o iPhone non
possono essere caricate se
l'unità principale si trova in
modalità USB.
l
“This accessory is
l La batteria dell’iPhone è
not made to work
bassa. Caricare l’iPhone.
with iPhone” o
l iPhone non è agganciato
“This accessory is
correttamente.
not supported by
iPhone” compare
sullo schermo
dell’iPhone.
It-24
11/5/25 X-HM10_20_It.fm
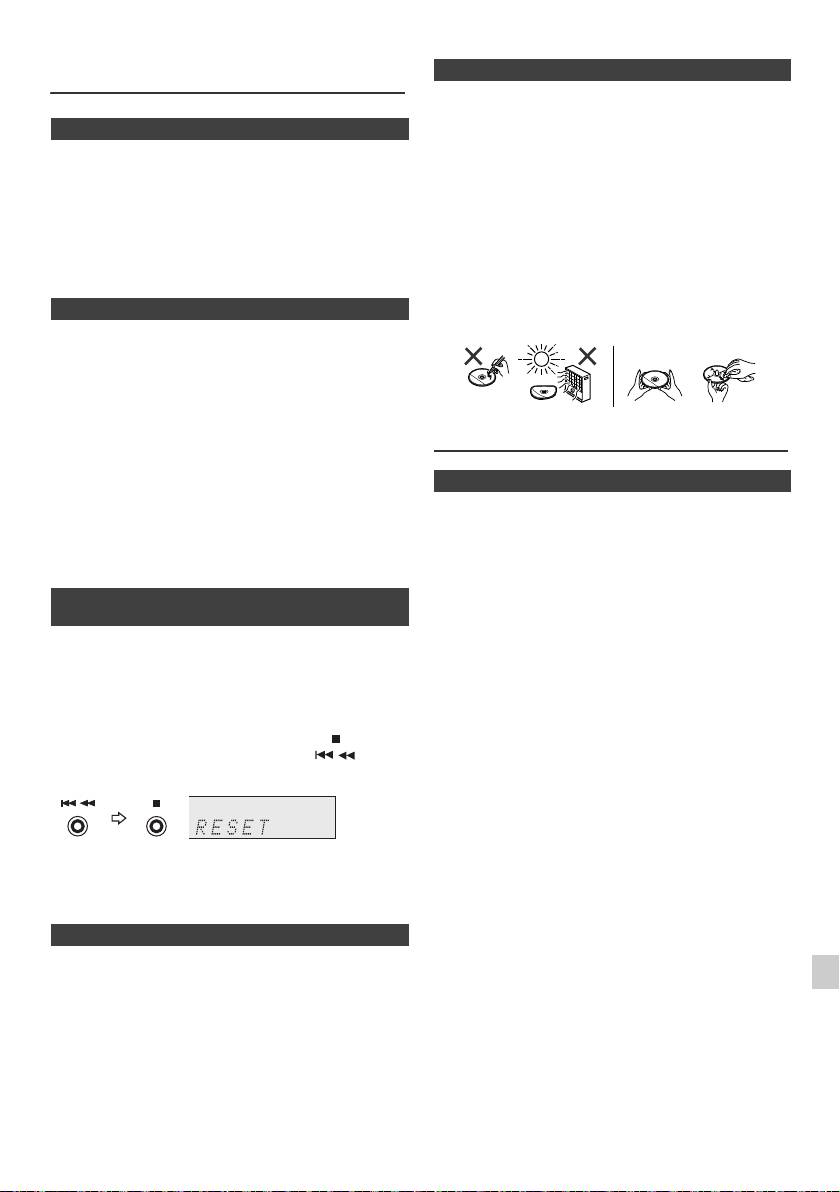
Tabella per la soluzione di problemi
n Cura corretta dei dischi
(continua)
I dischi compatti sono abbastanza resistenti ai danni, ma
si possono avere difetti di tracciamento causati da sporco
n Condensazione
accumulatosi sulla loro superficie. Per ottenere le
prestazioni migliori dalla vostra collezione di CD e dal
Improvvisi cambi di temperatura, collocazione o
vostro lettore seguire i suggerimenti descritti qui in basso.
funzionamento in ambienti estremamente umidi possono
l Non scrivere sui due lati del disco, soprattutto su quello
causare condensazione all’interno dell’apparecchio
senza l’etichetta perché è da questo lato che i segnali
(trasduttore di CD, ecc.) o sul trasmettitore del
vengono letti. Non rovinare tale lato.
telecomando. La condensazione può causare
malfunzionamenti all’unità. Se ciò avviene, lasciare
l Tenere lontano i dischi dalla luce diretta del sole,
l’apparecchio acceso senza disco all’interno fino a che
calore ed umidità eccessiva.
ridiventi possibile la riproduzione normale (un’ora circa).
l Tenere sempre i dischi compatti per i bordi. Sporco,
Asciugare la condensa dal trasmettitore con un panno
acqua o impronte di dita sul disco possono causare
morbido prima di mettere in funzione l’apparecchio.
rumore o errori di lettura. Se un disco è sporco o non
suona bene, pulirlo usando un panno morbido e
asciutto e strofinare in linea retta dal centro verso
n Se si verifica un problema
l’esterno.
Se questo prodotto viene soggetto a forti interferenze
esterne (shock meccanico, elettricità statica eccessiva,
alto voltaggio dovuto alla caduta di fulmini, ecc.) oppure se
viene usato in maniera scorretta, potrebbe non
funzionare.
Se si verifica tale problema, fare quanto segue:
1 Porre l’apparecchio nel modo stand-by e poi
Manutenzione
riaccenderlo.
2
Se l’unità non viene ripristinata nell’operazione precedete,
scollegarla e ricollegarla alla presa di alimentazione,
n Pulizia del mobiletto
quindi accenderla.
Pulire periodicamente il mobiletto con un panno morbido
Nota:
inumidito con una soluzione di acqua e sapone, poi
Se nessuna delle due operazioni permette di riavviare
asciugarlo con un panno asciutto.
l’apparecchio, cancellare i contenuti della memoria
Attenzione:
riportandola allo stato iniziale.
l Per la pulizia non usare prodotti chimici (benzina,
diluenti, ecc.). Ciò potrebbe danneggiare il mobiletto.
n Ripristino delle impostazioni predefinite,
l Non applicare olio all’interno dell’apparecchio.
annullamento di tutta la memoria
Potrebbe provocare malfunzionamenti.
1
Premere il tasto STANDBY/ON per accendere la
corrente.
2 Premere il tasto LINE sul telecomando o il tasto INPUT
ripetutamente sull’unità principale per selezionare la
funzione LINE IN.
3 Con la funzione LINE IN, premere il tasto sull’unità
principale e tenere premuto il tasto fino a
quando appare “RESET”.
1
Attenzione:
2
Questa operazione cancellerà tutti i dati della memoria
compresi l’orologio, le impostazioni del timer, le
3
preselezioni del sintonizzatore e il programma di CD.
n Prima di trasportare l’apparecchio
4
Togliere iPod, la periferica di memoria USB e disco
dall’unità. Poi impostare l’unità per attivare la modalità di
5
stand-by. Trasportare l’unità con iPod o periferica di
memoria USB collegati o dischi all’interno la può
6
danneggiare.
7
8
9
It-25
11/5/25 X-HM10_20_It.fm
NO Sì
Correcto
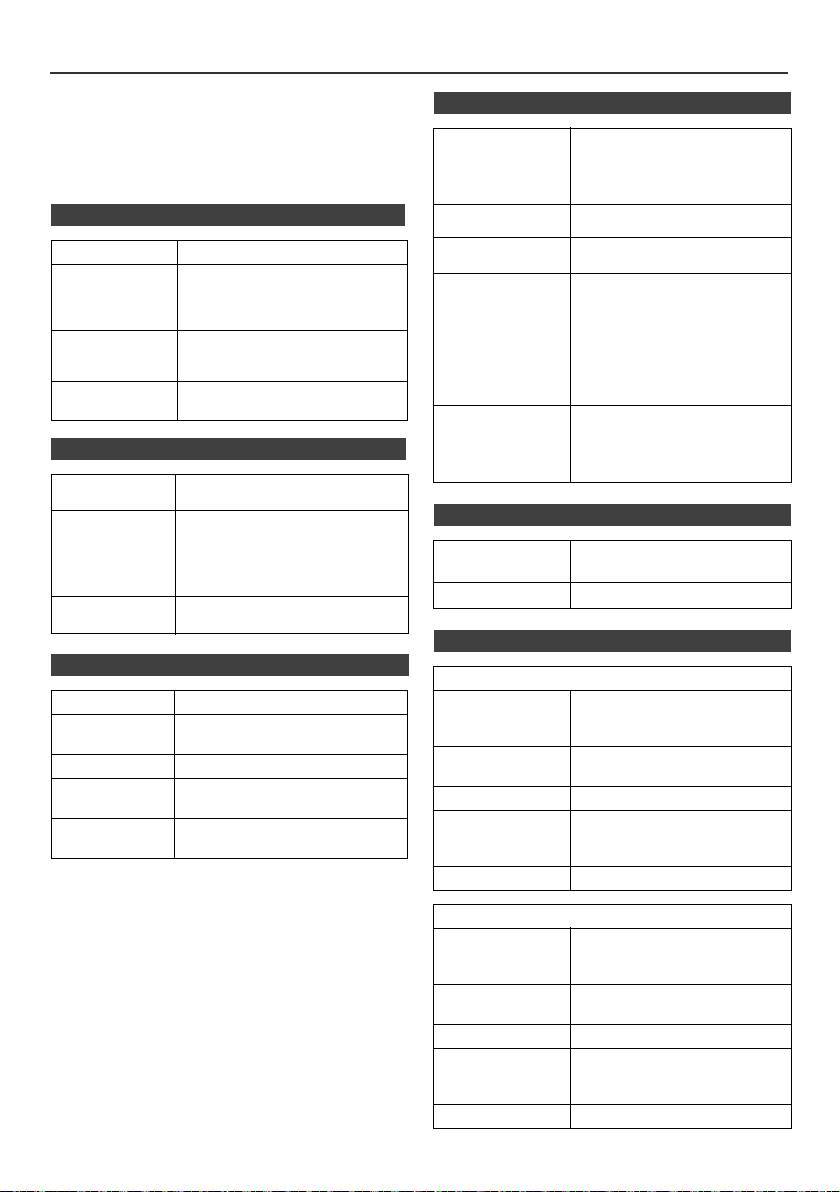
Dati tecnici
Per facilitare una politica di miglioramenti continui, la
n USB
PIONEER si riserva il diritto di cambiare il disegno e le
caratteristiche per perfezionamenti senza preavviso. Le
Interfaccia host
l Conforme alla classe di
caratteristiche di prestazioni numericamente indicate
USB
memoria di massa USB 1.1
sono valori nominali delle unità di produzione. Possono
(alta velocità)/2.0.
tuttavia verificarsi variazioni di valori rispetto ai suddetti
l Sostegno di massa e il
nelle unità individuali.
protocollo solo CBI.
n In generale
File supportati l MPEG 1 Layer 3
l WMA (Non DRM)
Supporto velocità
l MP3 (32 kbps a 320 kbps)
Alimentazione 220 V a 240 V c.a, 50 Hz/60 Hz
di trasmissione
l WMA (64 kbps a 160 kbps)
Consumo Acceso:
Altro l Il limite massimo totale di file
45 W (X-HM20)
MP3/WMA è 999.
30 kg (X-HM10)
l Il numero totale massimo di
Nel modo stand-by: 0,4 W
cartelle è 99 COMPRESA la
Dimensioni Larghezza: 215 mm
directory principale.
Altezza: 99 mm
l E informazioni ID3TAG
Profondità: 300 mm
supportate sono soltanto
TITLE, ARTIST e ALBUM.
Peso 3,8 kg (X-HM20)
l
Supporto ID3TAG versione 1 e 2.
3,7 kg (X-HM10)
Supporto file
l Supporto delle periferiche
system
USB con Microsoft Windows/
DOS/FAT 12/ FAT 16/ FAT 32.
n Amplificatore
l Lunghezza di blocco per
settore: 2 kbyte.
Potenza d’uscita RMS: 15 W + 15 W
(1 kHz, 10% T.H.D., 4 ohm)
n Sintonizzatore
Terminali di
Diffusori: 4 ohm
uscita
20 Hz a 20 kHz
Uscita video (solo X-HM20): 1 Vp-p
Gamma di
FM: 87,5 MHz a 108 MHz
Cuffia: 16 ohm
frequenza
AM: 522 kHz a 1.620 kHz
(raccomandati: 32 ohm)
Preimpostato 40 (Stazione FM e AM)
Terminali di
Linea in (ingresso analogico):
ingresso
500 mV/47 k ohm
n Diffusore
n Lettore CD
X-HM20
Tipo Multileettore disco singolo compatto
Tipo Diffusori a 2 vie
Tweeter 5 cm
Lettura segnale Non contatto, trasduttore con
10 cm Woofer
semiconduttori a 3 raggi laser
Potenza d’ingresso
15 W
Convertitore D/A Convertitore D/A multibit
massima
Risposta in
20 Hz a 20.000 Hz
Impedenza 4 ohm
frequenza
Dimensioni Larghezza: 132 mm
Gamma
90 dB (1 kHz)
Altezza: 260 mm
dinamica
Profondità: 173 mm
Peso 2,0 kg/ciascuno
X-HM10
Tipo Diffusori a 2 vie
Tweeter piezoelettrico
10 cm Woofer
Potenza d’ingresso
15 W
massima
Impedenza 4 ohm
Dimensioni Larghezza: 132 mm
Altezza: 260 mm
Profondità: 158 mm
Peso 1,6 kg/ciascuno
It-26
11/5/25 X-HM10_20_It.fm

Avviso
Su iPod/iPhone/iPad:
“Fatto per l’iPod”, “Fatto per l’iPhone” e “Fatto per l’iPad” significano
che un accessorio elettronico è stato progettato specificamente
rispettivamente per il collegamento con l’iPod, l’iPhone o l’iPad ed è
stato certificato dal suo sviluppatore corrispondere agli standard
operativi stabiliti da Apple. Apple non può essere considerata
responsabile di questo dispositivo o della sua osservanza delle
norme di sicurezza e dei vari regolamenti. Tenere presente che
l’uso di questo accessorio con l’iPod o l’iPhone può peggiorare le
prestazioni wireless.
iPad, iPhone e iPod sono marchi di fabbrica della Apple Inc.
depositati negli U.S.A. ed in altri paesi.
1
2
3
4
5
6
7
© 2011 PIONEER CORPORATION.
8
Tutti i diritti riservati.
9
It-27
11/5/25 X-HM10_20_It.fm
WAARSCHUWING
Gebruiksomgeving
Dit apparaat is niet waterdicht. Om brand of een
Temperatuur en vochtigheidsgraad op de plaats van
elektrische schok te voorkomen, mag u geen voorwerp
gebruik:
dat vloeistof bevat in de buurt van het apparaat zetten
+5 °C tot +35 °C, minder dan 85 % RH
(bijvoorbeeld een bloemenvaas) of het apparaat op
(ventilatieopeningen niet afgedekt)
andere wijze blootstellen aan waterdruppels,
Zet het apparaat niet op een slecht geventileerde plaats
opspattend water, regen of vocht.
D3-4-2-1-3_A1_Nl
en stel het apparaat ook niet bloot aan hoge
vochtigheid of direct zonlicht (of sterke kunstmatige
verlichting).
D3-4-2-1-7c*_A1_Nl
WAARSCHUWING
Lees zorgvuldig de volgende informatie voordat u de
stekker de eerste maal in het stopcontact steekt.
Als de netstekker van dit apparaat niet geschikt is
De bedrijfsspanning van het apparaat verschilt
voor het stopcontact dat u wilt gebruiken, moet u de
afhankelijk van het land waar het apparaat wordt
stekker verwijderen en een geschikte stekker
verkocht. Zorg dat de netspanning in het land waar
aanbrengen. Laat het vervangen en aanbrengen van
het apparaat wordt gebruikt overeenkomt met de
een nieuwe netstekker over aan vakkundig
bedrijfsspanning (bijv. 230 V of 120 V) aangegeven
onderhoudspersoneel. Als de verwijderde stekker per
op de achterkant van het apparaat.
ongeluk in een stopcontact zou worden gestoken,
D3-4-2-1-4*_A1_Nl
kan dit resulteren in een ernstige elektrische schok.
Zorg er daarom voor dat de oude stekker na het
verwijderen op de juiste wijze wordt weggegooid.
WAARSCHUWING
Haal de stekker van het netsnoer uit het stopcontact
Om brand te voorkomen, mag u geen open vuur (zoals
wanneer u het apparaat geruime tijd niet denkt te
een brandende kaars) op de apparatuur zetten.
D3-4-2-1-7a_A1_Nl
gebruiken (bijv. wanneer u op vakantie gaat).
D3-4-2-2-1a_A1_Nl
BELANGRIJKE INFORMATIE BETREFFENDE
DE VENTILATIE
LET OP
Let er bij het installeren van het apparaat op dat er
De STANDBY/ON schakelaar van dit apparaat
voldoende vrije ruimte rondom het apparaat is om een
koppelt het apparaat niet volledig los van het lichtnet.
goede doorstroming van lucht te waarborgen
Aangezien er na het uitschakelen van het apparaat
(tenminste 10 cm boven, 10 cm achter en 10 cm aan de
nog een kleine hoeveelheid stroom blijft lopen, moet
zijkanten van het apparaat).
u de stekker uit het stopcontact halen om het
10 cm 10 cm
apparaat volledig van het lichtnet los te koppelen.
Plaats het apparaat zodanig dat de stekker in een
10 cm
noodgeval gemakkelijk uit het stopcontact kan
worden gehaald. Om brand te voorkomen, moet u de
stekker uit het stopcontact halen wanneer u het
apparaat langere tijd niet denkt te gebruiken (bijv.
10 cm
wanneer u op vakantie gaat).
D3-4-2-2-2a*_A1_Nl
WAARSCHUWING
De gleuven en openingen in de behuizing van het
Dit apparaat is bestemd voor normaal huishoudelijk
apparaat zijn aangebracht voor de ventilatie, zodat een
gebruik. Indien het apparaat voor andere doeleinden
betrouwbare werking van het apparaat wordt verkregen
of op andere plaatsen wordt gebruikt (bijvoorbeeld
en oververhitting wordt voorkomen. Om brand te
langdurig gebruik in een restaurant voor zakelijke
voorkomen, moet u ervoor zorgen dat deze openingen
doeleinden, of gebruik in een auto of boot) en als
nooit geblokkeerd worden of dat ze afgedekt worden door
gevolg hiervan defect zou raken, zullen de reparaties
voorwerpen (kranten, tafelkleed, gordijn e.d.) of door
in rekening gebracht worden, ook als het apparaat
gebruik van het apparaat op een dik tapijt of een bed.
nog in de garantieperiode is.
K041_A1_Nl
D3-4-2-1-7b*_A1_Nl
11/5/25 X-HM10_20_Anki_Nl.fm
1
Over condensvocht
Als de disc-speler direct van een koude omgeving in
2
een warme kamer wordt geplaatst (’s winters
bijvoorbeeld), of als de kamer waarin de disc-speler
3
staat plotseling snel wordt verwarmd, kan er vocht uit
de lucht in het inwendige van het apparaat
4
condenseren (als druppeltjes op de lens e.d.). Na
dergelijke condensatie zal de disc-speler niet goed
5
werken, zodat u geen discs kunt afspelen. Laat de
disc-speler dan 1 tot 2 uur lang (afhankelijk van de
hoeveelheid condensatie) ongebruikt aan staan, totdat
6
het condensvocht verdampt is. Wanneer alle condens is
verdampt, zal de disc-speler weer normaal werken.
7
Condensatie kan ook ’s zomers optreden, als de
disc-speler in de koude luchtstroom van een
8
airconditioning staat. In dat geval kunt u de disc-speler
beter ergens anders zetten.
S005_A1_Nl
9
D-3
11/5/25 X-HM10_20_Anki_Nl.fm
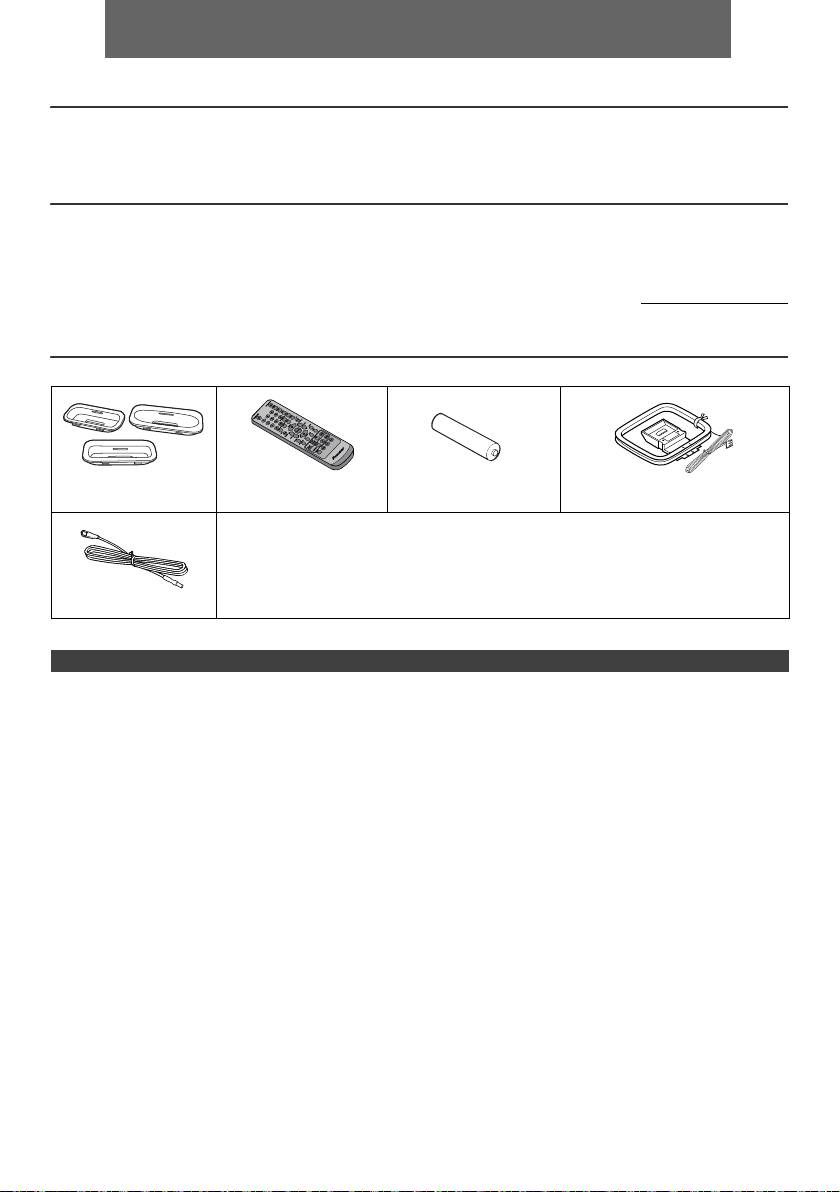
NEDERLANDS
l X-HM10/X-HM20 CD Receiver System bestaat uit een hoofdapparaat en een speakersysteem.
Inleiding
Hartelijk bedankt voor de aanschaf van dit PIONEER product. Voor het verkrijgen van de best mogelijke prestaties van
dit product, moet u deze gebruiksaanwijzing goed doorlezen. Deze aanwijzingen verduidelijken de bediening van dit
PIONEER product.
Bijzondere aantekening
De levering van dit product sluit niet automatisch een licentie in en geeft geen enkel recht, de inhoud, die met dit product
werd gescha pen, te benutten in inkomsten genererende omroepsystemen (aards, via satelliet, via kabel of via andere
kanalen), voor inkomstengene rerende on-line aanwendingen (via internet, intranet en/of andere netwerken), andere
inkomstengenererende inhoudsdistributiesystemen ( gebruik voor muziek op betaling of op bestelling en dergelijke), of
op inkomsten genererende fysieke media (CD’s DVD’s, halfgeleiderchips, harde schijven, geheugenkaarten en
dergelijke). Voor dit gebruik is een extra licentie nodig. Voor details verwijzen wij naar de website: http://mp3licensing.com
De MPEG Layer-3 audio coderingstechnologie is in licentie van Fraunhofer IIS en Thomson.
Accessoires
Controleert u alstublieft of de volgende accessoires inderdaad aanwezig zijn.
iPhone-adapters x 3
Afstandsbediening x 1 “AA” formaat batterij x 1 AM-ringantenne x 1
(alleen X-HM20)
Netsnoer
Garantiekaart
Deze gebruiksaanwijzing
FM-antenne x 1
INHOUD
Pagina
Pagina
USB
Algemene informatie
Luisteren naar USB
Voorzorgen . . . . . . . . . . . . . . . . . . . . . . . . . . . . . . . . . . 5
massaopslagapparaat/MP3-speler. . . . . . . . . . . . 16 - 17
Bedieningsorganen en indicatoren . . . . . . . . . . . . . . 5 - 6
Geavanceerde weergave van USB . . . . . . . . . . . . . . .17
Voorbereidingen voor gebruik
Systeemaansluitingen . . . . . . . . . . . . . . . . . . . . . . . 7 - 8
Radio
Afstandsbediening . . . . . . . . . . . . . . . . . . . . . . . . . . . . 8
Luisteren naar de radio . . . . . . . . . . . . . . . . . . . . . . . .18
Basisbediening
Algemene bediening . . . . . . . . . . . . . . . . . . . . . . . . . . 9
Geavanceerde mogelijkheden
Instellen van de klok (Alleen afstandsbediening) . . 9 - 10
Gebruiken van het Radio Data Systeem
(RDS) . . . . . . . . . . . . . . . . . . . . . . . . . . . . . . . . . . 19 - 21
iPod, iPhone en iPad
Timer en inslaaptimer bediening (Alleen
Luisteren naar de iPod, iPhone of iPad
afstandsbediening) . . . . . . . . . . . . . . . . . . . . . . . 21 - 23
(alleen X-HM20) . . . . . . . . . . . . . . . . . . . . . . . . . . 10 - 12
Hoofdtelefoon . . . . . . . . . . . . . . . . . . . . . . . . . . . . . . 23
Weergave van een CD of MP3/WMA-disc
Referenties
Luisteren naar een CD of MP3/WMA-disc . . . . . . . . . 13
Tabel probleemoplossing . . . . . . . . . . . . . . . . . . 24 - 25
Geavanceerde weergave van een CD of MP3/
Onderhoud . . . . . . . . . . . . . . . . . . . . . . . . . . . . . . . . . .25
WMA-disc . . . . . . . . . . . . . . . . . . . . . . . . . . . . . . . 14 - 15
Technische gegevens . . . . . . . . . . . . . . . . . . . . . . . . .26
MP3/WMA-mapmodus (alleen voor MP3/WMA-
Mededeling. . . . . . . . . . . . . . . . . . . . . . . . . . . . . . . . . .27
bestanden) . . . . . . . . . . . . . . . . . . . . . . . . . . . . . . 15 - 16
Nl-4
11/5/25 X-HM10_20_Nl.fm
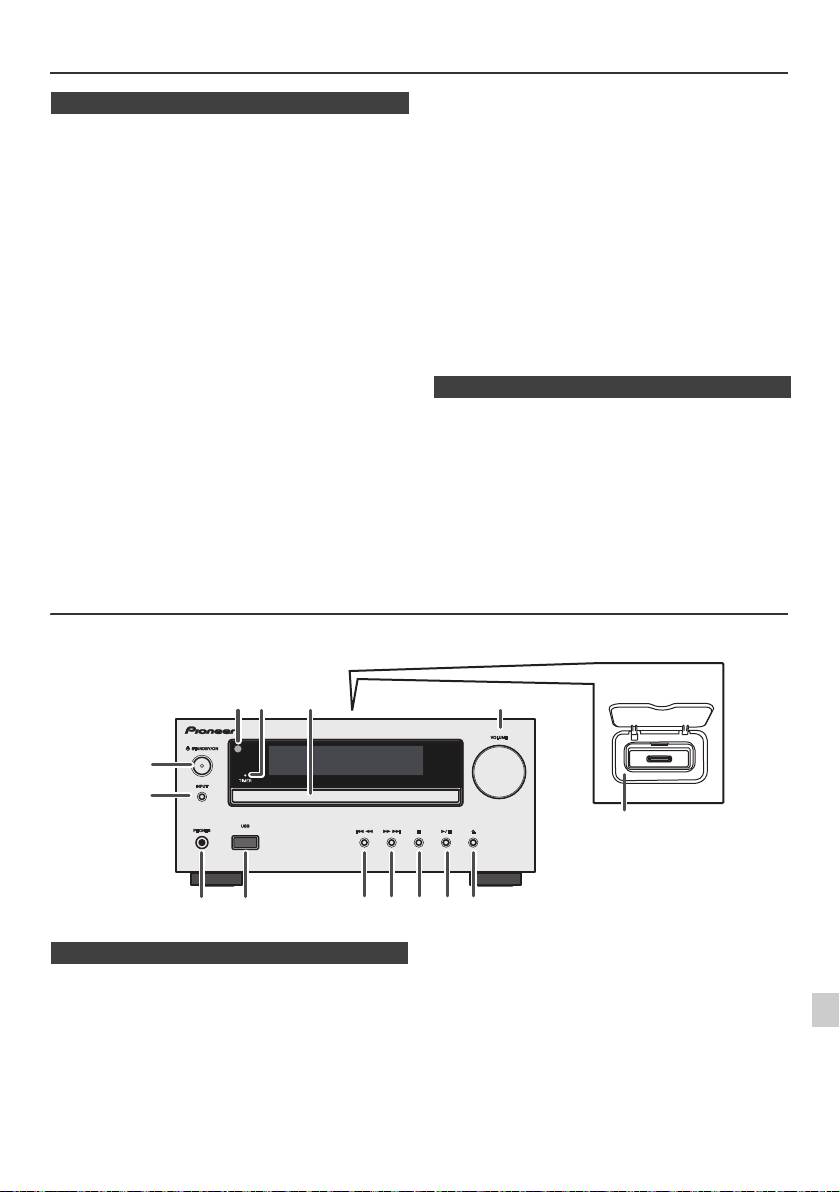
Voorzorgen
l De ventilatie mag niet worden belemmerd door de
n Algemeen
ventilatieopeningen af te dekken met voorwerpen zoals
kranten, tafellakens, gordijnen enz.
l Gebruik het toestel op een stevige, horizontale
l Er mogen geen open vuurbronnen, zoals brandende
ondergrond die vrij is van trillingen.
kaarsen op het toestel gezet worden.
l Vermijd kleurafwijkingen op het TV-scherm: plaats de
l U dient rekening te houden met het milieu wanneer u
luidsprekers niet op minder dan 30 cm van een CRT
batterijen weggooit.
TV. Plaats de luidsprekers verder van het TVtoestel als
de afwijkingen blijven. Bij een LCD TV doen zich
l Het toestel is ontworpen voor gebruik in een gematigd
dergelijke kleurafwijkingen niet voor.
klimaat.
l Stel het toestel niet aan direct zonlicht, magnetisme,
Waarschuwing:
stof, en vochtigheid bloot en houd het toestel uit de
De netspanning dient overeen te komen met de spanning
buurt van elektronische/elektrische apparaten
aangegeven op het toestel. Gebruik van dit toestel met
(personal computers, facsimiles, etc.) die mogelijk
een ander voltage dan het aangeduide is gevaarlijk en kan
storing veroorzaken.
leiden tot brand of andere ongelukken. PIONEER kan niet
l Zet niets bovenop het toestel.
aansprakelijk worden gesteld voor schade ten gevolge van
l Stel het toestel niet aan vocht, temperaturen hoger dan
60°C of extreem lage temperaturen bloot.
gebruik van dit toestel met een ander voltage dan het
l Als uw systeem niet naar behoren functioneert, dient u
gespecificeerde.
de stekker uit het stopcontact te halen. Doe vervolgens
de stekker weer terug in het stopcontact en zet uw
n Volumeregeling
systeem aan.
l Bij onweer dient u voor de veiligheid de stekker van uw
Het geluidsniveau bij een bepaald ingesteld volume,
toestel uit het stopcontact te halen.
hangt af van het prestatievermogen van de luidspreker,
van de locatie en van verschillende andere factoren. Het
l Grijp de stekker zelf beet als u deze uit het stopcontact
is aanbevolen, zich niet aan te hoge geluidsniveaus bloot
haalt. Indien aan het snoer wordt getrokken, kunnen de
te stellen. Zet niet het volume voluit wanneer u het toestel
interne draden beschadigen.
aanzet. Luister naar muziek op een gematigde
l De stroomstekker dient om het apparaat uit te
geluidssterkte. Excessieve geluidsdruk uit oor- en
schakelen en moet altijd gemakkelijk bereikbaar zijn.
hoofdtelefoons kan gehoorverlies veroorzaken.
l De behuizing mag niet verwijderd worden,
aangezien dit kan leiden tot elektrische schokken.
Raadpleeg voor werkzaamheden aan het
binnenwerk uw plaatselijke PIONEER
servicecentrum.
Bedieningsorganen en indicatoren
Functies voor iPod/iPhone zijn bij de X-HM20 niet beschikbaar.
1
2
3
4
Pagina
Pagina
5
1. Afstandsbedieningssensor . . . . . . . . . . . . . . . . . 8
10. Tuner Voorinstellen Omlaag, CD/USB Fragment
2. Timerindicator. . . . . . . . . . . . . . . . . . . . . . . . . . . 22
Omlaag, iPod/iPhone Overslaan Omlaag
6
3. Disclade . . . . . . . . . . . . . . . . . . . . . . . . . . . . . . . 13
. . . . . . . . . . . . . . . . . . . . . . . . . . . . . . . . . . . . .12, 13
4. Dockingstation voor de iPod of iPhone . . . . . . 11
11. Tuner Voorinstellen Omhoog, CD/USB Fragment
5. Volumeregeling . . . . . . . . . . . . . . . . . . . . . . . . . . 9
Omhoog, iPod/iPhone Overslaan Omhoog
7
6. Toets voor STANDBY/ON . . . . . . . . . . . . 11, 13, 18
. . . . . . . . . . . . . . . . . . . . . . . . . . . . . . . . . . . . .12, 13
7. INPUT toets . . . . . . . . . . . . . . . . . . 9, 11, 13, 16, 18
12. Toets Disc/USB Stop . . . . . . . . . . . . . . . . . . .12, 13
8. Aansluiting hoofdtelefoon . . . . . . . . . . . . . . . . 23
13. Toets Disc/USB/iPod/iPhone Afspelen of
8
9. USB aansluiting . . . . . . . . . . . . . . . . . . . . . . . . . 16
Pauze of Stop . . . . . . . . . . . . . . . . . . . . . . . . .12, 13
14. Toets voor openen/sluiten disclade . . . . . . . . .13
9
Nl-5
11/5/25 X-HM10_20_Nl.fm
1
52 3
6
7
4
8 10 11 12 13 14
9
Alleen X-HM20
n Voorpaneel
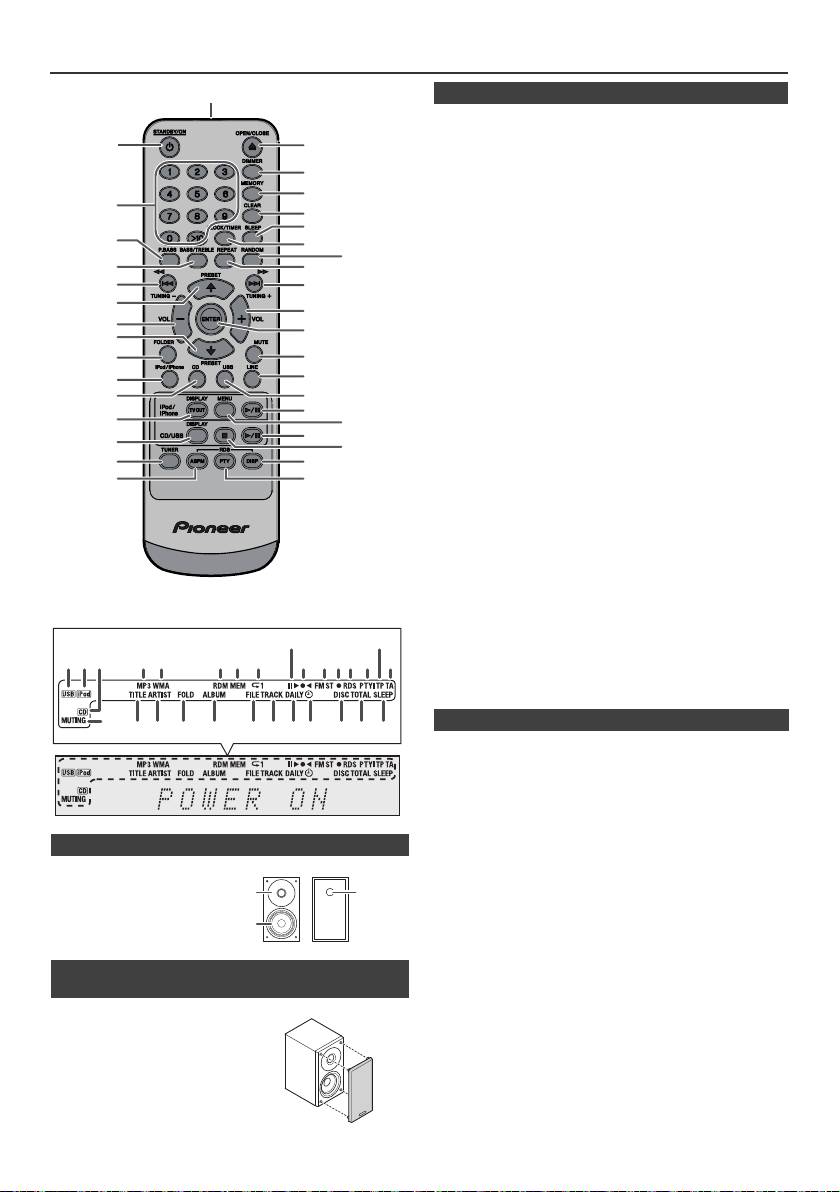
Bedieningsorganen en indicatoren (vervolg)
1
Pagina
1. Zender afstandsbediening . . . . . . . . . . . . . . . . . .8
2
17
2. Toets voor STANDBY/ON. . . . . . . . . . .9, 11, 13, 21
3. Cijfertoetsen . . . . . . . . . . . . . . . . . . . . . . . . . . . . .14
18
4. P.Bass toets . . . . . . . . . . . . . . . . . . . . . . . . . . . . . .9
5. Toets Bass/Treble (Hoge Tonen/Lage Tonen) . . .9
19
6. Afstem Omlaag, Overslaan Omlaag, Snel
3
20
Omkeren, Tijd Omlaag
21
Toets . . . . . . . . . . . . . . . . . .9, 12, 13, 16, 18, 19, 21
4
7. Tuner Voorinstellen Omhoog Toets, iPod Cursor
22
Omhoog . . . . . . . . . . . . . . . . . . . . . . .11, 12, 16, 18
23
5
24
8. Toets om geluidsvolume te verlagen . . . . . . . . 9
9. Tuner Voorinstellen Omlaag Toets, iPod Cursor
6
25
Omlaag . . . . . . . . . . . . . . . . . . . . . . . .11, 12, 16, 18
7
10. Directory-toets . . . . . . . . . . . . . . . . . . . . . . . . . 16
26
8
11. iPod/iPhone Toets . . . . . . . . . . . . . . . . . . . . . . . .11
27
12. CD toets . . . . . . . . . . . . . . . . . . . . . . . . . . . . . . . .13
9
13. Toets iPod/iPhone DISPLAY TV OUT . . . . . .11, 12
10
28
14. CD/USB DISPLAY-toets . . . . . . . . . . . . . . . . . . . .16
29
15. Tunertoets. . . . . . . . . . . . . . . . . . . . . . . . . . . .18, 19
11*
16. Keuzetoets RDS ASPM . . . . . . . . . . . . . . . . . . . .19
30
12
17. Toets Openen/Sluiten . . . . . . . . . . . . . . . . . . . . .13
31*
13*
18. Dimmer Toets . . . . . . . . . . . . . . . . . . . . . . . . . . . .9
32*
19. Geheugen toets . . . . . . . . . . . . . . . . . . . . . . .14, 18
33
14
20. Wistoets . . . . . . . . . . . . . . . . . . . . . . . . . . . . .14, 18
34
21. Sluimertoets . . . . . . . . . . . . . . . . . . . . . . . . . . . . .23
15
35
22. Toets voor klok/timer . . . . . . . . . . . . . . . . . . .9, 21
16
36
23. Randomtoets . . . . . . . . . . . . . . . . . . . . . . . . .12, 14
24. Repeattoets. . . . . . . . . . . . . . . . . . . . . . . . . . .12, 14
25. Afstemming Omhoog, Overslaan Omhoog,
Snel Voorwaarts, Tijd Omhoog
Toets . . . . . . . . . . . . . . . . . .9, 12, 13, 16, 18, 19, 21
26. Toets om geluidsvolume te verhogen . . . . . . . . .9
27. Entertoets . . . . . . . . . . . . . . . . . . . . . . . . . .9, 11, 12
28. Toets voor geluidsonderdrukking . . . . . . . . . . . .9
29. Linetoets . . . . . . . . . . . . . . . . . . . . . . . . . . . . . .8, 25
30. USB-toets . . . . . . . . . . . . . . . . . . . . . . . . . . . . . . .16
31. iPod/iPhone Afspeel/Pauze Toets. . . . . . . . . . . .12
32. iPod/iPhone Menu Toets . . . . . . . . . . . . . . . . . . .12
33. CD/USB Play/Pause-toets . . . . . . . . . . . .12, 13, 14
34. CD/USB Stoptoets . . . . . . . . . . . . . . . . . . . . .13, 14
35. Keuzetoets RDS-display . . . . . . . . . . . . . . . . . . .19
36. Keuzetoets RDS PTY . . . . . . . . . . . . . . . . . . . . . .19
Pagina
1. USB-indicator . . . . . . . . . . . . . . . . . . . . . . . . . . .16
2. iPod-indicator . . . . . . . . . . . . . . . . . . . . . . . . . . . .10
3. CD indicator . . . . . . . . . . . . . . . . . . . . . . . . . . . . .13
4. MP3-indicator . . . . . . . . . . . . . . . . . . . . . . . . . . . .13
5. WMA-indicator . . . . . . . . . . . . . . . . . . . . . . . . . . .13
6. RDM (Willekeurige)-indicator . . . . . . . . . . . . . . .14
7. MEM (Geheugen)-indicator . . . . . . . . . . . . . . . . .14
n Luidsprekersysteem
8. Herhalingsindicator . . . . . . . . . . . . . . . . . . . . . . .14
9. Afspeel/Pauze Indicator. . . . . . . . . . . . . . . . . . . .12
1. Tweeter
10. Afstemming FM/AM-indicator . . . . . . . . . . . . . . .18
2. Woofer
11. FM-stereofunctie indicator . . . . . . . . . . . . . . . . .18
3. Bassreflexkanaal
12. Stereo Station Aanwijzer. . . . . . . . . . . . . . . . . . .18
13. RDS-indicator . . . . . . . . . . . . . . . . . . . . . . . . . . .19
14. PTY-indicator . . . . . . . . . . . . . . . . . . . . . . . . . . . .19
15. TP-indicator . . . . . . . . . . . . . . . . . . . . . . . . . . . . .19
16. TA-indicator . . . . . . . . . . . . . . . . . . . . . . . . . . . . .19
n De speakergrills zijn afneembaar
17. Demping Indicator . . . . . . . . . . . . . . . . . . . . . . . . .9
(alleen X-HM20)
18. Titel Indicator . . . . . . . . . . . . . . . . . . . . . . . . . . . .16
19. Artiest Indicator . . . . . . . . . . . . . . . . . . . . . . . . . .16
Er mag niets in aanraking komen met
20. Map indicator . . . . . . . . . . . . . . . . . . . . . . . . . . . .16
de luidspreker-membranen wanneer
21. Album Indicator . . . . . . . . . . . . . . . . . . . . . . . . . .16
22. Bestand Indicator. . . . . . . . . . . . . . . . . . . . . . . . .16
u de grilles van de luidsprekers haalt.
23. Fragmentindicator . . . . . . . . . . . . . . . . . . . . . . . .14
24. Indicator Dagelijkse Timer . . . . . . . . . . . . . . . . .21
25. Eenmaal Timer Indicator . . . . . . . . . . . . . . . . . . .21
26. Plaat Indicator . . . . . . . . . . . . . . . . . . . . . . . . . . .13
27. Totaal-indicator . . . . . . . . . . . . . . . . . . . . . . . . . .16
28. Inslaaptimer-indicator . . . . . . . . . . . . . . . . . . . . .23
Nl-6
11/5/25 X-HM10_20_Nl.fm
*De toetsen 11, 13, 31, 32 zijn alleen bij de X-HM20 beschikbaar.
9
15
1 4 5 6 7
2 3
8
10 11 1312 14
16
17
28272624 2523221918 2120
n Afstandsbediening
n Display
1
3
2

Systeemaansluitingen
Schakel het apparaat uit en verwijder het netsnoer van het wandcontact voordat u apparatuur aansluit of
aansluitingen wijzigt.
Bijgeleverde FM-antenne:
Sluit de FM-antennedraad aan op de FM 75 OHMS
aansluiting en richt de draad zodanig dat de ontvangst
optimaal is.
FM-buitenantenne:
Gebruik voor een betere ontvangst een externe FM-
antenne (coaxiale kabel 75 Ohm). Wanneer gebruik wordt
gemaakt van een externe FM-antenne, trek dan de
meegeleverde FM-antennekabel uit.
Bijgeleverde AM-ringantenne:
Sluit de AM-ringantenne aan op de AM-aansluiting. Richt
de AM-ringantenne uit voor een optimale ontvangst.
Plaats de AM-ringantenne op een boekenplank, etc., of
bevestig ze met schroeven (niet meegeleverd) aan een rek
of aan de muur.
Opmerking:
Als u de antenne op het toestel of in de buurt van het
1
netsnoer plaatst, kan het signaal gestoord worden. Plaats
U kunt foto’s en video’s van de iPod of iPhone bekijken,
de antenne zo ver mogelijk uit de buurt van het toestel
door het systeem op een TV/monitor aan te sluiten. Sluit,
2
voor een betere ontvangst.
als het TV/monitor een video-ingang heeft, deze ingang
aan op de VIDEO OUT-aansluiting aan de achterzijde van
3
het toestel en zet de TV-uitgang op de iPod of iPhone in de
stand "ON".
4
Opmerking:
Het is belangrijk dat de NTSC- of PAL-instelling op de iPod
dezelfde is als die van het TV-signaal. Ga naar de
5
homepage van Apple voor verdere informaties.
6
7
8
9
Nl-7
11/5/25 X-HM10_20_Nl.fm
LINE
AUX
LOOP
AC IN
Linkerluid-
Installeren van de AM-ringantenne
AM-
Videokabel
Rechterluid-
TV
spreker
ringantenne
(niet meegeleverd)
spreker
< Bevestigen
< In elkaar zetten >
aan de wand >
muur
Naar video-ingang
Video Out-contact
Schroeven (niet meegeleverd)
(alleen X-HM20)
Wandstopcontact
(Wisselstroom 220 V
FM-antenne
tot 240 V, 50 Hz/60 Hz)
n Aansluiten van de antennes
n Aansluiten van de luidsprekers
l
Draai blootliggende draden in elkaar.
l Verbind de rode draad aan het
aansluitpunt plus (+), en de
andere draad and het
aansluitpunt min (–).
l Gebruik speakers met een
impedantie van 4 Ohm, omdat
speakers met een lagere
impedantie het apparaat kunnen
beschadigen.
Onjuist
l
Op deze luidsprekeraansluitingen staat een
GEVAARLIJKE spanning. Om een elektrische schok te
voorkomen bij het aansluiten en losmaken van de
luidsprekerkabels, moet u de stekker uit het stopcontact
halen voordat u niet geïsoleerde onderdelen aanraakt.
l De speakers mogen niet aan de wand of het plafond
worden bevestigd; indien ze eraf vallen kan dit leiden
tot letsel.
l
Verwissel in geen geval de rechter en linker kanalen. De
rechter luidspreker is de luidspreker aan de rechterkant
wanneer u naar het toestel gekeerd staat.
l Laat de ontblote luidsprekerdraden elkaar niet raken.
l Zorg dat er geen voorwerpen in de bassreflexkanalen
vallen of worden gestoken.
l
Ga niet op de luidsprekers zitten of staan. Dit kan leiden
tot persoonlijk letsel.
n Aansluiting van de iPod of de iPhone op
de TV (alleen X-HM20)
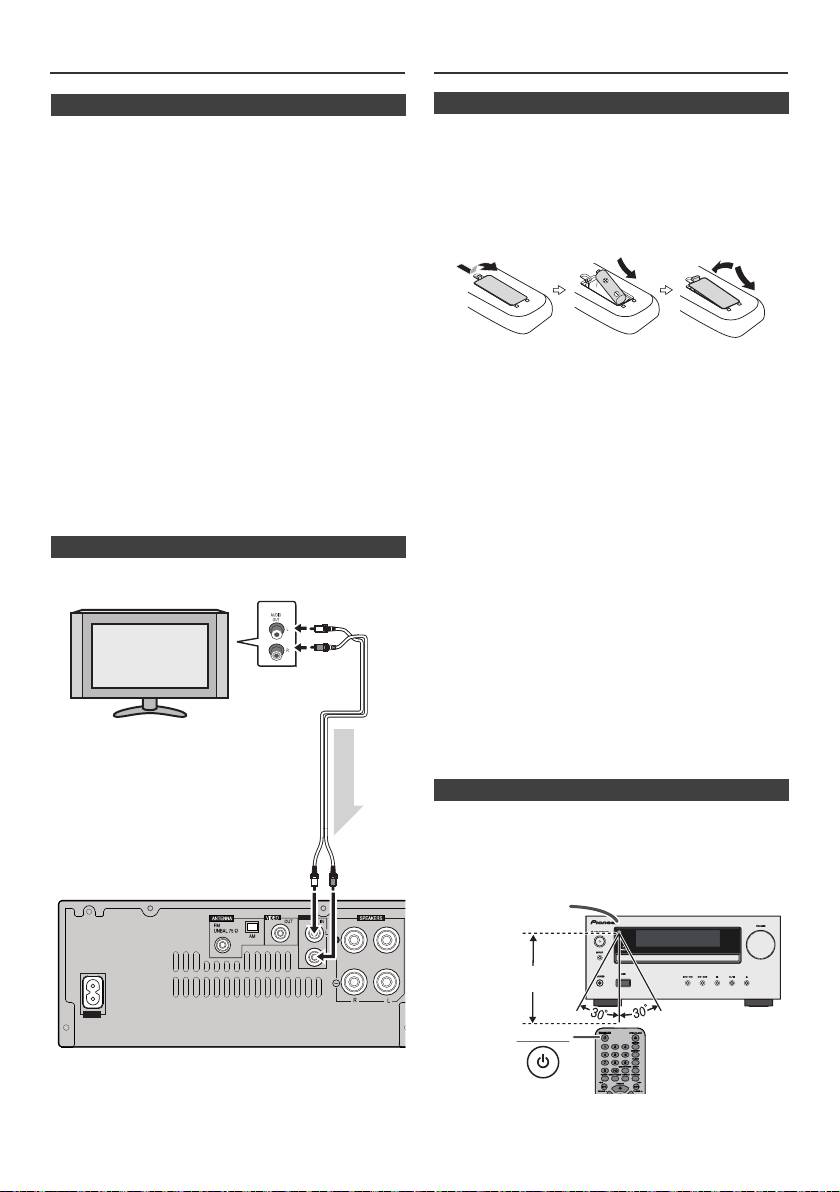
Systeemaansluitingen (vervolg)
Afstandsbediening
n Netsnoeraansluiting
Steek de stekker van het netsnoer van dit toestel in een
stopcontact nadat u heeft gecontroleerd dat alle
verbindingen juist zijn gemaakt.
Opmerking:
Trek de stekker uit het stopcontact indien u het toestel voor
langere tijd niet gaat gebruiken.
Let op:
l Pak het netsnoer alleen bij het stekkerdeel beet. Trek
de stekker niet uit door aan het snoer te rukken en raak
het netsnoer nooit met natte handen aan; dit kan een
kortsluiting of elektrische schok tot gevolg hebben.
Plaats het apparaat, een meubelstuk of enig ander
voorwerp niet op het netsnoer en knel het netsnoer op
geen enkele manier af. Maak nooit een knoop in het
netsnoer of knoop deze samen met andere kabels.
Waarschuwing:
Leid de netsnoeren zodanig dat de kans klein is dat er
l De batterij moet niet in direct zonlicht of op een andere
iemand op trapt. Een beschadigd netsnoer kan brand
warme plaats worden gebruikt of opgeslagen. Hierdoor
of een elektrische schok veroorzaken. Controleer
kan de batterij gaan lekken, oververhit raken,
regelmatig de staat van het netsnoer. Wanneer u
exploderen of in brand vliegen. Hierdoor kan de batterij
beschadigingen aantreft, vraagt u uw dichtstbijzijnde
sneller opraken of slechter presteren.
Pioneer-erkende, onafhankelijke servicecentrum om
het netsnoer te vervangen.
Let op:
l Alleen het bij dit apparaat meegeleverde netsnoer mag
l
Verwijder de batterij indien het apparaat voor langere tijd
worden gebruikt.
niet zal worden gebruikt. Hierdoor voorkomt u mogelijke
schade vanwege lekkende batterijen.
l Het netsnoer mag alleen voor het bovenomschreven
l
Gebruik geen oplaadbare batterij (nikkelcadmium batterij,
doeleinde worden gebruikt.
etc.).
l
Door foutieve plaatsing van de batterij is het mogelijk dat
n Een televisietoestel, enz. aansluiten
het apparaat slechter functioneert.
Opmerkingen aangaande de afstandsbediening:
Sluit aan de TV d.m.v. een audiokabel
.
l
Vervang de batterij als de bedieningsafstand wordt
verkleind of als de bediening onregelmatig werkt. Een
AA-formaat batterij moet worden gebruikt.
l
Reinig de zender van de afstandsbediening en de sensor
op het toestel zelf regelmatig met een zachte doek.
l
Blootstelling van de sensor op het apparaat aan sterk licht
kan de bediening nadelig beïnvloeden. Wijzig in dat geval
de verlichting of de richting van het apparaat.
l
Houd de afstandsbediening verwijderd van vocht, hitte,
shock en trillingen.
l Zorg ervoor dat de betreffende in uw land of gebied
geldende lokale regelgeving of milieuregelgeving
wordt nageleefd bij verwijdering van een verbruikte
batterij.
Controleer de afstandsbediening nadat u alle verbindingen
heeft gecontroleerd.
Richt de afstandsbediening op de sensor van het toestel. De
afstandsbediening kan worden gebruikt binnen het hieronder
aangegeven bereik:
Om Line In functie te kiezen:
l
Op hoofdunit: Druk herhaaldelijk op de INPUT toets totdat
Line In verschijnt.
l
Op de afstandsbediening: Druk herhaaldelijk op de LINE-
toets totdat Line In verschijnt.
Nl-8
11/5/25 X-HM10_20_Nl.fm
LINE
AUX
LOOP
AC IN
TV
Naar audio-
uitgangen
Audiokabel
(In
de handel
verkrijgbaar)
Audiosignaal
Naar LINE
invoer
Hoofd-toestel
stekerbus
n Batterij inzetten
1
Open het batterijklepje.
2
Plaats de meegeleverde batterij in de aangegeven richting
in de batterijhouder.
Duw de batterij bij het plaatsen of verwijderen in de richting
van de minpool van de batterijhouder.
3
Sluit het klepje.
n Testen van de afstandsbediening
STANDBY/ON
Afstandsbedienings-
sensor
7 m
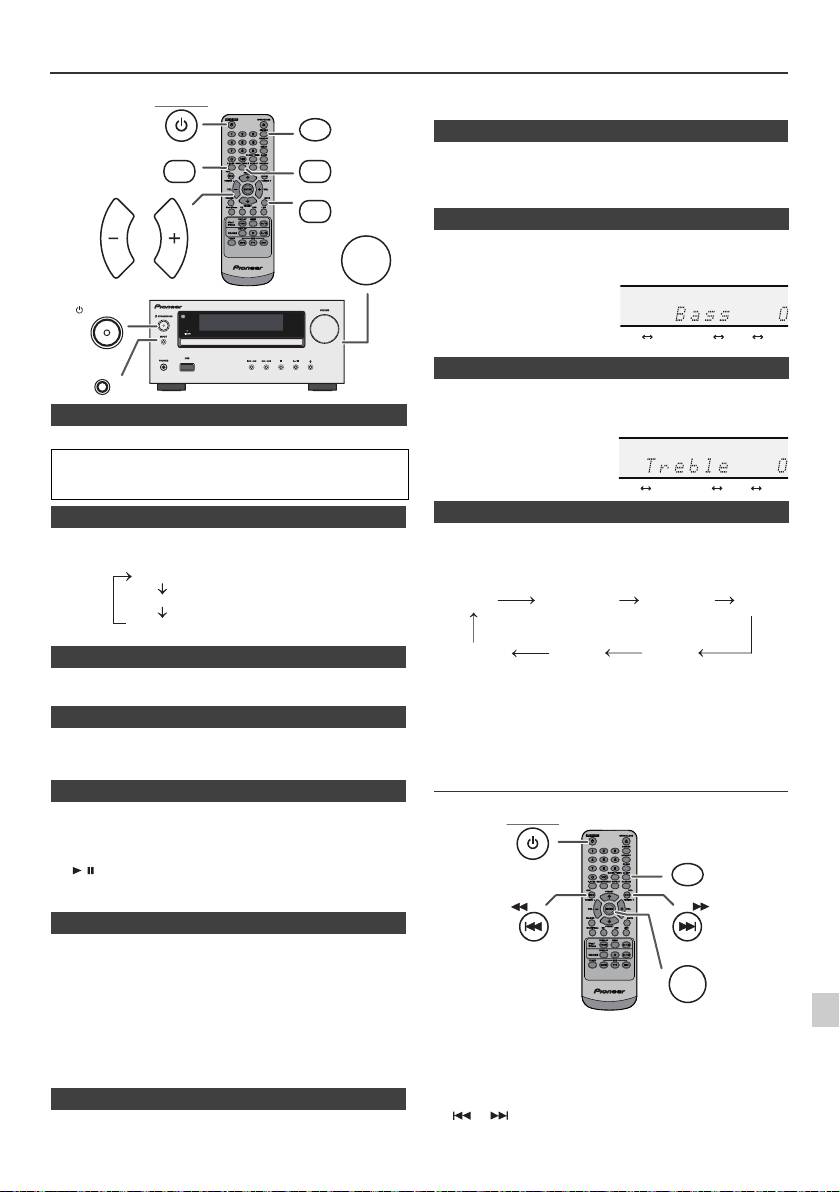
Algemene bediening
de afstandsbediening drukt. Druk opnieuw op deze toets, om het
STANDBY/ON
DIMMER
geluidsvolume te herstellen.
P.BASS
BASS/TREBLE
Als het apparaat voor het eerst wordt ingeschakeld, wordt de P.Bass-
modus weergegeven welke de basfrequenties versterkt. Druk op de
toets P.BASS van de afstandsbediening om de P.bass-modus uit te
MUTE
schakelen.
VOLUME
VOL VOL
1
Selecteer "Bass" door op de toets BASS/TREBLE te drukken.
2
Druk binnen 5 seconden op de toets VOL (+ of –), om de
laagtonen te regelen.
STANDBY/ON
INPUT
1
Selecteer "Treble" door op de toets BASS/TREBLE te drukken.
2
Druk binnen 5 seconden op de toets VOL (+ of –), om de
n Inschakelen van de stroom
hoogtonen te regelen.
Druk op de STANDBY/ON toets om de spanning in te schakelen.
Na gebruik:
Druk op de STANDBY/ON toets als u het toestel in de Standby-
stand wilt zetten.
n Helderheid van de display regelen
Wanneer op het hoofdtoestel op de INPUT-toets gedrukt
Om helderheid weergave te vervagen, druk de DIMMER-toets op
wordt, schakelt de actuele functie naar een andere modus
de afstandsbediening.
om. Druk herhaaldelijk op de INPUT-toets, om de
Dimmer 1
gewenste functie te kiezen.
Dimmer 2
Dimmer Off
n
Automatische begininstelling van het volume
Als u de hoofdunit in- of uitschakelt terwijl het volume op 17 of hoger
staat, dan begint de instelling bij 16.
Opmerking:
De backupfunctie kan de opgeslagen zenders een paar uur
n Volumeregeling
in het geheugen houden in geval van een stroomstoring of
wanneer de stekker uit het stopcontact raakt.
Draai de volumeknip naar VOLUME (op het hoofdapparaat) of druk
op VOL +/– (op de afstandsbediening) als u het volume wilt laten
Instellen van de klok (Alleen
toenemen of afnemen.
afstandsbediening)
n Automatische inschakelfunctie
Het toestel wordt ingeschakeld wanneer u op een van de volgende
toetsen drukt.
1
l
iPod / iPhone, CD, USB, LINE, TUNER op de afstandsbediening:
Gekozen functie is nou geactiveerd.
2
l
/ toets van het hoofdtoestel: Het apparaat wordt
ingeschakeld en het afspelen van de laatste functie begint (CD,
TUNER, USB, iPod, LINE IN)
3
n Functie voor automatisch uitschakelen
4
Het hoofdapparaat wil gaan naar stand-by modus (wanneer iPod/
iPhone is niet gekoppeld) na 15 minuten van inactiviteit gedurende:
iPod/iPhone: Geen aansluiting
5
CD / USB: In de stand Stop.
LINE IN: Er wordt geen ingangssignaal waargenomen of
het geluid is zeer laag hoorbaar.
6
In dit voorbeeld wordt de klok ingesteld op 24-uurs (00:00)
Opmerking:
display.
Alleen X-HM20: Het apparaat wil echter beginnen te laden als iPod/
7
iPhone is gekoppeld.
"Charge Mode" verschijnt tijdens stand-by op de display.
8
n Geluidsonderdrukking
Het geluid wordt tijdelijk onderdrukt wanneer u op de MUTE-toets op
9
Nl-9
11/5/25 X-HM10_20_Nl.fm
(De display is vaag).
(De display wordt vager).
(De display is helder).
n P.Bass-bediening
n Basregeling
n Hoogtonenregeling
n Functie
1
Druk op de STANDBY/ON toets om de spanning in te schakelen.
2
Druk op de CLOCK/TIMER toets.
3
Druk binnen 10 seconden op de ENTER-toets. Druk op de toets
of als u de dag wilt instellen, druk daarna op de ENTER
-toets.
........
-5 -4 +4 +5
........
-5 -4 +4 +5
CD AM
FM STEREO
FM MONO
Line In
iPod
USB
(alleen X-HM20)
STANDBY/ON
CLOCK/TIMER
TUNING −
TUNING +
ENTER
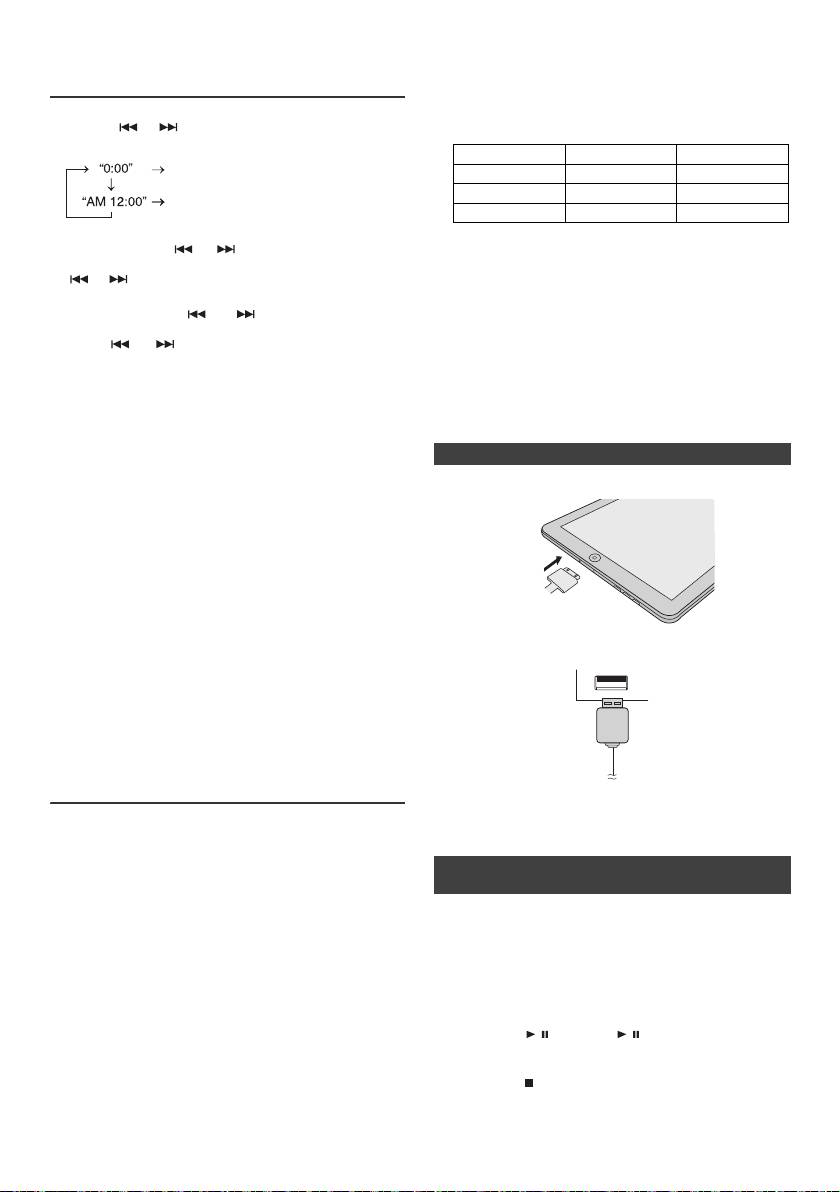
support/ios/eu).
Instellen van de klok (Alleen
l Installatie op uw iPod/iPhone/iPad van andere
afstandsbediening) (vervolg)
softwareversies dan de versies die staan vermeld op
de website van Pioneer, kan mogelijk leiden tot
incompatibiliteit met dit systeem.
4
Houd de of toets ingedrukt om de 24-uurs of 12-uurs
l Laadaansluitpunt voor de iPod, iPhone en iPad:
aanduiding te kiezen en druk dan op de ENTER-toets.
Stand Dockingstation
USB-aansluitpunt
De 24-uurs tijdsaanduiding verschijnt.
USB-functie NO YES
(00:00 - 23:59)
Overige functie YES NO
De 12-uurs tijdsaanduiding verschijnt.
(AM 12:00:00 - PM 11:59)
Stand-by YES NO
l Het bericht "Dit toebehoren is niet bestemd voor de
5
Druk op de toets of als u de uren wilt instellen,
iPhone" of iets dergelijks verschijnt mogelijk op het
druk daarna op de ENTER-toets. Druk éénmaal op de
scherm van de iPhone, als:
of toets als u de tijd met 1 uur wilt verhogen. Houd
- de batterij bijna op is.
ingedrukt om snel te verhogen.
- de iPhone niet juist is gedockt (bijv. scheef).
6
Druk op de toets of als u de minuten wilt
Wanneer dit zich voordoet verwijder dan de iPhone
instellen, druk daarna op de ENTER -toets. Druk éénmaal
en dock hem opnieuw.
op de of toets als u de tijd met 1 minuut wilt
l
Dit product is gemaakt voor de iPhone. Om
verhogen.
achtergrondruis te vermijden wanneer de iPod/
Bevestigen van het tijddisplay:
iPhone is gedockt, wordt de hoofdtelefoon
Druk op de CLOCK/TIMER toets. De tijdsaanduiding zal circa
gedeactiveerd en "HP INVALID" wordt weergegeven.
5 seconden worden getoond.
Je kunt ook kortstondige audio-interferentie bij
inkomende telefoongesprekken ervaren.
Opmerking:
Wanneer stroomvoorziening is weergegeven nadat het
n iPad-aansluiting (USB-aansluitpunt)
apparaat is weer ingestoken of door vermogensuitval, stel de
klok in opnieuw (pagina 9).
1
Steek de connector in de iPod, iPhone of iPad.
Gelijk zetten van de klok:
Voer "Instellen van de klok" vanaf stap 1 uit. Indien "Clock"
niet in stap 2 verschijnt, zal stap 4 (voor het kiezen van de 24-
uur of 12-uuraanduiding) worden overgeslagen.
Veranderen van het 24- of 12-uursdisplay:
1 Wis alle geprogrammeerde gegevens. [Zie
"Terugzetten fabrieksinstellingen, het gehele
geheugen wissen" op bladzijde 25 voor details.]
2 Sluit de iPad met een USB-connector aan op het
apparaat.
2 Voer de aanwijzingen onder "Instellen van de klok"
vanaf stap 1 verder uit.
Opmerking:
De timerinstelling wordt teruggezet indien het netsnoer is
verwijderd of ingeval van een stroomuitval.
Luisteren naar de iPod, iPhone of
iPad (alleen X-HM20)
Opmerking:
De USB-connector ondersteunt niet VIDEO OUT.
Modellen die iPod, iPhone en iPad ondersteunen:
l
iPad
l
iPhone 4
l
iPhone 3GS
n Weergave van de iPod, iPhone of iPad
l
iPhone 3G
(USB-aansluitpunt)
l
iPhone
de
l
iPod touch (4
generation)
1 Druk op de STANDBY/ON-toets om het apparaat in te
de
l
iPod touch (3
generation)
schakelen.
de
l
iPod touch (2
generation)
2 Druk herhaaldelijk op de USB-toets van de
de
l
iPod touch (1
generation)
afstandsbediening of op de INPUT-toets van de
l
iPod classic
hoofdunit om de USB-functie te selecteren.
de
l
iPod nano (6
generation)
3 Sluit de iPod, iPhone of iPad op het apparaat aan.
de
l
iPod nano (5
generation)
"iPod" verschijnt.
de
l
iPod nano (4
generation)
4 Druk op de / (CD/USB / )-toets om de weergave
de
l
iPod nano (3
generation)
te starten.
de
l
iPod nano (2
generation)
Opmerking:
Opmerkingen:
De Stoptoets ( ) is tijdens de weergave van de iPod,
l Dit systeem is ontwikkeld en getest voor de
iPhone of iPad niet geldig.
softwareversie van iPod/iPhone/iPad, zoals vermeld
op de website van Pioneer (http://pioneer.jp/homeav/
Nl-10
11/5/25 X-HM10_20_Nl.fm

Luisteren naar de iPod, iPhone of iPad (alleen X-HM20) (vervolg)
n Aansluiting iPod en iPhone-adapter
(Dockingstation)
Opmerkingen:
Gebruik de adapter die bij uw iPod of iPhone is geleverd.
iPhone-
Beschrijving
Vermogen
adapter Nr.
iPhone
12 iPhone 4GB & 8GB & 16GB
15 iPhone 3G,
8GB & 16GB & 32GB
iPhone 3GS
19 iPhone 4 16GB & 32GB
n De iPod of iPhone-adapter insteken
(Dockingstation)
1
Open het dockingstation voor de iPod en iPhone door
het op te lichten.
2 Steek de adapter voor de iPod en iPhone in de unit en
sluit uw iPod of iPhone aan.
Let op:
l
Het geluid schakelt pas over van de iPhone naar het
hoofdtoestel nadat het verificatieproces na ongeveer
Trek alle aangesloten accessoires uit de iPod of iPhone,
1
10 seconden is voltooid.
voordat u het toestel in het docking-station zet.
l
Bij binnenkomende gesprekken wordt de weergave tijdelijk
stopgezet.
2
l
Wanneer de oproepen worden beantwoord, kan het gesprek
alleen worden gehoord via de ingebouwde luidspreker van
de iPhone. Schakel de luidspreker van de iPhone in of neem
3
de iPhone uit de dock als u het gesprek wilt gaan voeren.
4
Verwijder de iPod of iPhone uit het dockingstation of de iPad uit
5
het USB-aansluitpunt. Zelfs tijdens de weergave kunt u dit gerust
doen.
6
7
8
9
Nl-11
11/5/25 X-HM10_20_Nl.fm
iPhone
iPhone (onderkant)
Dock-aansluiting
Adapter voor de iPhone
Connector voor de iPhone
Dock voor de iPhone
n Verwijderen van de adapter voor de iPod of
iPhone (Dockingstation)
Steek de punt van een
schroevendraaier ("–" type, klein) in het
gat van de adapter zoals wordt
afgebeeld en neem de adapter naar
boven toe uit.
n Weergave van de iPod of iPhone
(Dockingstation)
1
Druk op de STANDBY/ON toets om de spanning in te
schakelen.
2
Druk herhaaldelijk op de iPod/iPhone-toets van de
afstandsbediening of op de INPUT-toets van het
hoofdtoestel om de iPodfunctie te kiezen.
3
Plaats de iPod of iPhone unit in de dock van de hoofdunit.
4
Druk op de / (iPod/iPhone / ) toets om de weergave
te starten.
STANDBY/ON
INPUT
STANDBY/ON
PRESET
ENTER
iPod/iPhone
PRESET
DISPLAY
MENU
USB
iPod/
TV OUT
iPhone
DISPLAY
CD/USB
n iPhone-weergave
n Afsluiten van de iPod, iPhone of iPad
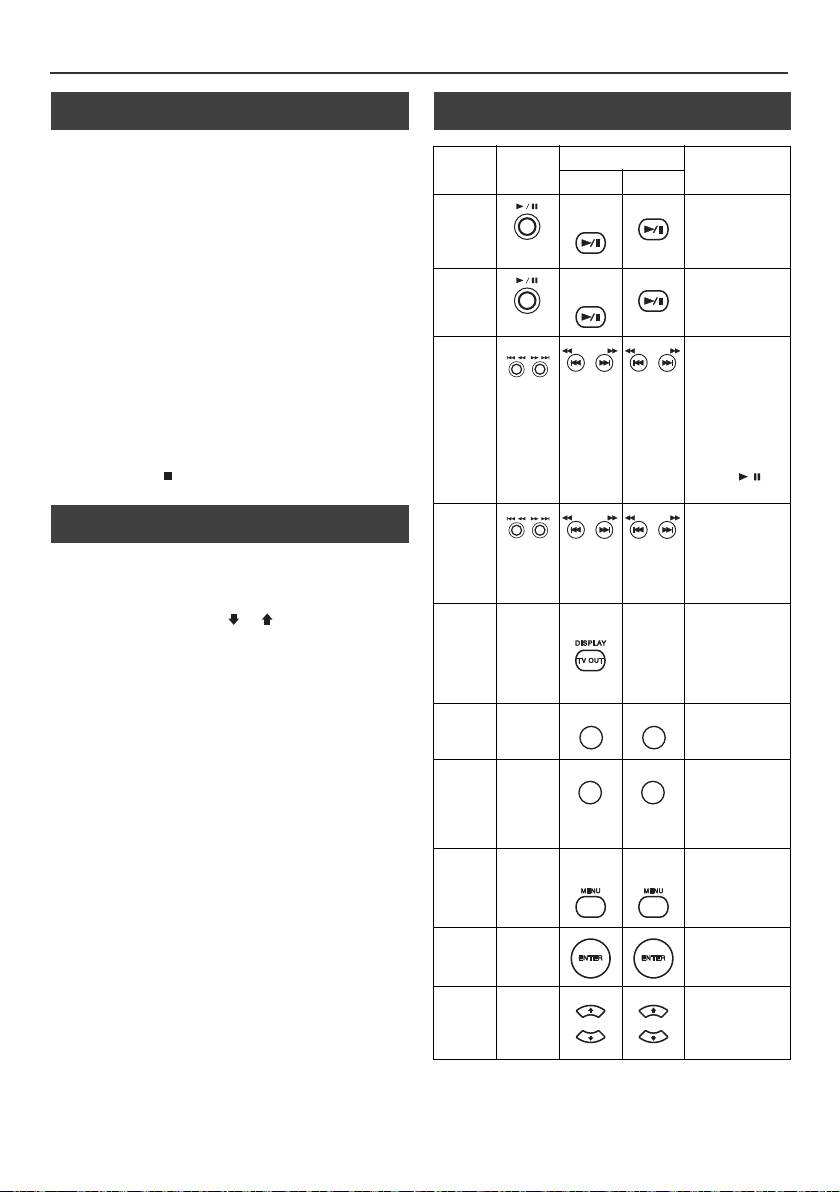
Luisteren naar de iPod, iPhone of iPad
(alleen X-HM20) (vervolg)
n Videobeelden bekijken op een TV-toestel
n Verscheidene functies van de iPod, iPhone
dat is aangesloten op de iPod of iPhone
en de iPad
1
Houd de DISPLAY TV OUT-toets minstens 2 seconden
Functie
Hoofd-
Afstandsbediening
Bediening
ingedrukt. "TV Display" verschijnt op de display.
toestel
Dock USB
2
Start het afspelen met een druk op de ENTER toets.
Weergave
iPod/
CD/USB
Druk in de
Opmerkingen:
iPhone
pauzestand.
l
Als de instelling TV Out al is ingeschakeld in het videomenu,
worden de videobeelden automatisch weergegeven op het
TV-scherm wanneer u op de ENTER toets drukt.
l
De display TV OUT wordt niet via het USB-aansluitpunt
Pauzeren
iPod/
CD/USB
Druk tijdens
ondersteund. (iPad)
iPhone
weergave.
l
Als u de videobeelden weer op het scherm van de iPod of
iPhone wilt bekijken, opent u het videomenu met een druk op
de MENU toets. Houd daarna de DISPLAY TV OUT-toets
langer dan 2 seconden ingedrukt tot "iPod Display"
Hoger/
Druk hierop in de
verschijnt.
lager
afspeel- of in de
l
Wanneer u tijdens het afspelen van videobeelden van de
pauzestand. Als u
iPod of iPhone op de DISPLAY TV OUT-toets drukt, wordt de
fragment
tijdens de
weergave van de beelden niet overgeschakeld tussen de
pauzemodus op
iPod en het TV-toestel.
de toets drukt,
start u het
Let op:
afspelen vanaf
l
Trek alle aangesloten accessoires uit de iPod of iPhone,
het fragment van
voordat u het toestel in het docking-station zet.
uw keuze door op
l De Stoptoets ( ) van het hoofdapparaat is tijdens de
de toets / te
iPod-functie niet geldig.
drukken.
n Navigeren door de menu’s van de iPod,
Snel
Houd tijdens
iPhone of iPad
voorwaarts/
weergave
ingedrukt.
achterwaarts
1
Druk op de MENU-toets van de iPod/iPhone om het
Laat de toets los
om de weergave
menu op de iPod, iPhone of iPad te bekijken.
Als u weer
te hervatten.
drukt, keert u terug naar het vorige menu.
Display
____
iPod/
____
Langer dan
2
Selecteer met de PRESET (
of
) toets een item op het
iPhone
2 seconden
menu en druk daarna op de ENTER toets.
indrukken om te
wisselen tussen
Opmerking:
de Video Out-
U kunt geen toets op iPod, iPhone of iPad unit gebruiken
display van de
wanneer u navigeert de iPod of iPhone menu met de
iPod en de TV.
afstandsbediening. U kunt het volumeniveau regelen door op de
Herhalen
____
Hiermee schakelt
VOL (+ of –) toets op het hoofdtoestel of op de
u herhalen in en
afstandsbediening te drukken.Het afstellen van het volume op de
uit.
iPod, iPhone of iPad heeft geen effect.
Weergave in
____
Houd deze toets
Bediening van iPod en iPhone:
willekeurige
ingedrukt als u
De hieronder beschreven functies zijn afhankelijk van de iPod en
weergave in
volgorde
iPhone-generatie, die u gebruikt.
willekeurige
volgorde wilt in-
Systeem in bedrijf:
en uitschakelen.
Als de hoofdunit is ingeschakeld, dan schakelt de iPod, iPhone
iPod-
____
iPod/
iPod/
Indrukken om de
of iPad automatisch in wanneer deze in de unit zijn gedockt.
menu
iPhone
iPhone
Shufflemodus in
en uit te
Systeem uitgeschakeld (stand-by bedrijf):
schakelen.
Als de hoofdunit in stand-by staat, gaat de gedockte iPod,
iPhone of de aangesloten iPad automatisch over op stand-
iPod
____
Bevestig de
by.
Enter
selectie door hier
te drukken.
iPod
____
Het iPod menu
Cursor
selecteren.
Omhoog/
Omlaag
Nl-12
11/5/25 X-HM10_20_Nl.fm
TUNING −
TUNING +
TUNING −
TUNING +
TUNING −
TUNING +
TUNING −
TUNING +
REPEAT
REPEAT
RANDOM
RANDOM
PRESET
PRESET
PRESET
PRESET
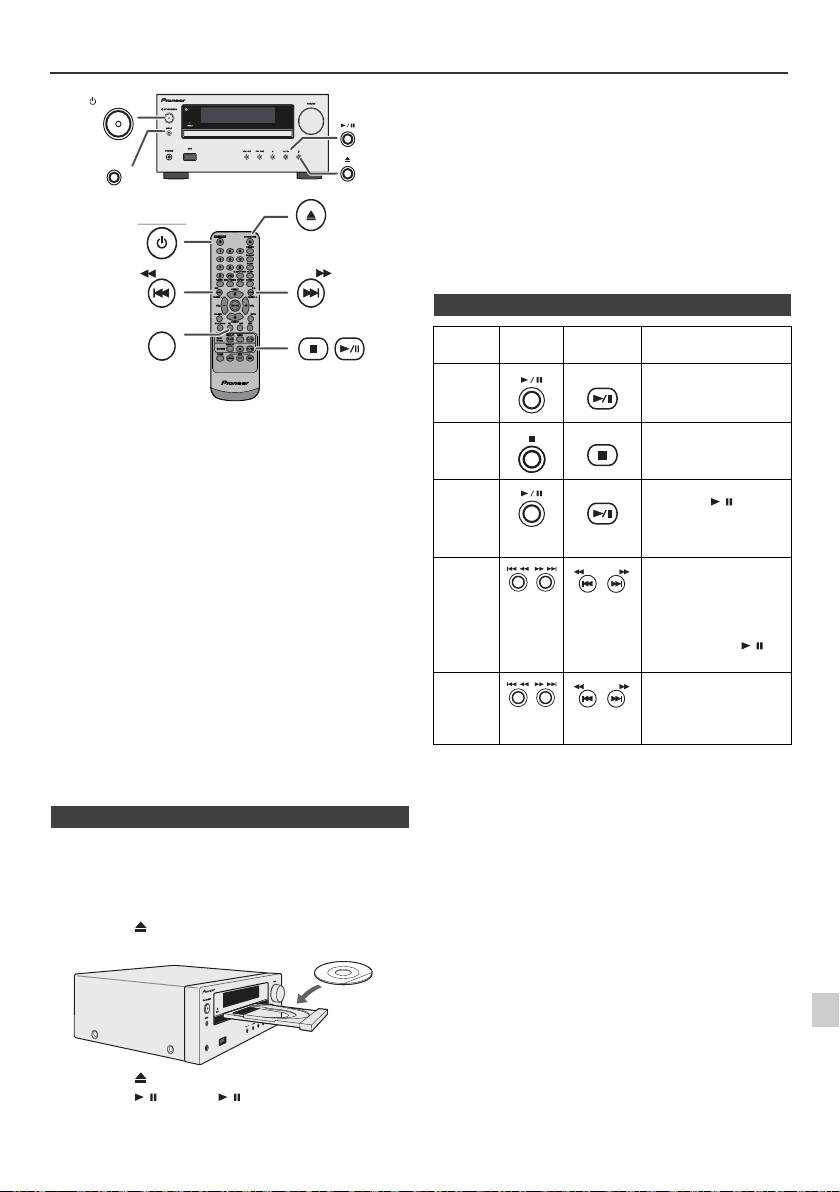
Luisteren naar een CD of MP3/WMA-disc
Let op:
STANDBY/ON
l
Plaats niet twee discs in één disclade.
l
Speel geen discs af met speciale vormen (hart, achthoekig,
enz.) Dit kan storingen veroorzaken.
l
Druk niet op de CD-lade terwijl deze beweegt.
INPUT
l
Wanneer de spanning wordt onderbroken met de lade
geopend moet u wachten totdat er weer spanning wordt
OPEN/CLOSE
geleverd.
l
Indien een radio of TV de weergave van de CD stoort, dient
STANDBY/ON
u het toestel verder van de TV of radio te plaatsen.
l
Plaats 8 cm discs beslist in het midden van de disclade.
l
Vanwege de structuur van de discinformatie, duurt het
aflezen van een MP3/WMA disc langer dan bij een normale
CD (ongeveer 20 tot 90 seconden).
TUNING −
TUNING +
CD
Dit systeem kan een standaard CD, CD-R/RW in CD-
formaat en CD-R/RW met MP3- of WMA-bestanden
afspelen, maar kan deze niet opnemen. Bepaalde audio
CD-R en CD-RW discs kunnen vanwege de status van de
disc of opname-apparatuur niet worden afgespeeld.
MP3:
MP3 is een compressieformaat. De afkorting staat voor
MPEG Audio Layer 3. MP3 is een soort audiocodering
voortkomend uit een aanzienlijke compressie van de
oorspronkelijke audiobron met zeer weinig verlies van de
geluidskwaliteit.
l
Dit systeem is alleen maar compatibel met MPEG 1 Layer 3
en met VBR bestanden.
l
Tijdens weergave van een VBR bestand verschilt de tijdteller
op het display mogelijk van de werkelijke weergavetijd.
l
MP3 werkt bij bitsnelheden van 32 kbps tot 320 kbps.
WMA:
WMA-bestanden zijn Advanced System Format-bestanden
welke audiobestanden bevatten die zijn gecomprimeerd met
de Windows Media Audio-codec. WMA is ontwikkeld door
Microsoft als audioformaat voor Windows Media Player.
l
De "MP3"- en "WMA"-indicator licht op nadat het toestel de
informatie op een MP3- of WMA-disc heeft gelezen.
l
WMA werkt bij bitsnelheden van 64 kbps tot 160 kbps.
n Disk afspelen
1
1
Druk op de STANDBY/ON toets om de spanning in te
schakelen.
2
2
Druk herhaaldelijk op de CD-toets van de afstandsbediening
of op de INPUT-toets van het hoofdtoestel om de tunerfunctie
3
te kiezen.
3
Druk op de toets om de disclade te openen.
4
4
Plaats de disc op de disclade met de labelkant boven.
5
6
7
5
Druk op de toets om de disclade te sluiten.
8
6
Druk op de
/
(CD/USB
/
) toets om de weergave te
starten. Nadat het laatste nummer op de disc is afgespeeld zal
het toestel automatisch stoppen.
9
Nl-13
11/5/25 X-HM10_20_Nl.fm
USB
PHONES
n Diverse discfuncties
Functie Hoofd-
Afstandsb
Bediening
toestel
ediening
Weergave
CD/USB
Druk tijdens de
stopfunctie.
Stoppen
CD/USB
Druk tijdens weergave.
Pauzeren
CD/USB
Druk tijdens weergave.
Druk op de / toets om
de weergave vanaf het
gepauzeerde punt voort
te zetten.
Hoger/
Druk tijdens weergave of
lager
de stopfunctie. Als u
TUNING −
TUNING +
tijdens de stopmodus op
fragment
de toets drukt, start u het
afspelen vanaf het
fragment van uw keuze
door op de toets / te
drukken.
Snel
Houd tijdens weergave
voorwaarts/
ingedrukt.
TUNING −
TUNING +
achterwaarts
Laat de toets los om de
weergave te hervatten.
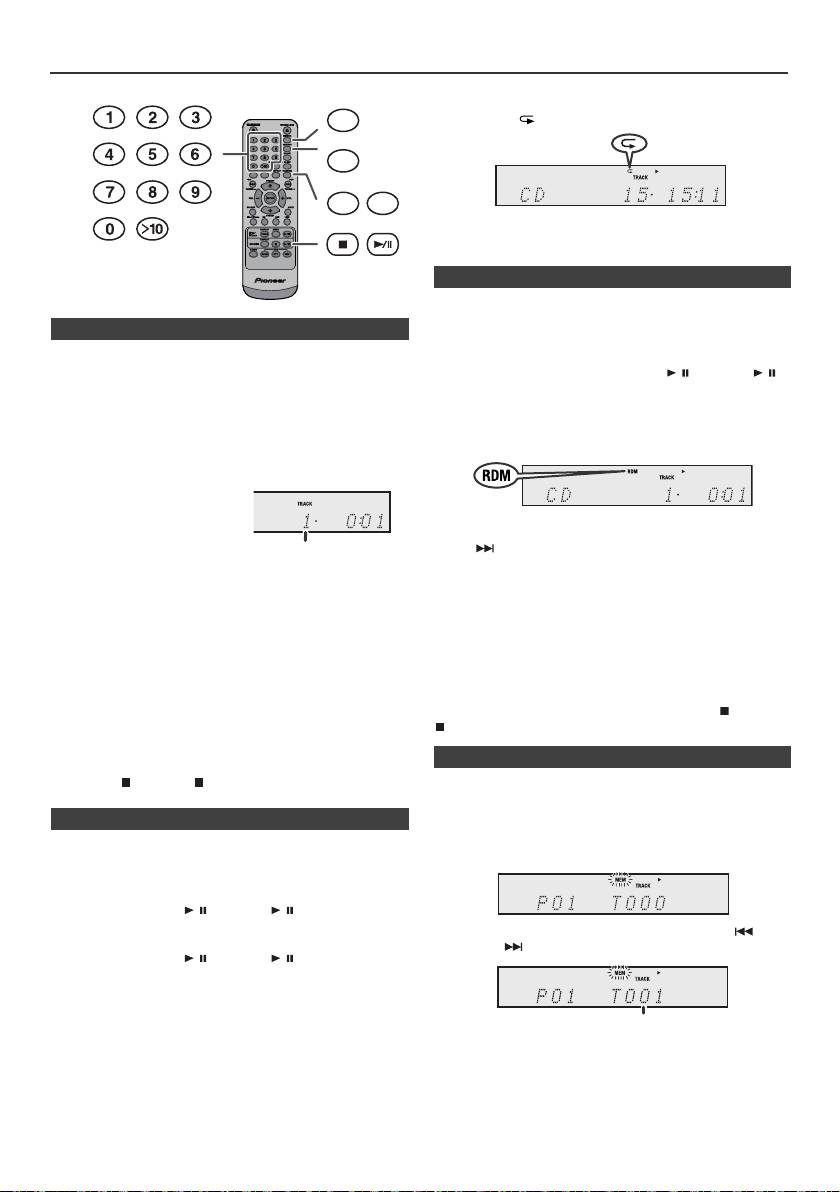
Geavanceerde weergave van een CD of MP3/WMA-disc
Annuleren van de herhaalde weergave:
DIMMER
Druk herhaaldelijk op de REPEAT-toets tot "Normal"
verschijnt en " " verdwijnt.
MEMORY
REPEAT
RANDOM
Opmerking:
Tijdens het herhaald afspelen is willekeurig afspelen niet
mogelijk.
De tracks op de disc kunnen automatisch in willekeurige
volgorde worden afgespeeld.
n Direct opzoeken van een fragment
Willekeurig weergave van alle nummers:
Met de cijfertoetsen kunnen de gewenste tracks op de
Houd de RANDOM-toets op de afstandsbediening ingedrukt
huidige schijf worden afgespeeld.
totdat “Random” verschijnt. Druk op de / (CD/USB / )
Gebruik de cijfertoetsen op de afstandsbediening om de
toets.
gewenste track te selecteren terwijl de geselecteerde
Annuleren van de willekeurige weergavevolgorde:
schijf wordt afgespeeld.
Druk op de RANDOM-toets totdat de indicator “RDM”
l
Met de cijfertoetsen kunt u tot maximaal nummer
verdwijnt.
9 selecteren.
l
Gebruik de ">10" toets om nummer 10 of hoger te kiezen.
A. Bijvoorbeeld 13 kiezen
1
Druk éénmaal op de ">10"
toets.
Opmerkingen:
l
Indien u, tijdens de weergave in willekeurige volgorde, op
2
Druk op de "1" toets.
de -toets drukt, kunt u naar het fragment gaan, dat
3
Druk op de "3" toets.
door de weergave in willekeurige volgorde als het
volgende gekozen is. U kunt met de toets echter niet
teruggaan naar het vorige fragment. In plaats daarvan zal
B. Bijvoorbeeld 130 kiezen
het begin van het huidige fragment worden opgezocht.
1
Druk tweemaal op de ">10" -toets.
l
Bij willekeurige weergave worden de fragmenten
2
Druk op de "1" toets.
automatisch kris-kras door elkaar weergegeven. (U kunt
niet zelf een bepaalde volgorde voor weergave kiezen.)
3
Druk op de "3" toets.
l
Tijdens het willekeurig afspelen is herhaald afspelen niet
4
Druk op de "0" toets.
mogelijk.
Let op:
Opmerkingen:
Druk na herhaalde weergave beslist op de toets (CD/USB
l
Een hoger fragmentnummer dan het aantal fragmenten
op de disc kan niet worden gekozen.
). De disc zal anders doorlopend worden afgespeeld.
l
Direct Search is niet mogelijk tijdens Random Play.
Stoppen van de weergave:
Druk op de (CD/USB ) toets.
U kunt maximaal 32 fragmenten voor weergave in de
gewenste volgorde kiezen.
n Herhaalde weergave
In de herhalingsfunctie kan één fragment, alle fragmenten of
een geprogrammeerde reeks herhaald worden afgespeeld.
Herhalen van één fragment:
Druk herhaaldelijk op de REPEAT-toets tot "Repeat One"
verschijnt. Druk op de / (CD/USB / ) toets.
Herhaling van alle fragmenten:
Druk herhaaldelijk op de REPEAT-toets tot "Repeat All"
verschijnt. Druk op de / (CD/USB / ) toets.
Herhalen van gewenste fragmenten:
Voer stap 1 - 5 van "Geprogrammeerde weergave" gedeelte
op deze pagina uit en druk vervolgens enkele malen op de
REPEAT-toets totdat "Repeat All" verschijnt.
Nl-14
11/5/25 X-HM10_20_Nl.fm
Ingesteld
fragmentnummer
n Willekeurige weergave
n Geprogrammeerde weergave (CD)
1
Druk op de MEMORY toets op de afstandsbediening terwijl
het toestel gestopt is, om de functie voor het opslaan van
een programma in te schakelen.
2
Selecteer het fragment van uw keuze door op de -toets
of op de -toets op de afstandsbediening te drukken.
3
Druk op de MEMORY toets om het fragmentnummer op te
slaan.
Ingesteld fragmentnummer
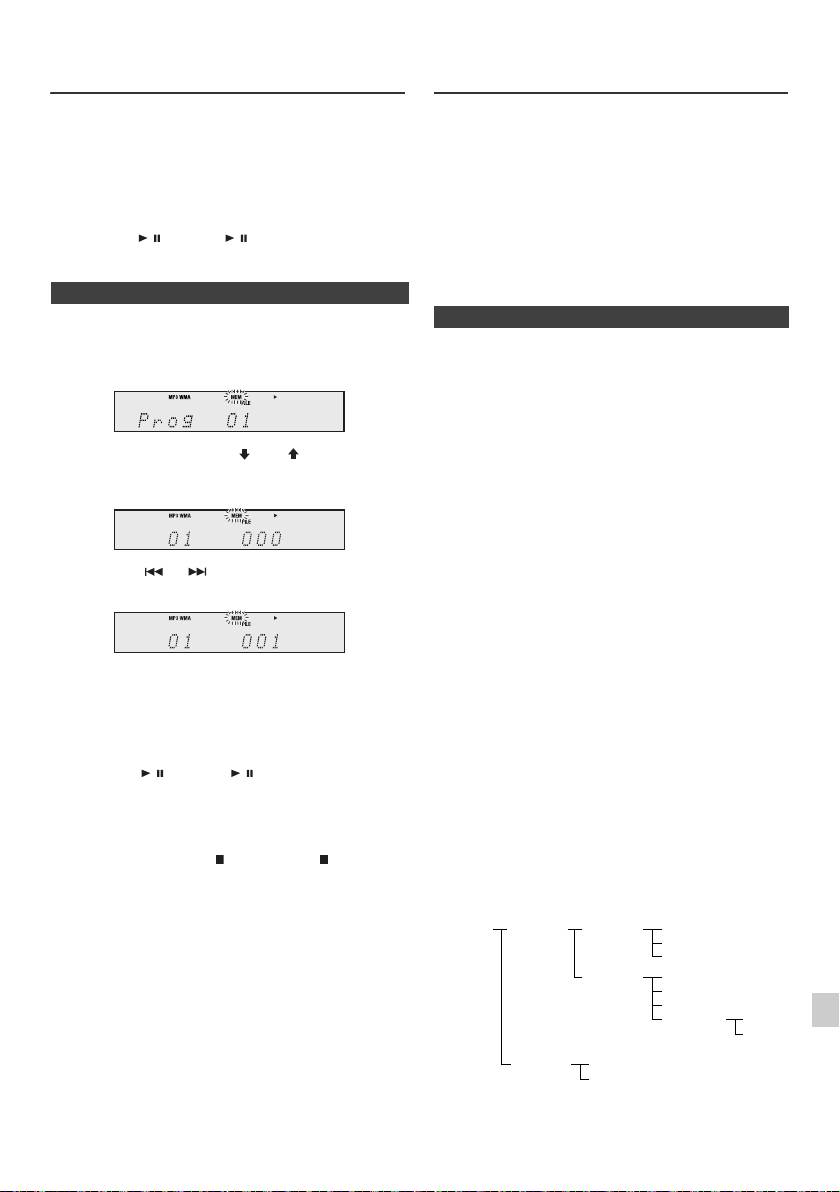
Geavanceerde weergave van een CD
MP3/WMA-mapmodus (alleen voor
of MP3/WMA-disc (vervolg)
MP3/WMA-bestanden)
Weergave van een MP3/WMA (Windows Media Audio)
4
Herhaal de stappen 2 - 3 voor verdere fragmenten. U kunt
bestand
maximaal 32 fragmenten programmeren. Druk
Op het Internet existeren veel muziek-websites, waar u
herhaaldelijk op de MEMORY-toets als u wilt controleren
MP3/WMA (Windows Media Audio) kunt downloaden.
welke fragmenten zijn geprogrammeerd. U kunt de
Volg de instructies van de website, hoe u de
geprogrammeerde fragmenten door een druk op de
muziekbestanden kunt downloaden. U kunt deze
CLEAR toets wissen indien u een vergissing heeft
gedownloade muziekbestanden dan afspelen door ze op
gemaakt.
een CD-R/RW disc te branden.
5
Druk op de / (CD/USB / ) toets om de weergave te
l Uw downgeloade liedjes/bestanden zijn alleen maar
starten.
voor persoonlijk gebruik bestemd. Elk ander gebruik
van de liedjes, zonder toestemming van de eigenaar,
is illegaal.
n Geprogrammeerde weergave (MP3/WMA)
n Volgorde van de mapweergave
1
Druk op de MEMORY toets terwijl het toestel gestopt is
Indien de MP3/WMA-bestanden in verschillende mappen
om de functie voor het opslaan van een programma in
zijn opgenomen, dan wordt voor elke map automatisch
te schakelen.
een nummer vastgelegd.
Deze mappen kunnen geselecteerd worden met de
FOLDER toets op de afstandsbediening. Indien zich in de
geselecteerde map geen compatibele bestandsformaten
bevinden, wordt de map overgeslagen en de volgende
2 Druk op de PRESET
(
of
)
toets op de
map geselecteerd.
afstandsbediening, om het gewenste bestand te
Voorbeeld: Hoe wordt het mapnummer vastgelegd,
kiezen.
wanneer bestanden in MP3/WMA-formaat worden
opgenomen, zoals in de afbeelding hier beneden.
1
De ROOT map wordt als map 1 vastgelegd.
2 Voor directories binnen de hoofddirectory (directory A
Druk op de of toets op de afstandsbediening
en directory B), wordt de eerder op de disc opgenomen
om de gewenste fragmenten te kiezen.
directory als directory 2 en directory 3 vastgelegd.
3 Voor de mappen in de map A (map C en map D), wordt
de map, die als eerste op de disc is opgenomen, als
map 4 och map 5 vastgelegd.
3 Druk op de MEMORY toets, om de map en het
4 Map E in map D wordt als map 6 vastgelegd.
fragmentnummer te saven.
4 Herhaal de stappen 2 – 3 voor verdere mappen/
l De informatie over de volgorde van de mappen en
bestanden die op de disc is opgenomen, is afhankelijk
fragmenten. U kunt maximaal 32 fragmenten
van de schrijfsoftware. Het is mogelijk, dat dit toestel
programmeren.
de bestanden niet weergeeft in de door ons verwachte
afspeelvolgorde.
5 Druk op de / (CD/USB / ) toets om de weergave
l Bij een CD MP3/WMA kunnen 99 nummers van
te starten.
mappen en 999 bestanden inclusief de mappen met
niet afspeelbare bestanden, worden gelezen.
Annuleren van de geprogrammeerde
1
De mapmodus kan in-/uitgeschakeld worden met de
weergavefunctie:
FOLDER toets op de afstandsbediening. De bestanden,
Druk op de toets (CD/USB ) wanneer
2
die weergegeven worden bij ingeschakelde mapmodus
geprogrammeerd afspelen is stopgezet. In de display
verschillen van de bestanden, die weergegeven worden bij
verschijnt: "Memory Clear" en de complete
uitgeschakelde mapmodus.
3
geprogrammeerde inhoud wordt gewist.
Toevoegen van fragmenten aan het programma:
4
Indien er reeds een programma is vastgelegd, zal de
"MEM" indicator worden getoond. Druk op de MEMORY-
5
toets. Volg daarna stappen 2 - 3 om tracks toe te voegen.
Opmerkingen:
6
l Wanneer een disc wordt uitgeworpen, wordt het
programma automatisch geannuleerd.
l De geprogrammeerde fragmenten worden niet gewist,
7
wanneer u op de STANDBY/ON toets drukt om de
standbyfunctie te activeren of van CD naar een andere
8
bron schakelt.
l Willekeurige weergave is niet mogelijk tijdens
geprogrammeerde bediening.
9
Nl-15
11/5/25 X-HM10_20_Nl.fm
ROOT
FOLDER A
FOLDER C
FILE 3
(FOLDER 1)
(FOLDER 2)
(FOLDER 4)
FILE 4
FILE 5
FOLDER D
FILE 6
(FOLDER 5)
FILE 7
FILE 8
FOLDER E
FILE 9
(FOLDER 6)
FILE 10
FOLDER B
FILE 1
(FOLDER 3)
FILE 2

MP3/WMA-mapmodus (alleen voor
Luisteren naar USB
MP3/WMA-bestanden) (vervolg)
massaopslagapparaat/ MP3-speler
n Procedure voor het afspelen van een MP3/
WMA-disc met stand Map ingeschakeld
Een CD-R/RW afspelen.
1
Druk op de CD toets en laad een MP3/WMA-disc. Druk
op de FOLDER toets en schijfinformatie wil verschijnen.
Opmerkingen:
l Dit product is niet compatible met MTP- en AAC-
bestandssystemen van het USB-apparaat voor
massaopslag of de MP3-speler.
l Mogelijk werkt bepaalde geheugenapparatuur niet met
dit systeem.
l De werking van externe geheugenapparatuur (USB-
geheugenapparatuur, externe harddisks, etc.) wordt
niet gegarandeerd.
2 Druk op de PRESET
(
of
)
toets om de gewenste
weergave folder te kiezen. (Mapmodus ingeschakeld)
3 Selecteer het bestand, dat u wilt weergeven door op de
of toets te drukken.
4 Druk op de / (CD/USB / ) toets. De weergave
begint en de bestandsnaam wordt in de display
weergegeven.
l Titel, Artiest en Album naam wordt weergegeven als
deze gegevens zijn vastgelegd op de disc.
l Ingeval van weergave terwijl de mapfunctie is
ingeschakeld, drukt u op de toets PRESET
(
of
)
,
waarna de map tevens in de weergave/pauzemodus
kan worden geselecteerd. De weergave/
pauzemodus blijft gehandhaafd in de eerste track
van de geselecteerde map.
l U kunt de inhoud van de display veranderen door op
de CD/USB DISPLAY toets te drukken.
Opmerking:
Weergave pauzeren:
Opmerking:
Druk op de / (CD/USB / ) toets.
Wanneer "Not Support" in de display verschijnt, betekent
dit, dat een "auteursrechtelijk beschermd WMA-bestand"
of een "niet compatibel weergavebestand" geselecteerd
is.
Nl-16
11/5/25 X-HM10_20_Nl.fm
TUNING −
TUNING +
PRESET
CD
FOLDER
PRESET
DISPLAY
CD/USB
MP3-indicator
WMA-indicator
TOTAL-indicator
Het totale aantal mappen
Het totale aantal bestanden
Map
indicator
Mapnummer
Eerste fragmentnummer
in de map
Weergave van de
bestandsnaam
Folder-display
Teller-display
Weergave van de titel
Weergave van
Weergave van de
het album
artiest
n Weergave van USB/MP3-speler bij
uitgeschakelde mapmodus
1
Druk herhaaldelijk op de USB-toets van de
afstandsbediening of op de INPUT-toets van het
hoofdtoestel om de USB-functie te kiezen. Sluit het
USB-geheugenapparaat, dat bestanden in MP3/WMA-
formaat bevat, aan. Zodra het USB-geheugen aan het
hoofdtoestel is aangesloten, wordt de toestelinformatie
in de display weergegeven.
2 Selecteer het bestand, dat u wilt weergeven door op de
of toets te drukken.
3 Druk op de / (CD/USB / ) toets. De weergave
begint en de bestandsnaam wordt in de display
weergegeven.
l De titel-, de artiest- en de albumnaam worden in de
display weergegeven, indien ze op het USB-
geheugenapparaat zijn opgenomen.
l U kunt de inhoud van de display veranderen door op
de CD/USB DISPLAY toets te drukken.
INPUT
USB
TUNING −
TUNING +
PRESET
USB
FOLDER
PRESET
DISPLAY
CD/USB
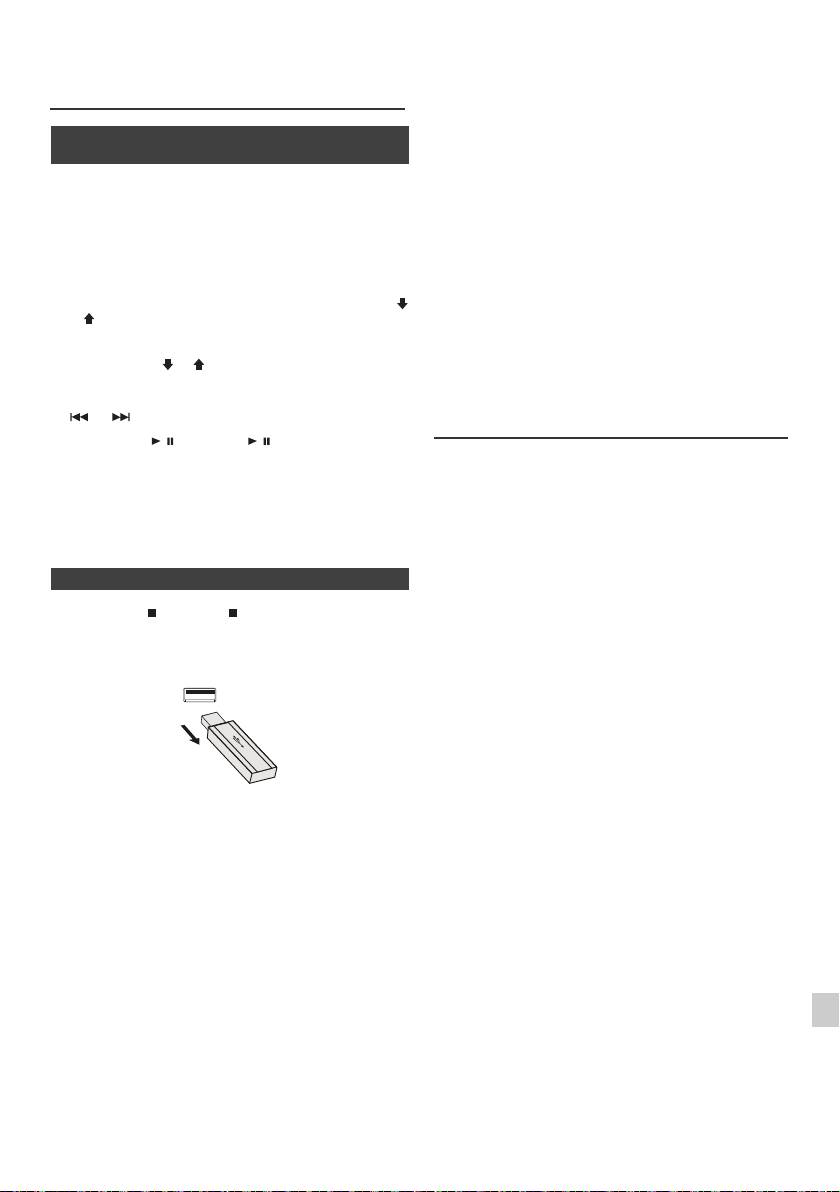
l Dit product kan WMA en MP3-bestanden weergeven.
Luisteren naar USB
Het ontdekt automatisch het bestandstype, dat
massaopslagapparaat/ MP3-speler
afgespeeld wordt. Als wordt geprobeerd op dit product
(vervolg)
een bestand af te spelen dat niet kan worden
afgespeeld, verschijnt de aanduiding "Not Support" en
wordt het bestand automatisch overgeslagen. Dit zal
n Weergave van USB/MP3-speler bij
enkele seconden in beslag nemen. Als abnormale
ingeschakelde mapmodus
aanduidingen op het scherm verschijnen als gevolg
van een ongespecificeerd bestand, zet het apparaat
1
Druk herhaaldelijk op de USB-toets van de
dan uit en weer aan.
afstandsbediening of op de INPUT-toets van het
l Dit product heeft betrekking op USB-massageheugens
hoofdtoestel om de USB-functie te kiezen. Sluit het
en MP3-spelers. Toch kunnen storingen optreden door
USB-geheugenapparaat, dat bestanden in MP3/WMA-
sommige apparaten, om veelvoudige onvoorzienbare
formaat bevat, aan. Zodra het USB-geheugen aan het
redenen. Indien dit gebeurt, schakel dan het apparaat
hoofdtoestel is aangesloten, wordt de toestelinformatie
kort uit en weer aan.
in de display weergegeven.
l De USB ingang is alleen bedoeld voor een directe
2 Druk op de FOLDER toets en druk op de PRESET
(
verbinding met het USB geheugen apparaat zonder
of
)
toets, om map, die u wilt weergeven, te selecteren.
gebruik te maken van een kabel.
Om de weergave in de mapfunctie te starten, moet u
l Gedurende de CD functie, MP3 speler wil niet worden
naar stap 4 gaan. Om de afspeelmap te wisselen, moet
opgeladen.
u op PRESET
(
of
)
drukken, om een andere map te
l “Not support” verschijnt in de display als een iPod op
selecteren.
een USB-aansluitpunt wordt aangesloten wanneer de
USB-functie is geselecteerd.
3 Selecteer het bestand, dat u wilt weergeven door op de
of toets te drukken.
Geavanceerde weergave van USB
4 Druk op de / (CD/USB / ) toets. De weergave
begint en de bestandsnaam wordt in de display
De volgende functies, zijn dezelfde als voor het
weergegeven.
afspelen van of CD:
l De titel-, de artiest- en de albumnaam worden in de
Pagina
display weergegeven, indien ze op het USB-
Direct opzoeken van een fragment . . . . . . . . . . . . . .14
geheugenapparaat zijn opgenomen.
Herhaalde weergave. . . . . . . . . . . . . . . . . . . . . . . . . .14
l U kunt de inhoud van de display veranderen door op
Weergave in willekeurige volgorde . . . . . . . . . . . . . .14
de CD/USB DISPLAY toets te drukken.
Geprogrammeerde weergave (MP3/WMA) . . . . . . . .15
Opmerkingen:
n Het USB geheugenapparaat uittrekken
l Indien het USB-geheugen niet aangesloten is
verschijnt "USB No Media" in de display.
1
Druk op de (CD/USB ) toets om de weergave te
l Dit toestel is alleen maar compatibel met het formaat:
stoppen.
"MPEG-1 Audio Layer 3". (de aftastfrequentie is
32 kHz, 44,1 kHz, 48 kHz)
2 Trek het USB-geheugenapparaat uit de USB-
l De afspeelvolgorde voor MP3-bestanden kan
aansluiting.
verschillen navenant de schrijfsoftware, die werd
gebruikt bij het downloaden van het bestand.
l De compatibele bitsnelheid is 32 kbps tot 320 kbps
voor MP3 en 64 kbps tot 160 kbps voor WMA.
l Gebruik voor MP3/WMA-bestanden de ".MP3"-,
".WMA"-extensie. Bestanden kunnen niet worden
weergegeven als er geen MP3/WMA-extensie is.
l Afspeellijsten zijn niet compatibel met dit toestel.
l Dit toestel kan in de display map- of bestandsnamen
met maximaal 32 letters weergeven.
Opmerkingen:
l Maximale totale aantal MP3/WMA bestanden is 999.
l PIONEER kan niet aansprakelijk worden gesteld voor
l Totaal aantal gelezen mappen is 99 inclusief de map
1
gegevensverlies, terwijl het USB-geheugentoestel aan
het audiosysteem is aangesloten.
met niet afspeelbare bestanden. De display toont
echter alleen de map met MP3-bestanden.
l In MP3 en/of WMA-formaat gecomprimeerde
2
bestanden kunnen worden afgespeeld, wanneer het
l De afspeeltijd wordt eventueel niet correct in de display
apparaat met de USB-aansluiting is verbonden.
weergegeven, wanneer een bestand met variabele
bitsnelheid wordt afgespeeld.
l Dit USB-geheugenformaat is compatibel met FAT 16
3
of FAT 32.
l De ID3TAG informatie die ondersteunt wordt zijn
l PIONEER kan niet garanderen, dat alle USB-
alleen TITLE, ARTIST en ALBUM. De titelnaam,
geheugenapparaten met dit audiosysteem werken.
artiestnaam en albumnaam kunnen worden
4
weergegeven door op de DISPLAY knop te drukken
l USB kabels worden niet aangeraden voor gebruik in dit
als een bestand wordt teruggespeeld of in de
audio systeem als verbinding naar een USB
pauzemodus.
geheugenapparaat. Gebruik van de USB kabel zal de
5
prestatie van dit audio apparaat beinvloeden.
l Ook WMA-metatags zijn compatibel met de titel-, de
artiest- en de albumnaam, die in WMA-bestanden zijn
l Dit USB-geheugen functioneert niet via een USB-
opgenomen. Copyright-beveiligde WMA-bestanden
6
verdeeldoos.
kunnen niet worden afgespeeld.
l De USB-aansluiting van dit toestel is niet bedoeld om
een computer aan te sluiten, maar voor muziek-
7
streaming met een USB-geheugenapparaat.
l Externe HDD-opslag kan niet worden teruggespeeld
via de USB terminal.
8
l Indien het aantal gegevens in het USB-geheugen zeer
groot is, kan het enige tijd duren om deze gegevens te
lezen.
9
Nl-17
11/5/25 X-HM10_20_Nl.fm
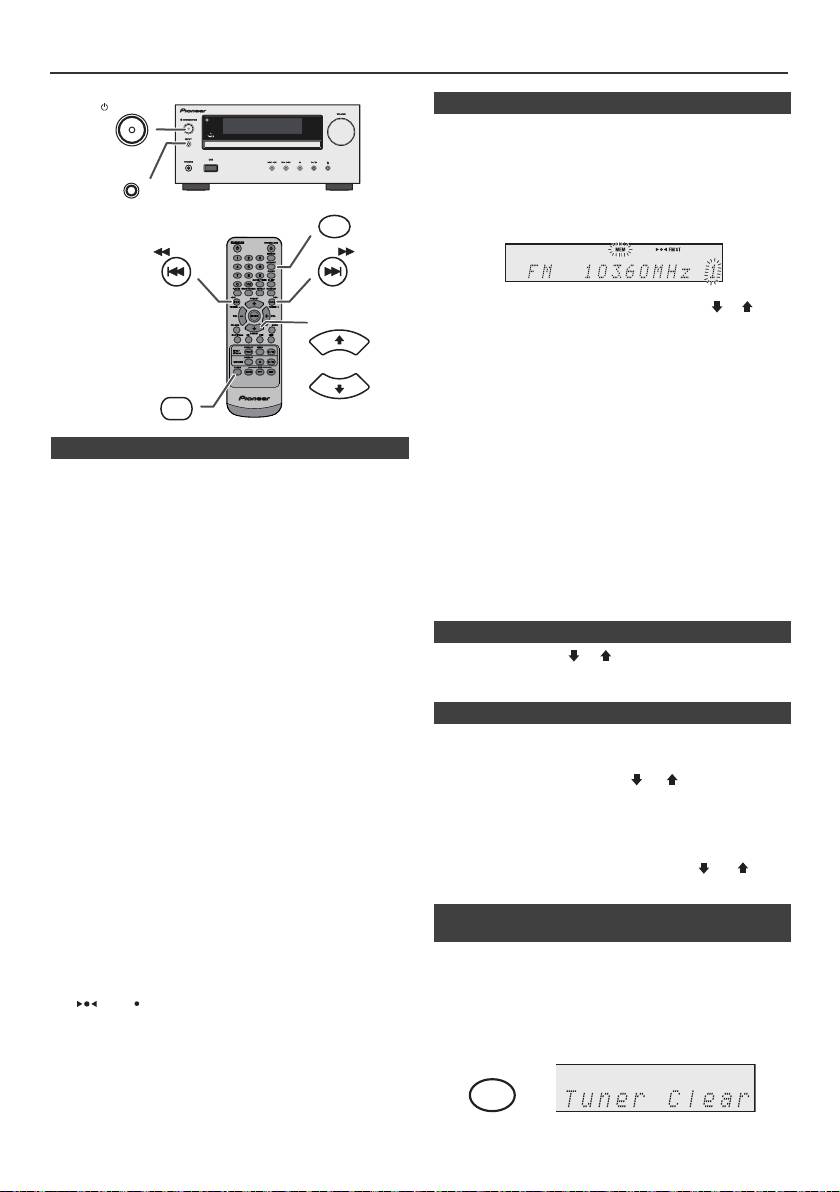
Luisteren naar de radio
STANDBY/ON
n Zenders opslaan in het geheugen
U kunt 40 AM en FM zenders in het geheugen opslaan en
deze met een druk op een toets weer oproepen.
(Voorkeurzenders)
INPUT
1
Voer de stappen 1 – 3 uit in "Afstemmen".
MEMORY
2 Druk op de MEMORY toets.
TUNING −
TUNING +
3 Druk binnen 30 seconden op de PRESET
(
of
)
toets
PRESET
om het voorkeurzendernummer te selecteren.
Programmeer de zenders op volgorde in het geheugen
beginnende met voorkeurzendernummer 1.
4 Druk binnen 30 seconden op de MEMORY toets om
TUNER
deze zender in het geheugen op te slaan. Indien de
PRESET
indicator "MEMORY" en de nummerindicatoren
verdwijnen, voordat de zender is opgeslagen, moet u de
procedure vanaf stap 2 herhalen.
n Afstemmen
5 Herhaal de stappen 1 - 4 om andere zenders in te
stellen of om een voorkeurzender te wijzigen. Wanneer
1
Druk op de STANDBY/ON toets om de spanning in te
een nieuwe zender in het geheugen opgeslagen wordt,
schakelen.
zal de eerder opgeslagen zender worden gewist.
2 Druk herhaaldelijk op de TUNER toets en kies de
Opmerking:
frequentieband van uw keuze (FM of AM).
De backup functie kan de opgeslagen zenders een paar
3 Druk op de TUNING + of - toets op de
uur in het geheugen houden in geval van een
afstandsbediening om de gewenste zender af te
stroomstoring of wanneer de stekker uit het stopcontact
stemmen.
raakt.
l Afstemmen met de hand:
n Instellen van een voorkeurzender
Druk op de TUNING + of - toets om de gewenste
zender af te stemmen.
1 Druk de PRESET
(
of
)
toets korter dan
0,5 seconden in om op de gewenste zender af te
l Automatisch afstemmen:
stemmen.
Wanneer de TUNING + of - toets meer dan
0,5 seconden ingedrukt wordt gehouden, zal het
n Aftasten van de voorkeuzezenders
automatisch afstemmen beginnen en stoppen bij de
De in het geheugen opgeslagen zenders kunnen automatisch
eerste zender die ontvangen kan worden.
worden afgetast. (Aftasten voorkeuzegeheugen)
Opmerkingen:
l Bij radiostoring, is het mogelijk dat het automatisch
1
Druk op de toets PRESET
(
of
)
toets gedurende
afstemmen automatisch op dat punt blijft staan.
minstens 0,5 seconden. Het voorkeuzezendernummer
l Het automatisch afstemmen zal signalen van zwakke
gaat knipperen en er zal op volgorde 5 seconden lang
zenders overslaan.
op elk van de geprogrammeerde zenders worden
l Druk nog eens op de TUNING + of - toets om het
afgestemd.
automatisch afstemmen te stoppen.
l Wanneer u heeft afgestemd op een RDS (Radio Data
2 Druk nog een keer op de PRESET
(
of
)
toets
Systeem), zal eerst de frequentie getoond worden en
wanneer u de gewenste zender gevonden heeft.
daarna zal de RDS indicator oplichten. Tenslotte zal de
naam van het station getoond worden.
n Wissen van het gehele ingestelde
l U kunt volautomatisch laten afstemmen op RDS
geheugen
zenders via "ASPM", zie bladzijde 19.
Ontvangen van FM stereo uitzendingen:
1
Druk herhaaldelijk op de TUNER-toets van de
l Selecteer de stereostand door op de TUNER toets te
afstandsbediening of druk op de INPUT-toets van de
drukken en de "ST" indicator wordt weergegeven.
hoofdunit om de Tunerfunctie te selecteren.
" " en " " wordt getoond indien het FM programma
stereo wordt uitgezonden.
2 Druk in de Tunerfunctie op de CLEAR-toets totdat
l Als de FM ontvangst zwak is, drukt u op de TUNER
"Tuner Clear" verschijnt.
toets en de "ST" indicator gaat uit. De ontvangst wordt
nu mono en het geluid zal duidelijker worden.
Nl-18
11/5/25 X-HM10_20_Nl.fm
CLEAR
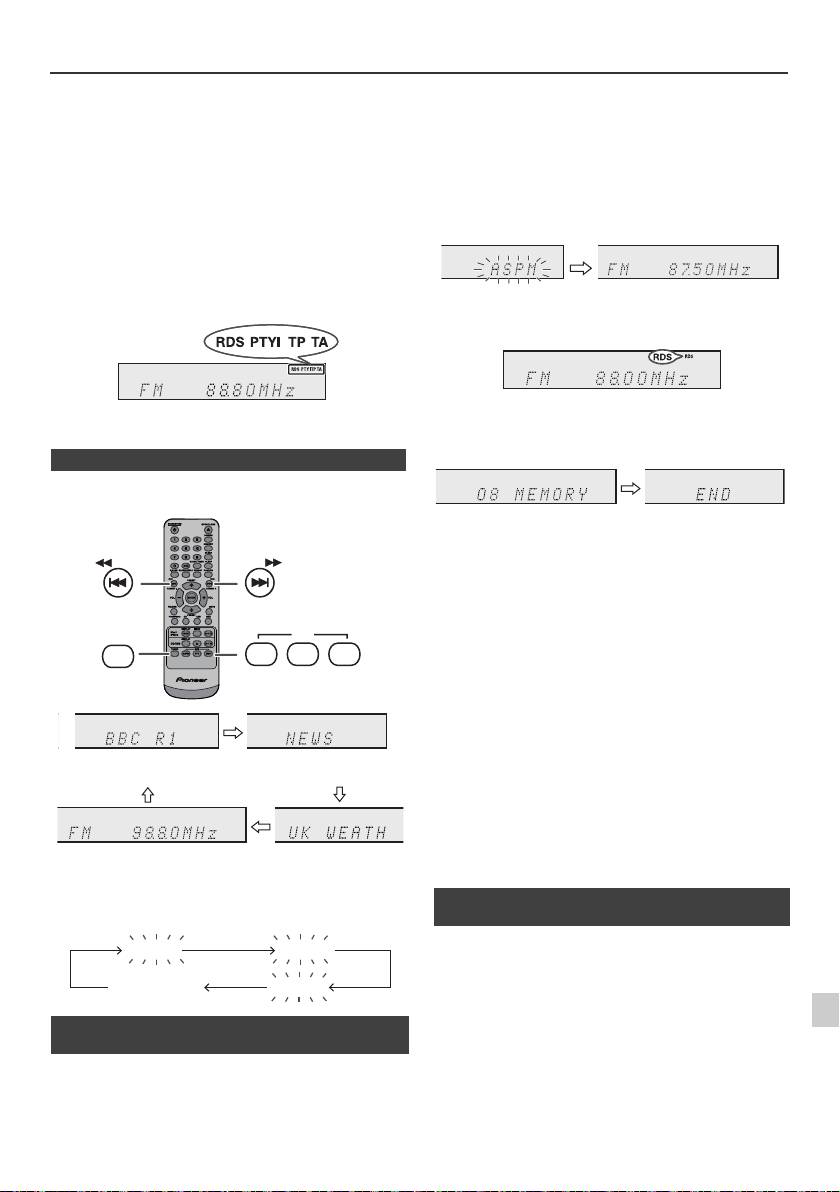
Gebruiken van het Radio Data Systeem (RDS)
RDS is een door een groeiend aantal FM zenders
aangeboden service. Deze FM zenders sturen met hun
reguliere programma's extra signalen mee. Deze
signalen bevatten gegevens zoals de naam van de
zender en informatie over het soort programma, zoals
sport, muziek enz.
Wanneer u heeft afgestemd op een RDS zender, zullen
"RDS" en denaam van de zender worden getoond.
"TP" (Verkeersinformatieprogramma) verschijnt op het
display wanneer de zender verkeersinformatie heeft, en
"TA" (Verkeersinformatie) verschijnt zodra
verkeersinformatie wordt uitgezonden.
De aanduiding "PTYI" (Dynamische PTY indicator) zal
verschijnen terwijl er een Dynamische PTY zender wordt
ontvangen.
De RDS kunt u alleen maar regelen met de toetsen op
de afstandsbediening.
n Via RDS verzorgde informatie
Met elke druk op de RDS DISPLAY toets zal het
display als volgt veranderen:
Voortijdig stoppen van de ASPM functie:
Druk tijdens het zoeken naar zenders op de RDS ASPM
toets.
De reeds in het geheugen opgeslagen zenders worden
hier bewaard.
Opmerkingen:
l Als dezelfde zender op verschillende frequenties
uitzendt, zal de sterkst doorkomende frequentie in het
geheugen worden opgeslagen.
l Een zender met dezelfde frequentie als een reeds in
het geheugen opgeslagen zender zal niet worden
opgeslagen.
l Als er reeds 40 zenders in het geheugen zijn
opgeslagen, zal het scannen worden afgebroken.
Wanneer u het ASPM-proces wilt herhalen, moet u het
geprogrammeerde geheugen wissen.
l "END" wordt ongeveer 4 seconden getoond indien er
geen zender in het geheugen is vastgelegd.
l Als de RDS signalen zeer zwak zijn, is het mogelijk dat
de naam van de zender in kwestie niet in het geheugen
kan worden opgeslagen.
1
l U kunt dezelfde zendernaam opslaan in verschillende
kanalen.
l Het is mogelijk dat de zendernamen tijdelijk afwijken in
2
Wanneer u afstemt op een zender die geen RDS
bepaalde gebieden of gedurende bepaalde perioden.
gegevens uitzendt, of op een zeer zwakke RDS zender,
3
zal het display in deze volgorde veranderen:
Mocht zich een van de volgende gevallen voordoen,
4
dan betekent dit niet dat het toestel defect is:
l "PS", "No PS" en een zendernaam worden
5
afwisselend getoond en het toestel functioneert niet
juist.
l Indien een bepaalde zender niet de juiste signalen
6
n Gebruiken van het Auto Station Program
uitzendt of aan het testen is, zal de RDS
Memory (ASPM)
ontvangstfunctie mogelijk niet juist functioneren.
7
l Het is mogelijk dat gegevens zoals de zendernaam
Tijdens de ASPM functie zoekt de tuner automatisch
niet getoond worden wanneer u afstemt op een RDS
nieuwe RDS-zenders zoeken. Er kunnen maximaal
zender waarvan het signaal te zwak is.
8
40 zenders worden vastgelegd.
l "No PS", "No PTY" of "No RT" zal ongeveer
Als u al een paar zenders in het geheugen heeft gezet, zal
5 seconden langknipperen, waarna de frequentie
het aantal nieuwe zenders dat u kunt opslaan minder zijn.
getoond zal worden.
9
Nl-19
11/5/25 X-HM10_20_Nl.fm
TUNING −
TUNING +
RDS
TUNER
ASPM PTY DISP
Zendernaam (PS) Programmatype (PTY)
Frequentie Radio Tekst (RT)
No PS No PTY
FM 98.80 MHz
No RT
1 Druk herhaaldelijk op de TUNER-toets van de
afstandsbediening of op de INPUT-toets van het
hoofdtoestel om de TUNER functie te kiezen.
2 Houd de RDS ASPM-toets op de afstandsbediening
ingedrukt.
1 Nadat "ASPM" ongeveer 4 seconden heeft
geknipperd, zal het scannen beginnen (87,50 -
108,00 MHz).
2 Wanneer er een RDS zender wordt gevonden, zal
de aanduiding "RDS" korte tijd getoond worden en
zal de zender in het geheugen worden opgeslagen.
3 Na het scannen zal het aantal zenders dat in het
geheugen is opgeslagen 4 seconden worden
getoond, waarna 4 seconden lang de aanduiding
"END" getoond zal worden.
n Opmerkingen aangaande het gebruik van
RDS
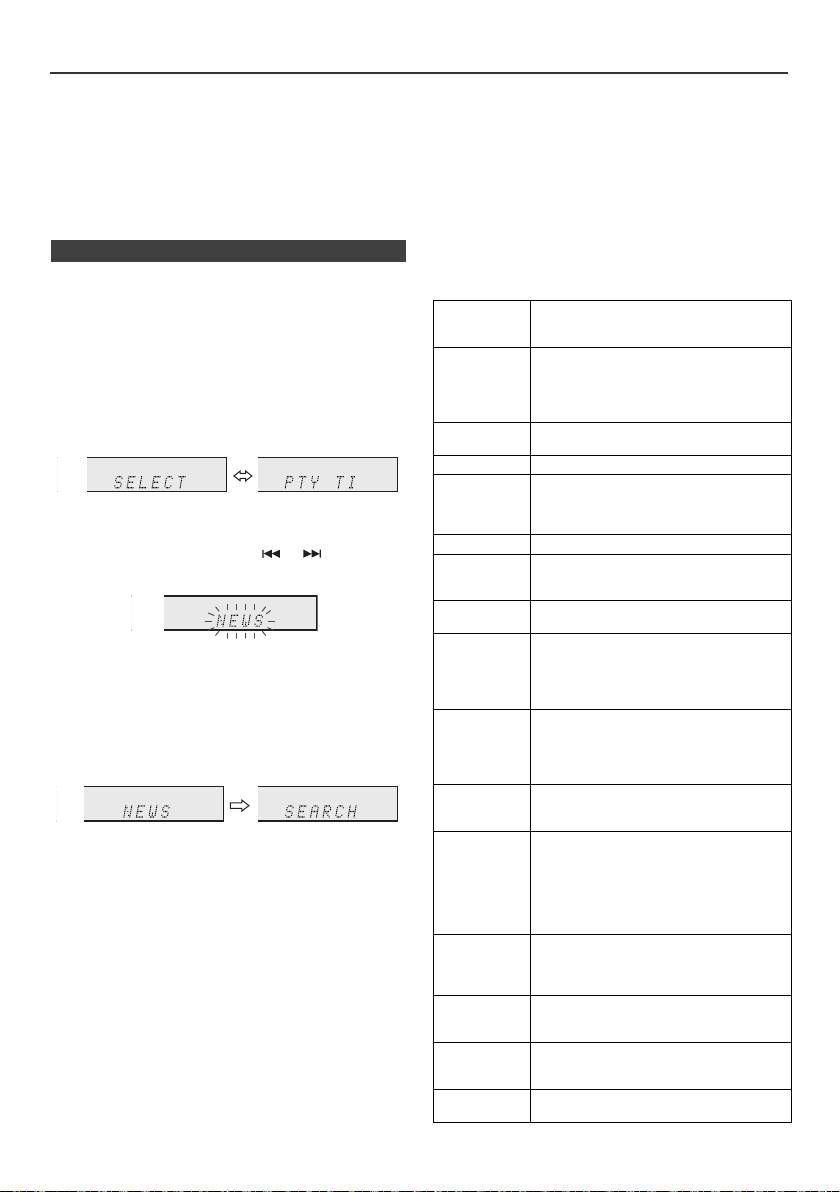
Gebruiken van het Radio Data Systeem (RDS) (vervolg)
Opmerkingen over radiotekst:
Als u het verkeersprogramma selecteert:
l Eerste 14 tekens van radio tekst zullen 4 seconden
Als u bij stap 3 het verkeersprogramma (TP) selecteert,
lang op het display getoond worden, waarna de
zal de aanduiding "TP" verschijnen.
tekstinformatie over het display zal gaan rollen.
(Dit betekent niet dat u nu direct naar verkeersinformatie
l Als u afstemt op een RDS zender die geen radiotekst
kunt luisteren.)
gegevensuitzendt, zal de aanduiding "No RT" getoond
De aanduiding "TA" zal verschijnen wanneer er
worden wanneer uoverschakelt naar de radiotekst.
verkeersinformatie wordt uitgezonden.
l Terwijl radio tekst gegevens ontvangen worden, of
Beschrijving van de verschillende PTY
wanneer de inhoud van de tekst gewijzigd wordt, zal
(Programmatype) codes, TP
"RT" op het display verschijnen.
(Verkeersinformatieprogramma) en TA
n Oproepen van zenders uit het geheugen
(Verkeersinformatie).
U kunt de volgende PTY, TP en TA signalen opzoeken en
Opgeven van programmatypes en zenders selecteren
ontvangen.
(PTY zoeken):
U kunt een in het geheugen opgeslagen zender opzoeken
NEWS Korte verslagen van feiten,
door het programmatype op te geven (nieuws, sport,
gebeurtenissen en openbare meningen,
reportages en actualiteiten.
verkeersprogramma enz, zie bladzijde 20).
AFFAIRS Actualiteitenprogramma dat dieper
1
Druk herhaaldelijk op de TUNER-toets van de
ingaat op het nieuws, in het algemeen
met een andere presentatiestijl en een
afstandsbediening of op de INPUT-toets van het
ander concept, inclusief debatten en
hoofdtoestel om de TUNER functie te kiezen.
analyses.
2 Druk op de RDS PTY toets op de afstandsbediening.
INFO Programma met als doel advies te
geven, in de breedste zin des woords.
SPORT Programma over enig aspect van sport.
EDUCATE Programma dat in de eerste plaats
bedoeld is om iets van te leren, met de
"SELECT" en "PTY TI" worden afwisselend
nadruk op de formele kan-ten van het
6 seconden op het display getoond.
onderwijs.
DRAMA Alle hoorspelen en radio-series.
3 Druk binnen 6 seconden op de of toets om het
CULTURE Programma's over enig aspect van de
programmatype te selecteren.
nationale of regionale cultuur, inclusief
taal, theater enz.
SCIENCE Programma's over de
natuurwetenschappen en technologie.
VARIED Voornamelijk gebruikt voor licht
Door iedere druk op de toets zal het programmatype
amusement praatprogramma's die niet
veranderen. Indien u de toets langer dan 0,5 seconden
onder een andere categorie vallen.
indrukt, zal het programmatype voortdurend
Bijvoorbeeld quizzen, panel-spelletjes,
veranderen.
interviews met beroemdheden ed.
POP M Commerciële muziek, gewoonlijk
4 Druk op de RDS PTY toets terwijl het gewenste
beschouwd als populair in het huidige
programmatype knipperend wordt getoond (binnen
tijdsgewricht, vaak opdui-kend op
6 seconden).
ranglijsten van platenverkopen van dit
moment of uit het recente verleden.
ROCK M Hedendaagse moderne muziek,
gewoonlijk geschreven en uitgevoerd
door jonge muzikanten.
Nadat het geselecteerde programmatype 2 seconden
EASY M Gemakkelijk in het gehoor liggende
gebrand heeft, zal de aanduiding "SEARCH"
hedendaagse muziek, niet zijnde Pop,
Rock of Klassiek, noch behorend tot een
verschijnen en zal het zoeken beginnen.
van de gespecialiseerde muziekstijlen,
Jazz, Folk of Country. Muziek in deze
Opmerkingen:
categorie is vaak, maar niet altijd, vocaal
l Begin, zodra de display stopt met knipperen, weer bij
en gewoonlijk van korte duur.
stap 2. Wanneer het apparaat het gewenste
programmatype gevonden heeft, knippert de
LIGHT M Klassieke Muziek voor een breed
publiek, niet speciaal voor afficionado's.
corresponderende zender gedurende ongeveer
8 seconden en daarna blijft de zendernaam verlicht.
Bijvoorbeeld instrumentale muziek en
individuele of koorzang.
l Als u naar hetzelfde programmatype wilt luisteren
maar via een andere zender, dient u op de RDS PTY
CLASSICS Uitvoeringen van de grote orkestrale
toets te drukken terwijl het kanaalnummer of de
werken, symfonieen, kamermuziek enz.
zendernaam knippert. Het toestel zal dan de volgende
inclusief de grote opera's.
zender opzoeken.
OTHER M Muziek die niet onder de andere titels
l Als er geen zender gevonden kan worden, zal de
valt. Vooral voor specialistische genres
aanduiding "NOT FOUND" 4 seconden lang getoond
als Rhythm & Blues en Reggae.
worden.
WEATHER Weerberichten, voorspellingen en
Meteorologische informatie.
Nl-20
11/5/25 X-HM10_20_Nl.fm
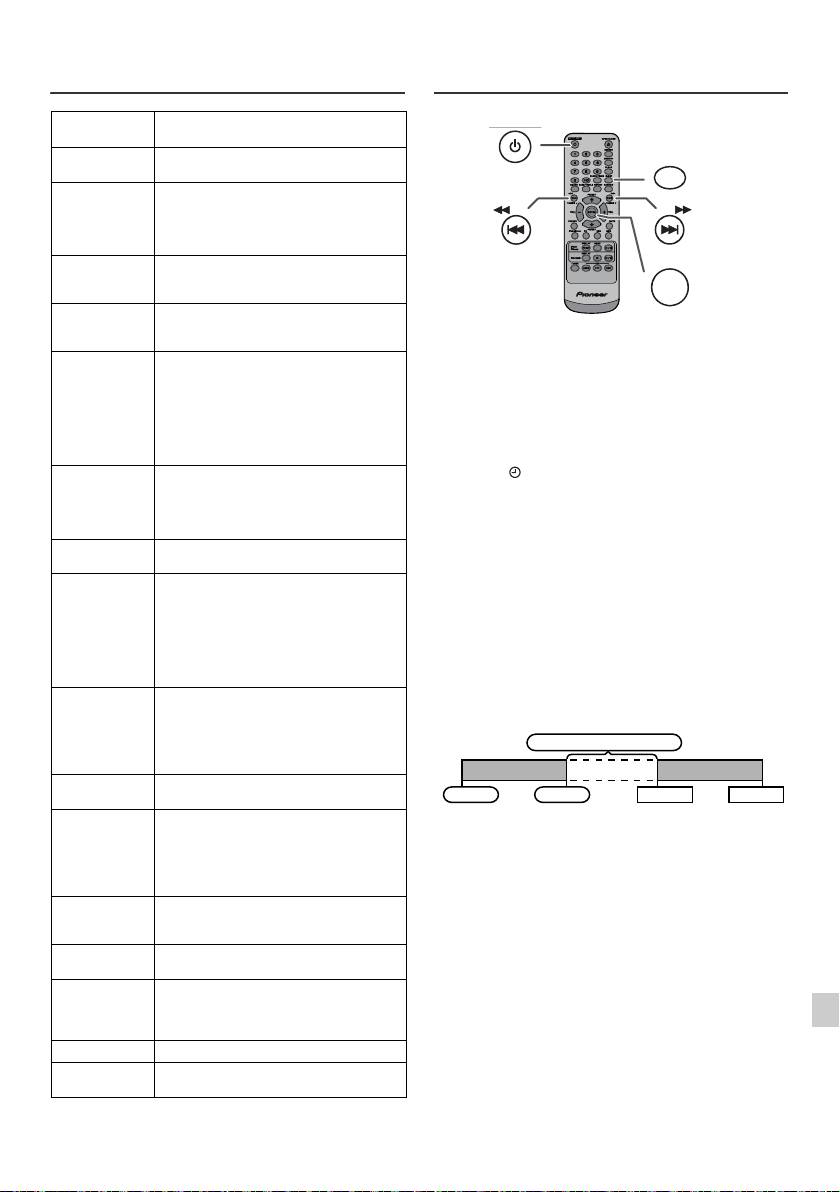
Gebruiken van het Radio Data
Timer en inslaaptimer bediening
Systeem (RDS) (vervolg)
(Alleen afstandsbediening)
FINANCE Beursberichten, handel en industrie
enz.
CHILDREN Programma's voor een jeugdig publiek
vooral ter vermaak, minder ter lering.
SOCIAL Programma's over mensen en dingen
die invloed hebben op individuen en
groepen mensen. Inclusief sociologie,
geschiedenis, aardrijkskunde,
psychologie en maatschappij.
RELIGION Alle kanten van overtuiging en geloof
met betrekking tot God of Goden, de
aard van het bestaan en ethiek.
PHONE IN Waarin gewone mensen hun meningen
op de radio tot uitdrukking brengen via
Timer-gestuurd weergeven:
de telefoon of in een publiek forum.
Het toestel schakelt in en speelt de gewenste bron: (CD,
TRAVEL Programma's over reizen naar
TUNER, USB, iPod, LINE IN) op de vooraf ingestelde tijd.
bestemmingen dicht-bij en veraf,
groepsreizen en reisideeën en kan-sen.
Dit toestel heeft 2 timers: ONCE TIMER en DAILY
Niet voor het aankondigen van
TIMER.
problemen, vertragingen of
wegomleggingen met gevolgen voor het
Eénmalige timer:
dagelijks verkeer, waarvoor de TP/TA
De éénmalige timerweergave werkt slechts één keer op
berichten bedoeld zijn.
de ingestelde tijd.
LEISURE Programma's over recreationele
(Indicator " ").
activiteiten waar de luisteraar mogelijk
Dagelijkse timer:
aan deel kan nemen. Bijvoorbeeld
tuinieren, vissen, antiek verzamelen,
De dagelijkse timerafspeel werkt iedere dag op de
kokke-rellen, eten en wijn enz.
ingestelde tijd. Stel de timer bijvoorbeeld in voor gebruik
als wekker.
JAZZ Polyfone syncopatische muziek
gekarakteriseerd door improvisatie.
(Indicator "DAILY").
COUNTRY Liedjes die ontstaan zijn in het zuiden
Gecombineerd gebruiken van de éénmalige timer en
van de Verenigde Staten of de muzikale
dagelijkse timer:
traditie van die regio voortzetten,
Gebruik bijvoorbeeld de éénmalige timer voor het
gekarakteriseerd door een gemakkelijk
in het gehoor liggende melodie en een
luisteren naar een radioprogramma en de dagelijkse timer
tekst met een verhaal. Gekenmerkt door
voor het gewekt worden.
een gemakkelijk in het gehoor liggende
melodie en tekst met een verhaal.
1 Stel de dagelijkse timer in (bladzijde 21).
NATION M Actuele populaire muziek uit het land of
2 Stel de Once Timer in (bladzijde 21).
de regio zelf in de landstaal, in contrast
tot internationale populaire muziek die
gewoonlijk geïnspireerd is op
Amerikaanse of Engelse muziek en in
het Engels wordt uitgevoerd.
OLDIES Muziek uit de zogeheten "gouden tijd"
van de populaire muziek.
FOLK M Muziek die geworteld is in de muzikale
1
traditie van een bepaald volk,
gewoonlijk uitgevoerd op akoestische
instrumenten. De teksten zijn soms
2
gebaseerd op historische
gebeurtenissen of personen.
3
DOCUMENT Programma's die van doen hebben met
feitelijke zaken, gepresenteerd in een
onderzoekende stijl.
4
TEST Uitgezonden wanneer ontvangers of
noodzendapparatuur getest worden.
5
ALARM Noodbericht, uitgezonden onder
uitzonderlijke omstandigheden om te
waarschuwen voor gebeurtenissen die
6
een publiek gevaar vertegenwoordigen.
TP Uitzendingen met verkeersinformatie.
7
TA Er wordt verkeersinformatie
uitgezonden.
8
9
Nl-21
11/5/25 X-HM10_20_Nl.fm
STANDBY/ON
CLOCK/TIMER
TUNING −
TUNING +
ENTER
1 minuut of meer
Dagelijkse timer
Eénmalige timer
Start
Stoppen
Start
Stoppen

Timer en inslaaptimer bediening (Alleen afstandsbediening) (vervolg)
Eénmalige timer:
n Timer-gestuurde weergave
De timer wordt geannuleerd.
Voor u de timer in gaat stellen:
Dagelijkse timer:
l Controleer dat de juiste tijd voor de klok is ingesteld
De timer werkt elke dag op dezelfde tijd. Dit gaat door
(zie bladzijde 9). U kunt de timerfunctie niet gebruiken
totdat de instelling voor de dagelijkse timer wordt
indien niet ingesteld.
geannuleerd. Annuleer daarom de dagelijkse timer
l Voor timer-gestuurde weergave: Kies wat u wilt
indien u deze niet wilt gebruiken.
weergeven: steek de USB in, laad discs of plaats de
iPod in de dock.
Opmerkingen:
l Selecteer “USB” of “LINE IN” in stap 5 tijdens
uitvoering van de Timer-weergave als een ander
apparaat op het USB-aansluitpunt is aangesloten.
1 Druk op de STANDBY/ON toets om de spanning in te
l Dit toestel schakelt zichzelf nu in of schakelt
schakelen.
automatisch naar stand-by. Het aangesloten apparaat
2 Houd de CLOCK/TIMER-toets ingedrukt.
wordt echter niet aan- of uitgeschakeld. Volg stap
"Annuleren van de timer wordt gecontroleerd" op
3 Druk binnen 30 seconden op de of toets om
deze bladzijde als u timerweergave wilt stoppen.
"Once" of "Daily" te kiezen en druk op de ENTER toets.
De instelling van de timer wordt gecontroleerd:
4 Druk binnen 30 seconden op de of toets om
1 Schakel de stroom in en houd de CLOCK/TIMER-toets
"Time set" te kiezen en druk op de ENTER toets.
ingedrukt.
5 Druk op de toets of als u een bron voor timer-
2 Druk binnen 30 seconden op de of toets om
weergave (CD, TUNER, USB, iPod, AUDIO IN, LINE
"Once" of "Daily" te kiezen en druk op de ENTER toets.
IN) wilt selecteren. Druk op de ENTER-toets.
3 Druk binnen 30 seconden op de toets of om
Als u de tuner als bron kiest, moet u met de of
"Timer Call" te selecteren en druk dan op de ENTER-
toets een zender kiezen en vervolgens op de ENTER
toets.
toets drukken. "No Preset" wordt getoond als er geen
zender is vastgelegd en de timerinstelling wordt
Annuleren van de timer wordt gecontroleerd:
geannuleerd.
1 Schakel de stroom in en houd de CLOCK/TIMER-toets
6 Druk op de toets of als u de dag wilt instellen,
ingedrukt.
druk daarna op de ENTER -toets.
2 Druk binnen 30 seconden op de of toets om
7 Druk op de ENTER-toets om de tijd in te stellen. Druk
"Once" of "Daily" te kiezen en druk op de ENTER toets.
op de toets of en druk vervolgens op de
ENTER-toets.
3 Druk binnen 30 seconden op de toets of om
"Timer Off" te selecteren en druk dan op de ENTER-
8 Druk op de toets of als u de minuten wilt
toets. De timer wordt geannuleerd (de gemaakte
instellen, druk daarna op de ENTER -toets.
instellingen worden echter niet gewist).
9 Stel de stoptijd in zoals in stappen 7 en 8 hierboven.
Opnieuw gebruiken van de vastgelegde
10 Het volume kan met gebruik van de toets VOL (+ of -)
timerinstelling:
worden afgesteld, en vervolgens drukt u op de ENTER-
De gemaakte timerinstelling blijft in het geheugen
toets.
vastgelegd. Voer de volgende handelingen uit om
dezelfde instelling opnieuw te gebruiken.
11 Druk op de STANDBY/ON toets als u het toestel in de
Standby-stand wilt zetten. De "TIMER" indicator licht
1 Schakel de stroom in en houd de CLOCK/TIMER-toets
op en het toestel staat gereed voor timerweergave.
ingedrukt.
2 Druk binnen 30 seconden op de of toets om
"Once" of "Daily" te kiezen en druk op de ENTER toets.
3 Druk binnen 30 seconden op de toets of om
"Timer On" te selecteren en druk dan op de ENTER-
toets.
4 Druk op de STANDBY/ON toets als u het toestel in de
12 Wanneer de ingestelde tijd bereikt wordt, zal de
Standby-stand wilt zetten.
weergave beginnen. Het volume wordt geleidelijk tot
het ingestelde niveau verhoogd. De timer indicator
Opmerking:
knippert tijdens timerweergave.
The instelling van de tijd voor teruggezet als het netsnoer
13 Wanneer de voor de timer ingestelde eindtijd is bereikt,
wordt verwijderd of ingeval van een stroomuitval.
zet het systeem zichzelf in standby.
Nl-22
11/5/25 X-HM10_20_Nl.fm
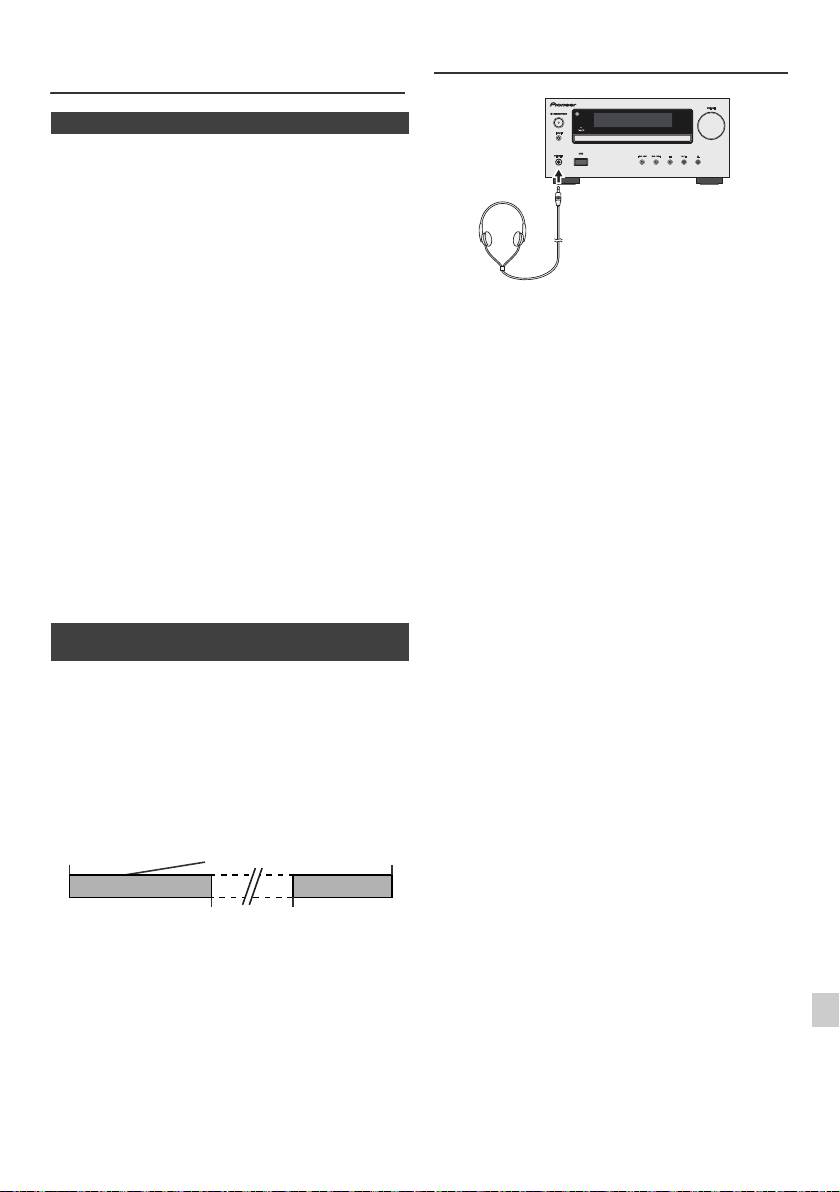
Timer en inslaaptimer bediening
Hoofdtelefoon
(Alleen afstandsbediening) (vervolg)
n Slaaptimer
De radio, compact disc, iPod, USB en Line In kunnen alle
automatisch worden uitgeschakeld.
1
Geef de gewenste geluidsbron weer.
2 Druk op de SLEEP-toets.
3 Druk binnen 5 seconden op de cijfertoets om de tijd in
te stellen. (1 minuut ~ 99 minuten)
4 Druk op de ENTER-toets. "SLEEP" zal verschijnen.
l Draai het volume niet op volle sterkte, wanneer u het
5 Het toestel schakelt automatisch standby nadat de
apparaat inschakelt en luister naar muziek bij matige
ingestelde tijd is verstreken. Het volume zal 1 minuut
geluidsniveaus. Excessieve geluidsdruk uit oor- en
hoofdtelefoons kan gehoorverlies veroorzaken.
voor de inslaaptimer afgelopen is, worden verlaagd.
l Zet het volume laag voor u de hoofdtelefoon aansluit of
uit het toestel haalt.
Controleren van de resterende slaaptijd:
l Let er op dat de gebruikte hoofdtelefoon een 3,5 mm
diameter stekker heeft en een impedantie tussen de 16
1 Druk wanneer "SLEEP" wordt getoond op de toets
en 50 Ohm. De aanbevolen impedantie is 32 Ohm.
SLEEP.
l Door een hoofdtelefoon aan te sluiten, worden de
luidsprekers automatisch uitgeschakeld. Stel het
Annuleren van de inslaaptimer:
volume in met de VOLUME regelaar.
Druk op de STANDBY/ON toets terwijl "SLEEP" wordt
l Alleen X-HM20: Er is geen geluid hoorbaar vanuit de
iPod/iPhone via de hoofdtelefoons die op het apparaat
getoond. Ga als volgt te werk om de inslaaptimer te
zijn aangesloten. “HP INVALID” verschijnt op de
annuleren zonder het systeem standby te schakelen.
display als de hoofdtelefoons worden aangesloten
wanneer de iPod/iPhone-functie is geselecteerd.
1 Druk wanneer "SLEEP" wordt getoond op de toets
SLEEP.
2 Druk de "0" toets twee keer binnen 5 seconden tot
"SLEEP 00" verschijnt.
n Gebruik van de timer en de inslaaptimer
samen
In slaap vallen en timerweergave:
U kunt bijvoorbeeld met het geluid van de radio in slaap
vallen en de volgende ochtend door een CD gewekt
worden.
1
Stel de slaaptijd in (zie hierboven, stappen 1 - 5).
2 Stel de timer voor het afspelen in, terwijl de inslaaptimer
is ingesteld (stappen 2 - 9, bladzijde 22).
1
2
3
4
5
6
7
8
9
Nl-23
11/5/25 X-HM10_20_Nl.fm
Verbeteren van
Instelling van de timer-
Stoptijd
uw systeem
gestuurde weergave
1-99 minuten
Gewenste tijd
Automatische
Starttijd van de
uitschakeling
timer-gestuurde
inslaaptimer
weergave

Tabel probleemoplossing
Veel vermeende problemen kunnen door de gebruiker zelf
n USB
worden opgelost, zonder een reparateur in te schakelen.
Als er iets mis lijkt met dit product, dient u eerst de onderstaande
Symptoom Mogelijke oorzaak
punten te controleren voor u contact opneemt met uw erkende
l Apparaat kan
l Is er een MP3/WMA bestand
PIONEER dealer of servicecentrum.
niet worden
beschikbaar?
n Algemeen
gedetecteerd.
l
Is het apparaat correct
verbonden?
Symptoom Mogelijke oorzaak
l Is het een MTP apparaat?
l Bevat het apparaat alleen AAC
l De juiste tijd is niet
l Is er een stroomstoring
bestanden?
voor de klok
geweest?
ingesteld.
Stel de klok opnieuw in.
l Terugspelen
l Is het een auteursrechtelijk
(zie bladzijde 9)
start niet.
beschermd WMA bestand?
l Is het een ongeschikt MP3-
l Het toestel reageert
l Zet het toestel in de
bestand?
niet na een druk op
standby-stand en zet het
een toets.
vervolgens weer aan.
l De verkeerde tijd
l Wordt een bestand met
l Als het toestel nog steeds
wordt
variabele bitsnelheid
niet naar behoren
weergegeven.
weergegeven?
functioneert, dient u het te
l De verkeerde
l
Is de naam in Chinese of Japanse
resetten. (zie bladzijde 25)
bestandsnaam
letters geschreven?
wordt
l Geen geluid. l Staat het volumeniveau op
weergegeven.
"Min"?
l Is de hoofdtelefoon
aangesloten?
n iPod en iPhone (alleen X-HM20)
l Sluiten de
luidsprekersnoeren kort?
Symptoom Mogelijke oorzaak
l Er is geen geluid
l
De iPod of iPhone speelt niet.
n CD-speler
te horen. Op de
l De iPod of iPhone is niet
TV/monitor
correct aan het apparaat
aangesloten.
Symptoom Mogelijke oorzaak
verschijnt geen
l Zit de stekker van het toestel in
beeld.
l Terugspelen start
het stopcontact?
l Zit de disc misschien
l De videokabel is niet correct
niet.
ondersteboven in het
aangesloten.
l De weergave stopt
toestel?
l De keuze voor de TV/monitor-
halverwege of
l Voldoet de disc aan de
ingang is niet correct
verloopt niet naar
standaarden?
ingesteld.
behoren.
l Is de disc vervormd of
l De iPod TV uit functie is nog
bekrast?
niet ingesteld naar uitvoer
video.
l Het weergegeven
l Is het toestel onderhevig
l
Er is geen geluid hoorbaar vanuit
geluid slaat over of
aan trillingen?
stopt middenin een
l Is de disc erg vuil?
de iPod/iPhone via de
fragment.
l Heeft zich wellicht
hoofdtelefoons die op het apparaat
condens gevormd
zijn aangesloten.
binnenin het toestel?
l De iPod of
l De iPod of iPhone maakt niet
iPhone wordt
volledig contact met de
n Afstandsbediening
niet opgeladen.
aansluiting.
de
l U gebruikt een iPod (3
generatie).
Symptoom Mogelijke oorzaak
l De iPod of iPhone is niet
ondersteund. Zie pagina 10
l De
l Zit de stekker van het
voor compatibele modellen.
afstandsbediening
toestel in het stopcontact?
l De iPod of iPhone kan niet
werkt niet.
l Zijn de batterijen met de
worden opgeladen terwijl het
polen in de juiste richting
hoofdapparaat op de USB-
ingezet?
l Zijn de batterijen leeg?
stand staat.
l Is de afstand of de hoek
l
"This accessory is
l De batterij van de iPhone is
verkeerd?
not made to work
bijna leeg. Laad de iPhone op.
l Valt er sterk licht op de
with iPhone" of
l iPhone is niet keurig gedokt.
sensor voor de
"This accessory is
afstandsbediening?
not supported by
iPhone" verschijnt
n Tuner
op het scherm
van de iPhone.
Symptoom Mogelijke oorzaak
l De tuner produceert
l Staat het toestel dicht bij
continu rare
een TV of computer?
geluiden.
l Is de FM-antenne of AM-
ringantenne juist
geplaatst? Plaats de
antenne verder uit de buurt
van het netsnoer indien te
dicht bij elkaar.
Nl-24
11/5/25 X-HM10_20_Nl.fm

Tabel probleemoplossing (vervolg)
n Zorg voor uw CD's
Compact Discs zijn redelijk duurzaam, maar door vuil op
n Condensatie
het oppervlak van het schijfje kan er een afleesfout
Door plotselinge temperatuurverschillen en opslag of
ontstaan. Volg de onderstaande richtlijnen zodat u
gebruik in een zeer vochtige ruimte wordt condens in het
maximaal kunt profiteren van uw CD collectie en uw
toestel (CD-pickup, enz.) of op de zender van de
speler.
afstandsbediening gevormd. Condensatie kan storingen
in de functie van het apparaat veroorzaken. U moet in
l Schrijf niet op het schijfje, vooral niet op de kant zonder
geval van condensvorming de stroom ingeschakeld laten
label, waar het signaal op staat. Maak geen markering
zonder een CD geplaatst en wachten totdat normale
van enigerlei soort op dit oppervlak.
weergave weer mogelijk is (ongeveer 1 uur). Veeg
l Stel de CD's niet bloot aan overmatige warmte of
condens met een zachte doek van de zender van de
vochtigheid, of aan direct zonlicht.
afstandsbediening alvorens deze voor bediening te
l Pak een CD altijd vast aan de rand, en nooit aan het
gebruiken.
plaatoppervlak. Vingerafdrukken, vuil of water op de
CD kan storingen bij het aflezen van de CD-signalen
n Als er zich een probleem voordoet
veroorzaken. Als een CD vuil is en daardoor niet goed
speelt, maak deze dan schoon door met een zachte,
Wanneer dit product wordt blootgesteld aan sterke
droge doek van het middenpunt uit naar de rand toe te
invloeden van buitenaf (mechanische schokken,
vegen.
abnormale statische elektriciteit, abnormale netspanning
als gevolg van blikseminslag, enz.) of wanneer het toestel
onjuist bediend wordt, is het mogelijk dat er storingen
optreden.
Als zich een dergelijk probleem voordoet, dient u het
volgende te doen:
Onderhoud
1 Zet het toestel uit (standby) en vervolgens weer aan.
2
Indien het toestel bij het vorige proces niet teruggezet is,
trek de stekker van het toestel dan uit het stopcontact en
n Reinigen van de behuizing
steek hem weer erin, en schakel dan het toestel weer aan.
Neem de behuizing van tijd tot tijd af met een zachte doek
en een slap sopje en wrijf na met een droge doek.
Opmerking:
Indien geen van de handelingen het toestel weer herstelt,
Let op:
moet u het gehele geheugen terugstellen.
l Gebruik geen chemische middelen voor het reinigen
(benzine, verfverdunner enz.). Hierdoor kan de
n Terugzetten fabrieksinstellingen, het
behuizing beschadigd raken.
gehele geheugen wissen
l Probeer in geen geval het binnenwerk van het toestel
te smeren. Dit kan storingen veroorzaken.
1
Druk op de ON/STAND-BY-toets om het apparaat in te
schakelen.
2 Druk herhaaldelijk op de LINE-toets van de
afstandsbediening of op de INPUT-toets van de
hoofdunit om de LINE IN-functie te selecteren.
3 Druk in de LINE IN-functie op de toets van de
hoofdunit en houd de toets ingedrukt totdat "RESET"
verschijnt.
1
Let op:
2
Deze handeling wist alle in het geheugen opgeslagen
gegevens, inclusief de klok-en timer-instellingen,
3
voorkeuzezenders en CD programma's.
n Voor u het toestel verplaatst
4
Verwijder de iPod, het USB-geheugenapparaat en de disc
uit het toestel. Schakel het apparaat dan in de standby-
5
modus. Wanneer u het toestel draagt met de iPod in de
dock of een USB-geheugenapparaat of disc geplaatst,
6
zou het toestel beschadigd kunnen raken.
7
8
9
Nl-25
11/5/25 X-HM10_20_Nl.fm
NEE JA
Juist
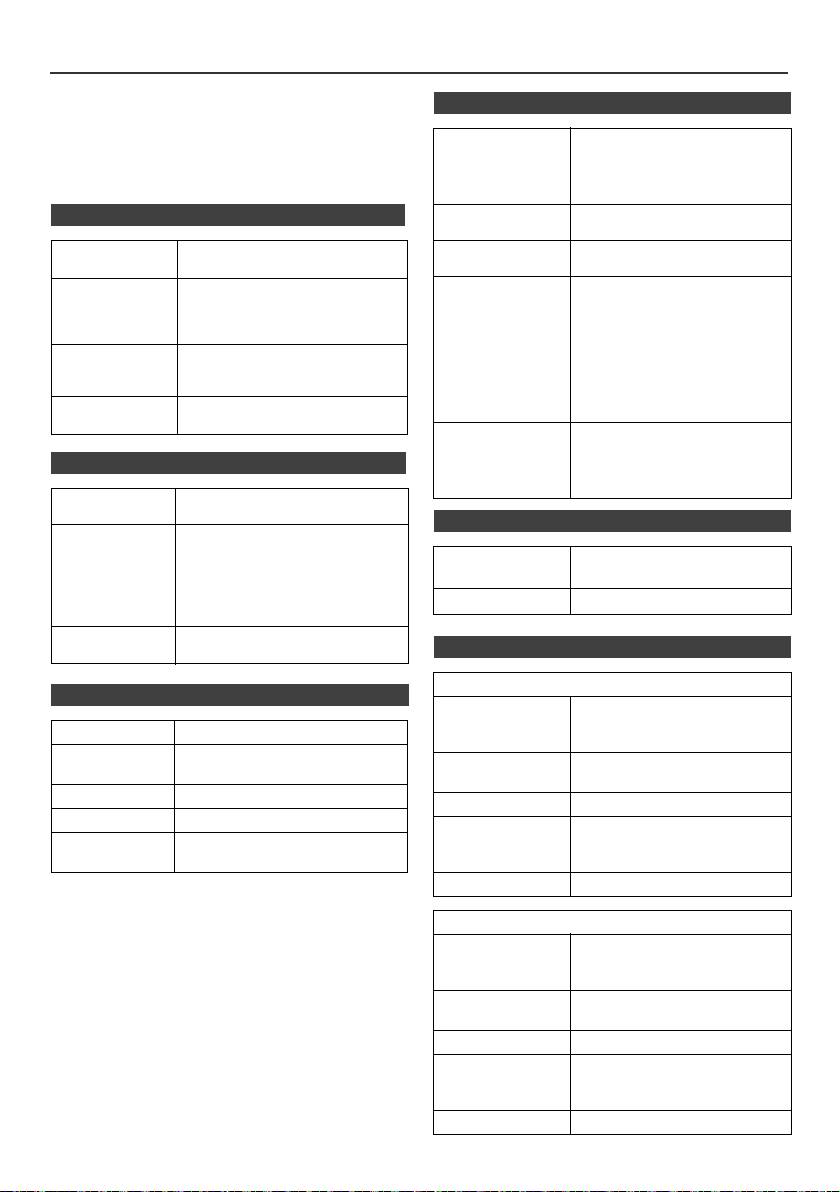
Technische gegevens
PIONEER behoudt zich het recht voor om het ontwerp en
n USB
de technische gegevens aan te passen terwille van
productverbeteringen zonder mededeling vooraf. De
USB-ontvanger
l Werkt met USB 1.1 (Volledige
waarden gegeven in het gedeelte "Technische gegevens"
interface
snelheid)/2.0
zijn gebaseerd op een gemiddeld model van de
Massapslagklasse
productielijn. Er kunnen echter lichte afwijkingen bestaan
l Ondersteunt alleen Bulk en
per individueel toestel.
CBI protocol.
n Algemeen
Compatibel
l MPEG 1 Layer 3
bestand
l WMA (Niet DRM)
Voedingsbron Wisselstroom 220 V tot 240 V,
Compatibele
l MP3 (32 kbps tot 320 kbps)
50 Hz/60 Hz
bitsnelheid
l WMA (64 kbps tot 160 kbps)
Overige l Maximale totale aantal MP3/
Stroomverbruik Stroom ingeschakeld:
WMA bestanden is 999.
45 W (X-HM20)
l Maximale totale aantal
30 W (X-HM10)
mappen is 99 INCLUSIEF
Stroom standby: 0,4 W
rootindex.
Afmetingen Breedte: 215 mm
l De ID3TAG informatie die
Hoogte: 99 mm
ondersteunt wordt zijn alleen
Diepte: 300 mm
TITLE, ARTIST en ALBUM.
l Ondersteuning ID3TAG versie
Gewicht 3,8 kg (X-HM20)
1 en versie 2.
3,7 kg (X-HM10)
Ondersteuning
l Ondersteuning USB
bestands-systeem
apparaten met Microsoft
Windows/DOS/FAT 12/FAT
n Versterker
16/FAT 32.
l 2 kbyte bloklengte voor sector.
Uitgangsvermogen
RMS: 15 W + 15 W (1 kHz,10%
T.H.D., 4 Ohm)
n Tuner
Uitgangsaansluitingen
Luidsprekers: 4 Ohm
20 Hz tot 20 kHz
Frequentiebereik FM: 87,5 MHz tot 108 MHz
Video-uitgang (alleen X-HM20):
AM: 522 kHz tot 1.620 kHz
1 Vp-p
Hoofdtelefoon: 16 Ohm
Vooringesteld 40 (FM en AM station)
(aanbevolen: 32 Ohm)
Ingangsaansluitingen
Lijn in (analoge invoer):
n Luidspreker
500 mV/47 kOhm
X-HM20
n CD-speler
Type 2-weg type luidsprekersysteem
Tweeter van 5 cm
Type Multi CD-speler voor één disc
Woofer van 10 cm
Signaalaflezing Geen contact makende, 3-straals
Maximum
15 W
halfgeleider laser leeskop
ingangsvermogen
D/A Omzetter Multi bit D/A omzetter
Impedantie 4 Ohm
Frequentiebereik 20 Hz tot 20.000 Hz
Afmetingen Breedte: 132 mm
Dynamisch
90 dB (1 kHz)
Hoogte: 260 mm
bereik
Diepte: 173 mm
Gewicht 2,0 kg/per stuk
X-HM10
Type 2-weg type luidsprekersysteem
Piezoelectric Tweeter
Woofer van 10 cm
Maximum
15 W
ingangsvermogen
Impedantie 4 Ohm
Afmetingen Breedte: 132 mm
Hoogte: 260 mm
Diepte: 158 mm
Gewicht 1,6 kg/per stuk
Nl-26
11/5/25 X-HM10_20_Nl.fm

Mededeling
Informatie over iPod/iPhone/iPad:
"Gemaakt voor iPod", "Gemaakt voor iPhone" en "Gemaakt voor
iPad" wil zeggen dat een elektronische accessoire speciaal
ontwikkeld is voor verbinding met respectievelijk een iPod, iPhone
of iPad, en door de maker gewaarborgd is als conform de Apple
werkingsnormen. Apple is niet verantwoordelijk voor de werking van
dit apparaat en voor het voldoen aan de veiligheidsnormen en
wettelijke normen. Houd er rekening mee dat het gebruik van dit
accessoire met iPod of iPhone invloed kan hebben op de draadloze
prestatie.
iPad, iPhone et iPod sont des marques commerciales d’Apple Inc.,
déposées aux États-Unis et dans d’autres pays.
1
2
3
4
5
6
7
© 2011 PIONEER CORPORATION.
Alle rechten voorbehouden.
8
9
Nl-27
11/5/25 X-HM10_20_Nl.fm
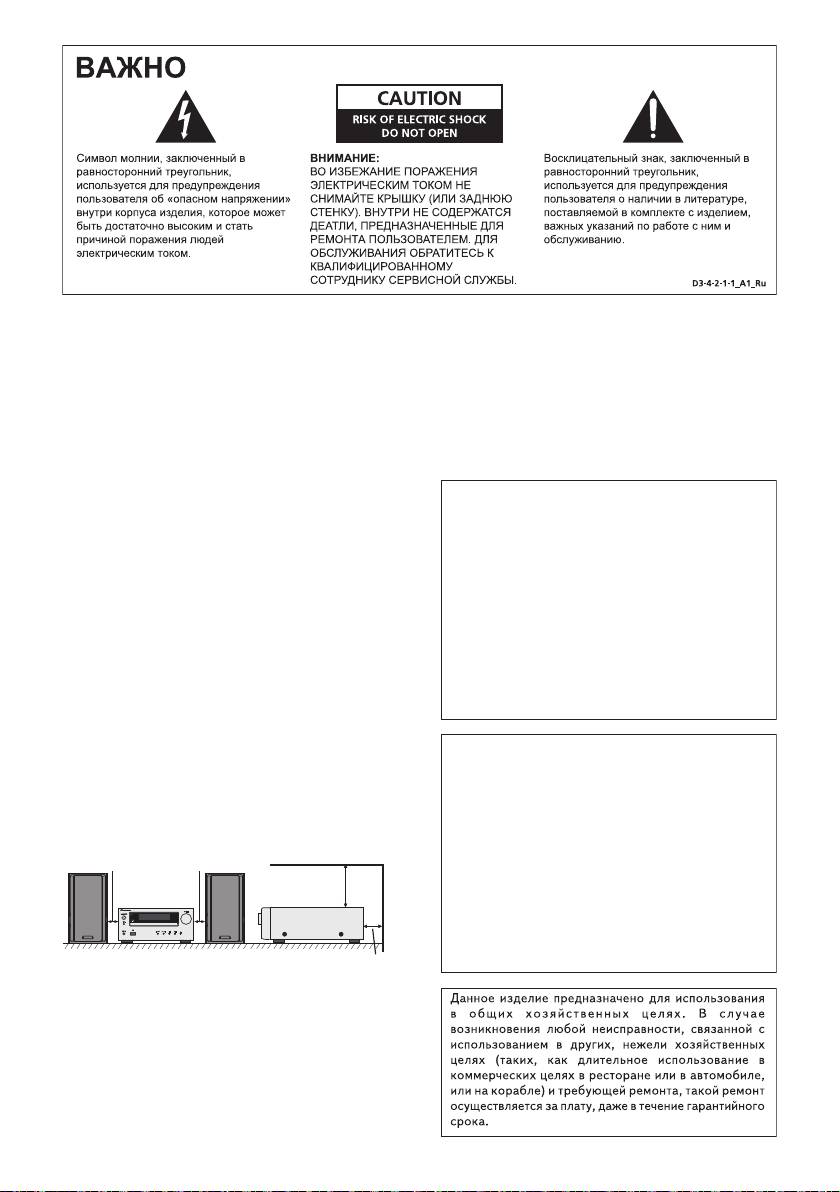
!"!#!! " ""
!! "! "!#" "!
!" ""!! "!""
!!#!! ""!!
""! "! "
11/5/25 X-HM10_20_Anki_Ru.fm
%&'()*()*(*)('*
(((*)*
+$'+$)((((
&)()'*((*)
()*(*&'()*()(*(
!"! "!"#!
((***)*(()
D3-4-2-1-3_A1_Ru
')!)(
"!(*)**)!
*(!(#
D3-4-2-1-7c*_A1_Ru
()*+,()*-+**
#$%&'&%(&&&%&
$'$'&$%(('&%(
$%&((
,
&$'('&%(&%&'&$
%(('%&&&'&(
$&(%'&%((%(
(''%&
!"#$%&"$%'
%(&$(&($%
%&'&%(&
D3-4-2-1-4*_A1_Ru
&%&&%
'&$%(%%($&
&'%('&%((%&&&(&$%&
&$%'$'&%
'&!&$%&''$("
D3-4-2-2-1a_A1_Ru
D3-4-2-1-7a_A1_Ru
!"#$"STANDBY/ON
"#$%&'%&'#&'&'&''
"#!"#$"!
#&'#&''$$$$$
"#!"#$
$'#'%#%'#$%&'#&'
"!!"
&&#%&&$$&&$
"!!"
&#
"!$ "!!"
&&
""! !
$ $ "
&
""!"!!"
!"
"$"
" !
&
D3-4-2-2-2a*_A1_Ru
#%&%&'#&'$'&$$'#&'$
'$$$&$$%
#'%$$$$$ '# #
$$#!'$'#&'$$
&%&%'#'$$&
'
#% $$#'$ '$&'#'$$
'#$$$%&'$'#%$
K041_A1_Ru
'&'#$$&'$
D3-4-2-1-7b*_A1_Ru
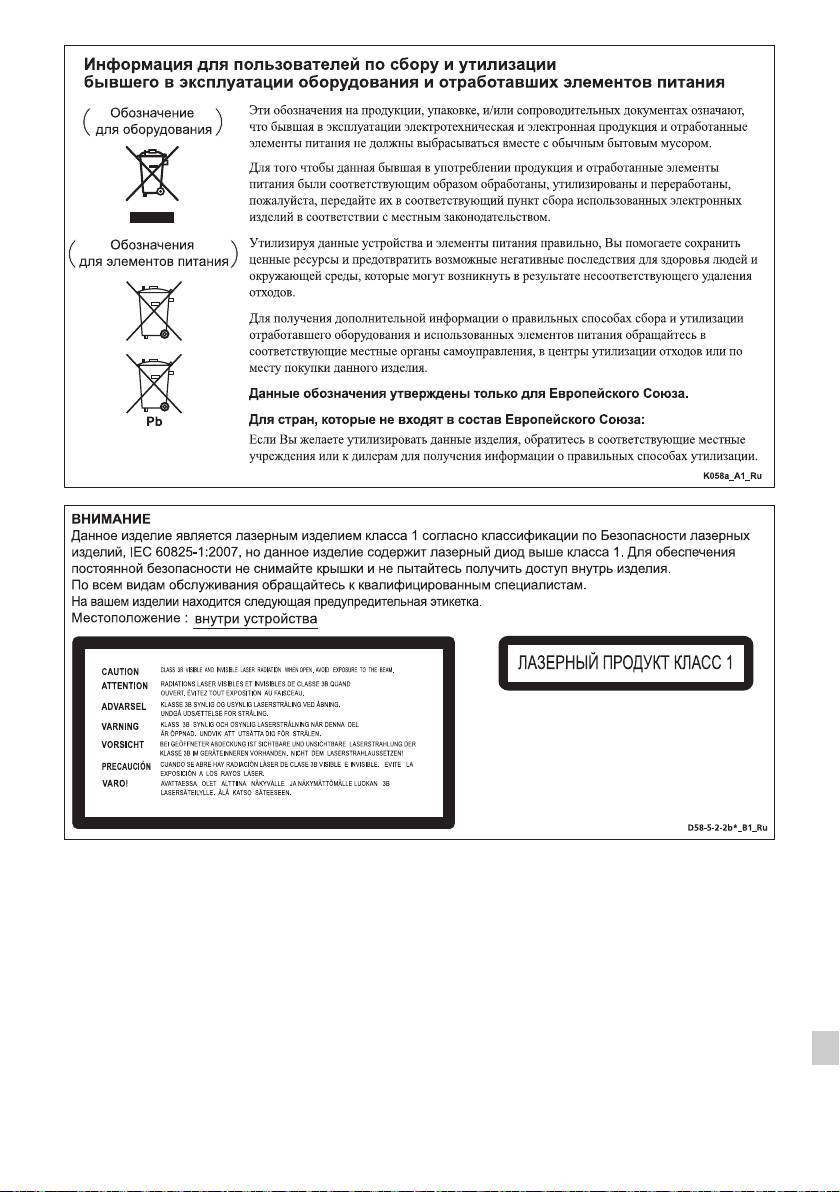
1
О конденсации
2
Если проигрыватель внезапно перемещен с холодного
места в теплую комнату (например, зимой) или если
3
температура в комнате, где установлен проигрыватель,
внезапно повысилась при использовании обогревателя,
4
др., внутри (на рабочих деталях и линзе) могут
образоваться водяные капли (конденсация). При
образовании конденсации проигрыватель не будет
5
срабатывать соответствующим образом и
воспроизведение не будет производиться. Оставьте
6
проигрыватель при комнатной температуре на 1 или 2
часа при включенном питании (время зависит от объема
7
конденсации).
Водяные капли испарятся и можно будет воспроизводить.
8
Конденсация может также образоваться летом, если
проигрыватель подвержден прямому обдуванию от
кондиционера воздуха. В таком случае отодвиньте
9
проигрыватель на другое место.
S005_A1_Ru
R-3
11/5/25 X-HM10_20_Anki_Ru.fm
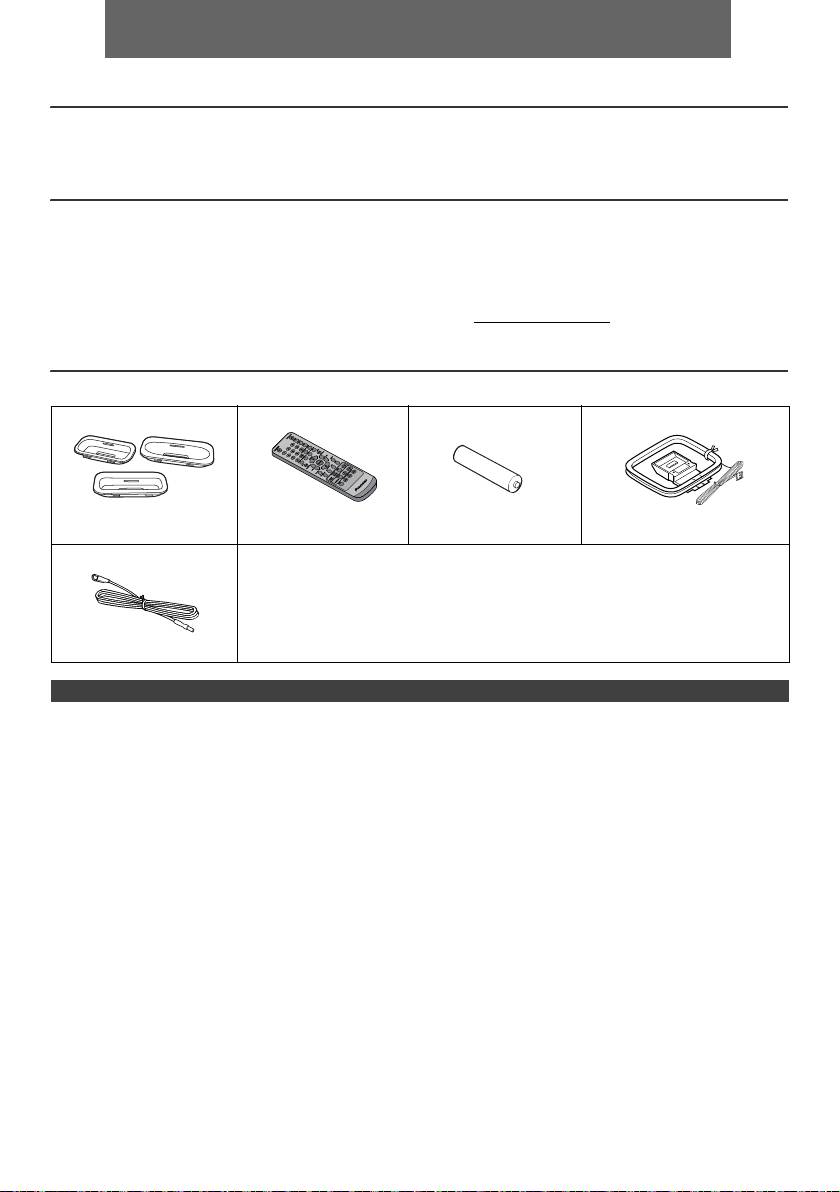
РУССКИЙ
l Система ресивера CD X-HM10/X-HM20 состоит из основного блока и системы громкоговорителей.
Введение
Благодарим вас за приобретение этого изделия компании PIONEER. Для получения наилучших рабочих характеристик этого
изделия внимательно прочтите данное руководство. В данном руководстве содержатся инструкции по эксплуатации вашего
изделия PIONEER.
Специальное примечание
С поставкой данного продукта не передается лицензия и не дается право на распространение созданного с этим продуктом
контента по коммерческим (приносящим доход) системам вещания (наземным, спутниковым, кабельным и/или другим
каналам передачи информации), по коммерческим средством потоковой передачи (через Интернет, интранет и/или другие
сети), по другим коммерческим системам распределения контента (приложениям платного ау
дио или аудиопрограммам по
запросу и т.п.) или на приносящих доход физических носителях информации (компакт-дисках, цифровых универсальных
дисках, полупроводниковых чипах, жестких дисках, картах памяти и т.п.). Для подобного использования необходима
отдельная лицензия. Для получения более подробной информации см. http://mp3licensing.com
Технология кодирования звука MPEG Layer-3 по лицензии Fraunhofer IIS и Thomson.
Принадлежности
Убедите сь в наличии в комплекте следующих принадлежностей.
Адаптеры для iPhone x 3
Пульт дистанционного
Батарейки размера
Рамочная антенна AM x 1
(только X-HM20)
управления x 1
«AA» x 1
Кабель питания
Гарантийный сертификат
Данное руководство по эксплуатации
Антенный кабель FM x 1
СОДЕРЖАНИЕ
Стр.
Стр.
Общая информация
USB
Меры предосторожности. . . . . . . . . . . . . . . . . . . . . . . . . . . . 5
Прослушивание запоминающего устройства большой
Органы управления и индикаторы . . . . . . . . . . . . . . . . 5 - 6
емкости USB/MP3-плеера . . . . . . . . . . . . . . . . . . . . . . 16 - 17
Усовершенствованное воспроизведение USB . . . . . . . . .17
Подготовка к использованию
Соединения системы . . . . . . . . . . . . . . . . . . . . . . . . . . . . 7 - 8
Радио
Пульт дистанционного управления . . . . . . . . . . . . . . . . . . . 8
Прослушивание радиопередач . . . . . . . . . . . . . . . . . . . . . .18
Основные операции
Дополнительные функции
Общее управление . . . . . . . . . . . . . . . . . . . . . . . . . . . . . . . . 9
Использование системы радиоданных (RDS) . . . . . . 19- 21
Ус т а но в к а часов (только с пульта ДУ) . . . . . . . . . . . . . 9 - 10
Работа с таймером и спящий режим
(только с пульта ДУ) . . . . . . . . . . . . . . . . . . . . . . . . . 21 - 23
iPod, iPhone и iPad
Наушники . . . . . . . . . . . . . . . . . . . . . . . . . . . . . . . . . . . . . . 23
Прослушивание iPod, iPhone или iPad
(только X-HM20) . . . . . . . . . . . . . . . . . . . . . . . . . . . . . 10 - 12
Справочные материалы
Таблица неисправностей . . . . . . . . . . . . . . . . . . . . . . . 24 - 25
Воспроизведение дисков CD или MP3/WMA
Обслуживание . . . . . . . . . . . . . . . . . . . . . . . . . . . . . . . . . . .25
Прослушивание дисков CD или MP3/WMA . . . . . . . . . . 13
Спецификации . . . . . . . . . . . . . . . . . . . . . . . . . . . . . . . . . . .26
Усовершенствованное воспроизведение дисков CD или
Предупреждение. . . . . . . . . . . . . . . . . . . . . . . . . . . . . . . . . .27
MP3/WMA . . . . . . . . . . . . . . . . . . . . . . . . . . . . . . . . . . 14 - 15
Режим папки MP3/WMA (только для файлов MP3/WMA)
. . . . . . . . . . . . . . . . . . . . . . . . . . . . . . . . . . . . . . . . . . . . 15 - 16
Ru-4
11/5/25 X-HM10_20_Ru.fm
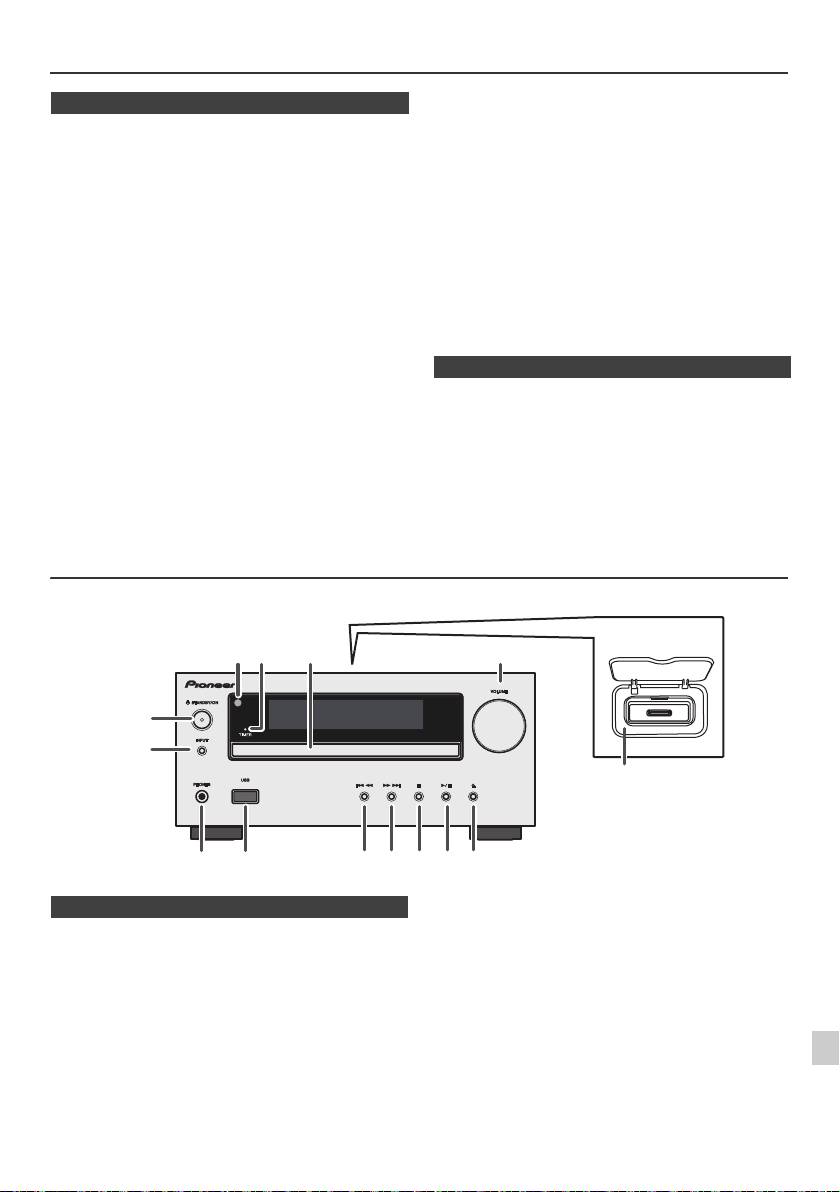
Меры предосторожности
отверстий какими-либо предметами, например, газетами,
n Общие сведения
скатертями, шторами и т.п.
l
Не размещайте на аппарате источники открытого огня,
l
Устанавливайте устройство на твердой, ровной поверхности
например, зажженные свечи.
без вибраций.
l
Обращайте внимание на экологические аспекты утилизации и
l
Располагайте громкоговорители на расстоянии минимум 30 см
удаления использованных батарей.
от любого ЭЛТ-телевизора во избежание отклонений в цвете
l
Аппарат предназначен для использования в условиях
на экране телевизора. При наличии отклонений, отодвиньте
умеренного климата.
громкоговорители подальше от телевизора. ЖК-телевизор не
подвержен таким вибрациям.
Предупреждение:
l
Предохраняйте устройство от воздействия прямого солнечного
Используемое напряжение должно совпадать с
света, сильных магнитных полей, чрезмерной пыли, влажности
напряжением, указанным на этом аппарате. Использование
и электронного/электрического оборудования (домашние
этого изделия при напряжении выше указанного является
компьютеры, факсы, и т.п.), создающего электрические помехи.
опасным и может привести к пожару или другому
l
Не размещайте никаких предметов на верхней стороне
несчастному случаю, вызывающему повреждение.
устройства.
Компания PIONEER не будет нести ответственность за
l
Не подвергайте устройство воздействию влаги, температур
выше 60°C или сверхнизких температур.
любое повреждение, вытекающее из использования этого
l
Если система работает неправильно, отсоедините кабель
аппарата при напряжении, отличном от указанного на
питания переменного тока от сетевой розетки. Снова
аппарате.
подсоедините кабель питания переменного тока и затем
включите систему.я
n Регулирование громкости
l
При грозе, отключите устройство от сети для безопасности.
l
При отсоединении вилки кабеля питания переменного тока от
Уровень звука при заданной н
астройке громкости зависит
сетевой розетки, держитесь за вилку, так как при вытягивании
от кпд громкоговорителей, расположения и других
за кабель может повредиться внутренняя проводка.
различных факторов. Рекомендуется избегать воздействия
l
Вилка кабеля питания переменного тока используется как
высоких уровней громкости. При включении устройства не
разъединитель и должна всегда находиться в рабочем
состоянии.
включайте громкость на полную мощность. Слушайте
l
Не снимайте наружную крышку, так как это может
музыку при средних уровнях громкости. Избыточное
привести к поражению электрическим током.
звуковое давление из наушников и головных телефонов
Обратитесь за внутренним обслуживанием в
может вызвать потерю слуха.
местный сервисный центр PIONEER.
l
Не блокируйте вентиляцию закрытием вентиляционных
Органы управления и индикаторы
Функции iPod/iPhone доступны только для X-HM20.
1
2
3
Стр.
Стр.
4
1. Датчик пульта . . . . . . . . . . . . . . . . . . . . . . . . . . . 8
10. Настройка тюнера вниз, дорожка CD/USB
2. Индикатор времени . . . . . . . . . . . . . . . . . . . . . 22
назад, пропуск iPod/iPhone назад . . . . . . .12, 13
3. Лоток для дисков . . . . . . . . . . . . . . . . . . . . . . . 13
11. Настройка тюнера вверх, дорожка CD/USB
5
4. Док-станция для iPod или iPhone . . . . . . . . . .11
вперед, пропуск iPod/iPhone вперед . . . .12, 13
5. Регулятор громкости . . . . . . . . . . . . . . . . . . . . . 9
12. Кнопка остановки диска/USB . . . . . . . . . . .12, 13
6
6. Кнопка STANDBY/ON. . . . . . . . . . . . . . . .11, 13, 18
13. Кнопка воспроизведения или пау
зы диска/
7. Кнопка INPUT . . . . . . . . . . . . . . . . .9, 11, 13, 16, 18
USB/iPod/iPhone . . . . . . . . . . . . . . . . . . . . . . 12, 13
8. Гнездо для наушников. . . . . . . . . . . . . . . . . . . 23
14. Кнопка открытия/закрытия лотка для
7
9. Разъем USB . . . . . . . . . . . . . . . . . . . . . . . . . . . . 16
дисков . . . . . . . . . . . . . . . . . . . . . . . . . . . . . . . . .13
8
9
Ru-5
11/5/25 X-HM10_20_Ru.fm
1
52 3
6
7
4
8 10 11 12 13 14
9
Только X-HM20
n Передняя панель
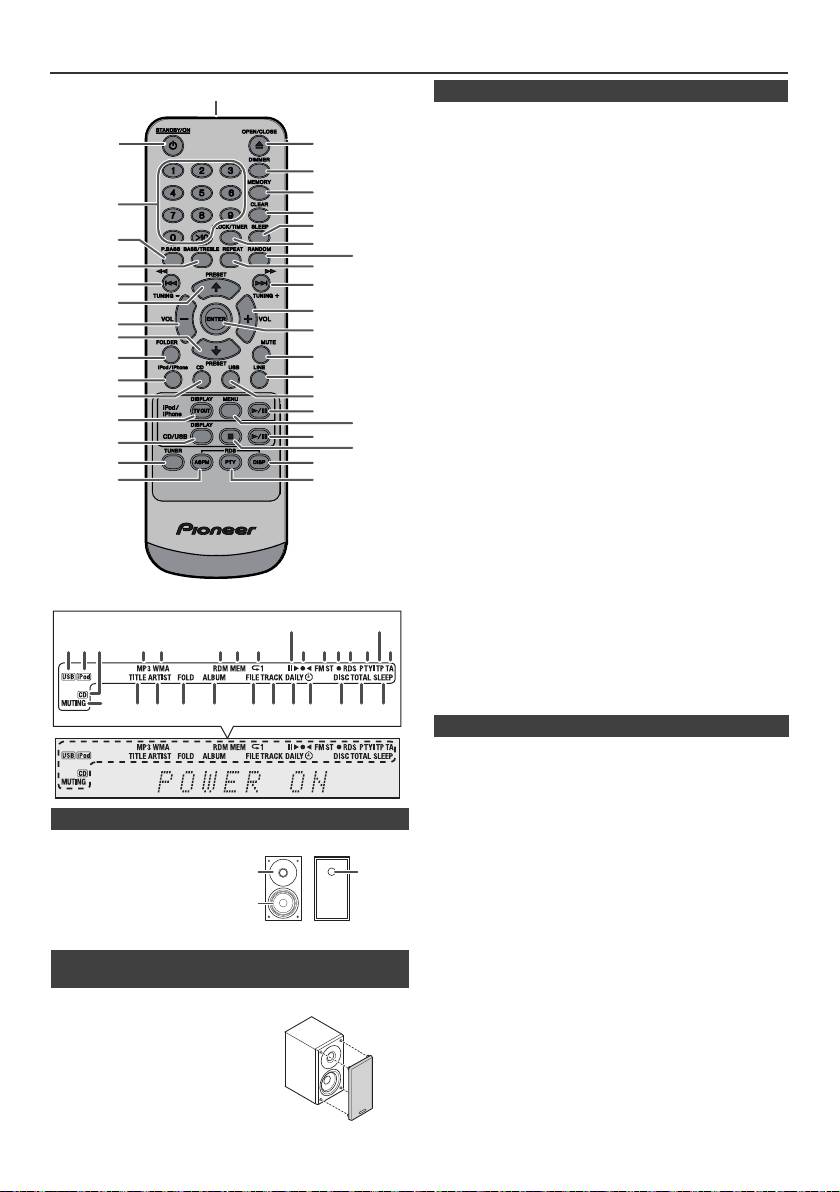
Органы управления и индикаторы (продолжение)
Стр.
1. Датчик дистанционного управления . . . . . . . . . . 8
2. Кнопка STANDBY/ON . . . . . . . . . . . . . . . 9, 11, 13, 21
3. Цифровые кнопки. . . . . . . . . . . . . . . . . . . . . . . . . 14
4. Кнопка P.Bass . . . . . . . . . . . . . . . . . . . . . . . . . . . . . . 9
5. Кнопка низких/высоких частот . . . . . . . . . . . . . . . 9
6. Кнопка настройки вниз, пропуска назад, быстрой
перемотки назад, установки времени
назад . . . . . . . . . . . . . . . . . . . 9, 12, 13, 16, 18, 19, 21
7. Кнопка настройки тюнера вверх, управления
курсором iPod вверх. . . . . . . . . . . . . . 11, 12, 16, 18
8. Кнопка уменьшения громкости. . . . . . . . . . . . . . . 9
9. Кнопка настройки тюнера вниз, управления
курсором iPod вниз. . . . . . . . . . . . . . . 11, 12, 16, 18
10. Кнопка папки . . . . . . . . . . . . . . . . . . . . . . . . . . . . . 16
11. Кнопка iPod/iPhone . . . . . . . . . . . . . . . . . . . . . . . . 11
12. Кнопка CD . . . . . . . . . . . . . . . . . . . . . . . . . . . . . . . . 13
13. Кнопка iPod/iPhone DISPLAY TV OUT . . . . . . 11, 12
14. Кн
опка CD/USB DISPLAY . . . . . . . . . . . . . . . . . . . 16
15. Кнопка настройки тюнера . . . . . . . . . . . . . . . 18, 19
16. Кнопка RDS ASPM . . . . . . . . . . . . . . . . . . . . . . . . . 19
17. Кнопка открытия/закрытия . . . . . . . . . . . . . . . . . 13
18. Кнопка настройки затемнения . . . . . . . . . . . . . . . 9
19. Кнопка запоминания. . . . . . . . . . . . . . . . . . . . 14, 18
20. Кнопка стирания . . . . . . . . . . . . . . . . . . . . . . . 14, 20
21. Кнопка перехода в спящий режим . . . . . . . . . . . 23
22. Кнопка установки часов/таймера. . . . . . . . . . 9, 22
23. Кнопка воспроизведения в случайной
последовательности . . . . . . . . . . . . . . . . . . . 12, 14
24. Кнопка повторного воспроизведения . . . . . 12, 14
25. Кнопка настройки вверх, пропуска вперед,
быстрой перемотки вперед, установки
времени вперед . . . . . . . . . 9, 12, 13, 16, 18, 19, 21
26. Кнопка увеличения гро
мкости . . . . . . . . . . . . . . . 9
27. Кнопка Enter . . . . . . . . . . . . . . . . . . . . . . . . . 9, 11, 12
28. Кнопка отключения звука . . . . . . . . . . . . . . . . . . . 9
29. Кнопка линейного входа . . . . . . . . . . . . . . . . . 8, 25
30. Кнопка USB . . . . . . . . . . . . . . . . . . . . . . . . . . . . . . 16
31. Кнопка воспроизведения/паузы
iPod/iPhone . . . . . . . . . . . . . . . . . . . . . . . . . . . . . . . 12
32. Кнопка меню iPod/iPhone. . . . . . . . . . . . . . . . . . . 12
33. Кнопка воспроизведения/паузы
CD/USB . . . . . . . . . . . . . . . . . . . . . . . . . . . . 12, 13, 14
34. Кнопка остановки CD/USB . . . . . . . . . . . . . . . 13, 14
35. Кнопка дисплея RDS . . . . . . . . . . . . . . . . . . . . . . 19
36. Кнопка RDS PTY . . . . . . . . . . . . . . . . . . . . . . . . . . . 19
Стр.
1. Индикатор USB . . . . . . . . . . . . . . . . . . . . . . . . . . . 16
2. Индикатор iPod . . . . . . . . . . . . . . . . . . . . . . . . . . . 10
3. Индикатор компакт-диска . . . . . . . . . . . . . . . . . . 13
4. Индикатор MP3 . . . . . . . . . . . . . . . . . . . . . . . . . . . 13
5. Индикатор WMA. . . . . . . . . . . . . . . . . . . . . . . . . . . 13
n Акустическая система
6. Индикатор RDM (воспроизведение в случайной
1. Высокочастотный
последовательности) . . . . . . . . . . . . . . . . . . . . . . 14
7. Индикатор MEM (память) . . . . . . . . . . . . . . . . . . . 14
динамик
8. Индикатор повтора . . . . . . . . . . . . . . . . . . . . . . . . 14
2. Низкочастотный
9. Индикатор воспроизведения/паузы . . . . . . . . . 12
динамик
10. Индикатор настройки FM/AM. . . . . . . . . . . . . . . . 18
3. Фазоинверторный
11. Индикатор режима стерео FM . . . . . . . . . . . . . . . 18
порт
12. Индикатор станции в стереорежиме . . . . . . . . . 18
13. Индикатор RDS . . . . . . . . . . . . . . . . . . . . . . . . . . . 19
14. Индикатор PTY. . . . . . . . . . . . . . . . . . . . . . . . . . . . 19
15. Индикатор TP . . . . . . . . . . . . . . . . . . . . . . . . . . . . . 19
n Съемные защитные решетки
16. Индикатор TA . . . . . . . . . . . . . . . . . . . . . . . . . . . . . 19
громкоговорителей (только X-HM20)
17. Индикатор приглушения звука . . . . . . . . . . . . . . . 9
18. Индикатор названия . . . . . . . . . . . . . . . . . . . . . . . 16
При снятии защитных решеток
19. Индикатор исполнителя. . . . . . . . . . . . . . . . . . . . 16
громкоговорителей убедитесь в
20. Индикатор папки . . . . . . . . . . . . . . . . . . . . . . . . . . 16
отсутствии контакта с диафрагмами
21
. Индикатор альбома . . . . . . . . . . . . . . . . . . . . . . . 16
громкоговорителей.
22. Индикатор файла . . . . . . . . . . . . . . . . . . . . . . . . . 16
23. Индикатор дорожки . . . . . . . . . . . . . . . . . . . . . . . 14
24. Индикатор ежедневного таймера. . . . . . . . . . . . 21
25. Индикатор одноразового таймера . . . . . . . . . . . 21
26. Индикатор диска . . . . . . . . . . . . . . . . . . . . . . . . . . 13
27. Суммарный индикатор. . . . . . . . . . . . . . . . . . . . . 16
28. Индикатор спящего режима . . . . . . . . . . . . . . . . 23
Ru-6
11/5/25 X-HM10_20_Ru.fm
1
2
17
18
19
3
20
21
4
22
23
5
24
6
25
7
26
8
27
9
10
28
29
11*
30
12
31*
13*
32*
33
14
34
15
35
16
36
*Кнопки 11, 13, 31, 32 доступны только для X-HM20.
9
15
1 4 5 6 7
2 3
8
10 11 1312 14
16
17
28272624 2523221918 2120
n Пульт дистанционного управления
n Дисплей
1
3
2
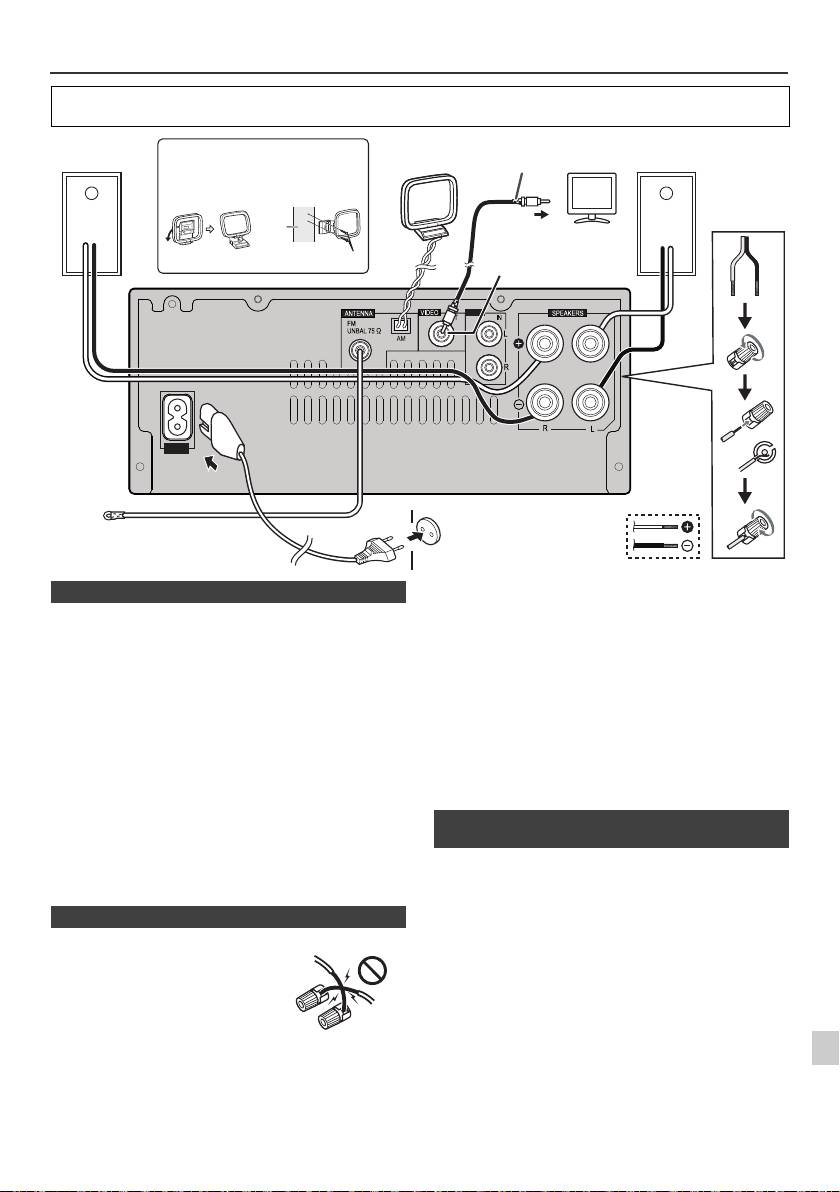
Соединения системы
Перед выполнением или изменением соединений отключите питание и отсоедините кабель питания от
розетки переменного тока.
Поставляемая в комплекте антенна FM:
Подсоедините антенну FM к гнезду FM с сопротивлением
75 Ом и расположите антенну FM в таком направлении,
когда возможен прием самого сильного сигнала.
Внешняя антенна FM:
Для улучшения приема используйте внешнюю антенну FM
(коаксиальный кабель с сопротивлением 75 Ом). При
использовании внешней антенны FM отсоедините
поставляемую в комплекте антенну FM.
Поставляемая в комплекте рамочная антенна AM:
Подсоедините рамочную а
нтенну AM к зажиму AM.
Расположите рамочную антенну AM дляобеспечения
оптимального приема. Ус т а н о в и т е рамочную антенну AM
на полке и т.п. или прикрепите ее на стойку или стену
винтами (не прилагаются).
Примечание:
1
Расположение антенны на аппарате или вблизи кабеля
питания переменного тока может вызвать помехи. Для
улучшения приема расположите антенну подальше от
Фото и видеофайлы с iPod или iPhone можно просматривать,
2
аппарата.
подключив систему к телевизору/монитору. Если телевизор/монитор
имеет видеовход, подключите его к гнезду VIDEO OUT в задней части
3
аппарата и установите ТВ-выход на устройстве iPod или iPhone в
положение «ON».
Примечание:
4
Обязательно настройте устройство iPod на систему NTSC
или PAL в соответствии с вашим ТВ-сигналом. Для
5
получения дополнительной информации посетите веб-сайт
компании Apple.
6
7
8
9
Ru-7
11/5/25 X-HM10_20_Ru.fm
LINE
AUX
LOOP
AC IN
Видеокабель
Правый
Ус т а н ов к а рамочной антенны AM
рамочная
Левый
(не прилагается)
Телевизор
громкоговоритель
антенна AM
Громкоговоритель
< Крепление
< Сборка >
к стене >
стена
К гнезду видеовхода
Гнездо видеовыхода
винты (не прилагаются)
(только X-HM20)
Сетевая розетка
(Переменный ток 220 В -
Aнтенный
240 В, 50 Гц/60 Гц)
кабель FM
n Подсоединение антенны
n Подключение громкоговорителей
l
Скрутите оголенные жилы провода.
l Подсоедините красный провод к
зажиму (+), а другой провод - к
зажиму минус (–).
l Используйте громкоговорители с
импедансом 4 Ом, так как
громкоговорители с более низким
импедансом могут повредить
аппарат.
Неправильно
l
На контактах громкоговорителей имеется ОПАСНОЕ ДЛЯ
ЖИЗНИ напряжение. Во избежание опасности поражения
электрическим током при подключении или отключении
кабелей громкоговорителей отсоединяйте кабель питания,
прежде чем прикасаться к любым неизолированным
деталям.
l Не крепите эти громкоговорители на стену или потолок,
так как при падении они могут нанести травму.
l
Не ошибитесь в выборе правого и левого каналов. Правый
громкоговоритель располагается с правой стороны, если
стоять лицом к аппарату.
l Не допускайте взаимного касания оголенных концов
проводов громкоговорителей.
l Не допускайте попадания или размещения любых
предметов в фазоинверторных портах.
l
Не вставайте и не садитесь на громкоговорители. Вы
можете получить травму.
n Подключение iPod или iPhone к
телевизору (только X-HM20)
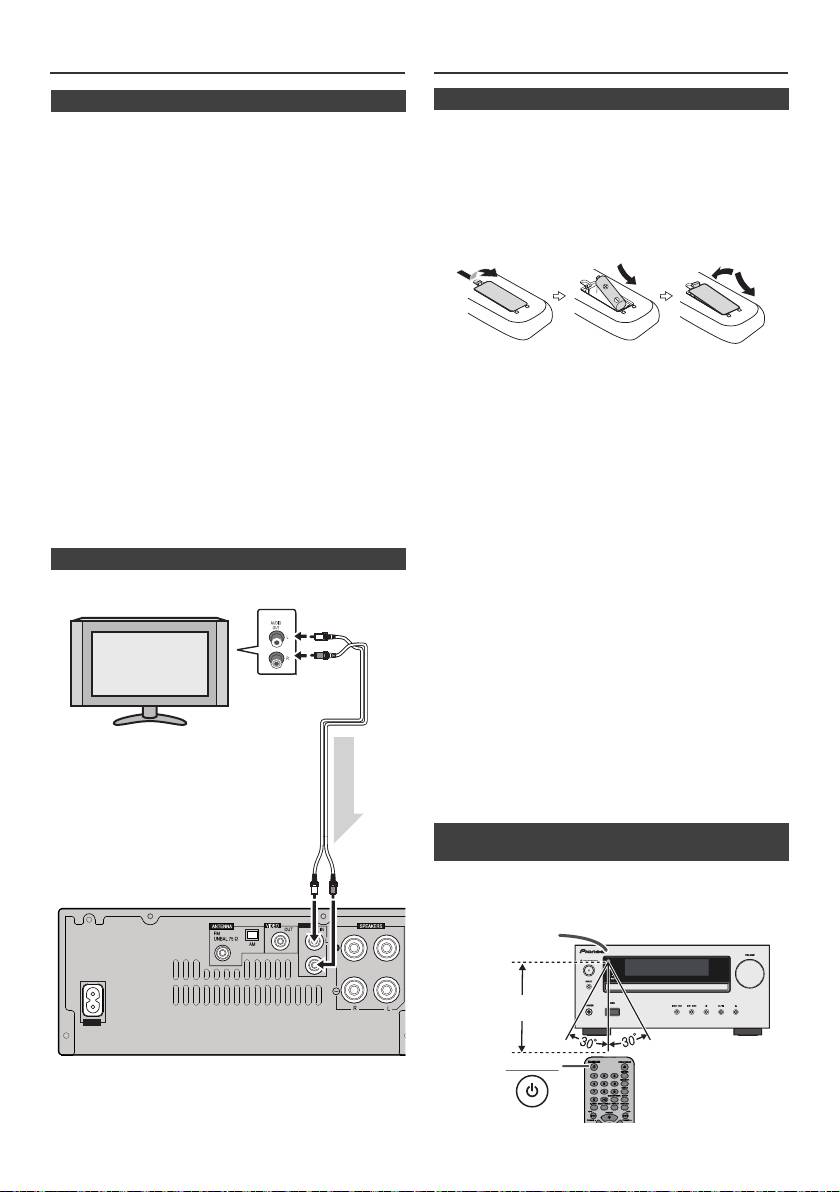
Соединения системы (продолжение)
Пульт дистанционного управления
n
Подключение питания переменного тока
Проверив правильность выполнения всех соединений,
вставьте кабель питания переменного тока этого устройства
в сетевую розетку.
Примечание:
Отсоедините кабель питания переменного тока от сетевой
розетки, если аппарат не будет использоваться длительный
период времени.
Предупреждение:
l Держите кабель питания за вилку. Вынимая вилку из
электророзетки, никогда не тяните за сам кабель,
никогда не дотрагивайтесь до кабеля питания влажными
руками, так как это может стать причиной короткого
замыкания и поражения электрическим током. Не
ставьте на кабель питания устройство, мебель или
другие предметы и не зажимайте его каким-либо иным
образом. Запрещается завязы
вать узлы на кабеле
питания или связывать его с другими кабелями. Кабели
ПРЕДУПРЕЖДЕНИЕ:
питания следует прокладывать в таких местах, где
l Не используйте и не храните батарейки под
возможность наступить на них будет маловероятной.
воздействием прямых солнечных лучей или в
Поврежденный кабель питания может стать причиной
помещении с высокой температурой, например, в
возгорания или поражения электрическим током.
автомобиле или рядом с обогревателем. Это может
Периодически проверяйте кабель питания. Если кабель
вызвать течь батареек, перегрев, взрыв или возгорание.
питания поврежден, обратитесь за сменным кабелем в
Это также отрицательно влияет на срок службы или
ближайший уполномоченный независимый сервис-
работоспособность батареек.
це
нтр Pioneer.
Предупреждение:
l Используйте только кабель питания, входящий в
l
Извлеките батарейки, если аппарат не будет использоваться
комплект поставки данного устройства.
в течение длительного периода времени. Это предотвратит
l Используйте прилагаемый кабель питания только по его
возможное повреждение вследствие утечки электролита из
прямому назначению, как описано выше.
батареек.
l
Не используйте перезаряжаемые батарейки (никель-
n Подключение телевизора и др.
кадмиевая батарея и т.п.).
l
Неправильная установка батареек может вызвать
Подключитесь к телевизору, используя аудиокабель
.
неисправность аппарата.
Примечания по использованию:
l
Замените батарейки при снижении рабочего расстояния
или нестабильной работе. Покупайте батарейки размера
«AA».
l
Периодически очищайте мягкой тканью датчик на пульте
ДУ и датчик на аппарате.
l
Попадание на датчик аппарата интенсивного света может
создавать помехи при работе. Если это произойдет,
поменяйте освещение или направление расположения
аппарата.
l
Предохраняйте пульт дистанционного управления от влаги,
перегрева, ударов и вибраций.
l Производите утилизацию использованных батареек в
соответствии с действующими в стране или регионе
государственными постановлениями или правилами по
охране окружающей среды.
Проверяйте пульт ДУ после проверки всех соединений.
Направляйте пульт ДУ прямо на датчик ДУ на аппарате. Пульт
ДУ можно использовать в указанном ниже диапазоне:
Для выбора функции линейного входа:
l
На основном блоке:
Нажмите несколько раз кнопку
INPUT, пока на дисплее не появится индикация Line In.
l
На пульте ДУ: Нажмите несколько раз кнопку LINE, пока
на дисплее не появится индикация Line In.
Ru-8
11/5/25 X-HM10_20_Ru.fm
LINE
AUX
LOOP
AC IN
Телевизор
К гнездам
аудиовыхода
Аудиокабель
(имеющийся в
продаже)
Аудиосигнал
К гнездам
линейного
Основной блок
входа
n Установка батареек
1
Откройте крышку батарейного отсека.
2
Ус т а н о в и т е входящие в комплект батарейки в соответствии
с направлением, указанным в батарейном отсеке.
При установке или извлечении батареек сдвиньте их в
направлении (–) клемм батареек.
3
Закройте крышку.
n Проверка пульта дистанционного
управления
STANDBY/ON
Датчик пульта
7 м
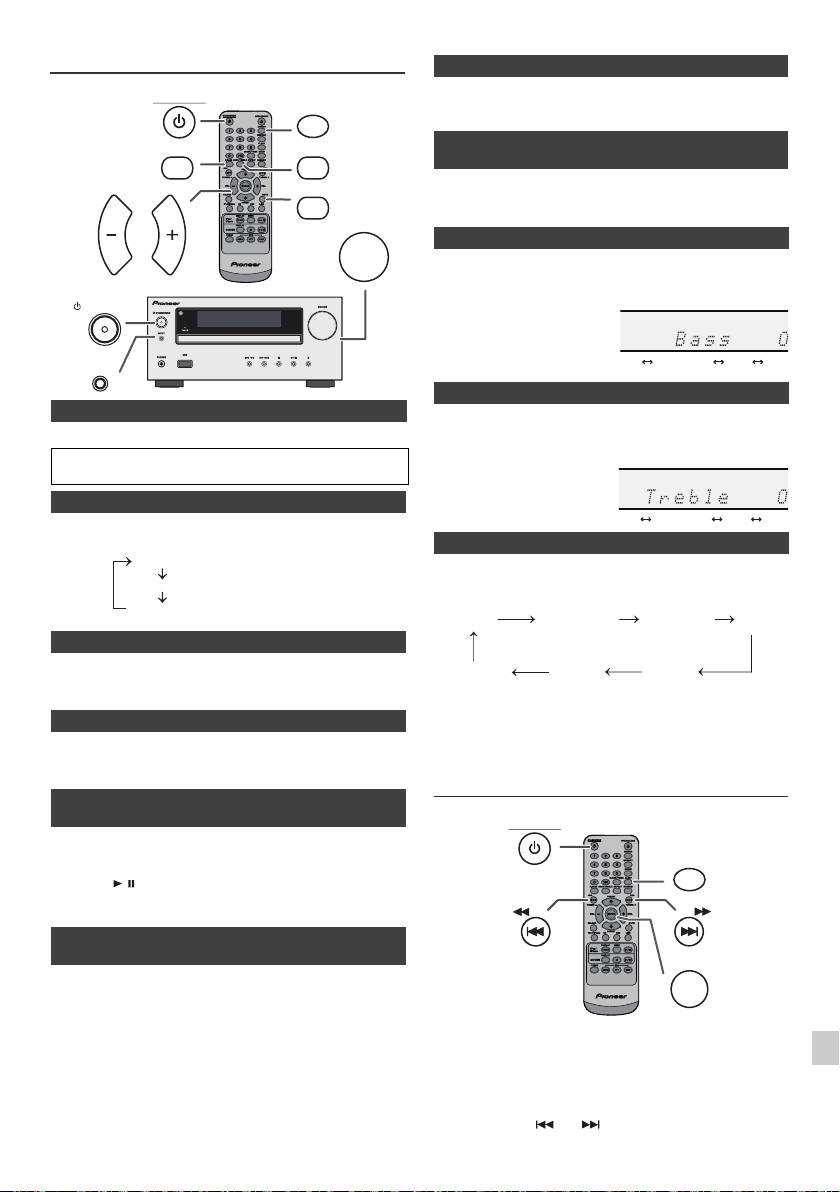
Общее управление
При нажатии кнопки MUTE на пульте ДУ звук временно
STANDBY/ON
приглушается. Повторно нажмите эту кнопку для восстановления
DIMMER
громкости.
P.BASS
BASS/TREBLE
При первом включении питания аппарат входит в режим P. b as s , при
MUTE
котором выделяются низкие частоты. Для отмены режима P. b as s
нажмите кнопку P.BASS на пу
льте ДУ.
VOLUME
VOL VOL
1
Нажмите кнопку BASS/TREBLE, чтобы выбрать параметр «Bass».
2
В течение 5 секунд нажмите кнопку VOL (+ или –), чтобы
отрегулировать низкие частоты.
STANDBY/ON
INPUT
n Для включения питания
1
Нажмите кнопку BASS/TREBLE, чтобы выбрать параметр «Treble».
Нажмите кнопку STANDBY/ON, чтобы включить питание.
2
В течение 5 секунд нажмите кнопку VOL (+ или –), чтобы
отрегулировать высокие частоты.
После использования:
Нажмите кнопку STANDBY/ON, чтобы войти в режим ожидания.
n Регулирование яркости дисплея
Для уменьшения яркости дисплея нажмите кнопку DIMMER на
пульте ДУ.
При нажатии кнопки INPUT на основном блоке текущая
функция изменится на другой режим. Нажмите несколько
раз кнопку INPUT, чтобы выбрать желаемую функцию.
n Автоматическая установка громкости
При выключении и включении основного блока с уровнем громкости,
установленным на значение 17 или выше, громкость начинается со
значения 16.
Примечание:
n Регулирование громкости
При аварийном отключении питания или отсоединении кабеля
Чтобы увеличить или уменьшить громкость, поверните регулятор
питания переменного тока функция резервирования защитит
громкости VOLUME (на основном блоке) или нажмите кнопку VOL +/
занесенный в память рабочий режим на несколько часов.
– (на пульте ДУ).
Установка часов (только с пульта ДУ)
n Функция автоматического включения
питания
1
Аппарат включается при нажатии любой из следующих кнопок:
l
iPod / iPhone, CD, USB, LINE, TUNER на пульте ДУ: Активируется
2
выбранная функция.
l
Кнопка / на основном блоке: Аппарат включается, и начнется
воспроизведение последней функции (CD, TUNER, USB, iPod,
3
LINE IN)
n Функция автоматического выключения
4
питания
Основной блок войдет в режим ожидания (если устройство iPod/
5
iPhone не установлено в док-станцию) по истечении 15 минут
бездействия при следующих условиях:
6
iPod/iPhone: Нет соединения.
CD / USB: В режиме остановки.
В этом примере, часы настроены на 24-часовой (00:00) показ
LINE IN: Не обнаружен входной сигнал или очень низкая слышимость
времени.
7
звука.
Примечание:
8
Только X-HM20: Однако, если устройство iPod/iPhone установлено в
док-станцию, аппарат начнет заряжаться.
В режиме ожидания на дисплее появится индикация «Charge Mode».
9
Ru-9
11/5/25 X-HM10_20_Ru.fm
Dimmer 1
Dimmer 2
Dimmer Off
(Дисплей темный).
(Дисплей становится темнее).
(Дис плей яркий).
n Приглушение звука
n Регулирование низких частот (режим
P.Bass)
n Регулирование низких частот
n Регулирование высоких частот
n Назначение
1
Нажмите кнопку STANDBY/ON, чтобы включить питание.
2
Нажмите кнопку CLOCK/TIMER.
3
В течение 10 секунд нажмите кнопку ENTER. Для регулировки дней
нажмите кнопку или и затем нажмите кнопку ENTER.
........
-5 -4 +4 +5
........
-5 -4 +4 +5
CD AM
FM STEREO
FM MONO
Line In
iPod
USB
(только X-HM20)
STANDBY/ON
CLOCK/TIMER
TUNING −
TUNING +
ENTER

l Зарядный терминал для iPod, iPhone и iPad:
Установка часов (только с пульта ДУ)
(продолжение)
Условие Док-станция Разъем USB
Функция USB НЕТ ДА
4
Нажмите кнопку или , чтобы выбрать 24-часовой или
Другая функция ДА НЕТ
12-часовой показ времени, и затем нажмите кнопку ENTER.
Режим ожидания ДА НЕТ
На дисплее отобразится 24-часовой показ
l
На экране iPhone может появиться сообщение «This
времени. (00:00 - 23:59)
accessory is not made to work with iPhone» (Это
На дисплее отобразится 12-часовой показ
оборудование не предназначено для работы с iPhone) или
времени. (AM 12:00 - PM 11:59)
подобное, если:
5
Для регулировки часов нажмите кнопку или и
- разряжена батарея.
затем нажмите кнопку ENTER. Нажмите кнопку или
- устройство iPhone неправильно установлено в
один раз, чтобы изменить время на 1 час. Держите ее
док-станцию (например, с перекосом). В таком случае,
нажатой для непрерывного изменения.
извлеките и повторно установите iPhone в док-станцию.
6
Для регулировки минут нажмите кнопку или и
l
Это изделие изготовлено для iPhone. Чтобы
затем нажмите кнопку ENTER. Нажмите кнопку или
предотвратить случайные помехи при установке
один раз, чтобы изменить время на 1 минуту.
iPod/iPhone в док-станцию, выход для наушников
Для подтверждения отображаемого времени:
отключается, и на дисплее появится индикация
Нажмите кнопку CLOCK/TIMER. Отображаемое время
«HP INVALID».
появится примерно на 5 секунд.
При входящих вызовах могут также возникать
Примечание:
кратковременные звуковые помехи.
При восстановлении электропитания после повторного
n Подключение iPad (разъем USB)
подключения аппарата или после аварийного отключения
питания, переустановите часы (стр. 9).
1
Вставьте разъем в гнездо для iPod, iPhone или iPad.
Для переустановки часов:
Выполните операции раздела «Установка часов» с шага 1. Если
инидикация «Clock» не появится в шаге 2, то шаг 4 (для выбора
24-часового или 12-часового показа времени) будет пропущен.
Для переключения на 24-часовой или 12-часовой
показ времени:
1
Стереть все запрограммированное содержимое. [Подробнее, см.
раздел «Возврат к заводским установкам, стирание всей памяти»
на стр. 24.]
2
Выполните операции раздела «Уст а н о в к а часов», начиная с шага 1.
2
Подключите iPad к аппарату через разъем USB.
Примечание:
Ус т а но в к а таймера будет сбрасываться при вытаскивании
кабеля питания из розетки или при отключении
электропитания.
Прослушивание iPod, iPhone или
iPad (только X-HM20)
Поддерживаемые модели iPod, iPhone и iPad:
Примечание:
l
iPad
Разъем USB не поддерживает выход VIDEO.
l
iPhone 4
l
iPhone 3GS
l
iPhone 3G
l
iPhone
n Воспроизведение Pod, iPhone или iPad
-e
l
iPod touch (4
поколение)
(разъем USB)
-e
l
iPod touch (3
поколение)
-e
l
iPod touch (2
поколение)
1
Нажмите кнопку STANDBY/ON, чтобы включить питание.
-e
l
iPod touch (1
поколение)
2
Нажмите кнопку USB на пульте ДУ или несколько раз кнопку
l
iPod classic
INPUT на основном блоке, чтобы выбрать функцию USB.
-e
l
iPod nano (6
поколение)
-e
3
Подключите к аппарату iPod, iPhone или iPad. Появится индикация
l
iPod nano (5
поколение)
-e
«iPod».
l
iPod nano (4
поколение))
-e
l
iPod nano (3
поколение)
4
Нажмите кнопку / (CD/USB / ), чтобы начать
-e
l
iPod nano (2
поколение)
воспроизведение.
Примечания:
Примечание:
l Эта система была разработана и протестирована для
Кнопка остановки () не действует во время воспроизведения iPod,
версии программного обеспечения iPod/iPhone/iPad,
iPhone или iPad.
указанной на веб-сайте Pioneer (http://pioneer.jp/homeav/
support/ios/eu).
l Ус т а но в ка на ваш iPod/iPhone/iPad версий программного
обеспечения, отличных от указанных на веб-сайте
Pioneer, может быть неудачной из-за несовместимости с
данной системой.
Ru-10
11/5/25 X-HM10_20_Ru.fm
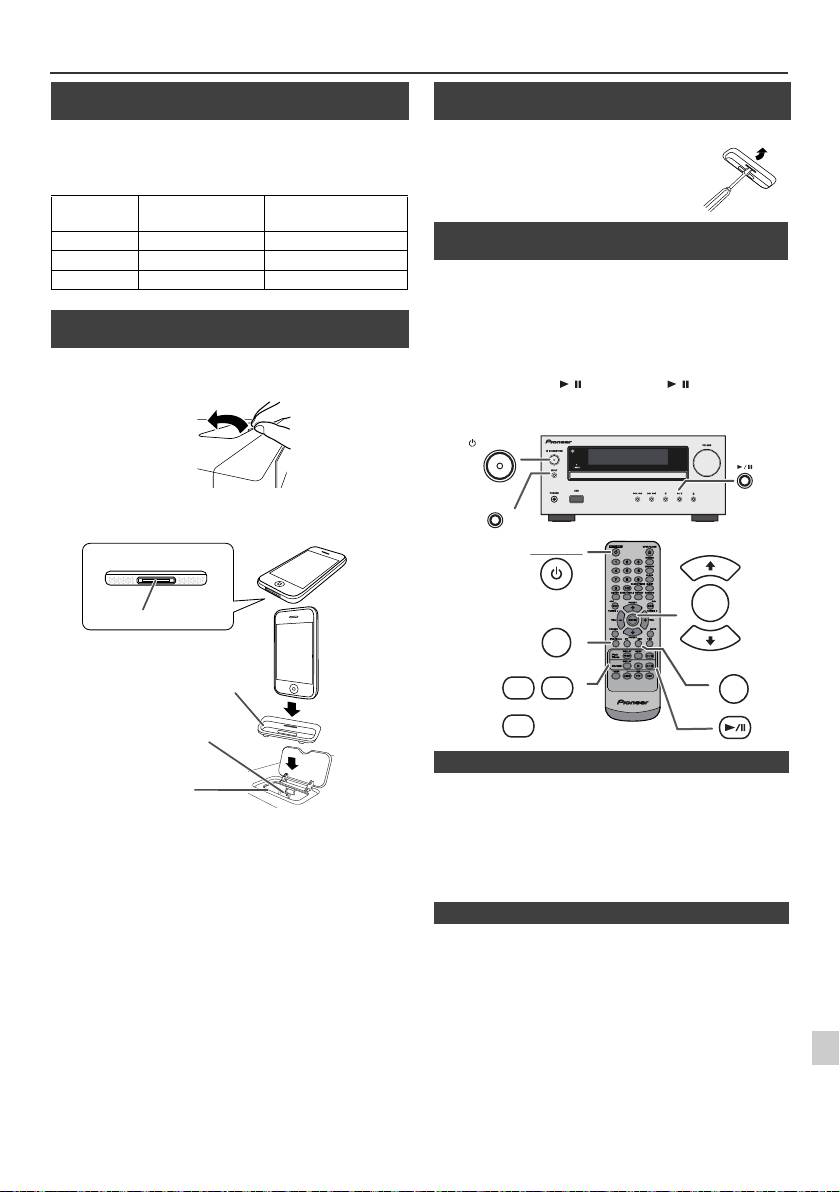
Прослушивание iPod, iPhone или iPad (только X-HM20) (продолжение)
n Подключение адаптера iPod и iPhone
(док-станция)
Примечания:
Используйте адаптер, поставляемый в комплекте с устройством iPod
или iPhone.
Адаптер
Наименование
Емкость
iPhone No.
iPhone
12
iPhone 4GB & 8GB & 16GB
15
iPhone 3G, iPhone 3GS 8GB & 16GB & 32GB
19
iPhone 4 16GB & 32GB
n Для установки адаптера iPod или iPhone
(док-станция)
1
Откройте док-станцию для iPod и iPhone снятием вверх.
2
Ус т а н о ви те адаптер iPod или iPhone в аппарат и подключите ваше
устройство iPod или iPhone.
l
Звук будет переключаться с iPhone на основной блок только
после завершения процесса аутентификации примерно в
Предупреждение:
течение 10 секунд.
1
Перед установкой в док-станцию отсоедините все
l
Входящие вызовы будут приостанавливать воспроизведение.
принадлежности от iPod или iPhone.
l
После ответа на вызовы разговор можно слышать только через
встроенный громкоговоритель iPhone. Чтобы начать разговор,
2
включите громкоговоритель iPhone или отсоедините iPhone от
док-станции.
3
Просто снимите iPod или iPhone с док-станции или отсоедините
4
iPad от разъема USB. Это можно безопасно сделать даже во время
воспроизведения.
5
6
7
8
9
Ru-11
11/5/25 X-HM10_20_Ru.fm
iPhone
iPhone (снизу)
Док-разъем
Адаптер для iPhone
Разъем для iPhone
Док-станция для iPhone
n Для снятия адаптера для iPod или
iPhone (док-станция)
Вставьте наконечник отвертки («–» типа, малый)
в отверстие адаптера, как показано на рисунке, и
поднимите вверх для снятия.
n Воспроизведение iPod или iPhone
(док-станция)
1
Нажмите кнопку STANDBY/ON, чтобы включить питание.
2
Нажмите кнопку iPod/iPhone на пульте ДУ или несколько раз
кнопку INPUT на основном блоке, чтобы выбрать функцию
iPod.
3
Ус т а н о в и т е устройство iPod или iPhone в док-станцию iPod
основного блока.
4
Нажмите кнопку / (iPod/iPhone / ), чтобы начать
воспроизведение.
STANDBY/ON
INPUT
STANDBY/ON
PRESET
ENTER
iPod/iPhone
PRESET
DISPLAY
MENU
USB
iPod/
TV OUT
iPhone
DISPLAY
CD/USB
n Воспроизведение iPhone
n Для отсоединения iPod, iPhone или iPad
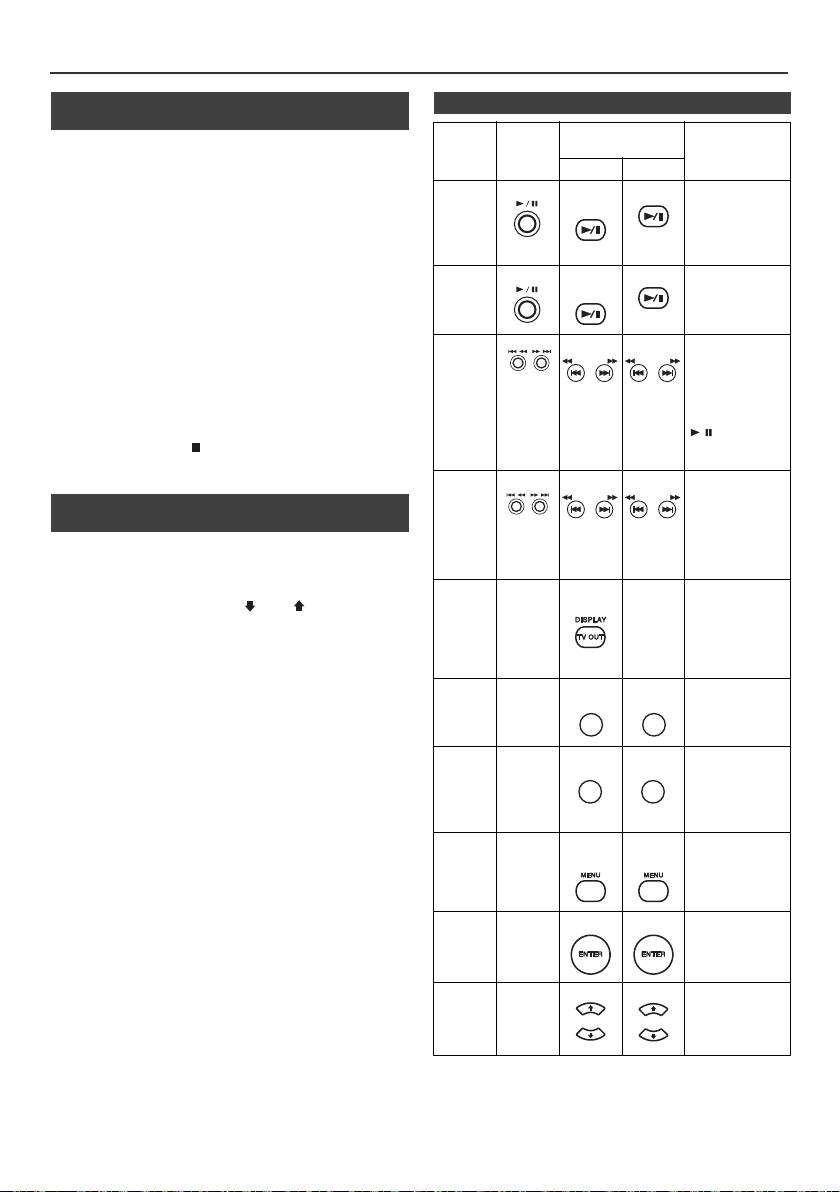
Прослушивание iPod, iPhone или iPad
(только X-HM20) (продолжение)
n Просмотр видео на телевизоре,
n Различные функции iPod, iPhone и iPad
подключенном к iPod или iPhone
Назначение
Основн
Пульт дистанционного
Операция
ой блок
управления
1
Нажмите кнопку DISPLAY TV OUT в течение более 2 секунд.
На дисплее появится индикация «TV Display».
Док USB
2
Чтобы начать воспроизведение, нажмите кнопку ENTER.
Воспрои
iPod/
CD/USB
Нажмите в режиме
iPhone
паузы.
зведение
Примечания:
l
Если в меню видео уже включен параметр TV Out, видео
автоматически отображается на экране телевизора при
нажатии кнопки ENTER.
l
Функция отображения ТВ-выхода не поддерживается через
Пауза
iPod/
CD/USB
Нажмите в режиме
разъем USB. (iPad)
iPhone
воспроизведения.
l
Чтобы вернуться к просмотру видео на экране iPod или iPhone,
нажмите кнопку MENU для входа в меню видео. Затем
нажмите кнопку DISPLAY TV OUT в течение более 2 секунд,
пока не появится индикация «iPod Display».
Дорожка
Нажмите в режиме
l
Во время воспроизведения видео на iPod или iPhone, нажатие
воспроизведения
вперед/
кнопки DISPLAY TV OUT не переключит отображение
или режиме паузы.
назад
видеовыхода между iPod и телевизором.
TUNING −
TUNING +
TUNING −
TUNING +
Если эта кнопка
нажимается в
Предупреждение:
режиме паузы,
l
Перед установкой в док-станцию iPod отсоедините все
нажмите кнопку
принадлежности для iPod или iPhone.
/, чтобы начать
l Кнопка остановки () на основном блоке не действует
воспроизведение
желаемой дорожки.
во время работы iPod.
Быстрая
Нажмите и
удерживайте в
перемотка
n Навигация по меню iPod, iPhone или
режиме
вперед/
iPad
TUNING −
TUNING +
TUNING −
TUNING +
воспроизведения.
назад
Отпустите кнопку
1
Нажмите кнопку iPod/iPhone MENU для просмотра меню на
для возобновления
устройстве iPod, iPhone или iPad. Нажмите ее повторно, чтобы
воспроизведения.
вернуться к предыдущему меню.
Дисплей
____
iPod/
____
Нажмите в течение
2
Используйте кнопку PRESET (
или
), чтобы выбрать
iPhone
более 2 секунд для
переключения
пункт в меню, и затем нажмите кнопку ENTER.
отображения
Примечание:
видеовыхода
между iPod или
При навигации по меню iPod, iPhone или iPad с пульта ДУ, не
телевизором.
используйте никакие кнопки на устройстве iPod или iPhone.
Уровень громкости регулируется нажатием кнопки VOL (+ или –)
Повтор
____
Нажмите для
на основном блоке или пульте ДУ. Регулирование громкости на
переключения в
режим повтора.
устройствах iPod, iPhone или iPad не действует.
Операции на iPod и iPhone:
Операции, описанные ниже, зависят от поколения используемых
Cлучайный
____
Нажмите для
переключения в
вами устройств iPod и iPhone.
порядок
режим
Включение системы в работу:
воспроизведения в
случайном
При включении питания основного блока, устройства iPod, iPhone
порядке.
или iPad будут включаться автоматически, если они установлены
в док-станцию аппарата.
Меню
____
iPod/
iPod/
Нажмите для
iPod
iPhone
iPhone
просмотра меню
Выключение системы (режим ожидания):
iPod во время
работы iPod.
При переключении основного блока в режим ожидания,
установленные в док-станцию устройства iPod, iPhone или
подключенный iPad будут автоматически переключаться в режим
Ввод
____
Нажмите для
ожидания.
подтверждения
iPod
выбора.
Курсор
____
Нажмите для
выбора меню iPod.
iPod
вверх/
вниз
Ru-12
11/5/25 X-HM10_20_Ru.fm
REPEAT
REPEAT
RANDOM
RANDOM
PRESET
PRESET
PRESET
PRESET
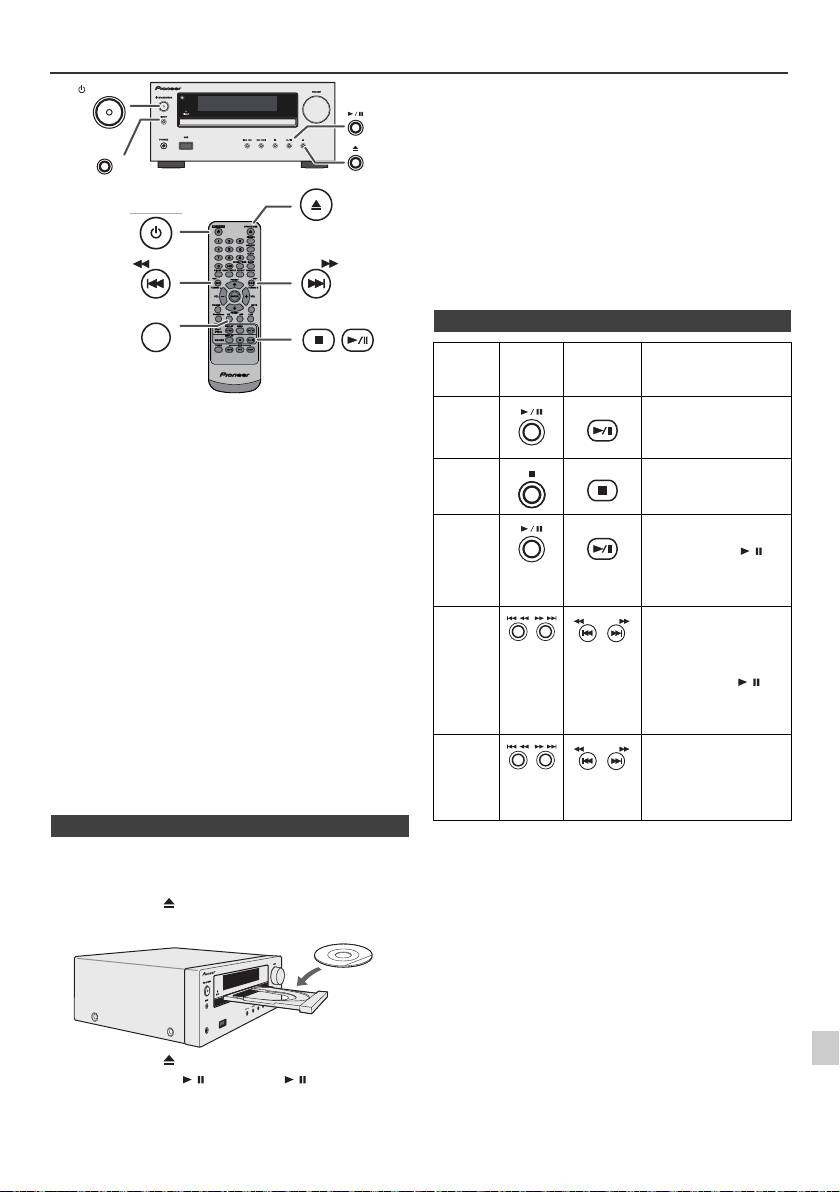
Прослушивание дисков CD или MP3/WMA
Предупреждение:
l
Не помещайте два диска в один лоток для дисков.
l
Не воспроизводите диски специальных профилей (в форме
сердца, восьмигранника и т.п.). Это может вызвать
неисправности.
l
Не давите на лоток для дисков при его движении.
l
Если при открытии лотка происходит аварийное отключение
питания, подождите до возобновления питания.
l
Если при работе компакт-диска возникают телевизионные или
радиопомехи, отодвиньте устройство подальше от телевизора
или радио.
l
Помещайте диск диаметром 8 см только по центру лотка для
дисков.
l
Из-за структуры информации на диске, требуется больше
времени для чтения диска MP3/WMA по сравнению с
обычным диском CD (приблизительно от 20 до 90 секунд).
В этой системе могут воспроизводиться стандартные диски CD,
CD-R/RW в формате CD и CD-R/RW с файлами MP3 или WMA, но
запись на них невозможна. Некоторые диски аудио CD-R и CD-RW
могут не воспроизводиться из-за состояния диска или устройства,
используемого для записи.
MP3:
MP3 является форматом сжатия. Это аббревиатура,
которая обозначает MPEG Audio Layer 3. MP3
представляет тип аудио кодека, который
обрабатывается со значительным сжатием от
первоначального аудиоисточника при очень малых
потерях в качестве звучания.
l
Эта система поддерживает файлы MPEG 1 Layer 3 и VBR.
l
Во время воспроизведения файла VBR счётчик времени на
дисплее может отличаться от фактического времени
воспроизведения.
l
Битрейт, который поддерживается форматом MP3, составляет
от 32 кбит/сек до 320 кбит/сек.
WMA:
Файлы WMA являются файлами формата Advanced
System Format, который включает в себя аудиофайлы,
сжимаемые с помощью кодека Windows Media Audio.
Формат WMA разработан компанией Microsoft как
формат звуковых файлов для проигрывателя Windows
Media Player.
l
После считывания устройством информации по диску MP3
или WMA загорится индикатор «MP3» и «WMA».
l
Битрейт, который поддерживается форматом WMA,
составляет от 64 кбит/сек до 160 кбит/сек.
n Воспроизведение диска
1
1
Нажмите кнопку STANDBY/ON, чтобы включить питание.
2
2
Нажмите кнопку CD на пульте ДУ или несколько раз кнопку
INPUT на основном блоке, чтобы выбрать функцию CD.
3
Нажмите кнопку , чтобы открыть лоток для дисков.
3
4
Поместите диск в лоток для дисков, стороной с этикеткой вверх.
4
5
6
7
5
Нажмите кнопку , чтобы закрыть лоток для дисков.
6
Нажмите кнопку / (CD/USB / ), чтобы начать
8
воспроизведение. После воспроизведения последней дорожки
устройство автоматически остановится.
9
Ru-13
11/5/25 X-HM10_20_Ru.fm
STANDBY/ON
INPUT
OPEN/CLOSE
STANDBY/ON
TUNING −
TUNING +
CD
USB
PHONES
n Различные функции для дисков
Назначение
Основно
Пульт
Операция
й блок
дистанционного
управления
Воспроиз
CD/USB
Нажмите в режиме
ведение
остановки.
Стоп
CD/USB
Нажмите в режиме
воспроизведения.
Пауза
CD/USB
Нажмите в режиме
воспроизведения.
Нажмите кнопку /,
чтобы возобновить
воспроизведение с места
остановки.
Дорожка
Нажмите в режиме
вперед/
воспроизведения или
режиме остановки. Если
назад
эта кнопка нажимается в
режиме остановки,
нажмите кнопку /,
чтобы начать
воспроизведение
желаемой дорожки.
Быстрая
Нажмите и удерживайте в
перемотка
режиме воспроизведения.
вперед/
Отпустите кнопку для
назад
возобновления
воспроизведения.
TUNING −
TUNING +
TUNING −
TUNING +

Для отмены повторного воспроизведения:
Усовершенствованное
Нажмите несколько раз кнопку REPEAT, пока не появится
воспроизведение дисков CD или
индикация «Normal» и не исчезнет символ «».
MP3/WMA
DIMMER
MEMORY
Примечание:
Во время повторного воспроизведения воспроизведение в
REPEAT
RANDOM
случайной последовательности невозможно.
Дорожки на диске можно автоматически воспроизводить в
случайной последовательности.
Для воспроизведения всех дорожек в случайной
последовательности:
Нажмите и удерживайте кнопку RANDOM на пульте ДУ, пока
n Прямой поиск дорожки
не появится индикация «Random». Нажмите кнопку / (CD/
С использованием цифровых кнопок можно воспроизводить
USB / ).
желаемые дорожки на текущем диске.
Для отмены воспроизведения в случайной
Используйте цифровые кнопки на пульте ДУ для
последовательности:
выбора желаемой дорожки во время
Нажмите кнопку RANDOM, пока не исчезнет индикатор
воспроизведения выбранного диска.
«RDM».
l
Цифровые кнопки позволяют делать выбор до номера 9.
l
При выборе номера 10 или выше воспользуйтесь кнопкой
«>10».
A. Например, чтобы
Примечания:
выбрать номер 13
l
Если кнопка нажимается во время воспроизведения в
1
Нажмите один раз кнопку
случайной последовательности, можно перейти на
«>10».
следующую выбранную дорожку в режиме
воспроизведения в случайной последовательности. В то же
2
Нажмите кнопку «1».
время, эта кнопка не позволяет перейти на предыдущую
дорожку. Будет определено место начала воспроизводимой
3
Нажмите кнопку «3».
дорожки.
B. Например, чтобы выбрать номер 130
l
При воспроизведении в случайной последовательности
устройство будет выбирать и проигрывать дорожки
1
Нажмите два раза кнопку «>10».
автоматически. (Нельзя выбирать последовательность
дорожек.)
2
Нажмите кнопку «1».
l
Во время воспроизведения в случайной
3
Нажмите кнопку «3».
последовательности повторное воспроизведение
невозможно.
4
Нажмите кнопку «0».
Предупреждение:
Примечания:
После выполнения повторного воспроизведения, обязательно
l
Нельзя выбрать номер дорожки, превышающий число
нажмите кнопку (CD/USB ). Иначе, диск будет
дорожек на диске.
воспроизводиться непрервыно.
l
Во время воспроизведения в случайной
последовательности прямой поиск невозможен.
Для остановки воспроизведения:
Нажмите кнопку (CD/USB ).
Можно сделать до 32 выборов для воспроизведения в
желаемой последовательности.
n Повторное воспроизведение
При повторном воспроизведении можно непрерывно
воспроизводить одну дорожку, все дорожки или дорожки в
запрограммированной последовательности.
Для повтора одной дорожки:
Нажмите несколько раз кнопку REPEAT, пока не
появится индикация «Repeat One». Нажмите кнопку
/ (CD/USB / ).
Для повтора всех дорожек:
Нажмите несколько раз кнопку REPEAT, пока не
появится индикация «Repeat All». Нажмите кнопку /
(CD/USB / ).
Для повтора желаемых дорожек:
Выполните шаги 1 - 5 в разделе «Запрограммированное
воспроизведение» на этой странице и затем несколько раз
нажмите кнопку REPEAT, пока не появится индикация «Repeat
All».
Ru-14
11/5/25 X-HM10_20_Ru.fm
Выбранный номер
дорожки
n Воспроизведение в случайной
последовательности
n Запрограммированное
воспроизведение (CD)
1
В режиме остановки, нажмите кнопку MEMORY на пульте
ДУ, чтобы войти в режим сохранения программы.
2
Нажмите кнопки или на пульте ДУ, чтобы выбрать
желаемую дорожку.
3
Нажмите кнопку MEMORY, чтобы сохранить номер
дорожки.
Выбранный номер дорожки
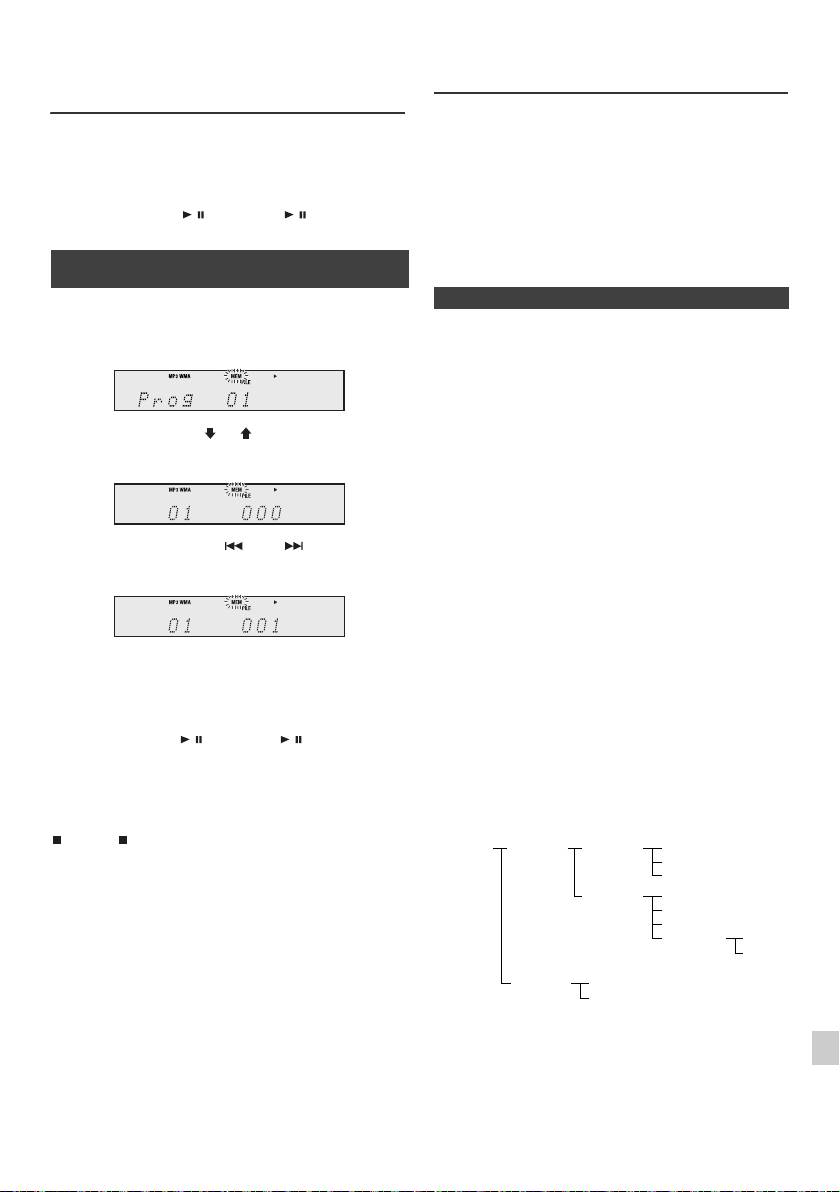
Усовершенствованное
Режим папки MP3/WMA (только для
воспроизведение дисков CD или
файлов MP3/WMA)
MP3/WMA (продолжение)
Воспроизведение файлов в формате MP3/WMA
(Windows Media Audio)
4
Повторите шаги 2 и 3 для других дорожек. Можно
В интернете имеется много музыкальныйх сайтов, где вы можете
запрограммировать до 32 дорожек. Для проверки
загрузить музыкальные файлы в формате MP3/WMA (Windows Media
запрограммированных дорожек несколько раз нажмите
Audio). Для загрузки музыкальных файлов следуйте инструкциям на
кнопку MEMORY. При ошибке, можно стереть
веб-сайте. Затем вы сможете воспроизвести эти загруженные
запрограммированные дорожки, нажав кнопку CLEAR.
музыкальные файлы, записав их на диск CD-R/RW.
5
Нажмите кнопку / (CD/USB / ), чтобы начать
l Загруженные композиции/файлы предназначены только
воспроизведение.
для личного пользования. Любое иное использование
композиции без разрешения владельца запрещено
n Запрограммированное
законом.
воспроизведение (MP3/WMA)
n О порядке воспроизведения папки
1
В режиме остановки, нажмите кнопку MEMORY, чтобы войти в
Если файлы MP3/WMA записаны в нескольких папках, то для каждой
режим сохранения программы.
папки будет автоматически задаваться номер папки.
Эти папки можно выбирать кнопкой FOLDER на пульте ДУ. Если
внутри выбранной папки нет поддерживаемых форматов файлов, то
папка пропускается, и будет выбираться следующая папка.
Например: Как задать номер папки, если файлы формата MP3/WMA
записываются, как показано на рисунке ниже.
2
Нажмите кнопку PRESET ( или ) на пульте ДУ, чтобы выбрать
желаемую папку.
1
Папка ROOT (корневая) задается как папка 1.
2
Что касается папок внутри папки ROOT (папка A и папка B), то
папка, которая записывается на диск раньше, будет задаваться как
папка 2 и папка 3.
3
Что касается папок внутри папки А (папка С и папка D), то папка,
Затем нажмите кнопку или на пульте ДУ,
которая записывается на диск раньше, будет задаваться как папка 4
чтобы выбрать желаемые дорожки.
и папка 5.
4
Папка E, находящаяся внутри папки D, будет задаваться как папка 6.
l Папка и информация о порядке файлов, которая
записывается на диск, зависит от записывающего
программного обеспечения. Имеется вероятность того,
3
Нажмите кнопку MEMORY, чтобы сохранить папку и номер
что на этом аппарате файлы будут воспроизводиться не
дорожки.
в соответствии с ожидаемым порядком
воспроизведения.
4
Повторите шаги 2 и 3 для других папок/дорожек. Можно
l Для CD MP3/WMA, можно считывать 99 номеров папок
запрограммировать до 32 дорожек.
и 999 файлов, включая папки, которые содержат
невоспроизводимые файлы.
5
Нажмите кнопку / (CD/USB / ), чтобы начать
воспроизведение.
Включение/отключение режима папки может производиться кнопкой
FOLDER на пульте ДУ. Файлы, которые воспроизводятся при
установке режима папки во включенное положение, могут отличаться
Для отмены режима запрограммированного
от файлов, воспроизводимых при установке режима папки в
воспроизведения:
выключенное положение.
Во время режима запрограммированной остановки, нажмите кнопку
1
(CD/USB ). На дисплее появится индикация «Memory Clear», и
все запрограммированное содержимое будет стерто.
2
Добавление дорожек к программе:
Если программа была предварительно сохранена в памяти, на дисплее
3
отобразится индикатор «MEM». Нажмите кнопку MEMORY. Затем
выполните шаги 2 - 3, чтобы добавить дорожки.
4
Примечания:
l При извлечении диска программа автоматически
отменяется.
5
l При нажатии кнопки STANDBY/ON для входа в режим
ожидания или изменения функции с CD на другую
6
функцию, выбранные программы будут стираться.
l При работе программы воспроизведение в случайной
последовательности невозможно.
7
8
9
Ru-15
11/5/25 X-HM10_20_Ru.fm
ROOT
FOLDER A
FOLDER C
FILE 3
(FOLDER 1)
(FOLDER 2)
(FOLDER 4)
FILE 4
FILE 5
FOLDER D
FILE 6
(FOLDER 5)
FILE 7
FILE 8
FOLDER E
FILE 9
(FOLDER 6)
FILE 10
FOLDER B
FILE 1
(FOLDER 3)
FILE 2

Режим папки MP3/WMA (только для
Прослушивание запоминающего
файлов MP3/WMA) (продолжение)
устройства большой емкости USB/
MP3-плеера
n Порядок воспроизведения диска MP3/
WMA при включенном режиме папки
Для воспроизведения CD-R/RW.
1
Нажмите кнопку CD и загрузите диск с файлами MP3/WMA.
Нажмите кнопку FOLDER, и отобразится информация о диске.
Примечания:
l Это изделие несовместимо с файловыми системами
MTP и AAC от запоминающего устройства большой
емкости USB или MP3-плеера.
l Некоторые внешние запоминающие устройства могут
не работать с этой системой.
l Работа внешних запоминающих устройств (устройства
памяти USB, внешние жесткие диски, и т.п.) не
2
Нажмите кнопку PRESET
(
или
)
, чтобы выбрать желаемую
гарантируется.
папку для воспроизведения. (включен режим папки)
3
Выберите желаемый файл для воспроизведения, нажав кнопку
или .
4
Нажмите кнопку / (CD/USB / ). Начнется воспроизведение,
и отобразится имя файла.
l Отображаются название песни, имя исполнителя и
название альбома, если они записаны на диске.
l При воспроизведении с включенным режимом папки
нажмите кнопку PRESET
(
или
)
, и можно выбрать
папку, даже если она находится в режиме
воспроизведения/паузы. Будет продолжаться режим
воспроизведения/паузы на 1-ой дорожке выбранной
папки.
l Содержимое дисплея можно изменить, нажав кнопку
CD/USB DISPLAY.
Примечание:
Для паузы в воспроизведении:
Нажмите кнопку / (CD/USB / ).
Примечание:
Если отображается индикация «Not Support», это означает, что
выбирается «Файл WMA, охраняемый авторским правом» или
«Неподдерживаемый файл для воспроизведения».
Ru-16
11/5/25 X-HM10_20_Ru.fm
TUNING −
TUNING +
PRESET
CD
FOLDER
PRESET
DISPLAY
CD/USB
Индикатор MP3
Индикатор WMA
Индикатор TOTAL
Общее количество папок
Общее количество файлов
Индикатор
FOLDER
Номер папки
Номер первой дорожки
в папке
Индикация имени файла Индикация папки
Индикация счетчика
Индикация названия
Индикация
Индикация альбома
исполнителя
n Для воспроизведения USB/MP3-плеера
при отключенном режиме папки
1
Нажмите кнопку USB на пульте ДУ или несколько раз кнопку
INPUT на основном блоке, чтобы выбрать функцию USB.
Подключите устройство памяти USB, которое содержит файлы
формата MP3/WMA на устройстве. Если устройство памяти USB
подключается к основному блоку, то будет отображаться
информация об устройстве.
2
Выберите желаемый файл для воспроизведения, нажав кнопку
или .
3
Нажмите кнопку / (CD/USB /). Начнется воспроизведение,
и отобразится имя файла.
l Отображаются название песни, имя исполнителя и
название альбома, если они записаны на устройстве
памяти USB.
l Содержимое дисплея можно изменить, нажав кнопку
CD/USB DISPLAY.
INPUT
USB
TUNING −
TUNING +
PRESET
USB
FOLDER
PRESET
DISPLAY
CD/USB
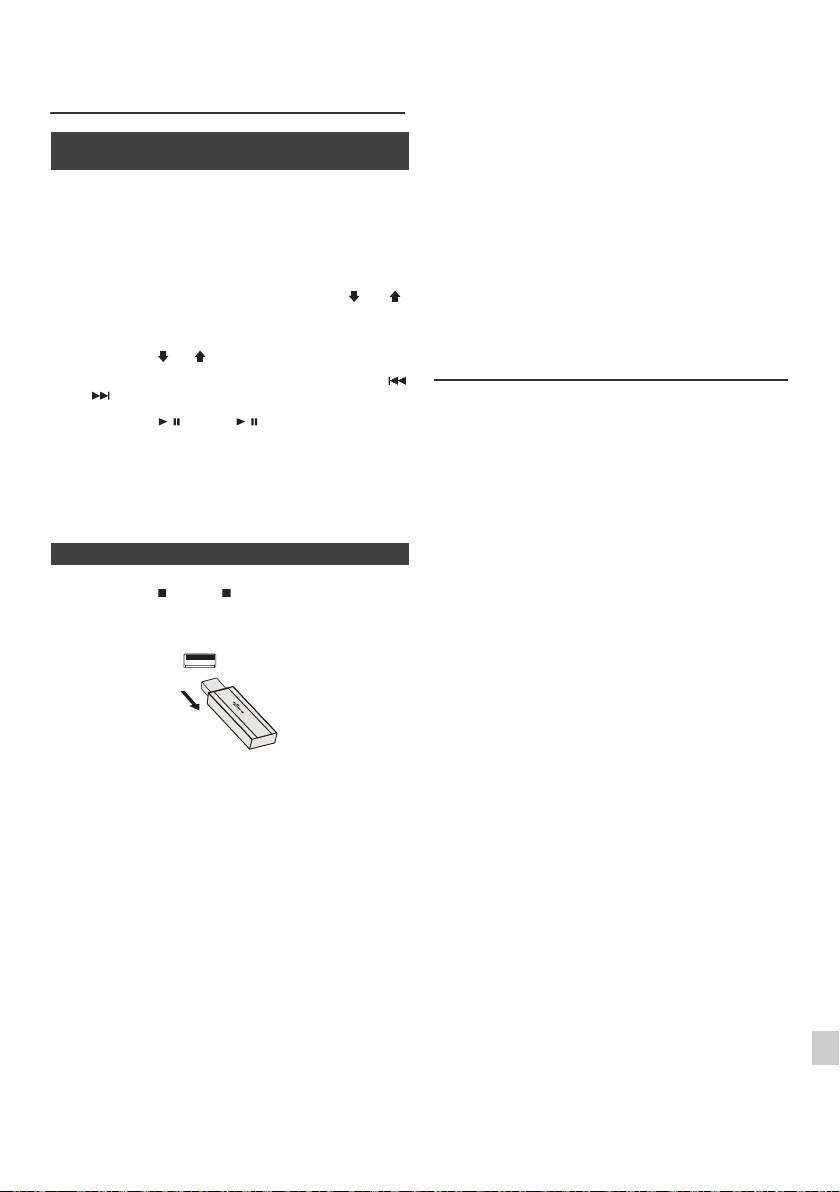
l Это устройство может воспроизводить файлы в
Прослушивание запоминающего
форматах WMA и MP3. Оно автоматически
устройства большой емкости USB/
обнаруживает тип воспроизводимого файла. Если на
этом устройстве проигрывается невоспроизводимый
MP3-плеера (продолжение)
файл, отображается индикация «Not Support», и файл
будет автоматически пропущен. Это займет несколько
секунд. Если на дисплее появляются ненормальные
n Для воспроизведения USB/MP3-плеера
ин
дикации из-за неопределенного файла, выключите
с включенным режимом папки
аппарат и затем снова его включите.
l Это изделие относится к запоминающим устройствам
большой емкости USB и MP3-плеерам. Однако, оно
1
Нажмите кнопку USB на пульте ДУ или несколько раз кнопку
может иметь некоторые сбои в работе по различным
INPUT на основном блоке, чтобы выбрать функцию USB.
непредвиденным причинам от некоторых устройств.
Подключите устройство памяти USB, которое содержит файлы
Если это произойдет, выключите аппарат и затем снова
формата MP3/WMA на устройстве. Если устройство памяти USB
его включите.
подключается к основному блоку, то будет отображаться
l Порт USB предназначен только для прямого по
дключения
к устройству памяти USB без использования кабеля.
информация об устройстве.
l Во время работы диска CD, MP3-плеер не будет
2
Нажмите кнопку FOLDER и затем кнопку PRESET
(
или
)
,
заряжаться.
чтобы выбрать желаемую папку для воспроизведения. Чтобы
l Если при выборе функции USB вы подключаете iPod к
разъему USB, отобразится индикация «Not support».
начать воспроизведение с включенным режимом папки, перейдите
к шагу 4. Чтобы изменить папку для воспроизведения, нажмите
Усовершенствованное
кнопку PRESET
(
или
)
для выбора другой папки.
воспроизведение USB
3
Выберите желаемый файл для воспроизведения, нажав кнопку
или .
Следующие функции аналогичны функциям при
работе CD:
4
Нажмите кнопку / (CD/USB / ). Начнется воспроизведение,
Стр.
и отобразится имя файла.
Прямой поиск дорожки . . . . . . . . . . . . . . . . . . . . . .14
l Отображаются название песни, имя исполнителя и
Повторное воспроизведение . . . . . . . . . . . . . . . . .14
название альбома, если они записаны на устройстве
Воспроизведение в случайной
памяти USB.
последовательности . . . . . . . . . . . . . . . . . . . . . . . .14
l Содержимое дисплея можно изменить, нажав кнопку
Запрограммированное воспроизведение
CD/USB DISPLAY.
(MP3/WMA) . . . . . . . . . . . . . . . . . . . . . . . . . . . . . . . . .15
Примечания:
n Для удаления устройства памяти USB
l Если устройство памяти USB не подключено, на
дисплее появится индикация «USB No Media».
l Это устройство поддерживает только формат «MPEG-1
1
Нажмите кнопку (CD/USB ) для остановки воспроизведения.
Audio Layer-3». (Частота дискретизации составляет
32 кГц, 44,1 кГц, 48 кГц)
2
Отсоедините устройство памяти USB от разъема USB.
l Порядок воспроизведения файлов MP3 может
отличаться, в зависимости от записывающего
программного обеспечения, ис
пользуемого при загрузке
файла.
l Битрейт, который поддерживается форматом MP3,
составляет от 32 кбит/сек до 320 кбит/сек, а для формата
WMA - от 64 кбит/сек до 160 кбит/сек.
l Для файлов MP3/WMA установите расширение «.MP3»
и «.WMA». При отсутствии расширения MP3/WMA
файлы воспроизвести невозможно.
l Списки воспроизведения не поддерживаются на этом
устройстве.
Примечания:
l На этом устройстве может отображаться имя папки или
l Компания PIONEER не будет нести ответственность за
им
я файла размером до 32 символов.
потерю данных во время подключения устройства
l Максимальное суммарное число файлов MP3/WMA
памяти USB к аудио системе.
равно 999.
1
l Файлы, сжатые в формате MP3 и/или WMA, можно
l Суммарное число считываемых папок равно 99, включая
воспроизводить при подключении к разъему USB.
папки с невоспроизводимыми файлами. Однако, на
l Этот формат памяти USB поддерживает файловую
дисплее показывается только папка с файлами MP3.
2
систему FAT 16 или FAT 32.
l Время воспроизведения дисплея может отображаться
l Компания PIONEER не может гарантировать, что все
неправильно при воспроизведении файла с переменным
3
устройства памяти USB будут работать на этой аудио
битрейтом.
системе.
l Поддерживаемыми данными ID3TAG являются только
НАЗВАНИЕ, ИСПОЛНИТЕЛЬ и АЛЬБОМ. Название
l В этой ау
дио системе не рекомендуется использовать
4
песни, имя ис
полнителя и название альбома можно
кабель USB для подключения устройства памяти USB.
отобразить, нажав кнопку DISPLAY во время
Использование кабеля USB не будет влиять на рабочие
воспроизведения файла или режима паузы.
5
характеристики этой аудио системы.
l WMA meta tag также поддерживает заголовок, имя
l Это устройство памяти USB не может работать через
исполнителя и название альбома, которые записываются
концентратор USB.
в файлах WMA. Файлы формата WMA, охраняемого
6
l Разъем USB на этом аппарате не предназначен для
авторским правом, воспроизводить невозможно.
подключения компьютера, а используется для потоковой
передачи музыки с устройства памяти USB.
7
l Внешний жесткий диск нельзя во
спроизводить через
разъем USB.
8
l Если в памяти USB содержится большой объем данных,
может потребоваться больше времени для считывания
данных.
9
Ru-17
11/5/25 X-HM10_20_Ru.fm
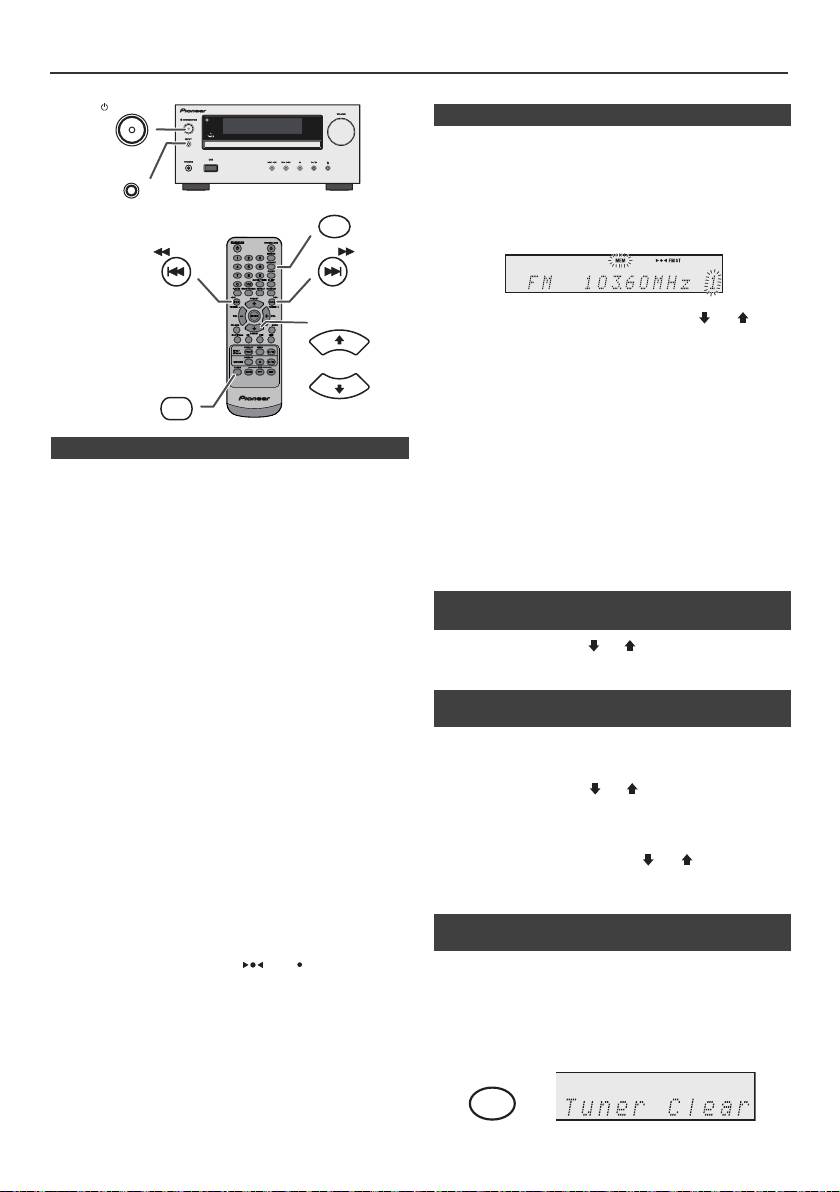
Прослушивание радиопередач
STANDBY/ON
n Запоминание станции
Можно сохранить в памяти 40 станций в диапазонах AM и FM и
вызывать их нажатием одной кнопки. (Предварительная настройка)
INPUT
1
Выполните шаги 1 - 3 в разделе «Настройка».
MEMORY
2
Нажмите кнопку MEMORY.
TUNING −
TUNING +
3
В течение 30 секунд нажмите кнопку PRESET
(
или
)
, чтобы
PRESET
выбрать номер запрограммированного канала. Сохраните станции
в памяти в порядке, начиная с запрограммированного канала 1.
4
В течение 30 секунд нажмите кнопку MEMORY, чтобы сохранить
TUNER
эту станцию в памяти. Если до запоминания станции исчезают
PRESET
индикаторы «MEMORY» и номера запрограммированного канала,
повторите операцию с шага 2.
5
Повторите шаги 1 - 4, чтобы настроить другие станции или сменить
n Настройка
предустановленную станцию. При сохранении новой станции в
памяти будет стираться станция, предварительно занесенная в
1
Нажмите кнопку STANDBY/ON, чтобы включить питание.
память для этого номера запрограммированного канала.
2
Нажмите кнопку TUNER несколько раз, чтобы выбрать желаемый
Примечание:
частотный диапазон (FM или AM).
При аварийном отключении питания или отсоединении кабеля
3
Нажмите кнопку TUNING + или – на пульте ДУ, чтобы настроиться
питания переменного тока функция резервирования защитит
на желаемую станцию.
занесенные в память станции на несколько часов.
l Ручная настройка:
Нажмите кнопку TUNING + или – несколько раз, чтобы
n Для вызова занесенной в память
настроиться на желаемую станцию.
станции
l Автоматическая настройка:
1
Нажмите кнопку PRESET
(
или
)
в течение менее 0,5 секунды,
Если кнопка TUNING + или – нажимается в течение более
чтобы выбрать желаемую станцию.
0,5 секунды, автоматически запустится сканирование, и тюнер
остановится на первой принимаемой радиостанции.
n Для сканирования предустановленных
Примечания:
станций
l При появлении радиопомех настройка с автоматическим
сканированием может автоматически остановиться в
Станции, сохраненные в памяти, могут сканироваться автоматически.
этом месте.
(Сканирование предустановленной памяти)
l Настройка с автоматическим сканированием будет
пропускать станции со слабым сигналом.
1
Нажмите кнопку PRESET
(
или
)
в течение более 0,5 секунды.
l Для остановки автоматической настройки повторно
Запрограммированный номер будет мигать, и
нажмите кнопку
TUNING + или –
.
запрограммированные станции будут настраиваться
l При настройке на станцию RDS (Система
последовательно, на 5 секунд каждая.
радиоданных), сначала будет отображаться частота, а
затем загорится индикатор RDS. Наконец, появится
2
Повторно нажмите кнопку PRESET
(
или
)
при обнаружении
название станции.
желаемой станции.
l Полной автоматической настройки можно достичь для
станций RDS «ASPM», см. стр. 19.
Для приема стереосигнала в диапазоне FM:
n Для полного стирания
l Нажмите кнопку TUNER, чтобы выбрать
предустановленной памяти
стереофонический режим, и на дисплее отобразится
индикатор «ST». Символы «» и «» появятся, если
принимается стереофоническая программа в FM-
1
Нажмите кнопку TUNER на пульте ДУ или несколько раз кнопку
диапазоне.
INPUT на основном блоке, чтобы выбрать функцию Tuner.
l При сла
бом приеме в диапазоне FM, нажмите кнопку
TUNER, чтобы погасить индикатор «ST». Прием
2
В функции Tuner нажмите кнопку CLEAR, пока не появится
меняется на монофонический, и звук становится чище.
индикация «Tuner Clear».
Ru-18
11/5/25 X-HM10_20_Ru.fm
CLEAR
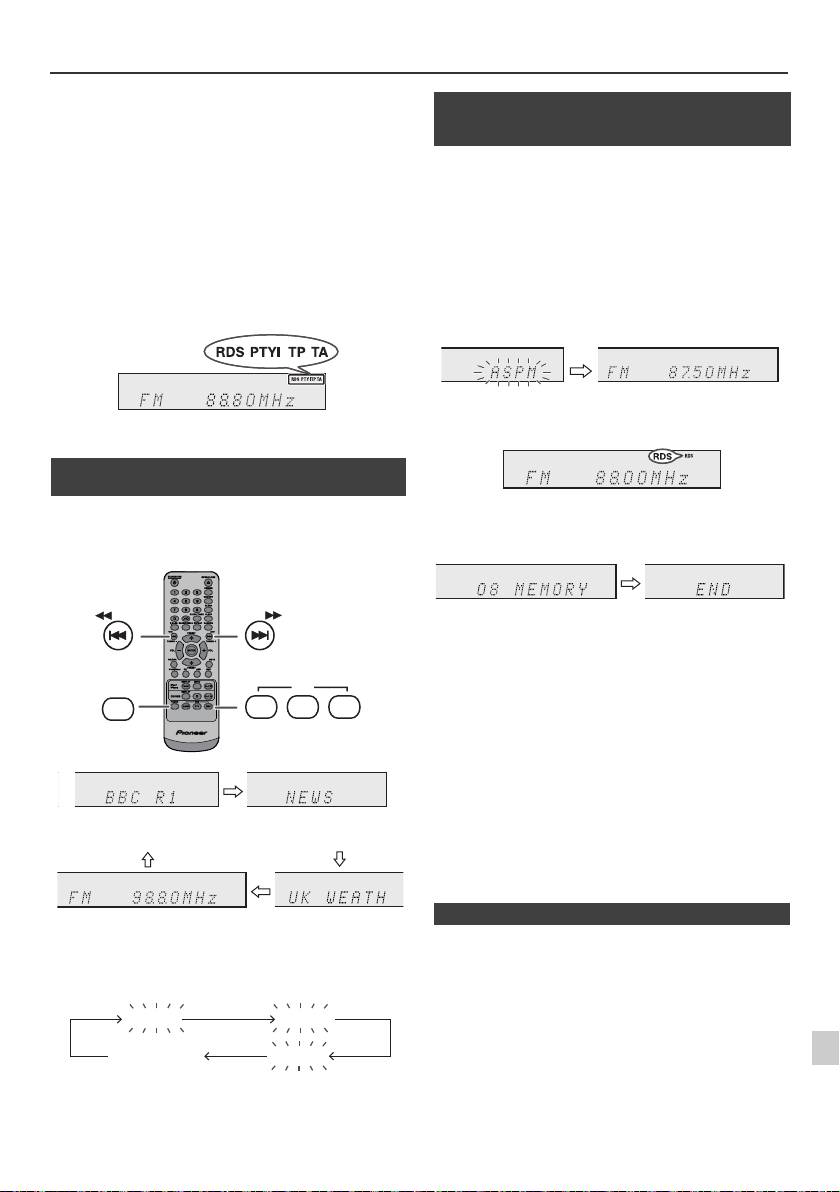
Использование системы радиоданных (RDS)
RDS является службой радиовещания, которая
обеспечивает растущее число радиостанций в
диапазоне FM. Эти станции в диапазоне FM
передают дополнительные сигналы наряду с
регулярными сигналами программ. Они передают
Во время рабочего режима ASPM тюнер будет автоматически
названия станций и информацию о типе
выполнять поиск новых станций RDS. Можно сохранить в памяти до
программы, например, спорт, музыка и т.д.
40 станций.
При настройке на станцию RDS, на дисплее отобразится индикация
Если некоторые станции уже сохранены в памяти, число новых
«RDS» и название станции.
станций, которые можно сохранить, будет меньше.
На дисплее появится индикация «TP» (программа передачи дорожной
обстановки), если принятая радиопрограмма передает информацию о
дорожном движении, и индикация «TA» (информация о дорожной
обстановке) при передаче в эфире информации о дорожном движении.
Появится индикация «PTYI» (Динамический PTY индикатор) во время
приема станции с динамическим кодом PTY.
Системой RDS можно управлять только с
помощью кнопок на пульте ДУ.
n Информация, предоставляемая
системой RDS
Каждый раз, когда нажимается кнопка RDS
DISPLAY, дисплей будет переключаться
следующим образом:
Для остановки режима ASPM до его завершения:
Нажмите кнопку RDS ASPM во время сканирования станций.
Будут иметься в распоряжении станции, уже сохраненные в памяти.
Примечания:
l Если одна и та же станция вещает на разных частотах,
будет сохраняться в памяти самая сильная частота.
l Не будет сохраняться в памяти станция, имеющая такую
же частоту, как уже сохраненная станция.
l Если уже сохранены в памяти 40 станций, сканирование
будет прекращено. Если необходимо вернуться к
режиму ASPM, сотрите предустановленную память.
l Если никакой ст
анции не сохранено в памяти, примерно
на 4 секунды появится индикация «END».
l Если сигналы RDS очень слабые, названия станций
1
могут не сохраняться в памяти.
l Название одной и той же станции может быть сохранено
на разных каналах.
2
l В определенной зоне или в определенные периоды
времени названия станции могут временно отличаться.
3
При настройке на станцию, отличную от станции RDS, или на
Если происходит любое из следующих событ
ий,
4
станцию RDS, которая передает слабый сигнал, дисплей будет
это не означает, что устройство неисправно:
изменяться в следующем порядке:
l Поочередно появляются индикации «PS», «No PS» и
5
название станции, и устройство не работает должным
образом.
l Если определенная станция не вещает должным образом
6
или на станции проводятся испытания, функция приема
RDS может работать неправильно.
7
l Если принимается станция RDS со слишком слабым
сигналом, может не отображаться такая информация,
как название станции.
8
l Индик
ации «No PS», «No PTY» или «No RT» будут мигать
в течение примерно 5 секунд, и затем будет отображаться
частота.
9
Ru-19
11/5/25 X-HM10_20_Ru.fm
TUNING −
TUNING +
RDS
TUNER
ASPM PTY DISP
Название станции (PS) Тип программы (PTY)
Частотный Радиотекст (RT)
No PS No PTY
FM 98.80 MHz
No RT
n Использование Программы
автоматического сохранения в памяти
станции (ASPM)
1
Нажмите кнопку TUNER на пульте ДУ или несколько раз кнопку
INPUT на основном блоке, чтобы выбрать функцию TUNER.
2
Нажмите и удерживайте кнопку RDS ASPM на пульте ДУ.
1 После мигания индикации «ASPM» в течение примерно
4 секунд, запустится сканирование (87,50 - 108,00 МГц).
2 При обнаружении станции RDS, на короткое время появится
индикация «RDS», и станция будет сохранена в памяти.
3 После сканирования, на дисплее в течение 4 секунд будет
отображаться число станций, сохраненных в памяти, и затем
на 4 секунды появится индикация «E
ND».
n Примечания по режиму RDS
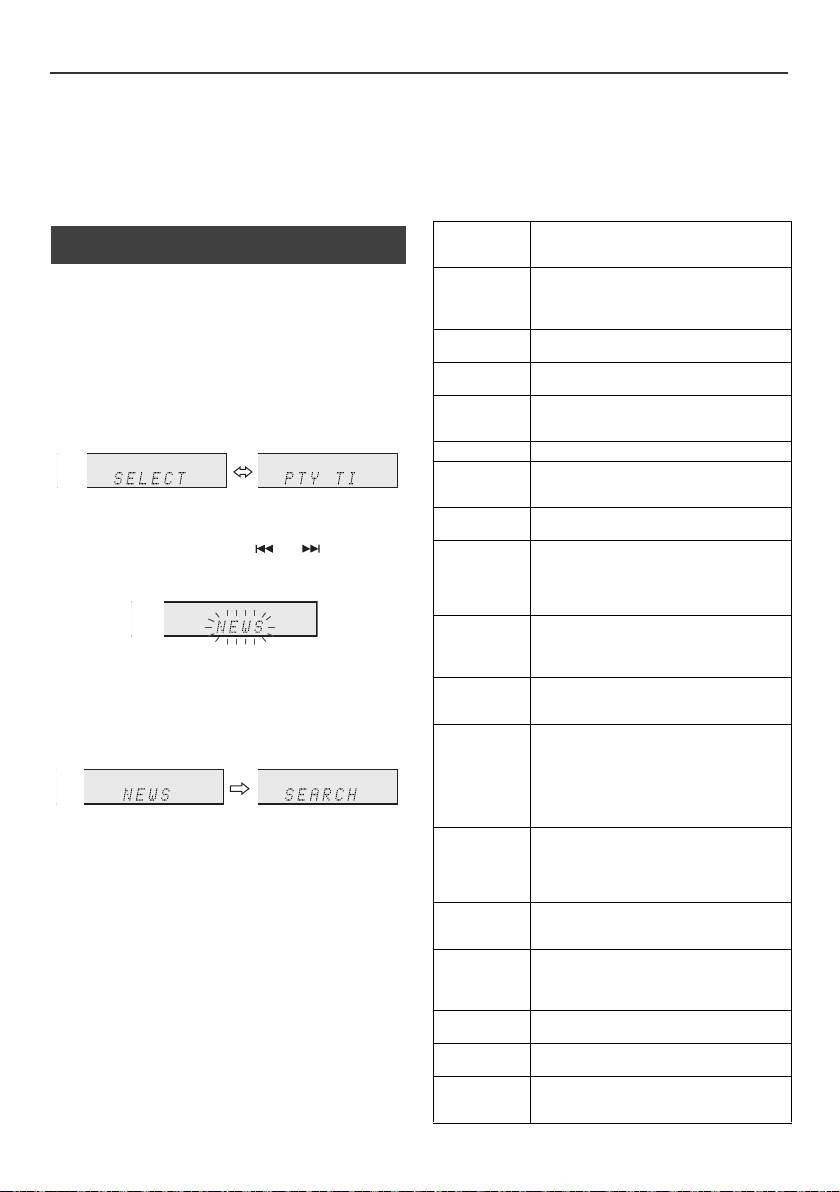
Использование системы радиоданных (RDS) (продолжение)
Примечания по радиотексту:
информацию о дорожной обстановке.)
l Первые 14 символов радиотекста появятся на 4 секунды
Если передается информация о дорожной обстановке, появится
и затем они будут прокручиваться по дисплею.
индикация «TA».
l При настройке на станцию RDS, которая не передает
Описание кодов PTY (тип программы), TP
радиотекст, будет отображаться индикация «No RT» при
(программа передачи дорожной обстановки) и TA
переключении на позицию радиотекста.
(информация о дорожной обстановке)
l Если принимаются данные радиотекста или изменяется
Можно выполнять поиск и принимать следующие сигналы PTY, TP и
содержание текста, на дисплее будет отображаться
TA.
индикация «RT».
NEWS
Краткие сводки фактов, событий и публично
n Для вызова станций, сохраненнных в
выраженных мнений, репортажей и
памяти
действительности.
Для задания типов программ и выбора станций
AFFAIRS
Актуальная программа с расширением или
дополнением новостей, обычно с представлением
(по
иск PTY):
в разных стилях или концепциях, включая
Из станций, сохраненных в памяти, можно найти определенную
дискуссии или анализ.
станцию заданием типа программы (программа новостей, спорта,
дорожной обстановки, и т.д. ... см. стр. 20).
INFO
Программы, имеющие целью предоставление
консультаций в самом широком смысле.
1
Нажмите кнопку TUNER на пульте ДУ или несколько раз кнопку
SPORT
Программа, связанная с любыми аспектами
INPUT на основном блоке, чтобы выбрать функцию TUNER.
спорта.
EDUCATE
Программа, предназначенная главным образом
2
Нажмите кнопку RDS PTY на пульте ДУ.
для обучения, формальным элементом которой
является основополагающий принцип.
DRAMA
Все pадиоспектакли и сериалы.
CULTURE
Программы, связанные с любыми аспектами
национальной или местной культуры, включая
язык, театр и т.д.
Примерно в течение 6 секунд будут поочередно появляться
SCIENCE
Программы о естественных науках и
индикации «SELECT» и «PTY TI».
технологиях.
3
В течение 6 секунд нажмите кнопку или , чтобы выбрать
VARIED
Используется в основном для речевых программ,
тип программы.
которые обычно имеют характер легкого
развлечения и не охватываются другими
категориями. Примерами являются: опросы,
викторины, персональные интервью.
POP M
Коммерческая музыка, которая как правило
считается популярной в данное время и часто
попадает в текущие или последние списки самых
Каждый раз, когда нажимается кнопка, будет показываться тип
ходовых записей.
программы. Если кнопка удерживается в течение более
0,5 секунды, тип программы будет показываться непрерывно.
ROCK M
Современная модерновая музыка, обычно
написанная и исполняемая молодыми
4
Во время мигания выбранного типа программы (в течение
музыкантами.
6 секунд), повторно нажмите кнопку RDS PTY.
EASY M
Современная музыка, считающаяся «легкой», в
противоположность поп-музыке, рок-музыке или
классической музыке, или один из специальных
музыкальных стилей, джаз, фолк или кантри.
Музыка в этой категории часто, но не всегда
является вокальной и обычно имеет малую
длительность звучания.
После загорания в течение 2 секунд выбранного типа программы,
появится индикация «SEARCH», и начнется операция поиска.
LIGHT M
Классическая музыка для общего пользования, а
не для понимания специалистами. Примерами
музыки в этой категории являются
Примечания:
инструментальная музыка, а также вокальные и
l Если индикация на дисплее перестала мигать, запустите
хоровые произведения.
операцию снова с шага 2. Если устройство находит
желаемый тип программы, то примерно на 8 секунд
CLASSICS
Исполнение основных произведений для
загорится соответствующий номер канала, и затем
оркестра, симфонии, камерная музыка и т.п.,
останется название станции.
включая гранд-оперу.
l Если необходимо прослушать аналогичный тип
OTHER M
Музыкальные стили, не попадающие в любые
программы другой станции, нажмите кнопку RDS PTY
другие категории. В частности, используется для
во время мигания номера канал или названия станции.
специальной музыки, примерами которой
Ус т р ой ст во будет выполнять поиск сле
дующей станции.
являются ритм-энд-блюз и регги.
l Если не найдено никакой станции, на 4 секунды
WEATHER
Сводки и прогнозы погоды и метеорологическая
появится индикация «NOT FOUND».
информация.
Если выбирается программа передачи дорожной
FINANCE
Курсовые бюллетени, коммерческая, торговая
обстановки:
информация и т.д.
Если выбирается программа передачи дорожной обстановки (TP) в
CHILDREN
Для программ, нацеленных на молодежную
шаге 3, появится индикация «TP».
аудиторию, в первую очередь для развлечений и
интересов, а не для образовательных целей.
(Это не означает, что в это время вы сможете прослушивать
Ru-20
11/5/25 X-HM10_20_Ru.fm
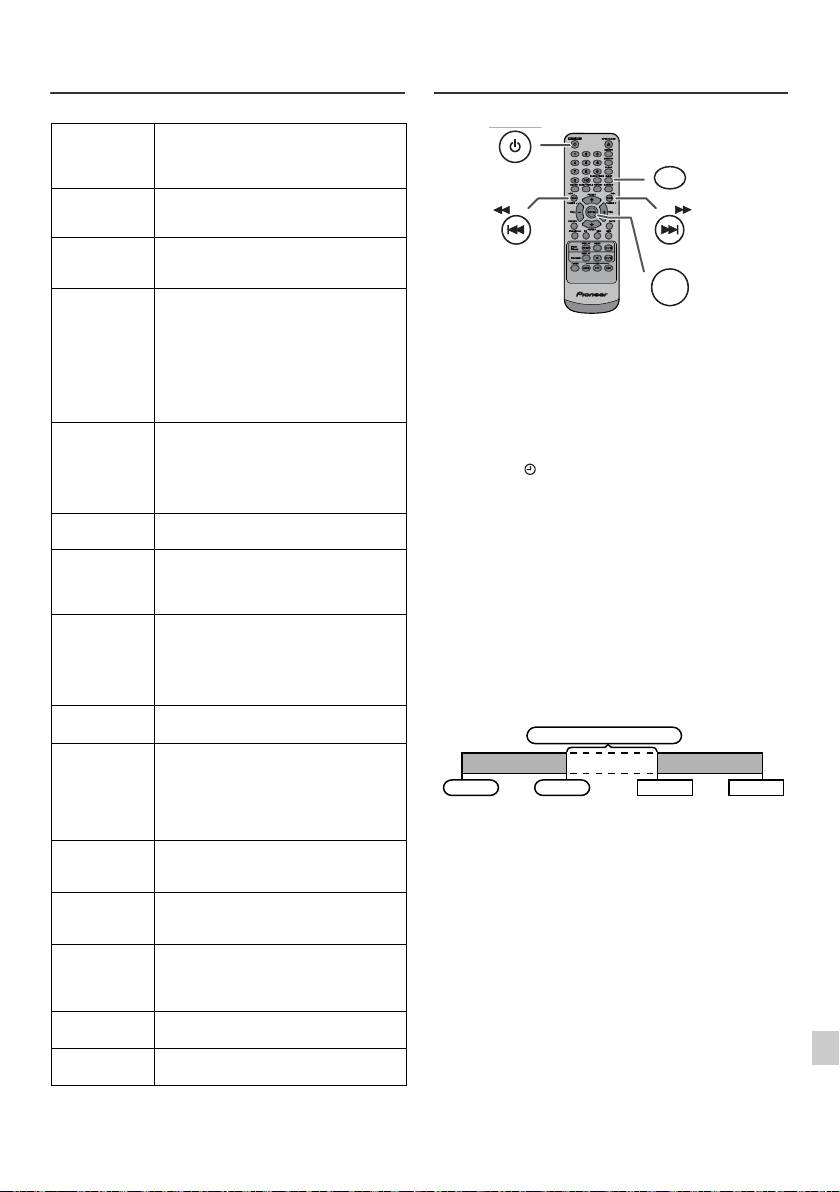
Использование системы
Работа с таймером и спящий режим
радиоданных (RDS) (продолжение)
(только с пульта ДУ)
SOCIAL
Программы о людях и обстоятельствах, которые
оказывают на них влияние индивидуально или
группами. Включаются: социология, история,
география, психология и общество.
RELIGION
Любые аспекты веры и вероисповедания,
касающиеся бога или богов, сущности бытия и
морали.
PHONE IN
Касается членов общества, выражающих свои
мнения либо по телефону, либо на публичном
форуме.
TRAVEL
Очерки и программы, связанные с
путешествиями на близкие и дальние
расстояния, организованными туристическими
Воспроизведение с таймером:
поездками, а также с идеями и возможностями
Ус т р ой с т в о включается и воспроизводит желаемый источник (CD,
для путешествий. Не используется для
TUNER, USB, iPod, LINE IN) в заданное время.
сообщений о проблемах, задержках или
дорожных работах, оказывающих
Это устройство имеет 2 типа таймера:
непосредственное влияние на поездку, когда
ОДНОРАЗОВЫЙ ТАЙМЕР и ЕЖЕДНЕВНЫЙ
должны использоваться категории TP/TA.
ТАЙМЕР.
LEISURE
Программы, связанные с отдыхом и
Одноразовый таймер:
развлечениями, в которых может принимать
Одноразовый таймер срабатывает один раз только в заданное время.
участие слушатель. Примерами являются
садоводство, рыболовство, коллекционирование
(индикатор «»).
предметов антиквариата, кулинария, кухня и
Ежедневный таймер:
вина и т.д.
Ежедневный таймер срабатывает в одно и то же заданное
JAZZ
Полифоническая, синкопированная музыка,
время в каждый установленный день. Например,
характеризуемая импровизацией.
установите таймер как звонок будильника каждое утро.
COUNTRY
Песни, начинавшие или продолжающие
(индикатор «DAILY»).
музыкальные традиции южных штатов США.
Использование одноразового таймера в сочетании с
Характеризуются простой мелодией и
повествовательной сюжетной линией.
ежедневным таймером:
Например, используйте одноразовый таймер для прослушивания
NATION M
Современная популярная музыка нации или
радиопрограммы, а ежедневный таймер для пробуждения.
региона на языке этой страны, в
противоположность зарубежной «поп-музыке»,
1
Ус т ан о в ит е ежедневный таймер (стр. 21).
которая обычно инспирируется в США или
Великобритании и исполняется на английском
2
Ус т ан о в ит е одноразовый таймер (стр. 21).
языке.
OLDIES
Музыка из так называемого «золотого века»
популярной музыки.
FOLK M
Музыка, которая имеет свои корни в
музыкальной культуре определенной нации,
обычно на акустических музыкальных
инструментах. Сюжет или фабула могут быть
основаны на исторических событиях или
народах.
1
DOCUMENT
Программа, связанная с фактическими
документами, представленными в виде
2
исследования.
TEST
Трансляция при тестировании аварийного
3
вещательного оборудования или приемных
устройств.
4
ALARM
Тревожное оповещение, сделанное в
исключительных обстоятельствах для
5
предупреждения о событиях, представляющих
опасность общего характера.
6
TP
Передачи, содержашие информацию о
дорожной обстановке.
7
TA
Передаются сообщения о о дорожной
обстановке.
8
9
Ru-21
11/5/25 X-HM10_20_Ru.fm
STANDBY/ON
CLOCK/TIMER
TUNING −
TUNING +
ENTER
1 минута или более
Ежедневный таймер
Одноразовый таймер
Пуск
Стоп
Пуск
Стоп

Работа с таймером и спящий режим (только с пульта ДУ) (продолжение)
Одноразовый таймер:
n Воспроизведение с таймером
Таймер будет отменен.
Перед установкой таймера:
Ежедневный таймер:
l Убедите сь, что часы установлены на правильное время
Таймер срабатывает в одно и то же время каждый день. Это будет
(см. стр. 9). Если часы не установлены, функцию
продолжаться до тех пор, пока не будет отменена установка
таймера использовать нельзя.
таймера. Отмените ежедневный таймер, если он не используется.
l Для воспроизведения с таймером: Подключите
устройство USB, загрузите диски или установите в
Примечания:
док-станцию воспроизводимое устройство iPod.
l При выполнении воспроизведения с таймером с
помощью другого устройства, подключенного к разъему
USB, выберите «USB» или «LINE IN» в шаге 5.
l Это устройство автоматически включится или войдет в
1
Нажмите кнопку STANDBY/ON, чтобы включить питание.
режим ожидания. Однако, подсоединенное устройство
не будет включаться или выключаться. Чтобы
2
Нажмите и удерживайте кнопку CLOCK/TIMER.
остановить воспроизведение с таймером, выполните
3
В течение 30 секунд нажмите кнопку или , чтобы выбрать
процедуру «Отмена установки таймера» на этой
параметр «Once» или «Daily», и нажмите кнопку ENTER.
странице.
Проверка установки таймера:
4
В течение 30 секунд нажмите кнопку или , чтобы выбрать
параметр «Timer set», и нажмите кнопку ENTER.
1
Включите питание и нажмите, удерживая, кнопку CLOCK/TIMER.
2
В течение 30 секунд нажмите кнопку или , чтобы выбрать
5
Для выбора источника воспроизведения с таймером (CD, TUNER,
параметр «Once» или «Daily», и нажмите кнопку ENTER.
USB, iPod, LINE IN) нажмите кнопку или . Нажмите
кнопку ENTER.
3
В течение 30 секунд нажмите кнопку или , чтобы выбрать
При выборе тюнера, выберите станцию, нажав кнопку или
параметр «Timer Call», и нажмите кнопку ENTER.
, и затем нажмите кнопку ENTER. Если станция не была
запрограммирована, на дисплее появится индикация «No Preset»,
Отмена установки таймера:
и установка таймера будет отменена.
1
Включите питание и нажмите, удерживая, кнопку CLOCK/TIMER.
6
Для регулировки дней нажмите кнопку или и затем
нажмите кнопку ENTER.
2
В течение 30 секунд нажмите кнопку или , чтобы выбрать
параметр «Once» или «Daily», и нажмите кнопку ENTER.
7
Нажмите кнопку ENTER для установки часов. Нажмите кнопку
3
В течение 30 секунд нажмите кнопку или , чтобы выбрать
или и затем нажмите кнопку ENTER.
параметр «Timer Off», и нажмите кнопку ENTER. Таймер будет
8
Для регулировки минут нажмите кнопку или и затем
отменен (установка не будет отменена).
нажмите кнопку ENTER.
9
Ус т а н о ви т е окончательно время, как описано в шагах 7 и 8 выше.
По
вторное использование занесенной в память
установки таймера:
10
Отрегулируйте громкость с помощью кнопки VOL (+ или -) и
Ус т а н о вк а таймера будет запоминаться после ее введения. Для
затем нажмите кнопку ENTER. Не настраивайте громкость до
повторного использования одной и той же установки выполните
слишком высокого уровня.
следующие операции.
11
Нажмите кнопку STANDBY/ON, чтобы войти в режим ожидания.
1
Включите питание и нажмите, удерживая, кнопку CLOCK/TIMER.
Загорается индикатор «TIMER», и устройство готово к
воспроизведению с таймером.
2
В течение 30 секунд нажмите кнопку или , чтобы выбрать
параметр «Once» или «Daily», и нажмите кнопку ENTER.
3
В течение 30 секунд нажмите кнопку или , чтобы выбрать
параметр «Timer On», и нажмите кнопку ENTER.
4
Нажмите кнопку STANDBY/ON, чтобы войти в режим ожидания.
Примечание:
Ус т а н о вк а часов будет сбрасываться при вытаскивании кабеля
питания из розетки или при отключении электропитания.
12
При достижении заданного времени начнется воспроизведение.
Громкость будет увеличиваться постепенно, пока не достигнет
заданного значения. Индикатор таймера будет мигать во время
воспроизведения с таймером.
13
При достижении времени окончания по таймеру, система
автоматически войдет в режим ожидания.
Ru-22
11/5/25 X-HM10_20_Ru.fm
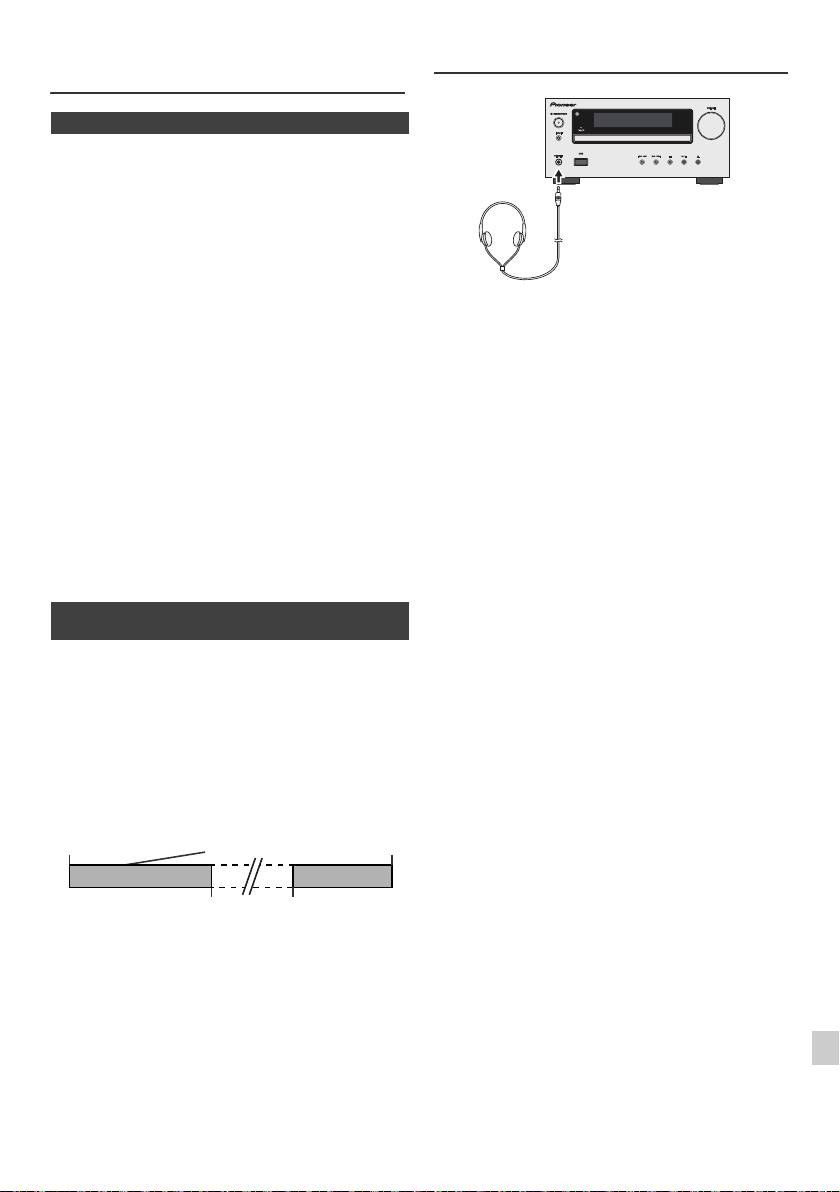
Работа с таймером и спящий режим
Наушники
(только с пульта ДУ) (продолжение)
n Cпящий режим
Радио, компакт-диск, iPod, USB и линейный вход могут отключаться
автоматически.
1
Воспроизведите желаемый источник звука.
2
Нажмите кнопку SLEEP.
3
В течение 5 секунд нажмите цифровую кнопку установки времени.
(1 минута - 99 минут)
4
Появится индикация «SLEEP».
l Не включайте громкость на полную мощность при
5
Ус т р ой ст во автоматически войдет в режим ожидания по истечении
включении аппарата и слушайте музыку при средних
заданного времени. Громкость будет уменьшаться за 1 минуту до
уровнях громкости. Избыточное звуковое давление из
окончания спящего режима.
наушников и головных телефонов может вызвать
потерю слуха.
l Перед подключением или отключением наушников
Для подтверждения остающегося времени
уменьшите громкость.
спящего режима:
l Убедите сь, что ваши наушники имеют штекер
диаметром 3,5 мм и импеданс от 16 до 50 Ом.
1
Когда показывается индикация «SLEEP», нажмите кнопку SLEEP.
Рекомендуемый импеданс составляет 32 Ом.
l При по
дключении наушников автоматически
Для отмены спящего режима:
отключаются громкоговорители. Отрегулируйте
Нажмите кнопку STANDBY/ON, когда показывается индикация
громкость с помощью регулятора VOLUME.
«SLEEP». Чтобы отменить спящий режим без установки устройства в
l Только X-HM20: Звук от iPod/iPhone не слышен через
режим ожидания, выполните следующее.
наушники, подключенные к аппарату. Если при выборе
функции iPod/iPhone вы подключаете
1
Когда показывается индикация «SLEEP», нажмите кнопку SLEEP.
громкоговорители, отобразится индикация «HP
INVALID».
2
В течение 5 секунд два раза нажмите кнопку «0», пока не появится
индикация «SLEEP 00».
n Для использования таймера наряду со
спящим режимом
Воспроизведение со спящим режимом и
таймером:
Например, вы можете заснуть, слушая радио, и проснуться
следующим утром по звучанию компакт-диска.
1
Ус т а н о ви те время отключения (см. выше, шаги 1 - 5).
2
Когда установлен таймер спящего режима, настройте
воспроизведение с таймером (шаги 2 - 9, стр. 22).
1
2
3
4
5
6
7
8
9
Ru-23
11/5/25 X-HM10_20_Ru.fm
Ус т а н о вк а
Ус т а н о в к а таймера
воспроизведения
Время
спящего режима
с таймером
окончания
1-99 минут
Необходимое время
Спящий режим будет
Время начала
остановлен
воспроизведения
автоматически
с таймером

Таблица неисправностей
n USB
Многие возможные проблемы владелец может разрешить без вызова
Неполадка Возможная причина
специалиста по обслуживанию.
l Устройство
l Имеется ли файл в формате
Если что-то не в порядке с этим изделием, то перед вызовом вашего
невозможно
MP3/WMA?
уполномоченного дилера или обращением в сервисный центр
обнаружить.
l
Устройство подключено
компании PIONEER проверьте нижеследующее.
правильно?
l Это устройство MTP?
n Общие сведения
l Устройство содержит только
файл в формате AAC?
Неполадка Возможная причина
l Воспроизведение
l Это файл WMA, охраняемый
l Часы не установлены
l Произошло аварийное
не запускается.
авторским правом?
на правильное время.
отключение питания?
l Это ошибочный файл MP3?
Переустановите часы. (Стр.
9)
l Неправильное
l Воспроизводится файл с
отображение
переменным битрейтом?
l При нажатии кнопки
l Ус т ан ов и т е устройство в
времени.
устройство не
режим ожидания и затем
l
Имя файла написано китайскими
реагирует.
включите его снова.
l Неправильное
или японскими иероглифами?
l Если устройство все еще
отображение
работает неправильно,
имени файла.
переустановите его. (Стр.
25)
l Не слышен звук. l Уровень громкости
n iPod и iPhone (только X-HM20)
установлен на «Min»?
l По
дключены наушники?
Неполадка Возможная причина
l Отсоединены кабели
громкоговорителей?
l Не выдается звук.
l
iPod или iPhone не воспроизводят.
Нет изображения
l iPod или iPhone неправильно
на телевизоре/
подключены к аппарату.
n Проигрыватель CD
мониторе.
l Подсоединен кабель питания
перем. тока устройства?
Неполадка Возможная причина
l Видеокабель подсоединен
l Воспроизведение не
l Диск загружен верхней
неправильно.
запускается.
стороной вниз?
l Выбор входа телевизора/
l Воспроизведение
l Диск соответствует
монитора установлен
останавливается
стандартам?
неправильно.
посередине или не
l Диск искривлен или
l Функция ТВ-выхода iPod не
выполняется
поцарапан?
настроена на видеовыход.
должным образом.
l
Звук от iPod/iPhone не слышен
через наушники, подключенные к
l Воспроизводимые
l Устройство расположено
аппарату.
звуки пропадают или
вблизи источника
прекращаются в
чрезмерных вибраций?
l iPod или iPhone
l iPod или iPhone не имеют
середине дорожки.
l Диск сильно загрязнен?
не заряжаются.
полного контакта с разъемом.
-е
l Внутри устройства
l Использование iPod (3
образовалась конденсация?
поколение).
l iPod или iPhone не
поддерживаются. По
n Пульт дистанционного управления
совместимым моделям см. стр.
10.
Неполадка Возможная причина
l Устройства iPod или iPhone не
могут заряжаться, когда
l Пульт ДУ не
l Подсоединен кабель
основной блок находится в
работает.
питания перем. тока
режиме USB.
устройства?
l Правильная полярность
l
На экране iPhone
l Разряжена батарея iPhone.
батареек?
появляется
Зарядите iPhone.
l Разрядились батарейки?
сообщение «This
l iPhone неправильно установлен
l Неправильное расстояние
accessory is not
в док-станцию.
или угол?
made to work with
l На датчик пульта ДУ
iPhone» (Это
попадает интенсивный
оборудование не
свет?
предназначено для
работы с iPhone)
или «This
n Тюнер
accessory is not
supported by
Неполадка Возможная причина
iPhone» (Это
оборудование не
l Радио непрерывно
l Устройство размещено
поддерживается
издает необычные
вблизи телевизора или
iPhone).
шумы.
компьютера?
l Антенна FM или рамочная
антенна AM расположены
правильно? Отодвиньте
антенну подальше от
кабеля питания перем. тока,
если она расположена
рядом.
Ru-24
11/5/25 X-HM10_20_Ru.fm
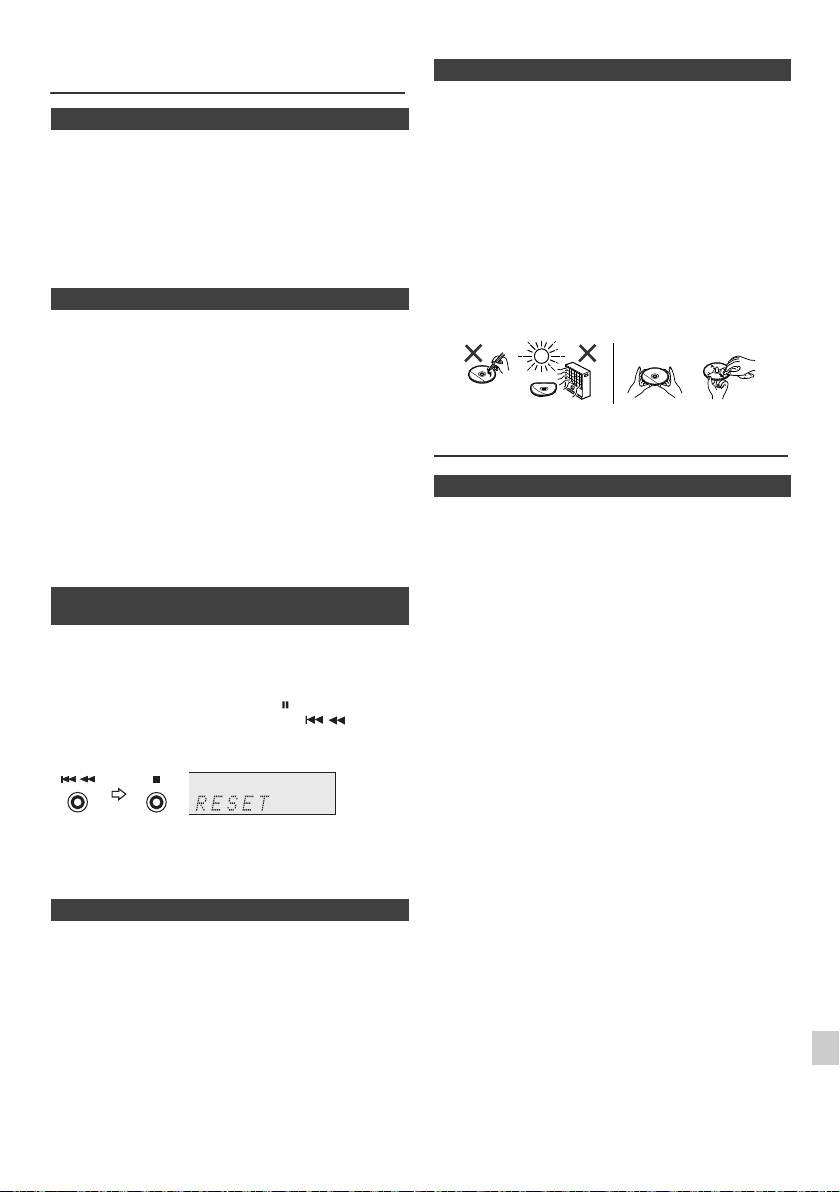
Таблица неисправностей
n Уход за компакт-дисками
(продолжение)
Ко
мпакт-диски достаточно устойчивы к повреждениям, однако из-за
скопления грязи на поверхности диска может возникнуть сбой
n Конденсация
дорожек. Следуйте нижеуказанным инструкциям для получения
Внезапные изменения температуры, хранение или
максимального наслаждения от вашей коллекции и проигрывателя
эксплуатация в чрезвычайно влажной окружающей среде
компакт-дисков.
могут вызывать конденсацию внутри корпуса (приемное
l Не делайте надписей на любой стороне диска, особенно
устройство CD и т.п.) или на датчике дистанционного
на стороне без этикетки, с которой считываются
управления. Конденсация может вызвать неисправность
сигналы. Не помечайте эту поверхность.
устройства. В таком случае, оставьте питание включенным
l Предохраняйте ваши диски от воздействия прямого
без диска в устройстве, пока не будет возможно нормальное
солнечного света, перегрева и избыточной влажности.
воспроизведение (примерно 1 час). Перед работой с
l Всегда держите компакт-диски за кромки. Отпечатки
устройством удалите любую к
онденсацию на датчике
пальцев, грязь или вода на поверхности компакт-дисков
мягкой тканью.
могут вызвать помехи или сбой до
рожек. Если компакт-
диск загрязнен или не проигрывается должным образом,
n Если возникает проблема
очистите его мягкой сухой тканью, вытирая его прямо от
центра по радиусу.
Если это изделие подвергается сильным внешним
воздействиям (механический удар, чрезмерное статическое
электричество, аномальное напряжение питания из-за
молнии, и т.п.), или если оно эксплуатируется неправильно,
оно может выйти из строя.
Если возникает такая проблема, выполните
следующее:
Обслуживание
1
Ус т а н о ви те устройство в режим ожидания и снова включите
питание.
2
Если не восстанавливается прежняя работа устройства,
n Очистка корпуса
отсоедините и снова подсоедините устройство и затем
включите питание.
Периодически протирайте корпус мягкой тканью и слабым мыльным
раствором, а затем сухой тканью.
Примечание:
Предупреждение:
Если ни одна операция выше не восстанавливает работу устройства,
очистите всю память установкой устройства в исходное состояние.
l Не используйте для очистки химические вещества
(бензин, разбавитель для краски, и т.п.). Это может
n Возврат к заводским установкам,
повредить корпус.
очистка всей памяти
l Не используйте масло внутри устройства. Это может
вызвать неисправности.
1
Нажмите кнопку STANDBY/ON, чтобы включить питание.
2
Нажмите кнопку LINE на пульте ДУ или несколько раз кнопку
INPUT на основном блоке, чтобы выбрать функцию LINE IN.
3
В функции LINE IN нажмите кнопку на основном блоке,
нажмите и удерживайте нажатой кнопку , пока не
появится индикация «RESET».
1
Предупреждение:
При этой операции произойдет стирание всех занесенных в память
данных, включая установки часов, установки таймера,
2
предварительные настройки тюнера и программу для CD.
3
n Перед транспортировкой устройства
Извлеките устройство iPod, устройство памяти USB и диск из
4
аппарата. Затем установите аппарат в режим ожидания. Переноска
аппарата с оставленным в док-станции устройством iPod или
5
устройством памяти USB или оставленными внутри дисками может
вызвать повреждение аппарата.
6
7
8
9
Ru-25
11/5/25 X-HM10_20_Ru.fm
НЕТ
ДА
Правильно
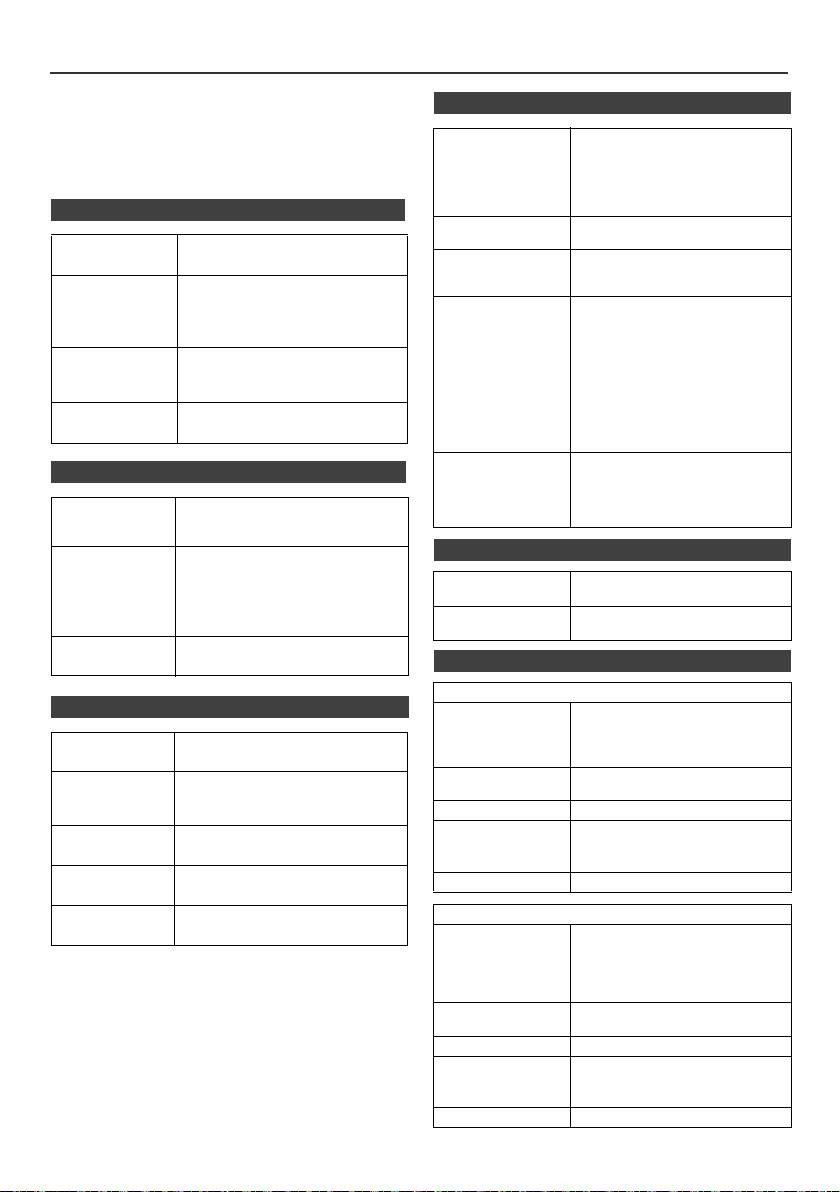
Спецификации
Как часть нашей политики непрерывного усовершенствования,
компания PIONEER сохраняет за собой право на внесение без
n USB
предупреждения изменений в конструкцию и технические
характеристики для совершенствования изделия. Указанные
Главный интерфейс
l Соответствует USB 1.1
технические характеристики представляют номинальные значения
USB
(максимальная скорость)/2.0
класса запоминающих
для производственных установок. По отдельным установкам
устройств большой емкости.
возможны некоторые отклонения от этих значений.
l Поддерживает только Bulk и
протокол CBI.
n Общие сведения
Поддерживаемые
l MPEG 1 Layer 3
форматы файлов
l WMA (без DRM)
Источник
Переменный ток 220 В - 240 В, 50 Гц/60 Гц
питания
Поддерживаемый
l MP3 (от 32 кб/сек до 320 кб/сек)
битрейт
l WMA (от 64 кб/сек до 160 кб/
Потребляемая
Включение питания:
сек)
мощность
45 Вт (X-HM20)
Другие параметры
l Максимальное суммарное число
30 Вт (X-HM10)
файлов MP3/WMA равно 999.
Мощность в режиме ожидания: 0,4 Вт
l Максимальное суммарное число
папок равно 99, ВКЛЮЧАЯ
Размеры
Ширина: 215 мм
корневой каталог.
Высота: 99 мм
l Поддерживаемыми данными
Глубина: 300 мм
ID3TAG являются только
НАЗВАНИЕ, ИСПОЛНИТЕЛЬ и
Вес
3,8 кг (X-HM20)
АЛЬБОМ.
3,7 кг (X-HM10)
l Поддерживает ID3TAG версии 1
и версии 2.
Поддержка файловой
l Поддерживает устройства USB с
n Усилитель
системы
системами Microsoft Windows/
DOS/FAT 12/FAT 16/ FAT 32.
l Длина блока 2 килобайта для
Выходная
Среднеквадратичная мощность:
сектора.
мощность
15 Вт + 15 Вт (1 кГц, 10% коэффициент
гармоник, 4 Ом)
n Тюнер
Выходные
Громкоговорители: 4 Ом
разъемы
20 Гц до 20 кГц
Диапазон частот
FM: от 87,5 МГц до 108 МГц
Видеовыход (только X-HM20): 1 Вp-p
AM: от 522 кГц до 1 620 кГц
Наушники: 16 Ом
Предварительная
40 (станция FM и AM)
(рекомендуется: 32 Ом)
настройка
Входные
Линейный вход (аналоговый вход):
разъемы
500 мВ/47 кОм
n Громкоговоритель
X-HM20
n Проигрыватель CD
Тип
Cистема громкоговорителей 2-полосного
типа
Тип
Однодисковый мультиплеер компакт-
Высокочастотный динамик 5 см
дисков
Низкочастотный динамик 10 см
Максимальная входная
15 Вт
Считывание
Бесконтактный, 3-лучевой
мощность power
сигнала
полупроводниковый лазерный
звукосниматель
Импеданс
4 Ом
Размеры
Ширина: 132 мм
Цифроаналоговый
Многоразрядный цифроаналоговый
Высота: 260 мм
преобразователь
преобразователь
Глубина: 173 мм
Частотный
от 20 Гц до 20 000 Гц
Вес
2,0 кг/каждый
диапазон
Динамический
90 дВ (1 кГц)
X-HM10
диапазон
Тип
Cистема громкоговорителей 2-полосного
типа
Пьезоэлектрический высокочастотный
динамик
Низкочастотный динамик 10 см
Максимальная входная
15 Вт
мощность power
Импеданс
4 Ом
Размеры
Ширина: 132 mm
Высота: 260 mm
Глубина: 158 mm
Вес
1,6 кг/каждый
Ru-26
11/5/25 X-HM10_20_Ru.fm

Спецификации
Об iPod/iPhone/iPad:
«
Made for iPod
»,
«
Made for iPhone
»
и
«
Made for iPad
»
означает, что электронный прибор быр разработан с целью
подключения определенно к iPod, iPhone или iPad
соответственно, и имеется сертифицикация разработчика о
соответствии с техническими характеристиками Apple.
Apple не несет ответственности за работу данного
устройства или его соответствие со стандартами по технике
безопасности или регулятивными нормами. Пожалуйста,
обратите внимание, что использование данного прибора с
iPod или iPhone может отрицательно сказываться на
ка
честве беспроводной связи.
iPad, iPhone и iPod являются торговымимарками Apple
Inc., зарегистированными в США и других странах.
1
2
3
4
5
6
7
© PIONEER CORPORATION, 2011.
8
Все права защищены.
9
Ru-27
11/5/25 X-HM10_20_Ru.fm

E-29
11/5/25 X-HM10_20_Backcover.fm
Примечание:
В соответствии со статьей 5 Закона Российской Федерации “О защите прав потребителя” и Указанием
Правительства Российской Федерации № 720 от 16 июня 1997 года корпорация Pioneer Europe NV
устанавливает условие на следующую продолжительность срока службы официально поставляемых на
Российский рынок товаров.
Аудио и видеооборудование: 7 лет
Переносное аудиооборудование: 6 лет
Другое оборудование (наушники, микрофон и т.д.): 5 лет
Автомобильная электроника: 6 лет
D3-7-10-6_A1_Ru
http://www.pioneer.co.uk
http://www.pioneer.fr
http://www.pioneer.es
http://www.pioneer.de
http://www.pioneer.it
http://www.pioneer.nl - http://www.pioneer.be
http://www.pioneer-rus.ru
http://www.pioneer.eu
© 2011 PIONEER CORPORATION.
All rights reserved.
© 2011 PIONEER CORPORATION.
Tous droits de reproduction et de traduction réservés.
PIONEER CORPORATION
1-1, Shin-ogura, Saiwai-ku, Kawasaki-shi, Kanagawa 212-0031, Japan
Корпорация Пайонир
1-1, Син-Огура, Сайвай-ку, г. Кавасаки, префектура Канагава, 212-0031, Япония
Импортер: ООО "ПИОНЕР РУС"
125040, Россия, г. Москва, ул. Правды, д.26 Тел.: +7(495) 956-89-01
PIONEER ELECTRONICS (USA) INC.
P.O. BOX 1540, Long Beach, California 90801-1540, U.S.A. TEL: (800) 421-1404
PIONEER ELECTRONICS OF CANADA, INC.
340 Ferrier Street, Unit 2, Markham, Ontario L3R 2Z5, Canada TEL: 1-877-283-5901, 905-479-4411
PIONEER EUROPE NV
Haven 1087, Keetberglaan 1, B-9120 Melsele, Belgium TEL: 03/570.05.11
PIONEER ELECTRONICS ASIACENTRE PTE. LTD.
253 Alexandra Road, #04-01, Singapore 159936 TEL: 65-6472-7555
PIONEER ELECTRONICS AUSTRALIA PTY. LTD.
5 Arco Lane, Heatherton, Victoria, 3202, Australia, TEL: (03) 9586-6300
PIONEER ELECTRONICS DE MEXICO S.A. DE C.V.
Blvd.Manuel Avila Camacho 138 10 piso Col.Lomas de Chapultepec, Mexico, D.F. 11000 TEL: 55-9178-4270
K002_B4_Ru
Printed in China / Imprimé en Chine
<TINSZA989AWZZ>
