Yamaha NS-P380: инструкция
Раздел: Бытовая, кухонная техника, электроника и оборудование
Тип: Акустика
Инструкция к Акустику Yamaha NS-P380
Оглавление
- Меры предосторожности
- • VOLTAGE SELECTOR
- Содержимое упаковки
- Установка колонок Установка савбуфера
- Настенный монтаж фронтальных колонок и колонок окружающего звучания
- Подключение колонок Схема подключения
- Подключение силовых кабелей
- Использование савбуфера Установка уровня громкости савбуфера Частотные характеристики
- Поиск и устранение неисправностей Технические характеристики
G
(NS-P380: NS-B380 + NS-C380 + NS-B280 + NS-SW380)
5.1CH SPEAKER PACKAGE
5.1 PACKAGE ENCEINTES
OWNER'S MANUAL
MODE D'EMPLOI
BEDIENUNGSANLEITUNG
BRUKSANVISNING
MANUALE DI ISTRUZIONI
MANUAL DE INSTRUCCIONES
GEBRUIKSAANWIJZING
ИНСТРУКЦИЯ ПО ЭКСПЛУАТАЦИИ

Precautions
Please read the following operating precautions before use. Yamaha will not be held responsible for any damage and/or
injury caused by not following the cautions below.
1.
To assure the finest performance, please read this
1.
Do not operate this unit upside down. It may overheat,
manual carefully. Keep it in a safe place for future
possibly causing damage.
reference.
2.
Do not use excessive force on switches, controls or
2.
Install the speakers in a cool, dry, clean place – away
connection wires. When moving this unit, first
from windows, sources of heat, sources of excessive
disconnect the power plug and the wires connected to
vibration, dust, moisture or cold. Avoid sources of
other equipment. Never pull the wires themselves.
electrical humming (e.g., transformers and motors). To
3.
Never put a hand or a foreign object into the port
prevent fire or electric shock, do not expose the
located on the right side of this unit. When moving this
speakers to rain or water.
unit, do not hold the port, as it might cause personal
3.
To prevent the enclosure from warping or discoloring,
injury and/or damage to this unit.
do not expose the speakers to direct sunlight or
4.
Since this unit has a built-in power amplifier, heat
excessive humidity.
radiates from the rear panel. Place the unit away from
4.
Avoid installing the speakers where foreign objects may
walls, allowing at least 20 cm (8") of space above,
fall onto them and/or where they may be exposed to
behind and on both sides of the unit to prevent fire or
liquid dripping or splashing.
damage. Furthermore, do not position the unit with the
5.
Do not place the following objects on top of the
rear panel facing down on the floor or other surfaces.
speakers:
5.
When using a humidifier, be sure to avoid condensation
– Other components, as they might damage or discolor
inside this unit by allowing enough space around the unit
the surface of the speakers.
and avoiding excess humidification. Condensation might
– Burning objects (e.g., candles), as they might cause
cause fire, damage to the unit, and/or electric shock.
fire, damage to the speakers or personal injury.
6.
Do not cover the rear panel of this unit with a
– Containers of liquid, as they might spill and cause
newspaper, tablecloth, curtain, etc. to avoid obstructing
electric shock to the user or damage to the speakers.
heat radiation. If the temperature inside the unit rises, it
6.
Do not place the speakers where they are liable to be
may cause fire, damage to the unit, or personal injury.
knocked over or struck by falling objects. Stable
7.
Do not plug this unit into a wall outlet until all
placement will also ensure better sound performance.
connections are complete.
7.
Placing the speakers on the same shelf or rack as the
8.
The voltage to be used must match that specified on the
turntable can result in feedback.
rear panel. Using this unit with a voltage higher than
8.
Any time you note distortion, reduce the volume control
specified is dangerous and may cause fire, damage to
on your amplifier to lower setting. Never allow your
the unit, and/or personal injury. Yamaha is not
amplifier to be driven into “clipping”. Otherwise, the
responsible for damage resulting from use of this unit
speakers may be damaged.
with a voltage other than specified.
9.
When using an amplifier with a rated output power
9.
Super-bass sound reproduced by this unit may cause a
higher than the nominal input power of the speakers,
turntable to generate audio feedback. In this case, move
care should be taken not to exceed the maximum input
the unit away from the turntable.
of the speakers.
10.
This unit may be damaged if certain sounds are
10.
Do not attempt to clean the speakers with chemical
continuously output at high volume level. For example,
solvents as this might damage the finish. Use a clean,
if 20 Hz–50 Hz sine waves from a test disc or bass
dry cloth.
sounds from an electronic instrument, etc. are
11.
Do not attempt to modify or fix the speakers. Contact
continuously output, or if a turntable stylus touches the
qualified Yamaha service personnel when service is
surface of a disc, reduce the volume level to prevent the
needed. The cabinet should never be opened for any
unit from being damaged.
reason.
11.
If you hear distorted noise (i.e., unnatural, intermittent
12.
Be sure to read the “Troubleshooting” section regarding
“rapping” or “hammering” sounds) from this unit,
common operating errors before concluding that the
reduce the volume level. Extremely loud movie
speakers are faulty.
soundtrack low frequency, bass-heavy sounds, or
13. Secure placement or installation is the owner’s
similarly loud popular music passages can damage this
responsibility. Yamaha is not liable for accidents
unit.
caused by improper placement or installation of
12.
Vibration generated by super-bass sound may distort
speakers.
images on a TV. In this case, move the unit away from
the TV set.
13.
When disconnecting the power cord from the wall
For NS-SW380
outlet, grasp the plug; do not pull the cord.
WARNING
14.
When you plan not to use this unit for a long period of
TO REDUCE THE RISK OF FIRE OR ELECTRIC
time (i.e. vacation, etc.), disconnect the AC power plug
from the wall outlet.
SHOCK, DO NOT EXPOSE THIS APPLIANCE TO
15.
Install this unit near the wall outlet and where the AC
RAIN OR MOISTURE.
power plug can be reached easily.
i
En

Precautions
English
• VOLTAGE SELECTOR
Information for Users on Collection and Disposal
(For China, Korea, Asia and General models)
of Old Equipment
The voltage selector switch on the rear panel of this
unit must be set to your local main voltage BE-
This symbol on the products, packaging,
FORE plugging this unit into the AC main supply.
and/or accompanying documents means
Voltages are 110-120/220-240 V AC, 50/60 Hz.
that used electrical and electronic
products should not be mixed with
This unit is not disconnected from the AC power
general household waste.
source as long as it is connected to the wall outlet, even
For proper treatment, recovery and
if this unit itself is turned off. In this state, this unit is
recycling of old products, please take
designed to consume a very small quantity of power.
them to applicable collection points, in
accordance with your national legislation
For U.K. customers
and the Directives 2002/96/EC.
If the socket outlets in the home are not suitable for the
By disposing of these products correctly,
plug supplied with this appliance, it should be cut off and
you will help to save valuable resources
an appropriate 3 pin plug fitted. For details, refer to the
and prevent any potential negative effects
instructions described below.
on human health and the environment
Note:
The plug severed from the mains lead must be
which could otherwise arise from
destroyed, as a plug with bared flexible cord is hazardous
inappropriate waste handling.
if engaged in a live socket outlet.
For more information about collection
and recycling of old products, please
contact your local municipality, your
SPECIAL INSTRUCTIONS FOR U.K. MODEL
waste disposal service or the point of sale
IMPORTANT:
where you purchased the items.
THE WIRES IN MAINS LEAD ARE COLOURED
[Information on Disposal in other
IN ACCORDANCE WITH THE FOLLOWING
Countries outside the European Union]
CODE:
This symbol is only valid in the European
Blue: NEUTRAL
Union. If you wish to discard these items,
Brown: LIVE
please contact your local authorities or
As the colours of the wires in the mains lead of this
dealer and ask for the correct method of
apparatus may not correspond with the coloured
disposal.
markings identifying the terminals in your plug,
proceed as follows: The wire which is coloured
BLUE must be connected to the terminal which is
marked with the letter N or coloured BLACK. The
wire which is coloured BROWN must be connected
to the terminal which is marked with the letter L or
coloured RED. Make sure that neither wire is
connected to the earth terminal of a three pin plug.
ii
En

Precautions
Limited Guarantee for European Economic Area (EEA) and Switzerland
Thank you for having chosen a Yamaha product. In the unlikely event that your Yamaha product needs guarantee service, please contact the dealer from
whom it was purchased. If you experience any difficulty, please contact Yamaha representative office in your country. You can find full details on our
website (
http://www.yamaha-hifi.com/
or
http://www.yamaha-uk.com/
for U.K. resident).
The product is guaranteed to be free from defects in workmanship or materials for a period of two years from the date of the original purchase. Yamaha
undertakes, subject to the conditions listed below, to have the faulty product or any part(s) repaired, or replaced at Yamaha’s discretion, without any
charge for parts or labour. Yamaha reserves the right to replace a product with that of a similar kind and/or value and condition, where a model has been
discontinued or is considered uneconomic to repair.
Conditions
1. The original invoice or sales receipt (showing date of purchase, product code and dealer’s name) MUST accompany the defective product, along with
a statement detailing the fault. In the absence of this clear proof of purchase, Yamaha reserves the right to refuse to provide free of charge service and
the product may be returned at the customer’s expense.
2. The product MUST have been purchased from an AUTHORISED Yamaha dealer within the European Economic Area (EEA) or Switzerland.
3. The product must not have been the subject of any modifications or alterations, unless authorised in writing by Yamaha.
4. The following are excluded from this guarantee:
a. Periodic maintenance and repair or replacement of parts due to normal wear and tear.
b. Damage resulting from:
(1) Repairs performed by the customer himself or by an unauthorised third party.
(2) Inadequate packaging or mishandling, when the product is in transit from the customer. Please note that it is the customer’s responsibility to
ensure the product is adequately packaged when returning the product for repair.
(3) Misuse, including but not limited to (a) failure to use the product for its normal purpose or in accordance with Yamaha’s instructions on the
proper use, maintenance and storage, and (b) installation or use of the product in a manner inconsistent with the technical or safety standards in
force in the country where it is used.
(4) Accidents, lightning, water, fire, improper ventilation, battery leakage or any cause beyond Yamaha’s control.
(5) Defects of the system into which this product is incorporated and/or incompatibility with third party products.
(6) Use of a product imported into the EEA and/or Switzerland, not by Yamaha, where that product does not conform to the technical or safety
standards of the country of use and/or to the standard specification of a product sold by Yamaha in the EEA and/or Switzerland.
(7) Non AV (Audio Visual) related products.
(Products subject to “Yamaha AV Guarantee Statement” are defined in our website at
http://www.yamaha-hifi.com/
or
http://www.yamaha-uk.com/
for U.K. resident.)
5. Where the guarantee differs between the country of purchase and the country of use of the product, the guarantee of the country of use shall apply.
6. Yamaha may not be held responsible for any losses or damages, whether direct, consequential or otherwise, save for the repair or replacement of the
product.
7. Please backup any custom settings or data, as Yamaha may not be held responsible for any alteration or loss to such settings or data.
8. This guarantee does not affect the consumer’s statutory rights under applicable national laws in force or the consumer’s rights against the dealer
arising from their sales/purchase contract.
iii
En
Contents
English
Package contents................................................1
Connecting the speakers .................................. 4
Connection diagram........................................... 4
Installing the speakers.......................................2
Connecting the power cables............................. 5
Installing the front, center, and surround
speakers ..........................................................2
Using the Subwoofer......................................... 6
Installing the subwoofer .....................................2
Setting the subwoofer volume ........................... 6
Wa ll-mounting the front and surround
Frequency characteristics................................... 6
speakers ..........................................................3
Troubleshooting................................................. 7
Specifications...................................................... 7
Package contents
Thank you for choosing the Yamaha NS-P380 5.1CH Speaker Package.
Make sure the package contains the following items.
■ Subwoofer
(NS-SW380 x1)
The Subwoofer features a built-in power
amplifier and utilizes Advanced Yamaha
■ Front speakers
Active Servo Technology to provide high-
(NS-B380 x2)
quality sub-bass sound that adds real
The front speakers are
“punch” to your home theater.
2-way acoustic-
suspension speakers.
■ Surround speakers
(NS-B280 x2)
The surround speakers are full-range
acoustic-suspension speakers.
■ Center speaker
(NS-C380 x1)
The center speaker is a 2-way
acoustic-suspension speaker.
■ Front speakers
Non-skid pad
Subwoofer cable,
Speaker cable,
5 m (16 ft.) x1
25 m (82 ft.) x1
(To be cut into 5 lengths for
■ Center speaker ■ Surround speakers
the front, center, and
surround speakers. Take
care to prevent injury when
preparing the cables.)
Non-skid pads (20 pcs.) x1
(For the front, center, and
Non-skid pads: When placing the speakers on a flat
surround speakers.)
surface, affix the included non-skid pads to the corners
of the speaker undersides, as shown. The pads will
prevent the speakers from moving around.
1
En
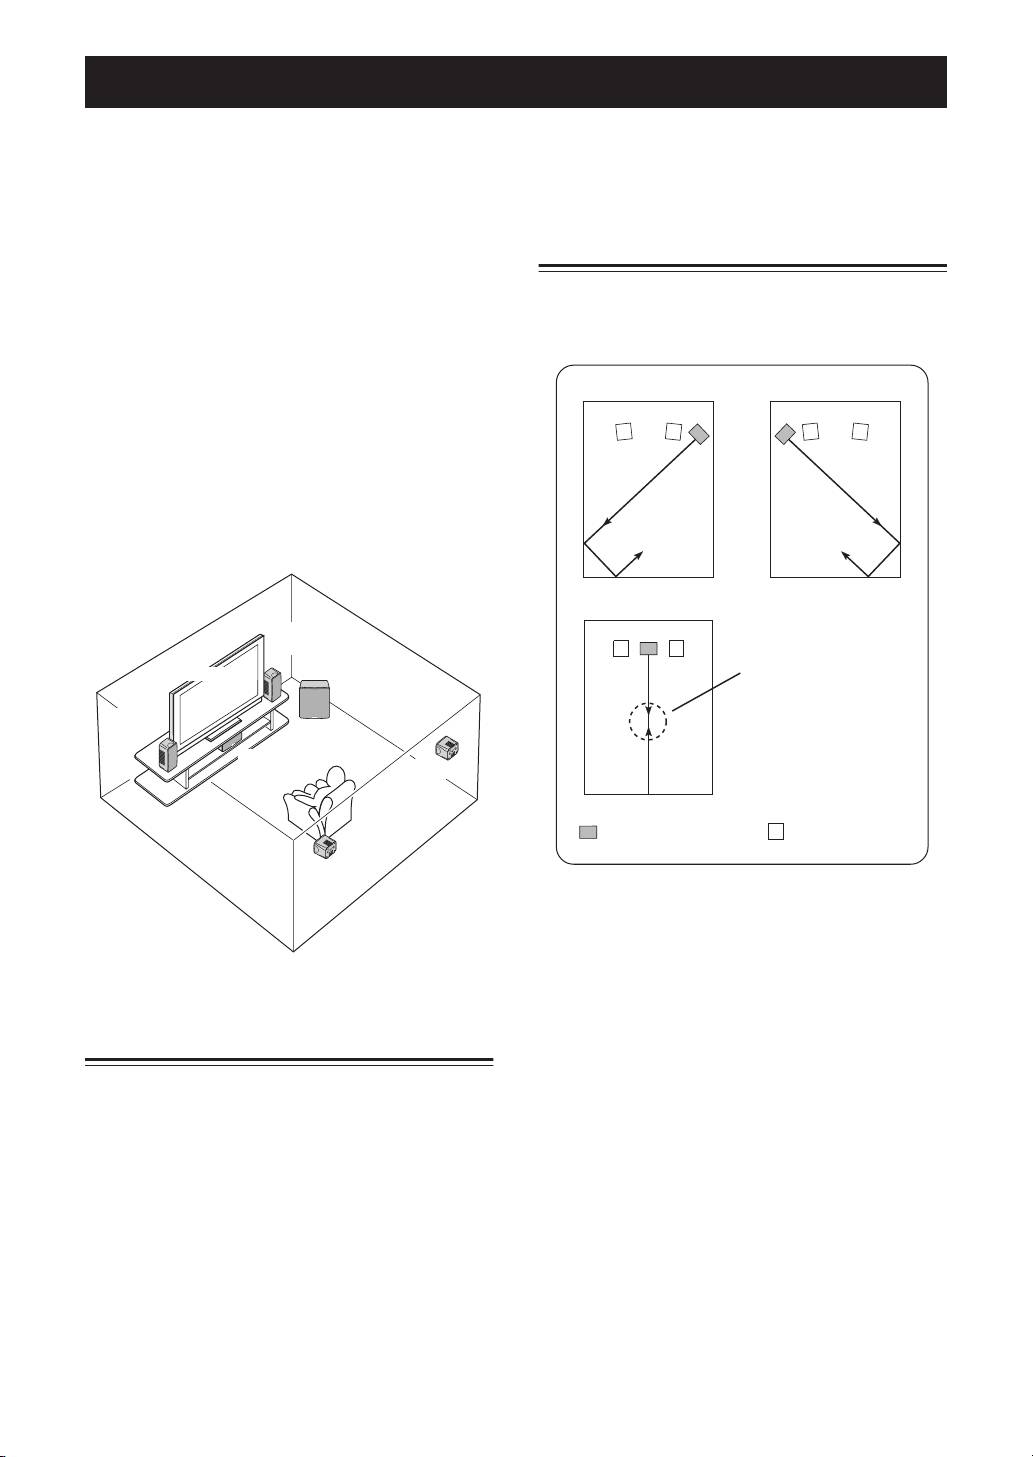
Installing the speakers
Before you connect the speakers, place each speaker in
Installing the subwoofer
its respective location. Speaker positioning is very
important as it affects the overall sound quality of the
Place the subwoofer on the outside of either the right
system. Place the speakers in locations that will
or the left front speaker, as shown in
A
and
B
.
optimize the sound quality at your listening position.
Refer to the illustration below.
AB
The position of the subwoofer is not as critical as the
position of the other speakers because sub-bass
sounds are not very directional. Refer to “Installing the
subwoofer” for more information.
Note
•Placing the speakers too close to a CRT-type TV
may impair the picture color or cause a buzzing
noise. In this case, move the speakers at least 20 cm
(8") away from the TV. This is not an issue with LCD
C
and plasma TVs.
Note: Standing waves
may make it difficult to
Front
hear bass sounds here.
right
Subwoofer
TV
Front
left
Center
Subwoofer Front speaker
Surround
right
The placement shown in
C
is also possible, however, if
the subwoofer is placed directly facing a wall and your
Surround
listening position is in the center of the room, you may
left
not be able to obtain enough bass sound from the
subwoofer. This is because “standing waves” are
forming between the two parallel walls and cancelling
out the bass sounds. In this case, position the
subwoofer at an angle to the wall. It may be necessary
to break up parallel wall surfaces by placing
Installing the front, center, and
bookshelves, etc., along them.
surround speakers
Front speakers:
Place the two front speakers on the
left and right sides of the TV, at approximately the
same height as the TV, facing directly forward.
Surround speakers:
Place the left and right
surround speakers behind your listening position,
facing slightly inward, about 1.8 meters (approx. 6 ft.)
above the floor.
You can place the front and surround speakers on
tables or other supports, or mount them on the walls.
For more information, see “Wall-mounting the front
and surround speakers” on page 3.
Center speaker:
Place the center speaker centrally
between the front speakers, facing directly forward.
2
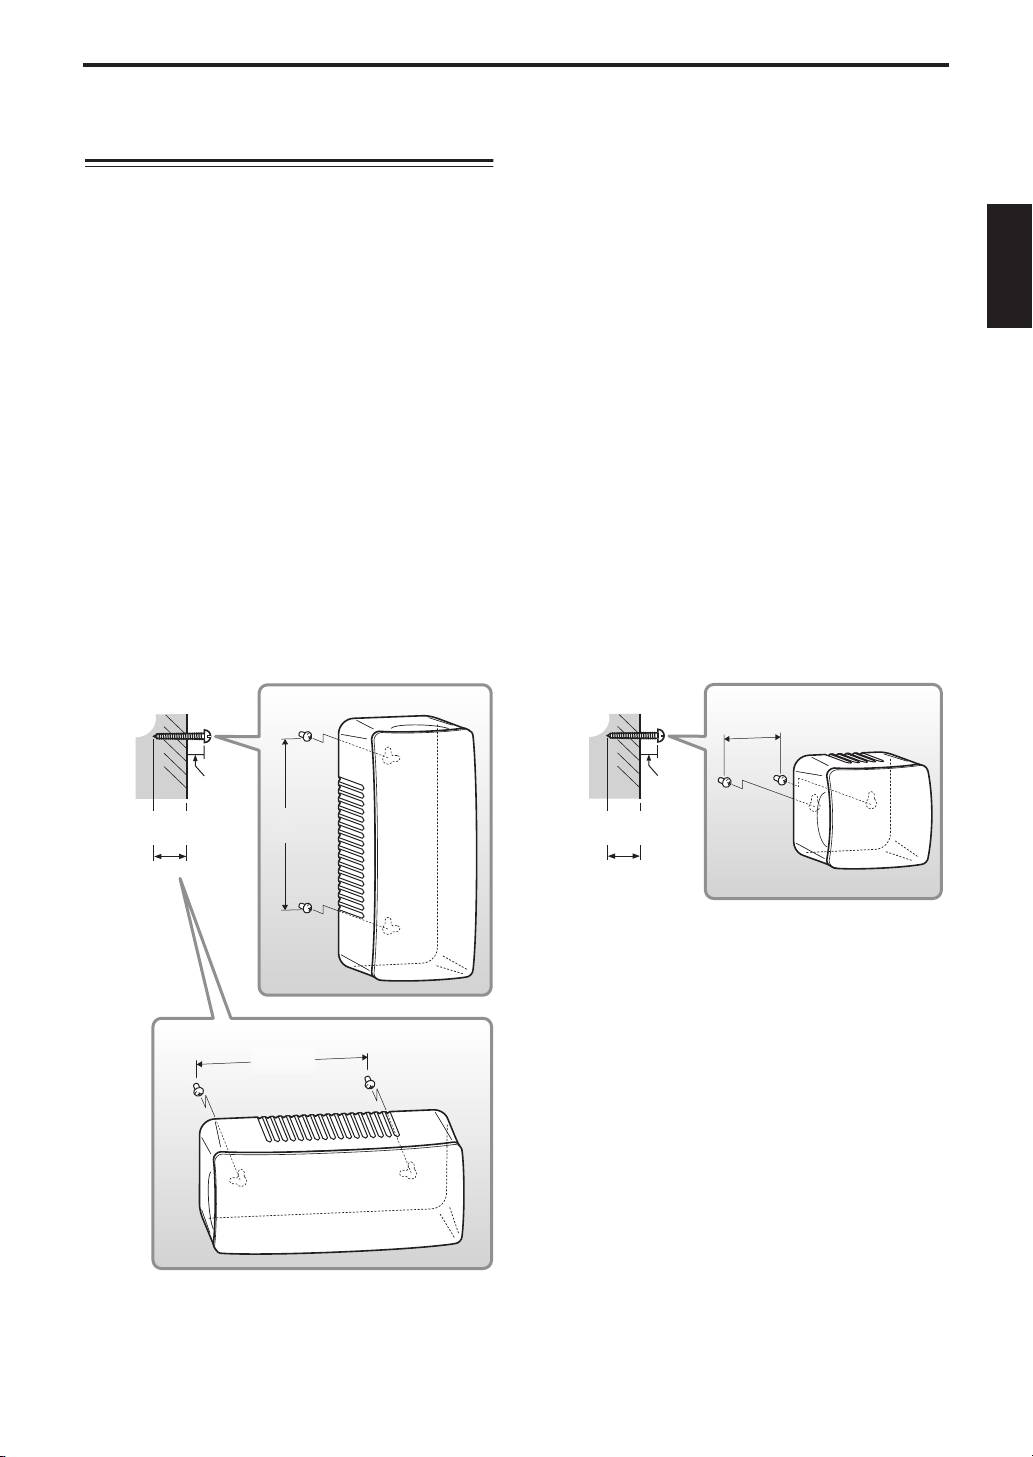
En
Installing the speakers
English
Warnings
Wall-mounting the front and
•Each front speaker weighs 1.0 kg (2.2 lbs.) and
surround speakers
each surround speaker weighs 0.45 kg (1 lbs.). Do
not mount the speakers on thin plywood or on a
You can mount the front or surround speakers on a
wall with a soft surface material. Otherwise, the
wall as follows. The front speakers can be mounted
screws may pull out of the surface and the
vertically or horizontally.
speakers may fall, possibly damaging the speakers
or causing personal injury.
1
Install screws into a solid wall or wall support
•Do not affix the speakers to a wall using nails,
as shown below. Use 3.5 to 4 mm (1/8")
adhesives, or unstable hardware. Long-term use
diameter self-tapping screws.
and vibration may cause the speakers to fall.
•To avoid accidents resulting from tripping over
2
Hang each speaker by its keyhole slots onto
loose speaker cables, affix the cables to the wall.
the protruding screws.
•Mount the speakers in a wall location that will be
unlikely to result in injury to an individual’s head.
Note
•Make sure the shaft of the screw is seated in the
narrow part of the keyhole slot. Otherwise, the
speaker may fall.
■
Front speakers
■
Surround speakers
Wall/wall
Vertical
Wall/wall
45 mm
support
support
(1-3/4")
6 mm
6 mm
(1/4")
(1/4")
Minimum
150 mm
Minimum
20 mm (3/4")
(5-7/8")
20 mm (3/4")
Horizontal
150 mm
(5-7/8")
3
En

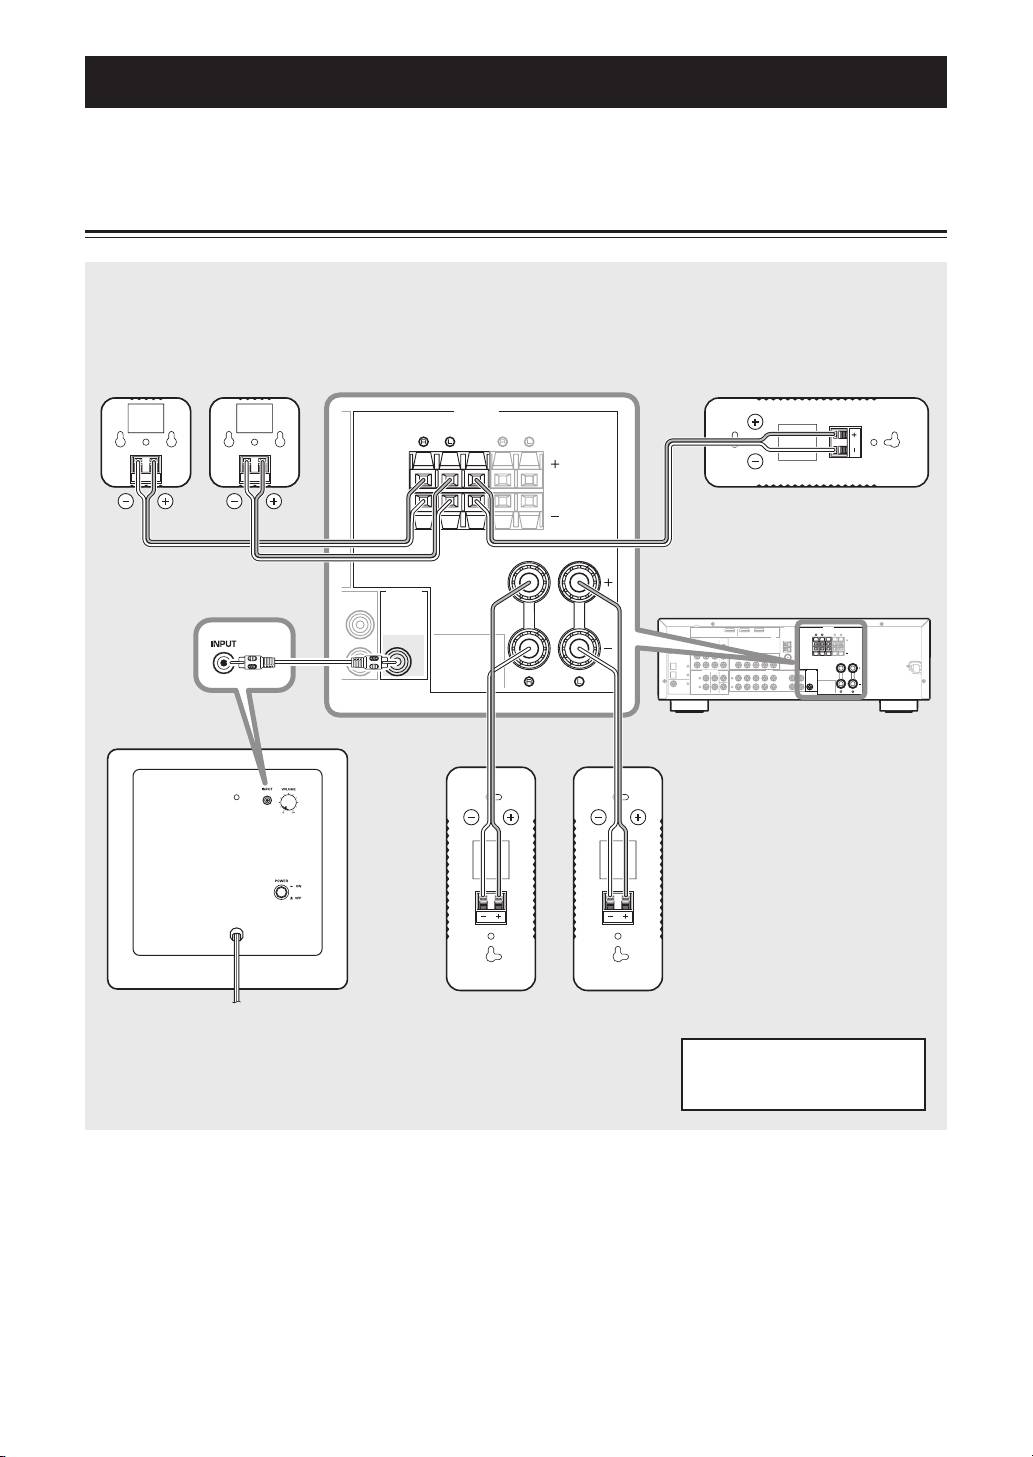
Connecting the speakers
Caution:
Make sure the power cables for the subwoofer and your other AV components are disconnected from the
AC wall outlets before making any connections.
Connection diagram
SPEAKERS
CENTER
FRONT B
ANTENNA
SPEAKERS
OUT
DVD
DTV/CBL
CENTER
FRONT B
DOCK
DVD
COMPONENT VIDEO
DTV/CBL
DVR
MONITOR
HDMI
OUT
P
R
AM
GND
DIGITAL INPUT
P
B
DVD
DTV/CBL
VIDEO
OPTICAL
IN
DVR
OUT
MONITOR
OUT
UNBAL.
FM
CD
Y
DTV/
MULTI CH INPUT
CBL
FRONT
SURROUND
CENTER
DVD
DTV/CBL
IN
DVR
OUT
AUDIO
CD
IN
(PLAY)
MD/
CD-R
OUT
(REC)
OUTPUT
SUB
FRONT A
WOOFR
DVD
COAXIAL
SUBWOOFER
FRONT A
4
En
D
OUTPUT
SUB
WOOFR
D
/
D
Surround speakers
Right Left
Center speaker
SURROUND
OUT
-R
(REC)
Amplifier
Subwoofer
Right Left
To AC wall outlet
Front speakers
Note: The exact layout of
the speaker terminals
depends on your amplifier.
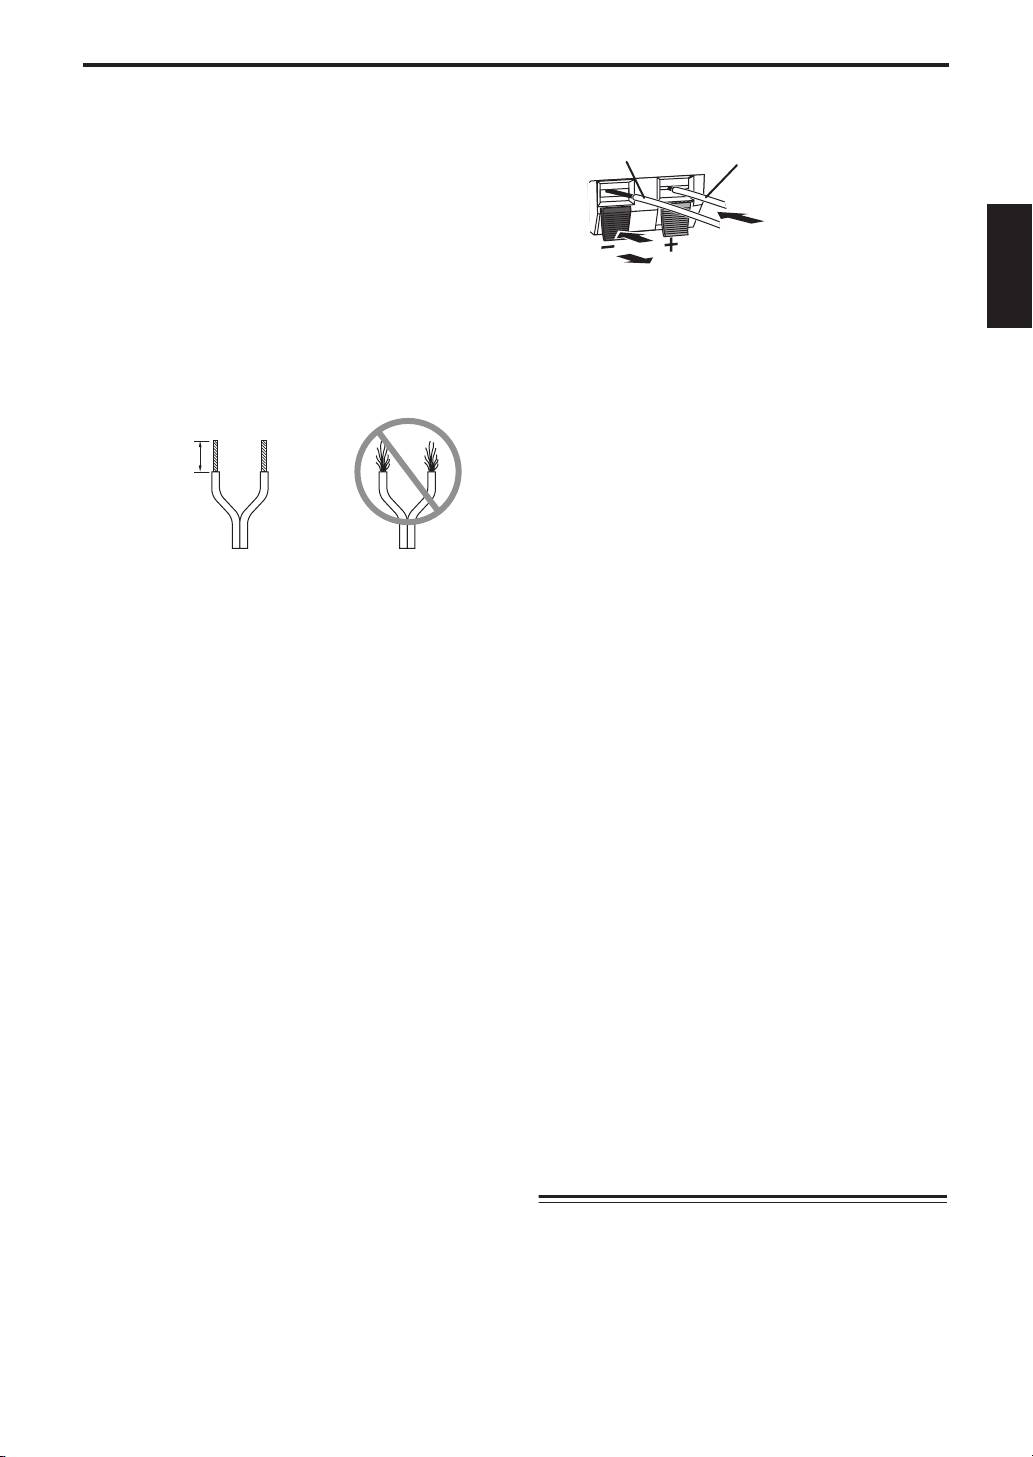
Connecting the speakers
English
■
Preparing the speaker cables
■
Connecting the speakers
Once you’ve positioned the speakers, you’ll need to cut
Connect each speaker to the appropriate speaker
the 25-meter (82 ft.) speaker cable to make five cables
terminals on your amplifier by using the cables you
for connecting the two front speakers, center speaker,
prepared earlier. See the “Connection diagram” on
and the two surround speakers.
page 4 for reference.
Make sure you connect the speakers with the correct
1
Cut the included speaker cable to suitable
polarity—positive (+) terminals to positive (+)
lengths for the front, center, and surround
terminals, and negative (–) terminals to negative (–)
speakers. You need five cables.
terminals. If you get them crossed over, the sound will
be unnatural and lack bass.
2
Remove about 10 mm (3/8") of insulation from
In your AV receiver’s speaker size settings, specify
the end of each speaker wire.
small (or “S”) for all of the NS-P380 speakers.
3
Twist the bare wires tightly.
If you’re connecting the subwoofer to a Yamaha DSP
amplifier or AV receiver, connect to its SUBWOOFER
or LOW PASS output.
10 mm (3/8")
Connecting the power cables
Once you’ve completed all of the speaker and
Good No Good
subwoofer connections, plug the subwoofer, amplifier,
and your other AV components into suitable AC wall
Notes
outlets.
•Make the speaker cables as short as possible. Do not
bundle or roll up excess cable.
•Twist the bare wires tightly so the individual strands
are not splayed.
•Be careful not to injure yourself while preparing the
speaker cables.
■
Operating the speaker terminals
Negative (–)
Positive (+)
Note: Make sure the
terminal is gripping
the bare wire, not
2
the insulation.
11
33
1
Press and hold the terminal tab.
2
Insert the bare wire.
3
Release the tab so that it closes securely on the
bare wire, not the insulation.
4
Test the security of the connection by pulling
gently on the cable.
Notes
•Make sure the bare wires do not touch each other, as
this could damage the speaker or the amplifier.
•If the connections are faulty, you will hear no sound
from the speakers.
5
En
Using the Subwoofer
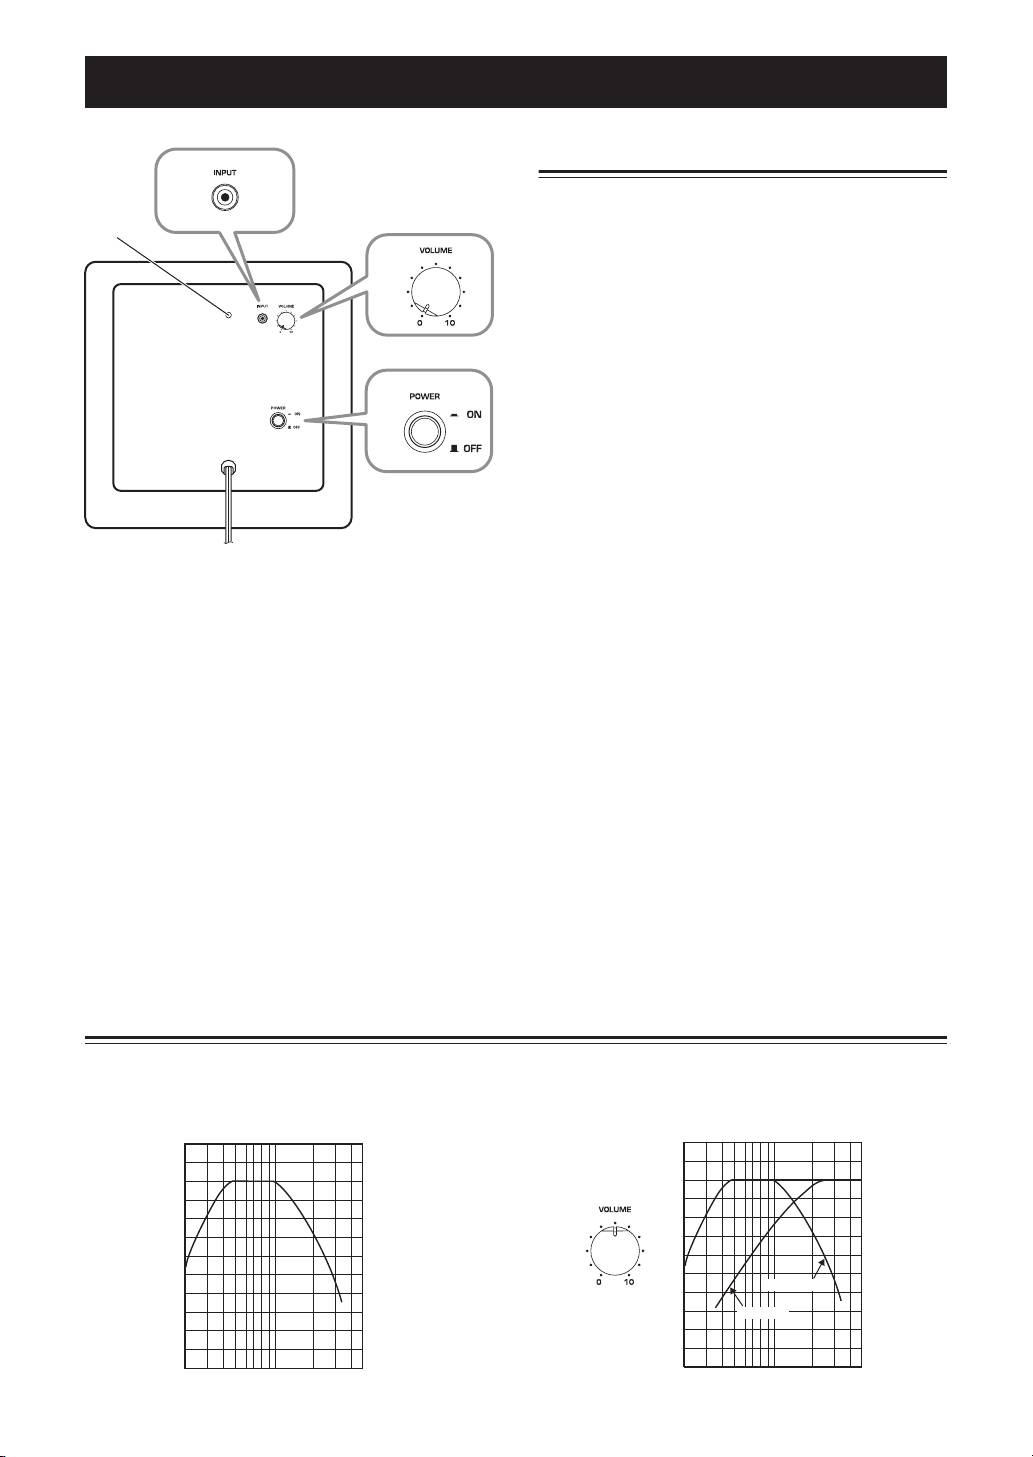
Setting the subwoofer volume
2
The very first time you use the subwoofer, you need to
set the volume balance between the subwoofer and the
1
front speakers as follows.
3
1 Turn on your other AV components.
2 Set the subwoofer’s VOLUME control to
minimum (0).
4
3 Set the subwoofer’s POWER switch to ON.
The power indicator on the rear panel lights up.
4 Play a audio source that contains low-
frequency bass sounds. Set the amplifier’s
volume control to a suitable level.
Rear panel
5 Turn the subwoofer’s VOLUME control up
gradually until you achieve a good balance
1
Power indicator
between the subwoofer and the other
Lights up when the POWER switch is set to ON;
speakers.
goes off when the POWER switch is set to OFF.
Notes
2 INPUT jack
•Once the subwoofer volume has been set, you can
Input jack for connecting the line-level subwoofer
leave the subwoofer’s VOLUME control set as it is
output on your amplifier.
and use your amplifier’s volume control to adjust the
volume of the entire system.
3 VOLUME control
•If you replace the front speakers (NS-B380) with
Adjusts the volume of the subwoofer. Turn it
other speakers, you will need to re-adjust the
clockwise to increase the volume;
subwoofer’s volume.
counterclockwise to decrease the volume.
•The frequency characteristics graphs below show
4 POWER switch
how the subwoofer and front speakers work
Set this to ON to turn on the subwoofer. Set it to
together to provide a full-range sound.
OFF to turn off the subwoofer.
Frequency characteristics
The following graph shows the frequency
The following graph shows the combined frequency
characteristics of the subwoofer (NS-SW380).
characteristics of the subwoofer (NS-SW380) and
front speakers (NS-B380).
100 dB
100 dB
90
90
80
80
70
70
NS-SW380
60
60
NS-B380
50
50
40
40
20 50 100 200 500 Hz
20 50 100 200 500 Hz
6
En

Troubleshooting
English
If this product doesn’t work as expected, look for a possible cause below. If the issue you are experiencing is not
listed, or you cannot resolve it after reading through these instructions, disconnect the power cable and contact an
authorized Yamaha dealer or service center.
Issue Possible cause Remedy
There’s no sound. The speaker cables are not
Make sure the speaker cables are connected properly.
connected properly.
The sound is very quiet. The speaker cables are not
Make sure the speaker cables are connected properly:
connected properly.
L (left) to L, R (right) to R, “+” to “+” and “–” to “–”.
■ Subwoofer (NS-SW380)
Issue Possible cause Remedy
The POWER switch is set
The power cable is not connected
Set the POWER switch to OFF, then make sure the power
to ON but the subwoofer
properly.
cable is connected properly.
doesn’t work.
There’s no sound. The VOLUME control is set to 0. Turn up the VOLUME control.
The subwoofer cable is not
Make sure the subwoofer cable is connected properly.
connected properly.
The subwoofer is too
The source material doesn’t
Try playing source material that contains more bass.
quiet.
contain much bass.
Bass sounds are being cancelled
Reposition the subwoofer, or break up parallel wall surfaces
out by standing waves.
by placing bookshelves or other large objects along the wall.
Specifications
■ Front speakers (NS-B380),
■ Subwoofer (NS-SW380)
Center speaker (NS-C380)
Type
..................... Advanced
Ya m a h a
Active Servo Te c hn ology
Type ...................2-way acoustic-suspension speaker system
Driver.................................................. 20 cm (8'') cone woofer
non-magnetic shielding type
non-magnetic shielding type
Driver ............................... 6.5 cm (2-1/2") cone woofer x 2 +
Output power .......................50 W (100 Hz, 5 Ω, 10% THD)
2.5 cm (1") balanced-dome tweeter
Dynamic power ...................................................... 100 W, 5 Ω
Nominal input power ......................................................50 W
Input impedance
................ INPUT (1P RCA pin jack): 10 kΩ
Maximum input power ................................................ 100 W
Frequency response ..........................................28 Hz–160 Hz
Impedance ...........................................................................6
Ω
Input sensitivity ..........................INPUT (1P RCA pin jack):
Frequency response ....................................... 110 Hz–40 kHz
80 mV (50 Hz, 50 W/5
Ω
)
Crossover frequency ......................................................8 kHz
Power supply
Sensitivity ............................................... 84 dB/2.83 V, 1 m
U.S.A. and Canada models .......................AC 120 V, 60 Hz
Dimensions (W x H x D)
Australia model..........................................AC 240 V, 50 Hz
NS-B380 ................................................ 90 x 220 x 109 mm
U.K. and Europe models ...........................AC 230 V, 50 Hz
(3-1/2" x 8-5/8" x 4-1/4")
China, Korea, Asia, and
NS-C380 ................................................ 220 x 90 x 109 mm
General models ............. AC 110-120/220-240 V, 50/60 Hz
(8-5/8" x 3-1/2" x 4-1/4")
Dimensions (W x H x D) ......................290 x 292 x 327 mm
Wei ght ..............................................................1.0 kg (2.2 lbs.)
(11-3/8" x 11-1/2" x 12-7/8")
Wei ght ............................................................. 8.5 kg (18.7 lbs.)
■ Surround speakers (NS-B280)
Type ........... Full-range acoustic-suspension speaker system
Specifications are subject to change without notice.
non-magnetic shielding type
Driver ........................................6.5 cm (2-1/2") cone speaker
Nominal input power ......................................................30 W
Maximum input power .................................................. 80 W
Impedance ...........................................................................6
Ω
Frequency response ....................................... 110 Hz–40 kHz
Sensitivity ............................................... 81 dB/2.83 V, 1 m
Dimensions (W x H x D) .......................... 90 x 90 x 109 mm
(3-1/2" x 3-1/2" x 4-1/4")
Wei ght ...............................................................0.45 kg (1 lbs.)
7 En

Précautions
Lisez attentivement les précautions d’utilisation suivantes. Yamaha décline toute responsabilité en cas de dommages et/
ou de blessures découlant du non respect de ces consignes.
1. Pour profiter au mieux de votre acquisition, lisez
En ce qui concerne le NS-SW380
attentivement ce mode d’emploi. Conservez-le
soigneusement pour référence.
AVERTISSEMENT
2. Installez les enceintes dans un endroit frais, sec, loin
POUR ÉVITER TOUT RISQUE D’INCENDIE OU
des fenêtres et des sources de chaleur et de vibration,
D’ÉLECTROCUTION, N’EXPOSEZ PAS CET
des poussières, de l’humidité et du froid. Évitez les
APPAREIL À LA PLUIE OU À L’HUMIDITÉ.
sources de ronflements électriques (transformateurs et
moteurs, par exemple). Pour éviter les risques
1. Ne le faites pas fonctionner à l’envers. Il peut
d’incendie et de secousses électriques, n’exposez pas
surchauffer et être endommagé.
les enceintes à la pluie ni à l’humidité.
2. Manœuvrez les commutateurs et les commandes avec
3. Pour éviter que la menuiserie des enceintes ne se
précaution, veillez aux câbles de liaison. Avant de
déforme ou ne se décolore, n’exposez pas les enceintes
déplacer cet appareil, débranchez la fiche du cordon
à la lumière directe du soleil ni à une humidité
d’alimentation et les câbles qui le relient aux autres
excessive.
appareils. Ne tirez pas sur les câbles.
4. Évitez d’installer les enceintes dans un endroit exposé à
3. N’introduisez jamais votre main ou un objet dans le
la chute d’objets ou encore à l’écoulement ou aux
port situé sur le côté droit de l’appareil. Lorsque vous
éclaboussures de liquides.
déplacez l’appareil, veillez à ne pas le saisir par ce port;
5. Ne posez pas les objets suivants sur le dessus des
vous risquez de vous blesser et/ou d’endommager
enceintes:
l’appareil.
– D’autres appareils qui pourraient endommager ou
4. Cet appareil étant doté d’un amplificateur de puissance,
décolorer la menuiserie des enceintes;
il rayonne de la chaleur, à travers son panneau arrière.
– Des objets enflammés (par exemple, des bougies)
Placez cet appareil loin des murs et ménagez au moins
qui pourraient endommager les enceintes, provoquer
20 cm au-dessus, derrière et sur chaque côté pour
une blessure, voire un incendie;
réduire les risques d’incendie ou d’endommagement.
– Des récipients contenant des liquides qui pourraient
Par ailleurs, ne positionnez pas cet appareil de telle
se renverser, endommager les enceintes ou être à
manière que son panneau arrière soit tourné vers le
l’origine d’une secousse électrique.
plancher ou en contact avec une paroi.
6. Ne placez pas les enceintes dans un endroit où elles
5. Si vous utilisez un humidificateur, veillez à réduire les
peuvent être heurtées, directement ou par la chute
risques de condensation à l’intérieur de cet appareil en
d’objets. Un emplacement stable garantit l’obtention de
ménageant suffisamment d’espace libre autour de lui et
meilleures sonorités.
en réglant l’humidificateur à une valeur convenable. La
7. Placer les enceintes sur des étagères ou dans un meuble
condensation peut provoquer un incendie, endommager
qui contient également la platine de lecture, peut
l’appareil et/ou être la cause d’une secousse électrique.
entraîner un phénomène de bouclage.
6. Ne couvrez pas le panneau arrière d’un journal, d’une
8. En cas de “saturation” , réduisez le niveau de sortie de
nappe, d’un rideau, etc., ce qui pourrait empêcher la
l’amplificateur. N’excitez pas l’amplificateur au point
chaleur de s’évacuer. Une augmentation anormale de la
qu’il écrête. Dans ce cas en effet, les enceintes
température intérieure de l’appareil peut provoquer un
pourraient être endommagées.
incendie, endommager l’appareil ou entraîner des
9. Vous devez être très attentif, si l’amplificateur peut
blessures.
délivrer une puissance supérieure à la puissance
7. Ne branchez pas la fiche du cordon d’alimentation sur
maximale admissible par les enceintes, à ce que cela ne
une prise secteur aussi longtemps que tous les
se produise pas.
raccordements ne sont pas terminés.
10. Ne nettoyez pas la menuiserie des enceintes avec un
8. La tension à utiliser est indiquée sur le panneau arrière.
produit chimique qui peut endommager leur finition.
Alimenter cet appareil sous une tension supérieure à la
Utilisez un chiffon sec et propre.
tension prescrite, peut provoquer un incendie,
11. Ne tentez pas de modifier les enceintes ni de les réparer.
endommager l’appareil et/ou entraîner des blessures.
Consultez le service Yamaha compétent si une
Yamaha ne saurait être responsable des dommages
réparation est nécessaire. Pour quelque raison que ce
résultant de l’utilisation d’une tension d’alimentation
soit, ne démontez pas la menuiserie des enceintes.
différente de la tension prescrite.
12. Prenez connaissance des erreurs fréquentes,
9. Le son à fréquences très graves produites par cet
mentionnées dans la section “Dépannage”, avant de
appareil peut agir sur la platine de lecture et provoquer
conclure que les enceintes sont défectueuses.
un bouclage. Dans ce cas, éloignez l’appareil de la
13. La détermination d’un endroit convenable est de
platine de lecture.
votre responsabilité. Yamaha ne saurait être
10. Cet appareil peut être endommagé par la production
responsable des accidents provoqués par le choix
permanente de certaines fréquences. Par exemple, si un
d’un emplacement qui ne conviendrait pas, ni par
signal sinusoïdal entre 20 Hz et 50 Hz est produit par un
l’installation incorrecte des enceintes.
disque d’essai ou des sons très graves sont générés par
un instrument de musique électronique, etc., ou encore
si le saphir de la platine de lecture frotte sur le
i Fr
Précautions
microsillon, il sera bon de réduire le niveau de sortie
Information concernant la Collecte et le
pour éviter les dommages.
Traitement des déchets d’équipements électriques
11. Si vous notez que cet appareil produit de la distorsion
et électroniques.
(par exemple, des “bruits secs et répétés”, un
“martèlement”), réduisez le niveau de sortie. Les
Le symbole sur les produits, l’emballage
fréquences très graves que contiennent certaines pistes
et/ou les documents joints signifie que les
sonores de film ou certains passages de musique
Français
produits électriques ou électroniques
populaire, peuvent endommager cet appareil.
usagés ne doivent pas être mélangés avec
12. Les vibrations produites par le son à fréquences très
les déchets domestiques habituels.
graves peuvent déformer les images affichées sur le
téléviseur. Dans ce cas, éloignez l’appareil du
Pour un traitement, une récupération et
téléviseur.
un recyclage appropriés des déchets
13. Pour débrancher la fiche du cordon d’alimentation,
d’équipements électriques et
saisissez la fiche mais ne tirez pas sur le cordon.
électroniques, veuillez les déposer aux
14. Si vous envisagez de ne pas utiliser cet appareil pendant
points de collecte prévus à cet effet,
une longue période (par exemple, pendant des congés),
conformément à la réglementation
débranchez la fiche du cordon d’alimentation au niveau
nationale et aux Directives 2002/96/EC.
de la prise secteur.
15. Installez l’appareil près de la prise secteur et à un
En vous débarrassant correctement des
endroit tel que la fiche secteur soit facilement
déchets d’équipements électriques et
accessible.
électroniques, vous contribuerez à la
sauvegarde de précieuses ressources et à
• Commutateur VOLTAGE SELECTOR
la prévention de potentiels effets négatifs
(Pour les modeles a destination de la Chine, de la
sur la santé humaine qui pourraient
Coree, de l’Asie et les modeles generaux)
advenir lors d’un traitement inapproprié
Vous devez régler le commutateur de tension situé
des déchets.
sur le panneau arrière de l’unité en fonction de la
Pour plus d’informations à propos de la
tension appliquée dans votre pays AVANT de bran-
collecte et du recyclage des déchets
cher l’unité au réseau électrique. Les tensions prises
d’équipements électriques et
en charge sont les suivantes : 110-120/220-240 V
électroniques, veuillez contacter votre
CA, 50/60 Hz.
municipalité, votre service de traitement
Tant que cet appareil est branché à la prise de courant,
des déchets ou le point de vente où vous
il n’est pas déconnecté du secteur, même s’il est éteint.
avez acheté les produits.
L’appareil consomme donc une faible quantité
[Information sur le traitement dans
d’électricité.
d’autres pays en dehors de l’Union
Européenne]
Ce symbole est seulement valables dans
l’Union Européenne. Si vous souhaitez
vous débarrasser de déchets
d’équipements électriques et
électroniques, veuillez contacter les
autorités locales ou votre fournisseur et
demander la méthode de traitement
appropriée.
ii Fr

Précautions
Garantie Limitée pour l’Espace Économique Européenne et la Suisse
Merci d’avoir porté votre choix sur un produit Yamaha. Dans l’hypothèse où vous devriez recourir au service de notre garantie après-vente, veuillez
contacter votre revendeur Yamaha. Si vous rencontrez la moindre difficulté, n’hésitez pas à contacter directement Yamaha dans votre pays de résidence.
Vous pouvez trouver toutes informations complémentaires sur notre site Web (http://www.yamaha-hifi.com/ ou http://www.yamaha-uk.com/ pour les
résidents au Royaume-Uni).
Yamaha garantit votre produit contre tout défaut de fabrication, pièces et main d’oeuvre, pour une durée de 2 ans à compter de la première date de vente au
détail. Yamaha s’engage, dans les conditions décrites ci-après, à procéder à la réparation du produit défectueux (ou d’un quelconque de ses composants) ou
à son remplacement à l’appréciation de Yamaha en prenant à sa charge les coûts relatifs aux pièces détachées et à la main d’oeuvre. Yamaha se réserve le
droit de remplacer le produit par un modèle semblable, de par sa valeur et ses caractéristiques, dès lors que la commercialisation dudit produit a cessé ou
bien lorsque sa réparation s’avère économiquement injustifiée.
Conditions
1. La facture d’achat originelle ou un justificatif d’achat correspondant (indiquant la date d’achat, la référence du produit et le nom du revendeur) DOIT
accompagner le produit défectueux, ainsi qu’une description précise du dysfonctionnement constaté. En l’absence de cette preuve d’achat, Yamaha se
réserve le droit de refuser le service de la garantie et le produit peut être restitué aux frais du consommateur.
2. Le produit DOIT avoir été acheté par un distributeur agréé Yamaha au sein de l’Espace Economique Européen ou en Suisse.
3. Le produit doit n’avoir fait l’objet d’aucune modification ou altération, sauf accord écrit de Yamaha.
4. Les cas suivants font obstacle à l’application de la garantie:
a. Entretien périodique et réparation ou remplacement de pièces ayant subi une usure ou défaillance normale.
b. Dommages résulótant de:
(1) Réparation effectuée par le consommateur lui-même ou par un tiers non autorisé.
(2) Emballage ou manutention inadéquats lors du transport du produit pour réparation. Veuillez noter qu’il est de la responsabilité de l’expéditeur de
s’assurer que le produit est correctement emballé.
(3) Utilisation non-conforme du produit, correspondant aux cas non limitatifs (a) d’utilisation non-conforme à l’objet normal du produit ou
nonconforme aux instructions d’utilisation, de maintenance ou d’installation publiées par Yamaha, (b) ou d’utilisation du produit incompatible
avec les normes techniques ou de sécurité en vigueur au sein du pays d’utilisation.
(4) Accidents, foudre, dégât des eaux, incendie, ventilation incorrecte, fuite de pile ou toute autre cause échappant au contrôle de Yamaha.
(5) Les défauts de la configuration dans laquelle ce produit est incorporé et/ou l’incompatibilité avec des produits tiers.
(6) Produit importé au sein de l’EEE , et/ou en Suisse, par une autre entité que Yamaha, dès lors que ce produit n’est pas conforme aux normes
techniques ou de sécurité du pays d’utilisation et/ou aux normes des produits commercialisés par Yamaha au sein de l’EEE et/ou en Suisse.
(7) Produits non audiovisuels.
(Les produits soumis à une “Déclaration de Garantie AV de Yamaha” sont indiqués sur notre site Web à l’adresse http://www.yamaha-
hifi.com/ ou http://www.yamaha-uk.com/ pour les résidents au Royaume-Uni.)
5. Lorsque la garantie diffère entre le pays d’achat et le pays d’utilisation du produit, la garantie du pays d’utilisation est applicable.
6. Yamaha ne saurait être tenu pour responsable de quelconques pertes ou dommages, directs, consécutifs ou autres, sa responsabilité au titre de la
garantie étant strictement limitée à la réparation ou au remplacement du produit.
7. Nous vous invitons à sauvegarder toutes les données ou réglages personnalisés de votre produit, Yamaha ne pouvant être tenu responsable de leur
modification ou perte.
8. La présente garantie laisse intégralement subsister les droits que le consommateur peut détenir au titre de la garantie légale en vigueur ou au titre du
contrat de vente conclu avec son revendeur.
iii Fr
Sommaire
Contenu de l’emballage.....................................1
Connexion des enceintes.................................. 4
Schéma des connexions...................................... 4
Installation des enceintes .................................2
Connexion des câbles d’alimentation ............... 5
Installation des enceintes avant, centrale et
surround.........................................................2
Utilisation du subwoofer .................................. 6
Installation du subwoofer...................................2
Réglage du volume du subwoofer ..................... 6
Français
Fixation murale des enceintes avant et
Réponse en fréquences....................................... 6
surround.........................................................3
En cas de problème ............................................ 7
Fiche technique .................................................. 7
Contenu de l’emballage
Nous vous remercions d’avoir opté pour le système d’enceintes Yamaha NS-P380 5.1CH.
Vérifiez que l’emballage contient les éléments suivants:
■ Subwoofer
(NS-SW380 x1)
Le subwoofer (caisson de graves) dispose
d’un ampli de puissance interne et utilise
■ Enceintes avant
l’Advanced Yamaha Active Servo
(NS-B380 x2)
Te chnology de délivrant des infra-graves
Les enceintes avant sont
d’excellente qualité conférant un “punch”
des enceintes à 2 voies à
considérable à votre système home cinéma.
suspension acoustique.
■ Enceintes surround
(NS-B280 x2)
Les enceintes surround sont des
enceintes full range à suspension
acoustique.
■ Enceinte centrale
(NS-C380 x1)
L’e n ce int e centrale est une enceinte à
2 voies à suspension acoustique.
■ Enceintes avant
Patin antidérapant
Câble du subwoofer,
Câble d’enceinte, 25 m x1
5 m x1
(A couper en 5 parties pour
les enceintes avant, centrales
■ Enceinte centrale ■ Enceintes surround
et surround. Evitez de vous
blesser en préparant les
câbles.)
Patins antidérapants (20 pcs.) x1
Patins antidérapants: Si vous posez les enceintes sur
(Pour les enceintes avant, centrale
une surface plane, collez les patins antidérapants fournis
et surround.)
aux quatre coins de la surface inférieure des enceintes,
comme illustré. Les patins antidérapants empêchent les
enceintes de glisser.
1 Fr
Installation des enceintes
Avant de brancher les enceintes, placez-les chacune à
Enceinte centrale: Placez l’enceinte centrale à mi-
l’emplacement approprié. Le positionnement des
chemin entre les enceintes avant, en l’orientant
enceintes est un facteur très important car il influence
directement vers l’avant.
le son général du système. Placez donc chaque
enceinte à un endroit produisant un son de qualité
Installation du subwoofer
optimale à la position d’écoute. Voyez l’illustration ci-
dessous.
Placez le subwoofer à l’extérieur du champ, à côté de
L’e m p l a c ement du subwoofer est moins déterminant
l’enceinte avant droite ou gauche, comme illustré sous
que celui des autres enceintes car les sons très graves
A et B.
ne sont pas très directionnels. Pour en savoir plus,
voyez “Installation du subwoofer”.
AB
Remarque
•Si des enceintes sont trop près d’un téléviseur à
écran cathodique, la couleur de l’image peut s’en
ressentir et cela peut générer un bourdonnement.
Dans ce cas, éloignez les enceintes d’au moins 20 cm
du téléviseur. Les téléviseurs à écran LCD ou plasma
ne posent aucun problème.
C
Avant
droite
Téléviseur
Remarque: Des ondes
Subwoofer
stationnaires peuvent
entraver l’audition des
Avant
gauche
graves ici.
Centrale
Surround
droite
Subwoofer Enceinte avant
Surround
gauche
La position illustrée sous C est également possible
mais si le subwoofer est placé directement face à un
mur alors que votre position d’écoute est au centre de
la pièce, vous risquez de ne pas entendre assez de
graves en provenance du subwoofer. Ce phénomène
Installation des enceintes avant,
est dû à la formation “d’ondes stationnaires” entre les
deux murs parallèles qui annulent les sons graves.
centrale et surround
Dans ce cas, placez le subwoofer dans un angle, en
l’orientant vers un mur. Il peut être nécessaire de
Enceintes avant: Placez les deux enceintes avant à
rompre le parallélisme entre deux murs en plaçant des
gauche et à droite du téléviseur, à environ la même
étagères etc. le long de ces murs.
hauteur que ce dernier et en les orientant directement
vers l’avant.
Enceintes surround: Placez les enceintes surround
gauche et droite derrière la position d’écoute, à environ
1,8 m du sol et en les tournant légèrement vers
l’intérieur.
Vous pouvez poser les enceintes avant et surround sur
des tables ou autres supports, voire les fixer aux murs.
Pour en savoir plus, voyez “Fixation murale des
enceintes avant et surround” à la page 3.
2 Fr
Installation des enceintes
Avertissements
Fixation murale des enceintes
•Chaque enceinte avant pèse 1,0 kg et chaque
avant et surround
enceinte surround pèse 0,45 kg. Ne montez pas les
enceintes sur une paroi en contreplaqué trop
Vous pouvez fixer les enceintes avant et surround sur
mince ni sur un mur en matériau peu résistant.
un mur de la façon suivante. Les enceintes avant
Les vis risqueraient alors d’être arrachées du mur,
Français
peuvent être fixées verticalement ou horizontalement.
provoquant la chute et l’endommagement des
enceintes ainsi que des blessures éventuelles.
1 Fixez les vis dans un mur solide ou dans un
•Ne fixez pas les enceintes au mur avec des clous,
renfort mural résistant, comme illustré ci-
des fixations adhésives ou toute autre matériel
dessous. Utilisez des vis auto-taraudeuses de
précaire. Avec le temps et les vibrations, les
3,5 à 4 mm de diamètre.
enceintes risquent de tomber.
•Pour éviter de trébucher sur les câbles d’enceintes
2 Suspendez chaque enceinte en insérant ses
et prévenir les accidents que cela peut causer, fixez
orifices sur les vis protubérantes.
les câbles le long du mur.
•Fixez les enceintes au mur de sorte que personne
Remarque
ne risque de les heurter de la tête.
•Vérifiez que la tige de la vis s’insère bien dans la
section étroite de l’orifice. Faute de quoi, l’enceinte
risque de tomber.
■ Enceintes avant ■ Enceintes surround
Mur/renfort
Verticale
Mur/renfort
mural
mural
45 mm
6mm
6 mm
Minimum
150 mm
Minimum
20 mm
20 mm
Horizontale
150 mm
3 Fr
Connexion des enceintes
Attention: Vérifiez que les câbles d’alimentation du subwoofer et de vos autres éléments AV sont débranchés des
prises secteur avant d’effectuer la moindre connexion.
Schéma des connexions
SPEAKERS
CENTER
FRONT B
ANTENNA
SPEAKERS
OUT
DVD
DTV/CBL
CENTER
FRONT B
DOCK
DVD
COMPONENT VIDEO
DTV/CBL
DVR
MONITOR
HDMI
OUT
P
R
AM
GND
DIGITAL INPUT
P
B
DVD
DTV/CBL
VIDEO
OPTICAL
IN
DVR
OUT
MONITOR
OUT
UNBAL.
FM
CD
Y
DTV/
MULTI CH INPUT
FRONT
SURROUND
DVD
DTV/CBL
IN
DVR
OUT
AUDIO
CBL
CENTER
CD
IN
(PLAY)
MD/
CD-R
OUT
(REC)
OUTPUT
SUB
FRONT A
WOOFR
DVD
COAXIAL
SUBWOOFER
FRONT A
4 Fr
D
OUTPUT
SUB
WOOFR
D
/
D
Enceintes surround
Droite Gauche
Enceinte centrale
SURROUND
OUT
-R
(REC)
Amplificateur
Subwoofer
Droite Gauche
A une prise secteur
Enceintes avant
Remarque: L’agencement exact
des borniers d’enceintes varie
selon votre amplificateur.
Connexion des enceintes
■ Préparation des câbles d’enceintes
■ Utilisation des bornes d’enceintes
Quand vous avez installé les enceintes, découpez le
Négatif (–)
Positif (+)
câble d’enceinte de 25 m en cinq câbles pour brancher
les deux enceintes avant, l’enceinte centrale et les deux
Remarque: Vérifiez
enceintes surround.
que la borne sert le
fil dénudé et non
Français
2
1 Coupez le câble d’enceinte fourni en segments
l’isolant.
11
adéquats pour les enceintes avant, centrale et
33
surround. Il vous faut cinq câbles.
1 Appuyez sur le levier de la borne et maintenez-
2 Dénudez l’extrémité de chaque fil sur environ
le.
10 mm.
2 Insérez le fil dénudé.
3 Torsadez la portion dénudée des fils.
3 Relâchez le levier pour qu’il se referme
convenablement en serrant le fil dénudé et
10 mm
non l’isolant.
4 Vérifiez que les fils sont bien maintenus en
tirant doucement dessus.
Bon Mauvais
Remarques
•Veillez à ce que les portions dénudées des câbles
Remarques
d’enceintes ne se touchent jamais car cela risque
•Faites des câbles d’enceintes aussi courts que
d’endommager l’enceinte ou l’amplificateur.
possible. Evitez de lier ou d’enrouler la longueur de
•Si les connexions sont incorrectes, les enceintes ne
câble excédentaire.
produisent aucun son.
•Torsadez correctement les fils dénudés pour bien
rassembler les brins individuels.
■ Connexion des enceintes
•Veillez à ne pas vous blesser lors de la préparation
Branchez chaque enceinte aux bornes adéquates sur
des câbles d’enceintes.
l’amplificateur à l’aide des câbles préparés au préalable.
Voyez la section “Schéma des connexions” à la page 4 à
titre de référence.
Vei lle z à respecter la polarité en branchant les câbles:
reliez les bornes positives (+) d’une part et les bornes
négatives (–) d’autre part. Si vous inversez la polarité
lors de la connexion d’une enceinte, le son est dénaturé
et manque de graves.
Dans les réglages de votre ampli-tuner AV relatifs à la
taille des enceintes, choisissez Petites ou Small (ou “S”)
pour toutes les enceintes du système NS-P380.
Si vous branchez le subwoofer à un amplificateur DSP
ou un ampli-tuner AV Yamaha, utilisez sa sortie
SUBWOOFER ou LOW PASS.
Connexion des câbles
d’alimentation
Quand toutes les connexions d’enceintes et du
subwoofer sont effectuées, branchez les câbles
d’alimentation du subwoofer, de l’amplificateur et de
vos autres composants AV à des prises secteur.
5 Fr
Utilisation du subwoofer
Réglage du volume du subwoofer
2
La première fois que vous utilisez le subwoofer, réglez
la balance entre son niveau et celui des enceintes avant
1
en procédant de la façon suivante.
3
1 Mettez les autres éléments AV sous tension.
2 Réglez la commande VOLUME du subwoofer
au minimum (0).
4
3 Réglez le commutateur POWER en position
ON.
Le témoin d’alimentation en face arrière s’allume.
4 Lancez la reproduction d’une source audio
riche en graves. Réglez l’amplificateur à un
niveau d’écoute adéquat.
Panneau arrière
5 Augmentez progressivement le volume du
1 Témoin d’alimentation
subwoofer avec la commande VOLUME pour
Il s’allume quand le commutateur POWER est en
régler la balance entre le subwoofer et les
position ON et s’éteint quand le commutateur
autres enceintes.
POWER est en position OFF.
2 Prise INPUT
Remarques
Entrée permettant de relier la sortie Subwoofer de
•Quand le volume du subwoofer a été réglé, vous
niveau ligne de l’amplificateur.
pouvez laisser la commande VOLUME du
subwoofer à la position atteinte et vous servir de la
3 Commande VOLUME
commande de volume de l’amplificateur pour régler
Règle le volume du subwoofer. Tournez cette
le volume du système entier.
commande vers la droite pour augmenter le
•Si vous remplacez les enceintes avant (NS-B380) par
volume et tournez-la vers la gauche pour le
d’autres enceintes, réglez à nouveau la balance entre
diminuer.
le subwoofer et les enceintes.
4 Commutateur POWER
•Les courbes de réponse en fréquences ci-dessous
Réglez-le en position ON pour mettre le
indiquent comment le subwoofer et les enceintes
subwoofer sous tension. Réglez-le en position
avant s’unissent pour délivrer un son full range.
OFF pour mettre le subwoofer hors tension.
Réponse en fréquences
Le schéma ci-dessous illustre la réponse en fréquences
Le schéma ci-dessous illustre la réponse en fréquences
du subwoofer (NS-SW380).
combinées du subwoofer (NS-SW380) et des enceintes
avant (NS-B380).
100 dB
100 dB
90
90
80
80
70
70
NS-SW380
60
60
NS-B380
50
50
40
40
20 50 100 200 500 Hz
20 50 100 200 500 Hz
6 Fr
