Pioneer X-SMC00BT-W: Hang from the wall to use
Hang from the wall to use: Pioneer X-SMC00BT-W
Table of contents
- CAUTION Operating Environment
- Information for users on collection and disposal of old equipment and used batteries Radio wave caution POWER-CORD CAUTION
- Contents
- Chapter 1: Before you start What’s in the box Loading the batteries in the remote control
- Using the remote control
- Chapter 2: Part names and functions Remote control
- Hang from the wall to use
- Front panel
- Top panel/Rear panel
- Change the interchangeable panel
- Chapter 3: Connections Plugging in Connecting antenna
- Chapter 4: Getting started To turn the power on General control
- Sound controls Setting the wake-up timer
- Calling the wake-up timer Using Headphones Using the sleep timer
- Chapter 5: iPod/iPhone/iPad mini playback Connecting your iPod/iPhone Confirming what iPod/iPhone/iPad mini models are supported
- Playing iPod/iPhone/iPad mini
- Chapter 6: Disc playback Playing discs or files
- Advanced CD or MP3/WMA disc playback
- Disc playback06 Programmed play (CD or MP3/WMA) About downloading MP3/WMA About folder playback order
- Specify the folder to play Switch the display contents
- Chapter 7: USB playback Playing USB storage devices
- Specify the folder to play Playing in the desired order (Programmed Play)
- Chapter 8: Using the tuner Listening to the radio broadcasts
- Using the Radio Data System (RDS) Searching for RDS programs An introduction to RDS
- Information provided by RDS Notes for RDS operation Using the Auto Station Program Memory (ASPM)
- Chapter 9: Other connections Connecting auxiliary components
- Chapter 10: Bluetooth Audio playback Music playback using Bluetooth wireless Pairing with the unit (Initial registration) technology
- Listen to music on the unit from a Radio wave caution Bluetooth capable device Scope of operation
- Radio wave reflections Precautions regarding connections to products supported by this unit
- Chapter 11: Additional information Troubleshooting General problem Problem Check Remedy
- Problem Check Remedy When a USB storage device is connected Problem Check Remedy
- Problem Check Remedy When an iPod/iPhone/iPad mini is connected Problem Remedy
- Playable discs and formats Cautions on use
- Handling discs
- About iPod/iPhone Restoring all the settings to the defaults
- Specifications
Part names and functions02
11
Tuner
control buttons
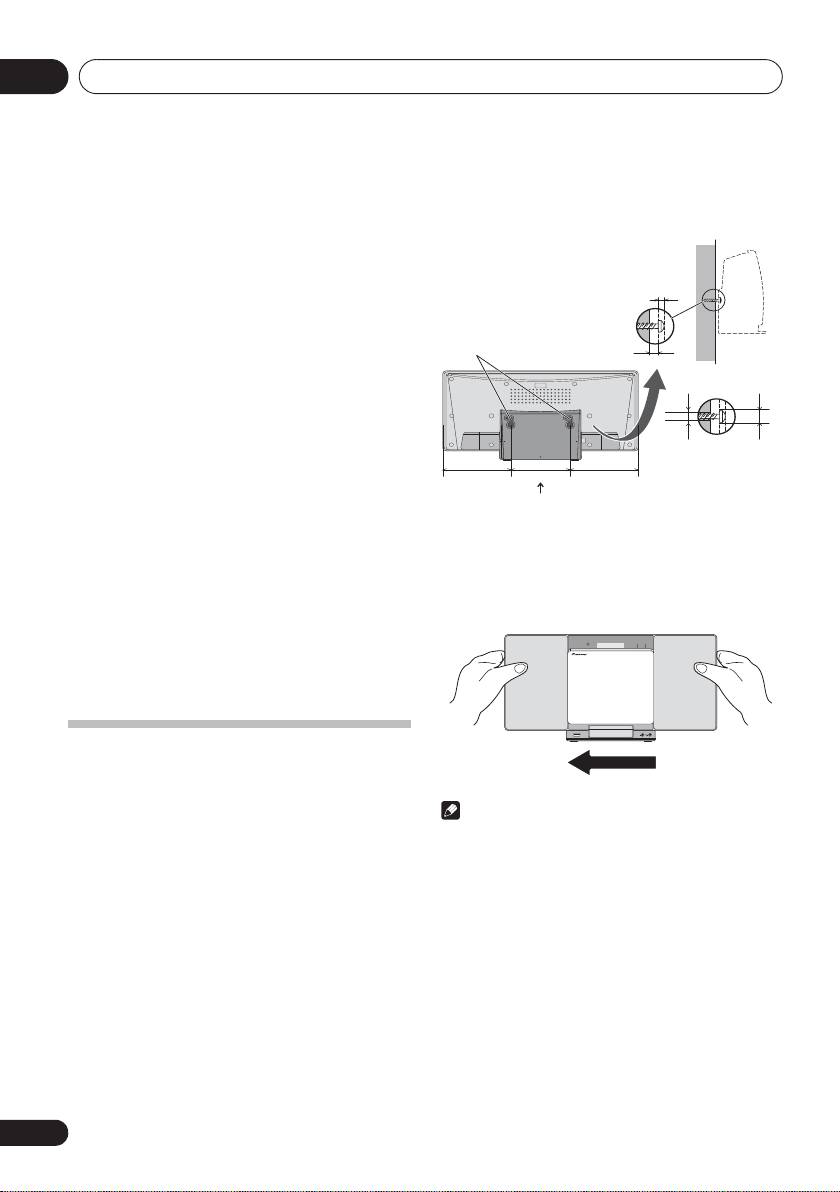
1 Screw the wall hanging screws into the
ST/MONO
wall, putting them the specified attachment
Use to switch the sound mode between stereo and
measurement (130 mm) apart.
monaural. (page 24)
RDS ASPM
Use to search for RDS Auto station program memory
(page 25).
RDS PTY
Use to search for RDS program types (page 25).
RDS DISPLAY
Press to change the RDS display for information mode
(page 25).
12 OPEN/CLOSE
Use to open or close the electric slide CD door (page 18).
ANTENNADC IN
13 Sound control buttons
Adjust the sound quality (page 14).
14 RANDOM
Randomize order of track playback from a CD, iPod or USB
(page 19).
2 Insert the wall hanging screws into the lock
15
REPEAT
holes.
Press to change the repeat play setting from a CD, iPod or
USB (page 19).
3
Slide to the left to secure in place.
(Slide
distance is around 10 mm)
16 Volume control buttons
Use to set the listening volume (page 13).
17
DIMMER
Dims or brightens the display. The brightness can be
controlled in four steps (page 13).
Hang from the wall to use
When hanging the unit from a wall, firmly screw the wall
hanging screws (sold separately) into the wall, and confirm
that the wall is capable of holding the unit safely. If the
materials or strength of the wall cannot support the weight of
Note
the unit, then there is the possibility of the unit falling off.
• When attaching the unit to the wall, there is the
possibility of it falling depending on how it is attached.
Take due care to avoid any accidents.
• Select a location for the placement/installation of unit
that is sufficiently strong enough to hold the weight of
the unit. If you do not know the strength etc. of the wall,
then consult with a professional.
• The company bears no responsibility for accidents or
damages caused by inadequate installation/attachment,
incorrect use, modifications, natural disasters etc.
• Place all cables along the wall to prevent anyone from
tripping over them.
• Do not exchange the changeable panel while the unit is
hanging from a wall.
• When the unit is hanging from a wall, pay extra attention
to make sure your iPod/iPhone does not fall.
• Do not hold the unit by grabbing onto the iPod/iPhone
connector.
8
En
Wall hanging screws
(commercially available)
2 mm to 3 mm
Lock holes
6 mm to 7 mm
Screw head
ø9 mm to ø12 mm
Screw diameter
ø4 mm
150 mm
130 mm
150 mm
Suggested screw
diameter
Attachment measurement for
(Please use screws that
wall hanging screws
match the wall strength
and wall materials)
;60&B6<;(B(QERRN࣮࣌ࢪ㸰㸮㸯㸱ᖺ㸯᭶㸰㸯᪥ࠉ᭶᭙᪥ࠉ༗ᚋ㸳㸯㸴ศ
POWER ON TIMER
PUSH OPEN
AUDIO IN
