Pioneer VSX-529-S: Initial Setup Before you start Automatically setting up for surround sound (MCACC) (VSX-824/VSX-529/VSX-424)
Initial Setup Before you start Automatically setting up for surround sound (MCACC) (VSX-824/VSX-529/VSX-424): Pioneer VSX-529-S
Table of contents
- Quick Start Guide What’s in the box
- Connecting up Connecting the speakers
- Connecting a TV and playback Connecting antennas Connecting to the network through LAN interface
- Initial Setup Before you start Automatically setting up for surround sound (MCACC) (VSX-824/VSX-529/VSX-424)
- Basic playback Multichannel playback
- Listening to the radio Saving station presets Listening to station presets Playing an iPod Listening to Internet radio stations
- To enjoy the many functions of the unit to the fullest extent
4
Initial Setup
Before you start
1
Put the batteries in the remote control.
The batteries included with the unit are to check initial
operations; they may not last over a long period. We
recommend using alkaline batteries that have a longer life.
2
Switch on the receiver and your TV.
BD
DVD
INPUT SELECT
SOURCE
SLEEP
TV
CONTROL
CD
INPUT
RECEIVER
RECEIVER
SLEEP
CTRL
BD
GAME
HDMI
S.SEL
ECO
STANDBY/ON
RECEIVER SIGNAL SEL
SOURCE
INPUT
3
Switch the TV input so that it connects to the
receiver.
4
Turn the subwoofer on and turn up the
volume.
CAUTION
•
Do not use or store batteries in direct sunlight or other
excessively hot place, such as inside a car or near a
heater. This can cause batteries to leak, overheat, explode
or catch fire. It can also reduce the life or performance of
batteries.
•
When inserting the batteries, make sure not to damage
the springs on the battery’s
*
terminals. This can cause
batteries to leak or overheat.
•
When disposing of used batteries, please comply with
governmental regulations or environmental public
institution’s rules that apply in your country/area.
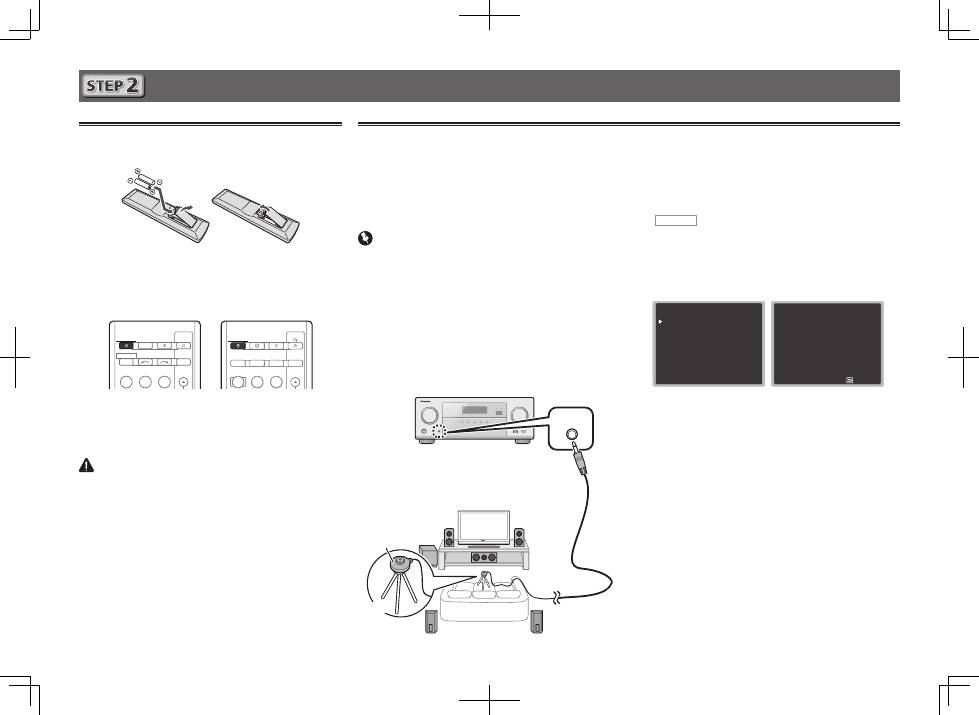
Automatically setting up for surround sound (MCACC)
(VSX-824/VSX-529/VSX-424)
The Auto Multi-Channel ACoustic Calibration (MCACC) setup
uses the supplied setup microphone to measure and analyze
the test tone that is outputted by the speakers. This setup
enables automatic high precision measuring and settings;
utilizing it will create an optimum user listening environment.
Important
•
Measure in a quiet environment.
•
If you have a tripod, use it to place the microphone so
that it’s about ear level at your normal listening position.
Otherwise, place the microphone at ear level using a table
or a chair.
•
Accurate measurements may not be possible if there are
obstacles between the speakers and the listening position
(microphone).
•
When measuring, step away from the listening position,
and operate using the remote control from the external
side of all the speakers.
1
Connect the supplied setup microphone.
MCACC
SETUP MIC
2
Press BD button on the remote control to
switch to BD entry.
3
Press RECEIVER CTRL (VSX-824/VSX-529),
RECEIVER
(VSX-424/VSX-329) on the remote
control, then press the HOME MENU button.
The Home Menu appears on your TV.
4
Select ’Auto MCACC’ from the Home Menu,
then press ENTER.
Automatic measuring will start.
Home Menu
1 . Auto MCACC
2 . Manual SP Setup
3 . Input Assign
4. Auto Power Down
5. HDMI Setup
6. Network Standby
7. MHL Setup
8. OSD Setup
1 . Auto MCACC
Now Analyzing
Surround Analyzing
Speaker System
X.Over
Speaker Distance
Channel Level
Acoustic Cal EQ
Return
•
Measuring will take about 3 to 12 minutes.
5
Follow the instructions on-screen.
•
Automatic setting is complete when the Home Menu
screen appears.
•
If the power is cut off, the protection circuit that activates
when the naked wires of the cable cord is touching the
rear panel or when the naked
and
*
cords are touching
each other may be activated.
Twist back the cable cords of the speakers to the normal
position, and connect, making sure that the naked cable
cord cannot be seen from outside the terminal. Do the
same for the connections on the speaker side.
•
If
ERR
is displayed, check to make sure that the speakers
are connected correctly.
6
Make sure the setup microphone is
disconnected.
Tripod
Microphone
VSX-824
VSX-424/VSX-329
VSX-824/VSX-529
