Pioneer S-71W: PANEL FACILITIES FRONT PANEL REAR PANEL
PANEL FACILITIES FRONT PANEL REAR PANEL: Pioneer S-71W
Table of contents
- IMPORTANT VENTILATION CAUTION Operating Environment POWER-CORD CAUTION
- CONTENTS INSTALLATION ACCESSORY ITEMS FEATURES IN COMBINATION WITH SPEAKERS
- MAINTENANCE OF EXTERNAL SURFACES: Installation Precautions
- PANEL FACILITIES FRONT PANEL REAR PANEL
- CONNECTIONS LINE LEVEL CONNECTION SPECIFICATIONS CONNECTING THE POWER CORD OPERATION
- TROUBLESHOOTING SYMPTOM CAUSE REMEDY
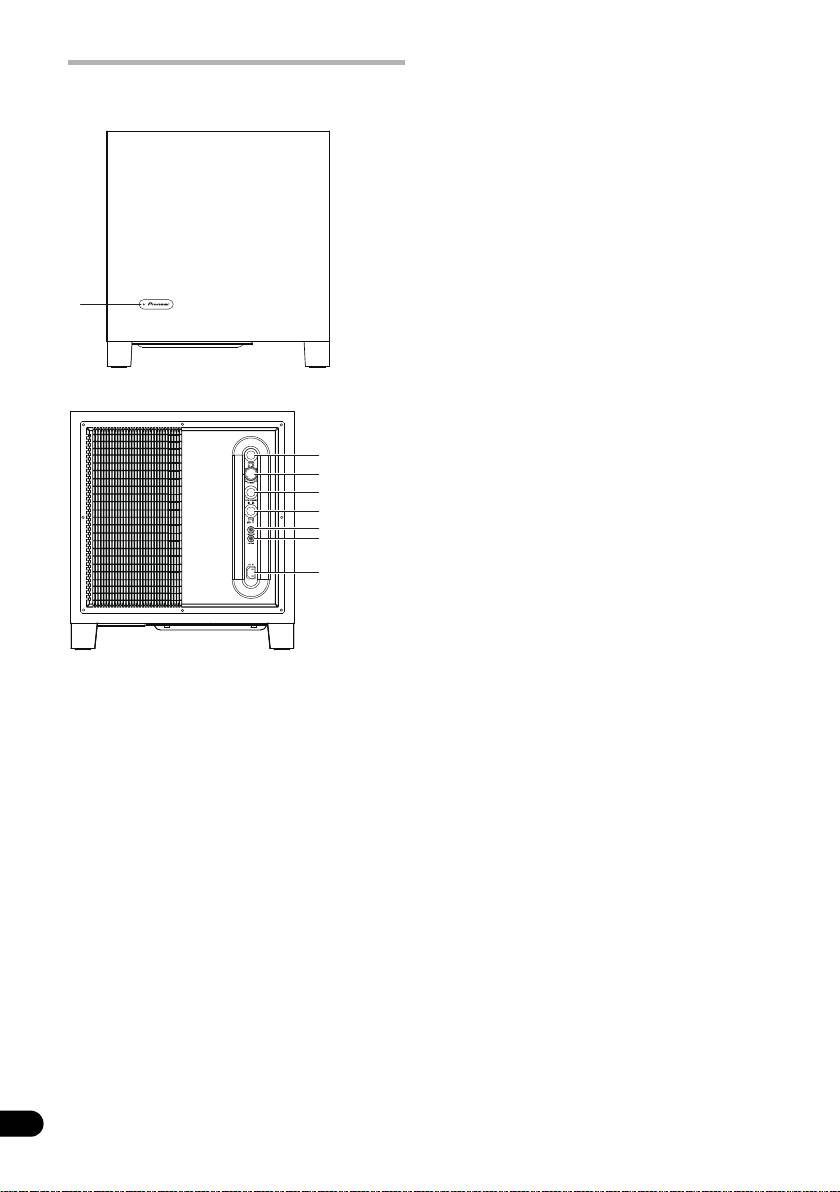
4 Auto Standby switch (AUTO STANDBY)
PANEL FACILITIES
Turning the Auto Standby function on or
off.
FRONT PANEL
NOTE:
• The default setting for Auto Standby switch
is ON.
Auto standby function
The power is automatically set to the standby
mode (off) if there is no input signal for
approximately 12 minutes (the power
indicator turns red). The power automatically
turns on when a signal is input. The auto
1
STANDBY/ON
standby function is deactivated when Auto
Standby switch is set to OFF.
NOTE:
• There may be cases where a connected
REAR PANEL
component outputs noise or some other
non-audio signal which causes this system
to automatically power on when in Auto
Standby mode. If this happens, switch off
the Auto Standby mode and switch the
system on/off manually.
5 Phase switch (PHASE)
When set to 180
°, the output phase
becomes the reverse of the input signal,
and when set to 0
°, it is in the same phase
as the input signal.
• Normally, the switch is set to 0
°.
But when the sound connection
between the subwoofer and the left and
1 Power Indicator (STANDBY/ON)
right speakers sounds unnatural, try
Lights blue when the power has been
switching to 180
° and set the switch in
switched ON. Lights red when the unit is in
the position where the sound is natural.
the standby condition.
6 Line Level Output terminal (LINE OUT)
NOTE:
Used for connecting other equipment
through the amplifier. The signal output
• The power is still supplied even when the
from this jack is not affected in any way by
power indicator is off. The power plug
(interrupter) must be unplugged in order to
the settings of the variouscontrols on the
completely cut the power supply. When not
unit.
using this product for long periods of time,
7 Line Level Input terminal (LINE IN)
such as when traveling, unplug the power
Connect to the SUBWOOFER PREOUT
cord (interrupter) from the power outlet for
terminal of an amplifier or receiver, with the
safety purposes. Failure to do so could lead
specially provided RCA plug cord.
to fire.
8AC IN
2 Power switch (POWER)
• Connect the power cord to the powered
Switches the subwoofer between ON and
subwoofer unit’s AC IN.
OFF.
• Connect the power cord to an AC socket.
3 Volume knob (VOLUME)
Sets the subwoofer volume.
• Turn the knob slowly from the MIN
position.
• With this unit, the bass level can be
independently set, so do not turn up the
6
bass on the AV amplifier.
En
2
3
4
5
6
7
8
S-71W_XRC3473A@en.fm 6 ページ 2009年9月11日 金曜日 午後4時48分
