Dell Latitude D610: Keyboard
Keyboard : Dell Latitude D610
Back to Contents Page
Keyboard
Dell™Latitude™D610ServiceManual
Removing the Keyboard
Installing the Keyboard
Removing the Keyboard
1. Follow the instructions in "Preparing to Work Inside the Computer."
2. Remove the center control cover (see "Removing the Center Control Cover").
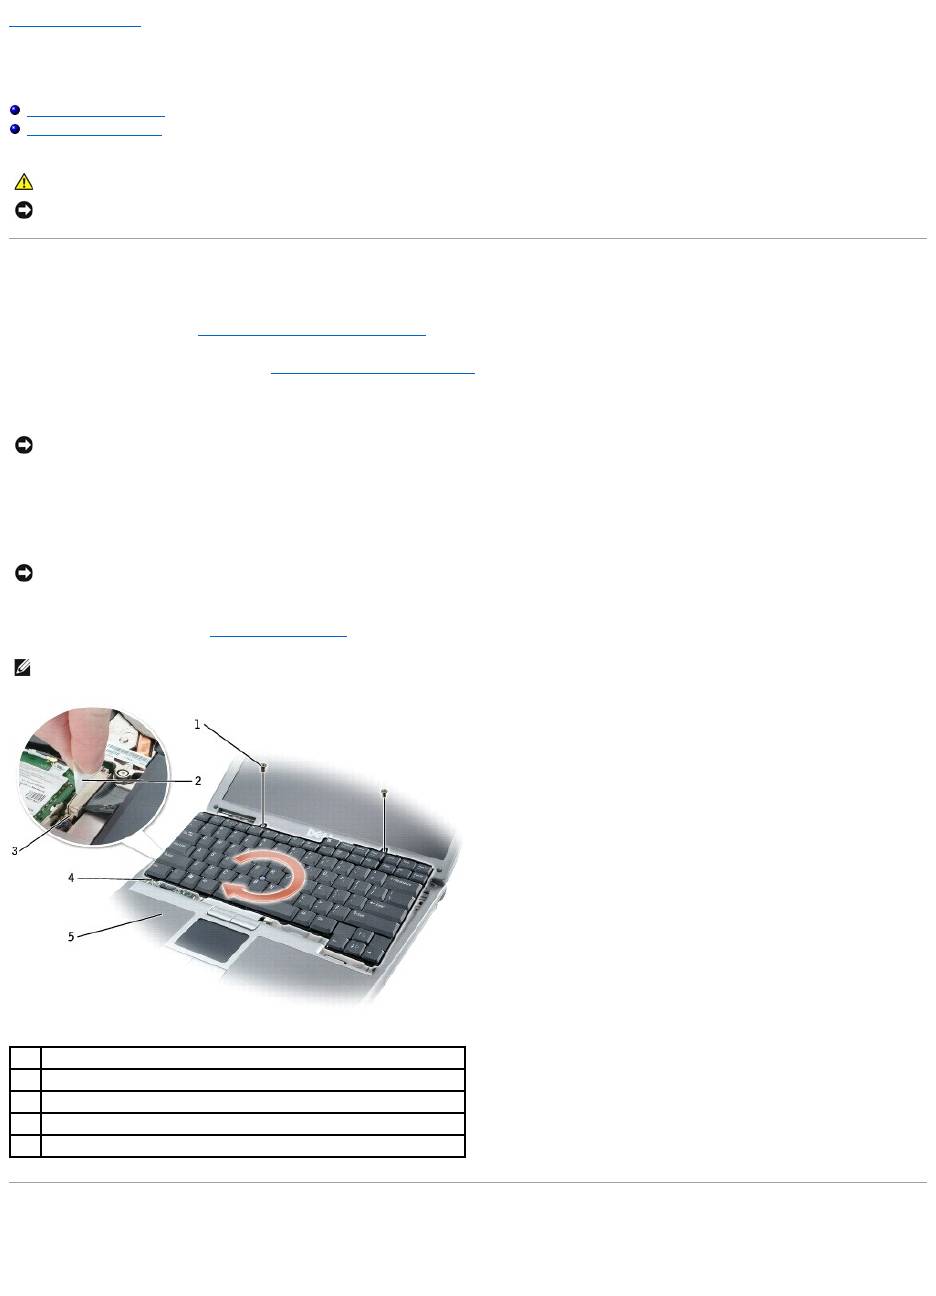
3. Remove the two M2.5 x 5-mm screws across the top of the keyboard.
4. Lift and rotate the keyboard clockwise 90 degrees to access the pull-tab.
5. Using the keyboard cable pull-tab, pull up to disconnect the keyboard cable connector from the keyboard connector on the system board.
6. Remove the keyboard (see "Removing the Keyboard").
Installing the Keyboard
1. Connect the keyboard cable connector to the keyboard connector on the system board.
CAUTION: Before you begin any of the procedures in this section, follow the safety instructions in the Product Information Guide.
NOTICE: To avoid electrostatic discharge, ground yourself by using a wrist grounding strap or by periodically touching an unpainted metal surface (such
as the back panel) on the computer.
NOTICE: When you remove the keyboard, pull up gently to avoid damaging the keyboard cable.
NOTICE: The keycaps on the keyboard are fragile, easily dislodged, and time-consuming to replace. Be careful when removing and handling the
keyboard.
NOTE: When you replace the keyboard, ensure that the keyboard tabs are completely in place to avoid scratching the palm rest.
1
M2.5 x 5-mm screws (2)
2
keyboard cable pull-tab
3
keyboard connector on system board
4
keyboard tabs (5)
5
palm rest

2. Slide the keyboard tabs at the bottom of the keyboard into the base of the computer.
3. Tighten the two M2.5 x 5-mm screws across the top of the keyboard.
4. Replace the center control cover (see "Installing the Center Control Cover").
Back to Contents Page
NOTE: You may need to slightly push the keyboard tabs into the base of the computer.
Оглавление
- Dell™Latitude™D610ServiceManual
- Before You Begin
- Flashing the BIOS
- Internal Card With Bluetooth® Wireless Technology
- Coin-Cell Battery
- Microprocessor Module
- Display Assembly and Display Latch
- Fan
- Hard Drive
- Center Control Cover
- Keyboard
- Base Latch
- Mini PCI Card
- Palm Rest
- Pin Assignments for I/O Connectors
- Speaker Assembly
- System Board
- System Components
- Microprocessor Thermal-Cooling Assembly
- Memory Module, Modem, and Devices
