Asus D452EP: Chapter 6: Upgrading your Notebook PC
Chapter 6: Upgrading your Notebook PC: Asus D452EP

Chapter 6:
Upgrading your Notebook PC
Notebook PC E-Manual
93

94
Notebook PC E-Manual
Installing a Random-access
Memory module*
Upgrade the memory capacity of your Notebook PC by installing a RAM
(random-access memory module) in the memory module compartment.
The following steps show you how to install a RAM module into your
Notebook PC:
WARNING! Disconnect all the connected peripherals, any telephone or
telecommunication lines and power connector (such as external power
supply, battery pack, etc.) before removing the compartment cover.
IMPORTANT! Visit an authorized service center or retailer for information
on RAM module upgrades for your Notebook PC. Purchase RAM modules
from authorized retailers of this Notebook PC to ensure maximum
compatibility and reliability.
NOTE: The appearance of your Notebook PC’s bottom side and RAM
module may vary per model but the RAM module installation remains the
same.
* on selected models only

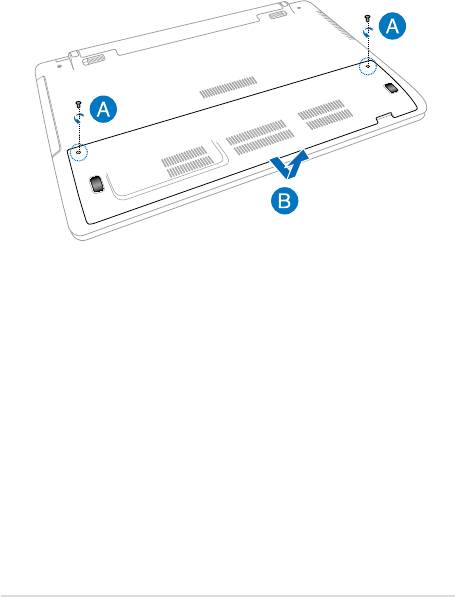
A. Loosen the screw of the Notebook PC’s compartment cover.
B. Pull out the compartment cover and remove it completely from
your Notebook PC.
Notebook PC E-Manual
95
96
Notebook PC E-Manual
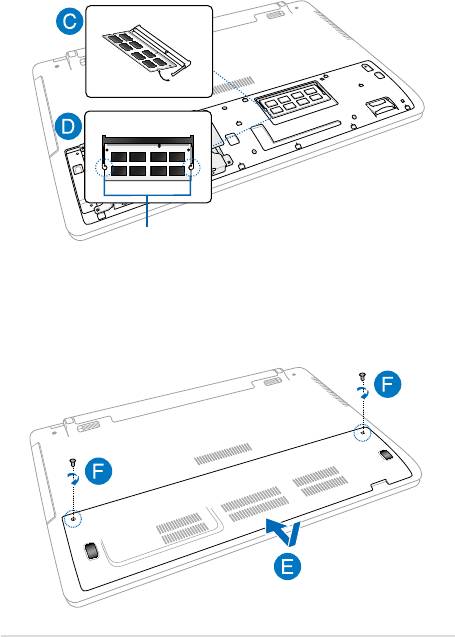
C. Align and insert the RAM module into the RAM module slot.
D. Push down the RAM module until it clicks in place
o
30
angle
notches
E. Align then push down the compartment cover back into place.
F. Reattach and tighten the screw that you removed earlier.

Replacing the Hard Disk Drive*
Refer to the following steps if you need to replace the HDD (hard disk
drive) of your Notebook PC.
IMPORTANT! Purchase an HDD from authorized retailers of this Notebook
PC to ensure maximum compatibility and reliability. It is recommended
that you replace the HDD under professional supervision. You may also
visit an authorized service center for further assistance.
WARNING! Disconnect all the connected peripherals, any telephone or
telecommunication lines and power connector (such as external power
supply, battery pack, etc.) before removing the compartment cover.
NOTE: The appearance of your Notebook PC’s bottom side and HDD may
vary per model but the HDD installation remains the same.
* on selected models only
Notebook PC E-Manual
97
98
Notebook PC E-Manual
A. Loosen the screw of the Notebook PC’s compartment cover.
B. Pull out the compartment cover and remove it completely from
your Notebook PC.
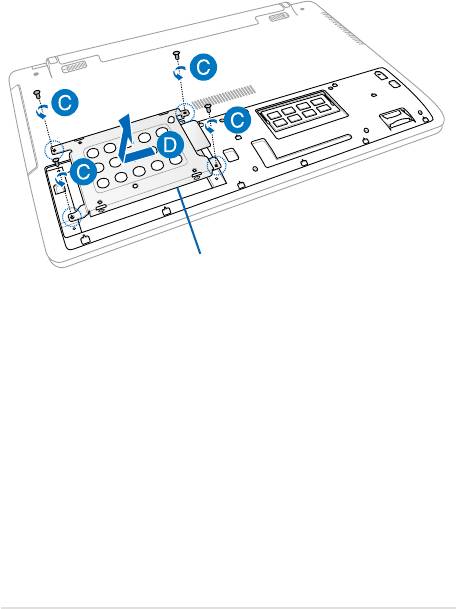
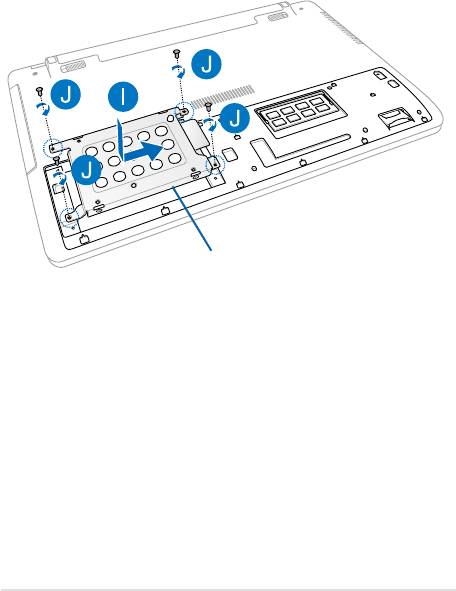
C. Remove the screws securing the HDD bay to the compartment.
D. Disconnect the HDD bay from the HDD port then remove the
HDD bay from the compartment.
HDD bay
Notebook PC E-Manual
99
100
Notebook PC E-Manual
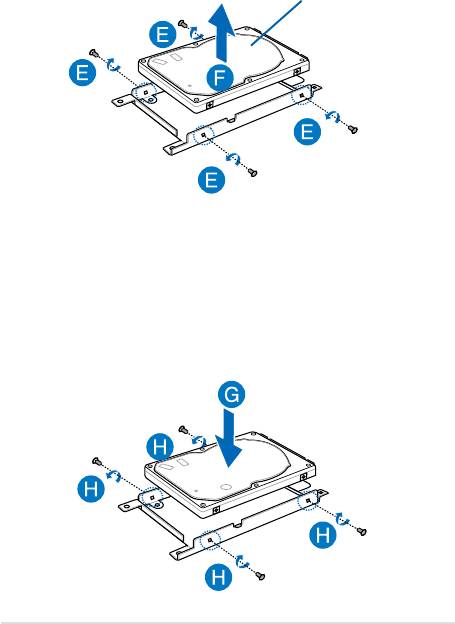
E. Turn the HDD bay upside down then remove the screws.
F. Remove the old HDD from the HDD bay.
HDD
G. Place the new HDD with its PCB (printed circuit board) facing the
HDD bay. Ensure that the port connectors of your HDD are not
obstructed by any part of the HDD bay.
H. Reattach and secure the HDD with the screws you removed
earlier.
I. Replace the HDD bay back in the compartment, with the HDD
connector aligned with the Notebook PC’s HDD port. Push the
HDD bay until it connects with the Notebook PC.
J. Secure the HDD bay with the screws you removed earlier.
HDD bay
Notebook PC E-Manual
101
102
Notebook PC E-Manual
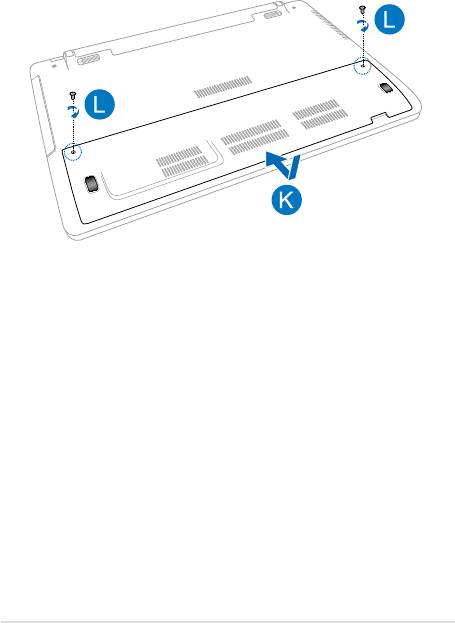
K. Align then push down the compartment cover back into place.
L. Reattach and tighten the screw that you removed earlier.

Installing a new battery pack*
WARNING! Turn o your Notebook PC and disconnect all connected
peripherals, any telephone or telecommunication lines and power
connector, before removing the battery pack.
IMPORTANT! Purchase battery packs from authorized retailers of this
Notebook PC to ensure maximum compatibility and reliability.
NOTE: The following steps are also applicable for removing and replacing
the battery pack of your Notebook PC.
* on selected models only
Notebook PC E-Manual
103
104
Notebook PC E-Manual
Refer to the following steps when installing a new battery pack for your
Notebook PC.
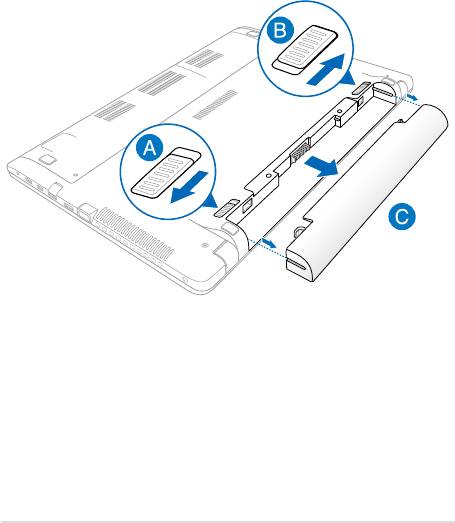
A. Move the manual battery lock to the unlocked position.
B. Move and hold the spring battery lock to an unlocked position.
C. Pull out the old battery pack from the battery slot then release
your hold on the spring battery lock.
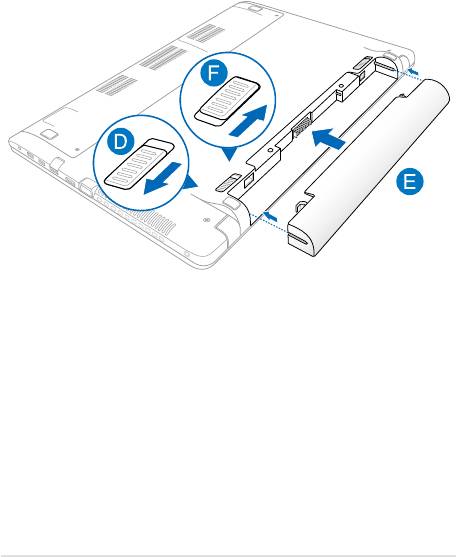
D. Move the manual battery lock to the unlocked position.
E. Align and insert the new battery pack into the Notebook PC’s
battery slot.
F. Move the manual battery lock back to the locked position after
inserting the battery pack.
Notebook PC E-Manual
105

106
Notebook PC E-Manual
