Asus D452EP: Chapter 2: Using your Notebook PC
Chapter 2: Using your Notebook PC: Asus D452EP

Chapter 2:
Using your Notebook PC
Notebook PC E-Manual
27
28
Notebook PC E-Manual
Getting started
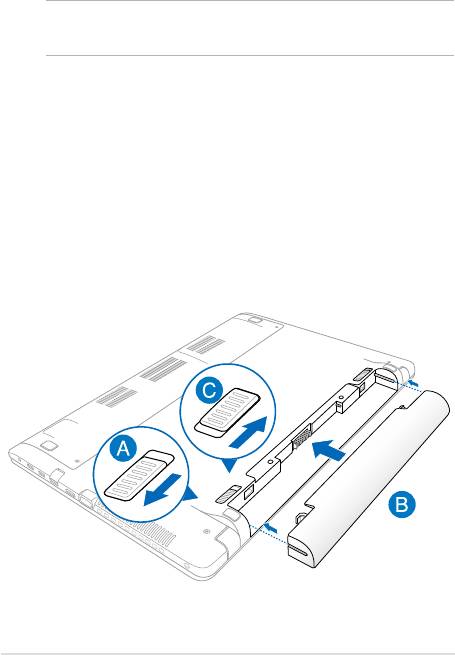
NOTE: If your Notebook PC does not have its battery pack installed, use
the following procedures for installation.
Install the battery pack.*
A. Move the manual battery lock to the unlocked position.
B. Align and insert the battery pack into the Notebook PC’s battery
slot.
C. Move the manual battery lock back to the locked position after
inserting the battery pack.
* on selected models only
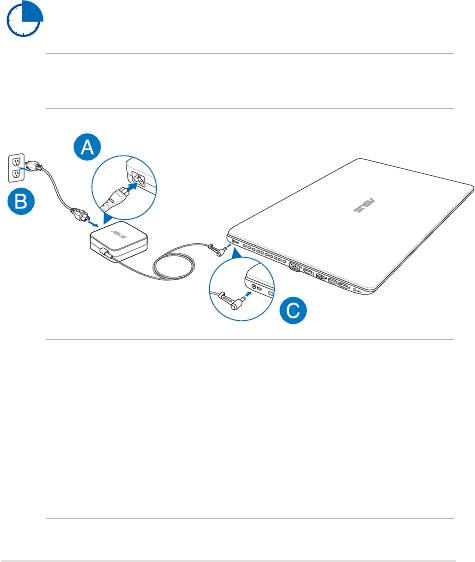
Charge your Notebook PC.
A. Connect the AC power cord to the AC/DC adapter.
B. Plug the AC power adapter into a 100V~240V power source.
C. Connect the DC power connector into your Notebook PC’s power
(DC) input.
Charge the Notebook PC for 3 hours before using it in
battery mode for the rst time.
NOTE: The power adapter may vary in appearance, depending on models
and your region.
NOTE:
Power adapter information:
• Input voltage: 100-240Vac
• Input frequency: 50-60Hz
• Rating output current: 3.42A (65W), 4.74A (90W)
• Rating output voltage: 19V
Notebook PC E-Manual
29

30
Notebook PC E-Manual
IMPORTANT!
• Ensure that your Notebook PC is connected to a grounded
power adapter before turning it on for the rst time.
• When using your Notebook PC on power adapter mode, the
socket outlet must be near to the unit and easily accessible.
• Locate the input/output rating label on your Notebook
PC and ensure that it matches the input/output rating
information on your power adapter. Some Notebook PC
models may have multiple rating output currents based on
the available SKU.
WARNING!
Read the following precautions for your Notebook PC’s battery.
• Only ASUS-authorized technicians should remove the battery
inside the device.
• The battery used in this device may present a risk of re or
chemical burn if removed or disassembled.
• Follow the warning labels for your personal safety.
• Risk of explosion if battery is replaced by an incorrect type.
• Do not dispose of in re.
• Never attempt to short-circuit your Notebook PC’s battery.
• Never attempt to dissamble and reassemble the battery.
• Discontinue usage if leakage is found.
• The battery and its components must be recycled or disposed
of properly.
• Keep the battery and other small components away from
children.
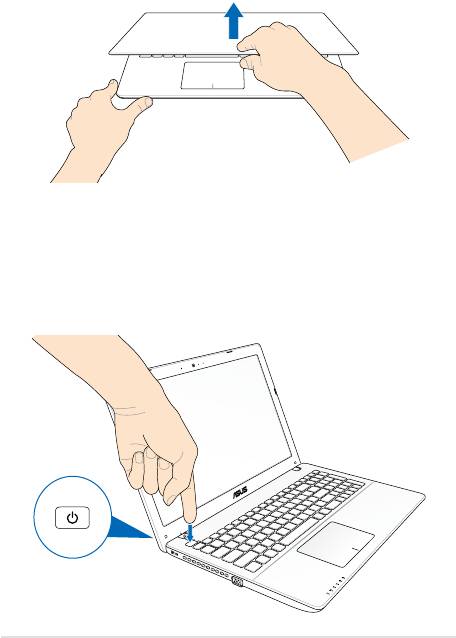
Lift to open the display panel.
Press the power button.
Notebook PC E-Manual
31
32
Notebook PC E-Manual
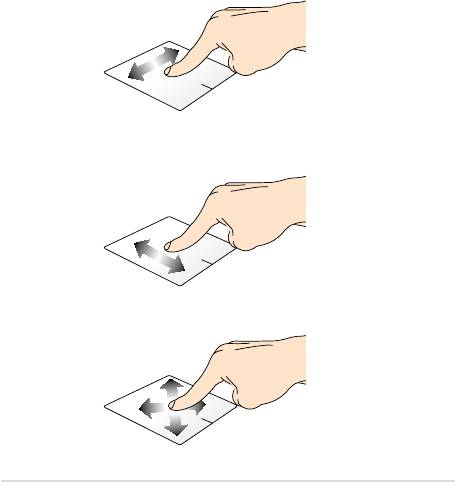
Gestures for the touchpad
Gestures allow you to launch programs and access the settings of your
Notebook PC. Refer to the following illustrations when using hand
gestures on your touchpad.
Moving the pointer
You can click or click anywhere on the touchpad to activate its pointer,
then slide your nger on the touchpad to move the pointer onscreen.
Slide horizontally
Slide vertically
Slide diagonally

One-nger gestures
Click/Double click
• In the Start screen, click an app to launch it.
• In Desktop mode, double-click an application to launch it.
Drag and drop
Double-click an item, then slide the same nger without lifting it o
the touchpad. To drop the item to its new location, lift your nger from
the touchpad.
Notebook PC E-Manual
33
34
Notebook PC E-Manual
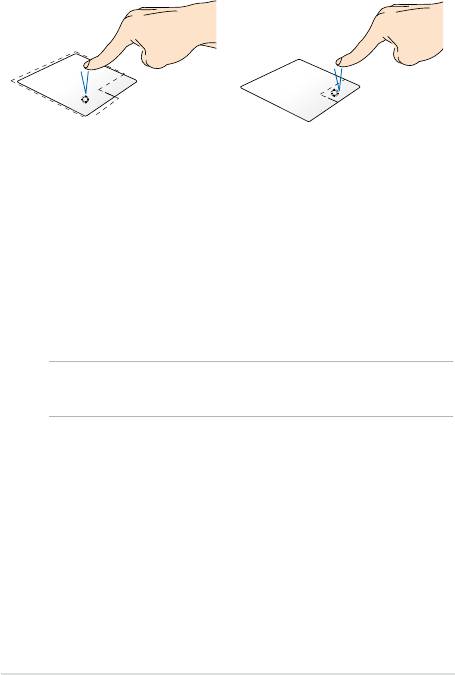
Left-click Right-click
• In the Start screen, click an
• In the Start screen, click an
app to launch it.
app to select it and launch
the settings bar. You can also
• In Desktop mode, double-
press this button to launch
click an application to
the All Apps bar.
launch it.
• In Desktop mode, use this
button to open the right-
click menu.
NOTE: The areas inside the dotted line represent the locations of the left
mouse button and the right mouse button on the touchpad.
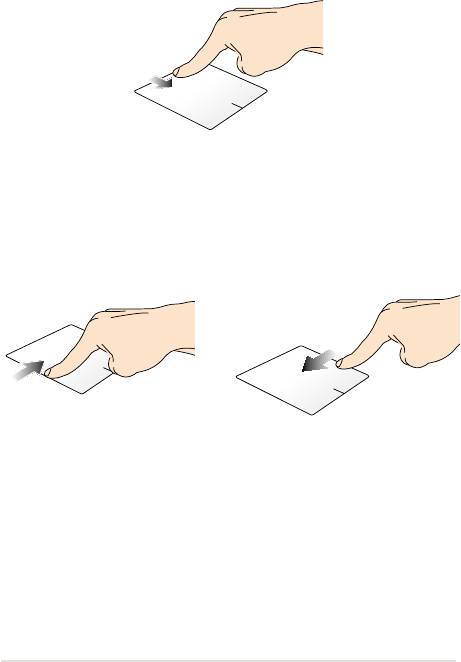
Top edge swipe
• In the Start screen, swipe from the top edge to launch the All
Apps bar.
• In a running app, swipe from the top edge to view its menu.
Left edge swipe Right edge swipe
Swipe from the left edge to shue
Swipe the right edge to launch
your running apps.
the Charms bar.
Notebook PC E-Manual
35
36
Notebook PC E-Manual
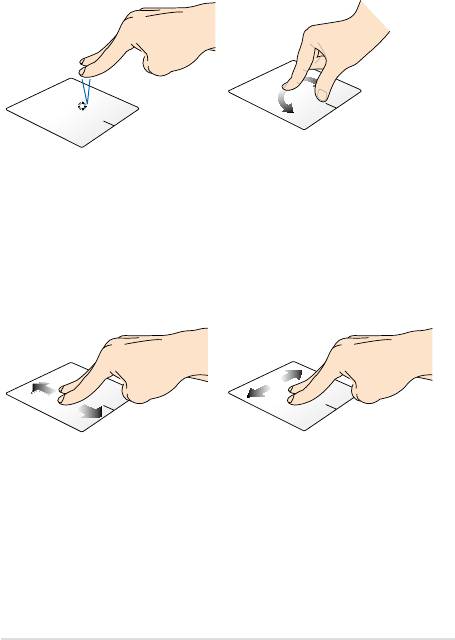
Two-nger gestures
Click Rotate
Click two ngers on the touchpad
To rotate an image, place two
to simulate the right-click
ngers on the touchpad then
function.
turn one nger clockwise or
counterclockwise while the other
stays still.
Two-nger scroll (up/down) Two-nger scroll (left/right)
Slide two ngers to scroll up or
Slide two ngers to scroll left or
down.
right.
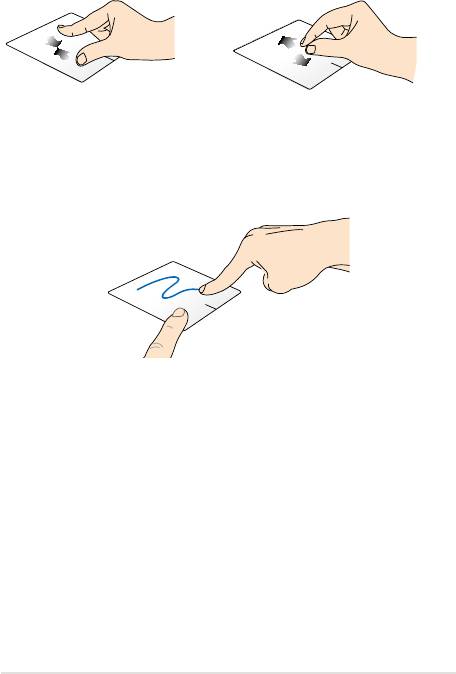
Zoom out Zoom in
Bring together your two ngers on
Spread apart your two ngers on
the touchpad.
the touchpad.
Drag and drop
Select an item then press and hold the left button. Using your other
nger, slide down the touchpad to drag and drop the item to a new
location.
Notebook PC E-Manual
37
38
Notebook PC E-Manual
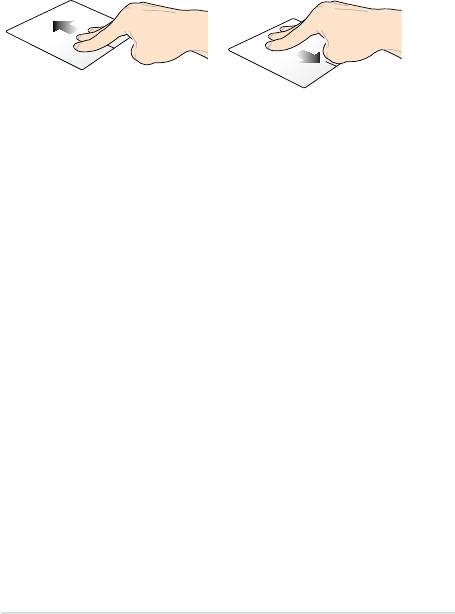
Three-nger gestures
Swipe up Swipe down
Swipe three ngers upward to
Swipe three ngers downward to
show all running applications.
show the Desktop mode.
Using the keyboard
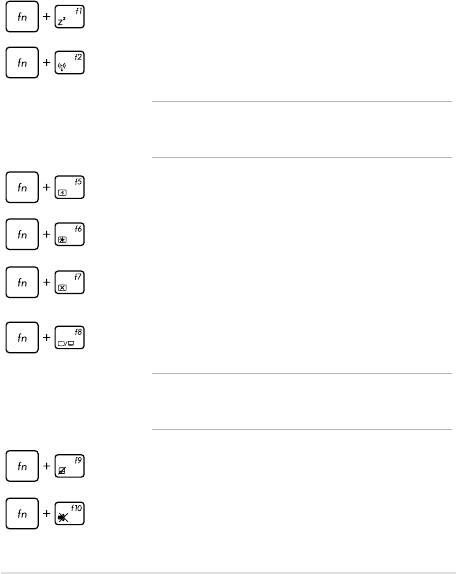
Function keys
The function keys on your Notebook PC’s keyboard can trigger the
following commands:
Puts the Notebook PC into Sleep mode
Turns Airplane mode on or o
NOTE: When enabled, the Airplane mode disables all
wireless connectivity.
Decreases display brightness
Increases display brightness
Turns the display panel o
Activates the second screen
NOTE: Ensure that the second display is connected to
your Notebook PC.
Enables or disables the touchpad
Turns the speaker on or o
Notebook PC E-Manual
39
40
Notebook PC E-Manual
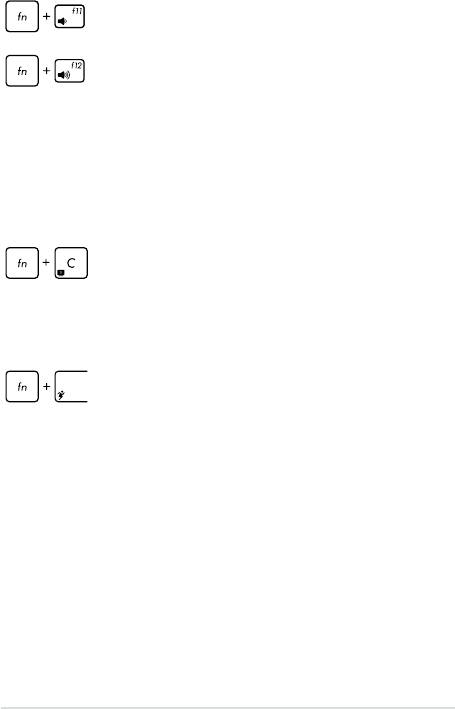
Turns the speaker volume down
Turns the speaker volume up
Function keys for ASUS Apps
Your Notebook PC also comes with a special set of function keys that
can be used to launch ASUS apps.
Toggles the ASUS Splendid Video Enhancement
Technology app to switch between these display
color enhancement modes: Gamma Correction, Vivid
Mode, Theater Mode, Soft Mode, My Prole, and
Normal.
Launches the ASUS Power4Gear Hybrid app
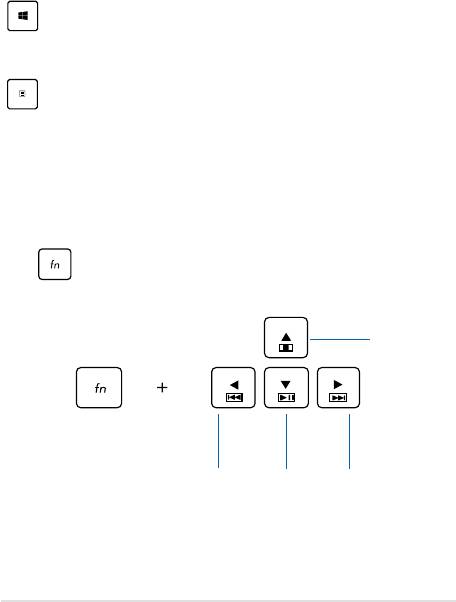
Windows®8 keys
There are two special Windows® keys on your Notebook PC’s keyboard
used as below:
Press this key to go back to the Start screen. If you are
already in the Start screen, press this key to go back to
the last app you opened.
Press this key to simulate the right-click functions.
Multimedia control keys*
The multimedia control keys allow you to control multimedia les, such
as audios and videos, when played in your Notebook PC.
Press in combination with the arrow keys on your Notebook PC,
illustrated as below.
Stop
Skip to
Play or
Skip to
previous
pause
next track
track or
or fast
rewind
forward
* on selected models only
Notebook PC E-Manual
41
42
Notebook PC E-Manual
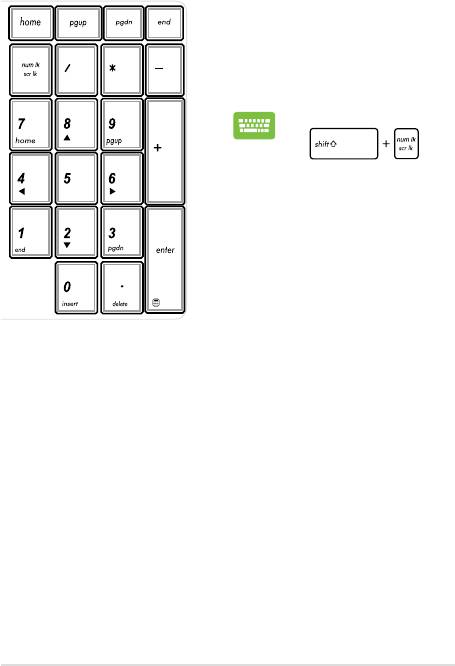
Using the numeric keypad
A numeric keypad is available on
selected Notebook PC models. You
can use this keypad for numeric
input or as pointer direction keys.
Press
to
toggle between using
the keypad as number
keys or as pointer
direction keys.
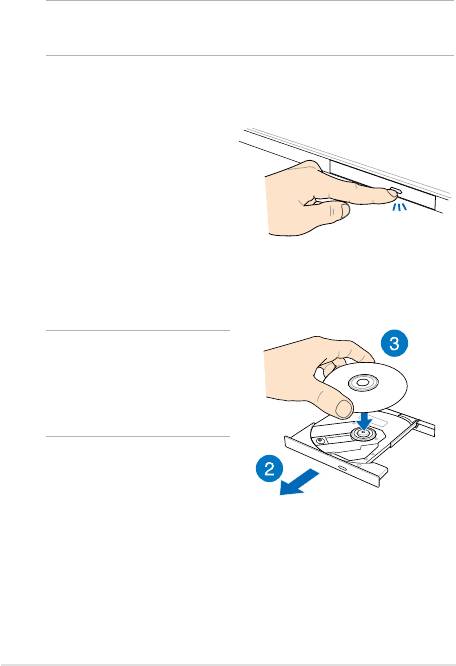
Using the optical drive
NOTE: The actual location of the electronic eject button may vary
depending on your Notebook PC model.
Inserting an optical disc
1. While the Notebook PC is
on, press the electronic eject
button to partially eject the
optical drive tray.
2. Gently pull out the drive tray.
IMPORTANT! Be careful not
to touch the optical drive lens.
Ensure that there are no objects
that may get jammed under the
drive tray.
3. Hold the disc by the edge,
with its printed side up, then
gently place it inside the hub.
Notebook PC E-Manual
43

44
Notebook PC E-Manual
4. Push down the disc’s plastic
hub until it snaps onto the
optical drive hub.
5. Push the drive tray gently to
close the optical drive.
NOTE: While data is being
read, it is normal to hear some
spinning and vibrating in the
optical drive.
Manual eject hole
The manual eject hole is located on the optical drive door and is used to
eject the optical drive tray in case the electronic eject button does not
work.
To manually eject the optical drive tray, insert a straightened paper clip
into the manual eject hole until the drive tray opens.
WARNING! Use the manual eject hole only when the electronic eject
button does not work.
