Asus D452EP: Chapter 1: Hardware Setup
Chapter 1: Hardware Setup: Asus D452EP

Chapter 1:
Hardware Setup
Notebook PC E-Manual
13
14
Notebook PC E-Manual
Getting to know your Notebook PC
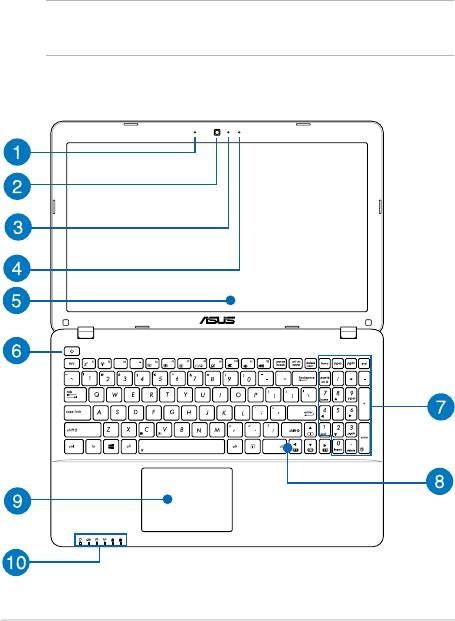
Top View
NOTE: The keyboard's layout may vary per region or country. The top
view may also vary in appearance depending on the Notebook PC model.
15” model

Microphone
The built-in microphone can be used for video conferencing,
voice narrations, or simple audio recording.
Camera
The built-in camera allows you to take pictures or record videos
using your Notebook PC.
Camera indicator
The camera indicator lights up when the built-in camera is in
use.
Microphone*
The built-in microphone can be used for video conferencing,
voice narrations, or simple audio recording.
Display panel
This high-denition display panel provides excellent viewing
features for photos, videos, and other multimedia les on your
Notebook PC.
Power button
Press the power button to turn your Notebook PC on or o. You
can also use the power button to put your Notebook PC to sleep
or hibernate mode and wake it up from sleep or hibernate mode.
In the event that your Notebook PC becomes unresponsive,
press and hold the power button for about four (4) seconds until
your Notebook PC shuts down.
* on selected models only
Notebook PC E-Manual
15

16
Notebook PC E-Manual
Numeric keypad*
The numeric keypad toggles between these two functions: for
numeric input and as pointer direction keys.
NOTE: For more details, refer to the Using the numeric keypad
section in this manual.
Keyboard
The keyboard provides full-sized QWERTY keys with a
comfortable travel depth for typing. It also enables you to use
the function keys, allows quick access to Windows®, and controls
other multimedia functions.
NOTE: The keyboard layout diers by model or territory.
Touchpad
The touchpad allows the use of multi-gestures to navigate
onscreen, providing an intuitive user experience. It also simulates
the functions of a regular mouse.
NOTE: For more details, refer to the Gestures for the touchpad
section in this manual.
* on selected models only
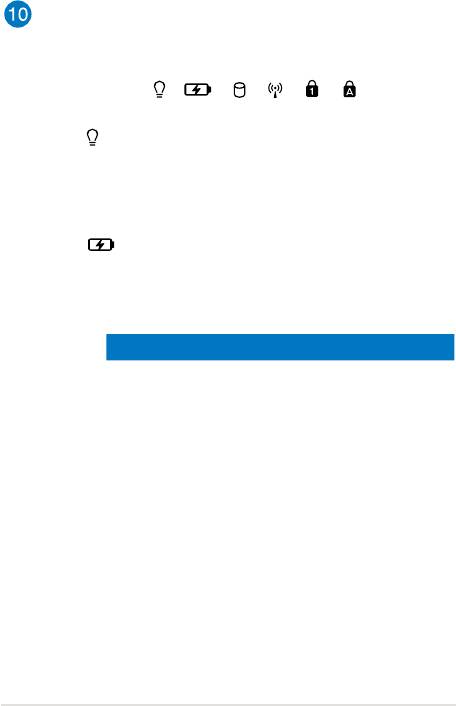
Status indicators
The status indicators help identify the current hardware status of
your Notebook PC.
Power indicator
The power indicator lights up when the Notebook PC
is turned on and blinks slowly when the Notebook
PC is in sleep mode.
Two-color battery charge indicator
The two-color LED provides a visual indication of the
battery’s charge status. Refer to the following table
for details:
Color Status
Solid Green The Notebook PC is plugged to
a power source and the battery
power is between 95% and
100%.
Solid Orange The Notebook PC is plugged
to a power source, charging its
battery, and the battery power
is less than 95%.
Blinking Orange The Notebook PC is running on
battery mode and the battery
power is less than 10%.
Lights o The Notebook PC is running on
battery mode and the battery
power is between 10% to 100%.
Notebook PC E-Manual
17

18
Notebook PC E-Manual
Drive activity indicator
This indicator lights up when your Notebook PC is
accessing the internal storage drives.
Bluetooth / Wireless indicator
This indicator lights up when your Notebook PC’s
wireless function (Bluetooth or Wi-Fi) is enabled.
Number lock indicator*
This indicator lights up when the number lock
function is activated. This allows you to use some of
the keys on your keyboard for numeric input.
Capital lock indicator
This indicator lights up when the capital lock
function is activated. Using capital lock allows you
to type capitalized letters (such as A, B, C) using your
Notebook PC’s keyboard.
* on selected models only
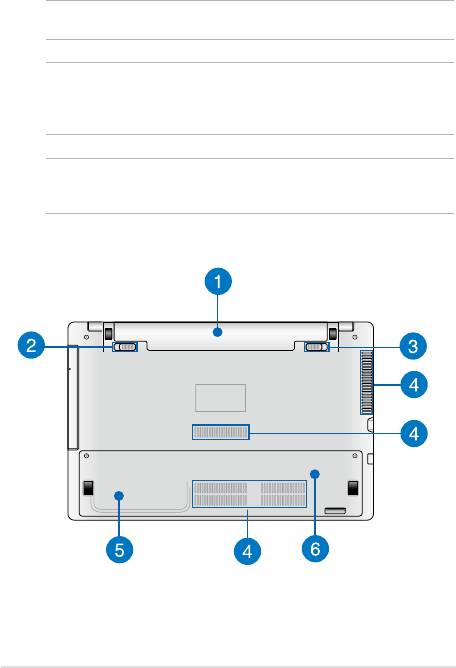
Bottom
NOTE: The bottom side may vary in appearance depending on model.
WARNING! The bottom of the Notebook PC can get warm to hot while in
use or while charging the battery pack. When working on your Notebook
PC, do not place it on surfaces that can block the vents.
IMPORTANT! Battery time varies by usage and by the specications for
this Notebook PC. The battery pack cannot be disassembled.
Notebook PC E-Manual
19

20
Notebook PC E-Manual
Battery pack
The battery pack is automatically charged when your Notebook
PC is connected to a power source. When charged, the battery
pack supplies power to your Notebook PC.
Spring battery lock*
The spring battery lock automatically locks the battery pack in
place once it is inserted into the battery slot.
IMPORTANT! This lock should be held in an unlocked position
when removing the battery pack.
Manual battery lock*
The manual battery lock is used to keep the battery pack
secured. This lock should be manually moved to a locked or
unlocked position to insert or remove the battery pack.
* on selected models only

Air vents
The air vents allow cool air to enter and warm air to exit the
Notebook PC.
WARNING! Ensure that paper, books, clothing, cables, or other
objects do not block any of the air vents or else overheating may
occur.
Hard disk drive compartment*
This compartment is a reserved space for the HDD (hard disk
drive) of your Notebook PC.
Random-access memory module compartment*
This compartment allows you to add RAM (random-access
memory) modules to increase the memory capacity of your
Notebook PC.
* on selected models only
Notebook PC E-Manual
21
22
Notebook PC E-Manual
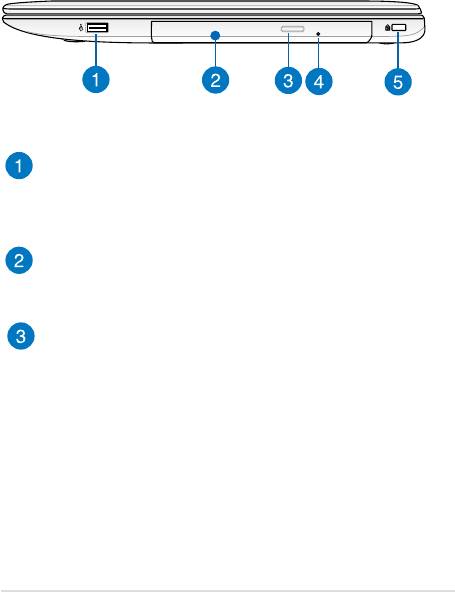
Right Side
15” and 14" model
USB 2.0 port*
This USB (Universal Serial Bus) port is compatible with USB 2.0
or USB 1.1 devices such as keyboards, pointing devices, ash
disk drives, external HDDs, speakers, cameras and printers.
Optical drive
Your Notebook PC’s optical drive may support several disc
formats such as CDs, DVDs, recordable discs, or rewritable discs.
Optical disc drive eject button
Press this button to eject the optical drive tray.
* on selected models only

Optical disc drive manual eject hole
The manual eject hole is used to eject the drive tray in case the
electronic eject button does not work.
WARNING! Use the manual eject hole only when the electronic
eject button does not work.
NOTE: For more details, refer to the Using the optical drive
section in this manual.
Kensington® security slot
The Kensington® security slot allows you to secure your
Notebook PC using Kensington® compatible Notebook PC
security products.
Notebook PC E-Manual
23
24
Notebook PC E-Manual
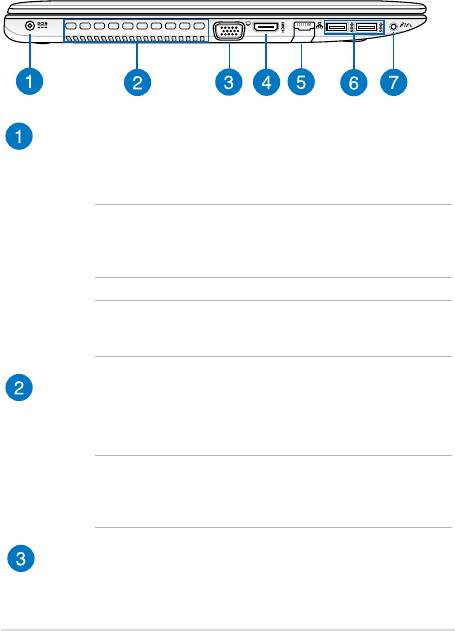
Left Side
15” and 14" model
Power (DC) input port
Insert the bundled power adapter into this port to charge the
battery pack and supply power to your Notebook PC.
WARNING! The adapter may become warm to hot while in use.
Do not cover the adapter and keep it away from your body while
it is connected to a power source.
IMPORTANT! Use only the bundled power adapter to charge
the battery pack and supply power to your Notebook PC.
Air vents
The air vents allow cool air to enter and warm air to exit the
Notebook PC.
WARNING! Ensure that paper, books, clothing, cables, or other
objects do not block any of the air vents or else overheating may
occur.
VGA port
This port allows you to connect your Notebook PC to an
external display.

HDMI port
This port is for the HDMI (High-Denition Multimedia Interface)
connector and is HDCP compliant for HD DVD, Blu-ray, and
other protected content playback.
LAN port
Insert the network cable into this port to connect to a local area
network.
USB 3.0 ports
These USB (Universal Serial Bus) 3.0 ports provide a transfer rate
of up to 5 Gbit/s and are backward compatible to USB 2.0.
Headphone output/microphone input combo jack port
This port allows you to connect your Notebook PC to amplied
speakers or headphones. You can also use this port to connect
your Notebook PC to an external microphone.
Notebook PC E-Manual
25

26
Notebook PC E-Manual
Front Side
NOTE: The front side may vary in appearance depending on model.
Status indicators
The status indicators help identify the current hardware status
of your Notebook PC.
Memory card reader
This built-in memory card reader supports SD and SDHC card
formats.
