Asus D452EP: Chapter 5: Power-on Self Test (POST)
Chapter 5: Power-on Self Test (POST): Asus D452EP

Chapter 5:
Power-on Self Test (POST)
Notebook PC E-Manual
77

78
Notebook PC E-Manual
The Power-on Self Test (POST)
The Power-on Self Test (POST) is a series of software-controlled
diagnostic tests that run when you turn on or restart your Notebook PC.
The software that controls the POST is installed as a permanent part of
the Notebook PC’s architecture.
Using POST to access BIOS and Troubleshoot
During POST, you can access the BIOS settings or run troubleshooting
options using the function keys of your Notebook PC. You may refer to
the following information for more details.
BIOS
The Basic Input and Output System (BIOS) stores system hardware
settings that are needed for system startup in the Notebook PC.
The default BIOS settings apply to most conditions of your Notebook
PC. Do not change the default BIOS settings except in the following
circumstances:
• An error message appears onscreen during system bootup and
requests you to run the BIOS Setup.
• You have installed a new system component that requires further
BIOS settings or updates.
WARNING: Using inappropriate BIOS settings may result to system
instability or boot failure. We strongly recommend that you change the
BIOS settings only with the help of a trained service personnel.
Accessing BIOS
Restart your Notebook PC then press during POST.

BIOS Settings
NOTE: The BIOS screens in this section are for reference only. The actual
screens may dier by model and territory.
Boot
This menu allows you to set your boot option priorities. You may refer to
the following procedures when setting your boot priority.
1. On the Boot screen, select Boot Option #1.
Aptio Setup Utility - Copyright (C) 2012 American Megatrends, Inc.
Main Advanced Boot Security Save & Exit
Sets the system
Boot Conguration
boot order
Fast Boot [Enabled]
Launch CSM [Disabled]
Driver Option Priorities
Boot Option Priorities
→←
: Select Screen
Boot Option #1 [Windows Boot Manager]
↑↓
: Select Item
Enter: Select
+/— : Change Opt.
F1 : General Help
Add New Boot Option
F9 : Optimized Defaults
F10 : Save & Exit
Delete Boot Option
ESC : Exit
Version 2.15.1226. Copyright (C) 2012 American Megatrends, Inc.
Notebook PC E-Manual
79
80
Notebook PC E-Manual
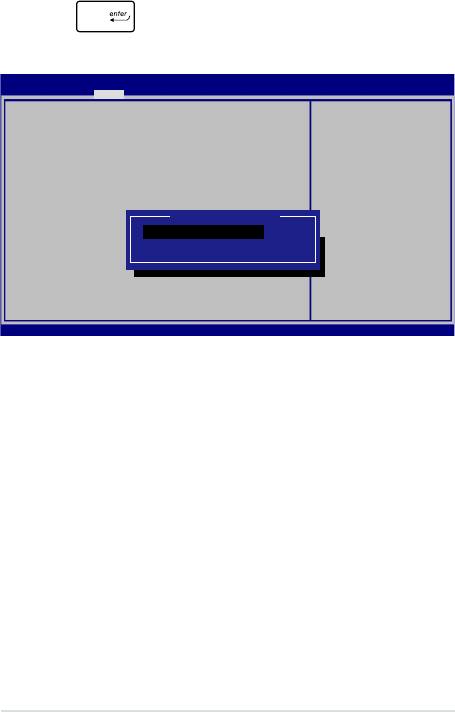
2. Press and select a device as the Boot Option #1.
Aptio Setup Utility - Copyright (C) 2012 American Megatrends, Inc.
Main Advanced Boot Security Save & Exit
Boot Conguration
Sets the system
boot order
Fast Boot [Enabled]
Launch CSM [Disabled]
Driver Option Priorities
Boot Option Priorities
Boot Option #1
→←
: Select Screen
Boot Option #1 [Windows Boot Manager]
Windows Boot Manager
↑↓
: Select Item
Enter: Select
Disabled
+/— : Change Opt.
F1 : General Help
F9 : Optimized Defaults
Add New Boot Option
F10 : Save & Exit
ESC : Exit
Delete Boot Option
Version 2.15.1226. Copyright (C) 2012 American Megatrends, Inc.

Security
This menu allows you to set up the administrator and user password
of your Notebook PC. It also allows you to control the access to your
Notebook PC’s hard disk drive, input/output (I/O) interface, and USB
interface.
NOTE:
• If you install a User Password, you will be prompted to input
this before entering your Notebook PC's operating system.
• If you install an Administrator Password, you will be
prompted to input this before entering BIOS.
Aptio Setup Utility - Copyright (C) 2012 American Megatrends, Inc.
Main Advanced Boot Security Save & Exit
Set Administrator
Password Description
Password. The
If ONLY the Administrator’s password is set,
password length
then this only limits access to Setup and is
must be in the
only asked for when entering Setup. If ONLY
following range:
the user’s password is set, then this is a
Minimum length 3
power on password and must be entered to boot
or enter Setup. In Setup, the User will have
Maximum length 20
Administrator rights.
Administrator Password Status NOT INSTALLED
User Password Status NOT INSTALLED
Administrator Password
User Password
HDD Password Status : NOT INSTALLED
Set Master Password
→←
: Select Screen
Set User Password
↑↓
: Select Item
I/O Interface Security
Enter: Select
+/— : Change Opt.
System Mode state User
F1 : General Help
Secure Boot state Enabled
F9 : Optimized Defaults
F10 : Save & Exit
Secure Boot Control [Enabled]
ESC : Exit
Key Management
Version 2.15.1226. Copyright (C) 2012 American Megatrends, Inc.
Notebook PC E-Manual
81

82
Notebook PC E-Manual
To set the password:
1. On the Security screen, select Administrator Password or User
Password.
2. Type in a password then press .
3. Re-type to conrm the password then press .
To clear the password:
1. On the Security screen, select Administrator Password or User
Password.
2. Type in the current password then press .
3. Leave the Create New Password eld blank then press
.
4. Select Yes in the conrmation box then press .
I/O Interface Security
In the Security menu, you can access I/O Interface Security to lock
or unlock some interface functions of your Notebook PC.
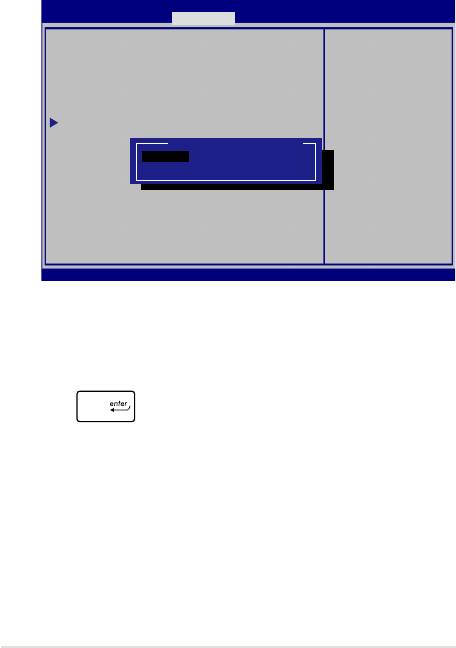
Aptio Setup Utility - Copyright (C) 2012 American Megatrends, Inc.
Security
I/O Interface Security
If Locked, LAN
controller will
be disabled.
LAN Network Interface [UnLock]
Wireless Network Interface [UnLock]
HD AUDIO Interface [UnLock]
USB Interface Security
LAN Network Interface
→←
: Select Screen
Lock
↑↓
: Select Item
UnLock
Enter: Select
+/— : Change Opt.
F1 : General Help
F9 : Optimized
Defaults
F10 : Save & Exit
ESC : Exit
Version 2.15.1226. Copyright (C) 2012 American Megatrends, Inc.
To lock an interface:
1. On the Security screen, select I/O Interface Security.
2. Select an interface you would like to lock then press
.
3. Select Lock.
Notebook PC E-Manual
83

84
Notebook PC E-Manual
USB Interface Security
Through the I/O Interface Security menu, you can also access USB
Interface Security to lock or unlock ports and devices.
Aptio Setup Utility - Copyright (C) 2012 American Megatrends, Inc.
Security
If Locked, all
USB Interface Security
USB device will
be disabled
USB Interface [UnLock]
External Ports [UnLock]
CMOS Camera [UnLock]
Card Reader [UnLock]
USB Interface
→←
: Select Screen
Lock
↑↓
: Select Item
UnLock
Enter: Select
+/— : Change Opt.
F1 : General Help
F9 : Optimized
Defaults
F10 : Save & Exit
ESC : Exit
Version 2.15.1226. Copyright (C) 2012 American Megatrends, Inc.
To lock the USB interface:
1. On the Security screen, select I/O Interface Security > USB
Interface Security.
2. Select an interface that you would like to lock then select
Lock.
NOTE: Setting the USB Interface to Lock also locks and hides the
External Ports and other devices included under USB Interface Security.
Set Master Password
In the Security menu, you can use Set Master Password to set up
a password-enabled access to your hard disk drive.
Aptio Setup Utility - Copyright (C) 2012 American Megatrends, Inc.
Aptio Setup Utility - Copyright (C) 2011 American Megatrends, Inc.
Main Advanced Boot Security Save & Exit
Password Description
Set HDD Master
If ONLY the Administrator’s password is
Password.
set,then this only limits access to Setup
***Advisable to
and is only asked for when entering Setup.
Power Cycle System
If ONLY the user’s password is set, then
after Setting Hard
this is a power on password and must be
Disk Passwords***
entered to boot or enter Setup. In Setup,
the User will have Administrator rights.
Administrator Password Status NOT INSTALLED
User Password Status NOT INSTALLED
Administrator Password
User Password
→←
: Select Screen
↑↓
: Select Item
HDD Password Status : NOT INSTALLED
Enter: Select
Set Master Password
+/— : Change Opt.
F1 : General Help
Set User Password
F9 : Optimized
I/O Interface Security
Defaults
F10 : Save & Exit
ESC : Exit
Version 2.15.1226. Copyright (C) 2012 American Megatrends, Inc.
To set the HDD password:
1. On the Security screen, select Set Master Password.
2. Type in a password then press .
3. Re-type to conrm the password then press .
4. Select Set User Password then repeat the previous steps to
set up the user password.
Notebook PC E-Manual
85

86
Notebook PC E-Manual
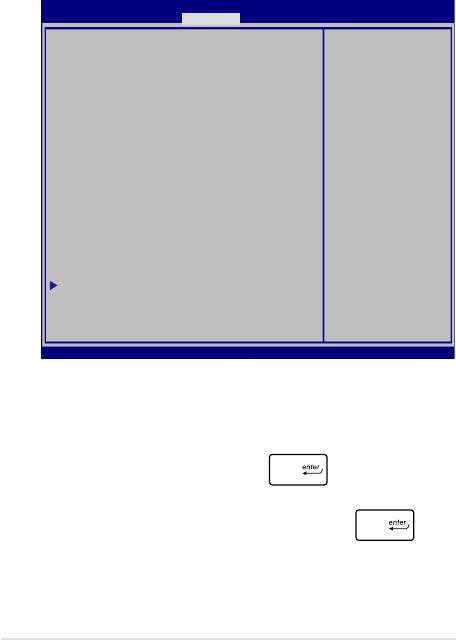
Save & Exit
To keep your conguration settings, select Save Changes and Exit
before exiting the BIOS.
Aptio Setup Utility - Copyright (C) 2012 American Megatrends, Inc.
Main Advanced Boot Security Save & Exit
Exit system setup
Save Changes and Exit
after saving the
Discard Changes and Exit
changes.
Save Options
Save Changes
Discard Changes
Restore Defaults
Boot Override
Windows Boot Manager
→←
: Select Screen
↑↓
: Select Item
Launch EFI Shell from lesystem device
Enter: Select
+/— : Change Opt.
F1 : General Help
F9 : Optimized Defaults
F10 : Save & Exit
ESC : Exit
Version 2.15.1226. Copyright (C) 2012 American Megatrends, Inc.
To update the BIOS:
1. Verify the Notebook PC’s exact model then download the latest
BIOS le for your model from the ASUS website.
2. Save a copy of the downloaded BIOS le to a ash disk drive.
3. Connect your ash disk drive to your Notebook PC.
4. Restart your Notebook PC then press during POST.
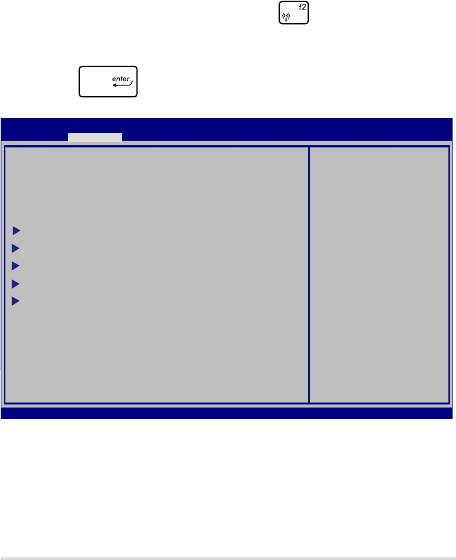
5. From the BIOS menu, Select Advanced > Start Easy Flash, then
press .
Aptio Setup Utility - Copyright (C) 2012 American Megatrends, Inc.
Aptio Setup Utility - Copyright (C) 2011 American Megatrends, Inc.
Main Advanced Boot Security Save & Exit
Start Easy Flash
Press Enter to run
the utility to
Internal Pointing Device [Enabled]
select and update
Wake on Lid Open [Enabled]
BIOS.
Power Off Energy Saving [Enabled]
SATA Conguration
Graphics Conguration
Intel (R) Anti-Theft Technology Corporation
USB Conguration
Network Stack
→←
: Select Screen
↑↓
: Select Item
Enter: Select
+/— : Change Opt.
F1 : General Help
F9 : Optimized Defaults
F10 : Save & Exit
ESC : Exit
Version 2.15.1226. Copyright (C) 2012 American Megatrends, Inc.
Notebook PC E-Manual
87

88
Notebook PC E-Manual
6. Locate your downloaded BIOS le in the ash disk drive then
press .
ASUSTek Easy Flash Utility
FLASH TYPE: MXIC 25L Series
Current BIOS
New BIOS
Platform: X452/X552
Platform: Unknown
Version: 101
Version: Unknown
Build Date: Oct 26 2012
Build Date: Unknown
Build Time: 11:51:05
Build Time: Unknown
FSO
0 EFI
<DIR>
FS1
FS2
FS3
FS4
[←→]: Switch [↑↓]: Choose [q]: Exit [Enter]: Enter/Execute
7. After the BIOS update process, select Exit > Restore Defaults to
restore the system to its default settings.

Troubleshoot
By pressing during POST, you can access Windows® 8 troubleshoot
options which includes the following:
• Refresh your PC
• Reset your PC
• Advanced options
Refresh your PC
Use Refresh your PC if you want to refresh your system without losing
your current les and applications.
To access this during POST:
1. Restart your Notebook PC then press during
POST.
2. Wait for Windows® to load the Choose an option
screen then click Troubleshoot.
3. Click Refresh your PC.
4. In the Refresh your PC screen, read the bullet points
to learn more about using this option then click
Next.
5. Click the account you would like to refresh.
6. Type your account password then click Continue.
7. Click Refresh.
IMPORTANT! Ensure that your Notebook PC is plugged in
to a power source before refreshing your system.
Notebook PC E-Manual
89

90
Notebook PC E-Manual
Reset your PC
IMPORTANT! Back up all your data before performing this option.
Use Reset your PC to restore your Notebook PC to its default settings.
To access this during POST:
1. Restart your Notebook PC then press during
POST.
2. Wait for Windows® to load the Choose an option
screen then click Troubleshoot.
3. Click Reset your PC.
4. In the Reset your PC screen, read the bullet points
to learn more about using this option then click
Next.
5. Click your preferred reset option: Just remove my
les or Fully clean the drive.
6. Click Reset.
IMPORTANT! Ensure that your Notebook PC is plugged in
to a power source before resetting your system.

Advanced options
Use Advanced options to perform additional troubleshooting options
in your Notebook PC.
To access this during POST:
1. Restart your Notebook PC then press during
POST.
2. Wait for Windows® to load the Choose an option
screen then click Troubleshoot.
3. Click Advanced options.
4. In the Advanced options screen, select the
troubleshooting option you wish to perform.
5. Follow the succeeding steps to complete the
process.
Using System Image Recovery
Under Advanced options, you can use System Image Recovery to
recover your system using your Notebook PC’s original image le.
To access this during POST:
1. Restart your Notebook PC then press during
POST.
2. Wait for Windows® to load the Choose an option
screen then click Troubleshoot.
3. Click Advanced options.
Notebook PC E-Manual
91

92
Notebook PC E-Manual
4. In the Advanced options screen, select System
Image Recovery.
5. Choose an account you would like to recover using
a system image le.
6. Type your account password then click Continue.
7. Select Use the latest available system image
(recommended), then click Next. You can also
choose Select a system image if your system
image is in an external device or DVD.
8. Follow the succeeding steps to complete the
system image recovery procedure.
NOTE: We strongly recommend that you regularly backup
your system to prevent data loss in case your Notebook
PC stops working.
