Dell Latitude XT – страница 2
Инструкция к Ноутбуку Dell Latitude XT
Оглавление

Quick Reference Guide
21
3
Select
Enable hibernation
.
4
Click
Apply
and
OK
.
To enter Hibernate mode:
1
Type the <Ctrl><Alt><Del> key sequence.
2
Select
Shut Down
→
Hibernate
.
If you have set you set the power management options to
Hibernate
in the
Power Options Properties
window or the QuickSet Power Management
Wizard, you may also use one of the following methods to enter hibernate
mode:
•
Press the power button.
•
Close the display.
•
Press <Fn><Esc>.
NOTE:
Some PC Cards or Express Cards may not operate correctly after the
computer exits hibernate mode. Remove and reinsert the card, or simply restart
(reboot) your computer.
To exit hibernate mode, press the power button. The computer may take a
short time to exit hibernate mode. You cannot make the computer exit
hibernate mode by pressing a key or touching the touch pad or track stick. For
more information on hibernate mode, see the documentation that came with
your operating system.
Charging the Battery
When you connect the computer to an electrical outlet or install a battery
while the computer is connected to an electrical outlet, the computer checks
the battery charge and temperature. If necessary, the AC adapter then charges
the battery and maintains the battery charge.
NOTE:
With Dell™ ExpressCharge™, when the computer is turned off, the AC
adapter charges a completely discharged battery to 80 percent in about 1 hour and
to 100 percent in approximately 2 hours. Charge time is longer with the computer
turned on. You can leave the battery in the computer for as long as you like. The
battery’s internal circuitry prevents the battery from overcharging.
If the battery is hot from being used in your computer or being in a hot
environment, the battery may not charge when you connect the computer to
an electrical outlet.

22
Quick Reference Guide
The battery is too hot to start charging if the
light flashes alternately
green and orange. Disconnect the computer from the electrical outlet and
allow the computer and the battery to cool to room temperature. Then
connect the computer to an electrical outlet to continue charging the battery.
For information about resolving problems with a battery, see “Power
Problems” in your
User’s Guide
.
Removing the Battery
CAUTION:
Using an incompatible battery may increase the risk of fire or
explosion. Replace the battery only with a compatible battery purchased from
Dell. The battery is designed to work with your Dell™ computer. Do not use a
battery from other computers with your computer.
CAUTION:
Before performing these procedures, turn off the computer, disconnect
the AC adapter from the electrical outlet and the computer, disconnect the modem
from the wall connector and computer, and remove any other external cables from
the computer.
NOTICE:
You must remove all external cables from the computer to avoid possible
connector damage.
NOTICE:
If you choose to replace the battery with the computer in standby mode,
you have up to 1 minute to complete the battery replacement before the computer
shuts down and loses any unsaved data.
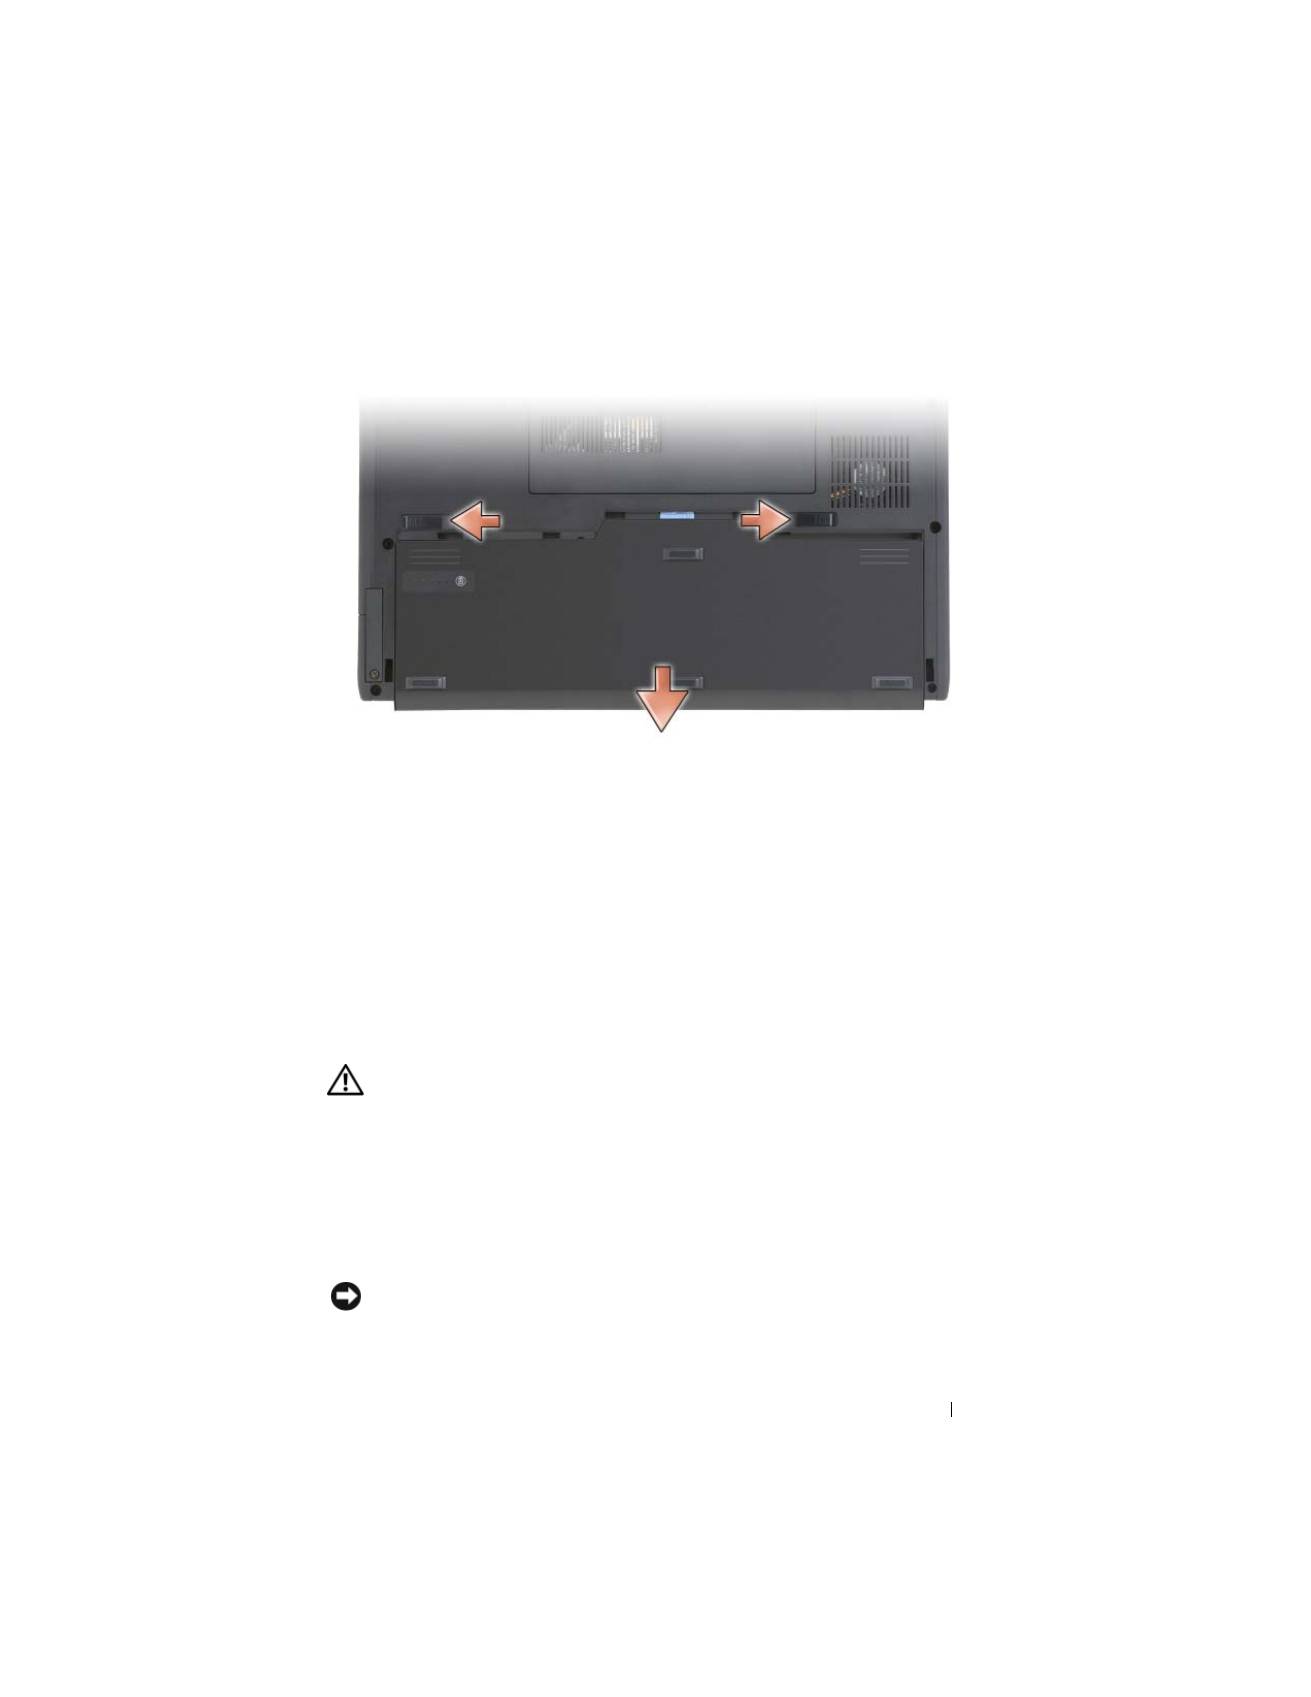
To remove the battery:
1
If the computer is connected to a docking device (docked), undock it. See
the documentation that came with your docking device for instructions.
2
Ensure that the computer is turned off or hibernated in a power
management mode.
3
Slide the battery-bay latch release on the bottom of the computer, and
then remove the battery from the bay.
Quick Reference Guide
23
To replace the battery, follow the removal procedure in reverse order.
Storing a Battery
Remove the battery when you store your computer for an extended period of
time. A battery discharges during prolonged storage. After a long storage
period, fully recharge the battery (see "Charging the Battery" on page 21)
before you use it.
Troubleshooting
Lockups and Software Problems
CAUTION:
Before you begin any of the procedures in this section, follow the
safety instructions in the
Product Information Guide
.
The Tablet-PC does not start up
E
NSURE
THAT
THE
POWER
CABLE
IS
FIRMLY
CONNECTED
TO
THE
T
ABLET
- P C
AND
TO
THE
ELECTRICAL
OUTLET
The Tablet-PC stops responding
NOTICE:
You may lose data if you are unable to perform an operating system
shutdown.

24
Quick Reference Guide
T
URN
THE
T
ABLET
- P C
OFF
—
If you are unable to get a response by pressing a
key on your keyboard or touching your display with the pen or your finger,
press and hold the power button for at least 8 to 10 seconds (until the Tablet-
PC turns off), and then restart your Tablet-PC.
A program stops responding
E
ND
THE
PROGRAM
—
1
Press <Ctrl><Shift><Esc> simultaneously to access the Task Manager.
2
Click the
Applications
tab.
3
Click to select the program that is no longer responding.
4
Click
End Task
.
A program crashes repeatedly
NOTE:
Most software includes installation instructions in its documentation, or on
a CD or DVD.
C
HECK
THE
SOFTWARE
DOCUMENTATION
—
If necessary, uninstall and then
reinstall the program.
A program is designed for an earlier Windows operating system
R
UN
THE
P
ROGRAM
C
OMPATIBILITY
W
IZARD
—
The Program Compatibility
Wizard configures a program so that it runs in an environment similar to
previous versions of Windows.
Windows Vista
1
Click
Start
→
Control Panel
→
Programs
→
Use an older program with
this version of Windows.
2
In the welcome screen, click
Next
.
3
Follow the instructions on the screen.
Windows XP
1
Click
Start
→
Help and Support
→
Fixing a problem
→
Application and
software problems.
2
Click
Run Software that Worked with previous versions
.

Quick Reference Guide
25
3
In the welcome screen, click
Next
.
4
Follow the instructions on the screen.
A solid blue screen appears
T
URN
THE
T
ABLET
- P C
OFF
—
If you are unable to get a response by pressing a
key on your keyboard or touching your display with the pen or your finger,
press and hold the power button for at least 8 to 10 seconds (until the Tablet-
PC turns off), and then restart your Tablet-PC.
Other software problems
C
HECK
THE
SOFTWARE
DOCUMENTATION
OR
CONTACT
THE
SOFTWARE
MANUFACTURER
FOR
TROUBLESHOOTING
INFORMATION
—
•
Ensure that the program is compatible with the operating system installed
on your Tablet-PC.
•
Ensure that your Tablet-PC meets the minimum hardware requirements
needed to run the software. See the software documentation for
information.
•
Ensure that the program is installed and configured properly.
•
Verify that the device drivers do not conflict with the program.
•
If necessary, uninstall and then reinstall the program.
B
ACK
UP
YOUR
FILES
IMMEDIATELY
U
SE
A
VIRUS
-
SCANNING
PROGRAM
TO
CHECK
THE
HARD
DRIVE
, C D
S
,
OR
D V D
S
S
AVE
AND
CLOSE
ANY
OPEN
FILES
OR
PROGRAMS
AND
SHUT
DOWN
YOUR
T
ABLET
-
P C
THROUGH
THE
S
TART
MENU
Dell Diagnostics
CAUTION:
Before you begin any of the procedures in this section, follow the
safety instructions in the
Product Information Guide
.
NOTICE:
The Dell Diagnostics works only on Dell™ computers.
NOTE:
You must use the optical drive in the D/Bay or the optional media base to
access the
Driver’s and Utilities
media.

26
Quick Reference Guide
When to Use the Dell Diagnostics
If you experience a problem with your Tablet-PC, perform the checks in
Lockups and Software Problems (see "Lockups and Software Problems" on
page 23), and run the Dell Diagnostics before you contact Dell for technical
assistance.
It is recommended that you print these procedures before you begin.
See “Using the System Setup Program” in your
User’s Guide
to review your
Tablet-PC’s configuration information, and ensure that the device that you
want to test displays in the system setup program and is active.
Start the Dell Diagnostics from your hard drive or from the
Drivers and
Utilities
media.
NOTE:
The
Drivers and Utilities
media is optional and may not ship with your
Tablet-PC.
Starting the Dell Diagnostics From Your Hard Drive
The Dell Diagnostics is located on a hidden diagnostic utility partition on
your hard drive.
NOTE:
If your Tablet-PC does not display a screen image, contact Dell (see
“Contacting Dell” in your
User’s Guide
).
NOTE:
If the Tablet-PC is connected to a docking device (docked), undock it. See
“Undocking Your Tablet-PC From the Media Base” and “Undocking Your Tablet-PC
From the Battery Slice” in your
User’s Guide
for instructions if applicable.
1
Ensure that the Tablet-PC is connected to an electrical outlet that is
known to be working properly.
2
Turn on (or restart) your Tablet-PC.
3
Start the Dell Diagnostics in one of the following two ways:
NOTE:
If you wait too long and the operating system logo appears, continue
to wait until you see the Microsoft
®
Windows
®
desktop; then, shut down your
Tablet-PC and try again.
–
When the DELL™ logo appears, press <F12> immediately. Select
Diagnostics
from the boot menu and press <Enter>.
NOTE:
Before attempting the following option, the Tablet-PC must be
powered down completely.
–
Press and hold the <Fn> key while powering the Tablet-PC on.

Quick Reference Guide
27
The Tablet-PC runs the Pre-boot System Assessment (PSA), a series of
initial tests of your system board, keyboard, display, memory, hard drive, etc.
•
During the assessment, answer any questions that appear.
•
If failures are detected during the Pre-boot System Assessment,
write down the error code(s) and contact Dell (see “Contacting
Dell” in your
User’s Guide
).
If the Pre-boot System Assessment completes successfully, the following
message appears: “
Booting Dell Diagnostic Utility
Partition.Press any key to continue
.”
4
Press any key to start the Dell Diagnostics from the diagnostics utility
partition on your hard drive.
NOTE:
If you see a message stating that no diagnostics utility partition has
been found, run the Dell Diagnostics from the
Drivers and Utilities
media.
5
When the Dell Diagnostics Main Menu appears, select the test you want
to run. See "Dell Diagnostics Main Menu" on page 28.
Starting the Dell Diagnostics From the Drivers and Utilities Media
1
Insert the
Drivers and Utilities
media
.
2
Shut down and restart the Tablet-PC.
When the DELL logo appears, press <F12> immediately.
NOTE:
If you wait too long and the operating system logo appears, continue
to wait until you see the Microsoft
®
Windows
®
desktop; then, shut down your
Tablet-PC and try again.
NOTE:
The next steps change the boot sequence for one time only. On the
next start-up, the Tablet-PC boots according to the devices specified in the
system setup program.
3
When the boot device list appears, highlight
CD/DVD/CD-RW
and press
<Enter>.
4
Select the
Boot from CD-ROM
option from the menu that appears and
press <Enter>.
5
Type
1
to start the CD menu and press <Enter> to proceed.
6
Select
Run the 32 Bit Dell Diagnostics
from the numbered list. If
multiple versions are listed, select the version appropriate for your
Tablet-PC.

28
Quick Reference Guide
7
When the Dell Diagnostics
Main Menu
appears, select the test you want
to run.
Dell Diagnostics Main Menu
1
After the Dell Diagnostics loads and the
Main
Menu
appears, click the
button for the option you want.
NOTE:
It is recommended that you select
Test System
to run a complete test
on your Tablet-PC.
2
After you have selected the
Test System
option from the main menu, the
following menu appears:
NOTE:
It is recommended that you select
Extended Test
from the menu below to
run a more thorough check of devices in the Tablet-PC.
Option
Function
Test Memory
Run the stand-alone memory test
Test System
Run System Diagnostics
Exit
Exit the Diagnostics
Option
Function
Express Test
Performs a quick test of devices in the
system. This typically can take 10 to
20 minutes.
Extended Test
Performs a thorough check of devices in
the system. This typically can take an
hour or more.
Custom Test
Use to test a specific device or
customize the tests to be run.
Symptom Tree
This option allows you to select tests
based on a symptom of the problem you
are having. This option lists the most
common symptoms.

Quick Reference Guide
29
3
If a problem is encountered during a test, a message appears with an error
code and a description of the problem. Write down the error code and
problem description and contact Dell (see “Contacting Dell” in your
User’s Guide
).
NOTE:
The Service Tag for your Tablet-PC is located at the top of each test
screen. If you contact Dell, technical support will ask for your Service Tag.
4
If you run a test from the
Custom Test or Symptom Tree
option, click the
applicable tab described in the following table for more information.
5
When the tests are complete, close the test screen to return to the
Main
Menu
screen. To exit the Dell Diagnostics and restart the Tablet-PC, close
the
Main
Menu
screen.
6
Remove the Dell
Drivers and Utilities
media
(if applicable).
Tab
Function
Results
Displays the results of the test and any
error conditions encountered.
Errors
Displays error conditions encountered,
error codes, and the problem
description.
Help
Describes the test and may indicate
requirements for running the test.
Configuration
Displays your hardware configuration
for the selected device.
The Dell Diagnostics obtains
configuration information for all
devices from system setup, memory, and
various internal tests, and it displays
the information in the device list in
the left pane of the screen. The device
list may not display the names of all
the components installed on your
Tablet-PC or all devices attached to
your Tablet-PC.
Parameters
Allows you to customize the test by
changing the test settings.

30
Quick Reference Guide

Index
31
Index
B
battery
charge gauge, 19
charging, 21
checking the charge, 19
performance, 18
removing, 22
storing, 23
C
computer
crashes, 23, 25
stops responding, 23
D
Dell Diagnostics, 25
Dell support site, 9
diagnostics
Dell, 25
documentation
End User License Agreement, 7
ergonomics, 7
online, 9
Product Information Guide, 7
regulatory, 7
safety, 7
documentation
(continued)
User’s Guide, 6
warranty, 7
Drivers and Utilities media
Dell Diagnostics, 25
E
End User License Agreement, 7
ergonomics information, 7
H
hardware
Dell Diagnostics, 25
L
labels
Microsoft Windows, 8
Service Tag, 8
M
media
operating system, 11

32
Index
O
operating system
reinstalling, 11
Operating System media, 11
P
problems
blue screen, 25
computer crashes, 23, 25
computer stops responding, 23
Dell Diagnostics, 25
general, 23
program crashes, 24
program stops responding, 24
software, 24-25
Product Information Guide, 7
Q
QuickSet Help, 11
R
regulatory information, 7
S
safety instructions, 7
Service Tag, 8
software
problems, 24-25
Starting the Dell Diagnostics
From the Drivers and
Utilities Media, 27
Starting the Dell Diagnostics
From Your Hard Drive, 26
support website, 9
system views
back, 15
bottom, 16
front, 13
left side, 14
right side, 15
T
troubleshooting
Dell Diagnostics, 25
U
User’s Guide, 6
W
warranty information, 7
Windows Vista
reinstalling, 11

w w w . d e l l . c o m | s u p p o r t . d e l l . c o m
Guide de référence rapide Dell™ Latitude™ XT
Modèle PP12S

Remarques, avis et précautions
REMARQUE :
Une REMARQUE indique des informations importantes qui peuvent
vous aider à mieux utiliser votre ordinateur.
AVIS :
Un AVIS vous avertit d’un risque d'endommagement du matériel ou de perte
de données et vous indique comment éviter le problème.
PRÉCAUTION :
Une PRÉCAUTION indique un risque potentiel d'endommagement
du matériel, de blessure corporelle ou de mort.
____________________
Les informations de ce document sont sujettes à modification sans préavis.
© 2007 Dell Inc. Tous droits réservés.
La reproduction de ce document, de quelque manière que ce soit, sans l'autorisation écrite de Dell Inc.
est strictement interdite.
Marques utilisées dans ce document : Dell, le logo DELL, Wi-Fi Catcher, ExpressCharge et Latitude
sont des marques de Dell Inc. ; Microsoft, Windows etWindows Vista sont des marques ou des marques
déposées de Microsoft Corporation aux États-Unis et/ou dans d'autres pays.
D'autres marques et noms commerciaux peuvent être utilisés dans ce document pour faire référence
aux entités se réclamant de ces marques et de ces noms ou à leurs produits. Dell Inc. rejette tout intérêt
propriétaire dans les marques et les noms commerciaux autres que les siens.
Modèle PP12S
Décembre 2007
Réf. GM919
Rév. A01

Table des matières
35
Table des matières
Ressources
. . . . . . . . . . . . . . . . . . . . . . .
37
Recherche d'informations
. . . . . . . . . . . . .
37
Configuration de votre ordinateur
. . . . . . . . .
45
À propos de votre Tablet-PC
. . . . . . . . . . . . . .
45
Vue frontale
. . . . . . . . . . . . . . . . . . . .
46
Vue du côté gauche
. . . . . . . . . . . . . . . .
47
Vue du côté droit
. . . . . . . . . . . . . . . . . .
48
Vue arrière
. . . . . . . . . . . . . . . . . . . . .
48
Vue de dessous
. . . . . . . . . . . . . . . . . .
49
Vue du stylet
. . . . . . . . . . . . . . . . . . . .
50
Utilisation d'une batterie
. . . . . . . . . . . . . . . .
50
Performances de la batterie
. . . . . . . . . . . .
51
Vérification de la charge de la batterie
. . . . . .
52
Chargement de la batterie
. . . . . . . . . . . . .
54
Retrait de la batterie
. . . . . . . . . . . . . . . .
55
Stockage de la batterie
. . . . . . . . . . . . . .
56
Dépannage
. . . . . . . . . . . . . . . . . . . . . . .
57
Problèmes de blocages et logiciels
. . . . . . . .
57
Dell Diagnostics
. . . . . . . . . . . . . . . . . .
59
Index
. . . . . . . . . . . . . . . . . . . . . . . . . . . . . . .
65

36
Table des matières

Guide de référence rapide
37
Ressources
Recherche d'informations
REMARQUE :
Il se peut que certaines fonctionnalités et certains supports soient
en option et ne soient pas livrés avec votre Tablet-PC. Certaines fonctionnalités ne
sont pas nécessairement disponibles dans tous les pays.
REMARQUE :
Il est possible que des informations supplémentaires soient fournies
avec votre Tablet-PC.
REMARQUE :
Pour accéder au support
Drivers and Utilities,
utilisez le lecteur
optique qui se trouve dans la baie D/Bay ou le périphérique d'accueil en option.
Que recherchez-vous ?
Cherchez ici
• Programme de diagnostic pour mon
Tablet-PC
• Pilotes pour mon Tablet-PC
• La documentation concernant mon
appareil
Support Drivers and Utilities
REMARQUE :
Il se peut que le support
Drivers and Utilities
soit en option et qu'il
ne soit pas livré avec votre Tablet-PC.
38
Guide de référence rapide
• NSS (Notebook System Software)
La documentation et les pilotes sont déjà
installés sur le Tablet-PC. Vous pouvez
utiliser le support
Drivers and Utilities
pour réinstaller les pilotes (reportez-vous
à la section « Réinstallation des pilotes et
des utilitaires » de votre
Guide
d'utilisation
) ou exécuter Dell
Diagnostics (reportez-vous à la section
« Dell Diagnostics » à la page 59).
Des fichiers « Lisez-moi » peuvent être
inclus sur votre support ; ces fichiers
fournissent des informations sur les
modifications techniques de dernière
minute apportées à votre Tablet-PC ou
des informations de référence destinées
aux techniciens ou aux utilisateurs
expérimentés.
REMARQUE :
Les dernières mises à jour
des pilotes et de la documentation se
trouvent à l'adresse
support.dell.com
.
Que recherchez-vous ?
Cherchez ici
Guide de référence rapide
39
• Comment retirer et remplacer des pièces
• Caractéristiques
• Comment configurer les paramètres du
système
• Comment déterminer et résoudre des
problèmes
Guide d'utilisation du Dell™ Latitude™ XT
Microsoft Windows XP et Windows Centre
d'aide et de support de Vista™
1
Cliquez sur
Démarrer
(ou
Démarrer sous Windows XP)
→
Aide et
support
→
Dell User and system guides
(Guides d'utilisation du système)
→
Guides système
.
2
Cliquez sur le
Guide d'utilisation
de
votre ordinateur.
• Informations sur les garanties
• Termes et Conditions (États-Unis
uniquement)
• Consignes de sécurité
• Informations sur les réglementations
• Informations relatives à l'ergonomie
• Contrat de licence pour utilisateur final
Guide d'information sur le produit Dell™
• Comment configurer mon Tablet-PC
• Sommaire des fonctionnalités de votre
Tablet-PC
• Accessoires disponibles pour votre
Tablet-PC
Carte de référence rapide
Que recherchez-vous ?
Cherchez ici

40
Guide de référence rapide
• Numéro de service et code de service
express
• Étiquette de licence Microsoft
®
Windows
®
Numéro de service et licence Microsoft
Windows
REMARQUE :
L'étiquette portant le
numéro de service de votre Tablet-PC se
trouve sur le dessous de celui-ci près du
cache de la mémoire et de la carte Mini
(reportez-vous à la section « Vue de
dessous » à la page 49).
REMARQUE :
Vous pouvez également
utiliser le Programme de configuration du
système pour trouver les informations
concernant votre Numéro de service.
Reportez-vous à la section « Écrans de
configuration du système » du
Guide
d'utilisation
.
Le numéro de service de votre Tablet-PC
inclut un numéro de service et un code de
service express.
• Utilisez le numéro de service pour
identifier votre Tablet-PC lorsque vous
accédez au site Web
support.dell.com
ou lorsque vous appelez le service de
support technique.
• Entrez le code de service express pour
orienter votre appel lorsque vous
contactez le service de support.
REMARQUE :
L'étiquette de licence
Microsoft
®
Windows
®
de votre Tablet-PC
se trouve sous la batterie principale dans
la baie de batterie de votre Tablet-PC
(reportez-vous à la section « Retrait de la
batterie » à la page 55).
Que recherchez-vous ?
Cherchez ici
