Dell Latitude X300: UsingtheDell™D/Bay
UsingtheDell™D/Bay : Dell Latitude X300
UsingtheDell™D/Bay
About the Dell D/Bay
Removing and Installing Devices When the Computer is Turned Off
Removing and Installing Devices While the Computer Is Running
Using the CD or DVD Tray
About the Dell D/Bay
YoucaninstallDellLatitude™D-Family devices such as a floppy drive or an optical drive.
Removing and Installing Devices When the Computer is Turned Off
CAUTION: Before performing any of the procedures listed below, read and follow the safety instructions.
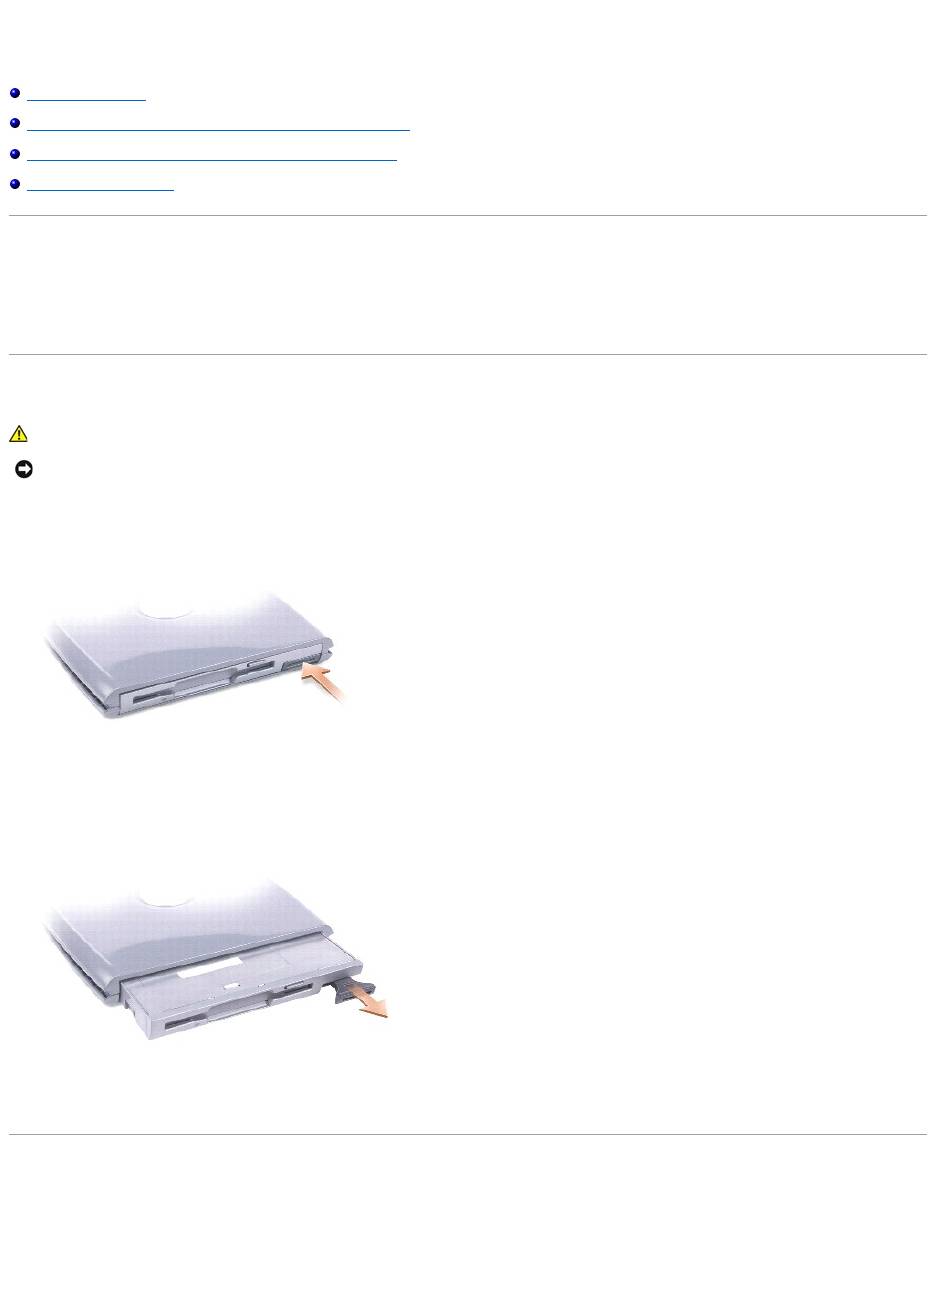
1. Press the device latch release so that the latch release pops out.
2. Pull the device by the latch release to remove the device from the D/Bay.
3. Insert the new device into the bay, push the device until you feel a click, and push the device latch release in so that it is flush with the bay.
4. Connect the D/Bay cable to the Dell D/Bay connector on the computer.
Removing and Installing Devices While the Computer Is Running
®
®
Microsoft
Windows
XP
1. Double-click the Safely Remove Hardware icon on the taskbar.
2. Click the device you want to eject.
NOTICE: To prevent damage to devices, place them in a safe, dry place when they are not installed in the computer. Avoid pressing down on them or
placing heavy objects on top of them.
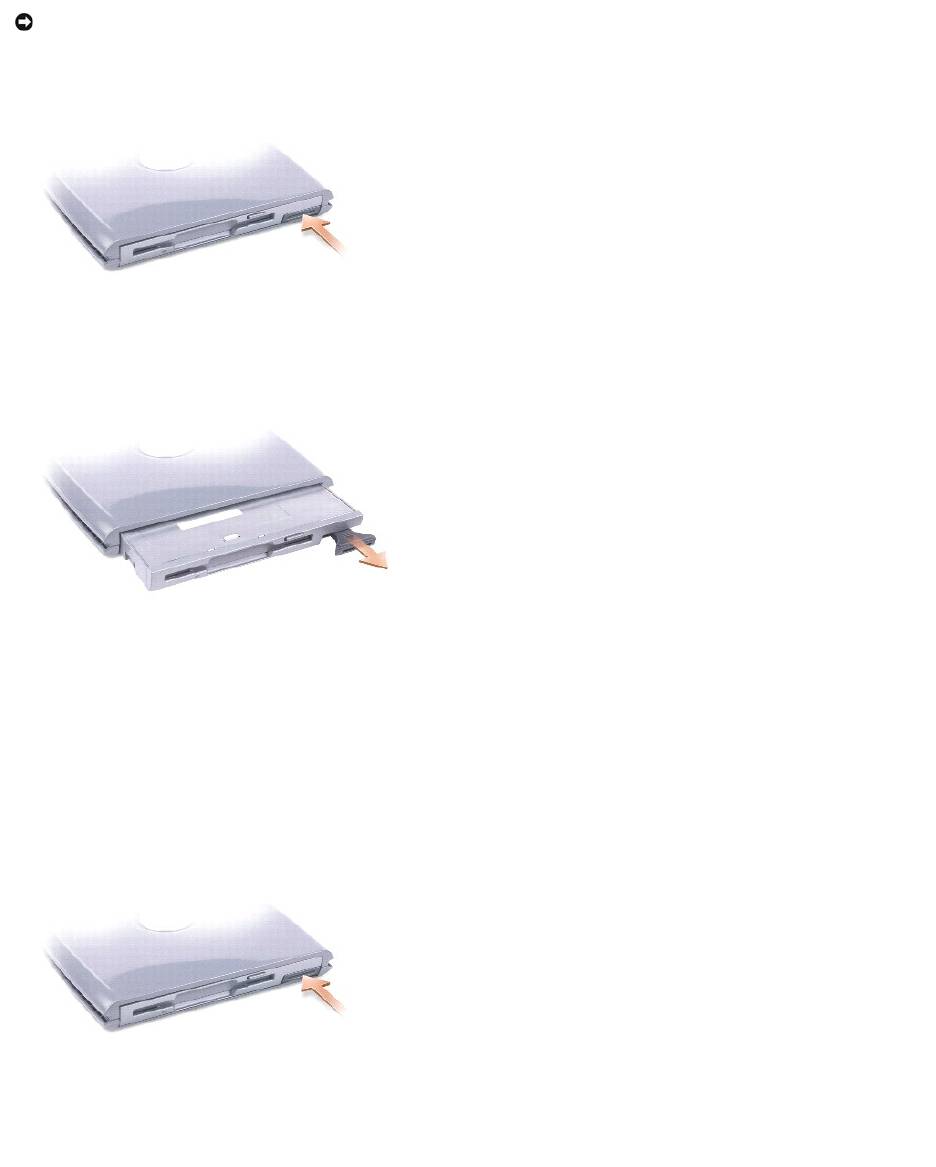
3. Press the device latch release so that the latch release pops out.
4. Pull the device by the latch release to remove the device from the D/Bay.
5. Insert the new device into the bay, push the device until you feel a click, and push the device latch release in so that it is flush with the bay.
Windows XP automatically recognizes the new device.
6. If necessary, enter your password to unlock your drive.
Windows 2000
1. Click the Unplug or Eject Hardware icon on the taskbar.
2. Click the device you want to eject and click Stop.
3. Press the device latch release so that the latch release pops out.
4. Pull the device by the latch release to remove the device from the D/Bay.
NOTICE: To prevent damage to devices, place them in a safe, dry place when they are not installed in the computer. Avoid pressing down on them or
placing heavy objects on top of them.
5. Insert the new device into the bay, push the device until you feel a click, and push the device latch release in so that it is flush with the computer.
6. When the operating system recognizes the new device, click Close.
Using the CD or DVD Tray
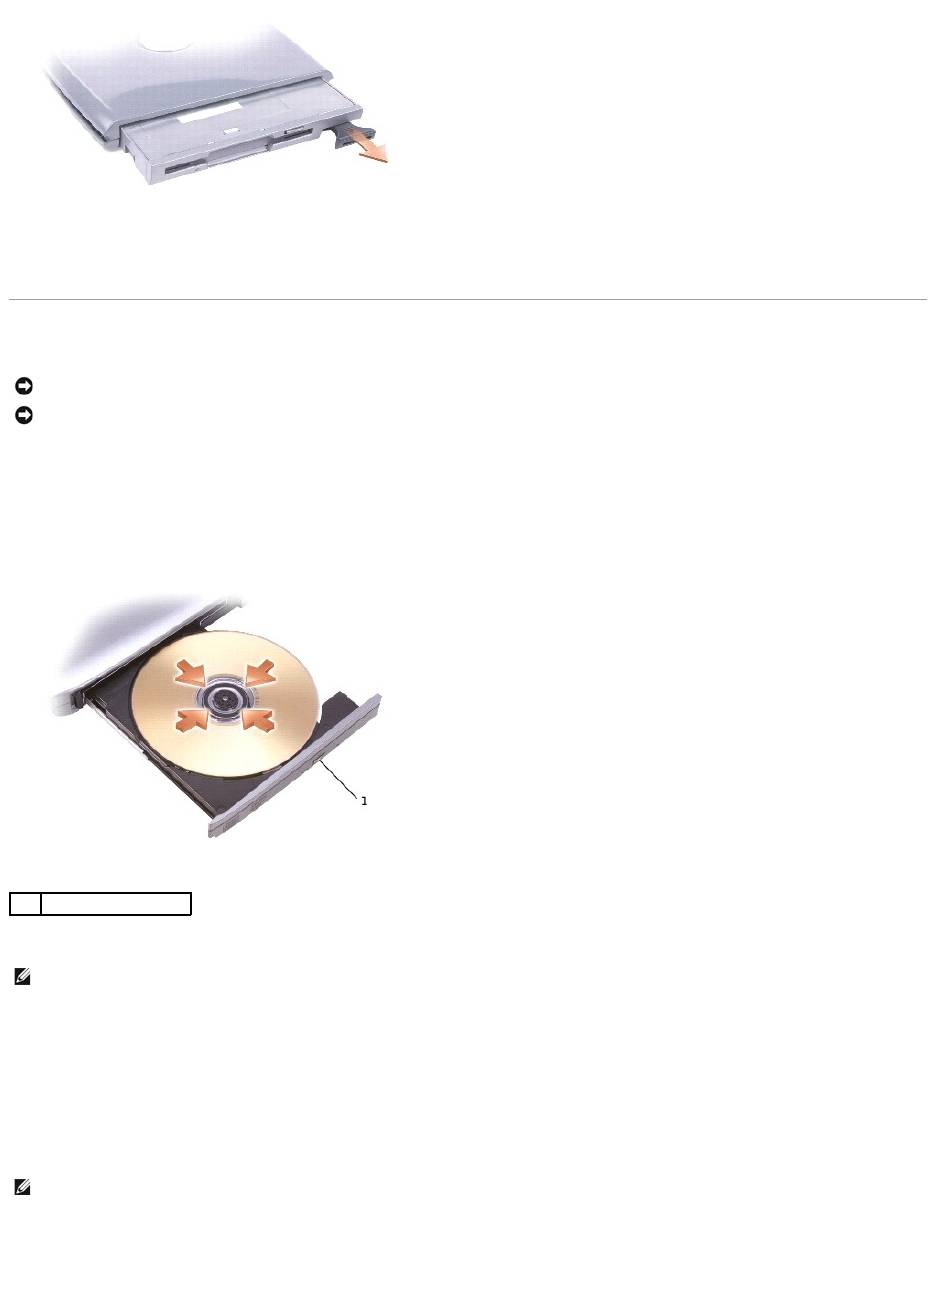
1. Press the eject button on the front of the drive.
2. Pull the tray out.
3. Place the disc, label side up, in the center of the tray.
4. Snap the disc onto the spindle.
5. Push the tray back into the drive.
You can play a DVD on your computer if the computer shipped with a DVD drive or a CD-RW/DVD combo drive. You can write data to a blank CD on your
computer if the computer shipped with a CD-RW or CD-RW/DVD combo drive.
For more information about playing CDs or watching movies, click Help on the CD player or DVD player (if available).
Adjusting the Volume
1. Click the Start button, point to All Programs® Accessories® Entertainment (or Multimedia), and then click Volume Control.
2. In the Volume Control window, click and drag the bar in the Volume Control column and slide the bar up or down to increase or decrease the volume.
NOTICE: Do not press down on the drive tray when opening or closing it. Keep the tray closed when you are not using the drive.
NOTICE: Do not move the computer while playing CDs or DVDs.
1
eject button
NOTE: If you use a module bay that shipped with another Latitude D-Family computer, you need to install the drivers and software necessary to play
DVDs or write data. For more information, see the Drivers and Utilities CD.
NOTE: If the speaker is muted, you do not hear the CD or DVD playing.
For more information about volume control options, click Help in the Volume Control window.
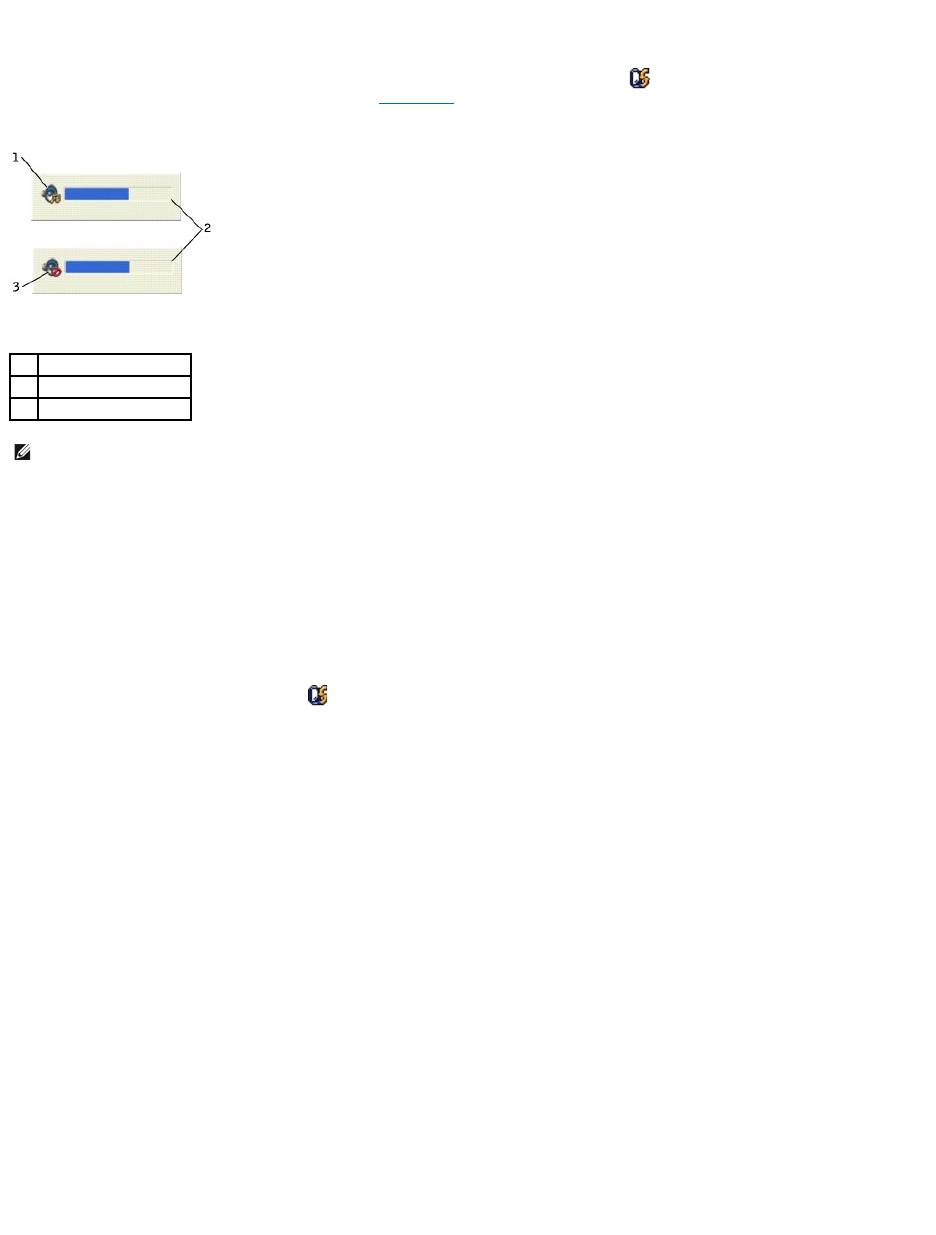
The Volume Meter displays the current volume level, including mute, on your computer. Either right-click the icon in the taskbar or press the volume control
buttons to enable or disable the Volume Meter on the screen (if Dell QuickSet is installed).
When the meter is enabled, adjust the volume using the volume control buttons or by pressing the following keys:
l Press <Fn><Page Up> to increase volume.
l Press <Fn><Page Down> to decrease volume.
l Press <Fn><Find> to mute volume.
For more information about QuickSet, right-click the icon in the taskbar and click Help.
Adjusting the Picture
If an error message notifies you that the current resolution and color depth are using too much memory and preventing DVD playback, adjust the display
properties.
Windows XP
1. Click the Start button and click Control Panel.
2. Under Pick a category, click Appearance and Themes.
3. Under Pick a task..., click Change the screen resolution.
4. In the Display Properties window, click and drag the bar in Screen resolution to change the setting to 1024 by 768 pixels.
5. Under Color quality, click the drop-down menu and click Medium (16 bit).
6. Click OK.
Windows 2000
1. Click the Start button, point to Settings, and then click Control Panel.
2. Double-click the Display icon and click the Settings tab.
3. Click and drag the bar in Screen area to change the setting to 1024 by 768 pixels.
4. Under Color quality, click the drop-down menu and click High Color (16 bit).
5. Click Apply.
6. Click OK to save the settings and close the window.
1
volume icon
2
Volume Meter
3
mute icon
NOTE: By default, the Volume Meter appears in the lower-right corner of the display. If you click and drag the meter to a new location, the meter always
appears at the new location.
Оглавление
- Dell™Latitude™X300User'sGuide
- About Your Computer
- Appendix
- Alert Standard Format (ASF)
- Using a Battery
- UsingtheDell™D/Bay
- Cleaning Your Computer
- Dell Diagnostics
- Using the Display
- Reinstalling Software
- Finding Information for Your Computer
- Getting Help
- Glossary
- Using the Keyboard and Touchpad
- Passwords
- Using PC Cards
- Solving Problems
- Power Management
- Dell™QuickSetFeatures
- Adding and Replacing Parts
- Using the System Setup Program
- Specifications
- Traveling With Your Computer
- Using Microsoft®Windows®XP
