Asus A8N-E: 4 Using the Notebook PC
4 Using the Notebook PC: Asus A8N-E
4 Using the Notebook PC
OS
Operating System
This Notebook PC may offer (depending on territory) its customers the choice of a pre-installed operating
system such as Microsoft Windows XP. The choices and languages will depend on the territory. The
levels of hardware and software support may vary depending on the installed operating system. The
stability and compatibility of other operating systems cannot be guaranteed.
Support Software
This Notebook PC comes with a support CD that provides BIOS,
drivers and applications to enable hardware features, extend
functionality, help manage your Notebook PC, or add functionality
not provided by the native operating system. If updates or
replacement of the support CD is necessary, contact your dealer
for web sites to download individual software drivers and utilities.
The support CD contains all drivers, utilities and software for all popular operating systems including
those that have been pre-installed. The support CD does not include the operating system itself. The
support CD is necessary even if your Notebook PC came pre-configured in order to provide additional
software not included as part of the factory pre-install.
A recovery CD is optional and includes an image of the original operating system installed on the hard
drive at the factory. The recovery CD provides a comprehensive recovery solution that quickly restores
the Notebook PC’s operating system to its original working state provided that your hard disk drive is
in good working order. Contact your retailer if you require such a solution.
Note: Some of the Notebook PC’s components and features may not work until the
device drivers and utilities are installed.
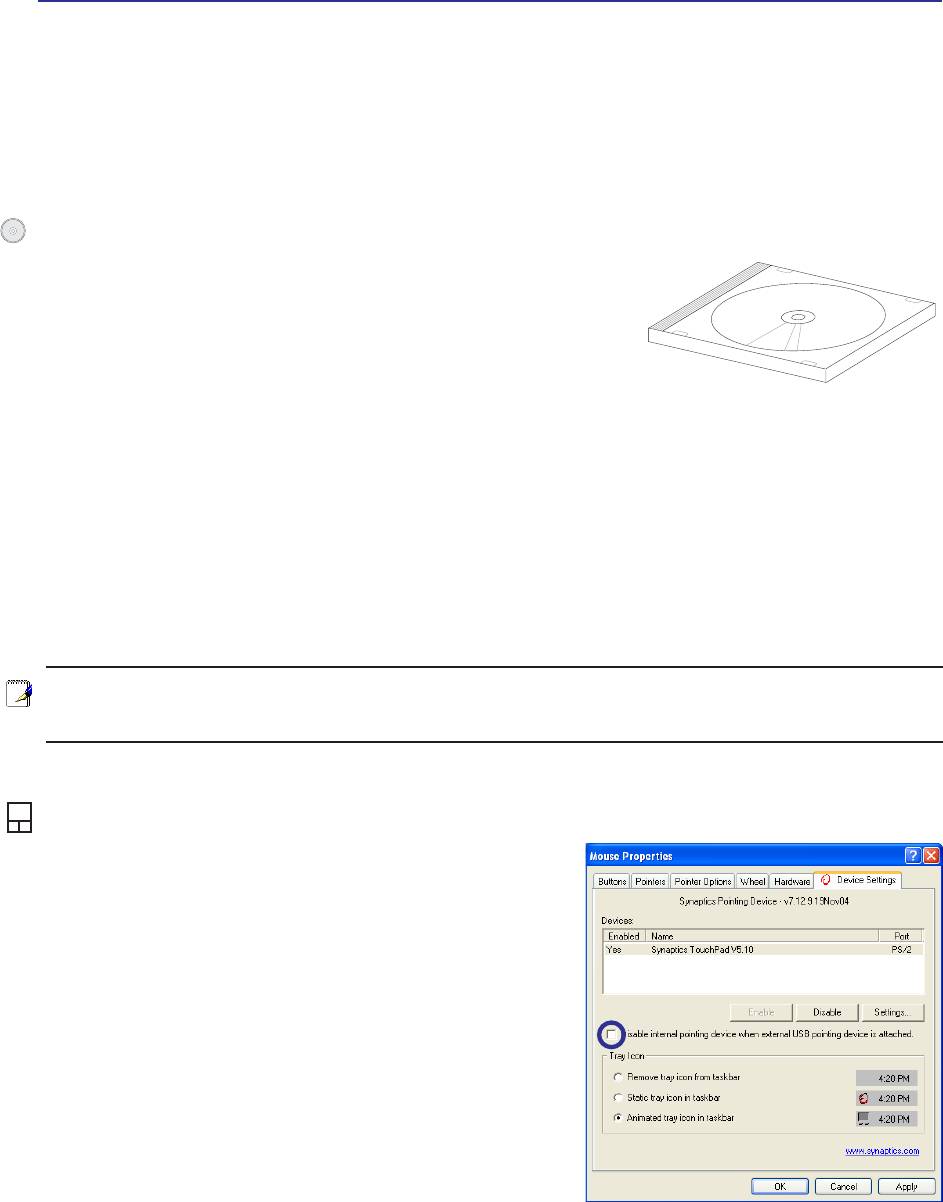
Touchpad activation with external USB mouse
Software on Notebook PC models with newer chipsets
will automatically disable the Notebook PC’s touchpad
when an external USB mouse is attached. To turn OFF
this feature, deselect the option in Windows Control
Panel - Mouse Properties - Device Settings.
36
Using the Notebook PC 4
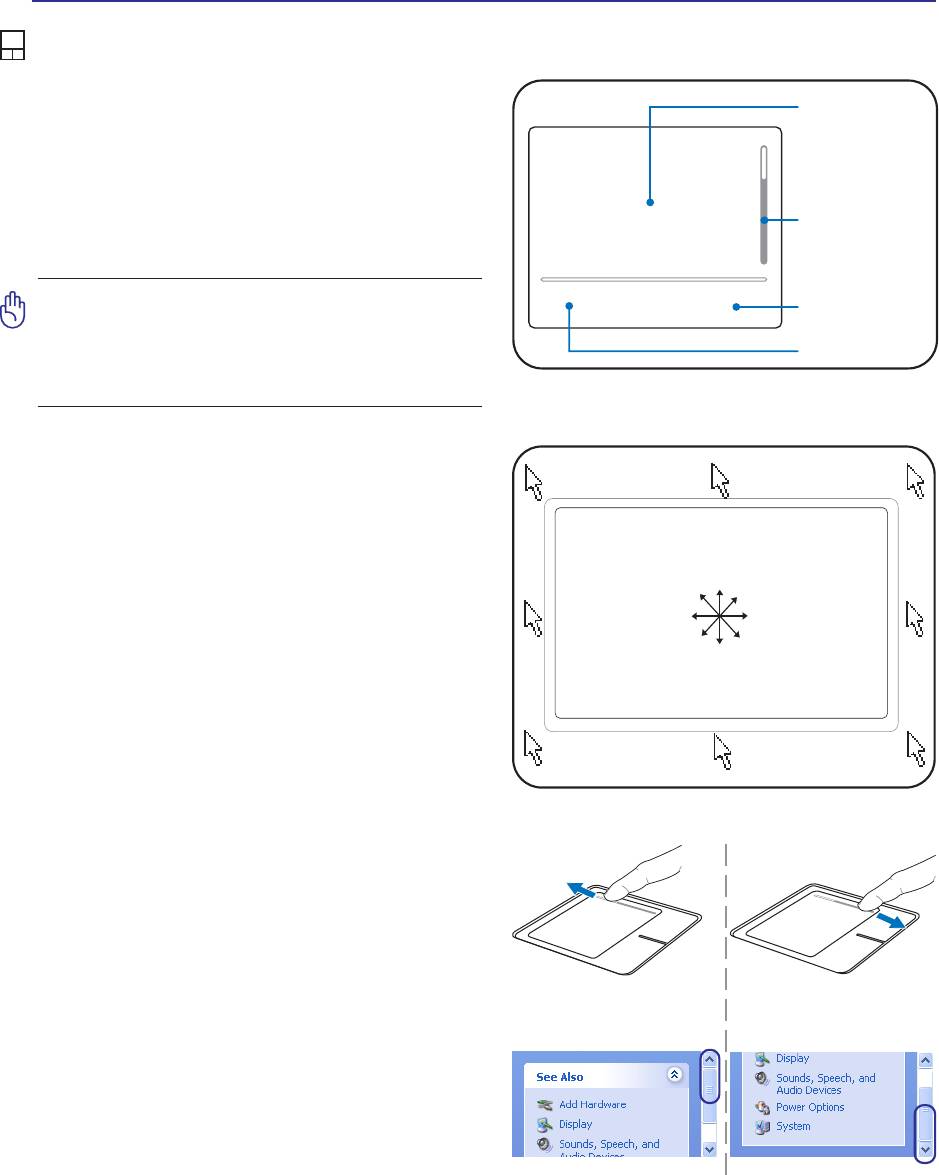
Pointing Device
The Notebook PC’s integrated touchpad pointing
Cursor
device is fully compatible with all two/three-button
Movement
and scrolling knob PS/2 mice. The touchpad is
pressure sensitive and contains no moving parts;
therefore, mechanical failures can be avoided. A
Vertical
device driver is still required for working with some
Scroll Area
application software.
IMPORTANT! Do not use any objects in
Right Click
place of your finger to operate the touch-
Left Click
pad or else damage may occur to the
touchpad’s surface.
Using the Touchpad
Light pressure with the tip of your finger is all that
is required to operate the touchpad. Because the
Slide finger
forward
touchpad is electrostatic sensitive, objects cannot
be used in place of your fingers. The touchpad’s
Slide
Slide finger
primary function is to move the cursor around or
finger left
right
select items displayed on the screen with the use of
your fingertip instead of a standard desktop mouse.
Slide finger
The following illustrations demonstrate proper use
backward
of the touchpad.
Moving The Cursor
Place your finger in the center of the touchpad and
slide in a direction to move the cursor.
Scrolling (on selected models)
Slide your finger up or down on the right side to
scroll a window up or down.
Scroll DownScroll Up
37
4 Using the Notebook PC
Touchpad Usage Illustrations
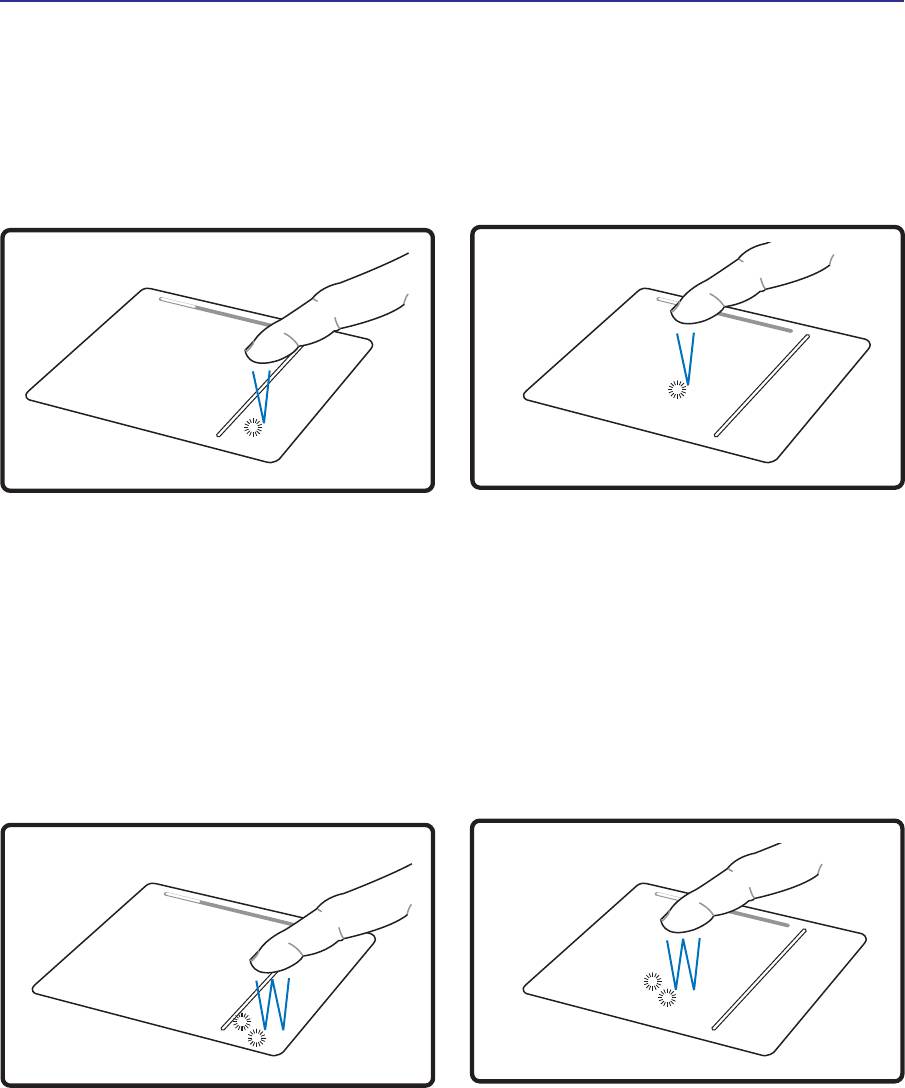
Clicking/Tapping - With the cursor over an item, press the left button or use your fingertip to touch the
touchpad lightly, keeping your finger on the touchpad until the item is selected. The selected item will
change color. The following 2 examples produce the same results.
Clicking Tapping
(press the left cursor button and release) (lightly but rapidly strike the touchpad)
Double-clicking/Double-tapping - This is a common skill for launching a program directly from the
corresponding icon you select. Move the cursor over the icon you wish to execute, press the left button
or tap the pad twice in rapid succession, and the system launches the corresponding program. If the
interval between the clicks or taps is too long, the operation will not be executed. You can set the
double-click speed using the Windows Control Panel “Mouse.” The following 2 examples produce the
same results.
Double-Clicking
Double-Tapping
(press the left button twice and release) (lightly but rapidly strike the touchpad twice)
38
Using the Notebook PC 4
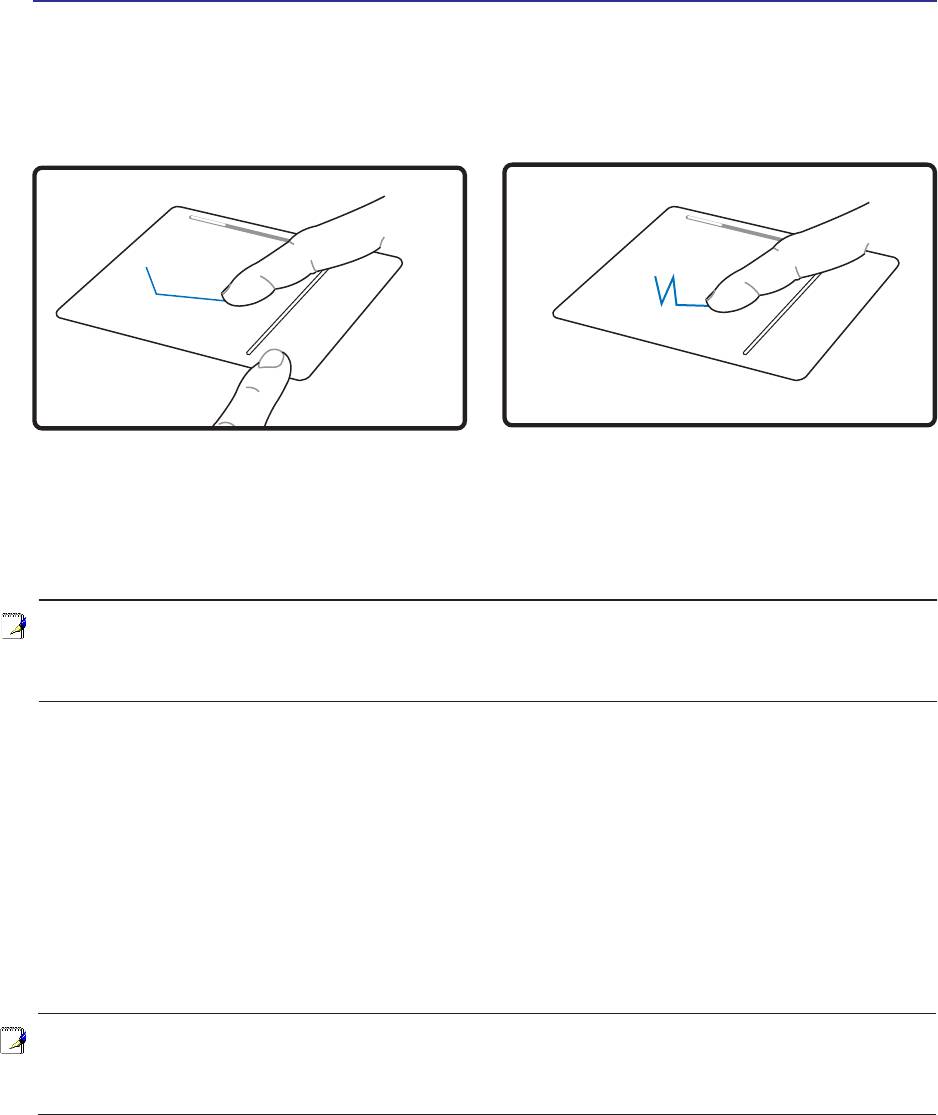
Dragging - Dragging means to pick up an item and place it anywhere on the screen you wish. You can
move the cursor over the item you select, and while keeping the left button depressed, moving the
cursor to the desired location, then release the button. Or, you can simply double-tap on the item and
hold while dragging the item with your fingertip. The following illustrations produce the same results.
Dragging-Clicking Dragging-Tapping
(hold left button and slide finger on touchpad)
(lightly strike the touchpad twice, sliding finger
on touchpad during second strike)
NOTE: A software-controlled scrolling function is available after setting up the included
touchpad utility to allow easy Windows or web navigation. Basic functions can be ad-
justed at the Windows control panel to allow comfortable clicking and tapping.
Caring for the Touchpad
The touchpad is pressure sensitive. If not properly cared for, it can be easily damaged. Take note of the
following precautions.
• Make sure the touchpad does not come into contact with dirt, liquids or grease.
• Do not touch the touchpad if your fingers are dirty or wet.
• Do not rest heavy objects on the touchpad or the touchpad buttons.
• Do not scratch the touchpad with your finger nails or any hard objects.
NOTE: The touchpad responds to movement not to force. There is no need to tap the
surface too hard. Tapping too hard does not increase the responsiveness of the touch-
pad. The touchpad responds best to light pressure.
39
4 Using the Notebook PC
Storage Devices
Storage devices allow the Notebook PC to read or write documents, pictures, and other files to various
data storage devices. This Notebook PC has the following storage devices:
• ExpressCard
• Optical drive
• Flash memory reader
• Hard disk drive
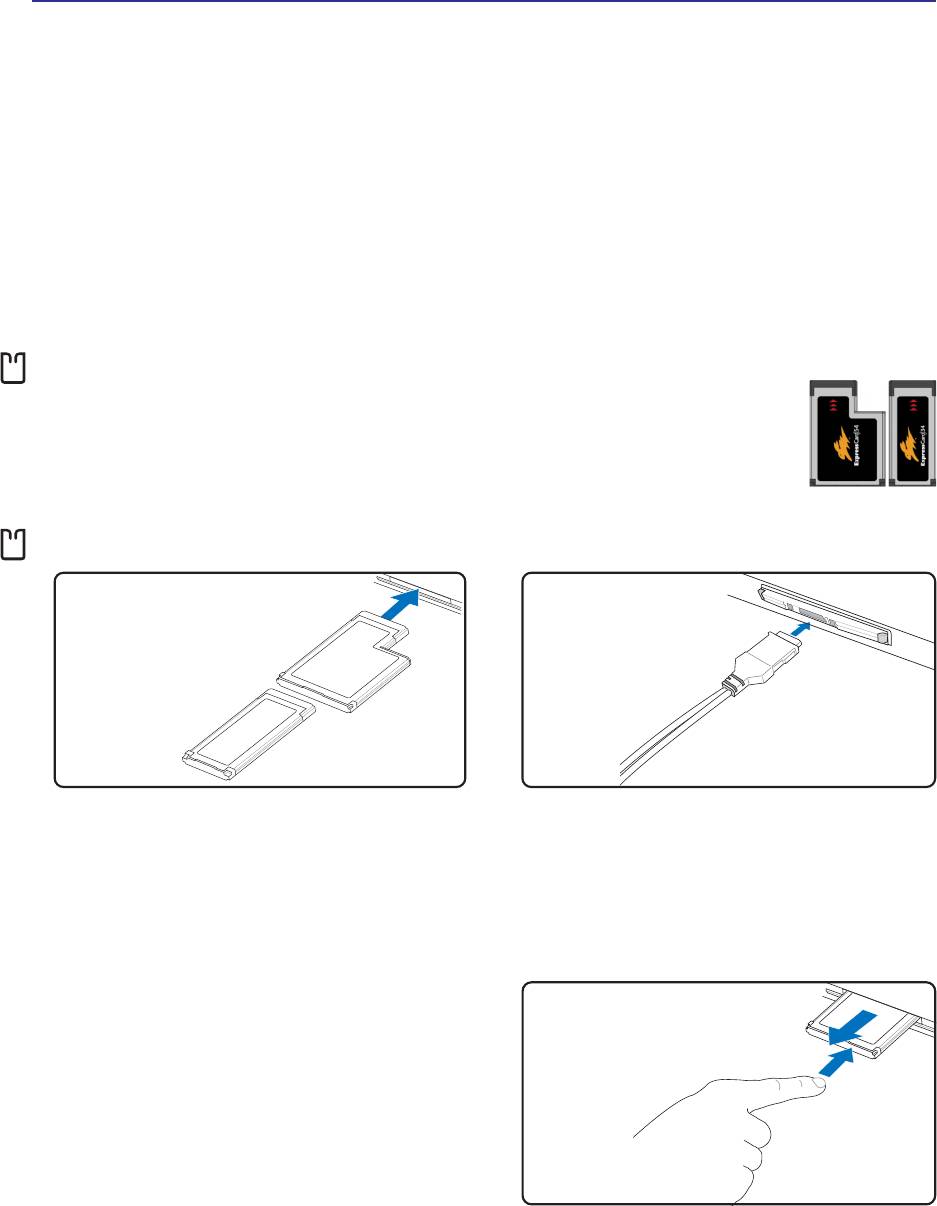
ExpressCard
One 26pin Express card socket is available to support one ExpressCard/34mm or one
ExpressCard/54mm expansion card. This new interface is faster by using a serial bus
supporting USB 2.0 and PCI Express instead of the slower parallel bus used in the PC
card socket. (Not compatible with previous PCMCIA cards.)
Inserting an ExpressCard
Be sure the ExpressCard
is level when inserting.
1. If there is an ExpressCard socket protector, re-
3. Carefully connect any cables or adapters
move it using the “Removing an ExpressCard”
needed by the ExpressCard. Usually connec-
instructions below.
tors can only be inserted in one orientation.
Look for a sticker, icon, or marking on one side
2. Insert the ExpressCard with the connector side first
of the connector representing the top side.
and label side up. Standard ExpressCards will be
flush with the Notebook PC when fully inserted.
Removing an ExpressCard
The ExpressCard socket does not have an eject
button. Press the ExpressCard inwards and release
to eject the ExpressCard. Carefully pull the ejected
ExpressCard out of the socket.
40
Using the Notebook PC 4
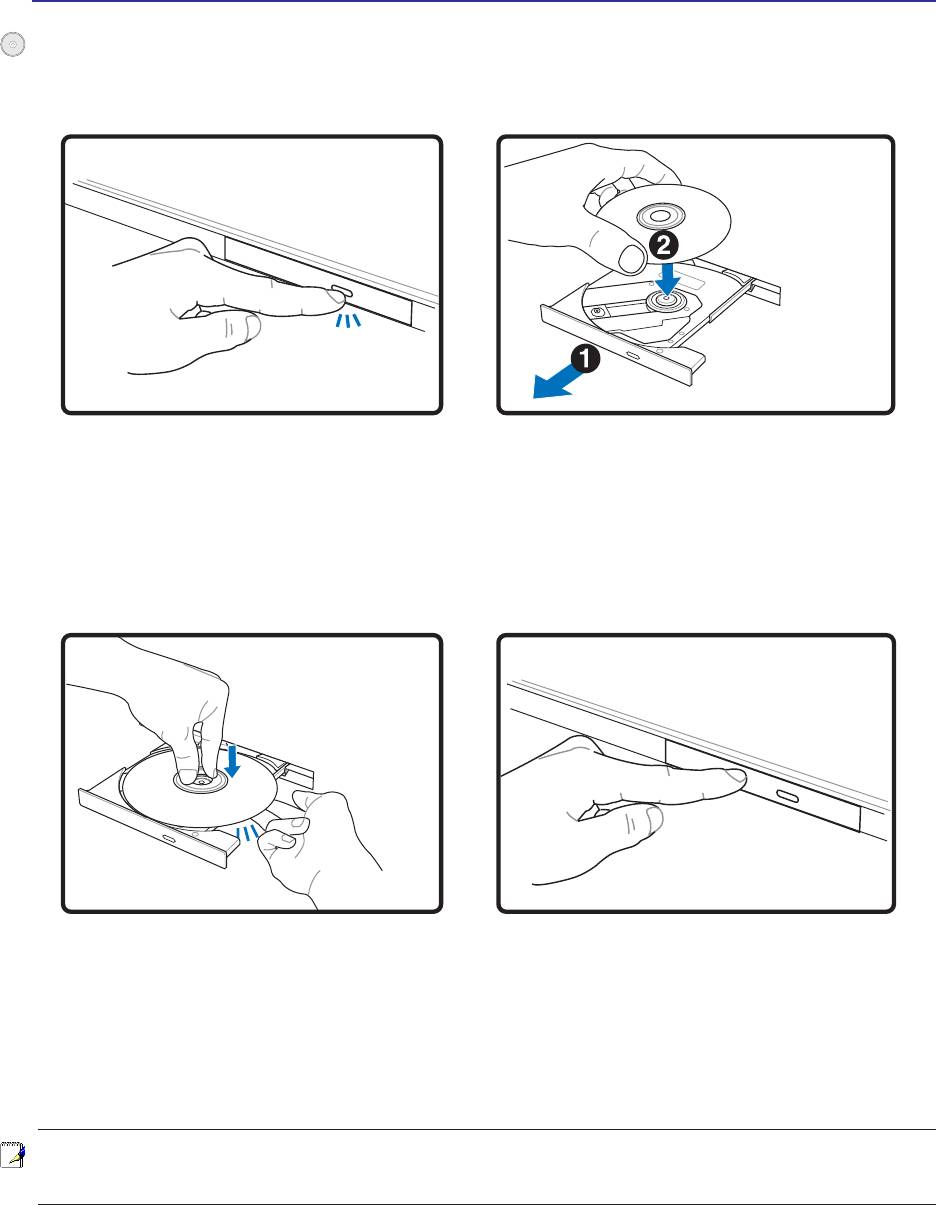
Optical Drive
Inserting an optical disc
1. While the Notebook PC’s power is ON,
2. Gently pull on the drive’s front panel and slide
press the drive’s eject button and the tray
the tray completely out. Be careful not to touch
will eject out partially.
the CD drive lens and other mechanisms.
Make sure there are no obstructions that may
get jammed under the drive’s tray.
3. Hold the disc by the edge and face the disc’s
4. Slowly push the drive’s tray back in. The drive
printed side up. Push down on both sides of
will begin reading the table of contents (TOC)
the disc’s center until the disc snaps onto
on the disc. When the drive stops, the disc is
the hub. The hub should be higher than
ready to be used.
the disc when correctly mounted.
NOTE: It is normal to hear as well as feel the CD spinning with great intensity in the
CD drive while data is read.
41
4 Using the Notebook PC
Optical Drive (Cont’)
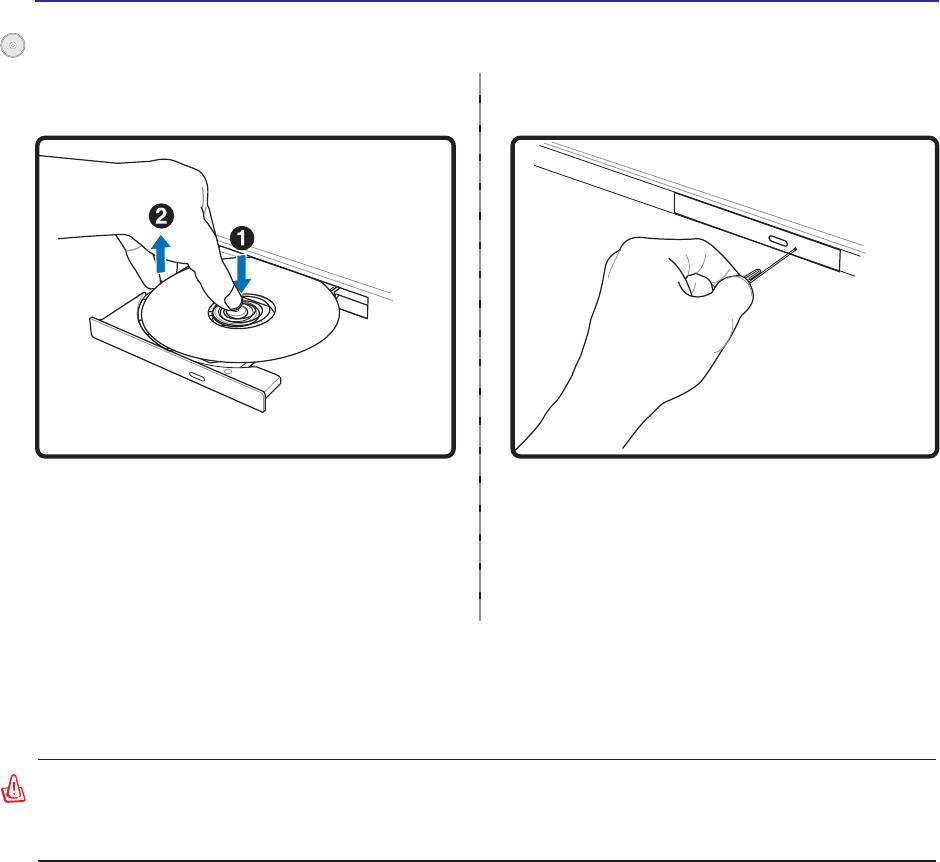
Removing an optical disc
Emergency eject
Actual location will
vary by model.
Eject the tray and gently pry the edge of the disc
The emergency eject is located in a hole on the
upwards at an angle to remove the disc from the
optical drive and is used to eject the optical drive
hub.
tray in case the electronic eject does not work.
Do not use the emergency eject in place of the
electronic eject. Note: Make sure not to stab
the activity indicator located in the same area.
Using the Optical Drive
Optical discs and equipment must be handled with care because of the precise mechanics involved.
Keep in mind the important safety instructions from your CD suppliers. Unlike desktop optical drives,
the Notebook PC uses a hub to hold the CD in place regardless of the angle. When inserting a CD, it is
important that the CD be pressed onto the center hub or else the optical drive tray will scratch the CD.
WARNING! If the CD disc is not properly locked onto the center hub, the CD can be
damaged when the tray is closed. Always watch the CD closely while closing the tray
slowly to prevent damage.
A CD drive letter should be present regardless of the presence of a CD disc in the drive. After the CD is
properly inserted, data can be accessed just like with hard disk drives; except that nothing can be
written to or changed on the CD. Using the proper software, a CD-RW drive or DVD+CD-RW drive
can allow CD-RW discs to be used like a hard drive with writing, deleting, and editing capabilities.
Vibration is normal for all high-speed optical drives due to unbalanced CDs or CD print. To decrease
vibration, use the Notebook PC on an even surface and do not place labels on the CD.
Listening to Audio CD
The optical drives can play audio CDs, but only the DVD-ROM drive can play DVD audio. Insert the
audio CD and Windows™ automatically opens an audio player and begins playing. Depending on the
DVD audio disc and installed software, it may require that you open a DVD player to listen to DVD
audio. You can adjust the volume using hotkeys or Windows™ speaker icon on the taskbar.
42
Using the Notebook PC 4
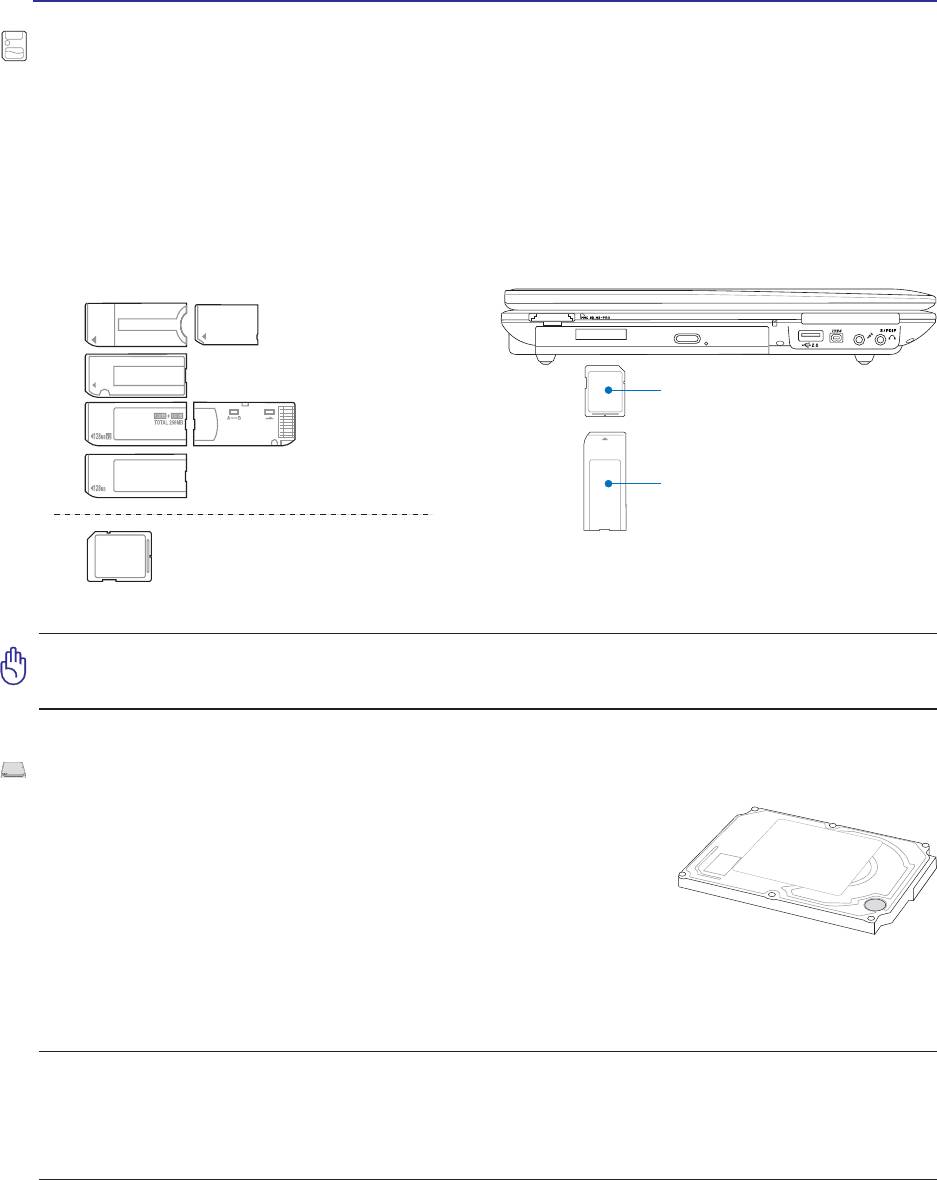
Supported Memory Types
MS adapter
MS (Memory Stick)
Duo/Pro/Duo Pro/MG
MS (Memory Stick)
Magic Gate (MG)
SD / MMC
MS (Memory Stick)
Select
MS (Memory Stick)
MS / MS P
MMC (Multimedia Card)
SD (Secure Digital)
43
ro
Flash Memory Card Reader
Normally a PCMCIA memory card reader must be purchased separately in order to use memory cards
from devices such as digital cameras, MP3 players, mobile phones, and PDAs. This Notebook PC has
a single built-in memory card reader that can read flash memory cards as shown below. The built-in
memory card reader is not only convenient, but also faster than most other forms of memory card
readers because it utilizes the high-bandwidth PCI bus.
512MB
IMPORTANT! Never remove cards while or immediately after reading, copying, for-
matting, or deleting data on the card or else data loss may occur.
Hard Disk Drive
Hard disk drives have higher capacities and operate at much faster speeds
than floppy disk drives and CD-ROM drives. Enhanced IDE drives
provide a reliable, fast, and cost-effective mass storage solution in the
PC storage industry. The high speed transfer modes supported are
UltraATA/100 up to 100MB/sec and PIO mode 4 up to 16.6MB/sec. The
Notebook PC comes with a removable 2.5” (6.35cm) wide and .374”
(.95cm) high UltraATA/100/66 IDE hard disk drive with current capacities up to 80GB. Current IDE hard
drives support S.M.A.R.T. (Self Monitoring and Reporting Technology) to detect hard disk errors or
failures before they happen. Visit an authorized service center or retailer for upgrades.
IMPORTANT! Poor handling of the Notebook PC may damage the hard disk drive.
Handle the Notebook PC gently and keep it away from static electricity and strong
vibrations or impact. The hard disk drive is the most delicate component and will
likely be the first or only component that is damaged if the Notebook PC is dropped.
4 Using the Notebook PC
Connections
NOTE: The built-in modem and network cannot be installed later as an upgrade. After
purchase, modem and/or network can be installed as a PC card (PCMCIA).
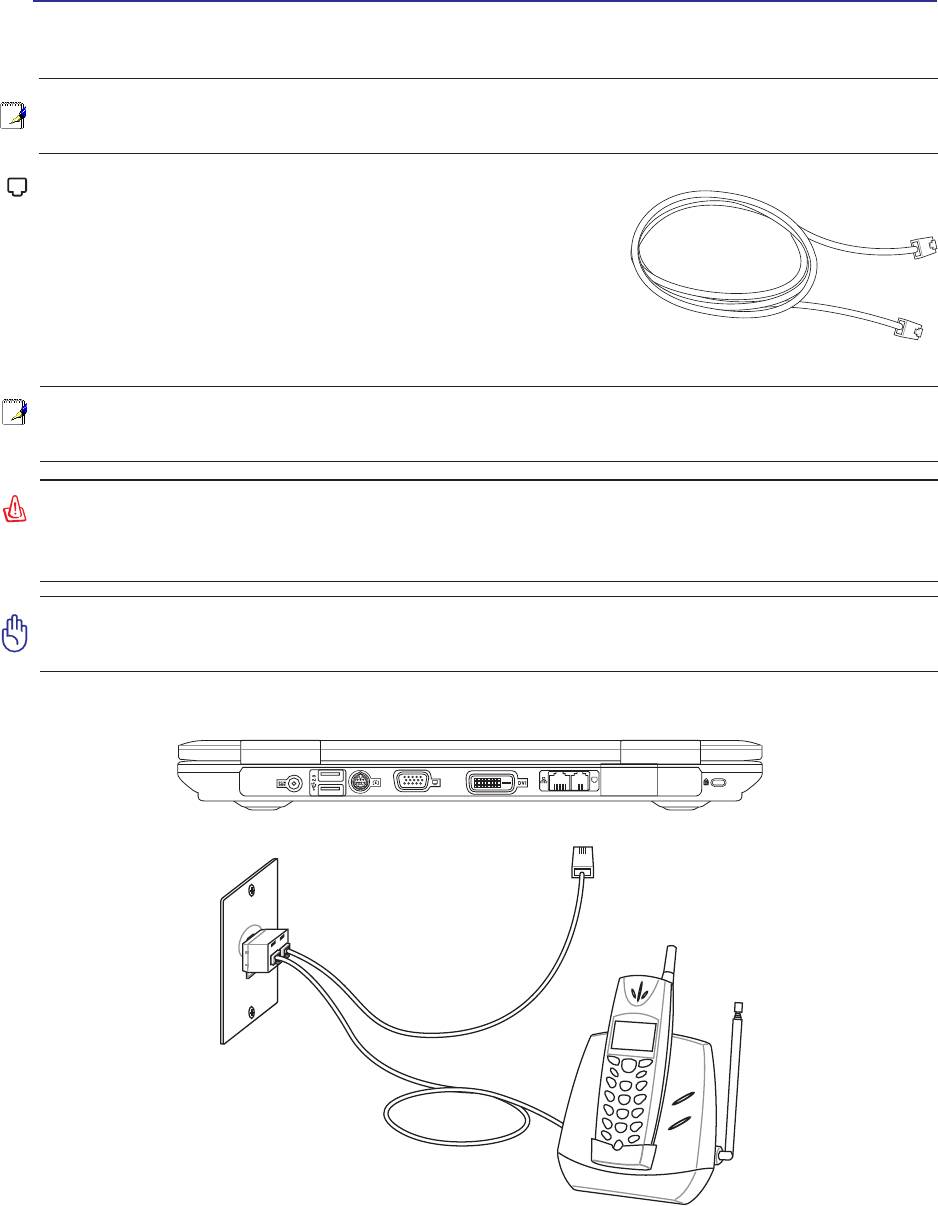
Modem Connection
The telephone wire used to connect the Notebook PC’s internal
modem should have either two or four wires (only two wires
(telephone line #1) is used by the modem) and should have an RJ-
11 connector on both ends. Connect one end to the modem port
and the other end to an analog telephone wall socket (the ones
found in residential buildings). Once the driver is setup, the modem is ready to use.
NOTE: When you are connected to an online service, do not place the Notebook PC in
suspend (or sleep mode) or else you will disconnect the modem connection.
WARNING! Only use analog telephone outlets. The built-in modem does not support
the voltage used in digital phone systems. Do not connect the RJ-11 to digital phone
systems found in many commercial buildings or else damage will occur!
CAUTION: For electrical safety concerns, only use telephone cables rated 26AWG or
higher. (see Glossary for more information)
Example of the Notebook PC connected to a telephone jack for use with the built-in modem:
Telephone connector is
the smaller of the two.
Telephone cables
with RJ-11 connectors
Telephone
Wall Jack
Telephone
connection
is optional
44
Using the Notebook PC 4
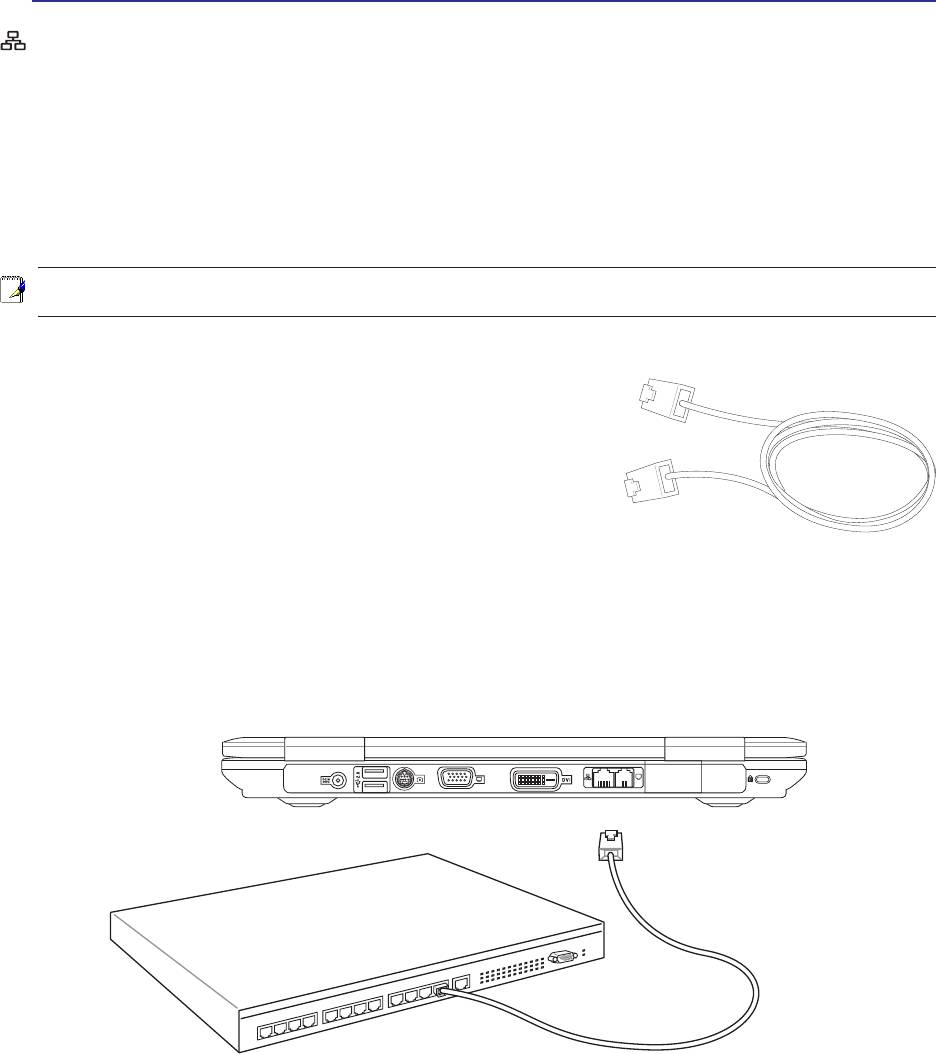
Network Connection
Connect a network cable, with RJ-45 connectors on each end, to the modem/network port on the Notebook
PC and the other end to a hub or switch. For 100 BASE-TX / 1000 BASE-T speeds, your network cable
must be category 5 or better (not category 3) with twisted-pair wiring. If you plan on running the
interface at 100/1000Mbps, it must be connected to a 100 BASE-TX / 1000 BASE-T hub (not a BASE-
T4 hub). For 10Base-T, use category 3, 4, or 5 twisted-pair wiring. 10/100 Mbps Full-Duplex is supported
on this Notebook PC but requires connection to a network switching hub with “duplex” enabled. The
software default is to use the fastest setting so no user-intervention is required.
1000BASE-T (or Gigabit) is only supported on selected models.
Twisted-Pair Cable
The cable used to connect the Ethernet card to a host (generally
a Hub or Switch) is called a straight-through Twisted Pair Ethernet
(TPE). The end connectors are called RJ-45 connectors, which
are not compatible with RJ-11 telephone connectors. If connecting
two computers together without a hub in between, a crossover
LAN cable is required (Fast-Ethernet model). (Gigabit models
support auto-crossover so a crossover LAN cable is optional.)
Example of the Notebook PC connected to a Network Hub or Switch for use with the built-in
Ethernet controller.
LAN connector is the
larger of the two.
Network Hub or Switch
Network cable with RJ-45 connectors
45
4 Using the Notebook PC
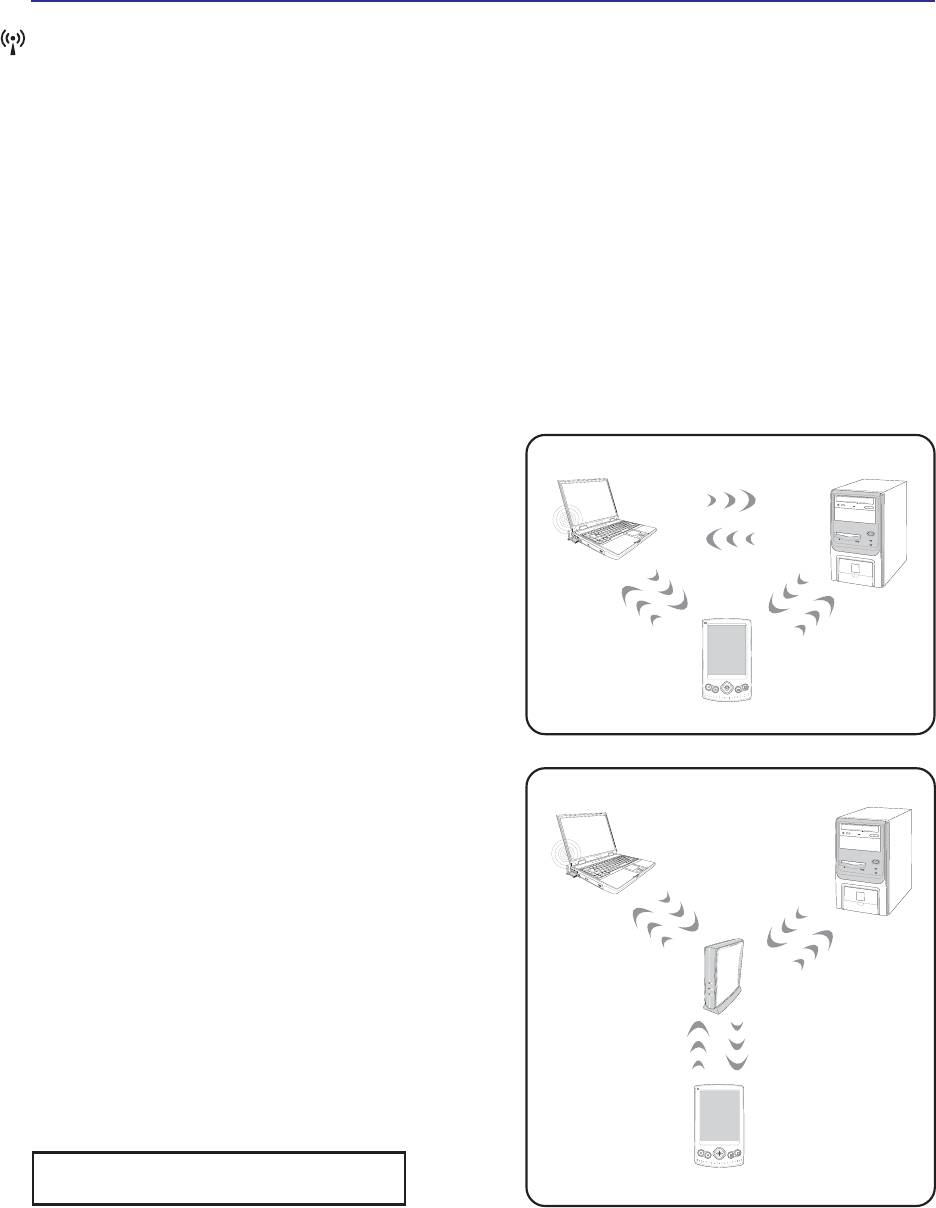
Wireless LAN Connection (on selected models)
The optional built-in wireless LAN is a compact easy-to-use wireless Ethernet adapter. Implementing
the IEEE 802.11 standard for wireless LAN (WLAN), the optional built-in wireless LAN is capable of
fast data transmission rates using Direct Sequence Spread Spectrum (DSSS) and Orthogonal Frequency
Division Multiplexing (OFDM) technologies on 2.4 GHz frequencies. The optional built-in wireless
LAN is backward compatible with the earlier IEEE 802.11 standards allowing seamless interfacing of
wireless LAN standards.
The optional built-in wireless LAN is a client adapter that supports Infrastructure and Ad-hoc modes
giving you flexibility on your existing or future wireless network configurations for distances up to 40
meters between the client and the access point.
To provide efficient security to your wireless communication, the optional built-in wireless LAN comes
with a 64-bit/128-bit Wired Equivalent Privacy (WEP) encryption and Wi-Fi Protected Access (WPA)
features.
Ad-hoc mode
Notebook PC
Desktop PC
The Ad-hoc mode allows the Notebook PC to connect
to another wireless device. No access point (AP) is
required in this wireless environment.
(All devices must install optional 802.11 wireless
LAN adapters.)
PDA
Infrastructure mode
Notebook PC
Desktop PC
The Infrastructure mode allows the Notebook PC and
other wireless devices to join a wireless network
created by an Access Point (AP) (sold separately) that
provides a central link for wireless clients to
communicate with each other or with a wired network.
(All devices must install optional 802.11 wireless
Access
LAN adapters.)
Point
These are examples of the Notebook
PC connected to a Wireless Network.
PDA
46
Using the Notebook PC 4
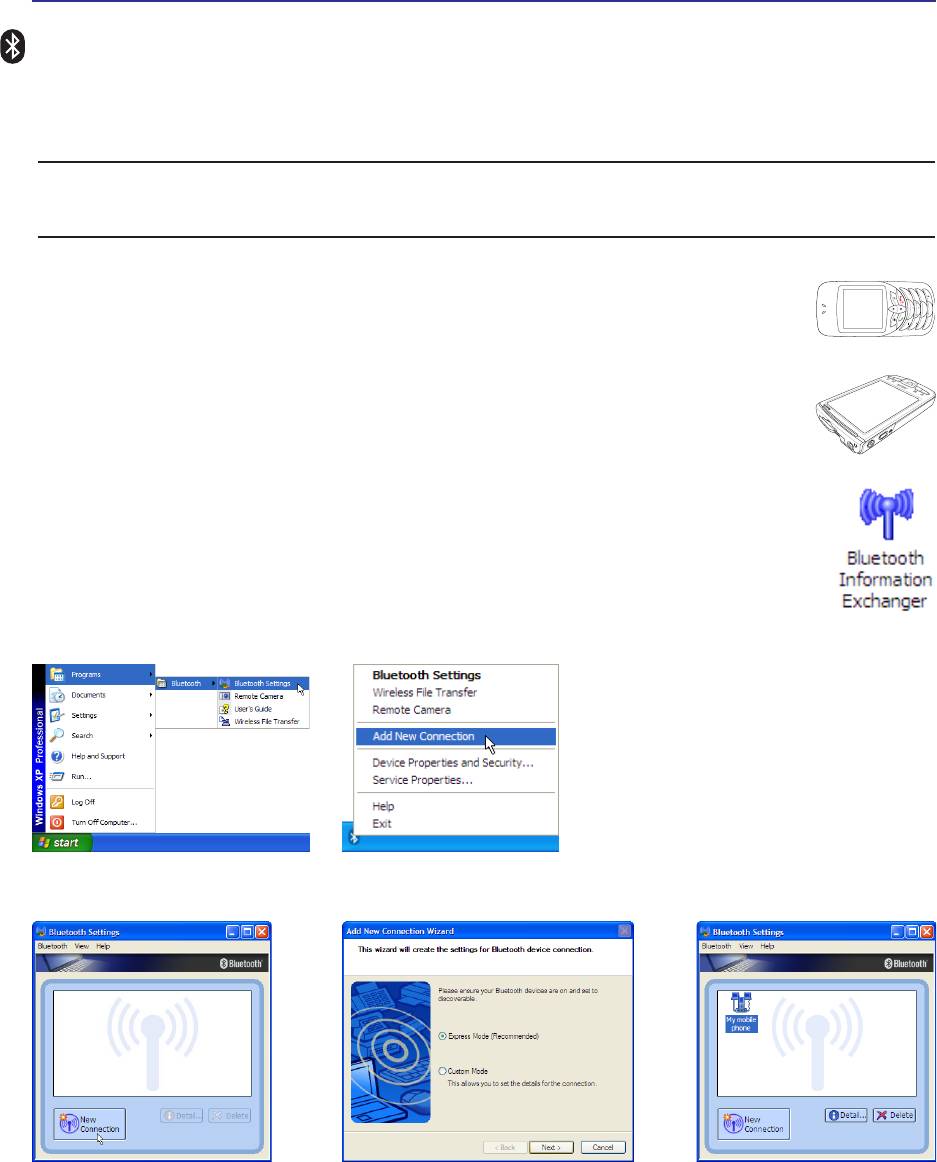
Bluetooth Settings from Windows
Add New Connection from the
Start | Programs | Bluetooth
Bluetooth taskbar icon
Click New Connection from
Follow the wizard to add Bluetooth
After complete, you should see
Bluetooth Settings.
devices.
your device in the window.
47
£⁄
d
3
£¤
£•
£‡
6
£'
?
£‚
£·
w
9
£¥
m
£ƒ
£“
£„
£
#
£¶
£§
£”
£|£¡£fl
a
2
£}£¢£
5
j
£~££
£–£†
8
t
+
0
£t
£x£«
g
£u
£y£‹
£v
p
7
£›£z
a/A
£{
£w£fi
1
4
*
Bluetooth Wireless Connection (on selected models)
Notebook PCs with Bluetooth technology eliminates the need for cables for connecting Bluetooth-
enabled devices. Examples of Bluetooth-enabled devices may be Notebook PCs, Desktop PCs, mobile
phones, and PDAs.
Note: If your Notebook PC did not come with built-in Bluetooth, you need to connect
a USB or PC Card Bluetooth module in order to use Bluetooth.
Bluetooth-enabled mobile phones
You can wireless connect to your mobile phone. Depending on your mobile phone’s
capabilities, you can transfer phone book data, photos, sound files, etc. or use it as a
modem to connect to the Internet. You may also use it for SMS messaging.
Bluetooth-enabled computers or PDAs
You can wireless connect to another computer or PDA and exchange files, share
peripherals, or share Internet or network connections. You may also make use of
Bluetooth-enabled wireless keyboard or mouse.
Pairing with Bluetooth-enabled devices
You first need to pair your Notebook PC with a Bluetooth-enabled device before you can
connect to it. Make sure the Bluetooth-enabled device is turned ON and ready to accept a
pair. Launch Bluetooth Settings from Windows Start | Programs | Bluetooth or select
Add New Connection from the Bluetooth taskbar icon if available.

4 Using the Notebook PC
Power Management Modes
The Notebook PC has a number of automatic or adjustable power saving features that you can use to
maximize battery life and lower Total Cost of Ownership (TCO). You can control some of these features
through the Power menu in the BIOS Setup. ACPI power management settings are made through the
operating system. The power management features are designed to save as much electricity as possible
by putting components into a low power consumption mode as often as possible but also allow full
operation on demand. These low power modes are referred to as “Stand by” (or Suspend-to-RAM) and
“Hibernation” mode or Suspend-to-Disk (STD). The Standby mode is a simple function provided by
the operating system. When the Notebook PC is in either one of the power saving modes, the status will
be shown by the following: “Stand by”: Power LED Blinks and “Hibernation”: Power LED OFF.
Full Power Mode & Maximum Performance
The Notebook PC operates in Full Power mode when the power management function is disabled by
configuring Windows power management and SpeedStep. When the Notebook PC is operating in Full
Power Mode, the Power LED remains ON. If you are conscious of both system performance and power
consumption, select “Maximum Performance” instead of disabling all power management features.
ACPI
Advanced Configuration and Power Management (ACPI) was developed by Intel, Microsoft, and Toshiba
especially for Windows and later to control power management and Plug and Play features. ACPI is the
new standard in power management for Notebook PCs.
NOTE: APM was used in older operating systems like Windows NT4 and Windows 98.
Because newer operating systems like Windows XP, Windows 2000, and Windows ME
utilize ACPI, APM is no longer fully supported on this Notebook PC.
Suspend Mode
In “Stand by” (STR) and “Hibernation” (STD), the CPU clock is stopped and most of the Notebook PC
devices are put in their lowest active state. The suspend mode is the lowest power state of the Notebook
PC. The Notebook PC enters suspend mode when the system remains idle for a specified amount of time
or manually using the [Fn][F1] keys. The Power LED blinks when the Notebook PC is in STR mode. In
STD mode, the Notebook PC will appear to be powered OFF. Recover from STR by pressing any
keyboard button (except Fn). Recover from STD by using the power switch (just like powering
ON the Notebook PC).
Power Savings
In addition to reducing the CPU clock, this mode puts devices including the LCD backlight in their
lower active state. The Notebook PC enters “Stand by” mode (low priority) when the system remains
idle for a specified amount of time. The timeout can be set through Windows power management
(higher priority). To resume system operation, press any key.
48

Using the Notebook PC 4
Power State Summary
STATE ENTRY EVENT EXIT EVENT
“Stand by” • “Stand by” through Windows Start button, • Any device
• Timer as set though “Power Management” • Battery low
in Windows Control Panel (higher priority) --
STR (“Stand by”) • Hotkey [Fn][F1] • Signal from modem port
(Suspend-to-RAM) -- • Power button • Any key
STD (“Hibernate”) • Hotkey [Fn][F1] • Power button
(Suspend-to-Disk) -- --
Soft OFF • Power button (can be defined as STR or STD) • Power button
• “Shut down” through Windows Start button --
Thermal Power Control
There are three power control methods for controlling the Notebook PC’s thermal state. These power
control cannot be configured by the user and should be known in case the Notebook PC should enter
these states. The following temperatures represent the chassis temperature (not CPU).
• The fan turns ON for active cooling when the temperature reaches the safe upper limit.
• The CPU decreases speed for passive cooling when the temperature exceeds the safe upper limit.
• The system shut down for critical cooling when temperature exceeds the maximum safe upper limit.
49
4 Using the Notebook PC
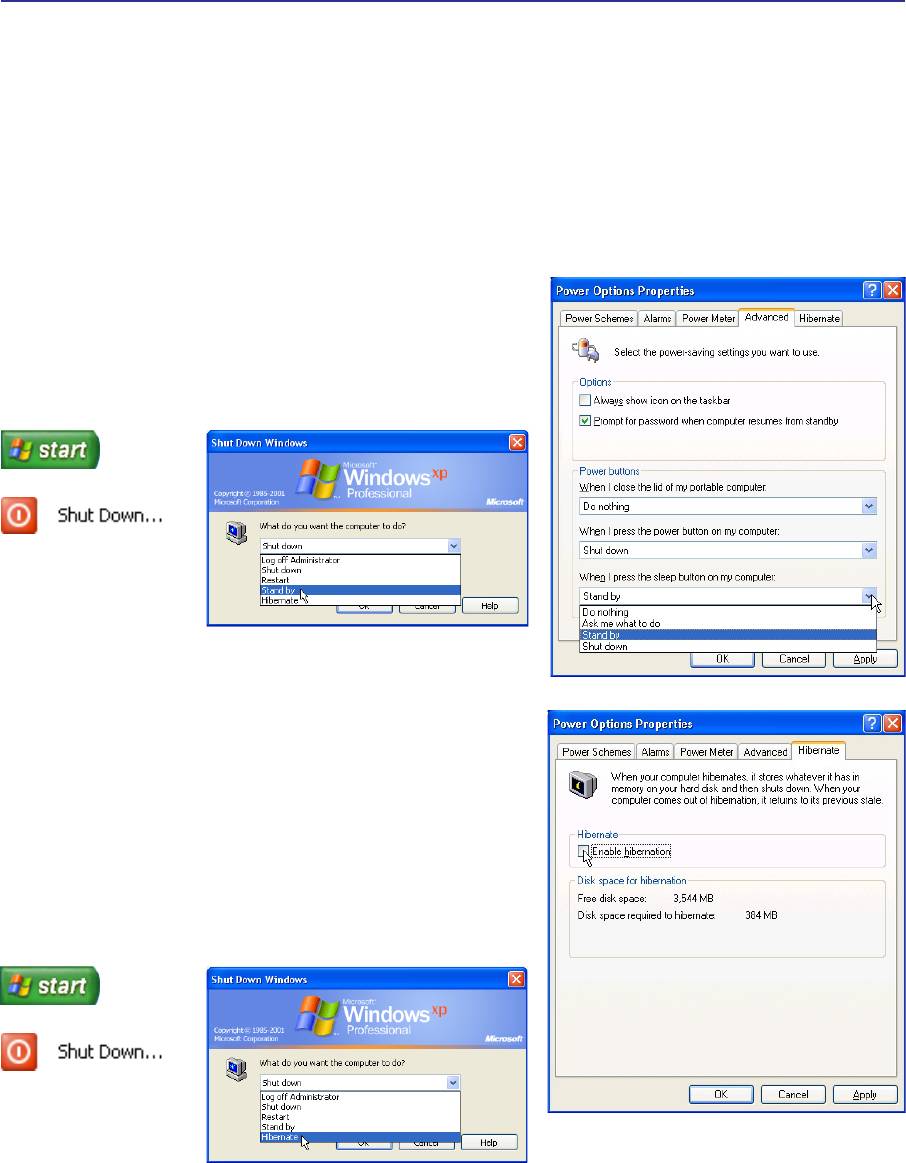
Stand by and Hibernate
Power management settings can be found in the Windows control panel. The following shows the
power options properties in Windows. You can define “Stand By” or “Shut down” for closing the
display panel, pressing the power button, or activating sleep mode. “Stand by” and “Hibernate” saves
power when your Notebook PC is not in use by turning OFF certain components. When you resume
your work, your last status (such as a document scrolled down half way or email typed half way will
reappear as if you never left. “Shut down” will close all applications and ask if you want to save your
work if any are not saved.
“Stand by” is the same as Suspend-to-RAM (STR). This
function stores your current data and status in RAM while
many components are turned OFF. Because RAM is volatile,
it requires power to keep (refresh) the data. To operate: select
“Start” | “Shut down”, and “Stand by”.
“Hibernate” is the same as Suspend-to-Disk (STD) and
stores your current data and status on the hard disk drive. By
doing this, RAM does not have to be periodically refreshed
and power consumption is greatly reduced but not completely
eliminated because certain wake-up components like LAN
needs to remain powered. “Hibernate” saves more power
compared to “Stand by”. To operate: Enable hibernation in
“Power Options” and select “Start” | “Shut down”, and
“Hibernate”.
50
Appendix
Optional Accessories
Optional Connections
Glossary
Declarations and Safety Statements
Notebook PC Information
51
Оглавление
- 1 Introducing the Notebook PC
- 2 Knowing the Parts
- 3 Getting Started
- 4 Using the Notebook PC
- A Appendix
