Asus A8N-E: 3 Getting Started
3 Getting Started: Asus A8N-E
3 Getting Started
Power System
Using AC Power
The Notebook PC power is comprised of two parts,
the power adapter and the battery power system.
The power adapter converts AC power from a wall
outlet to the DC power required by the Notebook
PC. Your Notebook PC comes with a universal AC-
DC adapter. That means that you may connect the
power cord to any 100V-120V as well as 220V-
240V outlets without setting switches or using
power converters. Different countries may require
that an adapter be used to connect the provided
US-standard AC power cord to a different standard.
Most hotels will provide universal outlets to support different power cords as well as voltages. It is
always best to ask an experienced traveler about AC outlet voltages when bringing power adapters to
another country.
TIP: You can buy travel kits for the Notebook PC that includes power and modem
adapters for almost every country.
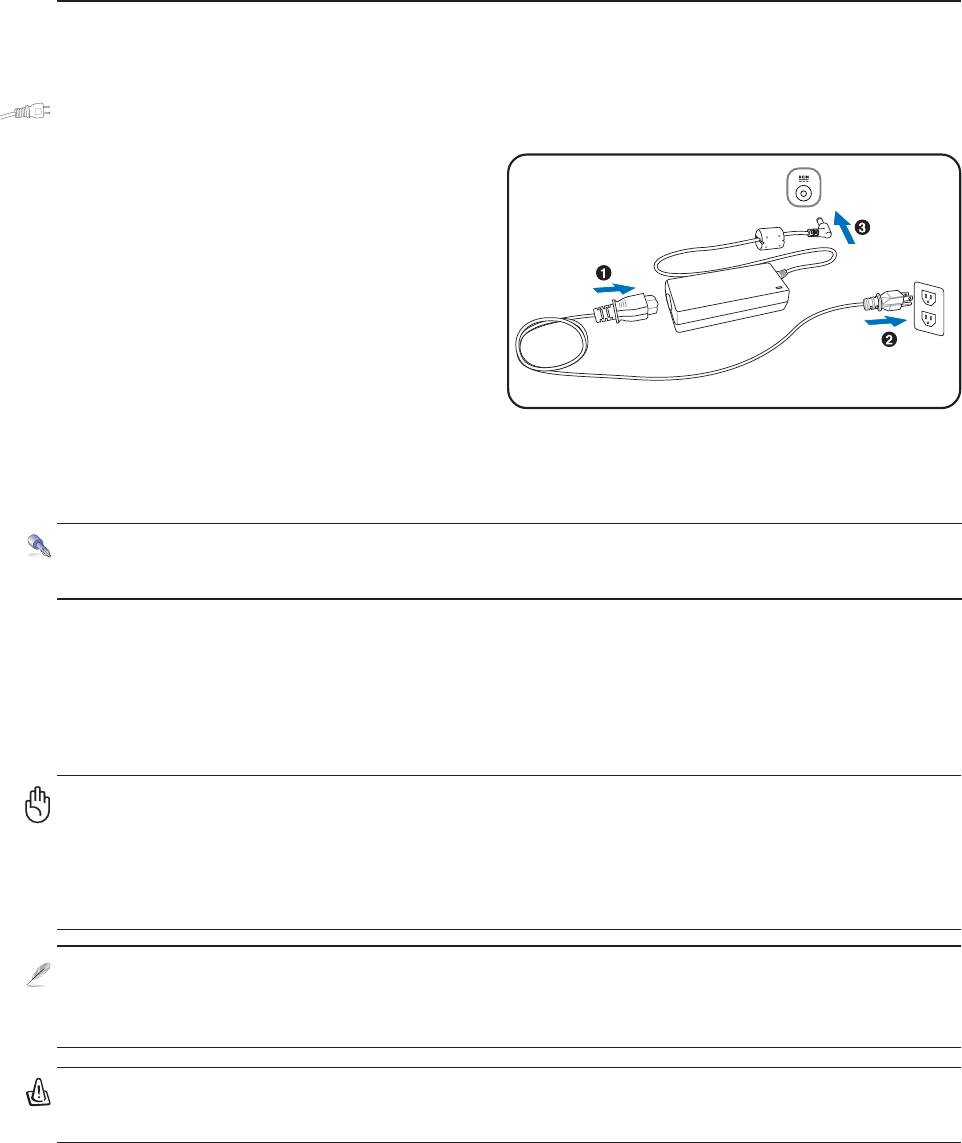
With the AC power cord connected to the AC-DC converter, connect the AC power cord to an AC outlet
(preferably with surge-protection) and then connect the DC plug to the Notebook PC. Connecting the
AC-DC adapter to the AC outlet first allows you to test the AC outlet’s power and the AC-DC converter
itself for compatibility problems before connecting the DC power to the Notebook PC. The green
power LED on the adapter lights up if the power is within accepted ranges.
IMPORTANT! Damage may occur if you use a different adapter to power the Note-
book PC or use the Notebook PC’s adapter to power other electrical devices. If there
is smoke, burning scent, or extreme heat coming from the AC-DC adapter, seek ser-
vicing. Seek servicing if you suspect a faulty AC-DC adapter. You may damage both
your battery pack(s) and the Notebook PC with a faulty AC-DC adapter.
NOTE: This Notebook PC may come with either a two or three-prong plug depending on
territory. If a three-prong plug is provided, you must use a grounded AC outlet or use a
properly grounded adapter to ensure safe operation of the Notebook PC.
WARNING! THE POWER ADAPTER MAY BECOME WARM TO HOT WHEN IN USE. BE
SURE NOT TO COVER THE ADAPTER AND KEEP IT AWAY FROM YOUR BODY.
24

Getting Started 3
Using Battery Power
The Notebook PC is designed to work with a removable battery pack. The battery pack consists of a set
of battery cells housed together. A fully charged pack will provide several hours of battery life, which
can be further extended by using power management features through the BIOS setup. Additional
battery packs are optional and can be purchased separately through a Notebook PC retailer.
Installing and Removing the Battery Pack
Your Notebook PC may or may not have its battery pack installed. If your Notebook PC does not have
its battery pack installed, use the following procedures to install the battery pack.
IMPORTANT! Never attempt to remove the battery pack while the Notebook PC is
turned ON, as this may result in the loss of working data.
To install the battery pack:
To remove the battery pack:
1
1
2
2
IMPORTANT! Only use battery packs and power adapters supplied with this Note-
book PC or specifically approved by the manufacturer or retailer for use with this
model or else damage may occur to the Notebook PC.
Battery Care
The Notebook PC’s battery pack, like all rechargeable batteries, has a limit on the number times it can
be recharged. The battery pack’s useful life will depend on your environment temperature, humidity,
and how your Notebook PC is used. It is ideal that the battery be used in a temperature range between
5˚C and 35˚C (41˚F and 95˚F). You must also take into account that the Notebook PC’s internal
temperature is higher than the outside temperature. Any temperatures above or below this range will
shorten the life of the battery. But in any case, the battery pack’s usage time will eventually decrease
and a new battery pack must be purchased from an authorized dealer for this Notebook PC. Because
batteries also have a shelf life, it is not recommended to buy extras for storing.
WARNING! For safety reasons, DO NOT throw the battery in fire, DO NOT short circuit
the contacts, and DO NOT disassemble the battery. If there is any abnormal operation
or damage to the battery pack caused by impact, turn OFF the Notebook PC and
contact an authorized service center.
25

3 Getting Started
Powering ON the Notebook PC
The Notebook PC’s power-ON message appears on the screen when you turn it ON. If necessary, you may
adjust the brightness by using the hot keys. If you need to run the BIOS Setup to set or modify the system
configuration, press [F2] upon bootup to enter the BIOS Setup. If you press [Tab] during the splash
screen, standard boot information such as the BIOS version can be seen. Press [ESC] and you will be
presented with a boot menu with selections to boot from your available drives.
NOTE: Before bootup, the display panel flashes when the power is turned ON. This is
part of the Notebook PC’s test routine and is not a problem with the display.
IMPORTANT! To protect the hard disk drive, always wait at least 5 seconds after
turning OFF your Notebook PC before turning it back ON.
WARNING! DO NOT carry or cover a Notebook PC that is powered ON with any mate-
rials that will reduce air circulation such as a carrying bag.
The Power-On Self Test (POST)
When you turn ON the Notebook PC, it will first run through a series of software-controlled diagnostic
tests called the Power-On Self Test (POST). The software that controls the POST is installed as a
permanent part of the Notebook PC’s architecture. The POST includes a record of the Notebook PC’s
hardware configuration, which is used to make a diagnostic check of the system. This record is created
by using the BIOS Setup program. If the POST discovers a difference between the record and the
existing hardware, it will display a message on the screen prompting you to correct the conflict by
running BIOS Setup. In most cases the record should be correct when you receive the Notebook PC.
When the test is finished, you may get a message reporting “No operating system found” if the hard
disk was not preloaded with an operating system. This indicates that the hard disk is correctly detected
and ready for the installation of a new operating system.
The S.M.A.R.T. (Self Monitoring and Reporting Technology) checks the hard disk drive during POST
and gives a warning message if the hard disk drive requires servicing. If any critical hard disk drive
warning is given during bootup, backup your data immediately and run Windows disk checking program.
To run Window’s disk checking program: (1) right-click any hard disk drive icon in “My Computer”, (2)
choose Properties, (3) click the Tools tab, (4) click Check Now, (5) select a hard disk drive, (6) select
Thorough to also check for physical damages, and (7) click Start. Third party disk utilities such as Symantec’s
Norton Disk Doctor can also perform the same functions but with greater ease and more features.
IMPORTANT! If warnings are still given during bootup after running a software disk
checking utility, you should take your Notebook PC in for servicing. Continued use
may result in data loss.
26
Getting Started 3
Checking Battery Power
The battery system implements the Smart Battery standard under
the Windows environment, which allows the battery to accurately
report the amount of charge left in the battery. A fully-charged battery
pack provides the Notebook PC a few hours of working power. But
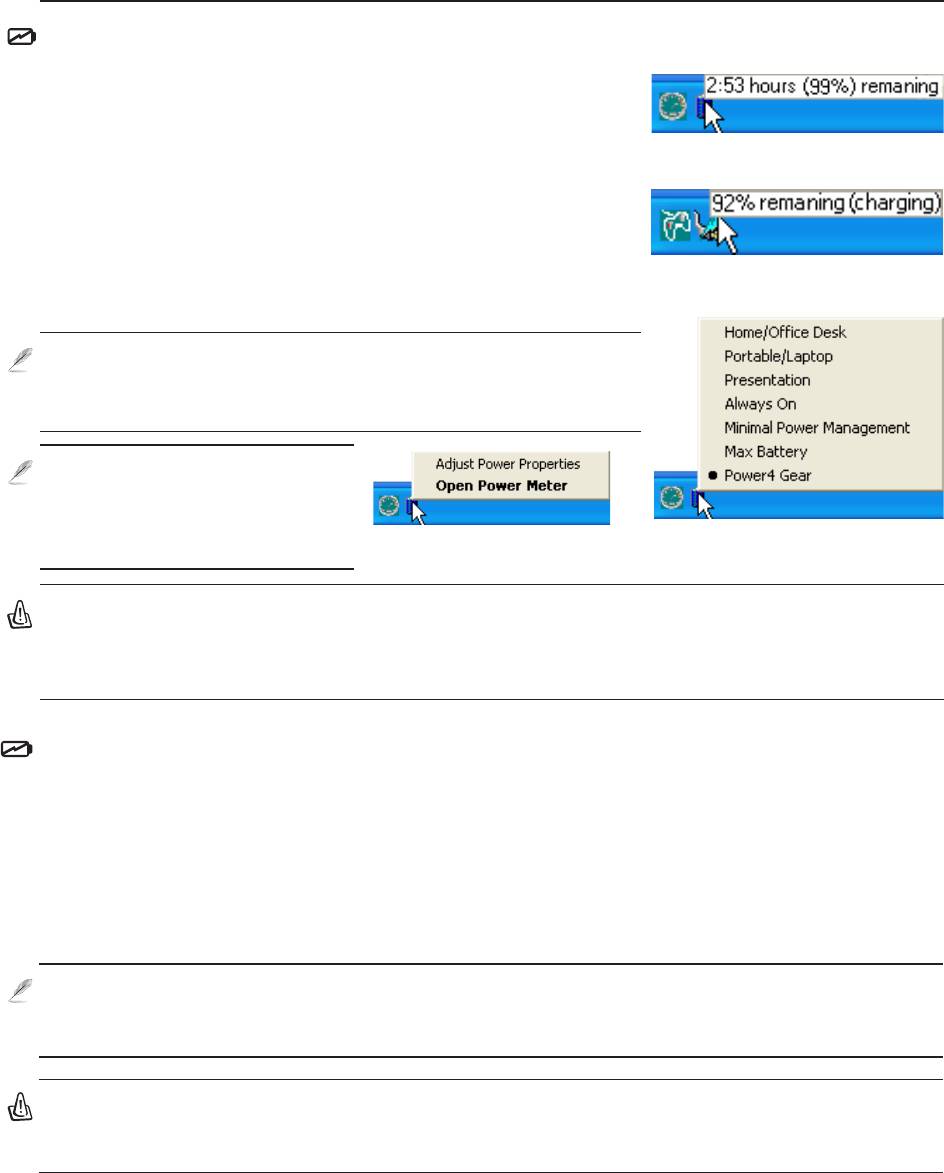
Move your mouse over the battery icon
for remaining power information.
the actual figure varies depending on how you use the power saving
features, your general work habits, the CPU, system memory size,
and the size of the display panel.
To check the remaining battery power, move your cursor over the
power icon. The power icon is a “battery” when not using AC power
When the AC power is connected,
charging status will be shown.
and a “plug” when using AC power. Double click on the icon for
more information and settings.
NOTE: You will be warned when battery power is low. If you
continue to ignore the low battery warnings, the Notebook PC
eventually enters suspend mode (Windows default uses STR).
Note: Screen captures shown
here are examples only and
may not reflect what you see
Right-click the battery icon for
Left-click the battery icon for power
in your system.
submenus.
management settings.
WARNING! Suspend-to-RAM (STR) does not last long when the battery power is depleted.
Suspend-to-Disk (STD) is not the same as power OFF. STD requires a small amount of
power and will fail if no power is available due to complete battery depletion or no power
supply (e.g. removing both the power adapter and battery pack).
Charging the Battery Pack
Before you use your Notebook PC on the road, you will have to charge the battery pack. The battery
pack begins to charge as soon as the Notebook PC is connected to external power using the power
adapter. Fully charge the battery pack before using it for the first time. A new battery pack must completely
charge before the Notebook PC is disconnected from external power. It takes a few hours to fully
charge the battery when the Notebook PC is turned OFF and may take twice the time when the Notebook
PC is turned ON. The battery charge light turns OFF when the battery pack is charged.
NOTE: The battery stops charging if the temperature is too high or the battery voltage is
too high. BIOS provides a smart battery refreshing function. If the battery calibration pro-
cess fails, stop charging and contact an authorized service center.
WARNING! Do not leave the battery pack discharged. The battery pack will discharge over
time. If not using a battery pack, it must continued to be charged every three months to
extend recovery capacity or else it may fail to charge in the future.
27
3 Getting Started
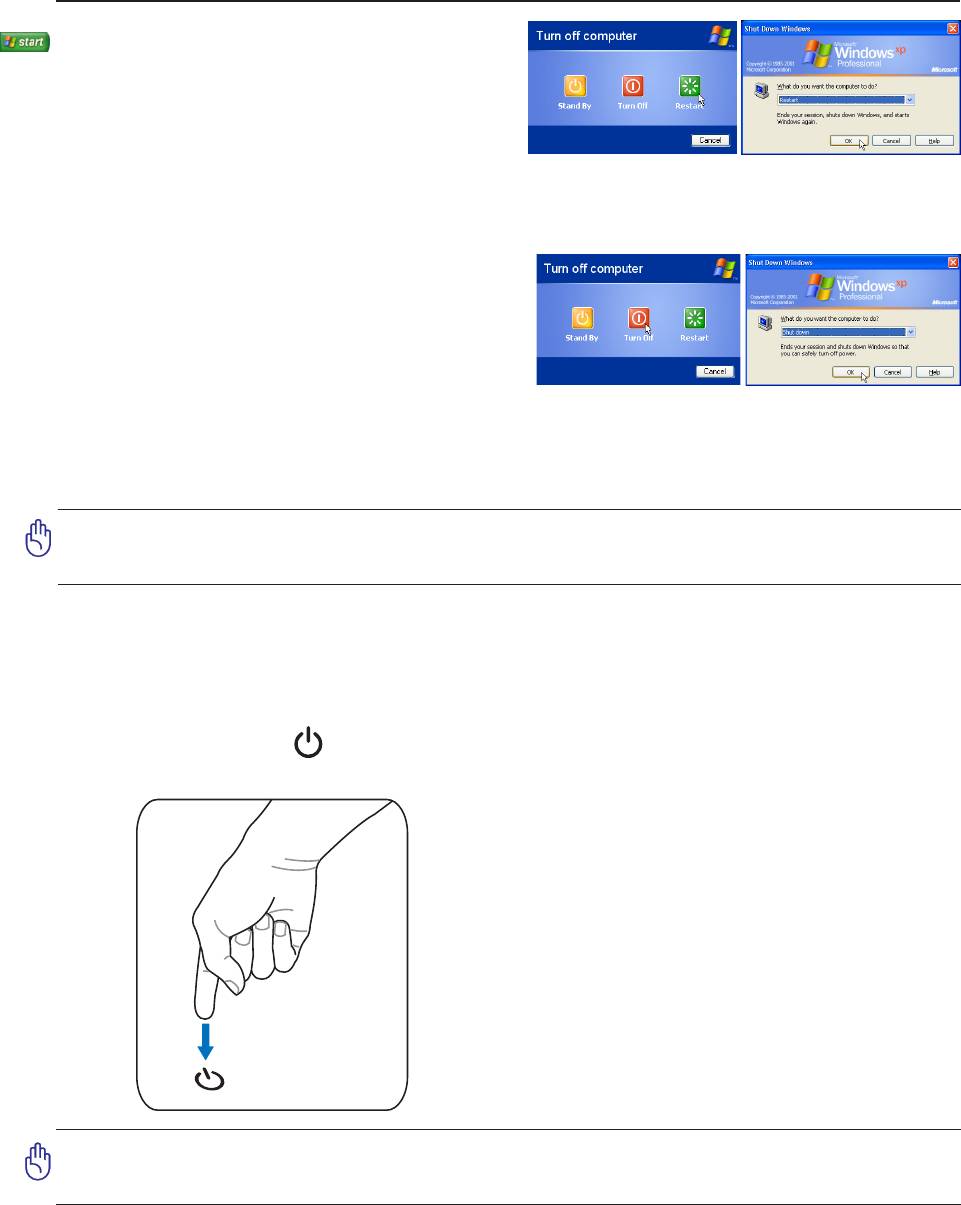
Restarting or Rebooting
After making changes to your operating system, you
may be prompted to restart the system. Some
installation processes will provide a dialog box to
allow restart. To restart the system manually, click
(Screens are different depending on security settings.)
Windows Start button and select Shut Down and
then choose Restart.
Powering OFF
In Windows XP, power OFF the Notebook PC by
clicking Windows Start button and select Shut Down
and then choose Turn off (or Shut down). For
operating systems without proper power management
(DOS, Windows NT), you must close all applications and exit operating systems and then power OFF by
holding the power switch for 2 seconds (as opposed to 1 second to power ON). Holding the power switch for
2 seconds is necessary in order to prevent accidental power-OFFs.
IMPORTANT! To protect the hard drive, wait at least 5 seconds after turning OFF your
Notebook PC before turning it back ON.
Emergency Shutdown
In case your operating system cannot properly turn OFF or restart, there are two additional ways to
shutdown your Notebook PC:
(1) Hold the power button
over 4 seconds.
IMPORTANT! Do not use emergency shutdown while data is being written; doing so
can result in loss or destruction of your data.
28
Getting Started 3
Special Keyboard Functions
PUSH
Colored Hot Keys
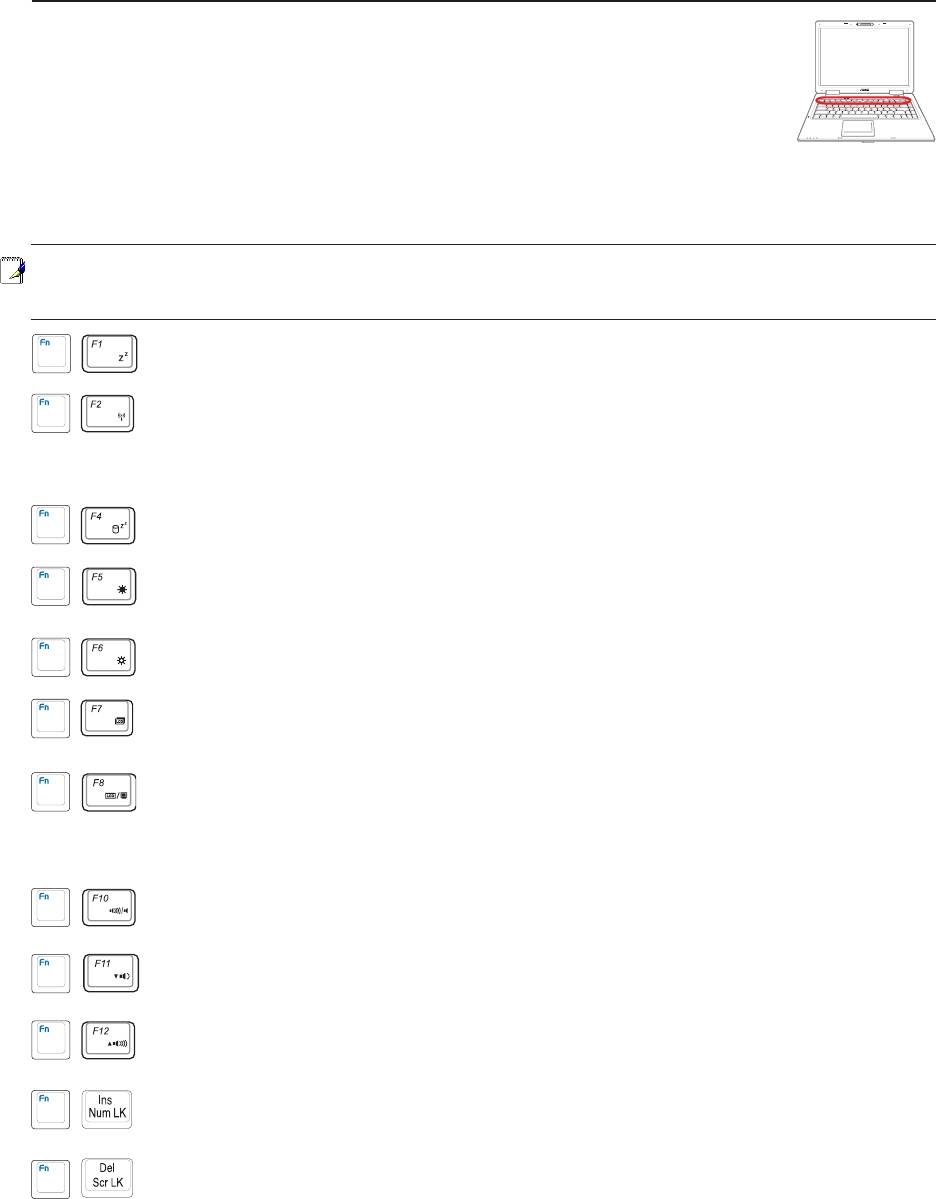
The following defines the colored hot keys on the Notebook PC’s keyboard. The colored commands can only
be accessed by first pressing and holding the function key while pressing a key with a colored command.
NOTE: The Hot Key locations on the function keys may vary depending on model but
the functions should remain the same. Follow the icons instead of the function keys.
“Zz” Icon (F1): Places the Notebook PC in suspend mode (either Save-to-RAM or Save-to-
Disk depending on sleep button setting in power management setup).
Radio Tower (F2): Wireless Models Only: Toggles the internal wireless LAN or Bluetooth
(on selected models) ON or OFF with an on-screen-display. When enabled, the corresponding
wireless indicator will light. Windows software settings are necessary to use the wireless LAN
or Bluetooth.
Hard drive “Zz” Icon (F4): Places the Notebook PC’s hard disk drive in suspend mode to
save battery power.
Filled Sun Icon (F5):
Decreases the display brightness
Open Sun Icon (F6):
Increases the display brightness
LCD Icon (F7): Toggles the display panel ON and OFF. This also stretches your screen area
(on certain models) to fill the entire display when using low resolution modes.
LCD/Monitor Icons (F8): Toggles between the Notebook PC’s LCD display and an external
monitor in this series: Notebook PC LCD -> External Monitor -> Both. (This function does
not work in 256 Colors, select High Color in Display Property Settings.) IMPORTANT:
Connect an external monitor before booting up the Notebook PC.
Speaker Icons (F10):
Toggles the speakers ON and OFF (only in Windows OS)
Speaker Down Icon (F11):
Decreases the speaker volume (only in Windows OS)
Speaker Up Icon (F12):
Increases the speaker volume (only in Windows OS)
Num Lk (Ins): Toggles the numeric keypad (number lock) ON and OFF. Allows you to use a
larger portion of the keyboard for number entering.
Scr Lk (Del): Toggles the “Scroll Lock” ON and OFF. Allows you to use a larger portion of
the keyboard for cell navigation.
29
3 Getting Started
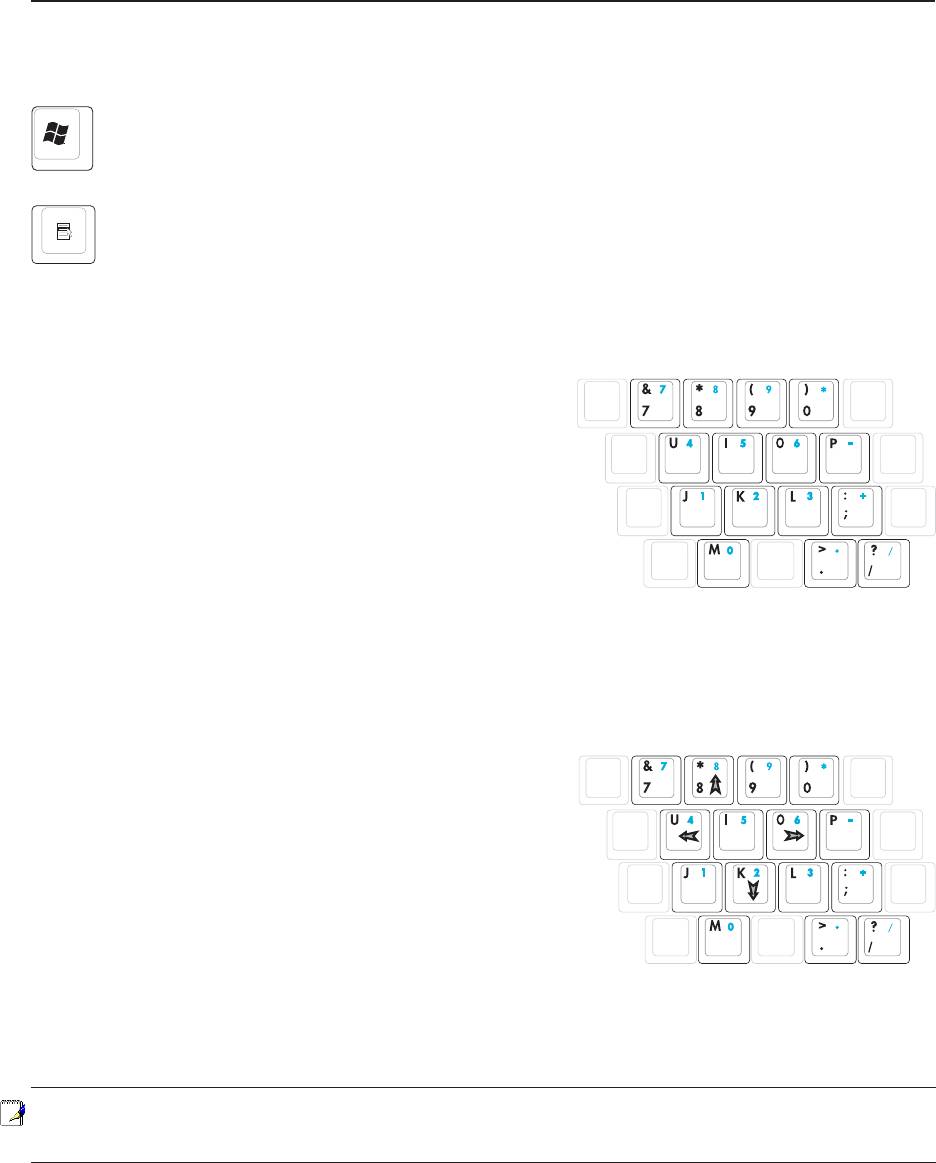
Microsoft Windows Keys
There are two special Windows keys on the keyboard as described below.
The key with the Windows Logo activates the Start menu located at the bottom left of the
Windows desktop.
The other key, that looks like a Windows menu with a small cursor, activates the properties
menu and is equivalent to pressing the right mouse button on a Windows object.
Keyboard as a Numeric Keypad
The numeric keypad is embedded in the keyboard and
consists of 15 keys that make number intensive input more
convenient. These dual-purpose keys are labeled in orange
on the key caps. Numeric assignments are located at the
upper right hand corner of each key as shown in the figure.
When the numeric keypad is engaged by pressing [Fn][Ins/
Num LK
], the number lock LED lights up. If an external
keyboard is connected, pressing the [Ins/Num LK] on the
external keyboard enables/disables the NumLock on both
keyboards simultaneously. To disable the numeric keypad while keeping the keypad on an external
keyboard activated, press the [Fn][Ins/Num LK] keys on the Notebook PC.
Keyboard as Cursors
The keyboard can be used as cursors while Number Lock is
ON or OFF in order to increase navigation ease while
entering numeric data in spreadsheets or similar applications.
With Number Lock OFF, press [
Fn] and one of the cursor
keys shown below. For example [Fn][8] for up, [Fn][K] for
down, [Fn][U] for left, and [Fn][O] for right.
With Number Lock ON, use [
Shift] and one of the cursor
keys shown below. For example [Shift][8] for up, [Shift][K]
for down, [Shift][U] for left, and [Shift][O] for right.
NOTE: The arrow symbols are illustrated here for your reference. They are not labeled
on the keyboard as shown here.
30
Getting Started 3
Switches and Status Indicators
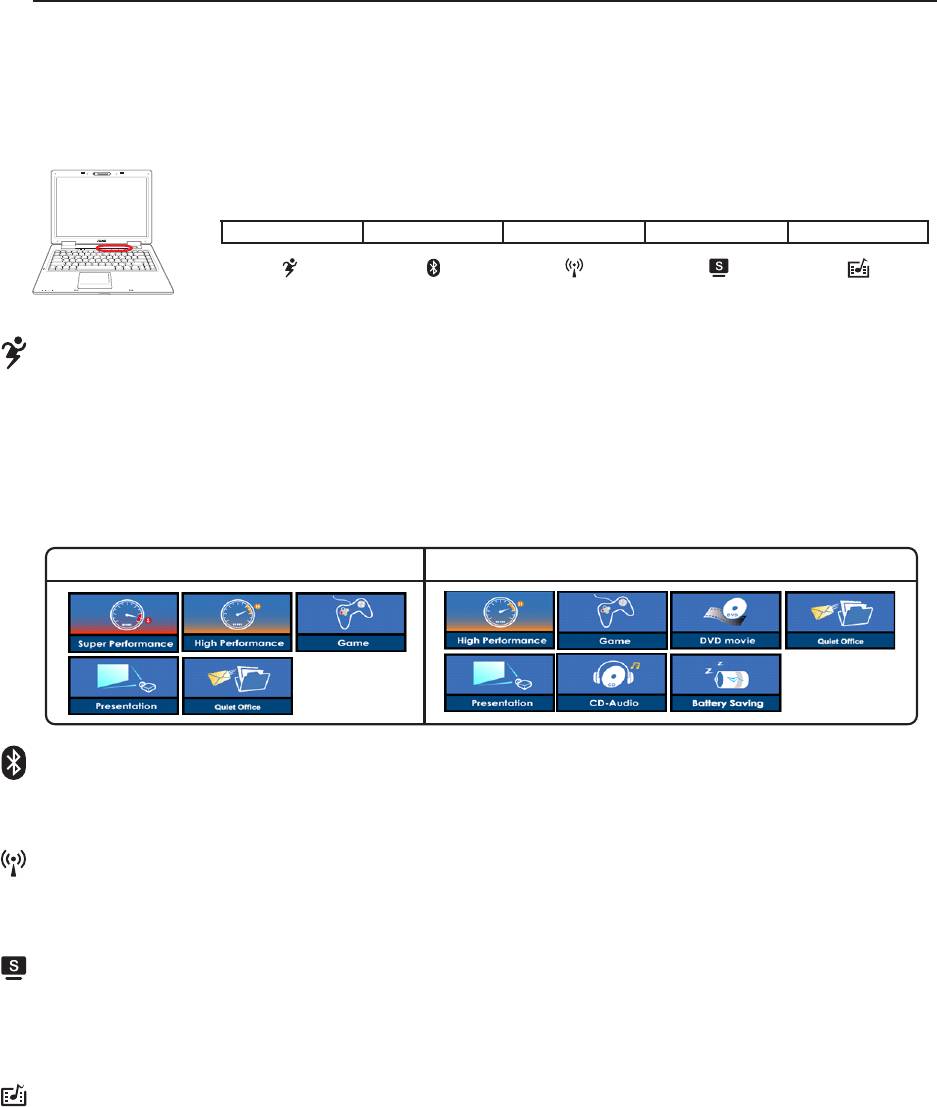
Switches
PUSH
Power4 Gear+ Key
The Power4 Gear+ button toggles power savings between various power saving modes. The power saving
modes control many aspects of the Notebook PC to maximize performance versus battery time.
When you are using an AC power adapter, Power4 Gear+ will switch between three modes in the AC power
mode segment. When you remove the AC adapter, Power4 Gear+ will switch between seven modes in the
battery (DC) mode segment. When you remove or apply the AC adapter, Power4 Gear+ will automatically
shift you up or down into the proper mode segment (AC or DC).
AC Mode Battery (DC) Mode
Bluetooth Key
This button is only applicable on models with internal Bluetooth (BT). Press once to enable and once to
disable the BT function. (Windows software settings are necessary.)
Wireless LAN Key
This button is only applicable on models with internal wireless LAN (WLAN). Press once to enable and
once to disable the WLAN function. (Windows software settings are necessary.)
Splendid Key (on selected models)
Toggles “Splendid” function ON and OFF. This allows switching between different display color enhancement
modes in order to improve contrast, brightness, skin tone, and color saturation for red, green, and blue
independently. You can see the current mode through the on-screen display (OSD).
InstantON Key
When the Notebook PC is Off: Pressing this button will launch a multimedia player application (without entering
Windows) to view DVDs, VCDs, videos, photos, or television programs; or listen to music CDs or files.
When the Notebook PC is On: Pressing this button will launch a multimedia player designed for Windows.
31
3 Getting Started
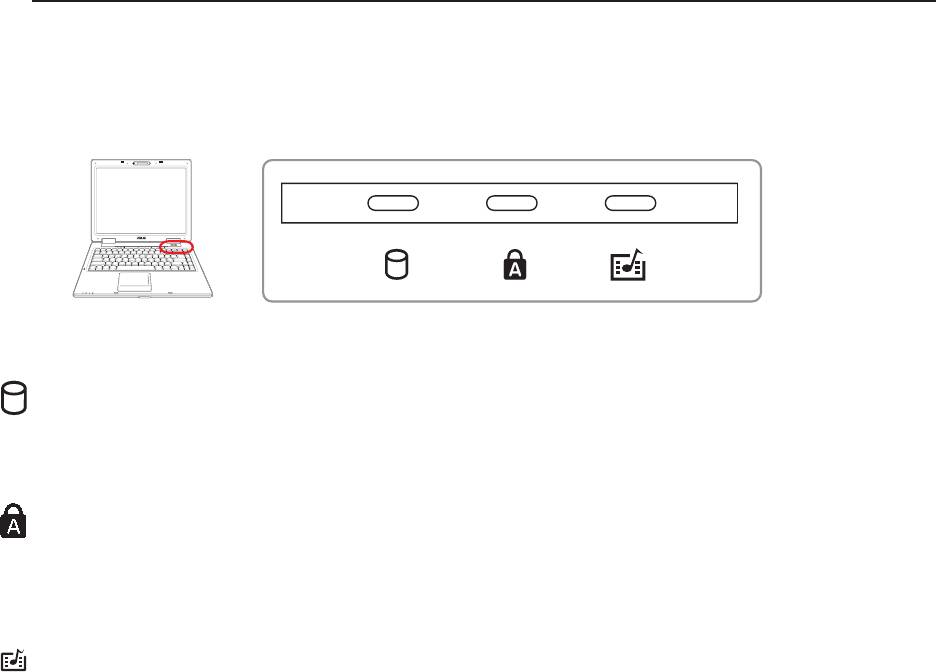
Status Indicators
Top of keyboard
PUSH
Drive Activity Indicator
Indicates that the Notebook PC is accessing one or more storage device(s) such as the hard disk. The
light flashes proportional to the access time.
Capital Lock Indicator
Indicates that capital lock [Caps Lock] is activated when lighted. Capital lock allows some of the
keyboard letters to type using capitalized letters (e.g. A, B, C). When the capital lock light is OFF, the
typed letters will be in the lower case form (e.g. a,b,c).
InstantON mode: InstantON Indicator
Indicates when the Notebook PC is in InstantON mode.
Windows Operating System: Number Lock Indicator
Indicates that number lock [Num Lk] is activated when lighted. Number lock allows some of the keyboard
letters to act as numbers for easier numeric data input.
32
Getting Started 3
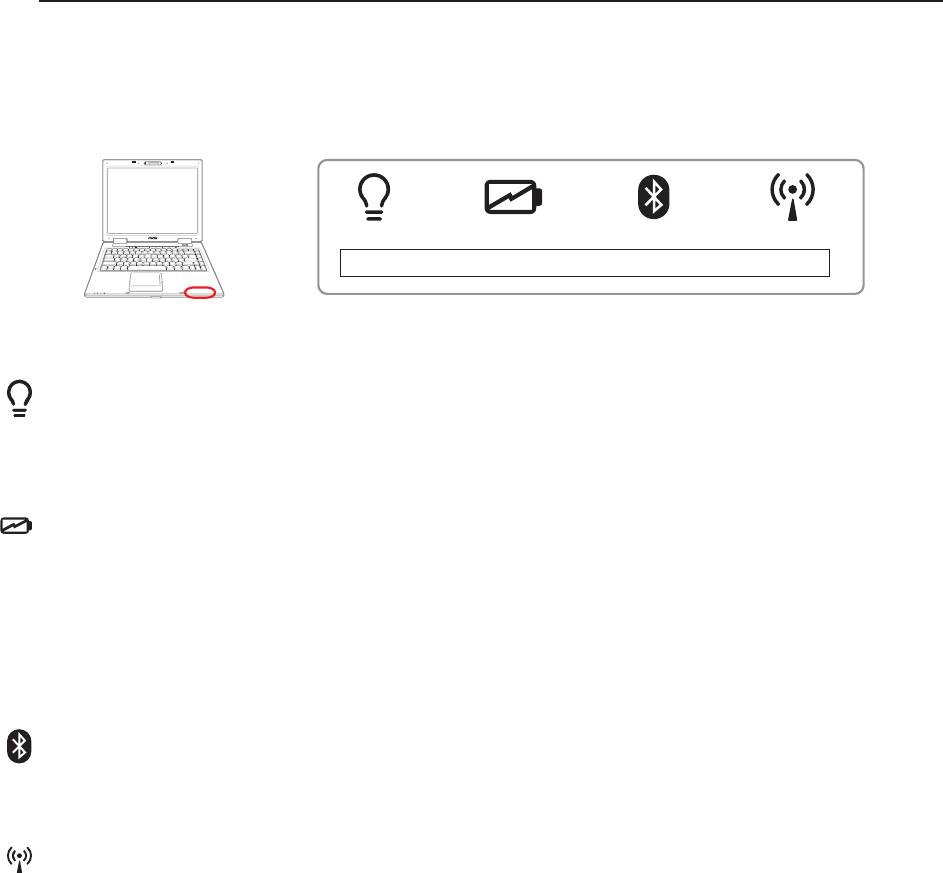
Status Indicators
Front edge
PUSH
Power Indicator
The power indicator lights when the Notebook PC is turned ON and blinks slowly when the Notebook
PC is in the Suspend-to-RAM (Standby) mode. This indicator is OFF when the Notebook PC is turned
OFF or in the Suspend-to-Disk (Hibernation) mode.
Battery Charge Indicator
The battery charge indicator is an LED that shows the status of the battery’s power as follows:
ON: The Notebook PC’s battery is charging when AC power is connected.
Off: The Notebook PC’s battery is charged or completely drained.
Blinking: Battery power is less than 10% and the AC power is not connected.
Bluetooth Indicator
This is only applicable on models with internal Bluetooth (BT). This indicator will light to show that the
Notebook PC’s built-in BT function is activated.
Wireless Indicator
This is only applicable on models with built-in wireless LAN and/or built-in Bluetooth. When the built-
in wireless LAN and/or built-in Bluetooth is enabled, this indicator will light. (Windows software settings
are necessary.)
33

3 Getting Started
34
4. Using the Notebook PC
Operating System
Pointing Device
Storage Devices
PC Card (PCMCIA) Socket
Optical Drive
Hard Disk Drive
Connections
Modem Connection
Network Connection
Wireless LAN Connection
Bluetooth Wireless Connection
Power Management Modes
35
