
Pioneer gm-a6604: Before installing the amplifier
Before installing the amplifier: Pioneer gm-a6604
Black plate (12,1)
! The optimal installation location differs de-
Before installing the amplifier
pending on the car model. Secure the ampli-
WARNING
fier at a sufficiently rigid location.
! To ensure proper installation, use the supplied
! Check all connections and systems before
parts in the manner specified. If any parts
final installation.
other than those supplied are used, they may
! After installing the amplifier, confirm that the
damage internal parts of the amplifier, or be-
spare tire, jack and tools can be easily re-
come loose causing the amplifier to shut
moved.
down.
! Do not install in:
— Places where it could injure the driver or
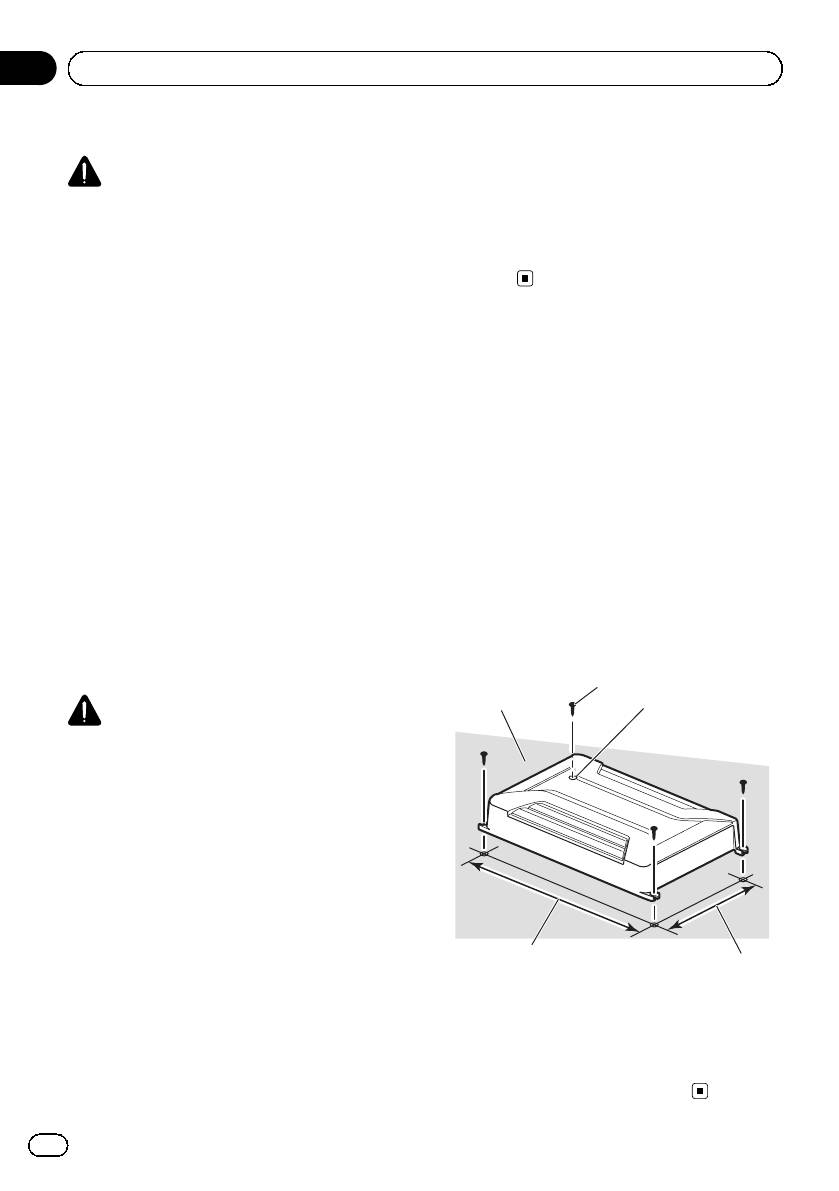
Example of insta llation on
passengers if the vehicle stops suddenly.
the floor mat or chassis
— Places where it may interfere with the dri-
ver, such as on the floor in front of the dri-
1 Place the amplifier in the desired instal-
ver’s seat.
lation location.
! Install tapping screws in such a way that the
Insert the supplied tapping screws (4 mm ×
screw tip does not touch any wire. This is im-
18 mm) into the screw holes and push on the
portant to prevent wires from being cut by vi-
screws with a screwdriver so they make an im-
bration of the car, which can result in fire.
print where the installation holes are to be lo-
! Make sure that wires do not get caught in the
cated.
sliding mechanism of the seats or touch the
2 Drill 2.5 mm diameter holes at the im-
legs of a person in the vehicle as short-circuit
prints either on the carpet or directly on
may result.
the chassis.
! When drilling to install the amplifier, always
confirm no parts are behind the panel and
3 Install the amplifier with the use of
protect all cables and important equipment
supplied tapping screws (4 mm × 18 mm).
(e.g. fuel/brake lines, wiring) from damage.
CAUTION
! To ensure proper heat dissipation of the ampli-
fier, ensure the following during installation:
— Allow adequate space above the amplifier
for proper ventilation.
— Do not cover the amplifier with a floor mat
or carpet.
! Protection function may activate to protect the
amplifier against overheating due to installa-
tion in locations where sufficient heat cannot
be dissipated, continuous use under high-vo-
lume conditions, etc. In such cases, the am-
4
plifier reduces the power output or shuts
down until it has cooled to a certain desig-
nated temperature.
! Place all cables away from hot places, such
as near the heater outlet.
5
Section
04
Installation
1
3
2
1 Tapping-screws (4mm × 18mm)
2 Drill a 2.5 mm diameter hole
3 Floor mat or chassis
4 Hole-to-hole distance: 338mm (GM-A6604) /
308 mm (GM-A4604)
5 Hole-to-hole distance: 196mm
12
En
<5707000008290>12
Table of contents
- Before you start
- Setting the unit
- Connecting the units
- Connections when using the RCA input jack
- Connecting the units
- Before installing the amplifier
- Additional information
- Avant de commencer
- Réglage de l’appareil
- Connexion des appareils
- Connexions lors de l’utilisation du jack d’entrée RCA
- Connexion des appareils
- Installation
- Informations complémentaires
- Prima di iniziare
- Impostazione dell’unità
- Collegamento delle unità
- Collegamenti utilizzando un connettore di ingresso RCA
- Collegamento delle unità
- Installazione
- Informazioni supplementari
- Antes de comenzar
- Configuración de la unidad
- Conexión de las unidades
- Conexiones al utilizar una toma de entrada RCA
- Conexión de las unidades
- Instalación
- Información adicional
- Bevor Sie beginnen
- Einstellen des Geräts
- Anschließen der Geräte
- Anschlüsse bei Verwendung des Cinch-Eingangs
- Anschließen der Geräte
- Installation
- Zusätzliche Informationen
- Vóór u begint
- Het toestel installeren
- De toestellen aansluiten
- Aansluiting via de RCA-ingang
- De toestellen aansluiten
- Installatie
- Aanvullende informatie
- Перед началом эксплуатации
- Настройка усилителя
- Подключение устройств
- Подключение устройств Перед подключением Режим мостового соединения усилителя
- Подключение устройств
- Подключение с использованием входного гнезда RCA
- Подключение устройств
- Установка
- Дополнительная информация Серийный номер
- Дополнительная информация


