Pioneer X-CM31-N: Chapter 9: Other connections Connecting auxiliary components
Chapter 9: Other connections Connecting auxiliary components: Pioneer X-CM31-N
Table of contents
- IMPORTANT VENTILATION CAUTION Operating Environment
- Information for users on collection and disposal of old equipment and used batteries
- Contents
- Chapter 1: Before you start What’s in the box Loading the batteries in the remote control
- Chapter 2: Part names and functions Remote control
- Part names and functions 02 Speaker system
- Front panel
- Top panel
- Chapter 3: Connections Connecting a TV Speaker connection
- Connecting antennas Plugging in
- Chapter 4: Getting started To turn the power on General control Setting the clock
- Sound controls Setting the wake-up timer
- Using Headphones Using the sleep timer
- Chapter 5: iPod/iPhone/iPad playback Confirming what iPod/iPhone/iPad models are supported Connecting your iPod/iPhone/iPad
- Connecting iPod/iPhone to the top panel Connecting iPod/iPhone/iPad using supplied stand
- Watching iPod/iPhone videos on your Playing iPad Playing iPod/iPhone
- Chapter 6: Disc playback Various disc functions Playing discs or files
- Advanced CD or MP3/WMA disc playback
- Disc playback06 Programmed play (CD or MP3/WMA) About downloading MP3/WMA About folder playback order
- Specify the folder to play Switch the display contents
- Chapter 7: USB playback Playing USB storage devices
- Specify the folder to play Playing in the desired order (Programmed Play)
- Chapter 8: Using the tuner Listening to the radio broadcasts Saving station presets Tuning
- To recall a memorised station To erase entire preset memory Using the Radio Data System (RDS) Searching for RDS programs An introduction to RDS
- Information provided by RDS Notes for RDS operation Using the Auto Station program Memory (ASPM)
- Chapter 9: Other connections Connecting auxiliary components
- Chapter 10: Additional information Troubleshooting General problem Problem Check Remedy
- Additional information 10 When a USB storage device is connected Problem Check Remedy When an iPod/iPhone/iPad is connected Problem Remedy
- Additional information10 Playable discs and formats Cautions on use
- Handling discs
- About iPod/iPhone/iPad Restoring all the settings to the defaults
- Specifications
Other connections 09
27
En
English Français Español
Chapter 9:
Other connections
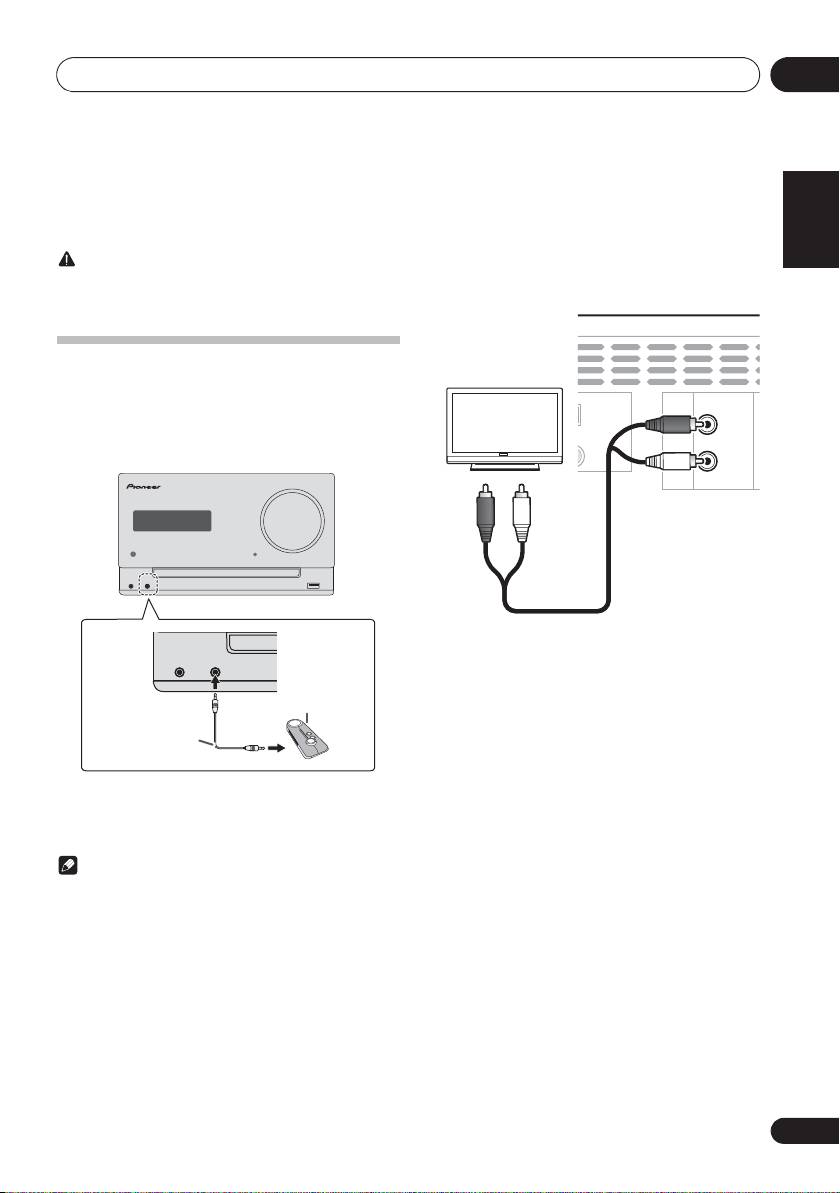
Connect the rear panel LINE IN audio jacks to your auxiliary
CAUTION
playback component.
• Before making or changing the connections, switch off
the power and disconnect the power cord from the AC
outlet.
Connecting auxiliary components
Connect the front panel AUDIO IN mini-plug jack to your
auxiliary playback component.
• This method can be used to play music on this unit from
iPods/iPhones/iPads that do not support use of an iPod
Dock and USB terminal.
TIMER VOLUME
PHONES AUDIO IN iPad
1 Press AUDIO IN/LINE twice as the input
PHONES AUDIO IN
source.
When LINE is selected, “LINE” is displayed on the main
Portable audio player, etc.
display.
Stereo mini-plug
cable (commercially
available)
1 Press AUDIO IN/LINE as the input source.
When AUDIO IN is selected, “AUDIO IN” is displayed on the
main display.
Note
•If the AUDIO IN mini-plug jack is connected to auxiliary
phones jack, the volume of the unit will be adjusted by
the volume on the playback component. If the sound is
distorted after you lower the volume of the unit, try
lowering the volume on the auxiliary playback
component.
NNA VIDEO LINE
S
OUT IN
AM
LOOP
R
FM
UNBAL 75 Ω
L
;&0B6<;(B(QERRN࣮࣌ࢪ㸰㸮㸯㸱ᖺ㸲᭶㸶᪥ࠉ᭶᭙᪥ࠉ༗๓㸯㸯㸲㸷ศ
This unit’s rear panel
TV
Audio cable
(commercially available)
