Pioneer VSX-S510-S: Connecting up Connecting the speakers VSX-S510 connection diagram
Connecting up Connecting the speakers VSX-S510 connection diagram: Pioneer VSX-S510-S
Table of contents
- AV Receiver What’s in the box
- Safety Brochure
- Connecting up Connecting the speakers VSX-S510 connection diagram
- VSX-S310 connection diagram
- Connecting a TV and playback Connecting antennas components
- Connecting to the network through LAN interface
- Initial Setup Before you start Automatically setting up for surround sound (MCACC)
- Basic playback Multichannel playback Listening to the radio
- Playing an iPod Listening to Internet radio stations
English
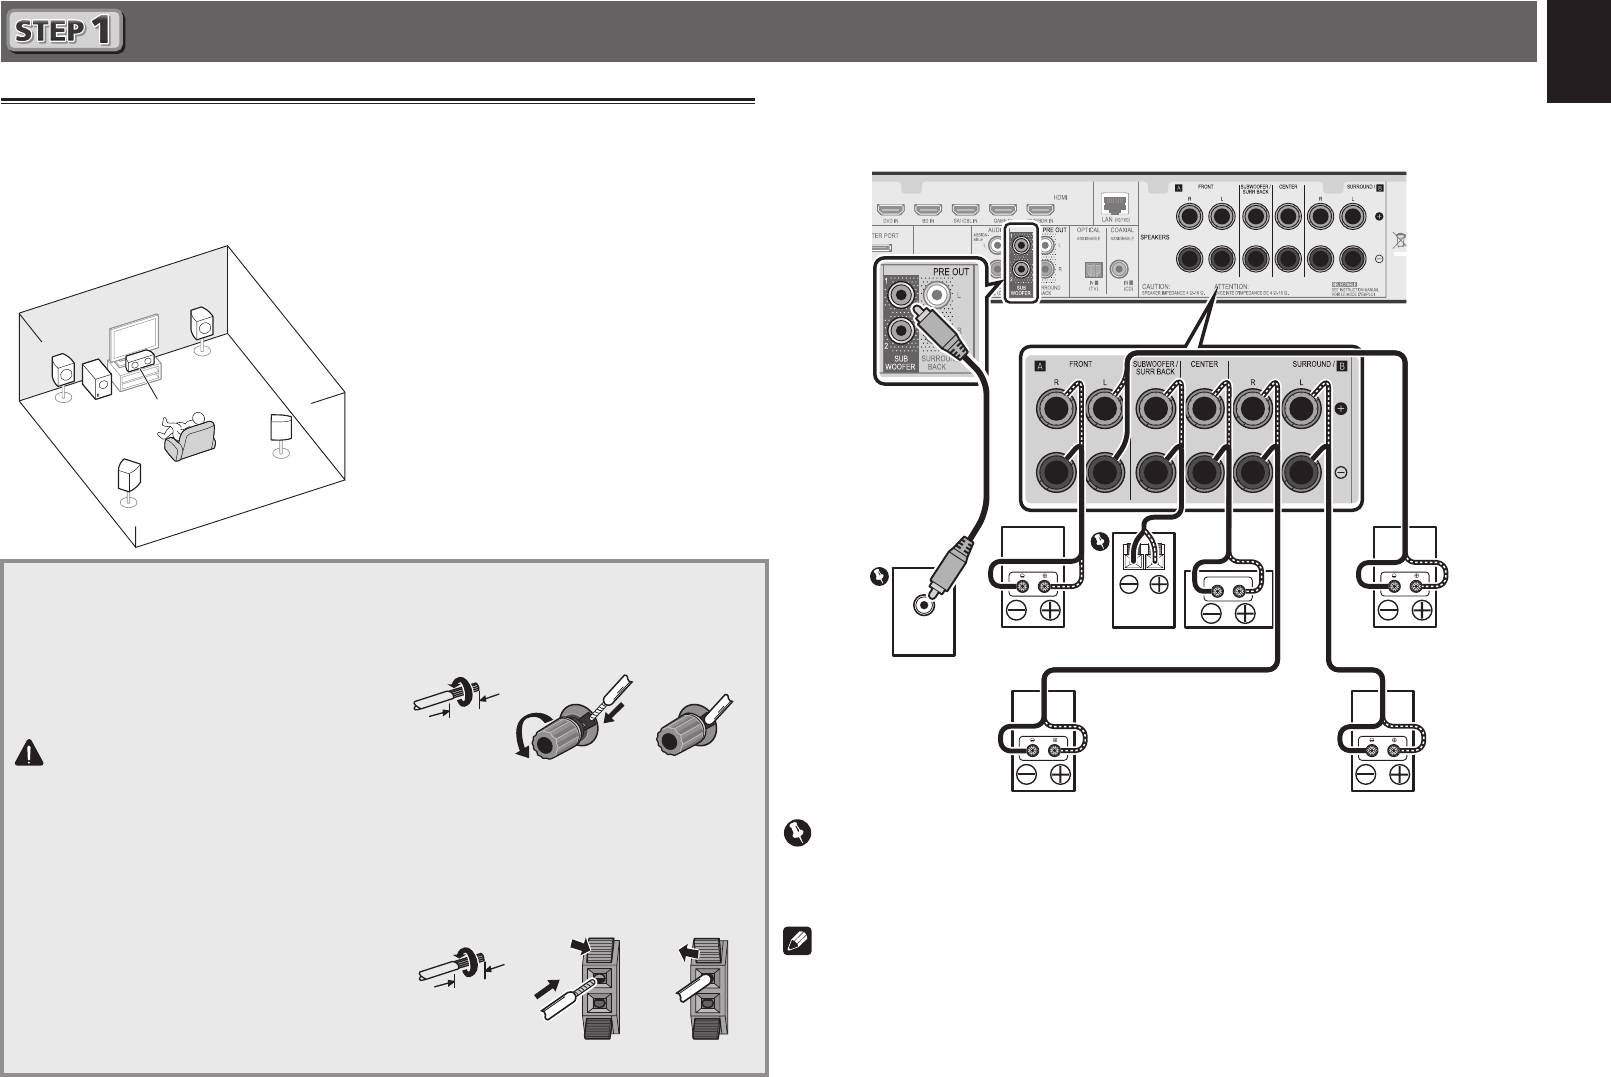
Connecting up
After installing the speakers, connect them as shown below.
Connecting the speakers
Français
VSX-S510 connection diagram
The receiver will work with just two stereo speakers (the front speakers in the diagram) but using
at least three speakers is recommended, and a complete setup is best for surround sound.
To achieve the best possible surround sound, install your speakers as shown below.
5.1 channel surorund system:
L
– Front Left
Deutsch
C
– Center
R
– Front Right
SL
– Surround Left
SR
– Surround Right
SW
– Subwoofer
Italiano
• In addition, surround back speakers or
Speaker B (VSX-S510 only) can also be
connected.
• For details, see page 11 of the Operating
Nederlands
Instructions (CD-ROM).
Connecting the speaker cables
1
Twist exposed wire strands together.
Make sure you connect the speaker on
2
Loosen terminal and insert exposed wire.
Español
LINE LEVEL
the right to the right (
R
) terminal and the
INPUT
3
Tighten terminal.
speaker on the left to the left (
L
) terminal.
Also make sure the positive and negative
(
+/–
) terminals on the receiver match those
on the speakers.
CAUTION
• Before making or changing
connections, switch off the power and
disconnect the power cord from the AC
outlet.
• These speaker terminals carry
HAZARDOUS LIVE
voltage. To prevent
the risk of electric shock when
connecting or disconnecting the
speaker cables, disconnect the power
cord before touching any uninsulated
parts.
3
12 3
10 mm
The wires should be connected as follows to the
VSX-S310’s CENTER or SURROUND terminals.
1
Twist exposed wire strands together.
2
Push open the tabs and insert exposed
wire.
3
Release the tabs.
12 3
R
L
SW
C
SR
SL
Front Right (
R
)
Passive
Center (
C
)
Front Left (
L
)
Subwoofer
Powered
Subwoofer (
SW
)
Surround Right
Surround Left
(
SR
)
(
SL
)
Important
• Connect passive subwoofers such as Pioneer S-SLW500 to the SPEAKERS SUBWOOFER
terminals.
• Please connect either the passive subwoofers or the powered subwoofers, not both.
Note
• This unit supports speakers with a nominal impedance of 4
W
to 16
W
.
10 mm
