Pioneer DEH-X6600DAB: Head unit Display indication Basic operations Set up menu
Head unit Display indication Basic operations Set up menu: Pioneer DEH-X6600DAB
Table of contents
- About this unit If you experience problems
- Head unit Display indication Basic operations Set up menu
- Digital Radio (Digital Audio Broadcasting)
- Radio
- CD/CD-R/CD-RW and USB storage devices
- iPod
- Function settings Using this unit’s iPod function from your iPod Playing songs related to the currently playing song Using connected device applications
Black plate (3,1)
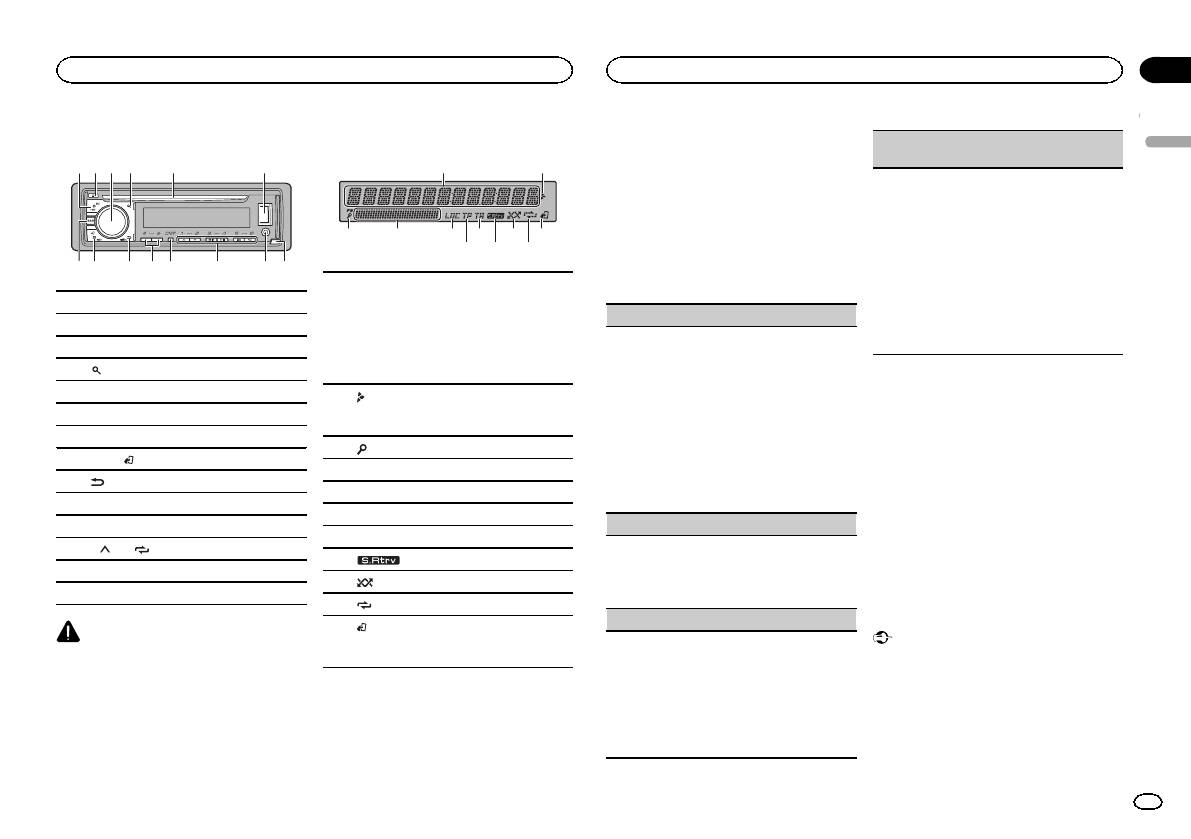
Head unit
2 4
3
5
6
d8 9 e
7
a
Display indication
1
1
7 b9
b c
1 SRC/OFF
2 h (eject)
3 MULTI-CONTROL (M.C.)
4
(list)
5 Disc loading slot
6 USB port
7 DAB
8 BAND/
(iPod control)
9
(back)/DIMMER (dimmer)
a c/d
b DISP
c 1/
to 6/
d AUX input jack (3.5 mm stereo jack)
e Detach button
CAUTION
Use an optional Pioneer USB cable (CD-U50E)
to connect the USB storage device as any device
connected directly to the unit will protrude out
from the unit, which could be dangerous.
6 8 a
Section
Using this unit
Using this unit
02
2 Turn M.C. to switch to YES.
DAB ANT PW (DAB antenna power supply set-
# If you do not use the unit for 30 seconds, the set
English
ting)
2
up menu will not be displayed.
# If you prefer not to set up at this time, turn M.C.
Use DAB ANT PW to select whether to output
to switch to NO.
power to a connected DAB antenna.
1 Turn M.C. to select the desired setting.
3 Press M.C. to select.
! ON – Use this option to enable the supply
3
54
of power to a DAB antenna. Select when
4 Follow these steps to set the menu.
using the optional DAB antenna (AN-
To proceed to the next menu option, you need to
DAB1, sold separately) with the unit.
Main information section
confirm your selection.
! OFF – Use this option to disable the supply
! Tuner: band and frequency
of power. Select when using a passive an-
! RDS: program service name, PTY infor-
LANGUAGE (multi-language)
tenna with no booster.
1
mation and other literal information
2 Press M.C. to confirm the selection.
This unit can display the text information from a
! CD player, USB storage device and iPod:
QUIT appears.
compressed audio file even for information em-
elapsed playback time and text informa-
bedded in English, Russian or Turkish.
tion
! If the embedded language and the selected
5 To finish your settings, turn M.C. to select
language setting are not the same, text infor-
YES.
2
Appears when a lower tier of folder or menu
mation may not display properly.
# If you prefer to change your setting again, turn
exists.
! Some characters may not be displayed prop-
M.C. to switch to NO.
erly.
3
(list)
1 Turn M.C. to select the desired setting.
6 Press M.C. to select.
4 Sub information section
ENG (English)—РУС (Russian)—TUR (Turk-
Notes
ish)
5 LOC (local seek tuning)
! You can set up the menu options from the
2 Press M.C. to confirm the selection.
6 TP (traffic program identification)
system menu and initial menu. For details
CLOCK SET (setting the clock)
about the settings, refer to System menu on
7 TA (traffic announcements)
page 10 and Initial menu on page 12.
1 Turn M.C. to adjust hour.
8
(sound retriever)
! You can cancel set up menu by pressing
2 Press M.C. to select minute.
SRC/OFF.
9
(random/shuffle)
3 Turn M.C. to adjust minute.
4 Press M.C. to confirm the selection.
a
(repeat)
Basic operations
FM STEP (FM tuning step)
(iPod control)
Important
b
This unit’s iPod function is operated from
Use FM STEP to set FM tuning step options (seek
your iPod.
! Handle the front panel with care when re-
step settings).
moving or attaching it.
1 Turn M.C. to select the FM tuning step.
! Avoid subjecting the front panel to excessive
100 (100 kHz)—50 (50 kHz)
shock.
2 Press M.C. to confirm the selection.
Set up menu
! Keep the front panel out of direct sunlight
! The manual tuning step is fixed at 50 kHz.
1 After installation of this unit, turn the
and high temperatures.
! When AF and TA are turned off, the seek step
ignition switch to ON.
! To avoid damaging the device or vehicle inte-
is fixed at 50 kHz even if set to 100.
SET UP appears.
rior, remove any cables and devices attached
to the front panel before detaching it.
En
3
<QRD3198-B>3
