Pioneer CD-SR100: English
English: Pioneer CD-SR100
English
Español
Installation
Specifications
Instalación
Especificaciones
WARNING
General
ADVERTENCIA
General
• Avoid installing this unit in such a location where the
operation of safety devices such as airbags is prevented by
Power source ...................... 3 V DC
• Evite instalar esta unidad en un lugar en el que la
Fuente de alimentación ..... 3 V CC
(Lithium Battery: CR2032)
operación de los dispositivos de seguridad tales como
(Pila de litio: CR2025)
• Fix this unit securely to the steering wheel with the belt
this unit. Otherwise, there is a danger of a fatal accident.
Dimensions (W × H × D): .... 38 mm × 67 mm × 18 mm
las bolsas de aire sea impedida por esta unidad. De otra
Dimensiones ...................... 38 (An) mm × 67 (Al) mm ×
stability, which may result in a traffic accident.
attached to the unit. If this unit is loose, it disturbs driving
Weight ................................. 37 g (including holder and
• Fije esta unidad seguramente al volante con la correa
manera, hay el peligro de un accidente fatal.
18 (Pr) mm
• Do not attach this unit to the outer circumference of the
battery)
steering wheel. Otherwise, it disturbs driving stability,
del manejo, lo que podría resultar en un accidente de
adjunta. Si ésta se aflojara, esto interrumpirá la estabilidad
Peso .................................... 37 g (incluyendo la funda y la
Infered Remote Control
tráfico.
pila)
<Wavelength> .................. 940 nm ±50 nm
5).
inner circumference of the steering wheel as shown (Fig.
causing a traffic accident. Always attach this unit to the
<Output> .......................... typ; 14 mw/sr per infrared
• No instale esta unidad fuera de la circunferencia del
LED (2LEDs used)
Nota
Notes
volante, tal como se indica (Fig. 5).
instale esta unidad en el interior de la circunferencia del
del manejo, causando un accidente de tráfico. Siempre
volante. De otra manera, esto interrumpirá la estabilidad
• Las especificaciones y el diseño están sujetos a posibles
modificaciones sin previo aviso debido a mejoramientos.
• Do not install this unit in a place that may obstruct the
Note
driver’s view.
• Specifications and the design are subject to possible
• Since interior layout differs depending on the type of
modification without notice due to improvements.
Notas
• No instale esta unidad en un lugar en el que obstruya la
differs. When installing the unit, select a location that
vehicle, the ideal installation location for the unit also
• Como la disposición interior difiere dependiendo del
visión del conductor.
Pioneer Head Unit.
assures optimum transmission of signals from the unit to
tipo de vehículo, la ubicación ideal para la instalación
seleccione un lugar que asegure la transmisión óptima de
de la unidad también difiere. Cuando instale la unidad,
Fig. 4
Fig. 6
Fig. 7
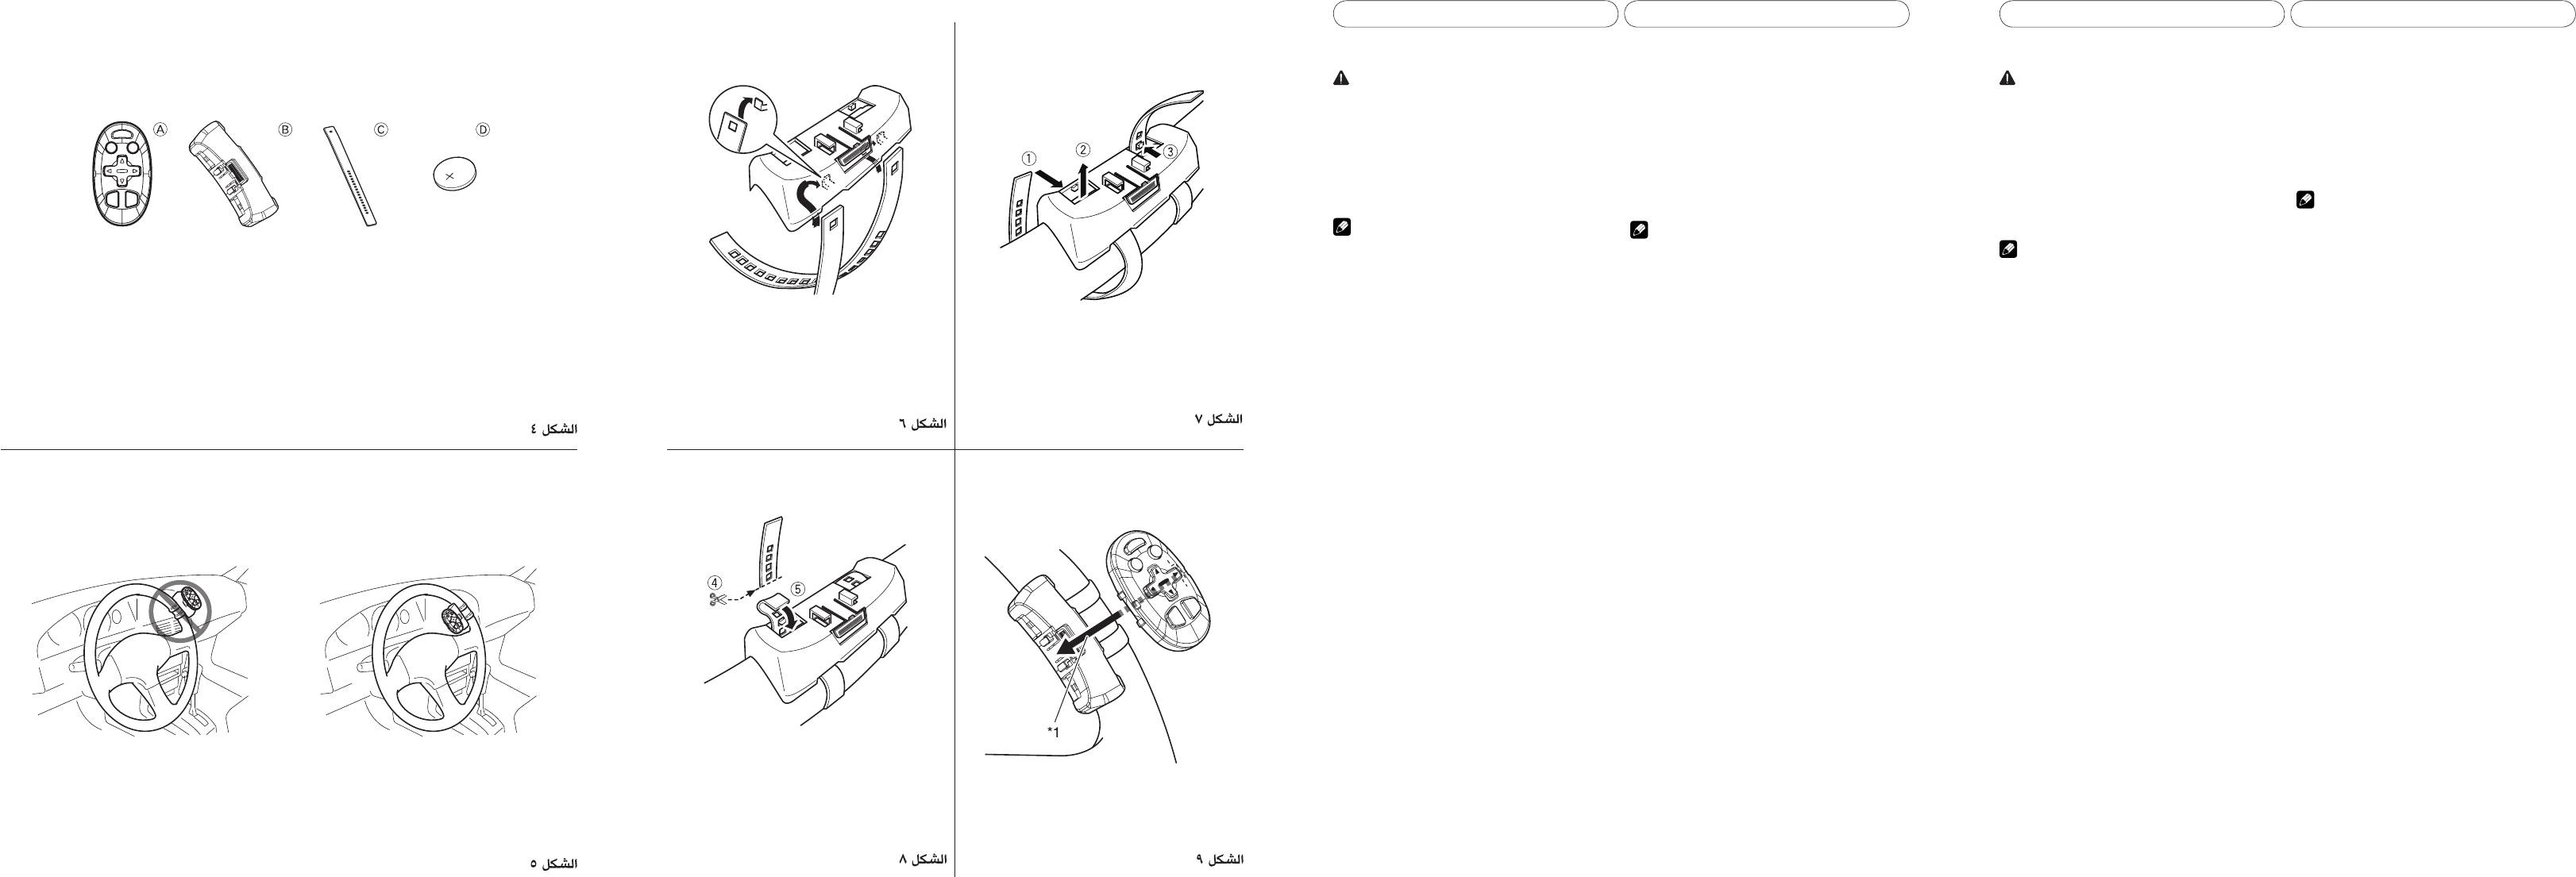
Accessories (Fig. 4)
las señales de la unidad a la unidad principal Pioneer.
Abb. 4
Abb. 6
Abb. 7
A Remote control unit × 1
Afb. 7
B Holder
× 1
Accesorios (Fig. 4)
Afb. 4
Afb. 6
C Belt
× 2
A Unidad de control remoto × 1
× 1
Рис. 4
Рис. 6
Рис. 7
D Lithium battery (CR2032, 3V)
× 1
B Soporte
C Correa
× 2
圖4
圖6
圖7
Installing the Unit on a Left-Hand-Drive
D Pila de litio (CR2032, 3V)
× 1
Car
1. Hook the belt on to the holder (Fig. 6).
Instalación de la unidad en el coche de
manejo del lado izquierdo
2. Fix the holder to the inside edge of the steering
wheel so that the holder is facing the driver
1. Enganche la correa al soporte (Fig. 6).
(Fig. 7).
2. Fije el soporte al borde interior del volante, de tal
12 Wrap the belt around the outside edge of the steering
forma que el soporte mire al conductor
wheel, passing the end through the slot in the holder.
(Fig. 7).
3 Pull on the belt to tighten it then secure it using the
12 Envuelva el borde exterior del volante con la correa y
other two hooks on the holder.
pase el extremo por la ranura del soporte.
3. 4 Cut off the extra portion of the belt (Fig. 8).
3 Tire de la correa para tensarla y fíjela a los otros dos
5 If some of the belt still protrudes, fold it back into the
enganches del soporte.
slot so that it does not interfere with driving.
3. 4 Corte la porción restante de la correa (Fig. 8).
4. Fasten the other belt in the same way (Fig. 8).
5 Si sigue sobresaliendo parte de la correa, dóblela e
introdúzcala de nuevo en la ranura, para que no moleste
5. Install the remote control unit in the holder
durante la conducción.
(Fig. 9).
When removing the remote control unit from the holder,
4. Fije la otra correa de la misma forma (Fig. 8).
move the corrugated release section (*1) toward the
5. Instale la unidad de control remoto en el
steering wheel as far as possible before sliding the remote
sujetador (Fig. 9).
control unit toward you.
Cuando quite la unidad de control remoto del sujetador,
mueva la sección de liberación corrugada (*1) hacia el
volante en lo posible y deslice la unidad de control remoto
hacia usted.
Fig. 5
Fig. 8
Fig. 9
Abb. 5
Abb. 8
Abb. 9
Afb. 5
Afb. 8
Afb. 9
Рис. 5
Рис.
Рис. 9
圖5
圖8
圖9
CZR5118A.indd17-20CZR5118A.indd17-20 2008/07/0111:37:142008/07/0111:37:14
Deutsch
Français
Italiano
Nederlands
Einbau
Technische Daten
Installation
Caractéristiques techniques
Installazione
Caratteristiche tecniche
Installeren
Technische gegevens
WARNUNG
Allgemein
AVERTISSEMENT
Généralités
AVVERTIMENTO
Generale
WAARSCHUWING
Algemeen
• Installieren Sie dieses Gerät nicht an einer Stelle, wo es
den Betrieb von Sicherheitseinrichtungen wie Airbags
Spannungsversorgung ....... 3 V Gleichspannung
• Eviter d’installer cette unité dans un endroit où elle
Source d’alimentation ....... 3 V CC
• Evitare di installare questa unità in luoghi dove il funzionamento
Alimentazione .................... 3 V CC
• Installeer de stuurafstandsbediening niet op plaatsen waar
Spanningsbron ................... 3 V gelijkstroom
beeinträchtigt, da in diesem Fall die Gefahr eines tödlichen
(Lithiumbatterie: CR2032)
comme celui du sac gonflable. Cela entraînerait un risque
empêche le fonctionnement d’un dispositif de sécurité,
(pile au lithium: CR2032)
possa essere ostacolato dall’apparecchio. Altrimenti c’è il
di dispositivi di sicurezza come palloni a gonfiaggio automatico
(pila al litio CR2032)
het de werking van veiligheidsmechanismen, bijvoorbeeld
(Lithiumbatterij: CR2032)
Abmessungen ..................... 38 (B) mm × 67 (H) mm × 18
Dimensions ........................ 38 (L) mm × 67 (H) mm × 18
Dimensioni ......................... 38 (L) mm × 67 (A) mm × 18
een airbag, zou kunnen hinderen. Een verkeerde plaats kan
Afmetingen: ........................ 38 (b) mm × 67 (h) mm × 18
• Befestigen Sie dieses Gerät mit dem an dem Gerät
Unfalls besteht.
(T) mm
d’accident fatal.
(P) mm
rischio di incidenti mortali.
(P) mm
angebrachten Riemen am Lenkrad. Wenn dieses Gerät lose
• Fixer solidement cette unité au volant de direction à
l’aide de la courroie fournie avec l’unité. Si cette unité est
• Fissare questa unità saldamente al volante con la cinghia in
dotazione. Se l’unità non è ben fissata, disturba la stabilità
• Bevestig de stuurafstandsbediening stevig aan het stuur
ernstige ongelukken veroorzaken.
(d) mm
ist, stört es die Fahrstabilität, was zu einem Verkehrsunfall
Gewicht ................................ 37 g
relâchée, elle gêne la stabilité de la conduite, ce qui peut
Poids ................................... 37 g
di guida e può causare incidenti stradali.
Peso .................................... 37 g (inclusi supporto e pila)
stuurafstandsbediening kan het besturen van de auto
met gebruik van de riem. Een loszittende
Gewicht ............................... 37 g
(einschließlich Halter und
(y compris le support et la
(inclusief houder en batterij)
• Bringen Sie dieses Gerät nicht am Außenumkreis des
führen kann.
Batterie)
• Ne pas fixer cette unité à la circonférence extérieure du
entraîner un accident.
pile)
• Non applicare questa unità alla circonferenza esterna del
Nota
hinderen met mogelijk ongelukken tot gevolg.
Lenkrads an, weil es dann die Fahrstabilität stören und
volant de direction. Elle gênerait la stabilité de la conduite
incidenti stradali. Applicare sempre l’unità alla circonferenza
volante, altrimenti disturba la stabilità di guida e causa
• Le caratteristiche tecniche e il design sono soggetti a possibili
• Bevestig dit toestel in geen geval aan de buitenrand van het
dadurch einen Verkehrsunfall verursachen kann. Bringen
Hinweis
et provoquerait un accident. Toujours fixer cette unité à la
Remarque
interna del volante come illustrato (Fig. 5).
modifiche senza preavviso dovute a miglioramenti.
stuur. Hier zal het toestel in de weg zitten bij het besturen
Opmerking
• Technische gegevens en ontwerp zijn ter
Sie dieses Gerät wie gezeigt am Innenumkreis des
• Technische Änderungen zum Zwecke der
illustré (Fig. 5).
circonférence intérieure du volant de direction, comme
• Du fait d’améliorations, les caractéristiques techniques
wijzigbaar.
produktverbetering zonder voorafgaande kennisgeving
vorbehalten.
Produktverbesserung sind ohne Vorankündigung
et la présentation sont susceptibles de modification sans
binnenrand van het stuur, zoals afgebeeld (Afb. 5).
verkeersongevallen. Bevestig dit toestel altijd aan de
van uw auto, hetgeen zal leiden tot
Lenkrads an (Abb. 5).
préavis.
Note
Hinweise
Remarques
• Non installare questa unità dove possa ostruire la vista del
conducente.
• Installieren Sie dieses Gerät nicht an einer Stelle, wo es die
• Ne pas installer cette unité dans un endroit où elle peut
Opmerkingen
• Die ideale Montagestelle richtet sich nach der der
Sicht des Fahrers beeinträchtigen kann.
• Puisque la disposition intérieure diffère en fonction du type
gêner la visibilité du conducteur.
• Poiché la disposizione interna dell’abitacolo varia in funzione
del tipo di veicolo, cambia altresì il punto ideale d’installazione
• Plaats de stuurafstandsbediening niet ergens waar het het
zicht van de bestuurder zou kunnen verslechteren.
Sie eine Montagestelle, die optimale Signalübertragung
Innenraumgestaltung des jeweiligen Fahrzeugs. Wählen
de véhicule, l’emplacement d’installation idéal pour l’unité
• Omdat de indeling van het interieur afhangt van het type
diffère aussi. Lors de l’installation de l’unité, sélectionnez
segnali da questa stessa unità all’unità Pioneer principale.
individuare il punto che assicura l’ottimale trasmissione dei
dell’unità. Prima d’installare l’unità si raccomanda di
voertuig, kunnen er grote verschillen zijn in de ideale
vom Gerät zum Pioneer Hauptteil gewährleistet.
signaux de l’unité à l’unité principale Pioneer.
un emplacement qui assure la meilleure transmission des
Accessori (Fig. 4)
van het toestel een plek waarvandaan de signalen van dit
installatieplek voor dit toestel. Kies voor het installeren
Zubehör (Abb. 4)
Accessoires (Fig. 4)
A Unità telecomando × 1
toestel goed kunnen worden verstuurd naar het Pioneer
A Fernbedienung × 1
Hoofdtoestel.
B Halter
× 1
A Télécommande × 1
B Supporto
× 1
C Riemen
× 2
B Support
× 1
C Cinghia
× 2
Accessoire (Afb. 4)
D Lithium-Batterie (CR2032, 3V)
× 1
C Courroie
× 2
D Pila al Litio (CR2032, 3V)
× 1
A Afstands-bediening × 1
B Houder
× 1
Installation des Geräts in einem Auto mit
D Pile au lithium (CR2032, 3V)
× 1
Installazione dell’unità su un’auto con vol-
C Riem
× 2
Linkslenkung
Installation de l’unité sur une voiture à
ante a sinistra
D Lithiumbatterij (CR2032, 3V)
× 1
1. Haken Sie das Band in den Halter ein (Abb. 6).
direction à gauche
1. Agganciare la cintura al supporto (Fig. 6).
Installeren van de stuurafstandbediening
1. Accrochez la courroie sur le support (Fig. 6).
2. Fissare il supporto al bordo interno del volante
in een auto met het stuur links
2. Fixieren Sie den Halter an der Innenseite des
Lenkrades, so dass der Halter zum Fahrer zeigt
2. Fixez le support sur le rebord intérieur du volant
in modo tale che il supporto sia rivolto verso il
1. Haak de riem op de houder vast (Afb. 6).
(Abb. 7).
pour que le support soit en face du conducteur
conducente (Fig. 7).
(Fig. 7).
12 Avvolgere la cintura attorno al bordo esterno del
2. Bevestig de houder aan de binnenste rand van
12 Wickeln Sie das Band um die Außenkante des
het stuur zodat de houder in de richting van de
Halter.
Lenkrades und fädeln Sie das Ende durch den Schlitz im
12 Entourez la courroie autour du rebord extérieur du
supporto.
volante, facendo passare l’estremità nello slot del
bestuurder wijst (Afb. 7).
volant et faites passer son extrémité dans la fente du
12 Wikkel de riem rond de buitenste rand van het stuur
3 Ziehen Sie das Band straff an, sichern Sie es dann mit
support.
3 Tirare la cintura fino a tenderla, quindi bloccarla
en plaats het uiteinde door de gleuf in de houder.
Hilfe der beiden anderen Haken am Halter.
3 Tirez sur la courroie pour la serrer puis fixez-la en
mediante gli altri due ganci del supporto.
3. 4 Schneiden Sie überschüssiges Band ab (Abb.
utilisant les deux autres crochets du support.
3. 4 Tagliare la parte in eccedenza (Fig. 8).
3 Trek de riem aan en zet hem vervolgens met de twee
overige haken aan de houder vast.
8).
3. 4 Coupez la partie de la courroie qui dépasse
5 Qualora vi siano ancora parti di cintura che sporgono,
3. 4
Knip het overtollige gedeelte van de riem af
5 Wenn nach wie vor ein Stück des Bandes
(Fig. 8).
interferenze.
ripiegarle nello slot, in modo tale che non possano creare
(Afb. 8).
es beim Fahren nicht im Wege ist.
hervorstehen sollte, legen Sie es in den Schlitz ein, damit
5 Si une partie de la courroie dépasse encore, rabattez-la
dans la fente pour qu’il n’y ait pas d’interférence avec la
4. Procedere nello stesso modo anche per l’altra
5 Als een gedeelte van de riem er nog steeds uitsteekt dan
4. Befestigen Sie das zweite Band auf die gleiche
conduite.
cintura (Fig. 8).
kunt u dit uiteinde in de gleuf vouwen om te voorkomen
dat dit uiteinde het besturen van de auto belemmerd.
Weise (Abb. 8).
4. Fixez l’autre courroie de la même manière (Fig. 8).
5. Installare l’unità del telecomando sul supporto
5. Die Fernbedienung in den Halter einsetzen (Abb.
(Fig. 9).
4. Maak de andere riem op dezelfde manier vast
5. Installer l’unité de télécommande dans le support
9).
(Fig. 9).
Togliendo il telecomando dal supporto, spostare la parte
(Afb. 8).
corrugata di rilascio (*1) per quanto possibile verso il
5. Plaats de stuurafstandsbediening in de houder
Bewegen Sie beim Herausnehmen der Fernbedienung
Pour retirer l’unité de té du support, déplacer autant que
volante prima far scorrere il telecomando verso di sè.
(Afb. 9).
aus dem Halter den geriffelten Freigabeteil (*1) so weit
wie möglich zum Lenkrad hin und bewegen Sie die
direction avant de faire glisser l’unité de télécommande
possible la section de libération striée (*1) vers le volant de
Bij het verwijderen van de stuurafstandsbediening uit de
Fernbedienung auf sich zu.
vers soi.
naar u toe schuiven.
naar het stuur drukken en dan de stuurafstandsbediening
houder moet u het geribbelde gedeelte (*1) zo ver mogelijk
CZR5118A.indd21-24CZR5118A.indd21-24 2008/07/0111:37:152008/07/0111:37:15
Русский
Português (B)
中文
Установка
Спецификация
Instalação
Especificações
安裝
規格
ПРЕДУПРЕЖДЕНИЕ
Источник питания ............ 3 V DC
Основное
ADVERTÊNCIA
Geral
警告
• Избегайте установки данного прибора в таких местах,
где срабатывает устройство безопасности, такое как
(Литиевая батарейка:
• Evite instalar este aparelho em um lugar onde a operação
Fonte de alimentação ......... CC 3 V
一般
Иначе существует опасность несчастного случая с
пневмоподушка, она будет мешать данному прибору.
CR2032)
dos dispositivos de segurança, como os airbags, possa ser
prejudicada. Caso contrário, existe o perigo de um acidente
(Pilha de lítio: CR2032)
• Fixe este aparelho firmemente no volante de direção com
fatal.
Dimensões (L × A × P): ....... 38 mm × 67 mm × 18 mm
фатальным исходом.
Размеры (W × H × D): ....... 38 мм × 67 мм × 18 мм
Peso ..................................... 37 g (incluindo o suporte e a
• Прочно зафиксируйте данный прибор на рулевом
Вес .................................... 37 г (включая держатель и
данному прибору. Если данный прибор не прикреплен,
колесе автомобиля с помощью ремня, прилагаемого к
батарейку)
a correia fixada ao aparelho. Se o aparelho ficar frouxo, ele
pilha)
prejudicar o controle da direção, o que pode resultar em
注意
приведет к дорожному происшествию.
это может нарушить стабильность движения, которая
Примечание
• Não instale este aparelho na circunferência exterior do
um acidente de trânsito.
Nota
volante de direção. Caso contrário, a condução do veículo
• As especificações e o design estão sujeitos a modificações
• Спецификации и дизайн прибора могут
sem aviso prévio em virtude de melhorias.
• Не прикрепляйте данный прибор к внешней
окружности рулевого колеса автомобиля. Иначе это
модифицироваться без уведомления из-за
será prejudica, resultando em um acidente de trânsito.
нарушит стабильность движения и будет причиной
усовершенствования.
Sempre instale o aparelho na circunferência interior do
дорожного происшествия. Всегда прикрепляйте
volante de direção como mostrado (Fig. 5).
注意
колеса автомобиля как показано (Рис. 5).
данный прибор на внутренней окружности рулевого
Notas
• Não instale este aparelho em um lugar que possa obstruir
Примечания
• Не устанавливайте данный прибор в месте, в котором
• Como a disposição interior difere dependendo do tipo
a visão do motorista.
может закрываться водительский обзор.
• Так как внутреннее расположение отличается
também difere. Ao instalar o aparelho, selecione um lugar
do veículo, o lugar ideal para a instalação do aparelho
идеальное местоположение данного прибора также
в зависимости от типа транспортного средства,
para o componente principal Pioneer.
que assegure a transmissão ótima dos sinais do aparelho
配
件(圖 4)
различно. Когда устанавливаете прибор, выберите
Acessórios (Fig. 4)
A 遙控器 × 1
сигналов от прибора к Головному прибору Pioneer.
место, которое обеспечит оптимальную передачу
A Controle remoto × 1
B 固定座 × 1
B Suporte × 1
Аксессуары (Рис. 4)
C Correia × 2
C 固定帶 × 2
A Прибор дистанционного управления × 1
D Pilha de lítio (CR2032, 3 V) × 1
D 鋰電池 (CR2032, 3V) × 1
B Держатель × 1
C Ремень × 2
Instalação do aparelho em um automóvel
D Литиевая батарейка (CR2032, 3V) × 1
com direção esquerda
於左駕車輛上安裝本遙控器
1. 將固定帶扣到固定座上(圖 6)。
Установка Прибора на машинах с рулём
1. Enganche a correia no suporte (Fig. 6).
с левой стороны
2. Fixe o suporte na borda interior do volante de
direção de modo que o suporte fique virado para
2. 將固定座面向駕駛人,固定於方向盤內側(圖
1. Закрепите ремень на держателе (Рис. 6).
o motorista (Fig. 7).
7)。
2. Зафиксируйте держатель на внутреннем
12 Enrole a correia ao redor da borda exterior do volante
de direção, passando a extremidade através da abertura
12
крае рулевого колеса так, чтобы держатель
«смотрел» на водителя (Рис. 7).
no suporte.
12 Оберните ремень вокруг наружного края
3 Puxe a correia para apertá-la e, em seguida, fixe-a
utilizando os outros dois ganchos no suporte.
3
рулевого колеса, пропустив его конец через щель в
держателе.
3. 4 Corte a porção extra da correia (Fig. 8).
3. 4 剪去固定帶上多出的部份(圖 8)。
3 Потяните ремень, чтобы затянуть его, затем
5 Se alguma parte da correia ainda estiver protuberante,
5
закрепите его, используя два других крючка в
dobre-a para trás na abertura de modo que não interfira
держателе.
com a condução do automóvel.
3. 4 Отрежьте лишнюю часть ремня (Рис. 8).
4. Aperte a outra correia da mesma maneira (Fig. 8).
4. 以相同方法固定另一條固定帶(圖 8)。
5 Если часть ремня все еще высовывается, загните
его в щель так, чтобы он не мешал водителю.
5. Instale o controle remoto no suporte (Fig. 9).
Ao retirar o controle remoto do suporte, mova a seção de
5. 將遙控器安裝到固定座上(圖 9)。
4. Прикрепите другой ремень в той же
até onde vá, antes de deslizar o controle remoto para si.
liberação corrugada (*1) no sentido do volante de direção,
последовательности (Рис. 8).
5. Установите прибор дистанционного
управления в держателе (Рис. 9).
При удалении прибора дистанционного управления
по направлению к рулевому колесу по возможности
из держателя, передвиньте рифленую секцию (*1)
дальше перед скольжением прибора дистанционного
управления по направлению к Вам.
CZR5118A.indd25-28CZR5118A.indd25-28 2008/07/0111:37:152008/07/0111:37:15


