Asus PQ321QE: Installing the stand (supplied)
Installing the stand (supplied): Asus PQ321QE
ENGLISH
5
E
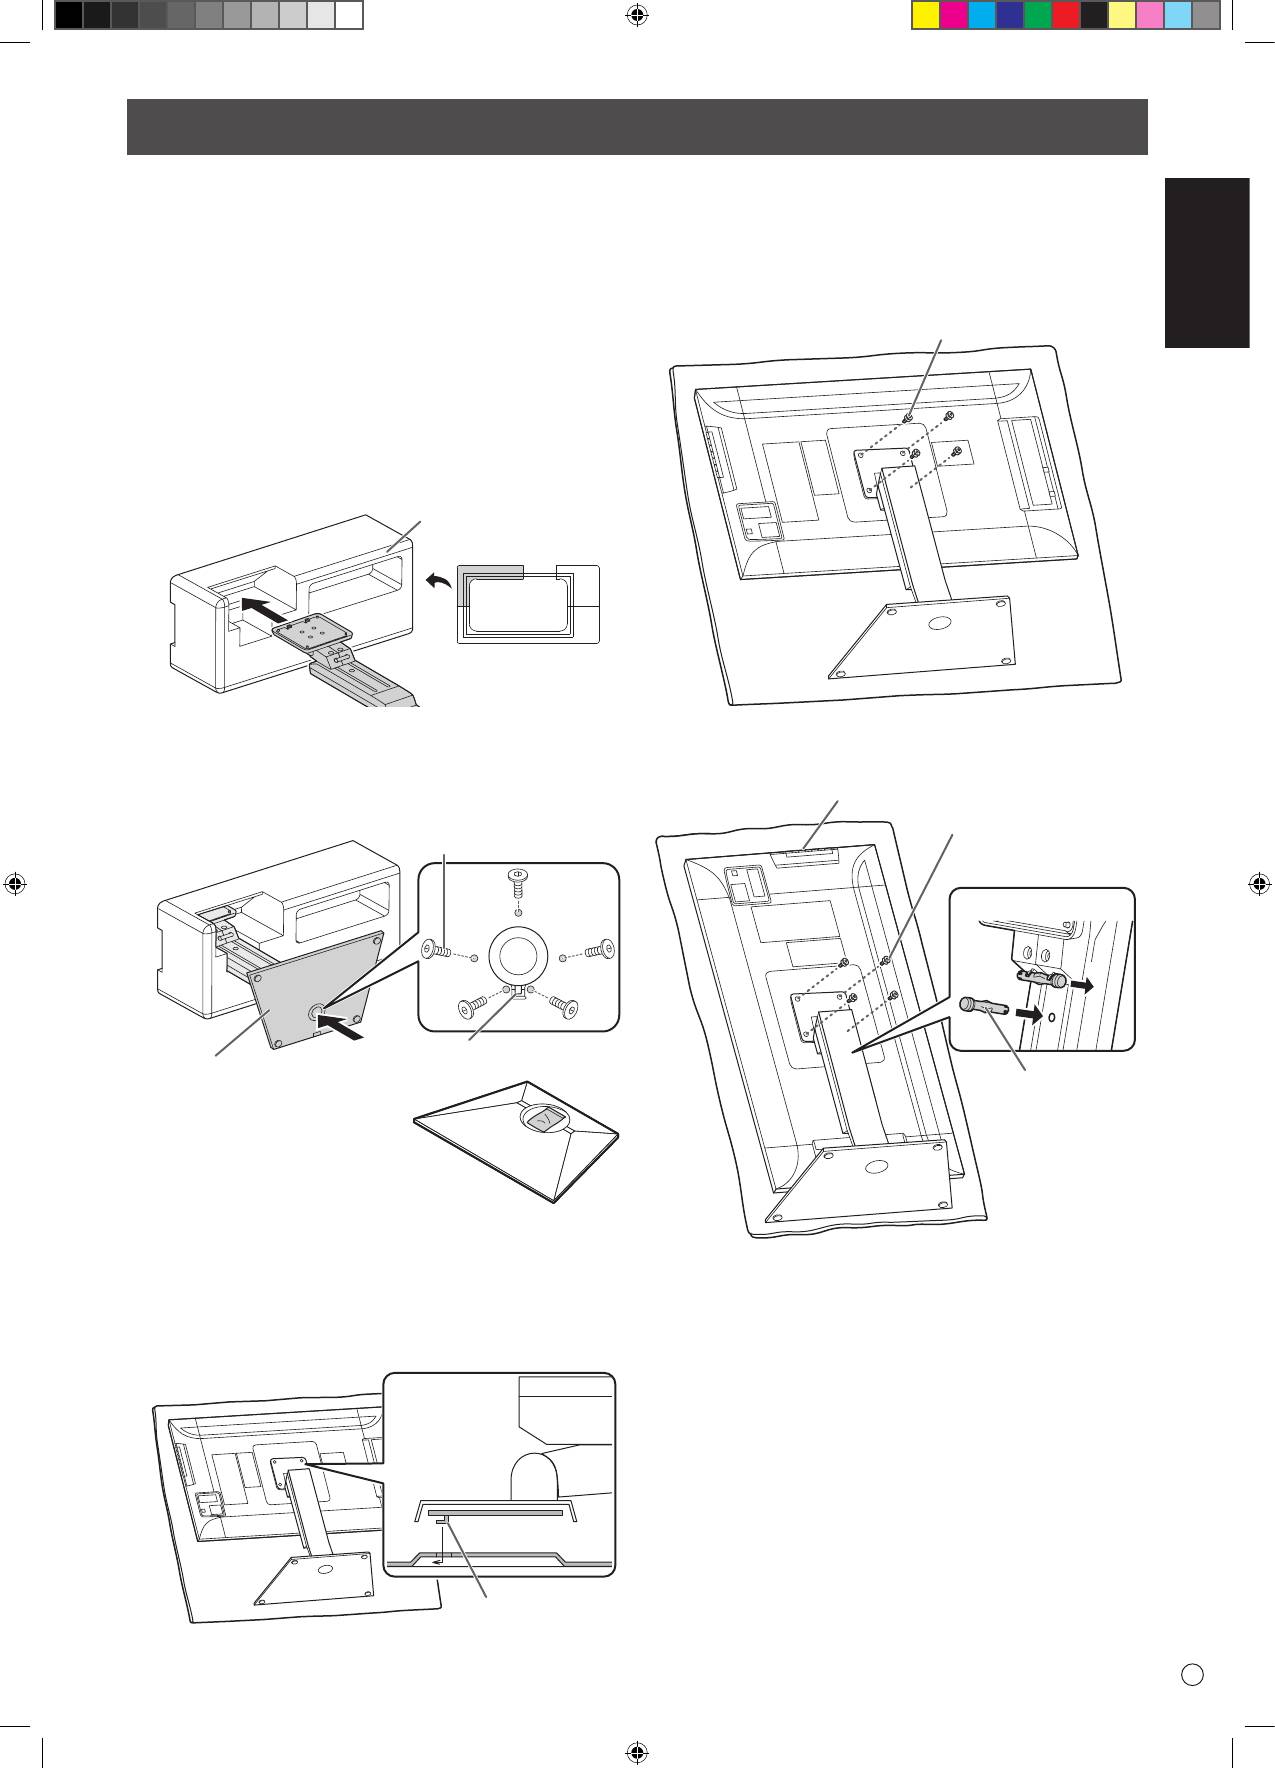
Installing the stand (supplied)
• Disconnect all cables from the monitor.
• Firmly tighten the installation screws (supplied) with the hex
wrench (supplied).
• Ensure that you have sucient space to work.
n
Attaching the stand
Remove all packaging materials before starting work.
To prevent the table (etc.) from being damaged by the stand
pedestal, spread a thick, soft cloth (blanket, etc.) and work on
the cloth.
1. Insert the stand strut into the packaging material (upper
left) as shown.
Packing material
(upper left)
Front
2. While supporting the stand pedestal with your hand, fasten
to the stand strut with the supplied countersunk screws (M4
x 6 without washers) (x5).
Use the supplied hex wrench.
Countersunk screw
(M4 x 6 without washers)
Insert by hooking the tab
Pedestal
* A bag containing the screws
(supplied) and hex wrench
(supplied) is attached to the
round hole in the stand pedestal.
3. Spread a thick, soft cloth (blanket, etc.) that will prevent
damage to the LCD panel on a stable at surface where the
entire monitor can be placed, and place the monitor with
the LCD panel face down on the cloth.
4. Place the stand on the monitor.
Hook the tab on the stand under the mounting plate (pre-
installed on monitor).
Tab
5. Fasten the stand to the monitor with the supplied screws
(M4 x 10 with washers) (x4).
Use the supplied hex wrench.
• Landscape
Screw
(M4 x 10 with washers)
• Portrait
Operation buttons
Screw
(M4 x 10 with washers)
Front
1
2
Fixing pin
CAUTION!
* If the monitor will be used in the portrait orientation, pull
out the xing pin (1), and insert it into the hole (2) as shown
above.
* To remove the stand, place the monitor and stand as shown
above and remove the screws.
CAUTION!
• Adhere to the following when installing the monitor in its
portrait orientation. Failing to adhere to the following may
cause malfunctions.
- Install the monitor such that the operation buttons are
located on the top side.
- Set the MONITOR on the MONITOR menu to PORTRAIT.
(See
USER MANUAL.
)
Оглавление
- Contents
- SAFETY PRECAUTIONS
- SAFETY PRECAUTIONS (Continued)
- MOUNTING PRECAUTIONS
- Installing the stand (supplied)
- Connections
- Turning Power On/O
- Specications
- Table des matières
- PRÉCAUTIONS DE SÉCURITÉ
- PRÉCAUTIONS DE SÉCURITÉ (Suite)
- PRÉCAUTIONS POUR LE MONTAGE
- Mise en place du support (fourni)
- Connexions
- Mise sous tension et hors tension
- Caractéristiques
- Índice
- PRECAUCIONES DE SEGURIDAD
- PRECAUCIONES DE SEGURIDAD (Continuación)
- PRECAUCIONES DE MONTAJE
- Instalar el soporte (suministrado)
- Conexiones
- Encendido/apagado
- Especicaciones
- Inhalt
- SICHERHEITSVORKEHRUNGEN
- SICHERHEITSVORKEHRUNGEN (Fortsetzung)
- WICHTIGE HINWEISE ZUR BEFESTIGUNG
- Anbringen des Ständers (im Lieferumfang enthalten)
- Anschlüsse
- Ein- und ausschalten
- Technische Daten
- Содержание
- ПРАВИЛА ТЕХНИКИ БЕЗОПАСНОСТИ
- ПРАВИЛА ТЕХНИКИ БЕЗОПАСНОСТИ (Продолжение)
- МЕРЫ ПРЕДОСТОРОЖНОСТИ ПРИ КРЕПЛЕНИИ
- Соединения
- Включение/выключение питания
- Спецификации
- Indice
- PRECAUZIONI DI SICUREZZA
- PRECAUZIONI DI SICUREZZA (seconda parte)
- PRECAUZIONI DI MONTAGGIO
- Installare il piedistallo (in dotazione)
- Connessioni
- Accensione/Spegnimento
- Speciche


