Sony α6500 ILCE-6500 – page 2
Manual for Sony α6500 ILCE-6500
Table of contents
- Check out the Help Guide!
- Owner’s Record Battery pack WARNING
- Notice Power Cord
- Notes on using your camera No compensation for damaged content or recording failure Screen language Notes on recording/playback Notes on the monitor, electronic viewfinder, lens, and image sensor Notes on handling the product
- Notes on using lenses and accessories Notes on the Multi Interface Shoe Notes on shooting with the viewfinder
- Notes on recording for long periods of time or recording 4K movies Notes on continuous shooting
- How to turn off wireless network functions (Wi-Fi, NFC and Bluetooth function, etc.) temporarily Notes on wireless LAN Notes on playing back movies on other devices Notes on security when using wireless LAN products Warning on copyright On the data specifications described in this manual
- Checking the camera and the supplied items
- Identifying parts When the lens is removed Multi Interface Shoe*
-
- Eye sensor Viewfinder Eyepiece cup Attaching/removing the eyepiece cup
- Monitor (For touch operation: Touch panel/Touch pad) (N mark)
- Battery/memory card cover Memory card slot Battery lock lever Battery insertion slot Connection plate cover Tripod socket hole Access lamp
- Basic operations Using the control wheel
- Using the Fn (Function) button To adjust settings from the dedicated setting screens
- Using the AF/MF/AEL switch lever
- Startup guide Step 1: Inserting the battery pack/memory card into the camera
- To remove the battery pack To remove the memory card
- Step 2: Charging the battery pack while it is inserted in the camera
- Step 3: Attaching a lens
- To remove the lens
- Step 4: Setting the language and the clock
- Step 5: Shooting images in auto mode
- To shoot movies To play back images To delete displayed image To shoot images in various shooting modes
- Using the Wi-Fi / One-touch (NFC) / Bluetooth functions PlayMemories Mobile Recording location information to captured images
- Introduction to computer software / PlayMemories Camera Apps PlayMemories Home
- Image Data Converter Remote Camera Control PlayMemories Camera Apps
- List of MENU items (Camera Settings1) Quality/Image Size Shoot Mode/Drive
- AF
- Exposure Flash Color/WB/Img. Processing White Balance Priority Set in AWB
- DRO/Auto HDR Creative Style Picture Effect Picture Profile Soft Skin Effect Focus Assist Face Detection/Shoot Assist
- Auto Obj. Framing (Camera Settings2) Movie
- Shutter/SteadyShot Zoom Display/Auto Review DISP Button FINDER/MONITOR Finder Frame Rate Zebra Grid Line Exposure Set. Guide
- Live View Display Auto Review Custom Operation (Wireless) Send to Smartphone Send to Computer View on TV
- One-touch(NFC) Airplane Mode Wi-Fi Settings Bluetooth Settings Loc. Info. Link Set. Edit Device Name Reset Network Set. (Application) (Playback) Delete View Mode Image Index Display Rotation Slide Show
- Rotate Enlarge Image Protect Specify Printing Photo Capture (Setup)
- NTSC/PAL Selector Cleaning Mode Touch Operation Touch Pad (vertical) Touch Pad Area Set. Demo Mode TC/UB Settings Remote Ctrl HDMI Settings 4K Output Sel. USB Connection USB LUN Setting USB Power Supply PC Remote Settings Language
- Date/Time Setup
- Specifications Battery life and number of recordable images
- Memory cards that can be used
- Number of recordable images
- The number of images that can be recorded on a memory card
- Recordable movie times File Format Record Setting 8 GB 16 GB 32 GB 64 GB
- File Format Record Setting 8 GB 16 GB 32 GB 64 GB
- Notes on continuous movie recording
- Specifications Camera
- Rechargeable battery pack NP-FW50
- On focal length Trademarks
- On GNU GPL/LGPL applied software
C:\4690670411ILCE6500CEC\01GB-ILCE6500CEC\020PRE.indd
2016/09/30 16:25
Startup guide
Step 1: Inserting the battery pack/memory card into the
camera
For details on memory cards that can be used with this camera, refer to
page 44.
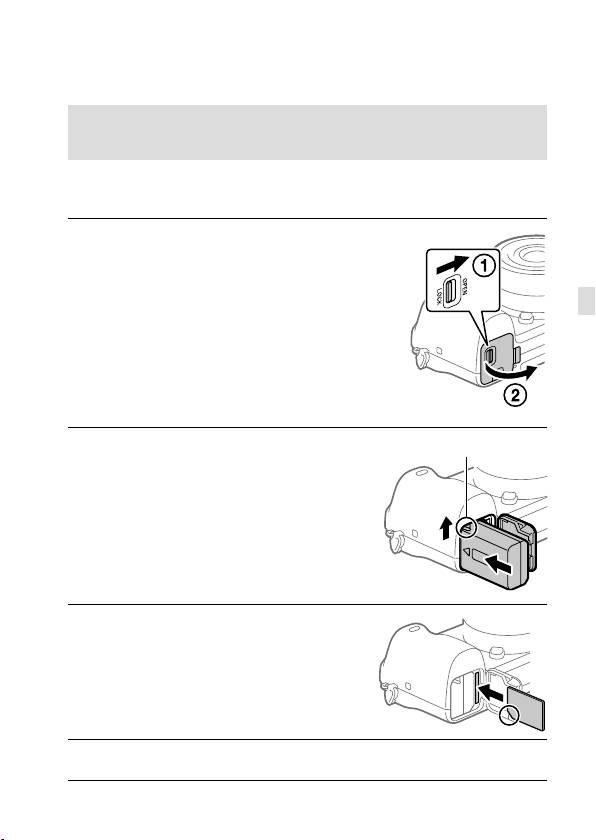
1
Open the battery/memory
card cover.
GB
2
Insert the battery pack while
Lock lever
pressing the lock lever with
the tip of the battery until the
battery locks into place.
3
Insert the memory card.
• With the notched corner facing
in the direction illustrated, insert
the memory card until it clicks
into place. Otherwise, it may
cause a malfunction.
4
Close the cover.
GB
21
ILCE-6500
4-690-670-41(1)
C:\4690670411ILCE6500CEC\01GB-ILCE6500CEC\020PRE.indd
2016/09/30 16:25
Hint
• When you use a memory card with the camera for the first time, it is
recommended that you format the card on the camera for more stable
performance of the memory card (page 42).
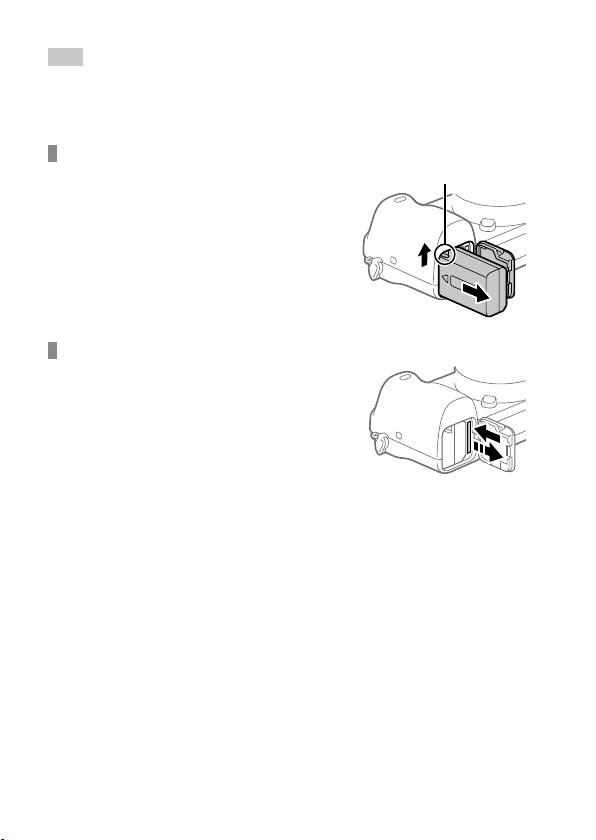
To remove the battery pack
Make sure that the access lamp
Lock lever
(page 17) is not lit, and turn off
the camera. Then, slide the lock
lever and remove the battery pack.
Be careful not to drop the battery
pack.
To remove the memory card
Make sure that the access lamp
(page 17) is not lit, and then
push in the memory card once to
remove it.
GB
22
ILCE-6500
4-690-670-41(1)
C:\4690670411ILCE6500CEC\01GB-ILCE6500CEC\020PRE.indd
2016/09/30 16:25
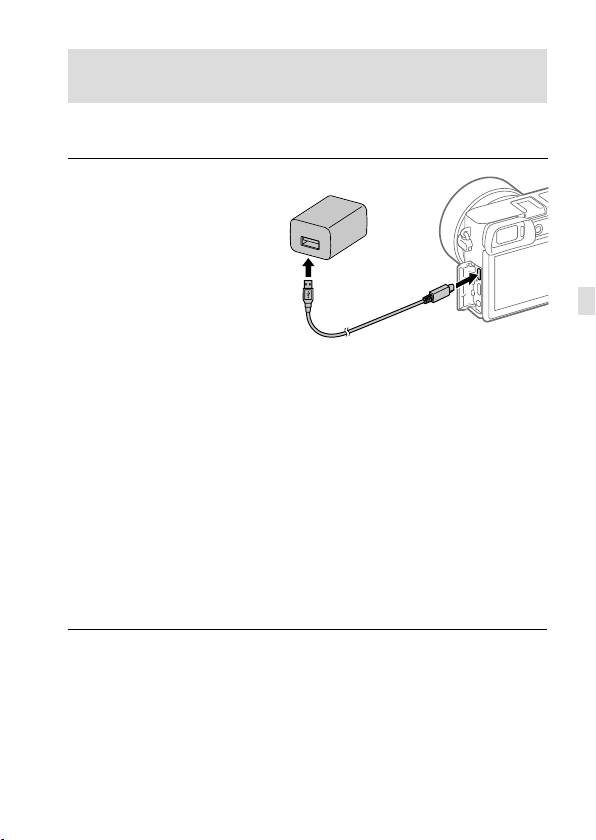
Step 2: Charging the battery pack while it is inserted in
the camera
1
Turn the power off.
2
Connect the camera
with the battery pack
inserted to the AC Adaptor
(supplied) using the micro
USB cable (supplied), and
connect the AC Adaptor
GB
to the wall outlet (wall
socket).
Charge lamp on the camera (orange)
Lit: Charging
Off: Charging finished
Flashing: Charging error or charging paused temporarily because the
camera is not within the proper temperature range
• Charging time (full charge): approximately 150 min (when charging a
fully depleted battery pack at a temperature of 25°C (77°F))
• When you use a completely new battery pack or a battery pack that
has not been used for a long time, the charge lamp may flash quickly
when the battery is charged. If this happens, remove the battery pack
or disconnect the USB cable from the camera and then re-insert it to
recharge.
• Be sure to use only genuine Sony brand battery packs, micro USB
cables (supplied) and AC Adaptors (supplied).
GB
23
ILCE-6500
4-690-670-41(1)
C:\4690670411ILCE6500CEC\01GB-ILCE6500CEC\020PRE.indd
2016/09/30 16:25
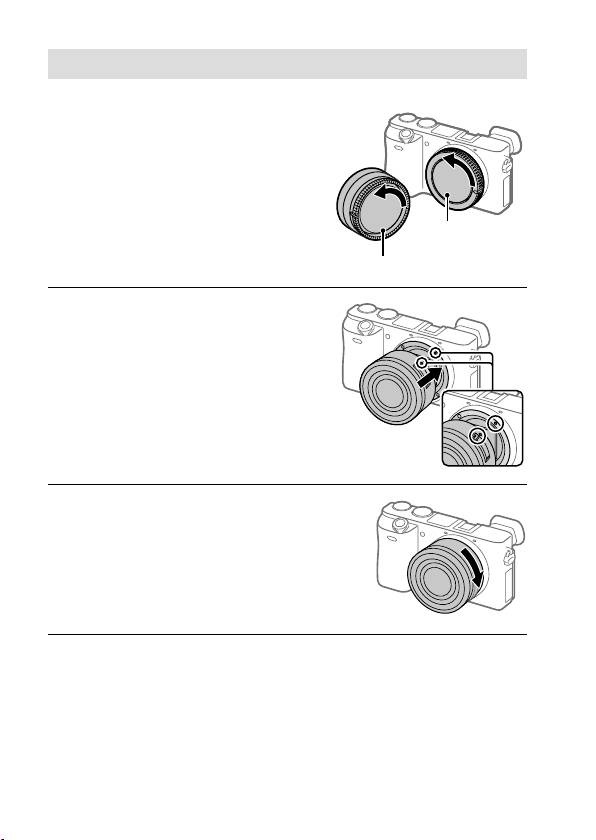
Step 3: Attaching a lens
1
Remove the body cap from the
camera and the rear lens cap
from the rear of the lens.
• When changing the lens,
work quickly in a dust-free
environment to keep dust or
debris from getting inside the
Body cap
camera.
Rear lens cap
2
Mount the lens by aligning
the two white index marks
(mounting indexes) on the
lens and camera.
• Hold the camera with the lens
facing down to prevent dust
or debris from entering the
camera.
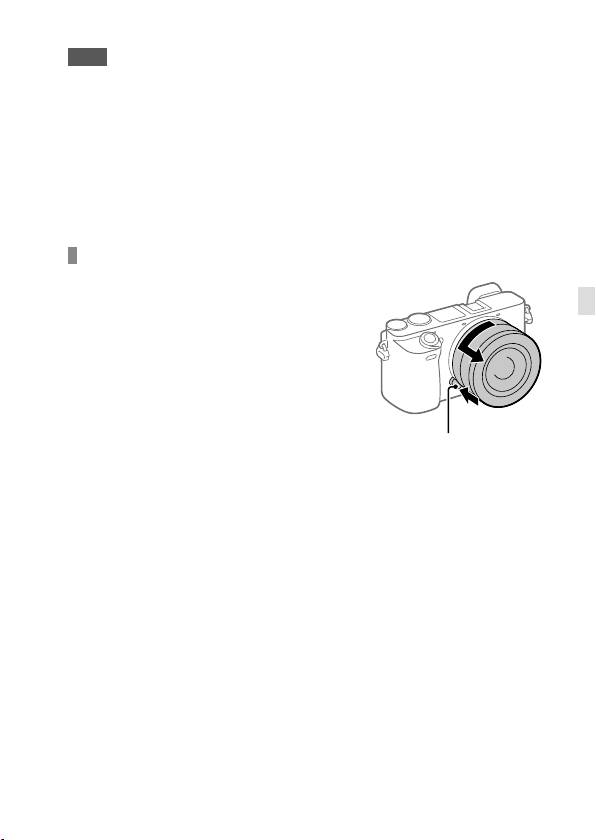
3
While pushing the lens lightly
toward the camera, turn the
lens slowly in the direction of
the arrow until it clicks into
the locked position.
GB
24
ILCE-6500
4-690-670-41(1)
C:\4690670411ILCE6500CEC\01GB-ILCE6500CEC\020PRE.indd
2016/09/30 16:25
Note
• Be sure to hold the lens straight and do not use force when attaching a lens.
• Do not press the lens release button when attaching a lens.
• The Mount Adaptor (sold separately) is required to use an A-mount lens
(sold separately). For details, refer to the operating manual supplied with the
Mount Adaptor.
• When carrying the camera with a lens attached, hold both the camera and
the lens firmly.
• Do not hold the part of the lens that is extended for zoom or focus
adjustment.
To remove the lens
Keep pressing the lens release
button and turn the lens in the
GB
direction of the arrow until it stops.
Lens release button
GB
25
ILCE-6500
4-690-670-41(1)
C:\4690670411ILCE6500CEC\01GB-ILCE6500CEC\020PRE.indd
2016/09/30 16:25
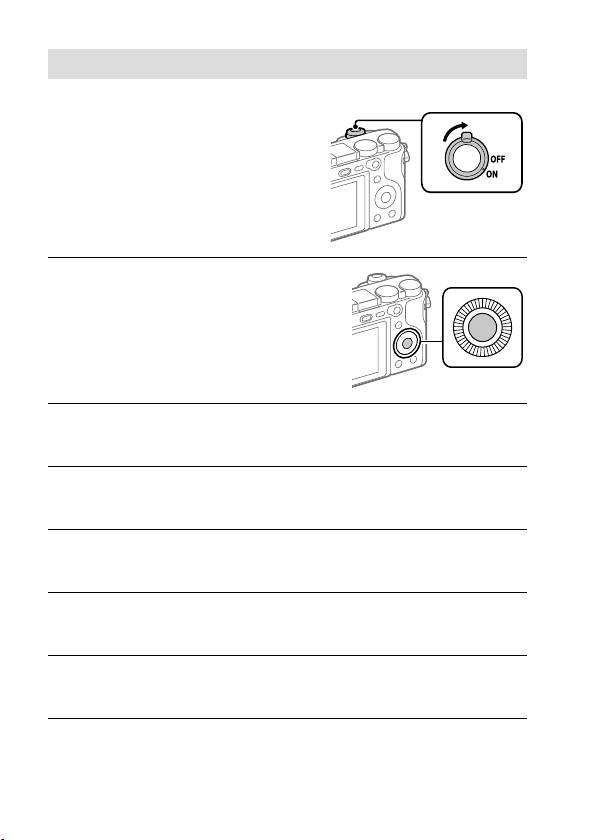
Step 4: Setting the language and the clock
1
Set the ON/OFF (Power) switch
to “ON” to turn on the camera.
ON/OFF (Power)
switch
2
Select the desired language
and then press the center of
the control wheel.
3
Make sure that [Enter] is selected on the screen and then press
the center.
4
Select the desired geographic location and then press the
center.
5
Select a setting item using the top/bottom of the control wheel
or by turning the control wheel, and then press the center.
6
Select the desired item by pressing the top/bottom/left/right
side of the control wheel, and then press the center.
7
Repeat steps 5 and 6 to set other items, then select [Enter] and
press the center.
GB
26
ILCE-6500
4-690-670-41(1)
C:\4690670411ILCE6500CEC\01GB-ILCE6500CEC\020PRE.indd
2016/09/30 16:25
Hint
• If you want to set the date and time later, you can cancel the date and time
setting procedure by pressing the MENU button. In this case, the setting
screen for the date and time will reappear the next time you turn on the
camera.
• To reset the date and time setting, use MENU (page 42).
Note
• This camera does not have a function for inserting the date into images.
You can insert the date into images and then save and print them using
PlayMemories Home (for Windows only).
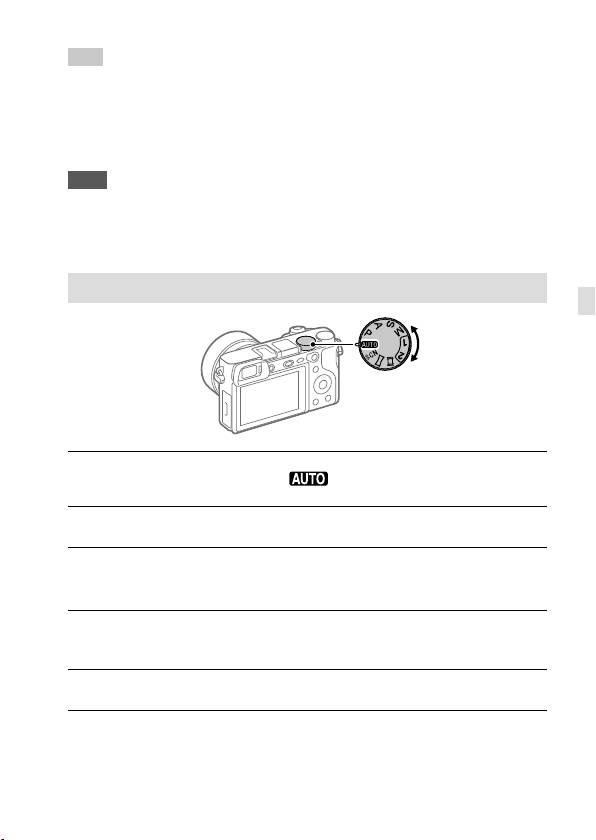
Step 5: Shooting images in auto mode
GB
1
Turn the mode dial to set to .
2
Look through the viewfinder and hold the camera.
3
Set the size of the subject by rotating the zoom ring of the lens
when a zoom lens is attached.
4
Press the shutter button halfway down to focus.
• When the image is in focus, an indicator (such as ) will light up.
5
Press the shutter button all the way down.
GB
27
ILCE-6500
4-690-670-41(1)

C:\4690670411ILCE6500CEC\01GB-ILCE6500CEC\020PRE.indd
2016/09/30 16:25
To shoot movies
Press the MOVIE button to start/stop recording.
To play back images
Press the (Playback) button to play back images. You can select the
desired image using the control wheel.
To delete displayed image
Press the (Delete) button while an image is displayed to delete it.
Select [Delete] using the control wheel on the confirmation screen, and
then press the center of the control wheel to delete the image.
To shoot images in various shooting modes
Set the mode dial to the desired mode depending on the subject or the
functions you want to use.
GB
28
ILCE-6500
4-690-670-41(1)

C:\4690670411ILCE6500CEC\01GB-ILCE6500CEC\070WRL.indd
2016/09/30 16:25
Using the Wi-Fi / One-touch (NFC) /
Bluetooth functions
You can perform the following operations using the camera's Wi-Fi, NFC
One-touch, and Bluetooth functions.
• Saving images to a computer
• Transferring images from the camera to a smartphone
• Using a smartphone as a remote control for the camera
• Viewing still images on a TV
• Recording location information from a smartphone to images
For details, refer to the “Help Guide” (page 2) or to the attached
document “Wi-Fi Connection/One-touch (NFC) Guide.”
GB
PlayMemories Mobile
PlayMemories Mobile is required to connect the camera and a
smartphone. If PlayMemories Mobile is already installed on your
smartphone, be sure to update it to the latest version.
For details on PlayMemories Mobile, refer to the support page
(http://www.sony.net/pmm/).
Recording location information to captured images
By using PlayMemories Mobile, you can obtain location information from
a connected smartphone (via Bluetooth communication) and record it to
captured images.
GB
29
ILCE-6500
4-690-670-41(1)

C:\4690670411ILCE6500CEC\01GB-ILCE6500CEC\090COM.indd
2016/09/30 16:25
Introduction to computer software /
PlayMemories Camera Apps
We offer the following computer software and
PlayMemories Camera Apps to enhance your enjoyment of photos/
movies.
To take advantage of the computer software, access one of the following
URLs using your Internet browser and then download the software by
following the onscreen instructions. If one of these programs is already
installed on your computer, update it to the latest version before use.
Windows:
http://www.sony.co.jp/imsoft/Win/
Mac:
http://www.sony.co.jp/imsoft/Mac/
You can check the recommended operating environment for the software from
the following URL:
http://www.sony.net/pcenv/
PlayMemories Home
PlayMemories Home allows you to import still images and movies to your
computer and view or use them.
You need to install PlayMemories Home to import XAVC S movies or
AVCHD movies to your computer.
You can access the download website directly from the following URL:
http://www.sony.net/pm/
• When you connect the camera to your computer, new functions may
be added to PlayMemories Home. Connecting the camera to your
computer is therefore recommended even if PlayMemories Home has
already been installed on the computer.
GB
30
ILCE-6500
4-690-670-41(1)

C:\4690670411ILCE6500CEC\01GB-ILCE6500CEC\090COM.indd
2016/09/30 16:25
Image Data Converter
You can develop and edit RAW images using various adjustment
functions like tone curve and sharpness.
Remote Camera Control
With Remote Camera Control, you can change the camera settings or
release the shutter from a computer connected via a USB cable.
To use Remote Camera Control, first select MENU
(Setup)
[USB Connection] [PC Remote], then connect the camera to a
computer via a USB cable.
GB
PlayMemories Camera Apps
You can add the functions of your choice to your camera by connecting
to the application download website
(PlayMemories Camera Apps)
using your computer or the Wi-Fi function of the camera.
http://www.sony.net/pmca/
• After installing an application, you can call up the application by
touching an NFC-enabled Android smartphone to the
mark on the
camera, using the [One-touch(NFC)] function.
GB
31
ILCE-6500
4-690-670-41(1)
C:\4690670411ILCE6500CEC\01GB-ILCE6500CEC\100MEN.indd
2016/09/30 16:25
List of MENU items
For details on each MENU items, refer to the Help Guide.
(Camera Settings1)
Red tab
Quality/Image Size
Quality
Sets the image quality for still images.
([RAW]/ [Fine], etc.)
Image Size
Selects the size of still images.
(L/ M/ S)
Aspect Ratio
Selects the aspect ratio for still images.
Panorama: Size
Selects the size of panoramic images.
Panorama: Direction
Sets the shooting direction for panoramic images.
Long Exposure NR
Sets noise reduction processing for shots with a
shutter speed of 1 second or longer.
High ISO NR
Sets noise reduction processing for high-sensitivity
shooting.
Color Space
Changes the color space (range of reproducible
colors).
Lens Comp.
Selects the type of lens compensation.
Shoot Mode/Drive
Auto Mode
You can shoot selecting either Intelligent Auto or
Superior Auto.
Scene Selection
Selects pre-set settings to match various scene
conditions.
([Portrait]/ [Sports Action], etc.)
S. Auto Img. Extract.
When the shooting mode is set to [Superior Auto]
and the camera recognizes the scene to be shot
with multiple images, this sets whether to extract an
image automatically and save it.
Drive Mode
Sets the drive mode, such as for continuous
shooting.
([Self-timer]/ [Cont. Bracket], etc.)
GB
32
ILCE-6500
4-690-670-41(1)
C:\4690670411ILCE6500CEC\01GB-ILCE6500CEC\100MEN.indd
2016/09/30 16:25
Bracket Settings
Sets self-timer shooting in bracket mode, shooting
order for exposure bracketing, and white balance
bracketing.
/ Recall
Calls up settings pre-registered to
[
/ Memory].
/ Memory
Registers the desired modes and camera settings.
AF
Focus Mode
Selects the focus mode.
([Single-shot AF]/ [Continuous AF], etc.)
Priority Set in AF-S
Sets the timing of the shutter release when
[Focus Mode] is set to [Single-shot AF], [DMF] or
[Automatic AF] with a still subject.
Priority Set in AF-C
Sets the timing of the shutter release when
GB
[Focus Mode] is set to [Continuous AF] or
[Automatic AF] with a moving subject.
Focus Area
Selects the area of focus.
([Wide]/ [Flexible Spot], etc.)
AF Illuminator
Sets the AF illuminator, which provides light to aid
focusing in dark scenes.
Center Lock-on AF
Sets the function to track a subject and continue
focusing when pressing the center of control wheel
in the shooting screen.
AF System
Sets the auto focus method when an LA-EA1/LA-EA3
Mount Adaptor (sold separately) is attached.
AF w/ shutter
Sets whether to perform auto focusing when the
shutter button is pressed halfway down. This is
useful when you want to adjust the focus and
exposure separately.
Pre-AF
Sets whether or not to perform auto focus before
the shutter button is half pressed.
Eye-Start AF
Sets whether to use auto focus when you look
through the viewfinder if an LA-EA2/LA-EA4 Mount
Adaptor (sold separately) is attached.
AF Area Auto Clear
Sets whether the focus area is displayed all the time
or disappears automatically shortly after focusing.
Disp. cont. AF area
Sets whether or not to display the focus area in
[Continuous AF] mode.
GB
33
ILCE-6500
4-690-670-41(1)
C:\4690670411ILCE6500CEC\01GB-ILCE6500CEC\100MEN.indd
2016/09/30 16:25
AF Micro Adj.
Finely adjusts the autofocused position, when
using the LA-EA2 or LA-EA4 Mount Adaptor
(sold separately).
Exposure
Exposure Comp.
Compensates for the brightness of the entire image.
ISO
Sets the ISO sensitivity.
([ISO AUTO], etc.)
ISO AUTO Min. SS
Sets the slowest shutter speed at which ISO
sensitivity will start to change in [ISO AUTO] mode.
Metering Mode
Selects the method for measuring brightness.
([Multi]/ [Spot], etc.)
Spot Metering Point
Sets whether to coordinate the spot metering point
with the focus area when [Focus Area] is set to
[Flexible Spot] or [Expand Flexible Spot].
Exposure step
Selects the size of the increment step for shutter
speed, aperture, and exposure compensation.
AEL w/ shutter
Sets whether to lock the exposure when the shutter
button is pressed halfway down. This is useful
when you want to adjust the focus and exposure
separately.
Exposure Std. Adjust
Adjusts the standard for the correct exposure value
for each metering modes.
Flash
Flash Mode
Sets the flash settings.
Flash Comp.
Adjusts the intensity of flash output.
Exp.comp.set
Sets whether to reflect exposure compensation
value to flash compensation.
Red Eye Reduction
Reduces the red-eye phenomenon when using
flash.
Color/WB/Img. Processing
White Balance
Corrects the tone effect of the ambient light to shoot
whitish objects in a white tone.
([Auto]/ [Daylight], etc.)
Priority Set in AWB
Selects which tone to prioritize when shooting under
lighting conditions such as incandescent light with
[White Balance] set to [Auto].
GB
34
ILCE-6500
4-690-670-41(1)
C:\4690670411ILCE6500CEC\01GB-ILCE6500CEC\100MEN.indd
2016/09/30 16:25
DRO/Auto HDR
Analyzes the contrast of light and shadow between
the subject and the background by dividing the
image into small areas, and creates an image with
the optimal brightness and gradation.
Creative Style
Selects the desired image processing.
You can also adjust contrast, saturation, and
sharpness.
([Vivid]/ [Portrait], etc.)
Picture Effect
Shoots images with a texture unique to the selected
effect.
([Toy Camera]/ [Rich-tone Mono.], etc.)
Picture Profile
Changes settings such as color and tone when
recording images.
* This function is for skilled movie creators.
GB
Soft Skin Effect
Sets the Soft Skin Effect and the effect level.
Focus Assist
Focus Magnifier
Enlarges the image before shooting so that you can
check the focus.
Focus Magnif. Time
Sets the length of time the image will be shown in
an enlarged form.
AF in Focus Mag.
Sets whether or not to autofocus when an enlarged
image is being displayed. While the enlarged image
is being displayed, you can focus within a smaller
area than the flexible spot.
MF Assist
Displays an enlarged image when focusing
manually.
Peaking Level
Enhances the outline of in-focus areas with a
specific color when focusing manually.
Peaking Color
Sets the color used for the peaking function.
Face Detection/Shoot Assist
Smile/Face Detect.
Selects to detect faces and adjust various settings
automatically. Sets to automatically release the
shutter when a smile is detected.
([Off]/ [On (Regist. Faces)]/ [On]/ [Smile Shutter])
Face Registration
Registers or changes the person to be given priority
when focusing.
GB
35
ILCE-6500
4-690-670-41(1)
C:\4690670411ILCE6500CEC\01GB-ILCE6500CEC\100MEN.indd
2016/09/30 16:25
Auto Obj. Framing
Analyzes the scene when capturing faces, close-ups,
or subjects tracked by the Lock-on AF function, and
automatically trims and saves another copy of the
image with a more impressive composition.
(Camera Settings2)
Purple tab
Movie
Movie/S&Q Motion
Sets the exposure mode when shooting movies
or slow-motion/quick-motion movies.
File Format
Selects the movie file format.
([XAVC S 4K]/ [AVCHD], etc.)
Record Setting
Selects the bit rate and frame rate for the
movie size.
S&Q Settings
Changes the settings for slow-motion and
quick-motion movie shooting.
Dual Video REC
Sets whether to simultaneously record an
XAVC S movie and MP4 movie or an AVCHD
movie and MP4 movie.
AF drive speed
Switches focusing speed when using autofocus
in movie mode.
AF Track Sens
Sets the AF tracking sensitivity for the movie
mode.
Auto Slow Shut.
Sets the function that automatically adjusts the
shutter speed following the brightness of the
environment in movie mode.
Audio Recording
Sets whether to record audio when shooting
a movie.
Audio Rec Level
Adjusts the audio recording level during movie
recording.
Audio Level Display
Sets whether to display the audio level.
Wind Noise Reduct.
Reduces wind noise during movie recording.
Marker Display
Sets whether to display markers on the monitor
when recording movies.
GB
36
ILCE-6500
4-690-670-41(1)
C:\4690670411ILCE6500CEC\01GB-ILCE6500CEC\100MEN.indd
2016/09/30 16:25
Marker Settings
Sets which markers to displayed on the monitor
when recording movies.
Shutter/SteadyShot
Silent Shooting
Shoots images without a shutter sound.
e-Front Curtain Shut.
Sets whether to use the electronic front curtain
shutter function.
Release w/o Lens
Sets whether to release the shutter when the
lens is not attached.
Release w/o Card
Sets whether to release the shutter when a
memory card is not inserted.
SteadyShot
Sets whether to activate SteadyShot for
shooting.
SteadyShot Settings
Sets SteadyShot settings.
GB
Zoom
Zoom
Sets the zoom scale for zoom functions other
than the optical zoom.
Zoom Setting
Sets whether to use the Clear Image Zoom and
Digital Zoom when zooming.
Zoom Ring Rotate
Assigns the zoom in/out to the rotational
direction of the zoom lens. This function is
only available with a power zoom lens that is
compatible with this function.
Display/Auto Review
DISP Button
Sets the type of information to be displayed on
the monitor or in the viewfinder when the DISP
button is pressed.
FINDER/MONITOR
Sets the method for switching the display
between the electronic viewfinder and the
monitor.
Finder Frame Rate
Sets the frame rate for the viewfinder when
shooting still images.
Zebra
Displays stripes to adjust brightness.
Grid Line
Displays grid lines for adjusting the image
composition.
Exposure Set. Guide
Sets the guide displayed when exposure
settings are changed in the shooting screen.
GB
37
ILCE-6500
4-690-670-41(1)
C:\4690670411ILCE6500CEC\01GB-ILCE6500CEC\100MEN.indd
2016/09/30 16:25
Live View Display
Sets whether to reflect settings such as
exposure compensation in screen display.
Auto Review
Sets auto review to display the captured image
after shooting.
Custom Operation
Custom Key(Shoot.)
Assigns functions to the various keys so that
you can perform operations more quickly by
pressing the keys when shooting images.
Custom Key(PB)
Assigns functions to the keys so that you can
perform operations more quickly by pressing
the keys when playing back images.
Function Menu Set.
Customizes the functions displayed when the
Fn (Function) button is pressed.
Dial/Wheel Setup
Sets the function of the control dial and the
control wheel when the exposure mode is
set to M. You can adjust the shutter speed or
aperture with this setting.
Dial/Wheel Ev Comp
Adjusts the exposure compensation with the
control dial or the control wheel.
MOVIE Button
Enables or disables for the MOVIE button.
Dial/Wheel Lock
Sets whether to disable the control dial and
the control wheel temporarily by using the Fn
button when shooting. You can disable/enable
the control dial and the control wheel by
pressing and holding down the Fn button.
Audio signals
Selects whether to sound a beep during auto
focus or self-timer operations.
(Wireless)
Green tab
Send to Smartphone
Transfers images to display on a smartphone.
Send to Computer
Backs up images by transferring them to a
computer connected to a network.
View on TV
Allows you to view images on a network-
enabled TV.
GB
38
ILCE-6500
4-690-670-41(1)
C:\4690670411ILCE6500CEC\01GB-ILCE6500CEC\100MEN.indd
2016/09/30 16:25
One-touch(NFC)
Assigns an application to One-touch (NFC). You
can call up the application when shooting by
touching an NFC-enabled smartphone to the
camera.
Airplane Mode
Disables wireless communications from the
device such as Wi-Fi, NFC, and Bluetooth
function.
Wi-Fi Settings
Allows you to register your access point
and check or change the Wi-Fi connection
information.
Bluetooth Settings
Controls the settings for connecting the camera
with a smartphone via a Bluetooth connection.
Loc. Info. Link Set.
Obtains location information from the paired
GB
smartphone and records it to captured images.
Edit Device Name
Changes the device name under Wi-Fi Direct,
etc.
Reset Network Set.
Resets all the network settings.
(Application)
Light Green tab
Application List
Displays the application list. You can select the
application you want to use.
Introduction
Displays instructions on using the application.
(Playback)
Blue tab
Delete
Deletes an image.
View Mode
Plays back images from a specified date or
specified folder of still images and movies.
Image Index
Displays multiple images at the same time.
Display Rotation
Sets the playback orientation for images shot
vertically.
Slide Show
Plays a slide show.
GB
39
ILCE-6500
4-690-670-41(1)
C:\4690670411ILCE6500CEC\01GB-ILCE6500CEC\100MEN.indd
2016/09/30 16:25
Rotate
Rotates the image.
Enlarge Image
Enlarges the playback images.
Protect
Protects recorded images against accidental
erasure.
Specify Printing
Specifies in advance on the memory card which
still images to print out later.
Photo Capture
Captures a chosen scene in a movie to save as
a still image.
(Setup)
Yellow tab
Monitor Brightness
Adjusts the brightness of the screen.
Viewfinder Bright.
Sets the brightness of the electronic viewfinder.
Finder Color Temp.
Sets the color temperature of the viewfinder.
Gamma Disp. Assist
Converts an S-Log image into an image with
contrast equivalent to a normal gamma setting
when it is displayed to assist monitoring.
Volume Settings
Sets the volume for movie playback.
Upload Settings
Sets the upload function of the camera when
using a commercially available Eye-Fi card.
Tile Menu
Sets whether to display the tile menu every
time you press the MENU button.
Mode Dial Guide
Turns the mode dial guide (the explanation of
each shooting mode) on or off.
Delete confirm.
Sets whether [Delete] or [Cancel] is preselected
in the delete confirmation screen.
Display Quality
Sets the display quality.
Pwr Save Start Time
Sets the time intervals to automatically switch
to power save mode.
Auto Pwr OFF Temp.
Sets the camera temperature at which the
camera turns off automatically during shooting.
When shooting in hand-held mode, set to
[Standard].
GB
40
ILCE-6500
4-690-670-41(1)
