Dell Precision M70 – страница 5
Инструкция к Ноутбуку Dell Precision M70
Оглавление

A program stops responding
A program crashes repeatedly
A program is designed for an earlier Windows operating system
A solid blue screen appears
Other software problems
End the program —
1. Press <Ctrl><Shift><Esc> simultaneously.
2. Click Applications.
3. Click the program that is no longer responding.
4. Click End Task.
NOTE: Software usually includes installation instructions in its documentation or on a floppy disk or CD.
Checkthesoftwaredocumentation— If necessary, uninstall and then reinstall the program.
IfYouAreUsingWindowsXP,RuntheProgramCompatibilityWizard— The Program Compatibility Wizard configures a program so it
runs in an environment similar to non-Windows XP operating system environments.
1. Click the Start button, point to All Programs® Accessories, and then click Program Compatibility Wizard.
2. In the welcome screen, click Next.
3. Follow the instructions on the screen.
Turnthecomputeroff— If you are unable to get a response by pressing a key on your keyboard or moving your mouse, press and hold
the power button for at least 8 to 10 seconds until the computer turns off. Then restart your computer.
Checkthesoftwaredocumentationorcontactthesoftwaremanufacturerfortroubleshootinginformation—
l Ensure that the program is compatible with the operating system installed on your computer.
l Ensure that your computer meets the minimum hardware requirements needed to run the software. See the software documentation
for information.
l Ensure that the program is installed and configured properly.
l Verify that the device drivers do not conflict with the program.
l If necessary, uninstall and then reinstall the program.
Back up your files immediately
Use a virus-scanning program to check the hard drive, floppy disks, or CDs
Save and close any open files or programs and shut down your computer through the Start menu
Scan the computer for spyware — If you are experiencing slow computer performance, you frequently receive pop-up advertisements, or

Memory Problems
Fill out the Diagnostics Checklist as you complete these checks.
Network Problems
Fill out the Diagnostics Checklist as you complete these checks.
PC Card Problems
you are having problems connecting to the Internet, your computer might be infected with spyware. Use an anti-virus program that includes
anti-spyware protection (your program may require an upgrade) to scan the computer and remove spyware. For more information, go to
support.dell.com and search for the keyword spyware.
Run the Dell Diagnostics— If all tests run successfully, the error condition is related to a software problem.
CAUTION: Before you begin any of the procedures in this section, follow the safety instructions in the Product Information Guide.
Ifyoureceiveaninsufficientmemorymessage—
l Save and close any open files and exit any open programs you are not using to see if that resolves the problem.
l See the software documentation for minimum memory requirements. If necessary, install additional memory.
l Reseat the memory modules to ensure that your computer is successfully communicating with the memory.
l Run the Dell Diagnostics.
Ifyouexperienceothermemoryproblems—
l Reseat the memory modules to ensure that your computer is successfully communicating with the memory.
l Ensure that you are following the memory installation guidelines.
l Run the Dell Diagnostics.
CAUTION: Before you begin any of the procedures in this section, follow the safety instructions in the Product Information Guide.
Checkthenetworkcableconnector— Ensure that the network cable is firmly inserted into both the network connector on the back of the
computer and the network jack.
Checkthenetworklightsonthenetworkconnector— No light indicates that no network communication exists. Replace the network
cable.
Restart the computer and log on to the network again
Checkyournetworksettings— Contact your network administrator or the person who set up your network to verify that your network
settings are correct and that the network is functioning.
CAUTION: Before you begin any of the procedures in this section, follow the safety instructions in the Product Information Guide.
CheckthePCCard— Ensure that the PC Card is properly inserted into the connector.
EnsurethatthecardisrecognizedbyWindows— Double-click the Safely Remove Hardware icon in the Windows taskbar. Ensure that
the card is listed.
If you have problems with a Dell-providedPCCard— Contact Dell.

Power Problems
Fill out the Diagnostics Checklist as you complete these checks.
Ensuring Sufficient Power for Your Computer
Your computer is designed to use the 90-W AC adapter; for optimum system performance, you should always use this adapter.
The 65-WACadaptersusedinotherDell™portablecomputerscanbeusedwithyourcomputer,buttheywilldecreasesystemperformance.Usingless-
powerful AC adapters, including the 65-W AC adapter, will cause you to receive a WARNING message.
Docking Power Considerations
Due to the extra power consumption when a computer is docked to the Dell D/Dock, normal computer operation is not possible on battery power alone.
Ensure that the 90-W AC adapter is connected to your computer when the computer is docked to the Dell D/Dock.
Docking While the Computer Is Running
IfyouhaveproblemswithaPCCardnotprovidedbyDell— Contact the PC Card manufacturer.
CAUTION: Before you begin any of the procedures in this section, follow the safety instructions in the Product Information Guide.
Check the power light — When the power light is lit or blinking, the computer has power. If the power light is blinking, the computer is in
standby mode—press the power button to exit standby mode. If the light is off, press the power button to turn on the computer.
Charge the battery — The battery charge may be depleted.
1. Reinstall the battery.
2. Use the AC adapter to connect the computer to an electrical outlet.
3. Turn on the computer.
Check the battery status light — If the battery status light flashes orange or is a steady orange the battery charge is low or depleted.
Connect the computer to an electrical outlet.
If the battery status light flashes green and orange, the battery is too hot to charge. Shut down the computer, disconnect the computer from
the electrical outlet, and then let the battery and computer cool to room temperature.
If the battery status light rapidly flashes orange, the battery may be defective. Contact Dell.
Check the battery temperature — Ifthebatterytemperatureisbelow0°C(32°F),thecomputerwillnotstartup.
Test the electrical outlet — Ensure that the electrical outlet is working by testing it with another device, such as a lamp.
Check the AC adapter — Check the AC adapter cable connections. If the AC adapter has a light, ensure that the light is on.
Connect the computer directly to an electrical outlet — Bypass power protection devices, power strips, and the extension cable to verify
that the computer turns on.
Put the computer into Standby Mode after undocking — If you leave your computer's display closed after undocking, it may continue to
function in active mode. Check the Power Options control panel to ensure that your settings allow the computer to go into Standby Mode.
Eliminate possible interference — Turn off nearby fans, fluorescent lights, halogen lamps, or other appliances.
Adjust the power properties — See "Power Management."
Reseat the memory modules — If the computer power light turns on but the display remains blank, reinstall the memory modules.

If a computer is connected to the Dell D/Dock or Dell D/Port while the computer is running, presence of the docking device is ignored until the AC adapter is
connected to the computer.
AC Power Loss While the Computer Is Docked
If a computer loses AC power while docked to the Dell D/Dock or Dell D/Port, the computer immediately goes into low-performance mode.
Printer Problems
Fill out the Diagnostics Checklist as you complete these checks.
Scanner Problems
CAUTION: Before you begin any of the procedures in this section, follow the safety instructions in the Product Information Guide.
NOTE: If you need technical assistance for your printer, contact the printer's manufacturer.
Checktheprinterdocumentation— See the printer documentation for setup and troubleshooting information.
Ensure that the printer is turned on
Checktheprintercableconnections—
l See the printer documentation for cable connection information.
l Ensure that the printer cables are securely connected to the printer and the computer.
Testtheelectricaloutlet— Ensure that the electrical outlet is working by testing it with another device, such as a lamp.
VerifythattheprinterisrecognizedbyWindows—
Windows XP
1. Click the Start button, point to Settings, click Control Panel, and then click Printers and Other Hardware.
2. Click View installed printers or fax printers.
If the printer is listed, right-click the printer icon.
3. Click Properties and click the Ports tab. For a USB printer, ensure that the Print to the following port(s): setting is USB. If your
computer is docked and the docking station has a parallel printer attached, ensure that the Print to the following port(s): setting is
LPT1 (Printer Port).
Windows 2000
1. Click the Start button, point to Settings, and then click Printers.
If the printer is listed, right-click the printer icon.
2. Click Properties and click the Ports tab.
If your computer is docked and the docking station has a parallel printer attached, ensure that the Print to the following port(s):
setting is LPT1 (Printer Port). For a USB printer, ensure that the Print to the following port(s): setting is USB.
Reinstalltheprinterdriver— See the printer documentation for instructions
CAUTION: Before you begin any of the procedures in this section, follow the safety instructions in the Product Information Guide.
NOTE: If you need technical assistance for your scanner, contact the scanner's manufacturer.
Checkthescannerdocumentation— See the scanner documentation for setup and troubleshooting information.
Sound and Speaker Problems
Fill out the Diagnostics Checklist as you complete these checks.
No sound from integrated speakers
No sound from external speakers
Unlockthescanner— Ensure that your scanner is unlocked if it has a locking tab or button.
Restart the computer and try the scanner again
Checkthecableconnections—
l See the scanner documentation for cable connection information.
l Ensure that the scanner cables are securely connected to the scanner and the computer.
VerifythatthescannerisrecognizedbyMicrosoftWindows—
1. Click the Start button, click Control Panel, and then click Printers and Other Hardware.
2. Click Scanners and Cameras.
If your scanner is listed, Windows recognizes the scanner.
Reinstallthescannerdriver— See the scanner documentation for instructions.
CAUTION: Before you begin any of the procedures in this section, follow the safety instructions in the Product Information Guide.
Adjust the Windows volume control — Double-click the speaker icon in the lower-right corner of your screen. Ensure that the volume is
turned up and that the sound is not muted. Adjust the volume, bass, or treble controls to eliminate distortion.
Adjust the volume using keyboard shortcuts — Press <Fn><End> to disable (mute) or re-enable the integrated speakers.
Reinstall the sound (audio) driver — See "Reinstalling Drivers and Utilities."
For Windows 2000 only, ensure that digital audio for the CD drive is enabled —
1. Click the Start button, point to Settings, and then click Control Panel.
2. Double-click the System icon.
3. Click the Hardware tab.
4. Click Device Manager.
5. Double-click DVD/CD-ROM drives.
6. Double-click the name of the drive.
7. On the drive Properties screen, click the Properties tab.
8. Click the box near the bottom of the screen to enable digital audio for your CD or DVD drive.
NOTE: The volume control in some MP3 players overrides the Windows volume setting. If you have been listening to MP3 songs, ensure that you did not
turn the player volume down or off.
Ensurethatthesubwooferandthespeakersareturnedon— See the setup diagram supplied with the speakers. If your speakers have
volume controls, adjust the volume, bass, or treble to eliminate distortion.
AdjusttheWindowsvolumecontrol— Click or double-click the speaker icon in the lower-right corner of your screen. Ensure that the
volume is turned up and that the sound is not muted.

No sound from headphones
Touch Pad or Mouse Problems
Video and Display Problems
Disconnectheadphonesfromtheheadphoneconnector— Sound from the speakers is automatically disabled when headphones are
connected to the computer's front-panel headphone connector.
Testtheelectricaloutlet— Ensure that the electrical outlet is working by testing it with another device, such as a lamp.
Eliminatepossibleinterference— Turn off nearby fans, fluorescent lights, or halogen lamps to check for interference.
Reinstall the audio driver
Run the Dell Diagnostics
Checktheheadphonecableconnection— Ensure that the headphone cable is securely inserted into the headphone connector.
AdjusttheWindowsvolumecontrol— Click or double-click the speaker icon in the lower-right corner of your screen. Ensure that the
volume is turned up and that the sound is not muted.
Check the touch pad settings —
Windows XP
1. Click the Start button, click Control Panel, and then click Printers and Other Hardware.
2. Click Mouse.
3. Try adjusting the settings.
Windows 2000
1. Click the Start button, point to Settings, and then click Control Panel.
2. Double-click the Mouse icon.
3. Try adjusting the settings.
Check the mouse cable — Shut down the computer. Disconnect the mouse cable, check it for damage, and firmly reconnect the cable.
If you are using a mouse extension cable, disconnect it and connect the mouse directly to the computer.
To verify that the problem is with the mouse, check the touch pad —
1. Shut down the computer.
2. Disconnect the mouse.
3. Turn on the computer.
4. At the Windows
desktop, use the touch pad to move the cursor around, select an icon, and open it.
If the touch pad operates correctly, the mouse may be defective.
Check the system setup program settings — Verify that the system setup program lists the correct device for the pointing device option.
(The computer automatically recognizes a USB mouse without making any setting adjustments.)
Test the mouse controller — To test the mouse controller (which affects pointer movement) and the operation of the touch pad or mouse
buttons, run the Mouse test in the Pointing Devices test group in the Dell Diagnostics.
Reinstall the touch pad driver — See "Reinstalling Drivers and Utilities."
Fill out the Diagnostics Checklist as you complete these checks.
If the display is blank
If the display is difficult to read
CAUTION: Before you begin any of the procedures in this section, follow the safety instructions in the Product Information Guide.
NOTE: If you are using a program that requires a higher resolution than your computer supports, it is recommended that you attach an external monitor
to your computer.
Check the battery — If you are using a battery to power your computer, the battery charge may be depleted. Connect the computer to an
electrical outlet using the AC adapter, and turn on the computer.
Test the electrical outlet — Ensure that the electrical outlet is working by testing it with another device, such as a lamp.
Check the AC adapter — Check the AC adapter cable connections. If the AC adapter has a light, ensure that the light is on.
Connect the computer directly to an electrical outlet — Bypass power protection devices, power strips, and the extension cable to verify
that the computer turns on.
Adjust the power properties — Search for the keyword standby in the Windows Help and Support Center (Windows Help in Windows 2000).
Switch the video image — If your computer is attached to an external monitor, press <Fn><F8> to switch the video image to the display.
Adjust the brightness — Press <Fn> and the up- or down-arrow.
Move the external subwoofer away from the computer or monitor — If your external speaker system includes a subwoofer, ensure that
thesubwooferisatleast60cm(2ft)awayfromthecomputerorexternalmonitor.
Eliminate possible interference — Turn off nearby fans, fluorescent lights, halogen lamps, or other appliances.
Rotate the computer to face a different direction — Eliminate sunlight glare, which can cause poor picture quality.
Adjust the Windows display settings —
Windows XP
1. Click the Start button, point to Settings, and then click Control Panel.
2. Click Appearance and Themes.
3. Click the area you want to change or click the Display icon.
4. Try different settings for Color quality and Screen resolution.
Windows 2000
1. Click the Start button, point to Settings, and then click Control Panel.
2. Double-click the Display icon and click the Settings tab.
3. Try different settings for Colors, Screen area, and Advanced Settings.
Run the Video diagnostics tests — If no error message appears and you still have a display problem, but the display is not completely blank,
run the Video device group in the Dell Diagnostics. Then contact Dell.
See "Error Messages" — If an error message appears, see "Error Messages."

If only part of the display is readable
Back to Contents Page
Connect an external monitor —
1. Shut down your computer and connect an external monitor to the computer.
2. Turn on the computer and the monitor and adjust the monitor brightness and contrast controls.
If the external monitor works, the computer display or video controller may be defective. Contact Dell.

Back to Contents Page
Dell™QuickSetFeatures
DellPrecision™MobileWorkstationM70User'sGuide
Clicking the QuickSet Icon
Double-Clicking the QuickSet Icon
Right-Clicking the QuickSet Icon
Dell QuickSet runs from the icon located in the taskbar and functions differently when you click, double-click, or right-click the icon.
Clicking the QuickSet Icon
Click the icon to perform the following tasks:
l Adjust power management settings using the Power Management Wizard.
l Adjust the size of icons and toolbars.
l Select a power scheme that you set in the Power Management Wizard.
l Turn presentation mode on or off.
Double-Clicking the QuickSet Icon
Double-click the icon to adjust power management settings using the Power Management Wizard.
Right-Clicking the QuickSet Icon
Right-click the icon to perform the following tasks:
l Enable or disable the Brightness Meter on the screen.
l Enable or disable the Volume Meter on the screen.
l Turn wireless activity on or off.
l View Dell QuickSet Help.
l View the version and copyright date of the QuickSet program installed on your computer.
For more information about QuickSet, right-click the icon in the taskbar and click Help.
Back to Contents Page

Back to Contents Page
Adding and Replacing Parts
DellPrecision™MobileWorkstationM70User'sGuide
Before You Begin
Memory
Modem
Mini PCI Card
Hard Drive
Internal Card With Bluetooth®Wireless Technology
Coin-Cell Battery
Before You Begin
This chapter provides procedures for removing and installing the components in your computer. Unless otherwise noted, each procedure assumes that the
following conditions exist:
l You have performed the steps in "Turning Off Your Computer" and "Before Working Inside Your Computer."
l YouhavereadthesafetyinformationinyourDell™Product Information Guide.
l A component can be replaced or, if purchased separately, installed by performing the removal procedure in reverse order.
Recommended Tools
The procedures in this document may require the following tools:
l Small flat-blade screwdriver
l Phillips screwdriver
l Flash BIOS update program floppy disk or CD
Turning Off Your Computer
1. Shut down the operating system:
a. Save and close any open files, exit any open programs, click the Start button, and then click Turn Off Computer.
b. In the Turn off computer window, click Turn off.
The computer turns off after the operating system shutdown process finishes.
2. Ensure that the computer and any attached devices are turned off. If your computer and attached devices did not automatically turn off when you shut
down your operating system, turn them off now. Press and hold the power button for 4 seconds.
Before Working Inside Your Computer
Use the following safety guidelines to help protect your computer from potential damage and to help ensure your own personal safety.
1. Ensure that the work surface is flat and clean to prevent the computer cover from being scratched.
NOTICE: To avoid losing data, save and close any open files and exit any open programs before you turn off your computer.
CAUTION: Before you begin any of the procedures in this section, follow the safety instructions in the Product Information Guide.i
CAUTION: Many repairs may only be done by a certified service technician. You should only perform troubleshooting and simple repairs as
authorized in Dell's product documentation, or as directed by Dell's online or telephone service and support team. Damage due to servicing that is
not authorized by Dell is not covered by your warranty. Read and follow the safety instructions that came with the product.
NOTICE: Handle components and cards with care. Do not touch the components or contacts on a card. Hold a card by its edges or by its metal
mounting bracket. Hold a component such as a processor by its edges, not by its pins.
NOTICE: When you disconnect a cable, pull on its connector or on its strain-relief loop, not on the cable itself. Some cables have a connector with
locking tabs; if you are disconnecting this type of cable, press in on the locking tabs before you disconnect the cable. As you pull connectors apart, keep
them evenly aligned to avoid bending any connector pins. Also, before you connect a cable, ensure that both connectors are correctly oriented and
aligned.
NOTICE: To avoid damaging the computer, perform the following steps before you begin working inside the computer.
2. Turn off your computer.
3. If the computer is connected to a docking device (docked), undock it. See the documentation that came with your docking device for instructions.
4. Disconnect any telephone or telecommunication lines from the computer.
5. Disconnect your computer and all attached devices from their electrical outlets, and then press the power button to ground the system board.
6. Remove any installed PC Cards from the PC Card slot.
7. Close the display and turn the computer upside down on a flat work surface.
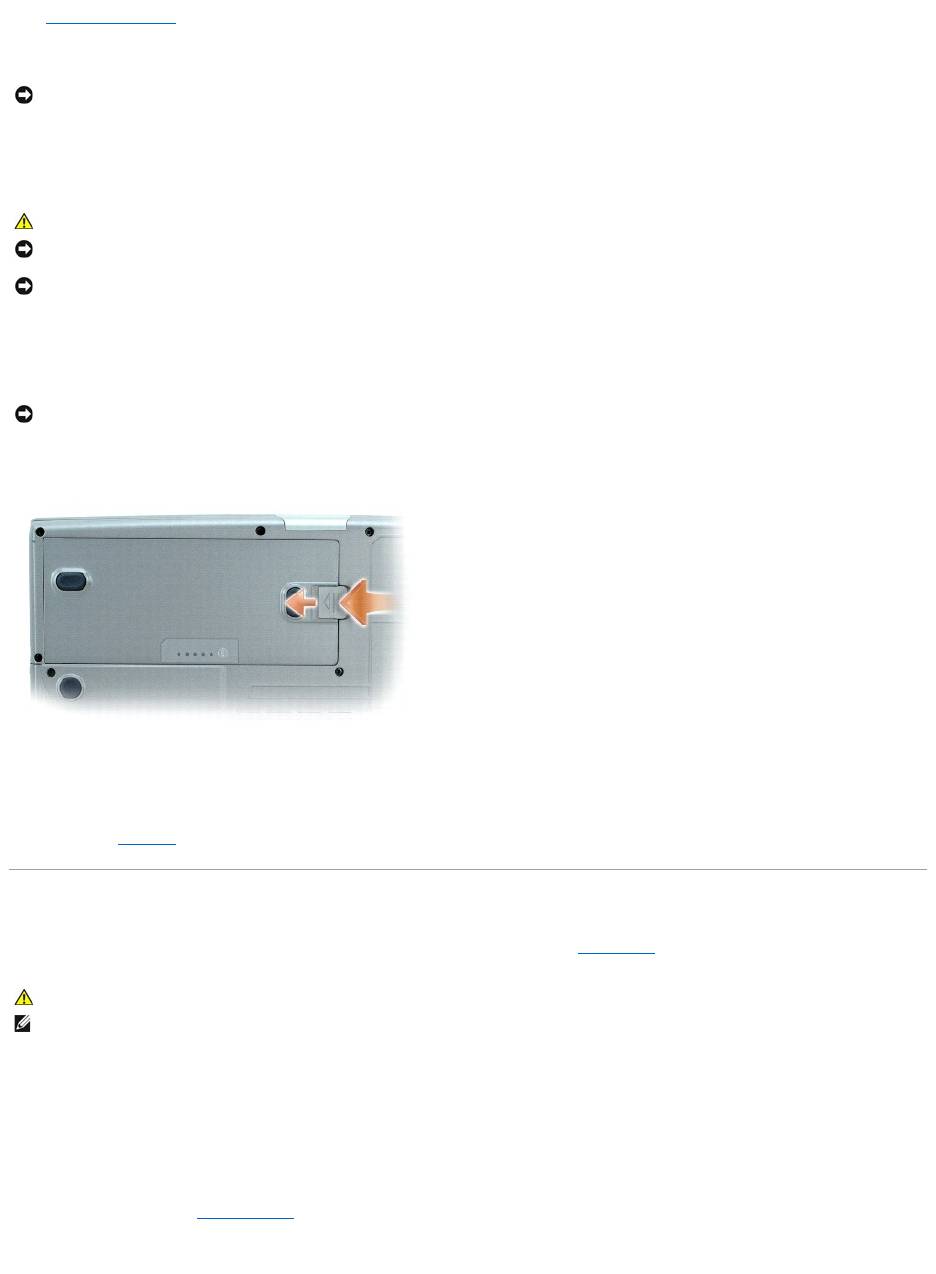
8. Slide and hold the battery-bay latch release on the bottom of the computer, and then remove the battery from the bay.
9. Remove any installed modules, including a second battery, if installed.
10. Remove the hard drive.
Memory
You can increase your computer memory by installing memory modules on the system board. See "Specifications" for information on the memory supported by
your computer. Install only memory modules that are intended for your computer.
The computer has two memory slots, DIMM A and DIMM B. DIMM A (located under the keyboard) holds the basic memory module as configured from the factory.
If you did not order additional memory, DIMM B (located on the bottom of the computer under the options door) will be empty. Generally, if you are adding
memory, you will install a memory module in DIMM B. If you are upgrading memory, you may need to install memory in DIMM A and B depending on the extent
of the upgrade.
Memory Module DIMM B
1. Follow the procedures in "Before You Begin."
2. Turn the computer over, loosen the captive screws from the options door, and then remove the door.
NOTICE: To disconnect a network cable, first unplug the cable from your computer and then unplug it from the network device.
CAUTION: To guard against electrical shock, always unplug your computer from the electrical outlet before opening the cover.
NOTICE: Before touching anything inside your computer, ground yourself by touching an unpainted metal surface, such as the metal at the back of the
computer. While you work, periodically touch an unpainted metal surface to dissipate any static electricity that could harm internal components.
NOTICE: To connect a network cable, first plug the cable into the network device and then plug it into the computer.
NOTICE: To avoid damaging the system board, you must remove the main battery before you service the computer.
CAUTION: Before you begin any of the procedures in this section, follow the safety instructions located in the Product Information Guide.
NOTE: Memory modules purchased from Dell are covered under your computer warranty.
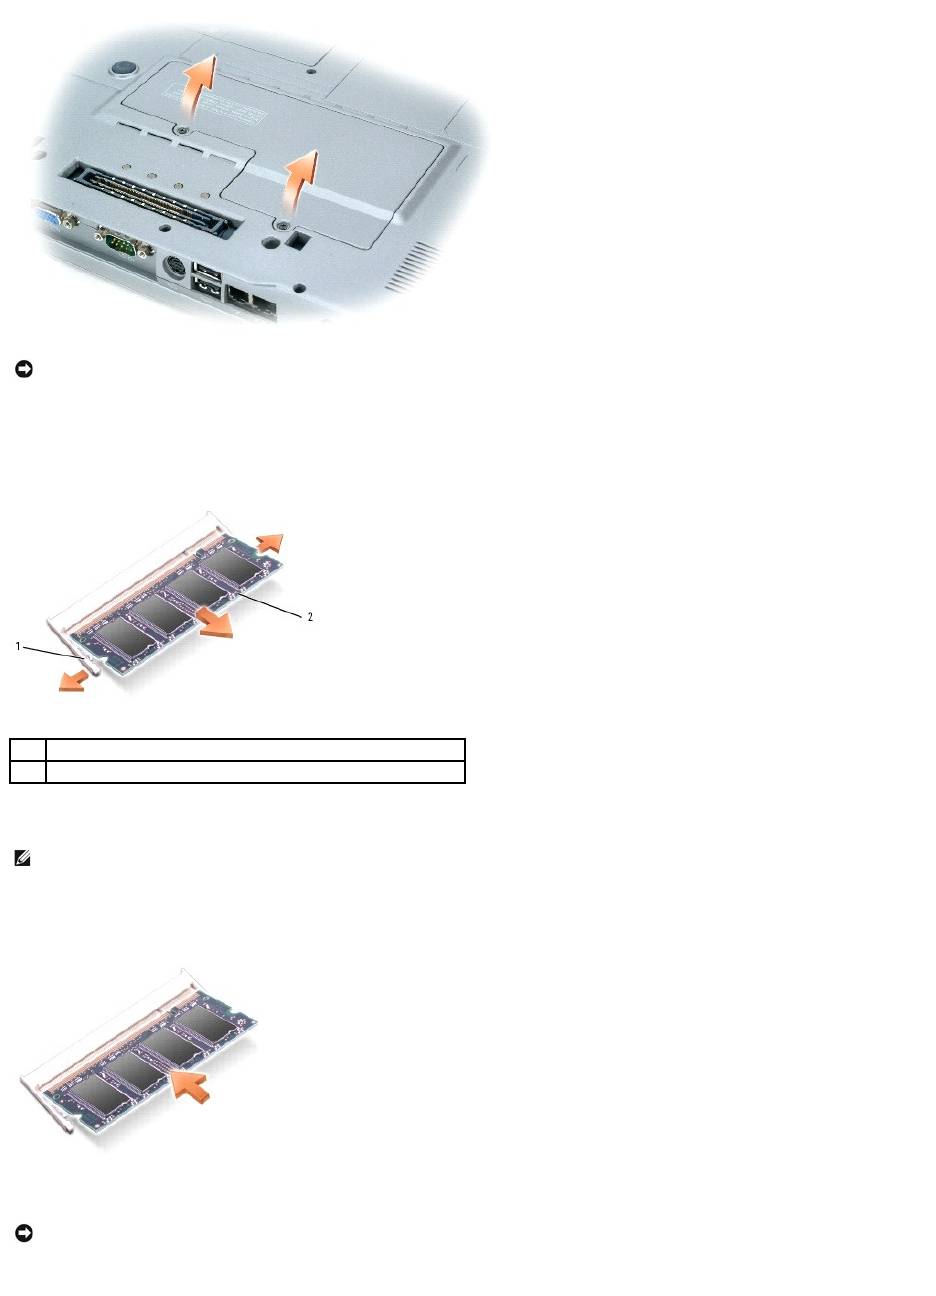
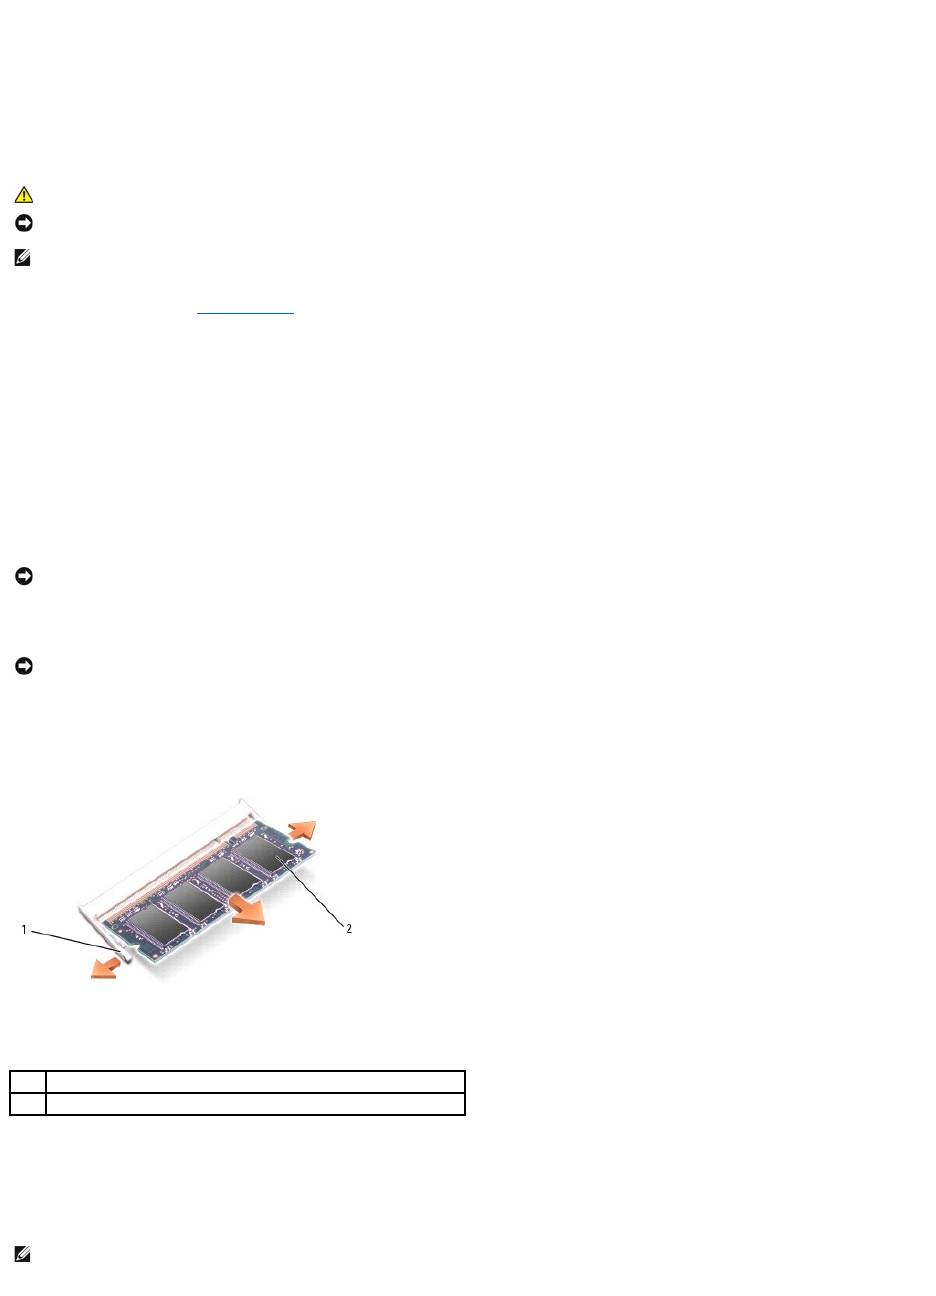
3. If you are replacing a memory module, remove the existing module:
a. Use your fingertips to carefully spread apart the securing clips on each end of the memory module connector until the module pops up.
b. Remove the module from the connector.
4. Ground yourself and install the new memory module:
a. Align the notch in the module edge connector with the tab in the connector slot.
b. Slide the module firmly into the slot at a 45-degree angle, and rotate the module down until it clicks into place. If you do not feel the click, remove
the module and reinstall it
5. Replace the options door.
6. Insert the battery into the battery bay, or connect the AC adapter to your computer and an electrical outlet.
NOTICE: To prevent damage to the memory module connector, do not use tools to spread the memory-module securing clips.
1
securing clips (2 per connector)
2
memory module
NOTE: If the memory module is not installed properly, the computer may not boot properly. No error message indicates this failure.
NOTICE: If the door is difficult to close, remove the module and reinstall it. Forcing the door to close may damage your computer.
7. Turn on the computer.
As the computer boots, it detects the additional memory and automatically updates the system configuration information.
To confirm the amount of memory installed in the computer, click the Start button, click Help and Support, and then click Computer Information.
Memory Module DIMM A
1. Follow the procedures in "Before You Begin."
2. Remove the central control cover.
a. Open the display all the way (180 degrees) so that it lies flat against your work surface.
b. Starting at the right side of the computer, use a flat-blade screwdriver to pry up the central control cover.
c. Lift the central control cover away from the computer and lay it aside.
3. Remove the keyboard.
a. Remove the two screws across the top of the keyboard
b. Gently lift the keyboard up and out of its tabs to allow access to the keyboard connector.
c. Pull up on the keyboard connector tab to disconnect the keyboard from the system board.
4. If you are replacing a memory module, remove the existing module.
a. Use your fingertips to carefully spread apart the securing clips on each end of the memory module connector until the module pops up.
b. Remove the module from the connector.
5. Ground yourself and install the new memory module:
a. Align the notch in the module with the slot in the center of the connector.
b. Slide the edge of the module firmly into the connector, and rotate the module down until you feel a click. If you do not feel the click, remove the
module and reinstall it.
CAUTION: BeforeworkinginsideyourDell™computer,readthesafetyinstructionsinyourProductInformationGuide.
NOTICE: To prevent static damage to components inside your computer, discharge static electricity from your body before you touch any of your
computer's electronic components. You can do so by touching an unpainted metal surface.
NOTE: Memory modules purchased from Dell are covered under your computer warranty.
NOTICE: To prevent damage to the memory module connector, do not use tools to spread the metal securring clips that secure the memory module.
NOTICE: Handle memory modules by their edges, and do not touch the components on a module.
1
securing clips (2 per connector)
2
memory module
NOTE: If the memory module is not installed properly, the computer does not boot. The Num Lock and Scroll Lock lights blink about ten times.
6. Replace the keyboard.
a. Reconnect the keyboard connector to the system board.
b. Slide the tabs at the bottom of the keyboard back into their slots.
c. Reinsert and tighten the two screws across the top of the keyboard.
7. Replace the central control cover. Starting at the left side of the computer, press down on the control cover until you feel it click into place.
8. Insert the battery into the battery bay, or connect the AC adapter to your computer and an electrical outlet.
9. Turn on the computer.
As the computer boots, it detects the additional memory and automatically updates the system configuration information.
To confirm the amount of memory installed in the computer, click the Start button, click Help and Support, and then click Computer Information.
Modem
If you ordered the optional modem at the same time that you ordered your computer, the modem is already installed.
1. Follow the procedures in "Before You Begin."
2. Turn the computer over, loosen the captive screws from the options door, and then remove the door.
3. If a modem is not already installed, go to step 4. If you are replacing a modem, remove the existing modem:
a. Remove the screws securing the modem to the system board, and set them aside.
b. Pull straight up on the attached pull-tab to lift the modem out of its connector on the system board, and disconnect the modem cable.
CAUTION: Before you begin any of the procedures in this section, follow the safety instructions located in the Product Information Guide.
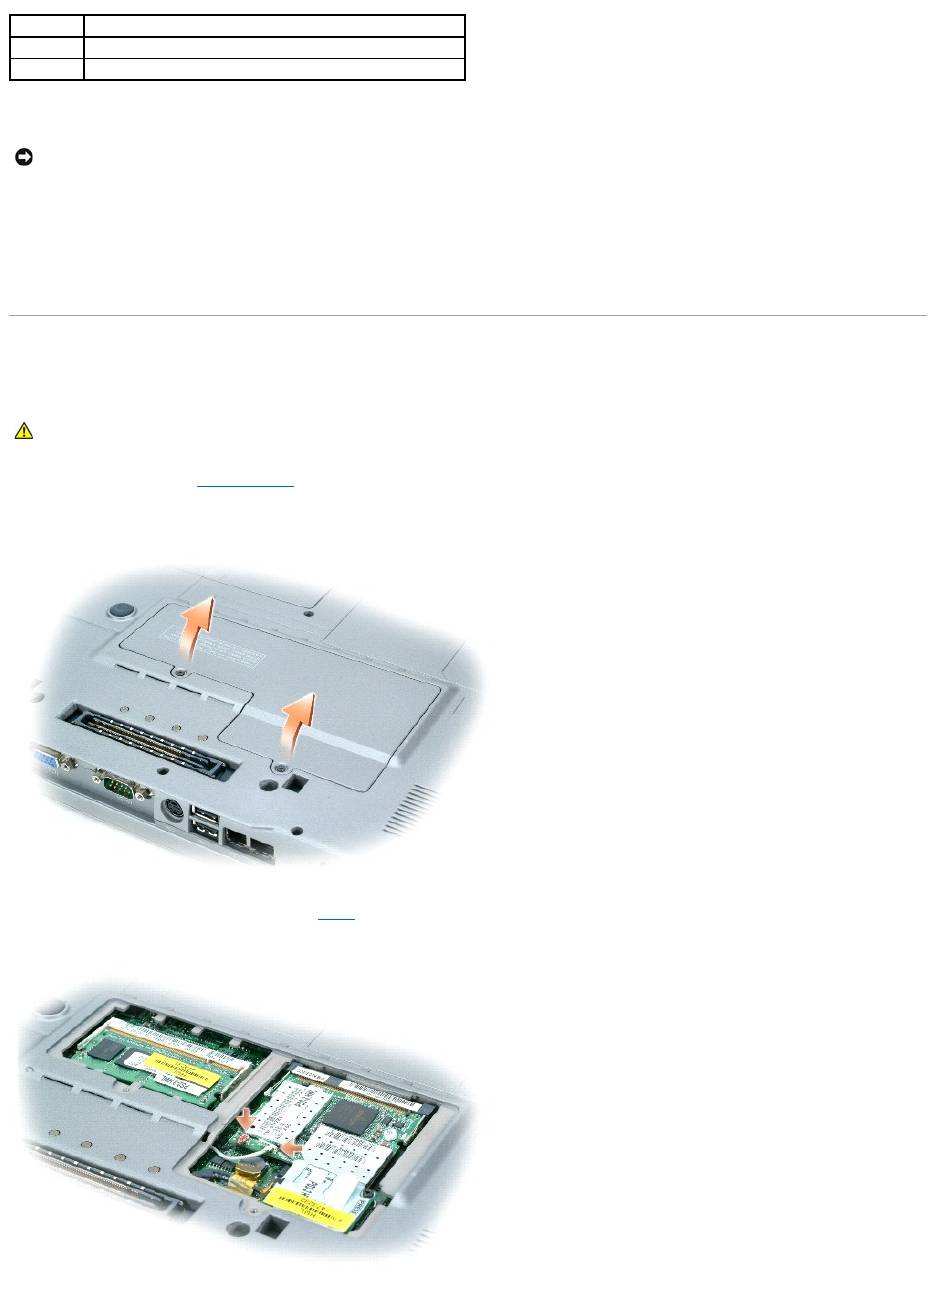
4. Connect the modem cable to the modem.
5. Align the modem with the screw hole and press the modem into the connector on the system board.
6. Install the screw to secure the modem to the system board.
7. Replace the options door.
Mini PCI Card
If you ordered a Mini PCI card with your computer, the card is already installed.
1. Follow the procedures in "Before You Begin."
2. Turn the computer over, loosen the captive screws from the options door, and then remove the door.
3. If a Mini PCI card is not already installed, go to step 4. If you are replacing a Mini PCI card, remove the existing card:
a. Disconnect the Mini PCI card from any attached cables.
1
modem cable
2
modem
3
screw
NOTICE: The connectors are keyed to ensure correct insertion. If you feel resistance, check the connectors and realign the card.
CAUTION: Before you begin any of the procedures in this section, follow the safety instructions located in the Product Information Guide.
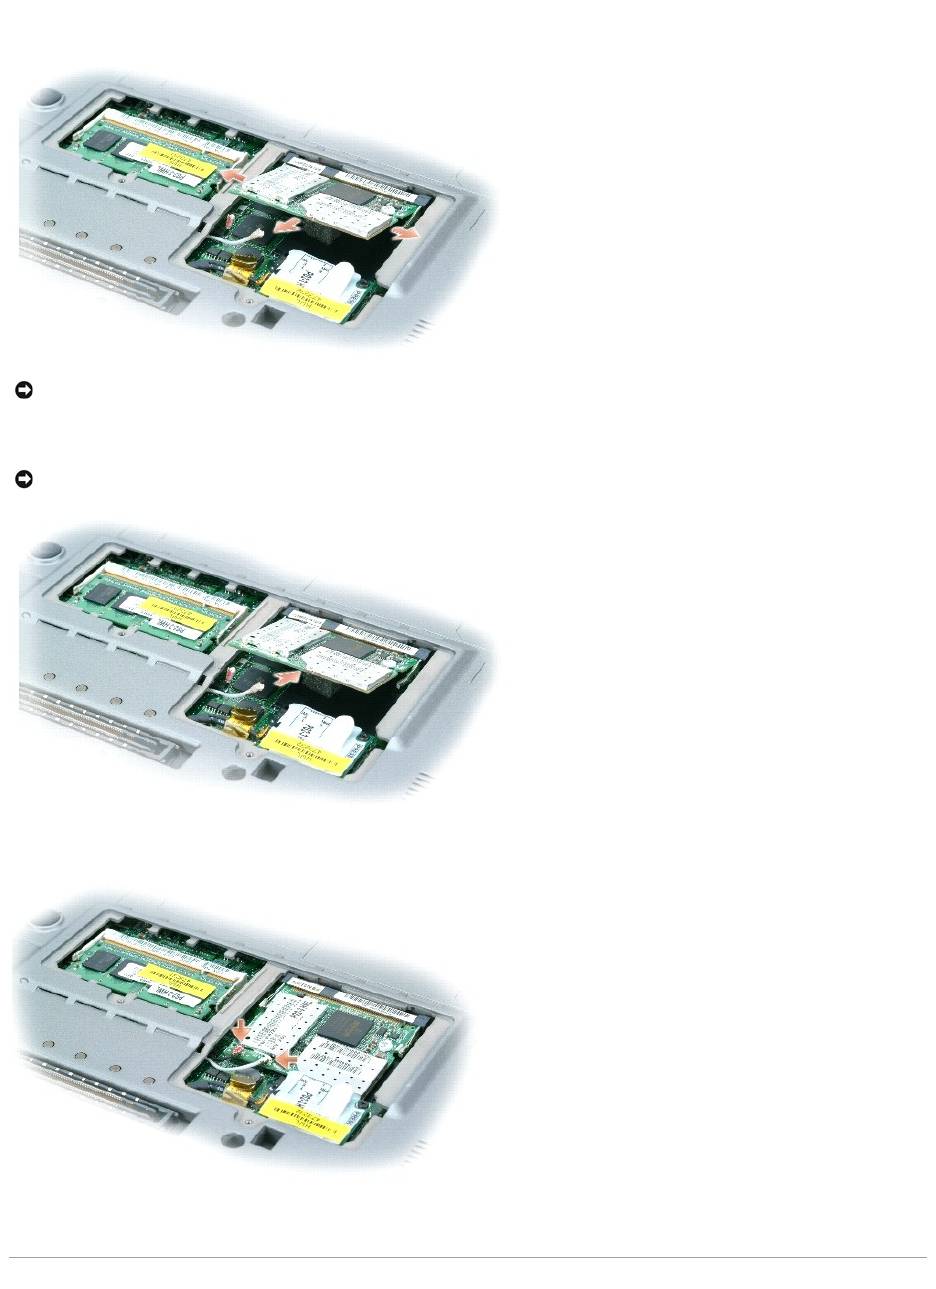
b. Release the Mini PCI card by spreading the metal securing tabs until the card pops up slightly.
c. Lift the Mini PCI card out of its connector.
4. Align the Mini PCI card with the connector at a 45-degree angle, and press the Mini PCI card into the connector until you hear a click.
5. Connect the antenna cables to the Mini PCI card.
6. Replace the door.
NOTICE: The connectors are keyed to ensure correct insertion. If you feel resistance, check the connectors and realign the card.
NOTICE: To avoid damaging the Mini PCI card, never place cables on top of or under the card.
Hard Drive
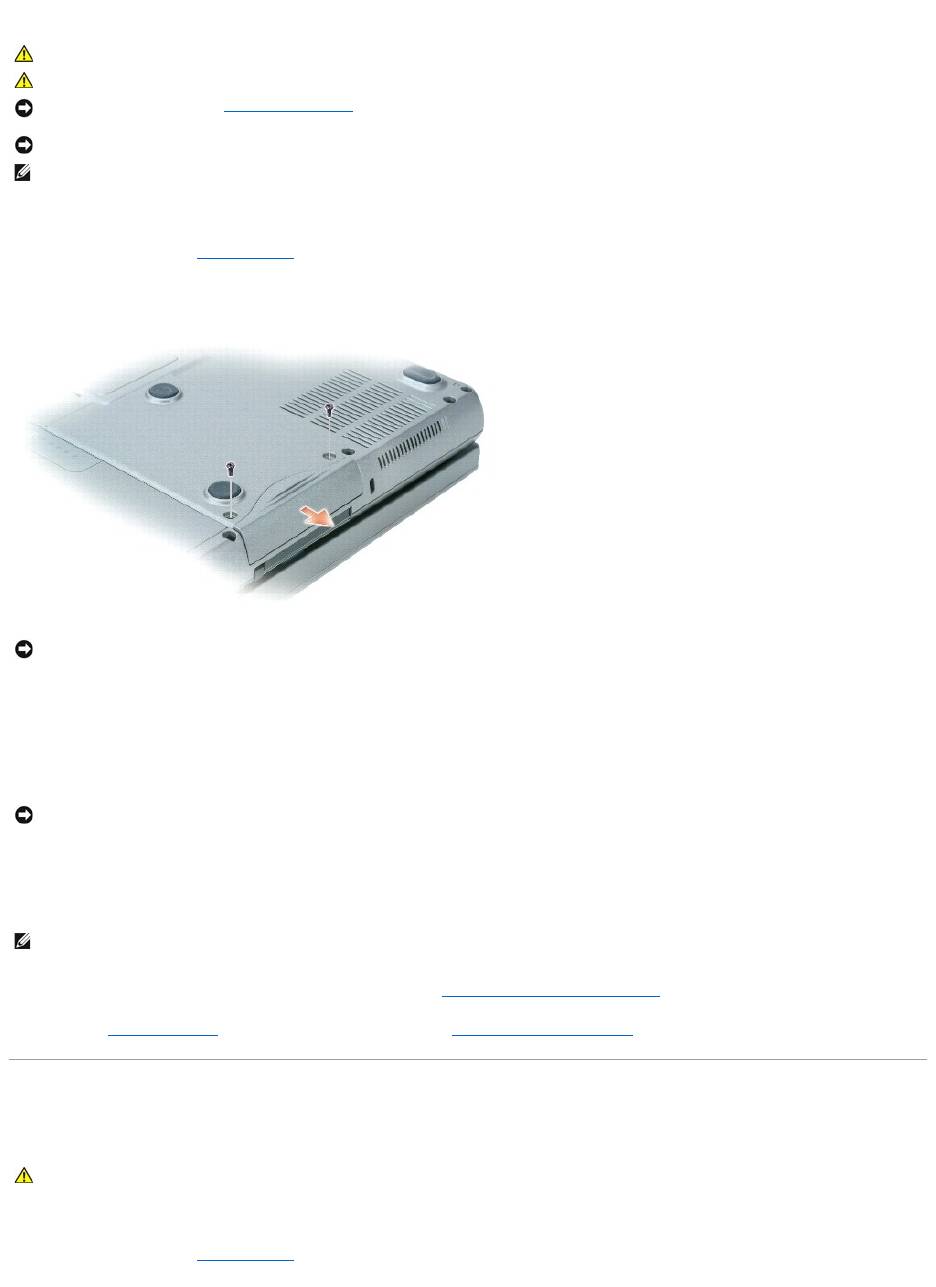
To replace the hard drive in the hard drive bay:
1. Follow the procedures in "Before You Begin."
2. Turn the computer over, and remove the hard drive screws.
3. Slide the hard drive out of the computer.
4. Remove the new drive from its packaging.
Save the original packaging for storing or shipping the hard drive.
5. Slide the hard drive into the bay until it is fully seated.
6. Replace and tighten the screws.
7. Install the operating system for your computer. For instructions, see Reinstalling Microsoft® Windows® XP.
8. Install the drivers and utilities for your computer. For instructions, see Reinstalling Drivers and Utilities.
Internal Card With Bluetooth®Wireless Technology
If you ordered an internal card with Bluetooth Wireless Technology with your computer, the card is already installed.
To replace the internal wireless card:
1. Follow the procedures in "Before You Begin."
CAUTION: If you remove the hard drive from the computer when the drive is hot, do not touch the metal housing of the hard drive.
CAUTION: Before working inside your computer, follow the safety instructions located in the Product Information Guide.
NOTICE: To prevent data loss, turn off your computer before removing the hard drive. Do not remove the hard drive while the computer is on, in
standby mode, or in hibernate mode.
NOTICE: Hard drives are extremely fragile; even a slight bump can damage the drive.
NOTE: Dell does not guarantee compatibility or provide support for hard drives from sources other than Dell.
NOTICE: When the hard drive is not in the computer, store it in protective antistatic packaging. See "Protecting Against Electrostatic Discharge" in the
Product Information Guide.
NOTICE: Use firm and even pressure to slide the drive into place. If you use excessive force, you may damage the connector.
NOTE: The Operating System CD and the Drivers and Utilities CD are optional and may not ship with all computers.
CAUTION: Before working inside your computer, read the safety instructions in your System Information Guide.
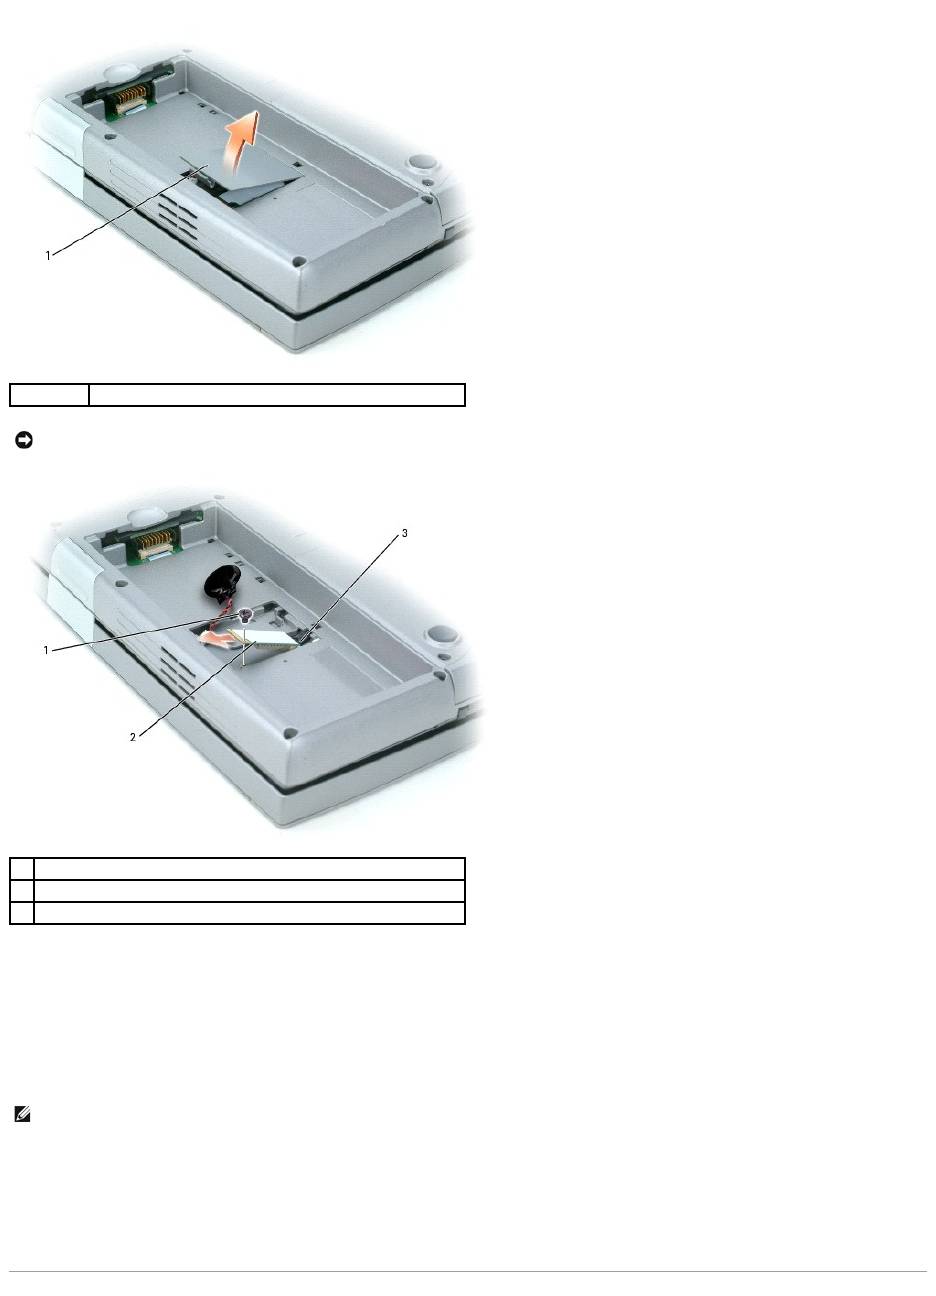
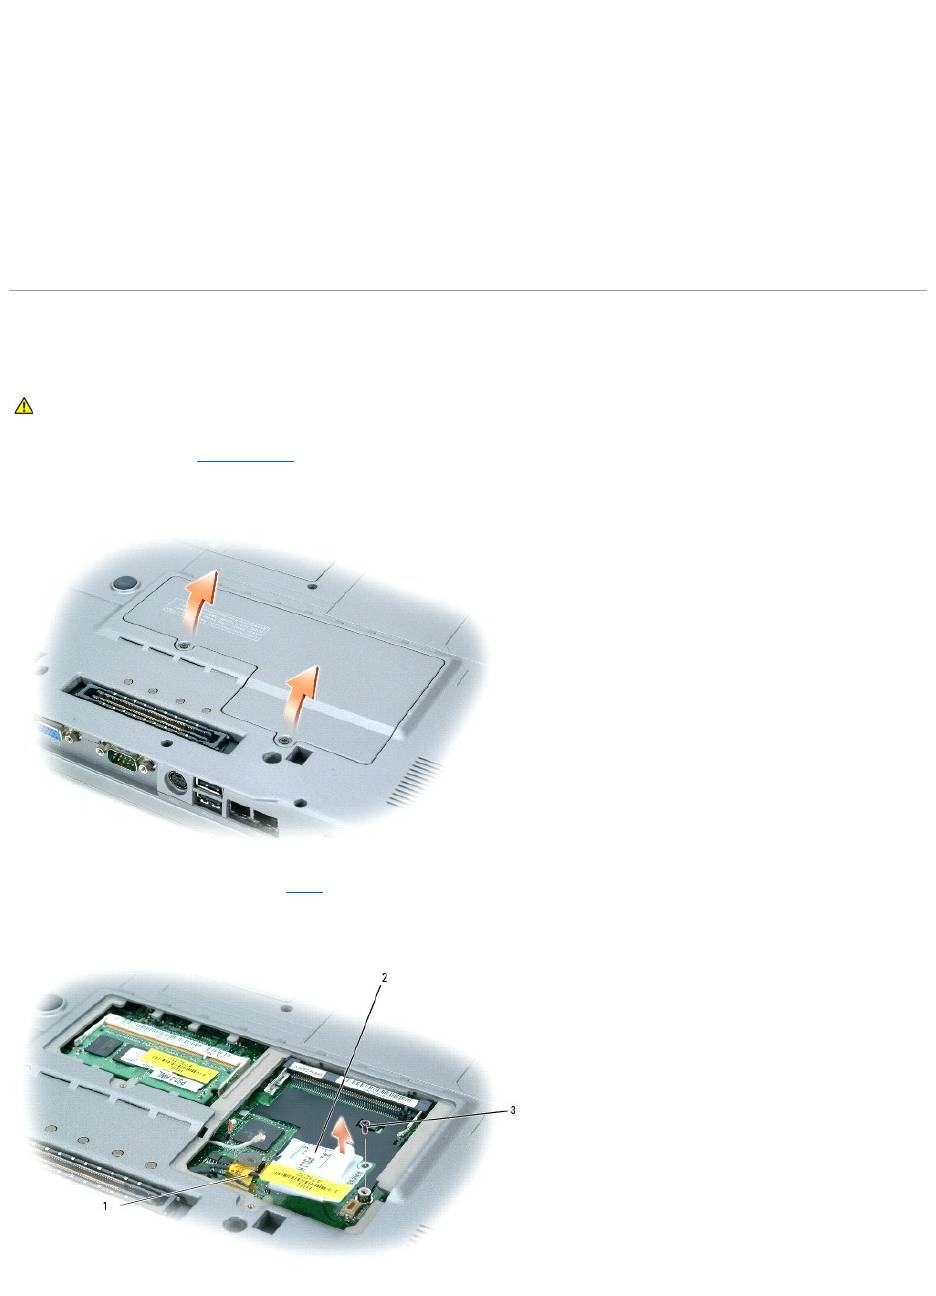
2. Remove the access door beneath the battery.
3. Remove the screw.
4. Pull the card out of the system board connector.
5. Remove the card from the computer and set it aside.
6. Attach the new card to the system board connector.
7. Replace and tighten the screw.
8. Reattach the access door and gently press down on the latch until you feel a click.
9. Reinsert the battery.
1
access door
NOTICE: Handle the card by its edges, and avoid touching pins and contacts. Ground yourself by touching a metal connector on the back of the
computer. Continue to ground yourself periodically during this procedure.
1
screw
2
internal card with Bluetooth wireless technology
3
system board connector
NOTE: The card and system board connector can only connect in one configuration. If you encounter resistance, check the configuration and try again.
Coin-Cell Battery
Your computer uses a coin-cell battery to maintain the date and time even while the computer is off. However, after several years, this battery may lose its
charge.
1. Follow the procedures in "Before You Begin."
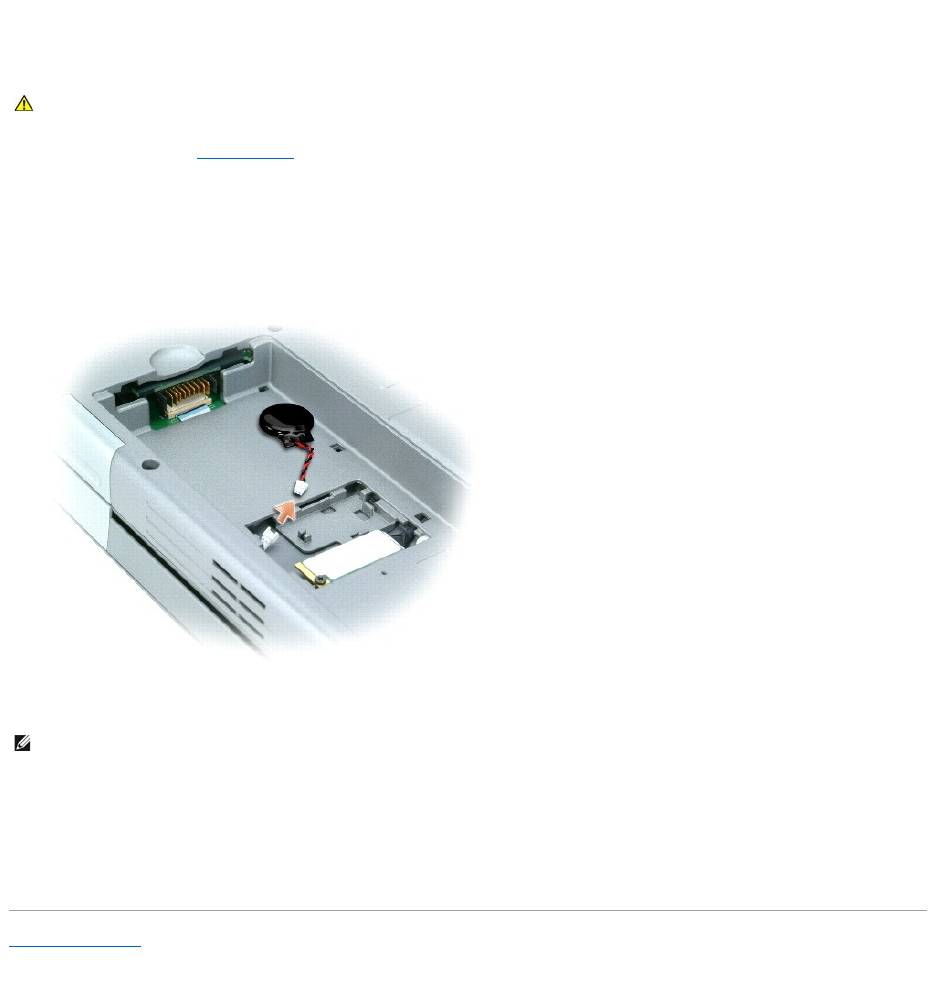
2. Remove the access door beneath the battery.
3. Slide the coin-cell battery out of the tabs that hold it in place.
4. Grasp the coin-cell battery connector cable and disconnect it from the coin-cell battery socket.
5. Connect the new coin-cell battery to the socket.
6. Slide the coin-cell battery under the tabs that hold it in place.
7. Reattach the access door and gently press down on the latch until you feel a click.
8. Reinsert the battery.
Back to Contents Page
CAUTION: Before working inside your computer, read the safety instructions in your System Information Guide.
NOTE: The coin-cell battery connector and socket can only connect in one configuration. If you encounter resistance, check the configuration and try
again.

Back to Contents Page
Using the System Setup Program
DellPrecision™MobileWorkstationM70User'sGuide
Overview
Viewing the System Setup Screens
System Setup Screen
Commonly Used Options
Overview
You can use system setup as follows:
l To set or change user-selectable features—for example, your computer password
l To verify information about the computer's current configuration, such as the amount of system memory
After you set up the computer, run system setup to familiarize yourself with your system configuration information and optional settings. You may want to
write down the information for future reference.
The system setup screens display the current setup information and settings for your computer, such as:
l System configuration
l Boot sequence
l Boot (start-up) configuration and docking-device configuration settings
l Basic device-configuration settings
l System security and hard-drive password settings
Viewing the System Setup Screens
1. Turn on (or restart) your computer.
2. WhentheDELL™logoappears,press<F2>immediately.IfyouwaittoolongandtheWindowslogoappears,continuetowaituntilyouseethe
Windows desktop. Then shut down your computer and try again.
3. Press the down-arrow key to position the cursor on the BIOS Setup option.
4. Press <Enter> to select Setup.
System Setup Screen
The System Setup screen consists of three panes. The left pane contains a menu of control categories. To show or hide subcategories, select a category (such
as System, Onboard Devices, or Video) and press the <Enter> key. The right pane displays information about the category or subcategory.
The bottom pane describes how to control system setup with key functions. Use the keys to select a category, modify settings, or exit system setup.
Commonly Used Options
Certain options require that you reboot the computer for new settings to take effect.
Changing the Boot Sequence
The boot sequence, or boot order, tells the computer where to look to find the software needed to start the operating system. You can control the boot
sequence and enable/disable devices using the Boot Sequence page of system setup.
NOTE: Your operating system may automatically configure most of the options available in system setup, thus overriding options that you set through
system setup. (An exception is the External Hot Key option, which you can disable or enable only through system setup.) For more information on
configuring features for your operating system, see the Windows Help and Support Center (Windows XP).
NOTICE: Unless you are an expert computer user or are directed to do so by Dell technical support, do not change the system setup settings. Certain
changes might make your computer work incorrectly.
")