Dell Precision M70 – страница 2
Инструкция к Ноутбуку Dell Precision M70
Оглавление
1. Turn off the computer and the TV and/or audio device that you want to connect.
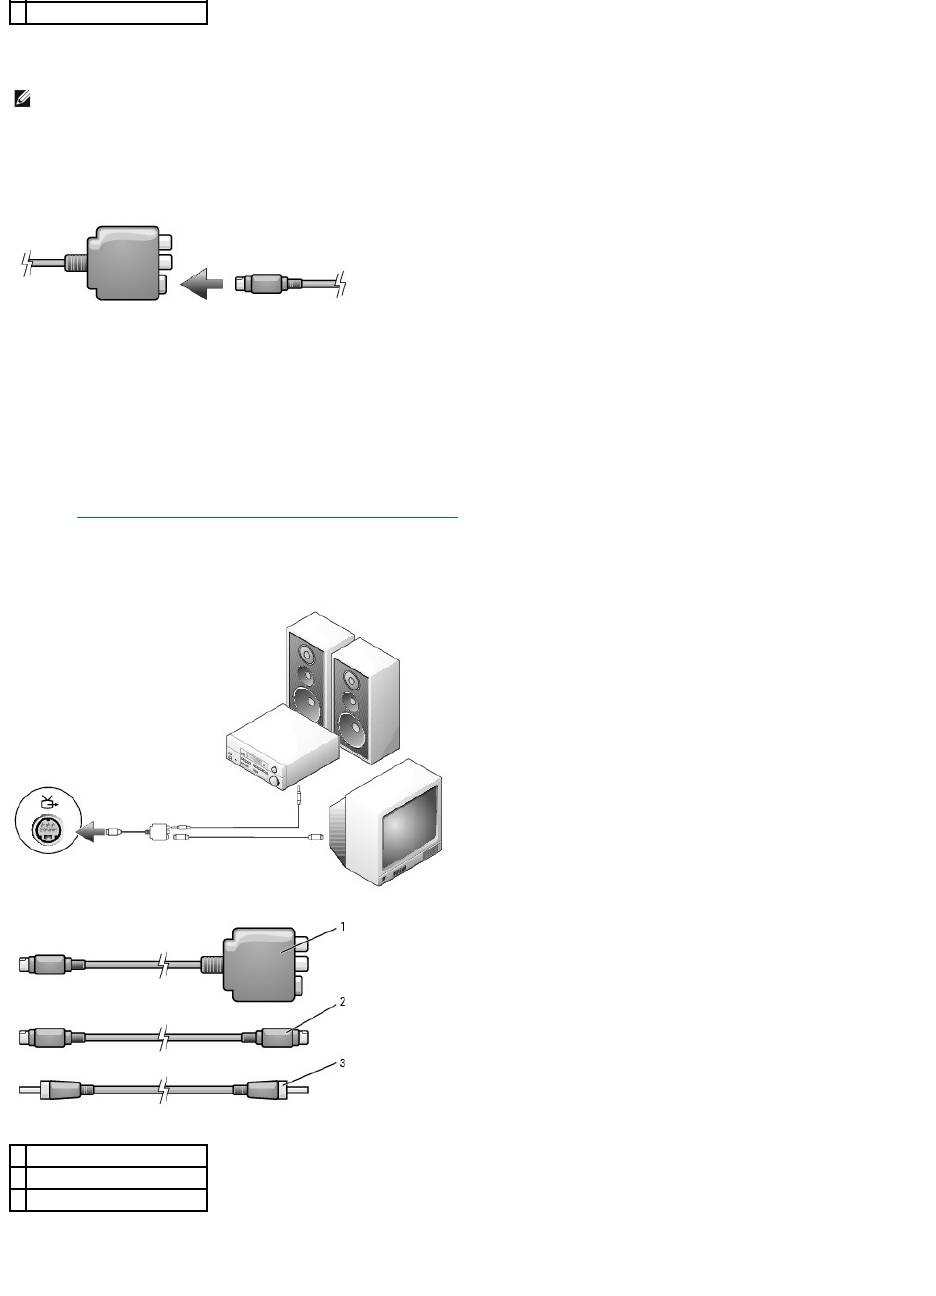
2. Connect the TV/digital audio adapter cable to the S-video TV-out connector on your computer.
3. Plug one end of the S-video cable in to the S-video input connector on the TV/digital audio adapter cable.
4. Plug the other end of the S-video cable in to the S-video input connector on your TV.
5. Plug the single-connector end of the audio cable in to the headphone connector on your computer.
6. Plug the two RCA connectors on the other end of the audio cable in to the audio input connectors on your TV or other audio device.
7. Turn on the TV and any audio device that you connected (if applicable), and then turn on the computer.
8. See "Enabling the Display Settings for a TV in Microsoft® Windows® XP" to ensure that the computer recognizes and works properly with the TV.
S-Video and S/PDIF Digital Audio
1. Turn off the computer and the TV and/or audio device that you want to connect.
2. Connect the TV/digital audio adapter cable to the S-video TV-out connector on your computer.
3
standard audio cable
NOTE: You can connect an S-video cable directly to the S-video TV-out connector on the computer (without the TV/digital audio adapter cable) if your TV
or audio device supports S-video but not S/PDIF digital audio.
1
TV/digital audio adapter cable
2
S-video cable
3
S/PDIF digital audio cable
3. Plug one end of the S-video cable in to the S-video input connector on the TV/digital audio adapter cable.
4. Plug the other end of the S-video cable in to the S-video input connector on the TV.
5. Plug one end of the S/PDIF digital audio cable in to the digital audio connector on the TV/digital audio adapter cable.
6. Plug the other end of the S/PDIF digital audio cable in to the audio input connector on your TV or other audio device.
7. Turn on the TV, turn on any audio device that you connected (if applicable), and then turn on the computer.
8. See "Enabling the Display Settings for a TV in Microsoft® Windows® XP" to ensure that the computer recognizes and works properly with the TV.
Composite Video and Standard Audio
1. Turn off the computer and the TV and/or audio device that you want to connect.
2. Connect the TV/digital audio adapter cable to the S-video TV-out connector on the computer.
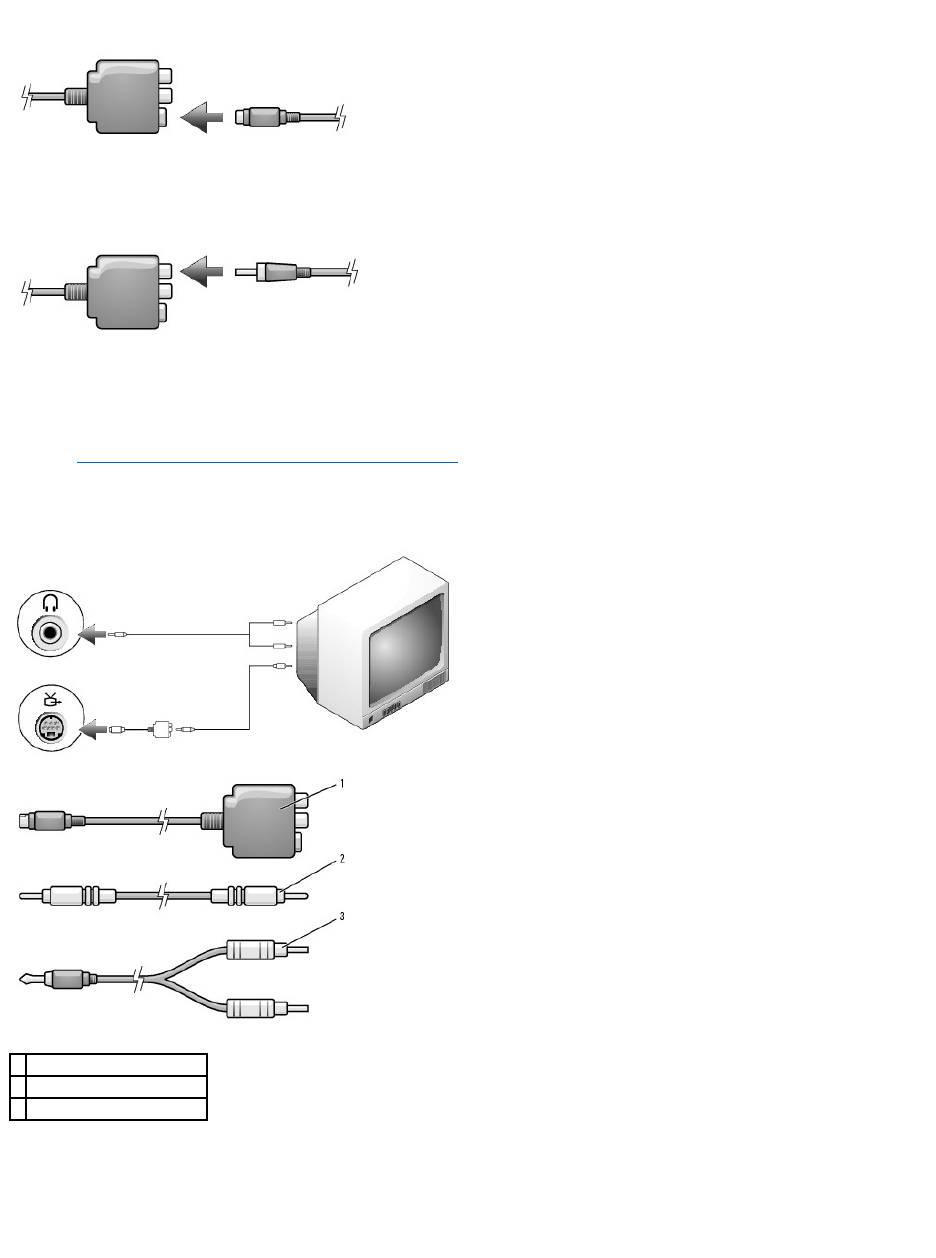
3. Plug one end of the composite video cable in to the composite video-input connector on the TV/digital audio adapter cable.
1
TV/digital audio adapter cable
2
composite video cable
3
standard audio cable
4. Plug the other end of the composite video cable in to the composite video-input connector on the TV.
5. Plug the single-connector end of the audio cable in to the headphone connector on the computer.
6. Plug the two RCA connectors on the other end of the audio cable in to the audio input connectors on your TV or other audio device.
7. Turn on the TV, turn on any audio device that you connected (if applicable), and then turn on the computer.
8. See "Enabling the Display Settings for a TV in Microsoft® Windows® XP" to ensure that the computer recognizes and works properly with the TV.
Composite Video and S/PDIF Digital Audio
1. Turn off the computer and the TV and/or audio device that you want to connect.
2. Connect the TV/digital audio adapter cable to the S-video TV-out connector on the computer.
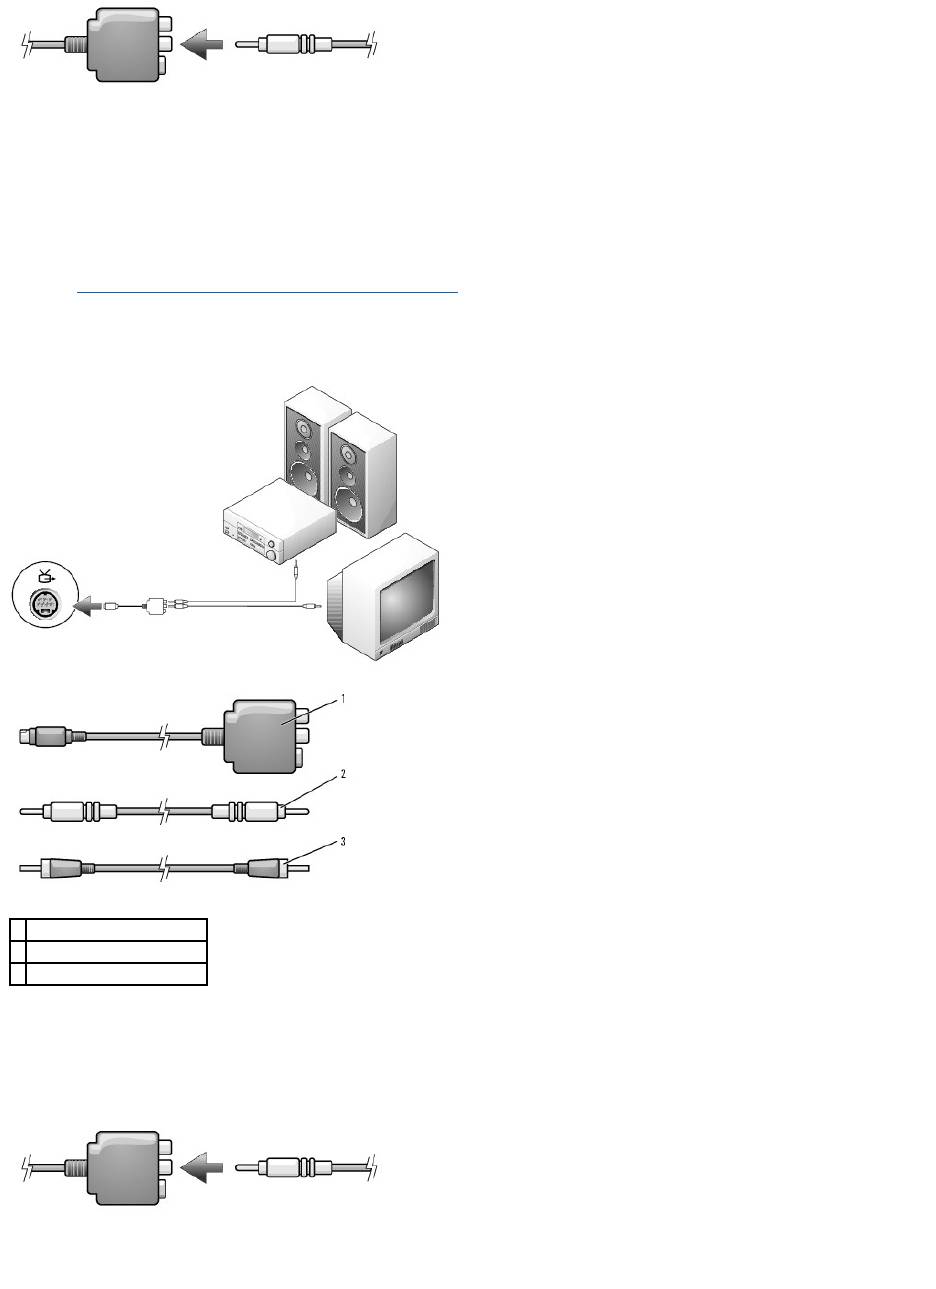
3. Plug one end of the composite video cable in to the composite video-input connector on the TV/digital audio adapter cable.
4. Plug the other end of the composite video cable in to the composite video-input connector on the TV.
1
TV/digital audio adapter cable
2
composite video cable
3
S/PDIF digital audio cable
5. Plug one end of the S/PDIF digital audio cable in to the S/PDIF audio connector on the TV/digital audio adapter cable.
6. Plug the other end of the digital audio cable in to the S/PDIF input connector on your TV or other audio device.
7. Turn on the TV, turn on any audio device that you connected (if applicable), and then turn on the computer.
8. See "Enabling the Display Settings for a TV in Microsoft® Windows® XP" to ensure that the computer recognizes and works properly with the TV.
Enabling S/PDIF Digital Audio
If your computer has a DVD drive, you can enable Dolby Digital 5.1 audio for DVD playback.
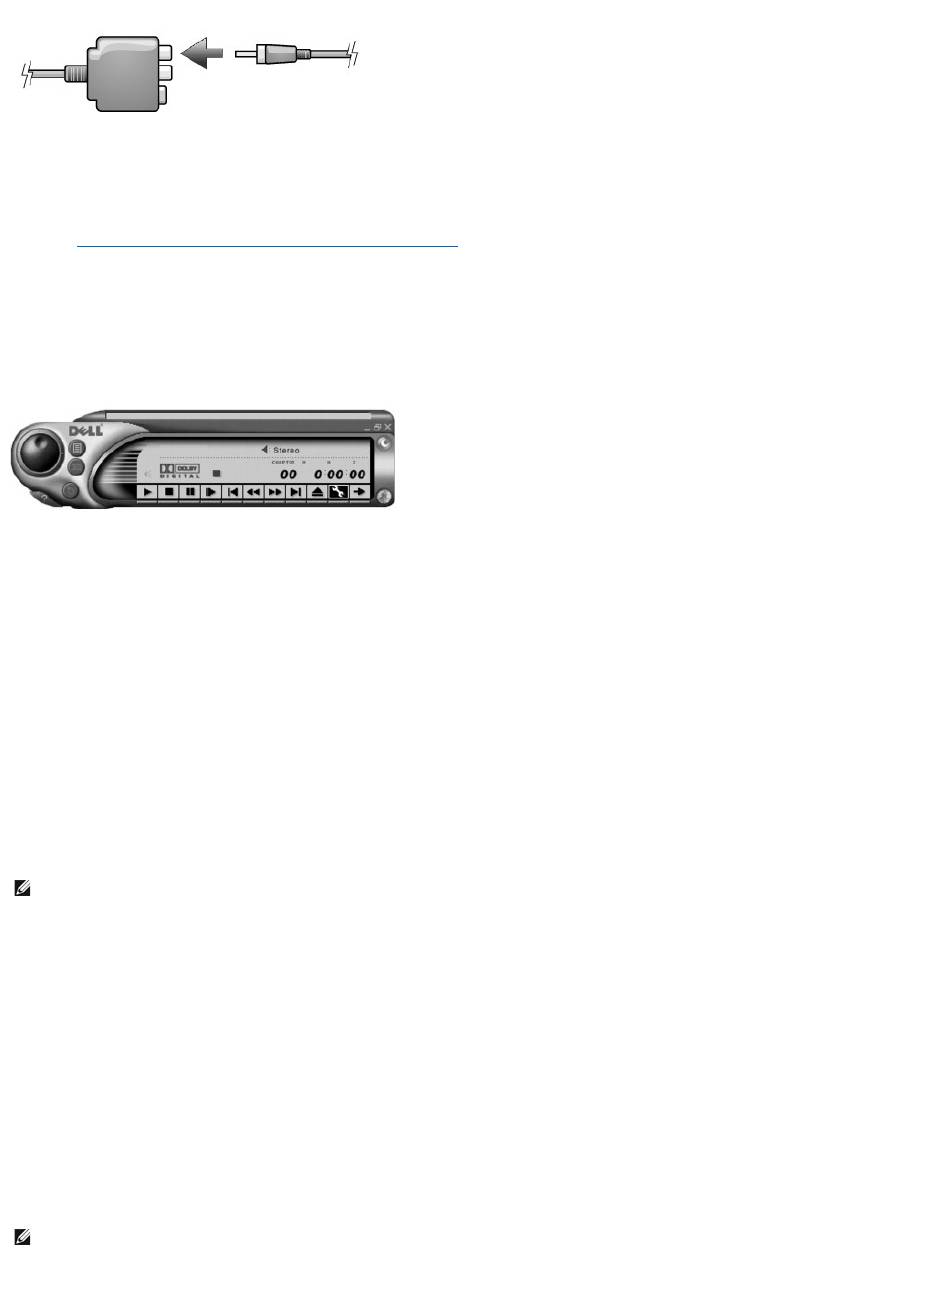
1. Double-click the Cyberlink PowerDVD icon on the Microsoft®Windows®desktop.
2. Insert a DVD into the DVD drive.
If the DVD begins playing, click the stop button.
3. Click the Properties (wrench) icon.
4. Click the Audio tab.
5. Click Enable S/PDIF output.
6. Click Apply.
7. Click OK.
Enabling S/PDIF in the Windows Audio Driver
1. Double-click the speaker icon in the Windows notification area.
2. Click the Options menu and then click Advanced Controls.
3. Click Advanced.
4. Click Enable S/PDIF.
5. Click Close.
6. Click OK.
Setting Up the Dolby Headphone
1. Double-click the Intervideo Win DVD icon on the Windows desktop.
NOTE: Enabling S/PDIF in Windows disables the sound from the headphone connector.
NOTE: The Dolby headphone feature is available only if your computer has a DVD drive.

2. Click the Properties icon.
3. Click the Dolby Headphone tab.
4. Click Enable Dolby Headphone.
5. Select one of the four options to set the level of surround sound effects. Option 1 is a baseline stereo option and Options 2, 3, and 4 are surround
sound levels.
6. Click Apply, and then click OK to close the WinDVD Properties window.
7. Click Exit.
Enabling the Display Settings for a TV in Microsoft®Windows®XP
Your computer may have either an ATI video-controller card or an NVIDIA video-controller card. See the following subsection that corresponds to the video
controller installed in your computer.
ATI Video-Controller Card
1. Click the Start button and click Control Panel.
2. Click Appearances and Themes.
3. Under or pick a Control Panel icon, click Display.
4. Click the Settings tab and click Advanced.
5. Click the Displays tab.
6. Click the upper-left corner of the TV button to enable the TV.
7. Click OK.
NVIDIA Video-Controller Card
1. Click the Start button and click Control Panel.
2. Click Appearances and Themes.
3. Under or pick a Control Panel icon, click Display.
4. Click the Settings tab and click Advanced.
5. Click the Nvidia GeForce tab.
6. On the left side of the menu, click nView Display Mode.
7. Click Clone to enable the television.
8. Click Apply.
9. Click OK to confirm the settings change.
10. Click Yes to keep the new settings.
NOTE: Icon labels may be visible only when you place the cursor over the icon.
NOTE: Ensure that you properly connect the TV before you enable the display settings.
NOTE: Ensure that you properly connect the TV before you enable the display settings.

11. Click OK.
Back to Contents Page

Back to Contents Page
Cleaning Your Computer
DellPrecision™MobileWorkstationM70User'sGuide
Computer, Keyboard, and Display
l Use a can of compressed air to gently remove dust from the slots and holes on your computer and from between the keys on the keyboard.
l Moisten a soft, lint-free cloth with either water or an LCD cleaner, and wipe the display until it is clean.
l Moisten a soft, lint-free cloth with water and wipe the computer and keyboard. Do not allow water from the cloth to seep between the touch pad and
the surrounding palm rest.
Touch Pad
1. Shut down and turn off your computer, disconnect any attached devices, and disconnect them from their electrical outlets.
2. Remove any installed batteries.
3. Moisten a soft, lint-free cloth with water, and wipe it gently across the surface of the touch pad. Do not allow water from the cloth to seep between the
touch pad and the surrounding palm rest.
Floppy Drive
Clean your floppy drive using a commercially available cleaning kit. These kits contain pretreated floppy disks to remove contaminants that accumulate during
normal operation.
CDs and DVDs
If you notice problems, such as skipping, with the playback quality of your CDs or DVDs, try cleaning the discs.
1. Hold the disc by its outer edge. You can also touch the inside edge of the center hole.
2. With a soft, lint-free cloth, gently wipe the bottom of the disc (the unlabeled side) in a straight line from the center to the outer edge of the disc.
For stubborn dirt, try using water or a diluted solution of water and mild soap. You can also purchase commercial products that clean discs and provide
some protection from dust, fingerprints, and scratches. Cleaning products for CDs are safe to use on DVDs.
Back to Contents Page
CAUTION: Before you begin any of the procedures in this section, follow the safety instructions located in the Product Information Guide.
CAUTION: Before you clean your computer, disconnect the computer from the electrical outlet and remove any installed batteries. Clean your
computer with a soft cloth dampened with water. Do not use liquid or aerosol cleaners, which may contain flammable substances.
NOTICE: To avoid damaging the computer or display, do not spray cleaning solution directly onto the display. Only use products specifically designed for
cleaning LCDs, and follow the instructions that are included with the product.
NOTICE: Do not attempt to clean drive heads with a swab. You might accidentally misalign the heads, which prevents the drive from operating.
NOTICE: Always use compressed air to clean the lens in the CD/DVD drive, and follow the instructions that come with the compressed air. Never touch
the lens in the drive.
NOTICE: To prevent damaging the surface, do not wipe in a circular motion around the disc.

Back to Contents Page
Using the Dell Diagnostics
DellPrecision™MobileWorkstationM70User'sGuide
Dell Diagnostics
When to Use the Dell Diagnostics
If you experience a problem with your computer, perform the checks in "Lockups and Software Problems" and run the Dell Diagnostics before you contact Dell
for technical assistance.
It is recommended that you print these procedures before you begin.
Start the Dell Diagnostics from either your hard drive or from the Drivers and Utilities CD (also known as the ResourceCD).
Starting the Dell Diagnostics From Your Hard Drive
The Dell Diagnostics is located on a hidden diagnostic utility partition on your hard drive.
1. Shut down the computer.
2. If the computer is connected to a docking device (docked), undock it. See the documentation that came with your docking device for instructions.
3. Connect the computer to an electrical outlet.
4. Diagnostics can be invoked one of two ways:
a. Turnonthecomputer.WhentheDELL™logoappears,press<F12>immediately.SelectDiagnosticsfromthebootmenuandpress<Enter>.
b. Press and hold the <Fn> key while powering the system on.
The computer runs the Pre-boot System Assessment, a series of initial tests of your system board, keyboard, hard drive, and display.
l During the assessment, answer any questions that appear.
l If a failure is detected, the computer stops and beeps. To stop the assessment and restart the computer, press <n>; to continue to the next
test, press <y>; to retest the component that failed, press <r>.
l If failures are detected during the Pre-boot System Assessment, write down the error code(s) and contact Dell.
If the Pre-boot System Assessment completes successfully, you receive the message Booting Dell Diagnostic Utility Partition. Press any key to
continue.
5. PressanykeytostarttheDellDiagnosticsfromthediagnosticsutilitypartitiononyourharddrive.
Starting the Dell Diagnostics From the Drivers and Utilities CD
1. Insert the Drivers and Utilities CD.
2. Shut down and restart the computer.
When the DELL logo appears, press <F12> immediately.
If you wait too long and the Windows logo appears, continue to wait until you see the Windows desktop. Then shut down your computer and try again.
CAUTION: Before you begin any of the procedures in this section, follow the safety instructions in the Product Information Guide.
NOTICE: The Dell Diagnostics works only on Dell computers.
NOTE: The Drivers and Utilities CD is optional and may not ship with your computer.
NOTE: If your computer cannot display a screen image, contact Dell.
NOTE: If you wait too long and the operating system logo appears, continue to wait until you see the Microsoft®Windows®desktop. Then shut down
your computer and try again.
NOTE: If you see a message stating that no diagnostics utility partition has been found, run the Dell Diagnostics from the Drivers and Utilities CD.

3. When the boot device list appears, highlight CD/DVD/CD-RW Drive and press <Enter>.
4. Select the CD/DVD/CD-RW Drive option from the CD boot menu.
5. Select the Boot from CD-ROM option from the menu that appears.
6. Type 1 to start the ResourceCD menu.
7. Type 2 to start the Dell Diagnostics.
8. Select Run the 32 Bit Dell Diagnostics from the numbered list. If multiple versions are listed, select the version appropriate for your computer.
9. When the Dell Diagnostics Main Menu appears, select the test you want to run.
Dell Diagnostics Main Menu
1. After the Dell Diagnostics loads and the Main Menu screen appears, click the button for the option you want.
2. If a problem is encountered during a test, a message appears with an error code and a description of the problem. Write down the error code and
problem description and follow the instructions on the screen.
If you cannot resolve the error condition, contact Dell.
3. If you run a test from the Custom Test or Symptom Tree option, click the applicable tab described in the following table for more information.
4. When the tests are completed, if you are running the Dell Diagnostics from the Drivers and Utilities CD, remove the CD.
5. When the tests are complete, close the test screen to return to the Main Menu screen. To exit the Dell Diagnostics and restart the computer, close the
Main Menu screen.
Back to Contents Page
NOTE: The next steps change the boot sequence for one time only. On the next start-up, the computer boots according to the devices specified in
system setup.
Option
Function
Express Test
Performs a quick test of devices. This test typically takes 10 to 20 minutes and requires no interaction on your part. Run Express Test first to
increase the possibility of tracing the problem quickly.
Extended
Test
Performs a thorough check of devices. This test typically takes 1 hour or more and requires you to answer questions periodically.
Custom Test
Tests a specific device. You can customize the tests you want to run.
Symptom
Tree
Lists the most common symptoms encountered and allows you to select a test based on the symptom of the problem you are having.
NOTE: The Service Tag for your computer is located at the top of each test screen. If you contact Dell, technical support will ask for your Service
Tag.
Tab
Function
Results
Displays the results of the test and any error conditions encountered.
Errors
Displays error conditions encountered, error codes, and the problem description.
Help
Describes the test and may indicate requirements for running the test.
Configuration
Displays your hardware configuration for the selected device.
The Dell Diagnostics obtains configuration information for all devices from system setup, memory, and various internal tests, and it displays
the information in the device list in the left pane of the screen. The device list may not display the names of all the components installed on
your computer or all devices attached to your computer.
Parameters
Allows you to customize the test by changing the test settings.

Back to Contents Page
Using the Display
DellPrecision™MobileWorkstationM70User'sGuide
Adjusting Brightness
Switching the Video Image
Setting Display Resolution
Dual Independent Display Mode
Large Desktop Display Mode
Swapping Primary and Secondary Displays
Adjusting Brightness
WhentheDell™computerisrunningonbatterypower,youcanconservepowerbysettingthebrightnesstothelowestcomfortablesettingbypressing<Fn>
and the up- or down-arrow on the keyboard.
The Dell QuickSet Brightness Meter shows the current brightness setting for the display. Right-click the icon in the taskbar to enable or disable the
Brightness Meter on the screen.
You can enable or disable the Brightness Meter from the QuickSet taskbar menu. When the meter is enabled, press the following keys to adjust brightness:
l Press <Fn> and the up-arrow key to increase brightness on the integrated display only (not on an external monitor).
l Press <Fn> and the down-arrow key to decrease brightness on the integrated display only (not on an external monitor).
For more information about QuickSet, right-click the icon in the taskbar and click Help.
Switching the Video Image
When you start the computer with an external device (such as an external monitor or projector) attached and turned on, the image may appear on either the
computer display or the external device.
Press <Fn><F8> to switch the video image to the display only, the external device only, or the display and the external device simultaneously.
Setting Display Resolution
To display a program at a specific resolution, both the graphics card and the display must support the program, and the necessary video drivers must be
installed.
Before you change any of the default display settings, make a note of the default settings for future reference.
If you choose a resolution or color palette that is higher than the display supports, the settings adjust automatically to the closest possible setting.
Microsoft®Windows®XP
1. Click the Start button and click Control Panel.
2. Under Pick a category, click Appearance and Themes.
3. Under Pick a task..., click the area you want to change, or under or pick a Control Panel icon, click Display.
NOTE: By default, the Brightness Meter appears in the lower-right corner of the display. You can click and drag the meter to a new location, and the
meter subsequently always appears at the new location.
NOTE: Brightness key combinations only affect the display on your portable computer, not monitors that you attach to your portable computer or
docking device. If your computer is connected to an external monitor and you try to change the brightness level, the Brightness Meter appears, but the
brightness level on the monitor does not change.
NOTE: Use only the Dell-installed video drivers, which are designed to offer the best performance with your Dell-installed operating system.

4. Try different settings for Color quality and Screen resolution.
Microsoft Windows 2000
1. Click the Start button, point to Settings, and then click Control Panel.
2. Double-click the Display icon and click the Settings tab.
3. Try different settings for Colors and Screen area.
If the video resolution setting is higher than that supported by the display, the computer enters pan mode. In pan mode, the screen cannot be completely
displayed. For example, the taskbar that usually appears at the bottom of the desktop may no longer be visible. To view the rest of the screen, use the touch
pad or track stick to pan up, down, left, and right.
Dual Independent Display Mode
You can attach an external monitor or projector to your computer and use it as an extension of your display (known as "dual independent display" or
"extended desktop" mode). This mode allows you to use both screens independently and drag objects from one screen to the other, effectively doubling the
amount of viewable work space.
Microsoft Windows XP
1. Connect the external monitor, TV, or projector to the computer.
2. Open the Control Panel and double-click the Display icon.
3. In the Display Properties window, click the Settings tab.
4. Click the monitor 2 icon, click the Extend my Windows desktop... check box, then and click Apply.
5. Change Screen Area to the appropriate sizes for both displays and click Apply.
6. If prompted to restart the computer, click Apply the new color setting without restarting and click OK.
7. If prompted, click OK to resize your desktop.
8. If prompted, click Yes to keep the settings.
9. Click OK to close the Display Properties window.
To disable dual independent display mode:
1. Click the Settings tab in the Display Properties window.
2. Click the monitor 2 icon, uncheck the Extend my Windows desktop... option, and then click Apply.
If necessary, press <Fn><F8> to bring the screen image back to the computer display.
Microsoft Windows 2000
The Windows 2000 operating system does not natively support dual independent display (extended desktop) mode on your computer.
NOTE: As the resolution increases, icons and text appear smaller on the screen.
NOTICE: You can damage an external monitor by using an unsupported refresh rate. Before adjusting the refresh rate on an external monitor, see the
monitor user's guide.
NOTE: If you choose a resolution or color palette that is higher than the display supports, the settings adjust automatically to the closest possible
values. For more information, see your operating system documentation.
NOTE: This software may not be available in certain countries.

Large Desktop Display Mode
With some operating systems, you can connect an external monitor or projector to your computer to enlarge your work space (large desktop display mode). This
mode allows you to view a large document over two displays as if they were one large display. The taskbar runs uninterrupted across the two displays. You
can set up your two monitors either vertically or horizontally.
Windows 2000
To activate large desktop mode on two external displays that are attached to the VGA or DVI connectors on the docking device, your computer must be
connected to the docking device and the portable computer display closed. To activate large desktop mode on the portable computer display and a single
external display, connect the external display either to your portable computer or the docking device, and keep the portable computer display open.
1. Connect the external monitor, TV, or projector to the computer or docking device.
2. Open the Control Panel and double-click the Display icon.
3. In the Display Properties window, click the Settings tab.
4. Press <Fn><F8> until the display that you want to use as primary (left-most or top-most) display is set as the primary display.
5. Click the Advanced tab.
6. On the next screen, click the ATI Displays tab which shows several different display options.
7. Click the red (off) and green (on) indicators in the upper left corners until the two displays that you want to use show green. Both displays should now
be active in clone (or simulscan) mode.
8. Press the right-arrow or the down-arrow button on your keyboard to specify a horizontal or vertical display setup, and click Apply.
Swapping Primary and Secondary Displays
Microsoft Windows XP
To swap your primary and secondary display designations (for example, to use your external monitor as your primary display after docking):
1. Click the Start button and click Settings.
2. Select Control Panel and click Display.
3. Under Pick a category, click Appearance and Themes.
4. Under Pick a task..., click the area you want to change, or under or pick a Control Panel icon, click Display.
5. Click Settings tab® Advanced® Displays tab.
See the documentation that came with your video card for additional information.
Microsoft Windows 2000
To swap your primary and secondary display designations (for example, to use your external monitor as your primary display after docking), open the Control
Panel, click the Display icon® Settings tab® Advanced® Displays tab. See the documentation that came with your video card for additional information.
Back to Contents Page
NOTE: The Windows XP operating system and some Windows 2000 operating systems do not support large desktop display mode. See the
documentation that came with your video card for more information.
NOTE: You may need to try different settings depending on your display setup.

Back to Contents Page
Reinstalling Software
DellPrecision™MobileWorkstationM70User'sGuide
Drivers
Resolving Software and Hardware Incompatibilities
Using Microsoft®Windows®XP System Restore
Reinstalling Microsoft®Windows®XP
Drivers
What Is a Driver?
A driver is a program that controls a device such as a printer, mouse, or keyboard. All devices require a driver program.
A driver acts like a translator between the device and any other programs that use the device. Each device has its own set of specialized commands that only
its driver recognizes.
Dell ships your computer to you with required drivers already installed—no further installation or configuration is needed.
Many drivers, such as the keyboard driver, come with your Microsoft®Windows®operating system. You may need to install drivers if you:
l Upgrade your operating system.
l Reinstall your operating system.
l Connect or install a new device.
Identifying Drivers
If you experience a problem with any device, identify whether the driver is the source of your problem and, if necessary, update the driver.
Windows XP
1. Click the Start button and click Control Panel.
2. Under Pick a Category, click Performance and Maintenance.
3. Click System.
4. In the System Properties window, click the Hardware tab.
5. Click Device Manager.
6. Scroll down the list to see if any device has an exclamation point (a yellow circle with a [!]) on the device icon.
If an exclamation point is next to the device name, you may need to reinstall the driver or install a new driver.
Reinstalling Drivers and Utilities
Using the Windows XP Device Driver Rollback
If you install a new device driver that causes system instability, you can use the Windows XP Device Driver Rollback to replace the new device driver with the
previously installed version of the device driver. If you cannot reinstall your previous driver by using the Device Driver Rollback process, then use System
Restore to return your operating system to its previous operating state before you installed the new device driver. To use Device Driver Rollback:
1. Click the Start button and right-click My Computer.
NOTICE: TheDellSupportwebsiteatsupport.dell.comandyourDriversandUtilitiesCDprovideapproveddriversforDell™computers.Ifyouinstall
drivers obtained from other sources, your computer might not work correctly.
NOTE: The Drivers and Utilities CD is optional and may not ship with all computers.

2. Click Properties.
3. Click the Hardware tab and click Device Manager.
4. In the Device Manager window, right-click the device for which the new driver was installed and then click Properties.
5. Click the Drivers tab.
6. Click Roll Back Driver.
Using the Drivers and Utilities CD
If using Device Driver Rollback or System Restore does not resolve the problem, then reinstall the driver from the Drivers and Utilities CD (also known as the
ResourceCD).
1. Save and close any open files, and exit any open programs.
2. Insert the Drivers and Utilities CD.
In most cases, the CD starts running automatically. If it does not, start Windows Explorer, click your CD drive directory to display the CD contents, and
then double-click the autorcd.exe file. The first time that you run the CD, it might prompt you to install setup files. Click OK, and follow the instructions
on the screen to continue.
3. From the Language drop-down menu in the toolbar, select your preferred language for the driver or utility (if available). A welcome screen appears.
4. Click Next.
The CD automatically scans your hardware to detect drivers and utilities used by your computer.
5. After the CD completes the hardware scan, you can also detect other drivers and utilities. Under Search Criteria, select the appropriate categories from
the System Model, Operating System, and Topic drop-down menus.
A link or links appear(s) for the specific drivers and utilities used by your computer.
6. Click the link of a specific driver or utility to display information about the driver or utility that you want to install.
7. Click the Install button (if present) to begin installing the driver or utility. At the welcome screen, follow the screen prompts to complete the installation.
If no Install button is present, automatic installation is not an option. For installation instructions, either see the appropriate instructions in the following
subsections, or click Extract, follow the extracting instructions, and then read the readme file.
If instructed to navigate to the driver files, click the CD directory on the driver information window to display the files associated with that driver.
Manually Reinstalling Drivers for Windows XP
1. After copying the driver files to your hard drive, click the Start button and right-click My Computer.
2. Click Properties.
3. Click the Hardware tab and click Device Manager.
4. Double-click the type of device for which you are installing the driver (for example, Modems or Infrared devices).
5. Double-click the name of the device for which you are installing the driver.
6. Click the Driver tab and click Update Driver.
7. Click Install from a list or specific location (Advanced) and click Next.
8. Click Browse and browse to the location to which you previously copied the driver files.
NOTE: The Drivers and Utilities CD may contain drivers for operating systems that are not on your computer. Ensure that you are installing software
appropriate for your operating system.
NOTE: The Drivers and Utilities CD is optional and may not ship with all computers.
NOTE: If you are reinstalling an infrared sensor driver, you must first enable the infrared sensor in system setup before continuing with the driver
installation.

9. When the name of the appropriate driver appears, click Next.
10. Click Finish and restart your computer.
Manually Reinstalling Drivers for Windows 2000
1. After copying the driver files to your hard drive, click the Start button, point to Settings, and then click Control Panel.
2. Double-click the System icon.
3. Click the Hardware tab.
4. Click Device Manager.
5. Double-click the type of device for which you are installing the driver (for example, Modems or Infrared devices).
6. Double-click the name of the device.
7. Click the Driver tab and click Update Driver.
8. Click Next.
9. Ensure that Search for a suitable driver for my device (recommended) is selected, and then click Next.
10. Ensure that the Specify a location check box is checked and that all other check boxes are unchecked, and click Next.
11. Click Browse to browse to the location to which you previously copied the driver files.
12. When the name of the appropriate driver appears, click Next.
13. Click Finish and restart your computer.
Resolving Software and Hardware Incompatibilities
If a device is either not detected during the operating system setup or is detected but incorrectly configured, you can use the Hardware Troubleshooter to
resolve the incompatibility.
Windows XP
To resolve incompatibilities using the Hardware Troubleshooter:
1. Click the Start button and click Help and Support.
2. Type hardware troubleshooter in the Search field and click the arrow to start the search.
3. Click Hardware Troubleshooter in the Search Results list.
4. In the Hardware Troubleshooter list, click I need to resolve a hardware conflict on my computer, and click Next.
Using Microsoft®Windows®XP System Restore
The Microsoft®Windows®XP operating system provides System Restore to allow you to return your computer to an earlier operating state (without affecting
data files) if changes to the hardware, software, or other system settings have left the computer in an undesirable operating state. See the Windows Help
and Support Center for information on using System Restore.
NOTE: If you are reinstalling an infrared driver, you must first enable the infrared sensor in the system setup program before continuing with the driver
installation.
NOTICE: Make regular backups of your data files. System Restore does not monitor your data files or recover them.
NOTE: TheproceduresinthisdocumentwerewrittenfortheWindowsdefaultview,sotheymaynotworkifyousetyourDell™computertothe
Windows Classic view.

Creating a Restore Point
1. Click the Start button and click Help and Support.
2. Click System Restore.
3. Follow the instructions on the screen.
Restoring the Computer to an Earlier Operating State
1. Click the Start button, point to All Programs® Accessories® System Tools, and then click System Restore.
2. Ensure that Restore my computer to an earlier time is selected and click Next.
3. Click a calendar date to which you want to restore your computer.
The Select a Restore Point screen provides a calendar that allows you to see and select restore points. All calendar dates with available restore points
appear in boldface type.
4. Select a restore point and click Next.
If a calendar date has only one restore point, then that restore point is automatically selected. If two or more restore points are available, click the
restore point that you prefer.
5. Click Next.
The Restoration Complete screen appears after System Restore finishes collecting data and then the computer restarts.
6. After the computer restarts, click OK.
To change the restore point, you can either repeat the steps using a different restore point, or you can undo the restoration.
Undoing the Last System Restore
1. Click the Start button, point to All Programs® Accessories® System Tools, and then click System Restore.
2. Click Undo my last restoration and click Next.
3. Click Next.
The System Restore screen appears and the computer restarts.
4. After the computer restarts, click OK.
Enabling System Restore
If you reinstall Windows XP with less than 200 MB of free hard-disk space available, System Restore is automatically disabled. To see if System Restore is
enabled:
1. Click the Start button and click Control Panel.
2. Click Performance and Maintenance.
3. Click System.
4. Click the System Restore tab.
NOTICE: Before you restore the computer to an earlier operating state, save and close any open files and exit any open programs. Do not alter, open,
or delete any files or programs until the system restoration is complete.
NOTICE: Before you undo the last system restore, save and close all open files and exit any open programs. Do not alter, open, or delete any files or
programs until the system restoration is complete.

5. Ensure that Turn off System Restore is unchecked.
Reinstalling Microsoft®Windows®XP
Before You Begin
If you are considering reinstalling the Windows XP operating system to correct a problem with a newly installed driver, first try using Windows XP Device Driver
Rollback. If Device Driver Rollback does not resolve the problem, then use System Restore to return your operating system to the operating state it was in
before you installed the new device driver.
To reinstall Windows XP, you need the following items:
l Dell™Operating System CD
l Dell™Drivers and Utilities CD
Reinstalling Windows XP
To reinstall Windows XP, perform all the steps in the following sections in the order in which they are listed.
The reinstallation process can take 1 to 2 hours to complete. After you reinstall the operating system, you must also reinstall the device drivers, virus
protection program, and other software.
Booting From the Operating System CD
1. Save and close any open files and exit any open programs.
2. Insert the Operating System CD. Click Exit if the Install Windows XP message appears.
3. Restart the computer.
4. Press<F12>immediatelyaftertheDELL™logoappears.
If the operating system logo appears, wait until you see the Windows desktop, and then shut down the computer and try again.
5. Press the arrow keys to select CD-ROM, and press <Enter>.
6. When the Press any key to boot from CD message appears, press any key.
Windows XP Setup
1. When the Windows XP Setup screen appears, press <Enter>.
2. Read the information on the Microsoft Windows Licensing Agreement screen, and press <F8> to accept the license agreement.
3. If your computer already has Windows XP installed and you want to recover your current Windows XP data, type r to select the repair option, and
remove the CD.
4. If you want to install a new copy of Windows XP, press <Esc> to select that option.
5. Press <Enter> to select the highlighted partition (recommended), and follow the instructions on the screen.
NOTICE: You must use Windows XP Service Pack 1 (SP1) or later when you reinstall Windows XP.
NOTICE: Before performing the installation, back up all data files on your primary hard drive. For conventional hard drive configurations, the primary
hard drive is the first drive detected by the computer.
NOTE: The Operating System CD and the Drivers and Utilities CD are optional and may not ship with all computers.
NOTE: The Drivers and Utilities CD contains drivers that were installed during assembly of the computer. Use the Drivers and Utilities CD to load any
required drivers, including the drivers required if your computer has a RAID controller.
NOTICE: The Operating System CD provides options for reinstalling Windows XP. The options can overwrite files and possibly affect programs installed
on your hard drive. Therefore, do not reinstall Windows XP unless a Dell technical support representative instructs you to do so.
NOTICE: To prevent conflicts with Windows XP, disable any virus protection software installed on your computer before you reinstall Windows XP. See
the documentation that came with the software for instructions.

The Windows XP Setup screen appears, and the operating system begins to copy files and install the devices. The computer automatically restarts
multiple times.
6. When the Regional and Language Options screen appears, select the settings for your location and click Next.
7. Enter your name and organization (optional) in the Personalize Your Software screen, and click Next.
8. At the Computer Name and Administrator Password window, enter a name for your computer (or accept the one provided) and a password, and click
Next.
9. If the Modem Dialing Information screen appears, enter the requested information and click Next.
10. Enter the date, time, and time zone in the Date and Time Settings window, and click Next.
11. If the Networking Settings screen appears, click Typical and click Next.
12. If you are reinstalling Windows XP Professional and you are prompted to provide further information regarding your network configuration, enter your
selections. If you are unsure of your settings, accept the default selections.
Windows XP installs the operating system components and configures the computer. The computer automatically restarts.
13. When the Welcome to Microsoft screen appears, click Next.
14. When the How will this computer connect to the Internet? message appears, click Skip.
15. When the Ready to register with Microsoft? screen appears, select No, not at this time and click Next.
16. When the Who will use this computer? screen appears, you can enter up to five users.
17. Click Next.
18. Click Finish to complete the setup, and remove the CD.
19. Reinstall the appropriate drivers with the Drivers and Utilities CD.
20. Reinstall the Notebook System Software (NSS) utility.
If you reinstall the operating system for your computer, you should also reinstall the Notebook System Software (NSS) utility. NSS provides critical
updates for your operating system and support for Dell™ 3.5-inch USB floppy drives, Intel® Pentium® M processors, optical drives, and USB devices.
NSS is necessary for correct operation of your Dell notebook computer. NSS automatically detects your computer and operating system and installs the
updates appropriate for your configuration.
If you do not have the Dell Drivers and Utilities CD, access the Dell product support website. Click Downloads and select System and Configuration Utilities
and Windows XP. Select Dell Notebook System Software and follow the instructions for downloading and installing the Dell Notebook System Software.
21. Reinstall your virus protection software.
22. Reinstall your programs.
Back to Contents Page
NOTICE: Do not press any key when the following message appears: Press any key to boot from the CD.
NOTE: The time required to complete the setup depends on the size of the hard drive and the speed of your computer.
NOTICE: Do not press any key when the following message appears: Press any key to boot from the CD.
NOTE: The Dell Drivers and Utilities CD is required for installation of the NSS utility. However, this CD is optional and may not ship with all computers.
NOTE: To reinstall and activate your Microsoft Office or Microsoft Works Suite programs, you need the Product Key number located on the back of the
Microsoft Office or Microsoft Works Suite CD sleeve.
Back to Contents Page
Finding Information
DellPrecision™MobileWorkstationM70User'sGuide
NOTE: Some features may not be available for your computer or in certain countries.
NOTE: Additional information may ship with your computer.
What Are You Looking For?
Find It Here
l A diagnostic program for my computer
l Drivers for my computer
l My computer documentation
l My device documentation
l Notebook System Software (NSS)
Drivers and Utilities CD (also known as ResourceCD)
Documentation and drivers are already installed on your computer.
You can use the CD to reinstall drivers, run the Dell Diagnostics, or
access your documentation.
Readme files may be included on your CD to provide last-minute
updates about technical changes to your computer or advanced
technical-reference material for technicians or experienced users.
NOTE: The Drivers and Utilities CD is optional and may not ship with
all computers.
NOTE: The latest drivers and documentation updates can be found
at support.dell.com.
l How to set up my computer
l How to care for my computer
l Basic troubleshooting information
l How to run the Dell Diagnostics
l Error codes and diagnostic lights
l How to remove and install parts
l How to open my computer cover
Quick Reference Guide
NOTE: The Quick Reference Guide is optional and may not ship with
all computers.
NOTE: This document is available as a PDF at support.dell.com.
l Warranty information
l Terms and Conditions (U.S. only)
l Safety instructions
l Regulatory information
l Ergonomics information
l End User License Agreement
Dell™ProductInformationGuide
l Service Tag and Express Service Code
l Microsoft Windows License Label
Service Tag and Microsoft Windows License
These labels are located on your computer.

Back to Contents Page
l Use the Service Tag to identify your computer when you use
support.dell.com or contact technical support.
l Enter the Express Service Code to direct your call when
contacting technical support.
l Solutions — Troubleshooting hints and tips, articles from technicians, online
courses, frequently asked questions
l Community — Online discussion with other Dell customers
l Upgrades — Upgrade information for components, such as memory, the hard
drive, and the operating system
l Customer Care — Contact information, service call and order status, warranty,
and repair information
l Service and support — Service call status and support history, service contract,
online discussions with technical support
l Reference — Computer documentation, details on my computer configuration,
product specifications, and white papers
l Downloads — Certified drivers, patches, and software updates
l Notebook System Software (NSS) — If you reinstall the operating system for
your computer, you should also reinstall the NSS utility. NSS provides critical
updatesforyouroperatingsystemandsupportforDell™3.5-inch USB floppy
drives, Intel® Pentium®M processors, optical drives, and USB devices. NSS is
necessary for correct operation of your Dell computer. The software
automatically detects your computer and operating system and installs the
updates appropriate for your configuration.
Dell Support Website — support.dell.com
NOTE: Select your region to view the appropriate support site.
NOTE: Corporate, government, and education customers can also
use the customized Dell Premier Support website at
premier.support.dell.com. The website may not be available in all
regions.
l Service call status and support history
l Top technical issues for my computer
l Frequently asked questions
l File downloads
l Details on my computer configuration
l Service contract for my computer
Dell Premier Support Website — premiersupport.dell.com
The Dell Premier Support website is customized for corporate,
government, and education customers. This website may not be
available in all regions.
l How to use Windows XP
l Documentation for my computer
l Documentation for devices (such as a modem)
Windows Help and Support Center
1. Click the Start button and click Help and Support.
2. Type a word or phrase that describes your problem and click
the arrow icon.
3. Click the topic that describes your problem.
4. Follow the instructions on the screen.
l How to reinstall my operating system
Operating System CD
The operating system is already installed on your computer. To
reinstall your operating system, use the Operating System CD. See
your Precision User's Guide for instructions.
After you reinstall your operating system, use the Drivers and Utilities
CD to reinstall drivers for the devices that came with your computer.
Your operating system product key label is located on your
computer.
NOTE: The Operating System CD is optional and may not ship with
all computers.
NOTE: The Drivers and Utilities CD is optional and may not ship with
all computers.
NOTE: The color of your CD varies based on the operating system
you ordered.
")