Dell Precision M20 – страница 6
Инструкция к Ноутбуку Dell Precision M20
Оглавление
Video and Display Problems
Fill out the Diagnostics Checklist as you complete these checks.
If the display is blank
If the display is difficult to read
To verify that the problem is with the mouse, check the touch pad —
1. Shut down the computer.
2. Disconnect the mouse.
3. Turn on the computer.
4. At the Windows
desktop, use the touch pad to move the cursor around, select an icon, and open it.
If the touch pad operates correctly, the mouse may be defective.
Check the system setup program settings — Verify that the system setup program lists the correct device for the pointing device option.
(The computer automatically recognizes a USB mouse without making any setting adjustments.)
Test the mouse controller — To test the mouse controller (which affects pointer movement) and the operation of the touch pad or mouse
buttons, run the Mouse test in the Pointing Devices test group in the Dell Diagnostics.
Reinstall the touch pad driver — See "Reinstalling Drivers and Utilities."
CAUTION: Before you begin any of the procedures in this section, follow the safety instructions in the Product Information Guide.
NOTE: If you are using a program that requires a higher resolution than your computer supports, it is recommended that you attach an external monitor
to your computer.
Check the battery — If you are using a battery to power your computer, the battery charge may be depleted. Connect the computer to an
electrical outlet using the AC adapter, and turn on the computer.
Test the electrical outlet — Ensure that the electrical outlet is working by testing it with another device, such as a lamp.
Check the AC adapter — Check the AC adapter cable connections. If the AC adapter has a light, ensure that the light is on.
Connect the computer directly to an electrical outlet — Bypass power protection devices, power strips, and the extension cable to verify
that the computer turns on.
Adjust the power properties — Search for the keyword standby in the Windows Help and Support Center (Windows Help in Windows 2000).
Switch the video image — If your computer is attached to an external monitor, press <Fn><F8> to switch the video image to the display.
Adjust the brightness — Press <Fn> and the up- or down-arrow.
Move the external subwoofer away from the computer or monitor — If your external speaker system includes a subwoofer, ensure that
thesubwooferisatleast60cm(2ft)awayfromthecomputerorexternalmonitor.
Eliminate possible interference — Turn off nearby fans, fluorescent lights, halogen lamps, or other appliances.
Rotate the computer to face a different direction — Eliminate sunlight glare, which can cause poor picture quality.
AdjusttheWindowsdisplaysettings—
Windows XP

If only part of the display is readable
Back to Contents Page
1. Click the Start button and then click Control Panel.
2. Click Appearance and Themes.
3. Click the area you want to change or click the Display icon.
4. Try different settings for Color quality and Screen resolution.
Windows 2000
1. Click the Start button, point to Settings, and then click Control Panel.
2. Double-click the Display icon and click the Settings tab.
3. Try different settings for Colors, Screen area, and Advanced Settings.
Run the Video diagnostics tests — If no error message appears and you still have a display problem, but the display is not completely blank,
run the Video device group in the Dell Diagnostics. Then contact Dell.
See "Error Messages" — If an error message appears, see "Error Messages."
Connect an external monitor —
1. Shut down your computer and connect an external monitor to the computer.
2. Turn on the computer and the monitor and adjust the monitor brightness and contrast controls.
If the external monitor works, the computer display or video controller may be defective. Contact Dell.
Back to Contents Page
Specifications
DellPrecision™MobileWorkstationM20User'sGuide
Processor
Processor type
Intel®Pentium®M
L1 cache
32-KB instruction and 32-KB write-back data cache
L2 cache
2 MB
External bus frequency
533 MHz
SystemInformation
System chipset
Intel 915PM, ICH6-M
Processor Side Data bus width
64 bits
DRAM bus width
DDR2 dual channel 400 MHz/533 MHz (independent
64-bit memory data channels)
Processor address bus width
36 bits
Flash EPROM
1 MB
Graphics bus
integrated
PCI bus
32 bits
PCCard
CardBus controller
Texas Instruments PCI 6515 CardBus controller
(support for USB express cards through adapter in
CardBus slot)
PC Card connector
one (supports one Type I or Type II cards)
Cards supported
3.3 V and 5 V
PC Card connector size
68 pins
Data width (maximum)
PCMCIA 16 bits
CardBus 32 bits
Memory
Memory module connector
two user-accessible SODIMM sockets
Memory module capacities
256 MB, 512 MB, and 1 GB
Memory type
400-MHz or 533-MHz 1.8-V DDR2 SDRAM SODIMM
Minimum memory
256 MB
Maximum memory
2 GB
PortsandConnectors
Audio
microphone connector, stereo headphone/speakers
connector
Infrared
sensor compatible with IrDA Standard 1.1 (Fast IR)
and IrDA Standard 1.0 (Slow IR)
Mini PCI
Type IIIA Mini PCI card slot
Modem
RJ-11 port
Network adapter
RJ-45 port
Parallel
25-hole connector; unidirectional, bidirectional, or
ECP
Serial
9-pin connector; 16550C-compatible,
16-byte buffer connector
S-video TV-out
7-pin mini-DIN connector (optional S-video to
composite video adapter cable)
USB
4-pin USB 2.0-compliant connector
Video
15-hole connector

Communications
Modem:
Type
v.92 56K MDC (optional)
Controller
softmodem
Interface
internal AC'97 bus
Network adapter
10/100/1000 Ethernet LAN on system board
Wireless
internal Mini PCI Wi-Fi (802.11b, 802.11b/g, or
802.11a/b/g) and Bluetooth®wireless technology
(optional)
Video
Video type
discrete video adapter, 128-bit hardware accelerated
Data bus
PCI-E x16
Video controller
ATI Mobility FireGL V3100
Video memory
64 MB
LCD interface
LVDS
TV support
NTSC or PAL in S-video and composite modes
Color output
16.7 million colors
Audio
Audio type
AC'97 (Soft Audio)
Audio controller
Sigmatel 9751
Stereo conversion
18-bit (analog-to-digital)
20-bit (digital-to-analog)
Interfaces:
Internal
AC'97
External
microphone-in connector, stereo
headphones/speakers connector
Speaker
two 4-ohm speakers
Internal speaker amplifier
2-W channel into 4 ohms
Volume controls
keyboard shortcuts, program menus, mute and
volume-up/down buttons
Display
Type (active-matrix TFT)
XGA; SXGA+
Dimensions:
Height
214.3 mm (8.4 inches)
Width
285.7 mm (11.3 inches)
Diagonal
357.1 mm (14.1 inches)
Maximum resolutions:
XGA
1024 x 768 at 16.7 million colors
SXGA+
1400 x 1050 at 16.7 million colors
Operating angle
0º (closed)to180°
Viewing angles:
Horizontal
±40°
Vertical
+10°/–30°
Pixel pitch:
XGA
0.28 mm (12.1-inch); 0.297 mm (14.1-inch)
SXGA+
0.204 mm (14.1-inch)
Power consumption (panel with backlight)
(maximum):
XGA
6.0 W
SXGA+
6.0 W
Controls
brightness can be controlled through keyboard
shortcuts
Keyboard
Number of keys
87 (U.S. and Canada); 88 (Europe); 91 (Japan)
Layout
QWERTY/AZERTY/Kanji
TouchPad
X/Ypositionresolution(graphicstable mode)
240 cpi
Size:
Width
64.88 mm (2.55-inch) sensor-active area
Height
48.88-mm (1.92-inch) rectangle
TrackStick
X/Ypositionresolution(graphicstablemode)
250 count/sec @ 100 gf
Size
protrudes 0.5 mm higher than surrounding keycaps
Battery
Type
6-cell "smart" lithium ion (53 WHr) (standard)
4-cell "smart" lithium ion (32 WHr) (optional)
Dimensions:
Depth
88.5 mm (3.48 inches)
Height
21.5 mm (0.83 inch)
Width
139.0 mm (5.47 inches)
Weight
0.32kg(0.7lb)(6cell)0.25kg(0.56lb)(4cell)
Voltage
14.8 VDC
Charge time (approximate):
Computer on
2.5 hours
Computer off
1 hour
Operating time
varies depending on operating conditions and can be
significantly reduced under certain power-intensive
conditions
See "Using a Battery" for more information on battery
life.
Life span (approximate)
300 discharge/charge cycles
Temperature range:
Operating
0° to35°C(32°to95°F)
Storage
–20° to65°C(–4°to149°F)
ACAdapter
NOTE: The 90-W AC adapter is optional and may not ship with your computer.
Types
90 W and 65 W
Input voltage
90–264 VAC (both)
Input current (maximum)
1.7 A (both)
Input frequency
47–63 Hz (both)
Output current:
90 W
5.62 A (maximum at 4-second pulse); 4.62 A
(continuous)
65 W
4.34 A (maximum at 4-second pulse); 3.34 A
(continuous)
Output power
90 W or 65 W
Rated output voltage
19.5 VDC (both)
Dimensions:
Height
33.8–34.6 mm (1.34–1.36 inches) (90 W)
27.8–28.6 mm (1.10–1.12 inches) (65 W)
Width
60.9 mm (2.39 inches) (90 W)

Back to Contents Page
57.9 mm (2.28 inches) (65 W)
Temperature range:
Operating
0°to35°C(32°to95°F)(both)
Storage
–40°to65°C(–40°to149°F)(both)
Physical
Height
34.3 mm (1.35 inches)
Width
312 mm (12.28 inches)
Depth
262.2 mm (10.32 inches)
Weight:
With travel module
2.196 kg (4.88 lb) (6 cell)
2.115 kg (4.70 lb) (4 cell)
With CD drive
2.3895 kg (5.31 lb) (6 cell)
Environmental
Temperature range:
Operating
0° to35°C(32°to95°F)
Storage
–40° to65°C(–40°to149°F)
Relative humidity (maximum):
Operating
10% to 90% (noncondensing)
Storage
5% to 95% (noncondensing)
Maximum vibration (using a random-vibration
spectrum that simulates user environment):
Operating
0.66 GRMS
Storage
1.30 GRMS
Maximum shock (measured with hard drive in head-
parked position and a 2-ms half-sine pulse):
Operating
142 G, 70 in/s
Storage
163 G
Altitude (maximum):
Operating
–15.2 to 3048 m (–50 to 10,000 ft)
Storage
–15.2 to 10,668 m (–50 to 35,000 ft)

Back to Contents Page
DellPrecision™MobileWorkstationM20User'sGuide
For a complete list of abbreviations and acronyms, see the Glossary.
IfyoupurchasedaDell™nSeriescomputer,anyreferencesinthisdocumenttoMicrosoft®
Windows®operating systems are not applicable.
Information in this document is subject to change without notice.
©2004–2005DellInc.Allrightsreserved.
Reproduction in any manner whatsoever without the written permission of Dell Inc. is strictly forbidden.
Trademarks used in this text: Dell, the DELL logo, Inspiron, Dell Precision, Dimension, OptiPlex, Latitude, Dell TravelLite, PowerEdge, PowerVault, PowerApp, Strikezone, and Dell
OpenManage are trademarks of Dell Inc.; Intel, Intel SpeedStep, and Pentium are registered trademarks of Intel Corporation; Microsoft, MS-DOS, Outlook, and Windows are registered
trademarks of Microsoft Corporation; Bluetooth is a registered trademark owned by Bluetooth SIG, Inc. and is used by Dell Inc. under license; ENERGY STAR is a registered
trademark of the U.S. Environmental Protection Agency. As an ENERGY STAR partner, Dell Inc. has determined that this product meets the ENERGY STAR guidelines for energy
efficiency, EMC is the registered trademark of EMC Corporation.
Other trademarks and trade names may be used in this document to refer to either the entities claiming the marks and names or their products. Dell Inc. disclaims any
proprietary interest in trademarks and trade names other than its own.
Model PP11L
March2005P/NW7411Rev.A01
Back to Contents Page
NOTE: A NOTE indicates important information that helps you make better use of your computer.
NOTICE: A NOTICE indicates either potential damage to hardware or loss of data and tells you how to avoid the problem.
CAUTION: A CAUTION indicates a potential for property damage, personal injury, or death.
NOTE: Some features may not be available for your computer or in certain countries.

Back to Contents Page
Travelling With Your Computer
DellPrecision™MobileWorkstationM20User'sGuide
Identifying Your Computer
Packing the Computer
Travel Tips
Identifying Your Computer
l Attach a name tag or business card to the computer.
l Write down your Service Tag and store it in a safe place away from the computer or carrying case. Use the Service Tag if you need to report a loss or
theft to law enforcement officials and to Dell.
l Create a file on the Microsoft®Windows®desktop called if_found. Place information such as your name, address, and telephone number in this file.
l Contact your credit card company and ask if it offers coded identification tags.
Packing the Computer
l Remove any external devices attached to the computer and store them in a safe place. Remove any cables attached to installed PC Cards, and remove
any extended PC Cards.
l Tomakethecomputeraslightaspossible,replaceanydevicesinstalledinthemodulebaywiththeDellTravelLite™module.
l Fully charge the main battery and any spare batteries you plan to carry with you.
l Shut down the computer.
l Disconnect the AC adapter.
l Remove any extraneous items, such as paper clips, pens, and paper, from the keyboard and palm rest and close the display.
l UsetheoptionalDell™carryingcasetopackthecomputeranditsaccessoriestogethersafely.
l Avoid packing the computer with items such as shaving cream, colognes, perfumes, or food.
l Protect the computer, the batteries, and the hard drive from hazards such as extreme temperatures and overexposure to sunlight, dirt, dust, or liquids.
l Pack the computer so that it does not slide around in the trunk of your car or in an overhead storage compartment.
Travel Tips
l Consider disabling wireless activity on your computer to maximize battery operating time. To disable wireless activity, press <Fn><F2>.
l Consider changing your power management options to maximize battery operating time.
l If you are travelling internationally, carry proof of ownership—or of your right to use the computer if it is company-owned—to speed your passage
through customs. Investigate the customs regulations of the countries you plan to visit, and consider acquiring an international carnet (also known as a
merchandise passport) from your government.
l Ensure that you know which electrical outlets are used in the countries you will visit, and have appropriate power adapters.
l Check with your credit card company for information about the kinds of emergency travel assistance it offers to users of portable computers.
Travelling by Air
l Ensure that you have a charged battery available in case you are asked to turn on the computer.
NOTICE: When the display is closed, extraneous items on the keyboard or palm rest could damage the display.
NOTICE: If the computer has been exposed to extreme temperatures, allow it to acclimate to room temperature for 1 hour before turning it on.
NOTICE: Do not check the computer as baggage.
NOTICE: Do not move the computer while using the optical drive. Doing so can result in loss of data.
NOTICE: Do not walk the computer through a metal detector. Send the computer through an X-ray machine or have it hand inspected.

l Before you use the computer on an airplane, verify that such usage is permitted. Some airlines forbid the use of electronic devices during the flight. All
airlines forbid the use of electronic devices during takeoff and landing.
If Your Computer Is Lost or Stolen
l Call a law enforcement agency to report the lost or stolen computer. Include the Service Tag in your description of the computer. Ask that a case
number be assigned and write down the number, along with the name, address, and telephone number of the law enforcement agency. If possible,
obtain the name of the investigating officer.
l If the computer belongs to a company, notify the security office of the company.
l Contact Dell customer service to report the missing computer. Provide the computer Service Tag, the case number, and the name, address, and
telephone number of the law enforcement agency to which you reported the missing computer. If possible, give the name of the investigating officer.
The Dell customer service representative will log your report under the computer Service Tag and flag the computer as missing or stolen. If someone calls Dell
for technical assistance and gives your Service Tag, the computer is identified automatically as missing or stolen. The representative will attempt to get the
phone number and address of the caller. Dell will then contact the law enforcement agency to which you made the report of the missing computer.
Back to Contents Page
NOTE: If you know where the computer was lost or stolen, call a law enforcement agency in that area. If you do not know, call a law enforcement
agency where you live.
Back to Contents Page
Connecting to a Wireless Local Area Network
DellPrecision™MobileWorkstationM20User'sGuide
Determining Your Network Type
Connecting to a Wireless Network in Microsoft®Windows®XP
Determining Your Network Type
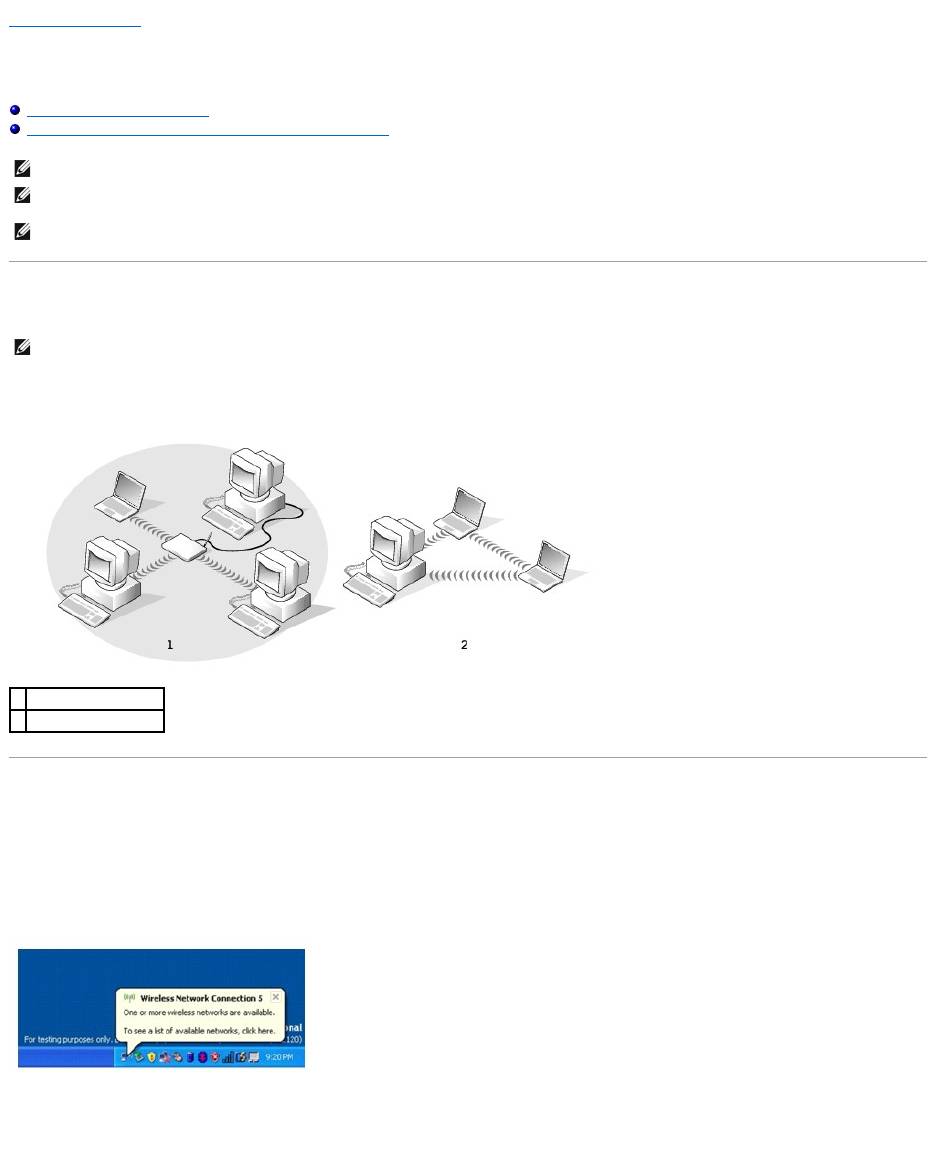
Wireless networks fall into two categories—infrastructure networks and ad-hoc networks. An infrastructure network uses routers or access points to connect
several computers. An ad-hoc network does not use routers or access points and consists of computers that broadcast to one another. For additional
assistance with setting up your wireless connection, go to support.dell.com and search for the keyword wireless setup.
Connecting to a Wireless Network in Microsoft®Windows®XP
Your wireless network card requires specific software and drivers in order to connect to a network. The software is already installed. If the software is
removed or corrupted, follow the instructions included in the user's guide for your wireless network card. The user's guide is located on your Drivers and
Utilities CD (that came with your computer) in the "User's Guides-Network User's Guides" category. The user's guide is also available on the Dell Support
website at support.dell.com.
When you turn on your computer, a pop-up appears from the network icon in the notification area whenever a network is detected in the area for which your
computer is not configured.
1. Click either the pop-up or the network icon to configure your computer for one of the available wireless networks.
The Wireless Network Connections window lists the wireless networks available in your area.
NOTE: These networking instructions do not apply to internal cards with Bluetooth®wireless technology or cellular products.
NOTE: To configure a wireless computer running the Windows 2000 operating system, see the user's guide that came with your wireless network
adapter.
NOTE: Your Dell QuickSet power management software can disable your wireless card. If your wireless card is not working, see your QuickSet Help by
clicking the QuickSet icon in the taskbar, then clicking Help.
NOTE: Most wireless networks are of the infrastructure type.
1
infrastructure network
2
ad-hoc network
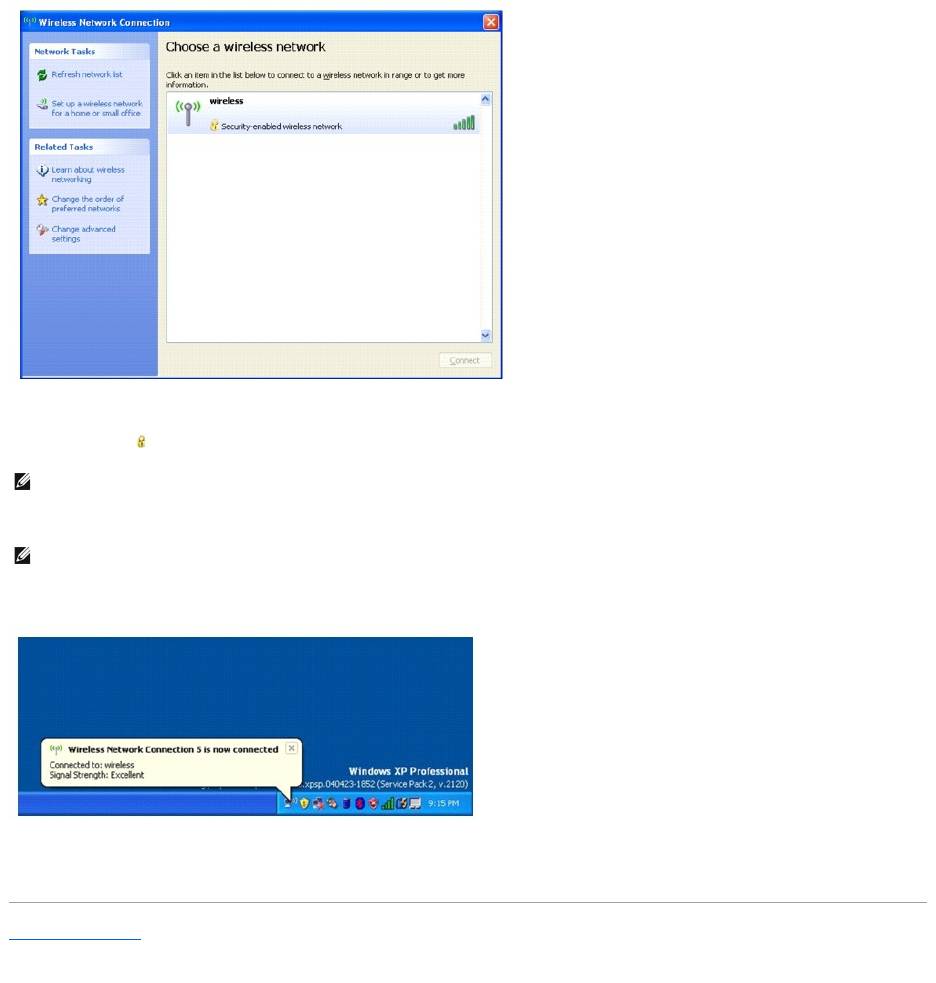
2. Click to select the network you want to configure, and then click Connect or double-click the network name in the list. If you select a secure network
(identified by a icon), you must enter a WEP or WPA key when prompted.
Your network is configured automatically.
After your computer is configured for the wireless network you selected, another pop-up notifies you that your computer is connected to the network
you selected.
Thereafter, whenever you log on to your computer in the area of the wireless network, the same pop-up notifies you of the wireless network
connection.
Back to Contents Page
NOTE: Network security settings are unique to your network. Dell cannot provide this information.
NOTE: Your computer can take up to 1 minute to connect to the network.

Back to Contents Page
Using Microsoft®Windows®XP
DellPrecision™MobileWorkstationM20User'sGuide
Help and Support Center
The Help and Support Center provides help with Windows XP and offers other support and educational tools. With the Help and Support Center, you can:
l Access user's guides for your computer hardware and software.
l Find detailed information about your computer, including configuration and error logs.
l Access support and educational tools installed on your computer.
l Search for topics based on words you provide.
To access the Help and Support Center, click the Start button and click Help and Support.
Microsoft®Windows®Classic View
You can change the appearance of the Windows desktop, Start menu, and Control Panel so that they look more like previous versions of the Windows
operating system.
Desktop
1. Click the Start button and click Control Panel.
2. Under Pick a category, click Appearance and Themes.
3. Under Pick a task..., click Change the computer's theme.
4. In the Theme drop-down menu, click Windows Classic.
5. Click OK.
Start Menu
1. Right-click the Start button and click Properties.
2. Click the Start Menu tab.
3. Click Classic Start menu and click OK.
Control Panel
1. Click the Start button and click Control Panel.
2. In the left panel, click Switch to Classic View.
Help and Support Center
Microsoft®Windows®Classic View
Desktop Cleanup Wizard
Transferring Information to a New Computer
User Accounts and Fast User Switching
Setting Up a Home and Office Network
Network Setup Wizard
Internet Connection Firewall
NOTE: The Microsoft®Windows®XP Home Edition and Windows XP Professional operating systems have different features and appearances. Also,
options available in Windows XP Professional vary depending on whether your computer is connected to a domain.
NOTE: TheproceduresinthisdocumentwerewrittenfortheWindowsdefaultview,sotheymaynotworkifyousetyourDell™computertothe
Windows classic view.

Desktop Cleanup Wizard
Your computer is set up to use the Desktop Cleanup Wizard to move programs that are not frequently used to a designated folder 7 days after you first start
your computer and every 60 days after that. The appearance of the Start menu changes as programs are moved.
To turn off the Desktop Cleanup Wizard, perform the following steps.
1. Right-click an empty spot on the desktop and click Properties.
2. Click the Desktop tab and click Customize Desktop.
3. Click Run Desktop Cleanup Wizard every 60 days to remove the check mark.
4. Click OK.
To run the Desktop Cleanup Wizard at any time:
1. Right-click an empty spot on the desktop and click Properties.
2. Click the Desktop tab and click Customize Desktop.
3. Click Clean Desktop Now.
4. When the Desktop Cleanup Wizard appears, click Next.
5. In the list of shortcuts, deselect any shortcuts you want to leave on the desktop and click Next.
6. Click Finish to remove the shortcuts and close the wizard.
Transferring Information to a New Computer
The Microsoft®
Windows®XP operating system provides a Files and Settings Transfer wizard to move data from the source computer to the new computer.
You can move data such as:
l E-mails
l Toolbar settings
l Window sizes
l Internet bookmarks
You can transfer the data to the new computer over a network or serial connection, or you can store it on a removable medium, such as a writable CD or
floppy.
To prepare the new computer for the file transfer:
1. Click the Start button, point to All Programs® Accessories® System Tools, and then click Files and Settings Transfer Wizard.
2. When the Files and Settings Transfer Wizard welcome screen appears, click Next.
3. On the Which computer is this? screen, click New Computer and click Next.
4. On the Do you have a Windows XP CD? screen, click I will use the wizard from the Windows XP CD and click Next.
5. When the Now go to your old computer screen appears, go to your old or source computer. Do not click Next at this time.
To copy data from the old computer:
1. On the old computer, insert the Windows XP Operating System CD.
2. On the Welcome to Microsoft Windows XP screen, click Perform additional tasks.
3. Under What do you want to do?, click Transfer files and settings.
4. On the Files and Settings Transfer Wizard welcome screen, click Next.
NOTE: You can run the Desktop Cleanup Wizard any time by clicking Clean Desktop Now under Run Desktop Cleanup Wizard every 60 days.

5. On the Which computer is this? screen, click Old Computer and click Next.
6. On the Select a transfer method screen, click the transfer method you prefer.
7. On the What do you want to transfer? screen, select the items you want to transfer and click Next.
After the information has been copied, the Completing the Collection Phase screen appears.
8. Click Finish.
To transfer data to the new computer:
1. On the Now go to your old computer screen on the new computer, click Next.
2. On the Where are the files and settings? screen, select the method you chose for transferring your settings and files and click Next.
The wizard reads the collected files and settings and applies them to your new computer.
When all of the settings and files have been applied, the Finished screen appears.
3. Click Finished and restart the new computer.
User Accounts and Fast User Switching
Adding User Accounts
After the Microsoft®Windows®XP operating system is installed, the administrator or a user with administrator rights can create additional user accounts.
1. Click the Start button and click Control Panel.
2. In the Control Panel window, click User Accounts.
3. Under Pick a task, click Create a new account.
4. Under Name the new account, type the name of the new user and click Next.
5. Under Pick an account type, click one of the following options:
l Computer administrator — You can change all computer settings.
l Limited — You can change only your own personal settings, such as your password. You cannot install programs or use the Internet.
6. Click Create Account.
Fast User Switching
Fast User Switching allows multiple users to access one computer without requiring the previous user to log off.
1. Click the Start button and click Log Off.
2. In the Log Off Windows window, click Switch User.
When you use Fast User Switching, programs that previous users were using remain running in the background, which might slow your computer's response
time. Also, multimedia programs, such as games and DVD software, might not work with Fast User Switching. For more information, see the Help and Support
Center.
Setting Up a Home and Office Network
NOTE: Additional options may be available, depending on whether you are using Windows XP Home Edition or Windows XP Professional. Also, options
available in Windows XP Professional vary depending on whether your computer is connected to a domain.
NOTE: Fast User Switching is unavailable if your computer is running Windows XP Professional and is a member of a computer domain, or if your
computer has less than 128 MB of memory.
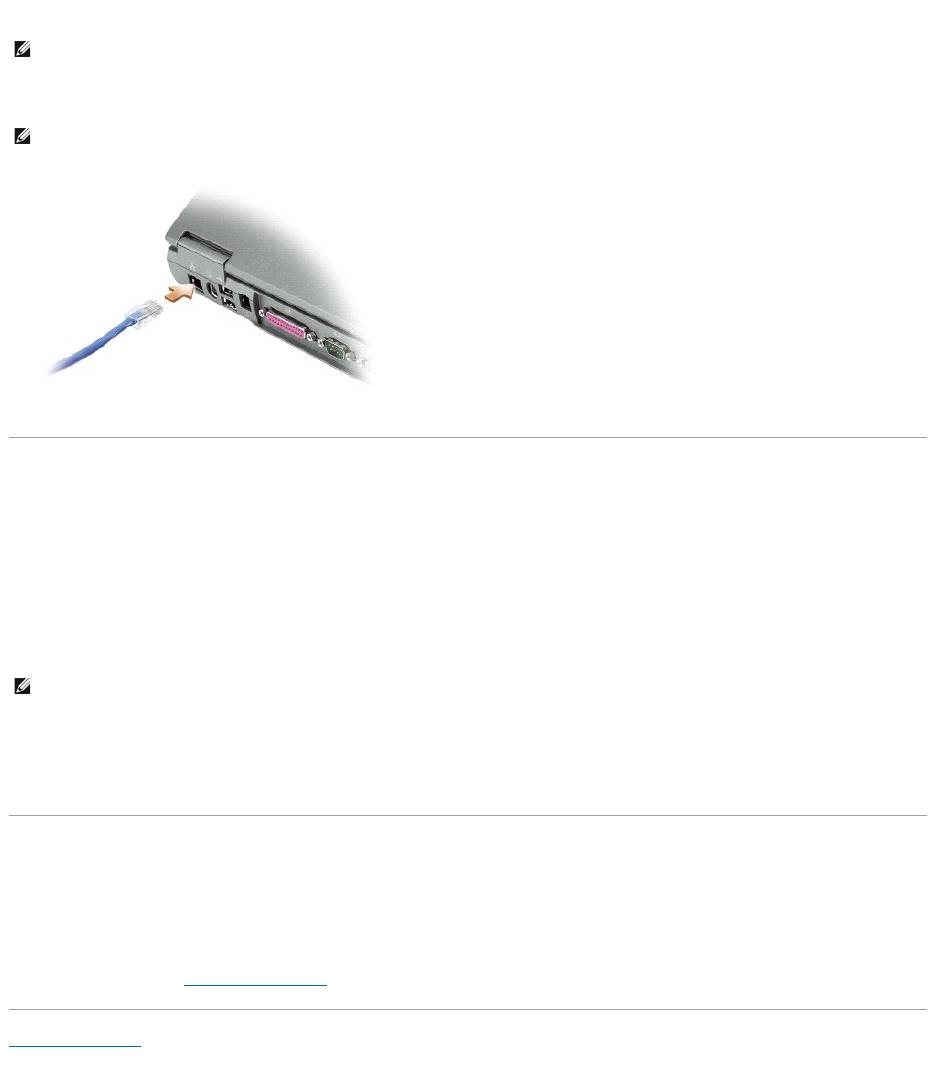
1. Connect the network cable to the network adapter connector on the back of your computer.
2. Connect the other end of the network cable to a network connection device, such as a network wall connector.
Network Setup Wizard
The Microsoft®Windows®XP operating system provides a Network Setup Wizard to guide you through the process of sharing files, printers, or an Internet
connection between computers in a home or small office.
1. Click the Start button, point to All Programs® Accessories® Communications, and then click Network Setup Wizard.
2. On the welcome screen, click Next.
3. Click Checklist for creating a network.
4. Complete the checklist and required preparations.
5. Return to the Network Setup Wizard and follow the instructions on the screen.
Internet Connection Firewall
The Internet Connection Firewall provides basic protection from unauthorized access to the computer while the computer is connected to the Internet. The
firewall is automatically enabled when you run the Network Setup Wizard. When the firewall is enabled for a network connection, the firewall icon appears
with a red background in the Network Connections section of the Control Panel.
Note that enabling the Internet Connection Firewall does not reduce the need for virus-checking software.
For more information, see the Help and Support Center (Microsoft®Windows®XP) or Windows Help (Windows 2000).
Back to Contents Page
NOTE: Insert the cable until it clicks into place, and then gently pull it to ensure that it is secure.
NOTE: Do not use a network cable with a telephone wall connector.
NOTE: Selecting the connection method labeled "This computer connects directly to the Internet" enables the integrated firewall provided with
Windows XP Service Pack 1 (SP1).
