Dell PowerVault MD3600i – страница 4
Инструкция к Компьютерным аксессуарам Dell PowerVault MD3600i
Оглавление

Windows XP
1
Click the
Start
button and click
Control Panel
.
2
Under
Pick a Category
, click
Performance and Maintenance
.
3
Click
System
.
4
In the
System Properties
window, click the
Hardware
tab.
5
Click
Device Manager
.
6
Scroll down the list to see if any device has an exclamation point (a yellow circle with a [
!]
) on
the device icon.
If an exclamation point is next to the device name, you may need to reinstall the driver or
install a new driver (see "Drivers" on page 60).
Reinstalling Drivers
NOTICE: The Dell Support website at support.dell.com and your Dell ResourceCD provide approved
drivers for Dell™ computers. If you install drivers obtained from other sources, your computer might not
work correctly.
Using Windows XP Device Driver Rollback
If a problem occurs on your computer after you install or update a driver, use Windows XP
Device Driver Rollback to replace the driver with the previously installed version.
1
Click the
Start
button and click
Control Panel
.
2
Under
Pick a Category
, click
Performance and Maintenance
.
3
Click
System
.
4
In the
System Properties
window, click the
Hardware
tab.
5
Click
Device Manager
.
6
Right-click the device for which the new driver was installed and click
Properties
.
7
Click the
Drivers
tab.
8
Click
Roll Back Driver
.
If Device Driver Rollback does not resolve the problem, then use System Restore to return your
computer to the operating state that existed before you installed the new driver.
Using the ResourceCD
If using Device Driver Rollback or System Restore does not resolve the problem, then reinstall
the driver from the ResourceCD.
1
With the Windows desktop displayed, insert the ResourceCD.
If this is your first time to use the ResourceCD, go to step 2. If not, go to step 5.
2
When the ResourceCD installation program starts, follow the prompts on the screen.
Advanced Troubleshooting 61

3
When the
InstallShield Wizard Complete
window appears, remove the ResourceCD and
click
Finish
to restart the computer.
4
When you see the Windows desktop, reinsert the ResourceCD.
5
At the
Welcome Dell System Owner
screen, click
Next
.
NOTE: The ResourceCD displays drivers only for hardware that came installed in your computer. If you
installed additional hardware, the drivers for the new hardware might not be displayed by the
ResourceCD. If those drivers are not displayed, exit the ResourceCD program. For drivers information,
see the documentation that came with the device.
A message stating that the ResourceCD is detecting hardware in your computer appears.
The drivers that are used by your computer are automatically displayed in the
www.dell.com | support.dell.com
My Drivers—The ResourceCD has identified these components in your system
window.
6
Click the driver that you want to reinstall and follow the instructions on the screen.
If a particular driver is not listed, then that driver is not required by your operating system.
Manually Reinstalling Drivers
1
After extracting the driver files to your hard drive as described in the previous section, click
the
Start
button and right-click
My Computer
.
2
Click
Properties
.
3
Click the
Hardware
tab and click
Device Manager
.
4
Double-click the type of device for which you are installing the driver.
5
Double-click the name of the device for which you are installing the driver.
6
Click the
Driver
tab and click
Update Driver
.
7
Click
Install from a list or specific location (Advanced)
and click
Next
.
8
Click
Browse
and browse to the location to which you previously extracted the driver files.
9
When the name of the appropriate driver appears, click
Next
.
10
Click
Finish
and restart your computer.
®
®
Using Microsoft
Windows
XP System Restore
®
®
The Microsoft
Windows
XP operating system provides System Restore to allow you to return
your computer to an earlier operating state (without affecting data files) if changes to the
hardware, software, or other system settings have left the computer in an undesirable operating
state. See the Windows Help and Support Center for information on using System Restore. To
access help, see "Windows Help and Support Center" on page 12.
NOTICE: Make regular backups of your data files. System Restore does not monitor your data files or
recover them.
62 Advanced Troubleshooting

Creating a Restore Point
1
Click the
Start
button and click
Help and Support
.
2
Click
System Restore
.
3
Follow the instructions on the screen.
Restoring the Computer to an Earlier Operating State
If problems occur after you install a device driver, use Device Driver Rollback (see "Using
Windows XP Device Driver Rollback" on page 61) to resolve the problem. If that is
unsuccessful, then use System Restore.
NOTICE: Before you restore the computer to an earlier operating state, save and close any open files
and exit any open programs. Do not alter, open, or delete any files or programs until the system
restoration is complete.
1
Click the
Start
button, point to
All Programs
→
Accessories
→
System Tools
, and then click
System Restore
.
2
Ensure that
Restore my computer to an earlier time
is selected and click
Next
.
3
Click a calendar date to which you want to restore your computer.
The
Select a Restore Point
screen provides a calendar that allows you to see and select restore
points. All calendar dates with available restore points appear in boldface type.
4
Select a restore point and click
Next
.
If a calendar date has only one restore point, then that restore point is automatically selected.
If two or more restore points are available, click the restore point that you prefer.
5
Click
Next
.
The
Restoration Complete
screen appears after System Restore finishes collecting data and
then the computer restarts.
6
After the computer restarts, click
OK
.
To change the restore point, you can either repeat the steps using a different restore point, or
you can undo the restoration.
Undoing the Last System Restore
NOTICE: Before you undo the last system restore, save and close all open files and exit any open
programs. Do not alter, open, or delete any files or programs until the system restoration is complete.
1
Click the
Start
button, point to
All Programs
→
Accessories
→
System Tools
, and then click
System Restore
.
2
Click
Undo my last restoration
and click
Next
.
Advanced Troubleshooting 63

3
Click
Next
.
The
System Restore
screen appears and the computer restarts.
4
After the computer restarts, click
OK
.
Enabling System Restore
If you reinstall Windows XP with less than 200 MB of free hard-disk space available, System
Restore is automatically disabled. To see if System Restore is enabled:
1
Click the
Start
button and click
Control
Panel
.
2
Click
Performance and Maintenance
.
3
Click
System
.
www.dell.com | support.dell.com
4
Click the
System Restore
tab.
5
Ensure that
Turn off System Restore
is unchecked.
Resolving Software and Hardware Incompatibilities
If a device is either not detected during the operating system setup or is detected but incorrectly
configured, you can use the Hardware Troubleshooter to resolve the incompatibility.
To resolve incompatibilities using the Hardware Troubleshooter:
1
Click the
Start
button and click
Help and Support
.
2
Ty p e
hardware troubleshooter
in the
Search
field and click the arrow to start the search.
3
Click
Hardware Troubleshooter
in the
Search Results
list.
4
In the
Hardware Troubleshooter
list, click
I need to resolve a hardware conflict on my
computer
, and click
Next
.
®
®
Reinstalling Microsoft
Windows
XP
NOTICE: You must use Windows XP Service Pack 1 (SP1) or later when you reinstall Windows XP.
NOTICE: If, after installing the operating system, you may ever wish to use a specific hard drive in an
array, you must create a single drive RAID 0 array when installing the operating system. See "Creating an
Array using the Nvidia MediaShield ROM Utility" on page 23 for instructions.
Before You Begin
If you are considering reinstalling the Windows XP operating system to correct a problem with a
newly installed driver, first try using Windows XP Device Driver Rollback (see "Using Windows
XP Device Driver Rollback" on page 61). If Device Driver Rollback does not resolve the
®
®
problem, then use System Restore (see "Using Microsoft
Windows
XP System Restore" on
page 62) to return your operating system to the operating state it was in before you installed the
new device driver.
64 Advanced Troubleshooting

NOTICE: Before performing the installation, back up all data files on your primary hard drive. For
conventional hard drive configurations, the primary hard drive is the first drive detected by the computer.
To reinstall Windows XP, you need the following items:
•Dell™
Operating System
CD
•Dell ResourceCD
NOTE: The ResourceCD contains drivers that were installed during assembly of the computer. Use the
ResourceCD to load any required drivers.
Reinstalling Windows XP
To reinstall Windows XP, perform all the steps in the following sections in the order in which
they are listed.
The reinstallation process can take 1 to 2 hours to complete. After you reinstall the operating
system, you must also reinstall the device drivers, virus protection program, and other software.
NOTICE: The Operating System CD provides options for reinstalling Windows XP. The options can
overwrite files and possibly affect programs installed on your hard drive. Therefore, do not reinstall
Windows XP unless a Dell technical support representative instructs you to do so.
NOTICE: To prevent conflicts with Windows XP, disable any virus protection software installed on your
computer before you reinstall Windows XP. See the documentation that came with the software for
instructions.
Booting From the Operating System CD
1
Save and close any open files and exit any open programs.
2
Insert the
Operating System
CD. Click
Exit
if
Install Windows XP
message appears.
3
Restart the computer.
4
Press <F12> immediately after the DELL™ logo appears.
If the operating system logo appears, wait until you see the Windows desktop, and then shut
down the computer and try again.
5
Press the arrow keys to select
CD-ROM
, and press <Enter>.
6
When the
Press any key to boot from CD
message appears, press any key.
Windows XP Setup
1
When the
Windows XP Setup
screen appears, press <Enter> to select
To set up
Windows now
.
2
Read the information on the
Microsoft Windows Licensing Agreement
screen, and press
<F8> to accept the license agreement.
3
If your computer already has Windows XP installed and you want to recover your current
Windows XP data, type
r
to select the repair option, and remove the CD.
Advanced Troubleshooting 65

4
If you want to install a new copy of Windows XP, press <Esc> to select that option.
5
Press <Enter> to select the highlighted partition (recommended), and follow the
instructions on the screen.
The
Windows XP Setup
screen appears, and the operating system begins to copy files and
install the devices. The computer automatically restarts multiple times.
NOTE: The time required to complete the setup depends on the size of the hard drive and the speed of
your computer.
NOTICE: Do not press any key when the following message appears: Press any key to boot
from the CD.
6
When the
Regional and Language Options
screen appears, select the settings for your
www.dell.com | support.dell.com
location and click
Next
.
7
Enter your name and organization (optional) in the
Personalize Your Software
screen, and
click
Next
.
8
If you are reinstalling Windows XP Home Edition
, at the
What's your computer's name
window, enter a name for your computer (or accept the name provided) and click
Next
.
If you are reinstalling Windows XP Professional
, at the
Computer Name and Administrator
Password
window, enter a name for your computer (or accept the one provided) and a
password, and click
Next
.
9
If the
Modem Dialing Information
screen appears, enter the requested information and click
Next
.
10
Enter the date, time, and time zone in the
Date and Time Settings
window, and click
Next
.
11
If the
Networking Settings
screen appears, click
Typical
and click
Next
.
12
If you are reinstalling Windows XP Professional and you are prompted to provide further
information regarding your network configuration, enter your selections. If you are unsure of
your settings, accept the default selections.
Windows XP installs the operating system components and configures the computer. The
computer automatically restarts.
NOTICE: Do not press any key when the following message appears: Press any key to boot
from the CD.
13
When the
Welcome to Microsoft
screen appears, click
Next
.
14
When the
How will this computer connect to the Internet?
message appears,
click
Skip
.
15
When the
Ready to register with Microsoft?
screen appears, select
No, not at this time
and
click
Next
.
16
When the
Who will use this computer?
screen appears, you can enter up to five users.
17
Click
Next
.
66 Advanced Troubleshooting

18
Click
Finish
to complete the setup, and remove the CD.
19
Reinstall the appropriate drivers with the ResourceCD (see "Reinstalling Drivers" on
page 61).
20
Reinstall your virus protection software.
21
Reinstall your programs.
NOTE: To reinstall and activate your Microsoft Office or Microsoft Works Suite programs, you need the
Product Key number located on the back of the Microsoft Office or Microsoft Works Suite CD sleeve.
Advanced Troubleshooting 67

www.dell.com | support.dell.com
68 Advanced Troubleshooting

Removing and Installing Parts
Before You Begin
This chapter provides procedures for removing and installing the components in your computer.
Unless otherwise noted, each procedure assumes that the following conditions exist:
• You have performed the steps in "Turning Off Your Computer" on page 69 and "Before
Working Inside Your Computer" on page 70.
• You have read the safety information in your Dell™
Product Information Guide.
• A component can be replaced by performing the removal procedure in reverse order.
Recommended Tools
The procedures in this document may require the following tools:
• Small flat-blade screwdriver
• Phillips screwdriver
• BIOS updates available on
support.dell.com
Turning Off Your Computer
NOTICE: To avoid losing data, save and close any open files and exit any open programs before you turn
off your computer.
1
Shut down the operating system:
a
Save and close any open files, exit any open programs, click the
Start
button, and then
click
Turn Off Computer
.
b
In the
Turn off computer
window, click
Tur n o ff
.
The computer turns off after the operating system shutdown process finishes.
2
Ensure that the computer and any attached devices are turned off. If your computer and
attached devices did not automatically turn off when you shut down your operating system,
press and hold the power button for 4 seconds.
Removing and Installing Parts 69

Before Working Inside Your Computer
Use the following safety guidelines to help protect your computer from potential damage and to
help ensure your own personal safety.
CAUTION: Before you begin any of the procedures in this section, follow the safety instructions located
in the Product Information Guide.
CAUTION: Handle components and cards with care. Do not touch the components or contacts on a
card. Hold a card by its edges or by its metal mounting bracket. Hold a component such as a processor
by its edges, not by its pins.
NOTICE: Only a certified service technician should perform repairs on your computer. Damage due to
servicing that is not authorized by Dell is not covered by your warranty.
www.dell.com | support.dell.com
NOTICE: When you disconnect a cable, pull on its connector or on its strain-relief loop, not on the cable
itself. Some cables have a connector with locking tabs; if you are disconnecting this type of cable, press
in on the locking tabs before you disconnect the cable. As you pull connectors apart, keep them evenly
aligned to avoid bending any connector pins. Also, before you connect a cable, ensure that both
connectors are correctly oriented and aligned.
NOTICE: To avoid damaging the computer, perform the following steps before you begin working inside
the computer.
1
Turn off your computer (see "Turning Off Your Computer" on page 69).
NOTICE: To disconnect a network cable, first unplug the cable from your computer and then unplug it
from the network port or device.
2
Disconnect any telephone or telecommunication lines from the computer.
3
Disconnect your computer and all attached devices from their electrical outlets, and then
press the power button to ground the system board.
CAUTION: To guard against electrical shock, always unplug your computer from the electrical outlet
before opening the cover.
4
Open the computer cover (see "Opening the Computer Cover" on page 76).
NOTICE: Before touching anything inside your computer, ground yourself by touching an unpainted
metal surface, such as the metal at the back of the computer. While you work, periodically touch an
unpainted metal surface to dissipate any static electricity that could harm internal components.
70 Removing and Installing Parts
Front and Back View of the Computer
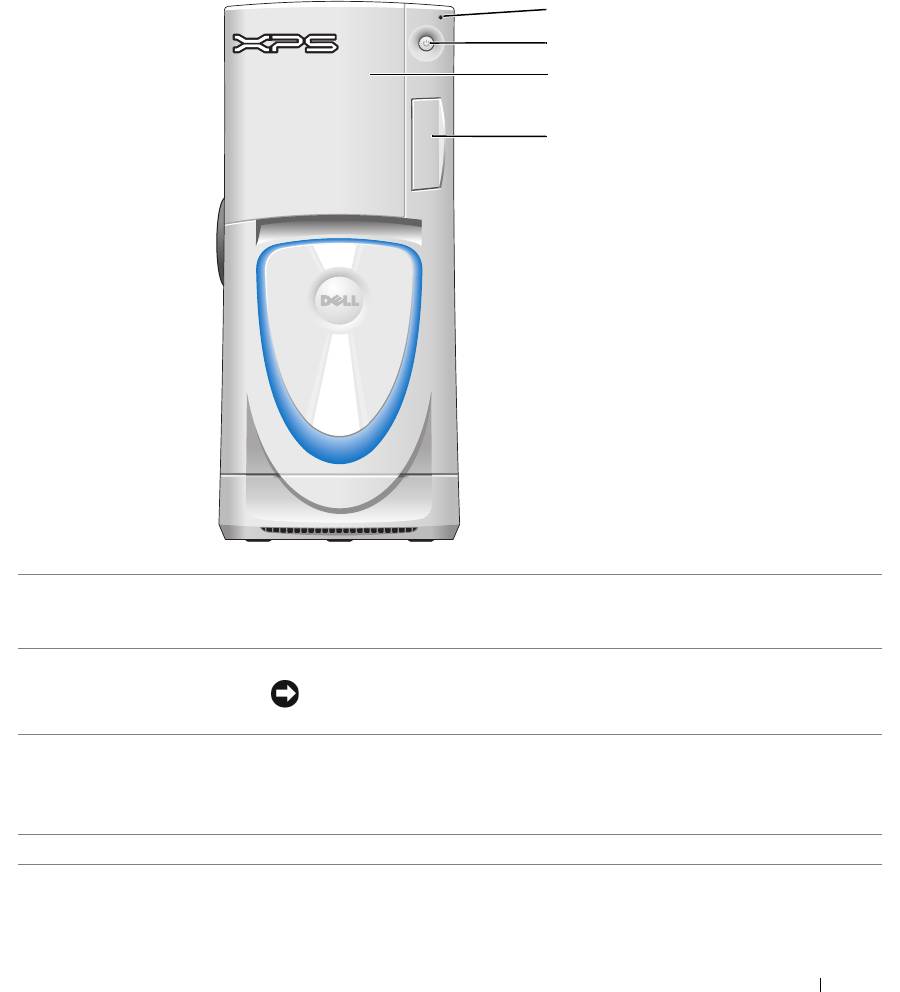
Front View
1
2
3
4
1
hard-drive activity light The hard-drive light is on when the computer reads data from or writes data to the
hard drive. The light might also be on when a device such as your CD player is
operating.
2
power button
Press to turn on the computer.
NOTICE: To avoid losing data, do not use the power button to turn off the
computer. Instead, perform an operating system shutdown.
3
drive door Open the drive door to access the floppy and CD/DVD drives.
NOTE: The drive door is removable; if you remove it or accidentally knock it off its
hinges, it snaps back in place. For instructions on how to reattach the door, see
"Replacing the Drive Door" on page 122.
4
front-panel door
Open the front-panel door to use the front-panel connectors.
Removing and Installing Parts 71
Front View (Doors Open)
1
2
3
4
5
www.dell.com | support.dell.com
1
headphone connector
Use the headphone connector to attach headphones and most kinds of speakers.
2
microphone connector Use the microphone connector to attach a personal computer microphone for voice or
musical input into a sound or telephony program.
3
USB 2.0 connectors (2) Use the front USB connectors for devices that you connect occasionally, such as joysticks
or cameras.
It is recommended that you use the back USB connectors for devices that typically
remain connected, such as printers and keyboards
, or for bootable USB devices, which
may not function properly if attached to the front connectors
.
4
IEEE 1394 connector Attach high-speed serial multimedia devices, such as digital video cameras.
5
diagnostic lights (4) Use the lights to help you troubleshoot a computer problem based on the diagnostic
code. For more information, see "Diagnostic Lights" on page 55.
72 Removing and Installing Parts
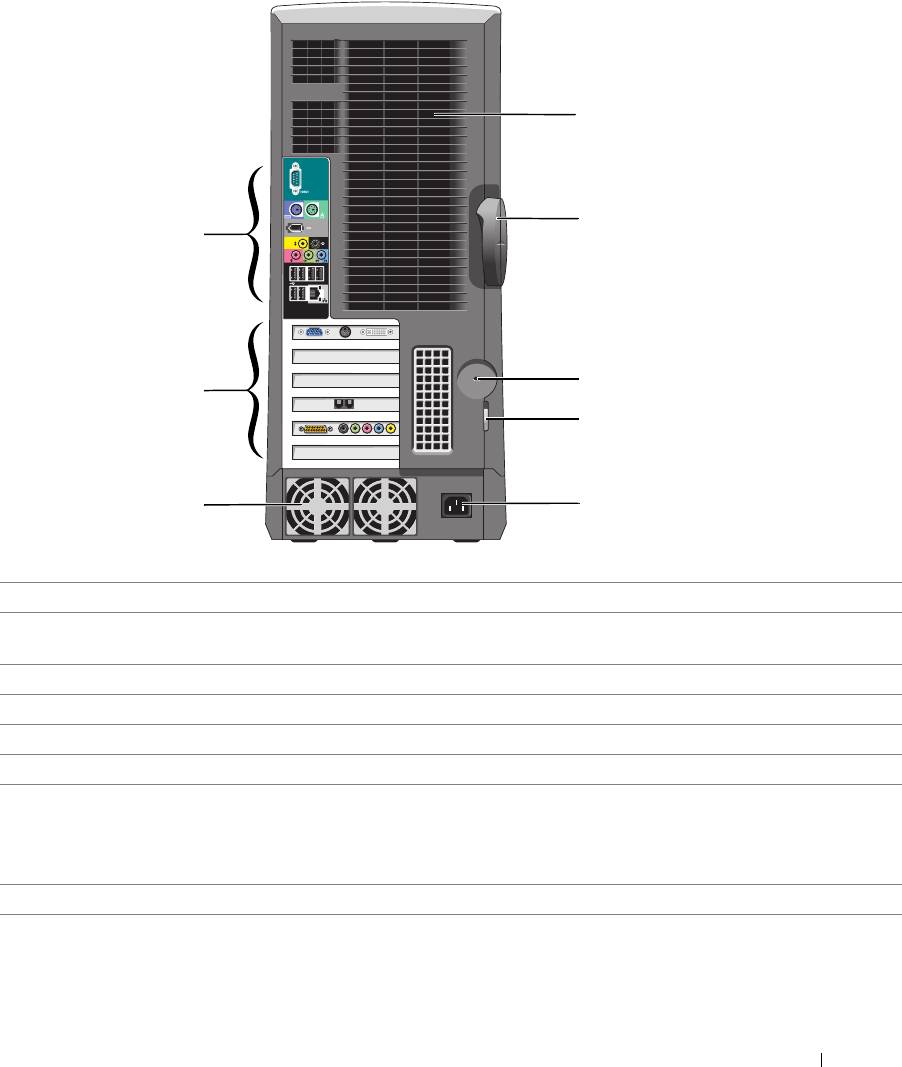
Back View
1
2
8
3
7
4
6
5
1
processor fans (2) For optimal cooling, two processor fans are provided. Do not block the vents.
2 cover latch release To open the computer, lay the computer on its side with the cover latch release at the top
and then push the latch to the left. See "Opening the Computer Cover" on page 76.
3 security cable slot Use a security cable with the slot to help secure your computer.
4 padlock ring Insert a padlock to lock the computer cover.
5 power connector Insert the power cable.
6
power supply fans For optimal cooling, two power supply fans are provided. Do not block the vents.
7
card slots (6)
Access connectors for optional video, audio, modem, or other PCI cards (three slots) and
PCI Express cards (two x16 slots and one x1 slot).
NOTE: If a graphics card is installed in each of the PCI Express x16 card slots in the dual-
graphics configuration, the PCI Express x1 card slot is not available for use.
8
back panel connectors Plug USB, audio, and other devices into the appropriate connector.
Removing and Installing Parts 73
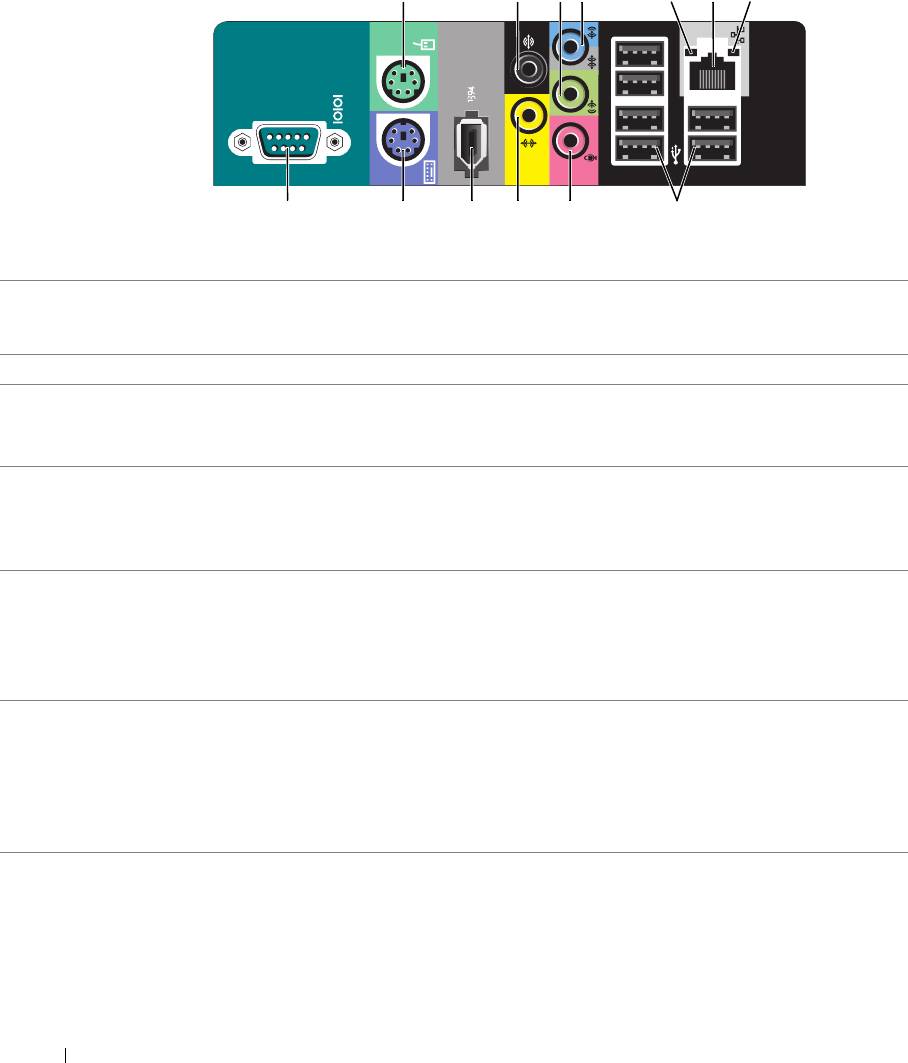
1 3 4
56
72
10111213
9
8
www.dell.com | support.dell.com
1
mouse connector Plug a standard mouse into the green mouse connector. Turn off the computer and any
attached devices before you connect a mouse to the computer. If you have a USB mouse,
plug it into a USB connector.
2
surround connector Use the black surround connector to attach multichannel-capable speakers.
3
line-out connector Use the green line-out connector (available on computers with integrated sound) to attach
headphones and most speakers with integrated amplifiers.
On computers with a sound card, use the connector on the card.
4
line-in connector / side-
Use the blue and silver connector to attach a record/playback device such as a cassette
surround
player, CD player, or VCR, or to provide enhanced surround audio for computers with 7.1
speakers.
On computers with a sound card, use the connector on the card.
5
link integrity light • Green — A good connection exists between a 10-Mbps network and the computer.
• Orange — A good connection exists between a 100-Mbps network and the computer.
• Yellow — A good network connection exists between a 1000-Mbps network and the
computer.
• Off — The computer is not detecting a physical connection to the network.
6
network adapter
To attach your computer to a network or broadband device, connect one end of a network
connector
cable to either a network jack or your network or broadband device. Connect the other end
of the network cable to the network adapter connector on the back panel of your computer.
A click indicates that the network cable has been securely attached.
NOTE: Do not plug a telephone cable into the network connector.
On computers with a network connector card, use the connector on the card.
74 Removing and Installing Parts

7
network activity light Flashes a yellow light when the computer is transmitting or receiving network data. A high
volume of network traffic may make this light appear to be in a steady "on" state.
8
USB 2.0 connectors (6)
Use the back USB connectors for devices that typically remain connected, such as
printers and keyboards.
It is recommended that you use the front USB connectors for devices that you connect
occasionally, such as joysticks or cameras.
9
microphone connector Use the pink connector to attach a personal computer microphone for voice or musical
input into a sound or telephony program.
On computers with a sound card, the microphone connector is on the card.
10
center/subwoofer
Use the yellow connector to attach a speaker to a Low Frequency Effects (LFE) audio
connector
channel.
11
IEEE 1394 connector Attach high-speed serial multimedia devices, such as digital video cameras.
12
keyboard connector If you have a standard keyboard, plug it into the purple keyboard connector. If you have a
USB keyboard, plug it into a USB connector.
13
serial connector
Connect a serial device, such as a handheld device, to the serial port.
Removing and Installing Parts 75
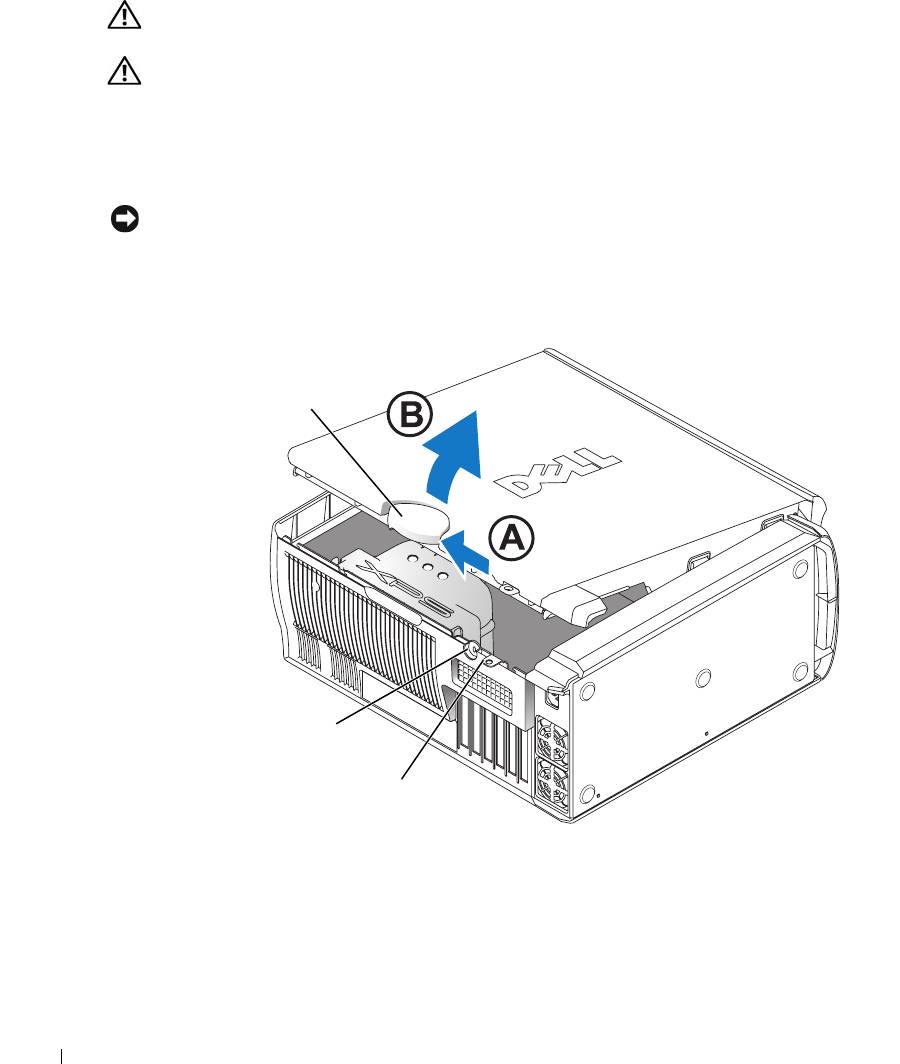
Opening the Computer Cover
CAUTION: Before you begin any of the procedures in this section, follow the safety instructions
located in the Product Information Guide.
CAUTION: To prevent static damage to components inside your computer, discharge static electricity
from your body before you touch any of your computer’s electronic components. You can do so by
touching an unpainted metal surface on the computer chassis.
1
Follow the procedures in "Before You Begin" on page 69.
2
Lay the computer on its side so that the arrow on the bottom of the computer points up.
NOTICE: Ensure that sufficient space exists to accommodate the open cover—at least 30 cm (1 ft) of
desk top space.
www.dell.com | support.dell.com
3
Slide the cover release latch toward the top of the computer.
4
Raise the cover, and pivot it toward the front of the computer.
cover release latch
security cable slot
padlock ring
76 Removing and Installing Parts
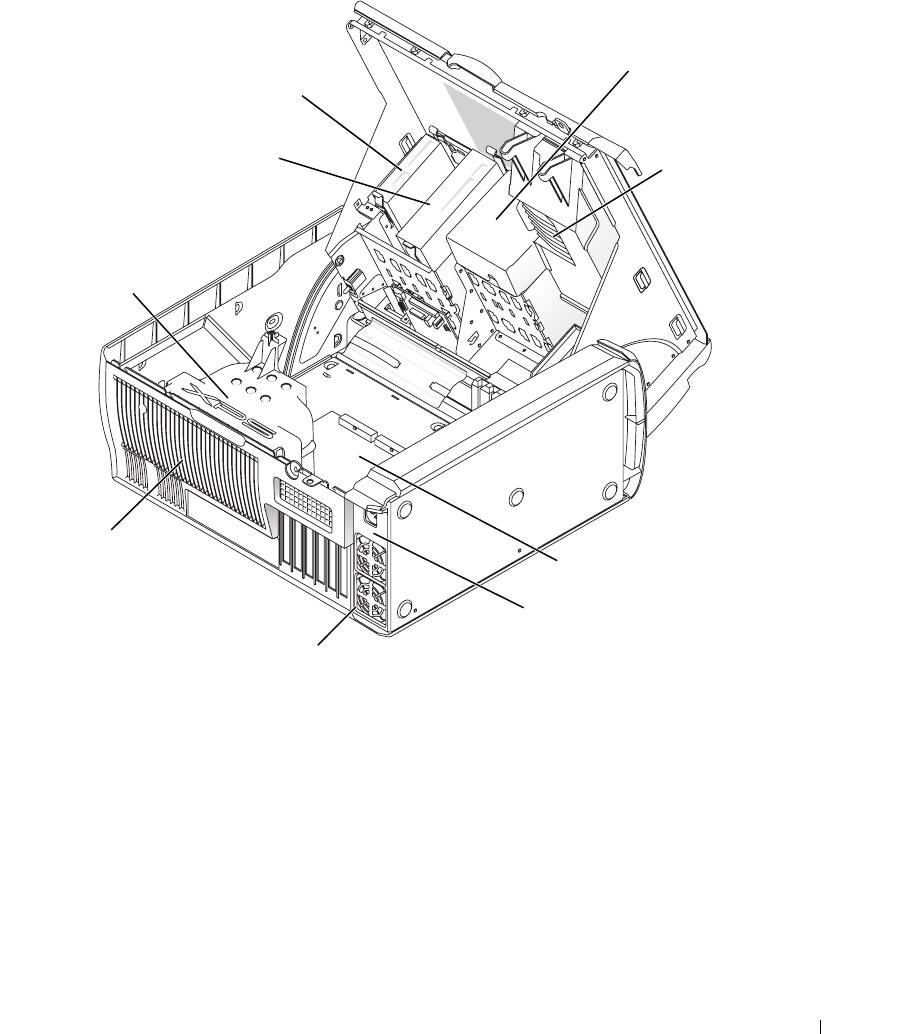
Inside View of Your Computer
hard drive
floppy drive
shroud
CD/DVD drive
PCI card shroud
and fan
processor
airflow shroud
processor fan
system board
power supply
power supply fans (2)
Removing and Installing Parts 77
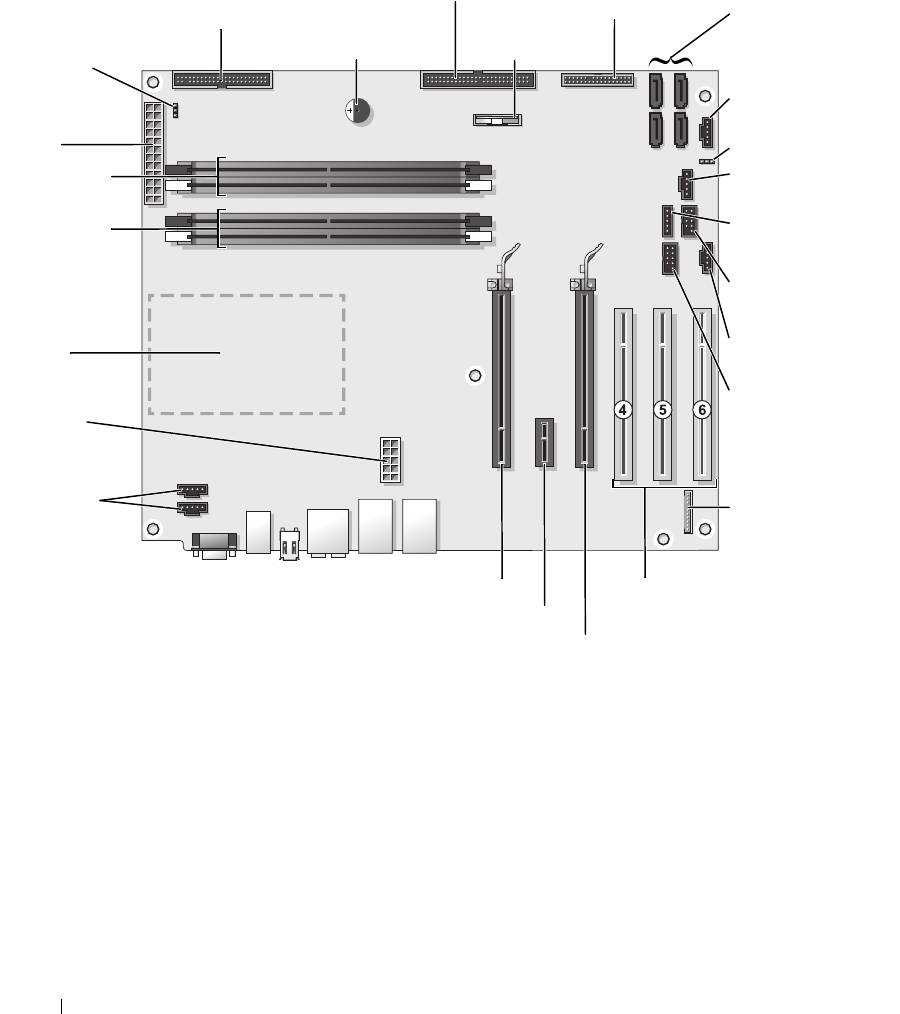
System Board Components
optical drive connector (IDE)
front-panel connector
(FRNT PNL)
floppy-drive connector (FLOPPY)
serial ATA connectors
(SATA0 - SATA3)
password jumper
internal speaker (SPKR)
battery (BATT)
(PASSWORD)
card fan connector
main power
(FAN CCAG)
connector
CMOS jumper
(POWER)
(RTCRST)
memory module
front-panel light
connectors (2, 4)
connector (LED)
www.dell.com | support.dell.com
memory module
internal USB
connectors (1, 3)
connector (USB)
USB FlexBay
connector (FLEXBAY)
processor and
heat-sink
card fan connector
connector
(FAN SYS)
1394 connector
power connector
(1394)
(POWER12V)
CPU fan
connectors (2)
front-panel audio
(FP_AUD)
PCI Express x16 card connector
PCI card connectors
(PCI SLOT 4, PCI SLOT 5,
PCI Express x1 card connector
PCI SLOT 6)
PCI Express x16 card connector
78 Removing and Installing Parts
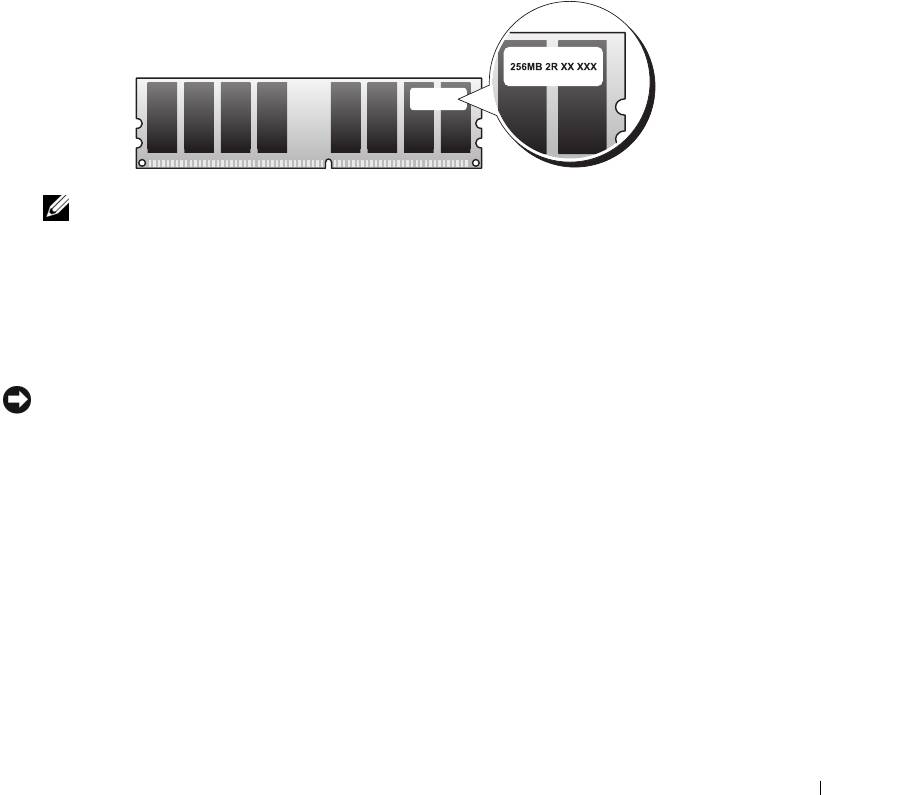
Memory
You can increase your computer memory by installing memory modules on the system board.
Your computer supports DDR2 memory. For additional information on the type of memory
supported by your computer, see "Memory" on page 127.
DDR2 Memory Overview
• DDR2 memory modules should be installed in
pairs of matched memory size and speed
. If the
DDR2 memory modules are not installed in matched pairs, the computer will continue to
operate, but with a slight reduction in performance. See the label on the upper-right or upper-
left corner of the module to determine the module’s capacity.
NOTE: Always install DDR2 memory modules in the order indicated on the system board.
The recommended memory configurations are:
– A pair of matched memory modules installed in DIMM connectors 1 and 2
or
– A pair of matched memory modules installed in DIMM connectors 1 and 2 and another
matched pair installed in DIMM connectors 3 and 4
NOTICE: Do not install ECC memory modules.
• If you install mixed pairs of PC2-4300 (DDR2 533-MHz) and PC2-5300 (DDR2 667-MHz)
memory, the modules function at the speed of the slowest module installed.
• Be sure to install a single memory module in DIMM connector 1, the connector closest to the
processor, before you install modules in the other connectors.
Removing and Installing Parts 79
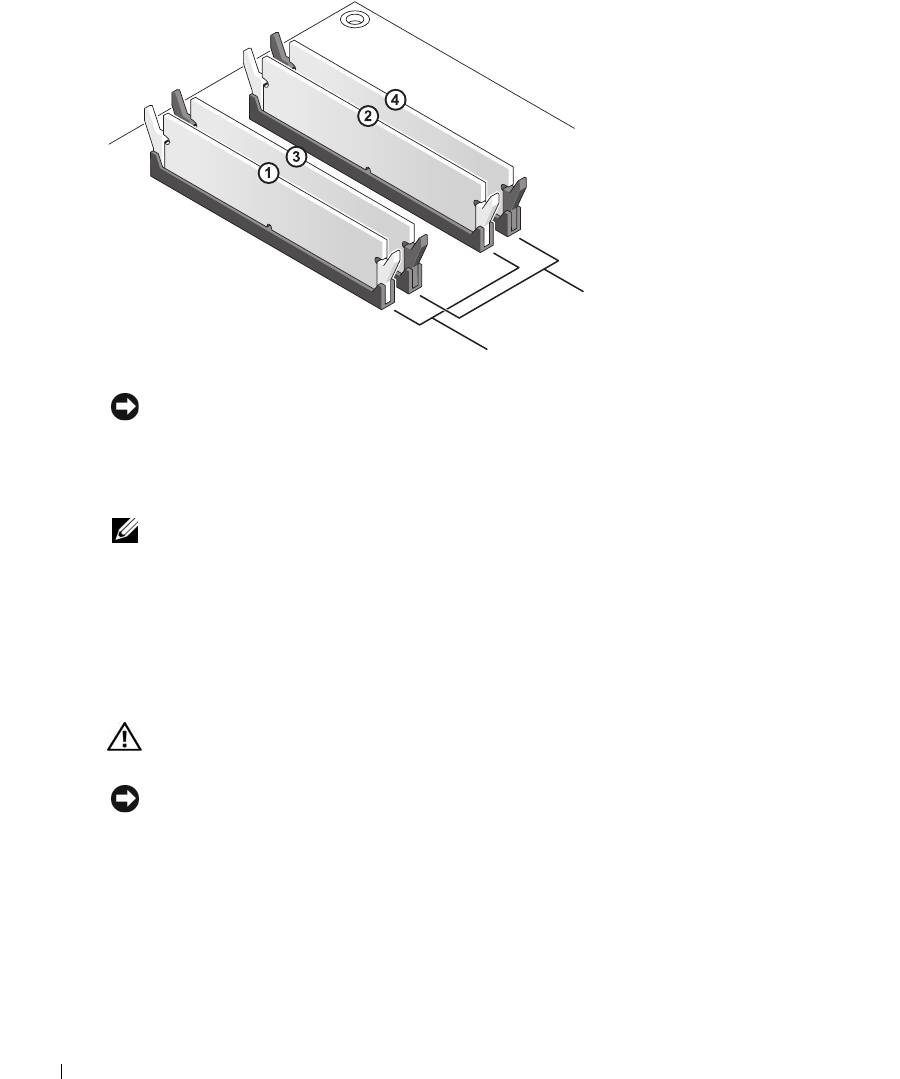
www.dell.com | support.dell.com
matched pair of memory modules in DIMM
connectors 3 and 4 (black securing clips)
matched pair of modules in DIMM
connectors 1 and 2 (white securing clips)
NOTICE: If you remove your original memory modules from the computer during a memory upgrade,
keep them separate from any new modules that you may have, even if you purchased the new modules
from Dell. If possible, do not pair an original memory module with a new memory module. Otherwise, your
computer may not start properly. You should install your original memory modules in pairs either in DIMM
connectors 1 and 2 or DIMM connectors 3 and 4.
NOTE: Memory purchased from Dell is covered under your computer warranty.
Addressing Memory Configurations
®
®
If you are using a 32-bit operating system such as Microsoft
Windows
XP, your computer will
support a maximum of 2 GB of memory. If you are using a 64-bit operating system, your
computer will support a maximum of 8 GB (2-GB DIMMs in each of the four slots) of memory.
Installing Memory
CAUTION: Before you begin any of the procedures in this section, follow the safety instructions
located in the Product Information Guide.
NOTICE: To prevent static damage to components inside your computer, discharge static electricity
from your body before you touch any of your computer’s electronic components. You can do so by
touching an unpainted metal surface on the computer chassis.
1
Follow the procedures in "Before You Begin" on page 69.
2
Lay the computer on its side so that the system board is on the bottom of the inside of the
computer.
3
Press out the securing clip at each end of the memory module connector.
80 Removing and Installing Parts
