Dell Latitude XT (Late 2007) – страница 2
Инструкция к Ноутбуку Dell Latitude XT (Late 2007)
Оглавление
- Notes, Notices, and Cautions
- Примечания, уведомления и предупреждения
- Содержание
- Информационные ресурсы Источники информации Что требуется найти? Информация находится здесь
- Что требуется найти? Информация находится здесь
- Что требуется найти? Информация находится здесь
- Что требуется найти? Информация находится здесь
- Что требуется найти? Информация находится здесь
- Что требуется найти? Информация находится здесь
- Что требуется найти? Информация находится здесь
- Что требуется найти? Информация находится здесь
- Что требуется найти? Информация находится здесь
- Настройка компьютера О планшетном компьютере
- Вид спереди
- Вид слева
- Вид справа Вид сзади
- Вид снизу
- Перо в деталях Использование аккумулятора
- Работа аккумулятора
- Проверка заряда аккумулятора Программа Dell™ QuickSet Battery Meter Индикатор заряда
- Проверка заряда аккумулятора Проверка работоспособности аккумулятора Предупреждение о недостаточном заряде аккумулятора
- Краткий справочник
- Зарядка аккумулятора Извлечение аккумулятора
- Извлечение аккумулятора.
- Хранение аккумулятора Поиск и устранение неисправностей Блокировки и неисправности программного обеспечения Планшетный компьютер не отвечает на запросы Программа не отвечает Завершение программы.
- Постоянно возникает сбой программы Программа разработана для предыдущих версий Windows. Windows Vista Windows XP Появляется сплошной синий экран
- Другие неисправности программного обеспечения Dell Diagnostics Когда использовать программу Dell Diagnostics
- Запуск программы Dell Diagnostics с жесткого диска
- Запуск программы Dell Diagnostics с компакт$диска Drivers and Utilities (Драйверы и утилиты)
- Основное меню Dell Diagnostics Параметр Функция
- Параметр Функция Вкладка Функция
- Вкладка Функция
- Указатель
- Указатель

3
Select
Enable hibernation
.
4
Click
Apply
and
OK
.
To enter Hibernate mode:
1
Type the <Ctrl><Alt><Del> key sequence.
2
Select
Shut Down
→
Hibernate
.
If you have set you set the power management options to Hibernate in the
Power Options Properties window or the QuickSet Power Management
Wizard, you may also use one of the following methods to enter hibernate
mode:
• Press the power button.
• Close the display.
• Press <Fn><Esc>.
NOTE: Some PC Cards or Express Cards may not operate correctly after the
computer exits hibernate mode. Remove and reinsert the card, or simply restart
(reboot) your computer.
To exit hibernate mode, press the power button. The computer may take a
short time to exit hibernate mode. You cannot make the computer exit
hibernate mode by pressing a key or touching the touch pad or track stick. For
more information on hibernate mode, see the documentation that came with
your operating system.
Charging the Battery
When you connect the computer to an electrical outlet or install a battery
while the computer is connected to an electrical outlet, the computer checks
the battery charge and temperature. If necessary, the AC adapter then charges
the battery and maintains the battery charge.
NOTE: With Dell™ ExpressCharge™, when the computer is turned off, the AC
adapter charges a completely discharged battery to 80 percent in about 1 hour and
to 100 percent in approximately 2 hours. Charge time is longer with the computer
turned on. You can leave the battery in the computer for as long as you like. The
battery’s internal circuitry prevents the battery from overcharging.
If the battery is hot from being used in your computer or being in a hot
environment, the battery may not charge when you connect the computer to
an electrical outlet.
Quick Reference Guide 21
The battery is too hot to start charging if the light flashes alternately
green and orange. Disconnect the computer from the electrical outlet and
allow the computer and the battery to cool to room temperature. Then
connect the computer to an electrical outlet to continue charging the battery.
For information about resolving problems with a battery, see “Power
Problems” in your User’s Guide.
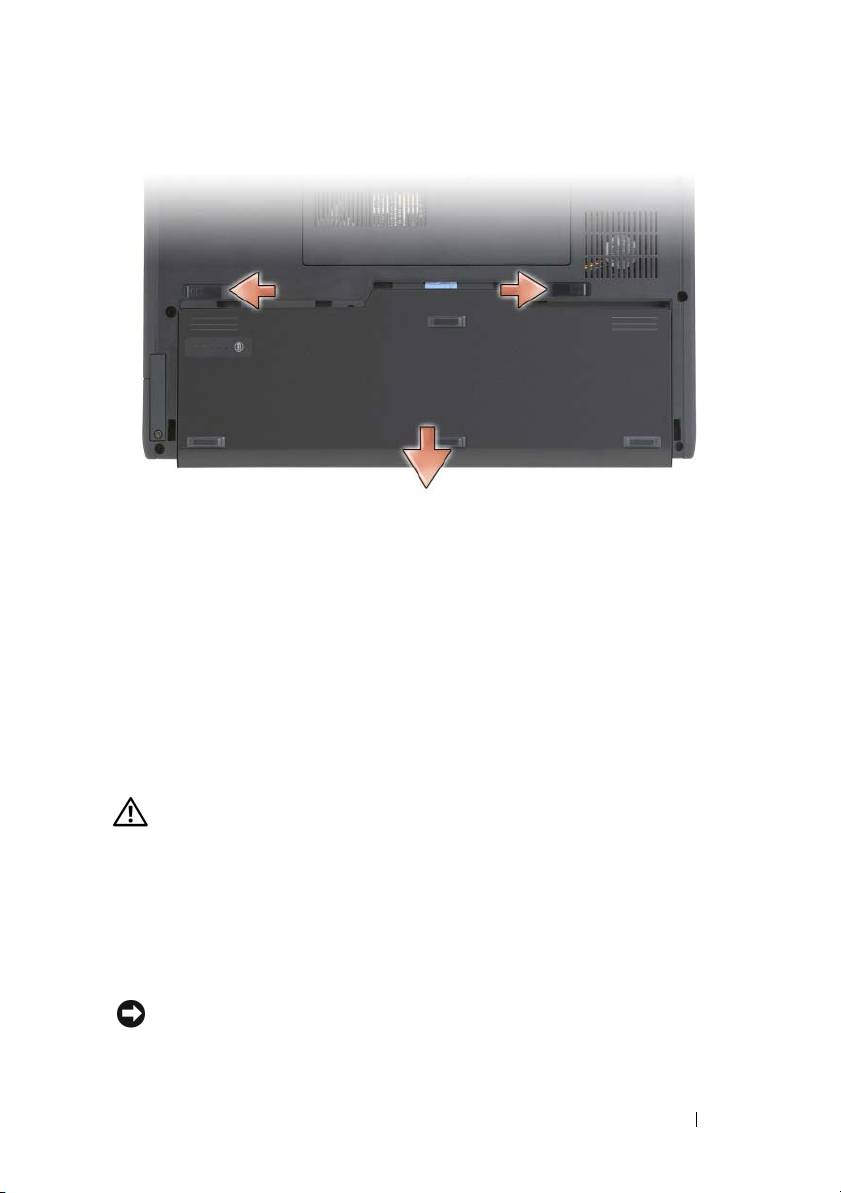
Removing the Battery
CAUTION: Using an incompatible battery may increase the risk of fire or
explosion. Replace the battery only with a compatible battery purchased from
Dell. The battery is designed to work with your Dell™ computer. Do not use a
battery from other computers with your computer.
CAUTION: Before performing these procedures, turn off the computer, disconnect
the AC adapter from the electrical outlet and the computer, disconnect the modem
from the wall connector and computer, and remove any other external cables from
the computer.
NOTICE: You must remove all external cables from the computer to avoid possible
connector damage.
NOTICE: If you choose to replace the battery with the computer in standby mode,
you have up to 1 minute to complete the battery replacement before the computer
shuts down and loses any unsaved data.
To remove the battery:
1
If the computer is connected to a docking device (docked), undock it. See
the documentation that came with your docking device for instructions.
2
Ensure that the computer is turned off or hibernated in a power
management mode.
3
Slide the battery-bay latch release on the bottom of the computer, and
then remove the battery from the bay.
22 Quick Reference Guide
To replace the battery, follow the removal procedure in reverse order.
Storing a Battery
Remove the battery when you store your computer for an extended period of
time. A battery discharges during prolonged storage. After a long storage
period, fully recharge the battery (see "Charging the Battery" on page 21)
before you use it.
Troubleshooting
Lockups and Software Problems
CAUTION: Before you begin any of the procedures in this section, follow the
safety instructions in the Product Information Guide.
The Tablet-PC does not start up
ENSURE THAT THE POWER CABLE IS FIRMLY CONNECTED TO THE TABLET-PC AND
TO THE ELECTRICAL OUTLET
The Tablet-PC stops responding
NOTICE: You may lose data if you are unable to perform an operating system
shutdown.
Quick Reference Guide 23

TURN THE TABLET-PC OFF — If you are unable to get a response by pressing a
key on your keyboard or touching your display with the pen or your finger,
press and hold the power button for at least 8 to 10 seconds (until the Tablet-
PC turns off), and then restart your Tablet-PC.
A program stops responding
END THE PROGRAM —
1
Press <Ctrl><Shift><Esc> simultaneously to access the Task Manager.
2
Click the
Applications
tab.
3
Click to select the program that is no longer responding.
4
Click
End Task
.
A program crashes repeatedly
NOTE: Most software includes installation instructions in its documentation, or on
a CD or DVD.
C
HECK THE SOFTWARE DOCUMENTATION — If necessary, uninstall and then
reinstall the program.
A program is designed for an earlier Windows operating system
RUN THE PROGRAM COMPATIBILITY WIZARD — The Program Compatibility
Wizard configures a program so that it runs in an environment similar to
previous versions of Windows.
Windows Vista
1
Click
Start
→
Control Panel
→
Programs
→
Use an older program with
this version of Windows.
2
In the welcome screen, click
Next
.
3
Follow the instructions on the screen.
Windows XP
1
Click
Start
→
Help and Support
→
Fixing a problem
→
Application and
software problems.
2
Click
Run Software that Worked with previous versions
.
24 Quick Reference Guide

3
In the welcome screen, click
Next
.
4
Follow the instructions on the screen.
A solid blue screen appears
TURN THE TABLET-PC OFF — If you are unable to get a response by pressing a
key on your keyboard or touching your display with the pen or your finger,
press and hold the power button for at least 8 to 10 seconds (until the Tablet-
PC turns off), and then restart your Tablet-PC.
Other software problems
CHECK THE SOFTWARE DOCUMENTATION OR CONTACT THE SOFTWARE
MANUFACTURER FOR TROUBLESHOOTING INFORMATION —
• Ensure that the program is compatible with the operating system installed
on your Tablet-PC.
• Ensure that your Tablet-PC meets the minimum hardware requirements
needed to run the software. See the software documentation for
information.
• Ensure that the program is installed and configured properly.
• Verify that the device drivers do not conflict with the program.
• If necessary, uninstall and then reinstall the program.
BACK UP YOUR FILES IMMEDIATELY
USE A VIRUS-SCANNING PROGRAM TO CHECK THE HARD DRIVE, CDS , OR DVDS
SAVE AND CLOSE ANY OPEN FILES OR PROGRAMS AND SHUT DOWN YOUR TABLET-
PC
THROUGH THE START MENU
Dell Diagnostics
CAUTION: Before you begin any of the procedures in this section, follow the
safety instructions in the Product Information Guide.
NOTICE: The Dell Diagnostics works only on Dell™ computers.
NOTE: You must use the optical drive in the D/Bay or the optional media base to
access the Driver’s and Utilities media.
Quick Reference Guide 25

When to Use the Dell Diagnostics
If you experience a problem with your Tablet-PC, perform the checks in
Lockups and Software Problems (see "Lockups and Software Problems" on
page 23), and run the Dell Diagnostics before you contact Dell for technical
assistance.
It is recommended that you print these procedures before you begin.
See “Using the System Setup Program” in your User’s Guide to review your
Tablet-PC’s configuration information, and ensure that the device that you
want to test displays in the system setup program and is active.
Start the Dell Diagnostics from your hard drive or from the Drivers and
Utilities media.
NOTE: The Drivers and Utilities media is optional and may not ship with your
Tablet-PC.
Starting the Dell Diagnostics From Your Hard Drive
The Dell Diagnostics is located on a hidden diagnostic utility partition on
your hard drive.
NOTE: If your Tablet-PC does not display a screen image, contact Dell (see
“Contacting Dell” in your User’s Guide).
NOTE: If the Tablet-PC is connected to a docking device (docked), undock it. See
“Undocking Your Tablet-PC From the Media Base” and “Undocking Your Tablet-PC
From the Battery Slice” in your User’s Guide for instructions if applicable.
1
Ensure that the Tablet-PC is connected to an electrical outlet that is
known to be working properly.
2
Turn on (or restart) your Tablet-PC.
3
Start the Dell Diagnostics in one of the following two ways:
NOTE: If you wait too long and the operating system logo appears, continue
®
®
to wait until you see the Microsoft
Windows
desktop; then, shut down your
Tablet-PC and try again.
– When the DELL™ logo appears, press <F12> immediately. Select
Diagnostics
from the boot menu and press <Enter>.
NOTE: Before attempting the following option, the Tablet-PC must be
powered down completely.
– Press and hold the <Fn> key while powering the Tablet-PC on.
26 Quick Reference Guide

The Tablet-PC runs the Pre-boot System Assessment (PSA), a series of
initial tests of your system board, keyboard, display, memory, hard drive, etc.
• During the assessment, answer any questions that appear.
• If failures are detected during the Pre-boot System Assessment,
write down the error code(s) and contact Dell (see “Contacting
Dell” in your
User’s Guide
).
If the Pre-boot System Assessment completes successfully, the following
message appears: “
Booting Dell Diagnostic Utility
Partition.Press any key to continue
.”
4
Press any key to start the Dell Diagnostics from the diagnostics utility
partition on your hard drive.
NOTE: If you see a message stating that no diagnostics utility partition has
been found, run the Dell Diagnostics from the Drivers and Utilities media.
5
When the Dell Diagnostics Main Menu appears, select the test you want
to run. See "Dell Diagnostics Main Menu" on page 28.
Starting the Dell Diagnostics From the Drivers and Utilities Media
1
Insert the
Drivers and Utilities
media
.
2
Shut down and restart the Tablet-PC.
When the DELL logo appears, press <F12> immediately.
NOTE: If you wait too long and the operating system logo appears, continue
®
®
to wait until you see the Microsoft
Windows
desktop; then, shut down your
Tablet-PC and try again.
NOTE: The next steps change the boot sequence for one time only. On the
next start-up, the Tablet-PC boots according to the devices specified in the
system setup program.
3
When the boot device list appears, highlight
CD/DVD/CD-RW
and press
<Enter>.
4
Select the
Boot from CD-ROM
option from the menu that appears and
press <Enter>.
5
Ty p e
1
to start the CD menu and press <Enter> to proceed.
6
Select
Run the 32 Bit Dell Diagnostics
from the numbered list. If
multiple versions are listed, select the version appropriate for your
Tablet-PC.
Quick Reference Guide 27
7
When the Dell Diagnostics
Main Menu
appears, select the test you want
to run.
Dell Diagnostics Main Menu
1
After the Dell Diagnostics loads and the
Main
Menu
appears, click the
button for the option you want.
NOTE: It is recommended that you select Test System to run a complete test
on your Tablet-PC.
Option Function
Test Memory Run the stand-alone memory test
Test System Run System Diagnostics
Exit Exit the Diagnostics
2
After you have selected the
Test System
option from the main menu, the
following menu appears:
NOTE: It is recommended that you select Extended Test from the menu below to
run a more thorough check of devices in the Tablet-PC.
Option Function
Express Test Performs a quick test of devices in the
system. This typically can take 10 to
20 minutes.
Extended Test Performs a thorough check of devices in
the system. This typically can take an
hour or more.
Custom Test Use to test a specific device or
customize the tests to be run.
Symptom Tree This option allows you to select tests
based on a symptom of the problem you
are having. This option lists the most
common symptoms.
28 Quick Reference Guide

3
If a problem is encountered during a test, a message appears with an error
code and a description of the problem. Write down the error code and
problem description and contact Dell (see “Contacting Dell” in your
User’s Guide
).
NOTE: The Service Tag for your Tablet-PC is located at the top of each test
screen. If you contact Dell, technical support will ask for your Service Tag.
4
If you run a test from the
Custom Test or Symptom Tree
option, click the
applicable tab described in the following table for more information.
Tab Function
Results Displays the results of the test and any
error conditions encountered.
Errors Displays error conditions encountered,
error codes, and the problem
description.
Help Describes the test and may indicate
requirements for running the test.
Configuration Displays your hardware configuration
for the selected device.
The Dell Diagnostics obtains
configuration information for all
devices from system setup, memory, and
various internal tests, and it displays
the information in the device list in
the left pane of the screen. The device
list may not display the names of all
the components installed on your
Tablet-PC or all devices attached to
your Tablet-PC.
Parameters Allows you to customize the test by
changing the test settings.
5
When the tests are complete, close the test screen to return to the
Main
Menu
screen. To exit the Dell Diagnostics and restart the Tablet-PC, close
the
Main
Menu
screen.
6
Remove the Dell
Drivers and Utilities
media
(if applicable).
Quick Reference Guide 29

30 Quick Reference Guide

Index
B
documentation (continued)
User’s Guide, 6
battery
warranty, 7
charge gauge, 19
Drivers and Utilities media
charging, 21
Dell Diagnostics, 25
checking the charge, 19
performance, 18
removing, 22
storing, 23
E
End User License Agreement, 7
ergonomics information, 7
C
computer
crashes, 23, 25
H
stops responding, 23
hardware
Dell Diagnostics, 25
D
Dell Diagnostics, 25
L
Dell support site, 9
labels
diagnostics
Microsoft Windows, 8
Dell, 25
Service Tag, 8
documentation
End User License Agreement, 7
ergonomics, 7
M
online, 9
media
Product Information Guide, 7
operating system, 11
regulatory, 7
safety, 7
Index 31

O
Starting the Dell Diagnostics
From the Drivers and
operating system
Utilities Media, 27
reinstalling, 11
Starting the Dell Diagnostics
Operating System media, 11
From Your Hard Drive, 26
support website, 9
system views
P
back, 15
problems
bottom, 16
blue screen, 25
front, 13
computer crashes, 23, 25
left side, 14
computer stops responding, 23
right side, 15
Dell Diagnostics, 25
general, 23
program crashes, 24
T
program stops responding, 24
software, 24-25
troubleshooting
Dell Diagnostics, 25
Product Information Guide, 7
U
Q
User’s Guide, 6
QuickSet Help, 11
W
R
warranty information, 7
regulatory information, 7
Windows Vista
reinstalling, 11
S
safety instructions, 7
Service Tag, 8
software
problems, 24-25
32 Index

Brzi referentni priručnik za
Dell™ Latitude™ XT
Model PP12S
www.dell.com | support.dell.com

Napomene, obavijesti i upozorenja
NAPOMENA:
OBAVIJESTI označava važne informacije koje vam pomažu pri
boljem korištenju računala.
OBAVIJEST:
OPREZ označava moguće oštećenje hardvera ili gubitak podataka i
informira vas kako taj problem možete izbjeći.
OPREZ:
OPREZ označava moguću opasnost od kvarova, fizičkih ozljeda ili
smrtnih slučajeva.
____________________
Informacije u ovom dokumentu podložne su promjeni bez prethodne najave.
© 2007 Dell Inc. Sva prava pridržana.
Bilo koji oblik reprodukcije bez pisanog odobrenja tvrtke Dell Inc. strogo je zabranjen.
Trgovaèki znakovi koji se koriste u ovom tekstu: Dell, DELL logo, Wi-Fi Catcher, ExpressCharge i
Latitude zaštitni su znakovi tvrtke Dell Inc.; Microsoft, Windows i Windows Vista zaštitni su ili
registrirani znakovi tvrtke Microsoft Corporation u Sjedinjenim Amerièkim Državama i/ili drugim
državama.
U dokumentu se možda koriste i drugi trgovaèki znakovi i zaštiæeni nazivi koji oznaèavaju entitete
koji su vlasnici tih znakova ili njihove proizvode. Dell Inc. odrièe se bilo kakvih vlasnièkih interesa
za navedene trgovaèke znakove i zaštiæene nazive, osim vlastitih.
Model PP12S
Prosinac 2007. B/D PU185 Izm. izdanje A01

Sadržaj
Resursi
. . . . . . . . . . . . . . . . . . . . . . . . . .
37
Traženje informacija
. . . . . . . . . . . . . . . . .
37
Postavljanje računala
. . . . . . . . . . . . . . . . .
45
O vašem Tablet-PC računalu
. . . . . . . . . . . . . . .
45
Pogled sprijeda
. . . . . . . . . . . . . . . . . . . .
46
Pogled s lijeve strane
. . . . . . . . . . . . . . . . .
47
Pogled s desne strane
. . . . . . . . . . . . . . . .
48
Pogled straga
. . . . . . . . . . . . . . . . . . . . .
48
Pogled odozdo
. . . . . . . . . . . . . . . . . . . .
49
Pregled olovke
. . . . . . . . . . . . . . . . . . . .
50
Korištenje baterije
. . . . . . . . . . . . . . . . . . . .
50
Izvedba baterije
. . . . . . . . . . . . . . . . . . . .
51
Provjera napunjenosti baterije
. . . . . . . . . . . . .
52
Punjenje baterije
. . . . . . . . . . . . . . . . . . .
54
Vađenje baterije
. . . . . . . . . . . . . . . . . . .
55
Pohrana baterije
. . . . . . . . . . . . . . . . . . .
56
Rješavanje problema
. . . . . . . . . . . . . . . . . . .
56
Problemi sa zaključavanjem i softverom
. . . . . . . .
56
Dell Diagnostics
. . . . . . . . . . . . . . . . . . . .
58
Index
. . . . . . . . . . . . . . . . . . . . . . . . . . . . .
63
Sadržaj
35

36
Sadržaj

Resursi
Traženje informacija
NAPOMENA:
Neke značajke ili mediji možda nisu obavezni te se neće
isporučivati s vašim Tablet računalom. Neke značajke ili mediji možda nisu dostupni
u određenim zemljama.
NAPOMENA:
S vašim Tablet računalom možda ćete dobiti i dodatne informacije.
NAPOMENA:
U D pogonu ili dodatnom pogonu za medije morate koristiti optički
pogon za pristup mediju Driver’s and Utilities.
Što tražite? Pronađite to ovdje
• Dijagnostički program za moje Tablet
Medij Drivers and Utilities
računalo
NAPOMENA:
Medij Drivers and Utilities
•Upravljački programi za moje Tablet
nije obvezan i možda ga nećete dobiti
računalo
prilikom kupnje tablet-PC-ja.
• Dokumentacija za moje računalo
Priručnik za brzi početak rada
37

Što tražite? Pronađite to ovdje
• Softver za sustav prijenosnog računala
Dokumentacija i upravljački programi već
(NSS)
su instalirani na vašem Tablet računalu.
Medij Drivers and Utilities možete koristiti
za ponovno instaliranje upravljačkih
programa (vidi “Reinstalling Drivers and
Utilities” (Ponovno instaliranje
upravljačkih i uslužnih programa) u
dokumentu Korisnički priručnik) ili za
pokretanje programa Dell Diagnostics (vidi
“Dell Diagnostics” na stranici 58).
Readme datoteke mogu se nalaziti na
mediju i sadržavati najnovija ažuriranja
tehničkih promjena na Tablet računalu ili
napredni tehnički referentni materijal za
tehničare ili iskusne korisnike.
NAPOMENA:
Najnovije informacije o
upravljačkim programima i dokumentaciji
možete pronaći na
support.dell.com
.
38
Priručnik za brzi početak rada

Što tražite? Pronađite to ovdje
• Uklanjanje i zamjena dijelova
Korisnički priručnik za Dell™ Latitude™ XT
• Specifikacije
Microsoft Windows XP i Windows Vista™
• Konfiguriranje postavki sustava
Centar za pomoć i podršku
• Rješavanje problema
1
Pritisnite
Start
(ili
Start
u OS
Windows XP)
→
Help and Support
(Pomoć i podrška)
→
Dell User and
System Guides
(Dell Korisnički
priručnici i priručnici za sustav)
→
System Guides
(Priručnici za sustav).
2
Pritisnite
User’s Guide
(Korisnički
priručnik) za svoje računalo.
• Informacije o jamstvu
Dell™ priručnik s informacijama o
proizvodu
• Uvjeti i pravila korištenja (samo za SAD)
• Sigurnosne upute
• Regulatorne informacije
• Informacije o ergonomiji
• Licencni sporazum s krajnjim korisnikom
• Postavljanje Tablet računala
Kartica brzih referenci
• Sažetak značajki Tablet računala
• Dostupan pribor za Tablet računalo
Priručnik za brzi početak rada
39
Što tražite? Pronađite to ovdje
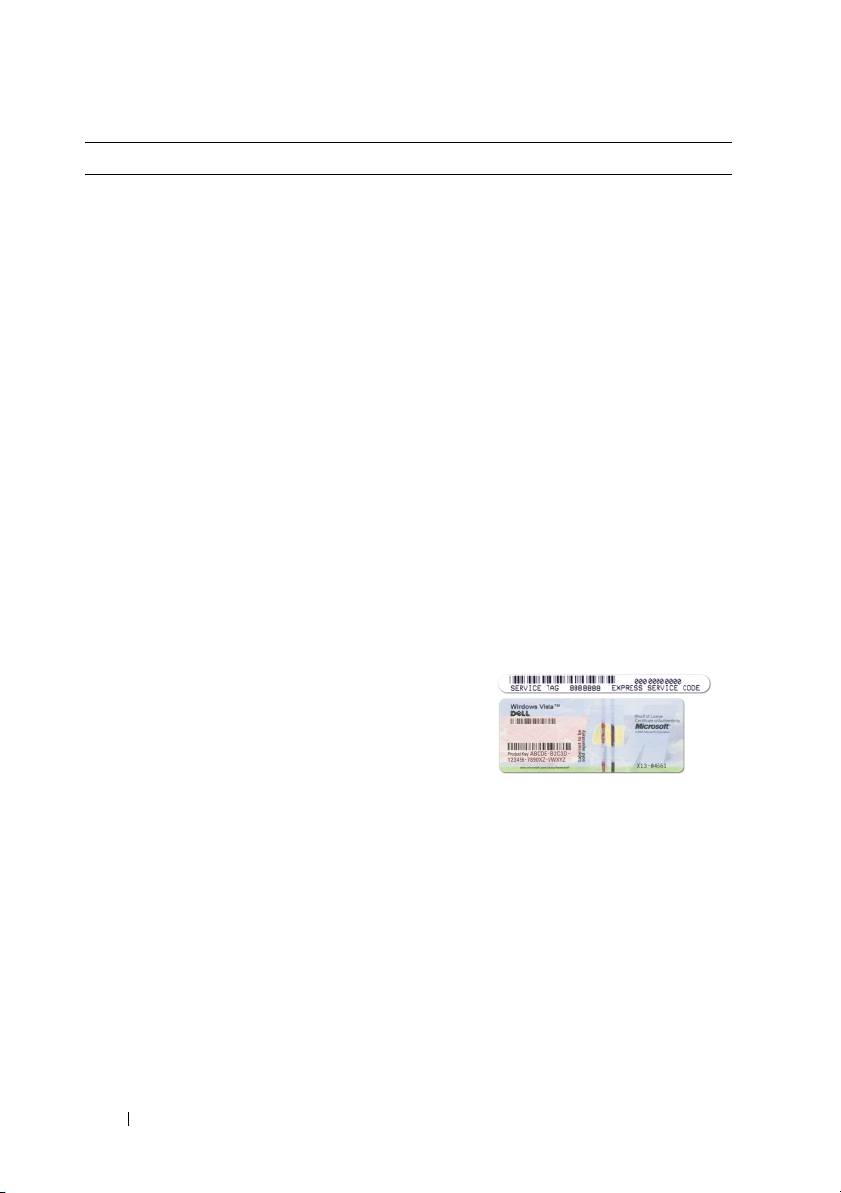
• Service Tag (Servisna oznaka) i Express
Servisna oznaka i licenca za Microsoft
Service Code (Šifra za ekspresnu uslugu)
Windows
®
• Licencna oznaka za Microsoft
NAPOMENA:
Servisna licencna oznaka
®
za Tablet računalo nalazi se s donje strane
Windows
Tablet računala pokraj poklopca za
memoriju i mini-karticu (vidi “Pogled
odozdo” na stranici 49).
NAPOMENA:
Informacije o servisnoj
oznaci možete pronaći i u programu za
postavljanje sustava. Vidi “System Setup
Screens” (Zasloni za postavljanje sustava)
u Korisničkom priručniku.
Servisna oznaka za Tablet računalo sadrži i
broj servisne oznake i ekspresnu servisnu
šifru.
• Servisnu oznaku koristite za identifikaciju
svog Tablet računala kad koristite
support.dell.com
ili se obraćate službi za
tehničku podršku.
• Šifru za ekspresnu uslugu unesite za
usmjeravanje poziva prilikom
kontaktiranja službi za podršku.
NAPOMENA:
Licencna oznaka
®
®
Microsoft
Windows
za tablet-PC nalazi se
ispod glavne baterije u odjeljku za bateriju
tablet-PC-ja (pogledajte “Vađenje baterije”
na stranici 55).
•U slučaju da trebate ponovno instalirati
operativni sustav, upotrijebite ključ
proizvoda na licencnoj oznaci.
NAPOMENA:
Kao dodatna mjera zaštite,
nova Microsoft Windows licenca sadržava i
nedostajući dio ili “rupu” kako bi se
onemogućilo uklanjanje oznake.
40
Priručnik za brzi početak rada
