Dell Latitude X300 – страница 5
Инструкция к Ноутбуку Dell Latitude X300
Оглавление
- Dell™ Latitude™ X300 User's Guide

Modem and Internet Connection Problems
Fill out the
Diagnostics Checklist
as you complete these checks.
Verify that Windows
®
recognizes the printer
Windows XP
1.
Click the
Start
button.
2.
Click
Control Panel
.
3.
Click
Printers and Other Hardware
.
4.
Click
View installed printers or fax printers
. If the printer model is listed, right-click the printer icon.
5.
Click
Properties,
and then click the
Ports
tab. Ensure that the
Print to the following port(s):
setting is
LPT1 (Printer Port)
.
Windows 2000
1.
Click the
Start
button, point to
Settings
, and then click
Printers
.
If the printer model is listed, right-click the printer icon.
2.
Click
Properties,
and then click the
Ports
tab.
3.
Ensure that the
Print to the following port:
option is set for your printer type:
l
For a parallel printer:
LPT1 (Printer Port)
l
For a USB printer:
USB
Reinstall the printer driver
—
See "
Reinstalling Drivers and Utilities
."
Check the printer
—
Run the printer self-test. If the test does not complete successfully, the printer is probably defective. Contact the printer
manufacturer.
NOTICE:
Connect the modem to an analog telephone wall jack only. Connecting the modem to a digital telephone network damages the modem.
NOTICE:
Modem and network connectors look similar. Do not plug a telephone line into the network connector.
NOTE:
If you can connect to your Internet service provider (ISP), your modem is functioning properly. If you are sure that your modem is working
properly and you still experience problems, contact your ISP.
Check the telephone wall jack
—
Disconnect the telephone line from the modem and connect it to a telephone. Listen for a dial tone. Ensure
that you have touchtone telephone service. Try connecting the modem to a different telephone wall jack.
Slow connection speeds can be caused by telephone noise as well as by telephone line or network conditions. Contact your telephone
company or network administrator for more information.
Connect the modem directly to the telephone wall jack
—
If you have other telephone devices sharing the line, such as an answering
machine, fax machine, surge protector, or line splitter, then bypass them and use the telephone line to connect the modem directly to the
telephone wall jack.
Check the connection
—
Verify that the telephone line is connected to the modem.
Check the telephone line
—
Try using a different telephone line. If you are using a line that is 3 m (10 ft) or more in length, try a shorter one.
Irregular dial tone
—
If you have voice mail service, you might hear an irregular dial tone when you have messages. Contact your telephone
company for instructions on restoring a dial tone.
Turn off call waiting (catch-phone)
—
See your telephone directory for instructions on deactivating this feature. Then adjust the dial-up
networking connection properties.
Windows
®
XP
1.
Click the
Start
button and click
Control Panel
.
2.
Click
Printers and Other Hardware
, click
Phone and Modem Options
, click the
Dialing Rules
tab, and then click
Edit...
.
3.
In the
Edit Location
window, ensure that
To disable call waiting, dial:
is checked, and then select the proper code as listed in your

Touch Pad or Mouse Problems
Fill out the
Diagnostics Checklist
as you perform the various checks.
telephone directory.
4.
Click
Apply
and click
OK
.
5.
Close the
Phone and Modems Options
window.
6.
Close the
Control Panel
window.
Windows 2000
1.
Click the
Start
button, point to
Settings
, and then click
Control Panel
.
2.
Click
Phone and Modem Options
.
3.
Click the
Dialing Rules
tab and click
Edit
.
4.
Ensure that
To disable call waiting, dial:
is checked, and then select the proper code as listed in your telephone directory.
5.
Click
Apply
and click
OK
.
6.
Close the
Phone and Modem Options
window.
Verify that the modem is communicating with Windows
Windows XP
1.
Click the
Start
button and click
Control Panel
.
2.
Click
Printers and Other Hardware
and click
Phone and Modem Options
.
3.
Click the
Modems
tab.
4.
Click the COM port for your modem.
5.
Click
Properties
, click the
Diagnostics
tab, and then click
Query Modem
to verify that the modem is communicating with Windows.
If all commands receive responses, the modem is operating properly.
Windows 2000
1.
Click the
Start
button, point to
Settings
, and then click
Control Panel
.
2.
Double-click
Phone and Modem Options
.
If multiple entries for the same modem or modems are listed but not installed, delete the entries, restart the computer, and repeat
steps 1 and 2.
3.
Click the
Modems
tab.
4.
Click the COM port for your modem.
5.
Click
Properties
, click the
Diagnostics
tab, and then click
Query Modem
to verify that the modem is communicating with Windows.
If all commands receive responses, the modem is operating properly.
Check the touch pad settings
Windows
®
XP
1.
Click the
Start
button, click
Control Panel
, and then click
Printers and Other Hardware
.
2.
Click
Mouse
.
3.
Try adjusting the settings.
Windows 2000
1.
Click the
Start
button, point to
Settings
, and then click
Control Panel.
2.
Double-click the
Mouse
icon.
3.
Try adjusting the settings.
Check the mouse cable
—
Shut down the computer. Disconnect the mouse cable and check it for damage. For PS/2 cables, check the cable
connector for bent or broken pins. Firmly reconnect the cable.
If you are using a mouse extension cable, disconnect it and connect the mouse directly to the computer.
To verify that the problem is with the mouse, check the touch pad
1.
Shut down the computer.
2.
Disconnect the mouse.
3.
Turn on the computer.
4.
At the Windows
desktop, use the touch pad to move the cursor around, select an icon, and open it.
If the touch pad operates correctly, the mouse may be defective.

External Keyboard Problems
Fill out the
Diagnostics Checklist
as you perform the various checks.
Unexpected Characters
Press <Fn><F4> to disable the numeric keypad if numbers are displayed instead of letters. Verify that the numbers lock light is not lit.
Drive Problems
Fill out the
Diagnostics Checklist
as you complete these checks.
If you cannot save a file to a floppy drive
Check the system setup program settings
—
Verify that the system setup program lists the correct device for the pointing device option.
(The computer automatically recognizes a USB mouse without making any setting adjustments.)
Test the mouse controller
—
To test the mouse controller (which affects pointer movement) and the operation of the touch pad or mouse
buttons, run the Mouse test in the Pointing Devices device group in the Dell Diagnostics.
Reinstall the touch pad driver
—
See "
Reinstalling Drivers and Utilities
."
NOTE:
Use the integrated keyboard when working in MS-DOS
®
mode or when running the Dell Diagnostics or the system setup program. When you
attach an external keyboard, the integrated keyboard remains fully functional.
Check the keyboard cable
—
Shut down the computer. Disconnect the keyboard cable and check it for damage. For PS/2 cables, check the
cable connector for bent or broken pins. Firmly reconnect the cable.
If you are using a keyboard extension cable, disconnect it and connect the keyboard directly to the computer.
Check the external keyboard
1.
Shut down the computer, wait 1 minute, and turn it on again.
2.
Verify that the numbers, capitals, and scroll lock lights on the keyboard blink during the boot routine.
3.
From the Windows
®
desktop, click
Start
, point to
Programs
, point to
Accessories
, and click
Notepad
.
4.
Type some characters on the external keyboard and verify that they appear on the display.
If you cannot verify these steps, you may have a defective external keyboard.
To verify that the problem is with the external keyboard, check the integrated keyboard
1.
Shut down the computer.
2.
Disconnect the external keyboard.
3.
Turn on the computer.
4.
From the Windows desktop, click
Start
, point to
Programs
, point to
Accessories
, and click
Notepad
.
5.
Type some characters on the integrated keyboard and verify that they appear on the display.
If the characters appear now but did not with the external keyboard, you may have a defective external keyboard.
Run the keyboard diagnostics tests
—
See the PC-AT Compatible Keyboards tests in the Dell Diagnostics. If the tests indicate a defective
external keyboard,
contact Dell
.
NOTE:
The floppy drive is only available with the media base or the D/Bay .

If you cannot play a CD, CD-RW, or DVD
High-speed CD drive vibration is normal and may cause noise. This noise does not indicate a defect with the drive or the CD.
Ensure that an external floppy drive is connected to the computer
—
Install the floppy drive in the Dell D/Bay or the media may or use the
optional USB cable to connect the floppy drive to the computer.
Ensure that Windows
®
recognizes the drive
—
In Windows XP,
click the
Start
button and click
My Computer
.
In other operating systems
,
double-click
My Computer
. If the drive is not listed, perform a full scan with your antivirus software to check for and remove viruses. Viruses
can sometimes prevent Windows from recognizing the drive. Insert a bootable disk and restart the computer. Verify that the
light is
blinking, indicating normal operation.
Ensure that the disk is not write-protected
—
You cannot save data to a write-protected disk.
Try another floppy disk
—
Insert another disk to eliminate the possibility that the original disk is defective.
Reinstall the floppy drive
1.
Save and close any open files, exit any open programs, and shut down the computer.
2.
If the drive is in the media base, see your media base user's guide for instructions on removing the drive.
If the drive is in the Dell D/Bay,
remove the drive from the bay
.
3.
Reinstall the drive.
4.
Turn on the computer.
Check the D/Bay cable
—
Shut down the computer. Disconnect the D/Bay cable from the computer, and firmly reconnect the cable.
Clean the drive
—
See "
Cleaning Your Computer
" for instructions.
Check the drive for errors
l
If a drive error message appears, see "
Error Messages
" for an explanation.
l
Run the Diskette tests as described in the Dell Diagnostics.
NOTE:
Because of different worldwide file types, not all DVD titles work in all DVD drives.
Ensure that Windows
®
recognizes the drive
—
In Windows XP,
click the
Start
button and click
My Computer
.
In other operating systems
,
double-click
My Computer
. If the drive is not listed, perform a full scan with your antivirus software to check for and remove viruses. Viruses
can sometimes prevent Windows from recognizing the drive. Insert a bootable disk and restart the computer.
Try another disc
—
Insert another disc to eliminate the possibility that the original disc is defective.
Adjust the Windows volume control
—
Double-click the speaker icon in the lower-right corner of your screen. Ensure that the volume is
turned up and that the sound is not muted.
Reinstall the drive
1.
Save and close any open files, exit any open programs, and shut down the computer.
2.
If the drive is in the media base
, see your media base user's guide for instructions on removing the drive.
If the drive is in the Dell D/Bay,
remove the drive from the bay
.
3.
Reinstall the drive.
4.
Turn on the computer.
Clean the drive or disc
—
See "
Cleaning Your Computer
" for instructions.
Check the drive for errors

If you cannot eject the CD or DVD/CD-RW drive tray
If you hear an unfamiliar scraping or grinding sound
If the DVD/CD-RW drive stops writing
If you have problems with a hard drive
PC Card Problems
If a drive error message appears, see "
Error Messages
" for an explanation.
Run the IDE Drives tests as described in the Dell Diagnostics.
1.
Ensure that the computer is turned off.
2.
Straighten a paper clip and insert one end into the eject hole at the front of the drive; push firmly until the tray is partially ejected.
3.
Gently pull out the tray until it stops.
l
Ensure that the sound is not caused by the program that is running.
l
Ensure that the disk or disc is inserted properly.
Disable standby mode in Windows before writing to a CD-RW
—
Search for the keyword
standby
or
hibernate
in Windows
Help or
the
Help
and Support Center
.
Change the write speed to a slower rate
—
See the help files for your CD creation software.
Close all other open programs
—
Closing all other open programs before writing to the CD-RW may alleviate the problem.
Allow the computer to cool before turning it on
—
A hot hard drive may prevent the operating system from starting. Try allowing the
computer to return to room temperature before turning it on.
Check the drive for errors
l
Run the Windows error-checking tool:
1.
In Windows XP,
click the
Start
button and click
My Computer
.
In Windows 2000, d
ouble-click
My Computer
.
2.
Right-click the drive letter (local disk) that you want to scan for errors, and then click
Properties
.
3.
Click the
Tools
tab.
4.
Under
Error-checking
, click
Check Now
.
5.
Click
Start
.
l
Run the IDE Drives tests as described in the Dell Diagnostics.
Check the PC Card
—
Ensure that the PC Card is properly inserted into the connector.
Ensure that the card is recognized by Windows
®
—
Double-click the
Safely Remove Hardware
(
Unplug or Eject Hardware
in Windows
2000)
icon in the Windows taskbar. Ensure that the card is listed.
Run the PC Card diagnostics test
—
See the documentation that came with the PC Card for instructions if a diagnostics test was provided
with the card.

Network Problems
Fill out the
Diagnostics Checklist
as you complete these checks.
General Program Problems
Fill out the
Diagnostics Checklist
as you complete these checks.
A program crashes
A program stops responding
A solid blue screen appears
If you have problems with a Dell-provided PC Card
—
Contact Dell
.
If you have problems with a PC Card not provided by Dell
—
Contact the PC Card manufacturer.
Check the network cable connector
—
Ensure that the network cable connector is firmly connected to the connector on the computer and
the network wall jack.
Check the network lights on the network connector
—
Left light indicates the network connection speed. If the status light is off, the
computer is not detecting network connection, try replacing the network cable. The status light is solid green, at 10 Mbps, Amber at 100
Mbps, and yellow at 1 Gps connection speed.
Restart the computer
—
Try to log on to the network again.
Contact your network administrator
—
Verify that your network settings are correct and that the network is functioning.
NOTE:
Software usually includes installation instructions in its documentation or on a floppy disk or CD.
See the software documentation
—
Many software manufacturers maintain websites with information that may help you solve the problem.
Ensure that you properly installed and configured the program. Reinstall the program if necessary.
End the program
1.
Simultaneously press <Ctrl><Shift><Esc>.
2.
Click the
Applications
tab, and then select the program that is no longer responding.
3.
Click
End Task
.
Turn the computer off
—
If the computer does not respond to a keystroke or a proper shutdown, press the power button until the computer
turns off. Press the power button again to restart the computer.
Windows XP
The computer restarts.

Error messages appear
If Your Computer Gets Wet
1.
Turn off the computer, disconnect the AC adapter from the computer, and then disconnect the AC adapter from the electrical outlet.
2.
Turn off any attached external devices, and disconnect them from their power sources and then from the computer.
3.
Ground yourself by touching one of the metal connectors on the back of the computer.
4.
Remove any installed PC Cards, and put them in a safe place to dry.
5.
Remove the battery.
6.
Wipe off the battery and put it in a safe place to dry.
7.
Remove the memory module
.
8.
Open the display and place the computer right-side up across two books or similar props to let air circulate all around it. Let the computer dry for at
least 24 hours in a dry area at room temperature.
9.
Ground yourself by touching one of the metal connectors on the back of the computer.
10.
Replace the memory module, the memory module cover, and the screw(s).
11.
Replace any PC Cards you removed.
12.
Replace the battery.
13.
Turn on the computer and verify that it is working properly.
If the computer does not start, or if you cannot identify the damaged components,
contact Dell
.
If You Drop or Damage Your Computer
1.
Save and close any open files, exit any open programs, and shut down the computer.
2.
Disconnect the AC adapter from the computer and from the electrical outlet.
3.
Turn off any attached external devices, and disconnect them from their power sources and then from the computer.
4.
Remove and reinstall the battery.
5.
Turn on the computer.
If the computer does not start, or if you cannot identify the damaged components,
contact Dell
.
Windows 2000
The solid blue screen appears because you were not able to perform a proper Windows shutdown. ScanDisk automatically runs during the
start-up process. Follow the instructions on the screen.
Review "
Error Messages
"
—
Look up the message and take the appropriate action. See the software documentation.
Confirm that the problem is software-related
—
Run the System Board Devices
tests as described in the Dell Diagnostics. If all tests in the
device group run successfully, the problem may be software-related. See the software documentation.
CAUTION:
Perform this procedure only after you are certain that it is safe to do so. If the computer is connected to an electrical outlet, Dell
recommends that you turn off AC power at the circuit breaker before attempting to remove the power cables from the electrical outlet. Use the
utmost caution when removing wet cables from a live power source.
NOTICE:
Do not use artificial means, such as a hair dryer or a fan, to speed the drying process.
CAUTION:
To help prevent electrical shock, verify that the computer is thoroughly dry before continuing with the rest of this procedure.
NOTE:
See your
System Information Guide
for information on your warranty coverage.
NOTE:
See your
System Information Guide
for information on your warranty coverage.

Resolving Other Technical Problems
Go to the Dell Support website
—
Go to
support.dell.com
for help with general usage, installation, and troubleshooting questions. See
"
Getting Help
" for a description of the hardware and software support provided by Dell.
E-mail Dell
—
Go to
support.dell.com
and then click
E-Mail Dell
in the
Communicate
list. Send an e-mail message to Dell about your
problem; you can expect to receive an e-mail message from Dell within hours. See "
Getting Help
" for a description of the hardware and
software support provided by Dell.
Contact Dell
—
If you cannot solve your problem using the Dell Support website (
support.dell.com
) or e-mail service, call Dell for technical
assistance. See "
Getting Help
" for a description of the hardware and software support provided by Dell.

Power Management
Power Management Tips
Power Management Wizard
Power Management Modes
Power Options Properties
Power Management Tips
l
Connect the computer to an electrical outlet when possible because battery life is largely determined by the number of times the battery is charged.
l
Place the computer in
standby mode
or
hibernate mode
when you leave the computer unattended for long periods of time.
l
To enter or exit a power management mode, press the power button.
Power Management Wizard
Click or double-click the
icon to open the Power Management Wizard.
The first two screens of the wizard
—
Welcome
and
What is Power Management?
—
describe and define various power management options.
Use the following screens of the Power Management Wizard to set various power management options, including sleep modes, power schemes, and low
battery-charge alarms.
Setting Sleep Modes
The screen defines standby and hibernate modes. From the screen you can:
l
Set standby-mode password options.
l
Enable or disable hibernate mode.
l
Select how the computer will respond when you close the display:
¡
Choose no action.
¡
Enter standby mode.
¡
Enter hibernate mode.
l
Select how the computer will respond when you press the power button:
¡
Choose no action.
¡
Enter standby mode.
¡
Enter hibernate mode.
¡
Shut down the operating system and turn off the computer.
¡
Prompt a user for an action (
Ask me what to do
).
l
Select how the computer will respond when you press <Fn> <Esc>
NOTE:
See "
Using a Battery
" for more information on conserving battery power.
NOTE:
The
Power Management Wizard
is not available if you have restricted access rights.
NOTE:
On the
What is Power Management?
screen, you can select
Do not show this page again.
When you select this option, the
Welcome
screen
also does not appear again.

¡
Choose no action.
¡
Enter standby mode.
¡
Enter hibernate mode.
¡
Shut down Microsoft Windows and turn off the computer.
¡
Prompt a user for an action (
Ask me what to do
).
Selecting a Power Scheme
The screen allows you to select, create, and edit power scheme settings. In addition, you can delete power schemes that you create, but you cannot delete
Dell™ QuickSet predefined power schemes (
Maximum Battery
,
Maximum Performance
,
Presentation
, and
Network Disabled
).
All QuickSet power schemes are displayed in a drop-down menu near the center of the screen. The power settings for each scheme in the menu are listed
below the menu. The power settings are listed separately for when the computer is running on battery or connected to an electrical outlet.
The Power Management Wizard also allows you to associate the display brightness level with a power scheme. You must enable brightness-level power
schemes through QuickSet in order to set the brightness level.
The display brightness, internal network-card activity, and wireless activity features are not available through the Control Panel power schemes. In order to
make use of these value-added features, you must set them through QuickSet power schemes.
Setting Battery Alarms and Actions
The screen allows you to enable the low-battery and critical-battery alarms and to change settings for the alarms. For example, you can set the low-battery
alarm to 20% to remind you to save work and switch to AC power, and you can set the critical-battery alarm to 10% to enter hibernate mode. From the
screen, you can:
l
Select whether the alarm will notify you by sound or text.
l
Adjust the power level at which you want the alarm to notify you.
l
Select how the computer will respond when the alarm notifies you:
¡
Choose no action.
¡
Enter standby mode.
¡
Enter hibernate mode.
¡
Shut down Windows and turn off the computer.
Completing the Power Management Wizard
The screen summarizes the QuickSet power scheme, sleep mode, and battery alarm settings for your computer. Review the settings you have selected and
click
Finish
.
For more information about QuickSet, right-click the
icon in the taskbar and click
Help
.
Power Management Modes
Standby Mode
NOTE:
When your computer is running on battery power, the
Network Disabled
power scheme disables your internal network and wireless activity.
When your computer is connected to an electrical outlet or docking device, the
Network Disabled
power scheme disables only your wireless activity. You
must set the power scheme through QuickSet (not Microsoft
®
Windows
®
) for
Network Disabled
to work.
NOTE:
QuickSet automatically adds the word
(QuickSet)
after the names of power schemes created using QuickSet.
NOTE:
Brightness shortcut keys only affect the display on your portable computer, not monitors that you attach to your portable computer or docking
device. If your computer is in
CRT only
mode and you try to change the brightness level, the
Brightness Meter
appears, but the brightness level on the
monitor does not change.

Standby mode conserves power by turning off the display and the hard drive after a predetermined period of inactivity (a time-out). When the computer exits
standby mode, it returns to the same operating state it was in before entering standby mode.
To enter standby mode:
l
In the Microsoft
®
Windows XP operating system
, click the
Start
button, click
Turn off computer
, and then click
Stand by
.
In Windows
®
2000
, click the
Start
button, click
Shutdown
, click
Standby
, and then click
OK
.
or
l
Depending on how you set the power management options on the
Advanced
tab
in the
Power Options Properties
window, use one of the following
methods:
¡
Press the power button.
¡
Close the display.
¡
Press <Fn> and <Esc>.
To exit standby mode, press the power button or open the display depending on how you set the options on the
Advanced
tab
. You cannot make the
computer exit standby mode by pressing a key or touching the touch pad.
Hibernate Mode
Hibernate mode conserves power by copying system data to a reserved area on the hard drive and then completely turning off the computer. When the
computer exits hibernate mode, it returns to the same operating state it was in before entering hibernate mode.
Your computer enters hibernate mode if the battery charge level becomes critically low.
To manually enter hibernate mode:
l
In Windows XP
, click the
Start
button, click
Turn off computer
, press and hold <Shift> and then click
Hibernate
.
In Windows
®
2000
, if
hibernate support is enabled
, click the
Start
button, click
Shutdown
, click
Hibernate
, and then click
OK
.
or
l
Depending on how you set the power management options on the
Advanced
tab
in the
Power Options Properties
window, use one of the following
methods to enter hibernate mode:
¡
Press the power button.
¡
Close the display.
¡
Press <Fn> and <Esc>.
To exit hibernate mode, press the power button. The computer may take a short time to exit hibernate mode. You cannot make the computer exit hibernate
mode by pressing a key or touching the touch pad. For more information on hibernate mode, see the documentation that came with your operating system.
Power Options Properties
The
Power Options Properties
window helps you to manage power consumption and monitor battery charge status. To access the Microsoft
®
Windows
®
Power Options Properties
window:
l
In Windows XP
,
c
lick the
Start
button
®
Control Panel
®
Performance and Maintenance
®
Power Options
.
l
In Windows 2000
, open the Control Panel, and then double-click the
Power Options
icon.
NOTICE:
If your computer loses AC and battery power while in standby mode, it may lose data.
NOTICE:
You cannot remove devices or undock your computer while your computer is in hibernate mode.
NOTE:
Some PC Cards may not operate correctly after the computer exits hibernate mode.
Remove and reinsert the card
, or simply restart (reboot) your
computer.

Power Schemes Tab
The
Power schemes
drop-down menu displays the selected preset power scheme. Keep the default
Portable/Laptop
power scheme to maximize battery
power.
Windows XP controls the performance level of the processor depending on the power scheme you select. You do not need to make any further adjustments to
set the performance level. For information on setting processor performance for other operating systems, see "
Intel SpeedStep
®
Technology Tab
."
Each preset power scheme has different time-out settings for entering standby mode, turning off the display, and turning off the hard drive. For more
information on power management options, see the Help and Support Center (Windows
Help
in Windows 2000
).
Alarms Tab
The
Low battery alarm
and
Critical battery alarm
settings alert you with a message when the battery charge falls below a certain percentage. When you
receive your computer, the
Low battery alarm
and
Critical battery alarm
check boxes are selected. It is recommended that you continue to use these
settings. See "
Using a Battery
" for more information on low-battery warnings.
Power Meter Tab
The
Power Meter
tab displays the current power source and amount of battery charge remaining.
Advanced Tab
The
Advanced
tab allows you to:
l
Set power icon and standby mode password options.
l
Program the following functions (depending on your operating system):
¡
Prompt a user for an action (
Ask me what to do
).
¡
Enter standby mode.
¡
Enter hibernate mode.
¡
Shut down Windows and turn off the computer.
¡
Choose no action (
None
or
Do nothing
).
To program these functions, click an option from the corresponding drop-down menu and then click
OK
.
Hibernate Tab
The
Hibernate
tab lets you enable hibernate mode by clicking the
Enable hibernate support
check box.
Intel SpeedStep
®
Technology Tab
Depending on your operating system and microprocessor, the
Power Options Properties
window includes the
Intel SpeedStep
®
technology
tab. The Intel
SpeedStep technology allows you to set the performance level of the processor according to whether the computer is running on battery or AC power.
Depending on your operating system, typical options are:
l
Automatic
—
The processor runs at its highest possible speed (Maximum Performance mode) when the computer is running on AC power. When the
computer is running on battery power, the processor runs in Battery Optimized mode.
l
Maximum Performance
—
The processor runs at its highest possible speed even if the computer is running on battery power.
l
Battery Optimized Performance
—
Processor speed is optimized for battery power even if the computer is connected to an electrical outlet.
NOTE:
To enable audible alarms, click each
Alarm Action
button and select
Sound alarm
.
NOTE:
Windows XP controls the performance level of the processor depending on the power scheme that you select. See "
Power Schemes Tab
."
NOTE:
To use Intel SpeedStep technology, a Windows operating system must be running.

To change additional Intel SpeedStep options:
1.
Click
Advanced
and then click one of the following options:
l
Disable Intel SpeedStep technology control
l
Remove flag icon
(from the notification area)
l
Disable audio notification when performance changes
2.
Click
OK
to accept any changes, and then click
OK
to close the
Intel SpeedStep
®
technology
window.
You can also change the Intel SpeedStep settings by right-clicking the flag icon in the notification area.

Dell™ QuickSet Features
Clicking the QuickSet Icon
Double-Clicking the QuickSet Icon
Right-Clicking the QuickSet Icon
Dell™ QuickSet runs from the
icon located in the taskbar and functions differently when you click, double-click, or right-click the icon.
Clicking the QuickSet Icon
Click the
icon to perform the following tasks:
l
Adjust power management settings using the
Power Management Wizard
.
l
Adjust the size of icons and toolbars.
l
Select a power scheme that you set in the
Power Management Wizard
.
l
Turn presentation mode on or off.
Double-Clicking the QuickSet Icon
Double-click the
icon to adjust power management settings using the
Power Management Wizard
.
Right-Clicking the QuickSet Icon
Right-click the
icon to perform the following tasks:
l
Enable or disable the
Brightness Meter
on the screen.
l
Enable or disable the
Volume Meter
on the screen.
l
Turn
wireless activity
on or off.
l
View
Dell QuickSet Help
.
l
View the version and copyright date of the QuickSet program installed on your computer.
For more information about QuickSet, right-click the
icon in the taskbar and click
Help
.
Adding and Replacing Parts
Adding Memory
Adding a Modem
Adding a Mini PCI Card
Adding Memory
You can increase your computer memory by installing a memory module on the system board. See "
Specifications
" for information on the memory supported by
your computer. Be sure to add only a memory module that is intended for your computer.
1.
Ensure that the work surface is flat and clean to prevent scratching the computer cover.
2.
Save and close any open files, exit any open programs, and shut down the computer.
3.
If the computer is connected to the media base (docked), undock it. See the documentation that came with your media base for instructions.
4.
Disconnect the computer from the electrical outlet.
5.
Wait 10 to 20 seconds, and then disconnect any attached devices.
6.
Remove any installed PC Cards and battery.
7.
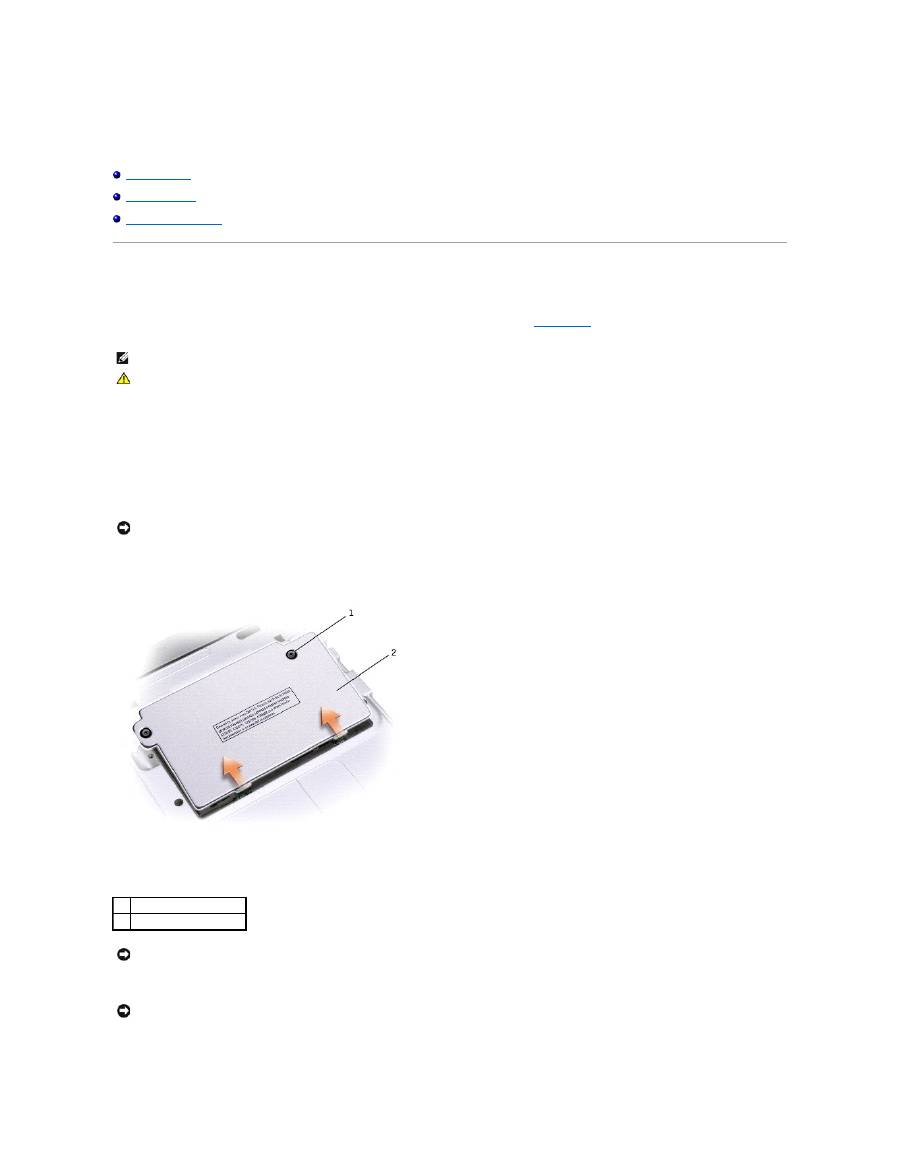
Turn the computer over, unscrew both captive screw(s) from the memory module/Mini PCI/modem cover, and remove the cover.
8.
If you are replacing a memory module, remove the existing module.
a.
Use your fingertips to carefully spread apart the securing clips on each end of the memory module connector until the module pops up.
NOTE:
Memory modules purchased from Dell are covered under your computer warranty.
CAUTION:
Before working inside your computer, read the safety instructions in your
System Information Guide
.
NOTICE:
Handle components and cards by their edges, and avoid touching pins and contacts. Ground yourself by touching a metal connector on the
back of the computer. Continue to ground yourself periodically during this procedure.
1
captive screw (2)
2
cover
NOTICE:
To prevent damage to the memory module connector, do not use tools to spread the the memory module securing clips.
NOTICE:
Handle components and cards by their edges, and avoid touching pins and contacts. Ground yourself by touching a metal connector on the
back of the computer. Continue to ground yourself periodically during this procedure..

b.
Remove the module from the connector.
9.
Ground yourself and install the new memory module:
a.
Align the notch inthe module edge connrctor with the tab in the center of the connector slot.
b.
Slide the module firmly into the slot at a 45-degree angle, and rotate the module down until it clicks into place. If you do not hear the click,
remove the module and reinstall it.
10.
Replace the cover.
1
memory module
2
securing clips (2)
NOTE:
If the memory module is not installed properly, the computer may not not boot properly. No error message indicates this failure.
1
memory module
2
connector
NOTICE:
If the cover is difficult to close, remove the module and reinstall it. Forcing the cover to close may damage your computer.

11.
Insert the battery into the battery bay, or connect the AC adapter to your computer and an electrical outlet.
12.
Turn on the computer.
As the computer boots, it detects the additional memory and automatically updates the system configuration information.
To confirm the amount of memory installed in the computer:
l
I
n the Microsoft
®
Windows
®
XP operating system, click the Start button, click Help and Support, and then click Computer Information.
l
In Windows 2000
, right-click the
My Computer
icon on your desktop, and then click the
General
tab.
Adding a Modem
1.
Ensure that the work surface is flat and clean to prevent scratching the computer cover.
2.
Save and close any open files, exit any open programs, and then shut down the computer.
3.
If the computer is connected to a media base (docked), undock it. See the documentation that came with the media base for instructions.
4.
Disconnect the computer from the electrical outlet.
5.
Wait 10 to 20 seconds and then disconnect any attached devices.
6.
Remove any installed PC Cards or blanks, battery, and devices.
7.
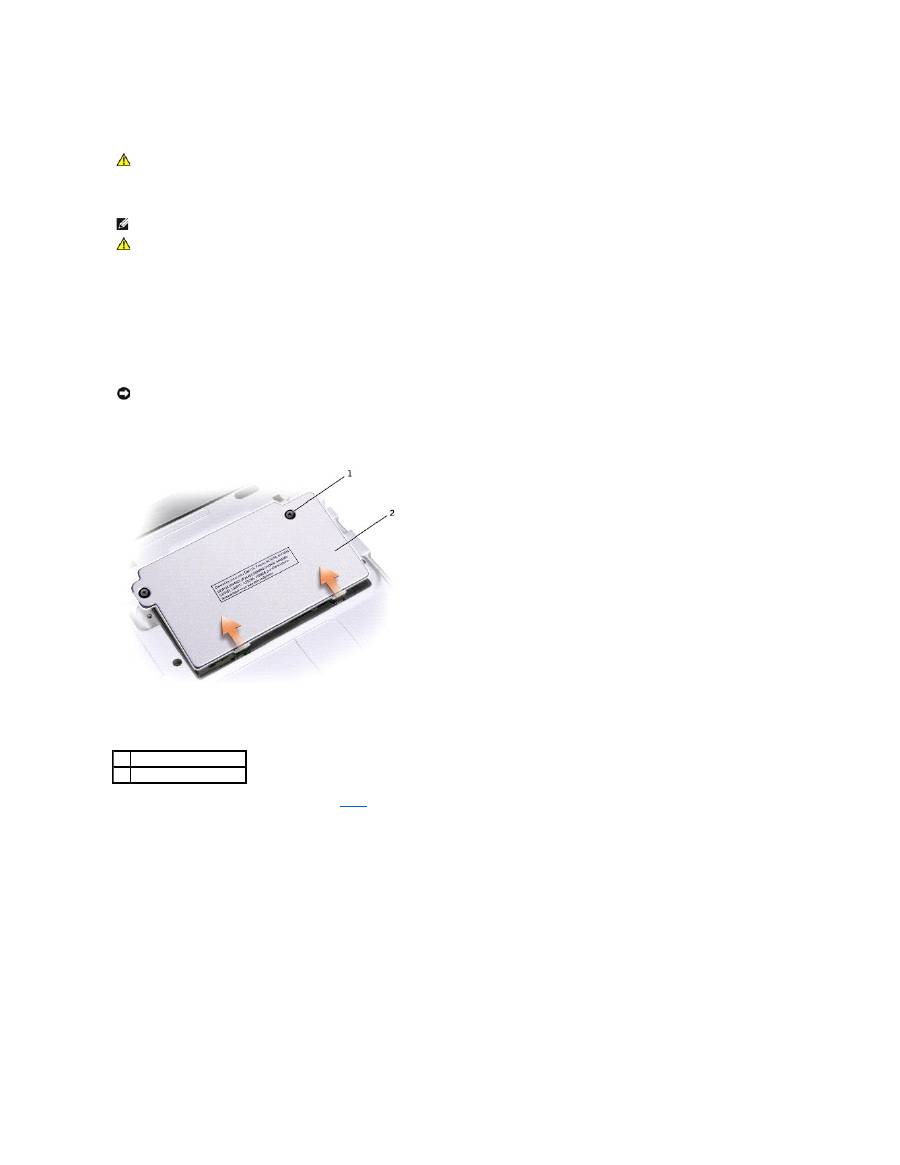
Turn the computer over and loosen the two captive screws on the modem cover, and remove the cover.
1 captive screw (2)
2 memory module cover
CAUTION:
Before working inside your computer, read the safety instructions in your
System Information Guide
.
NOTICE:
Handle memory modules by their edges, and do not touch the components on a module. Ground yourself by touching a metal connector on the
back of the computer, and continue to do so periodically during this procedure.
8.
If a modem is not already installed, go to
step 1
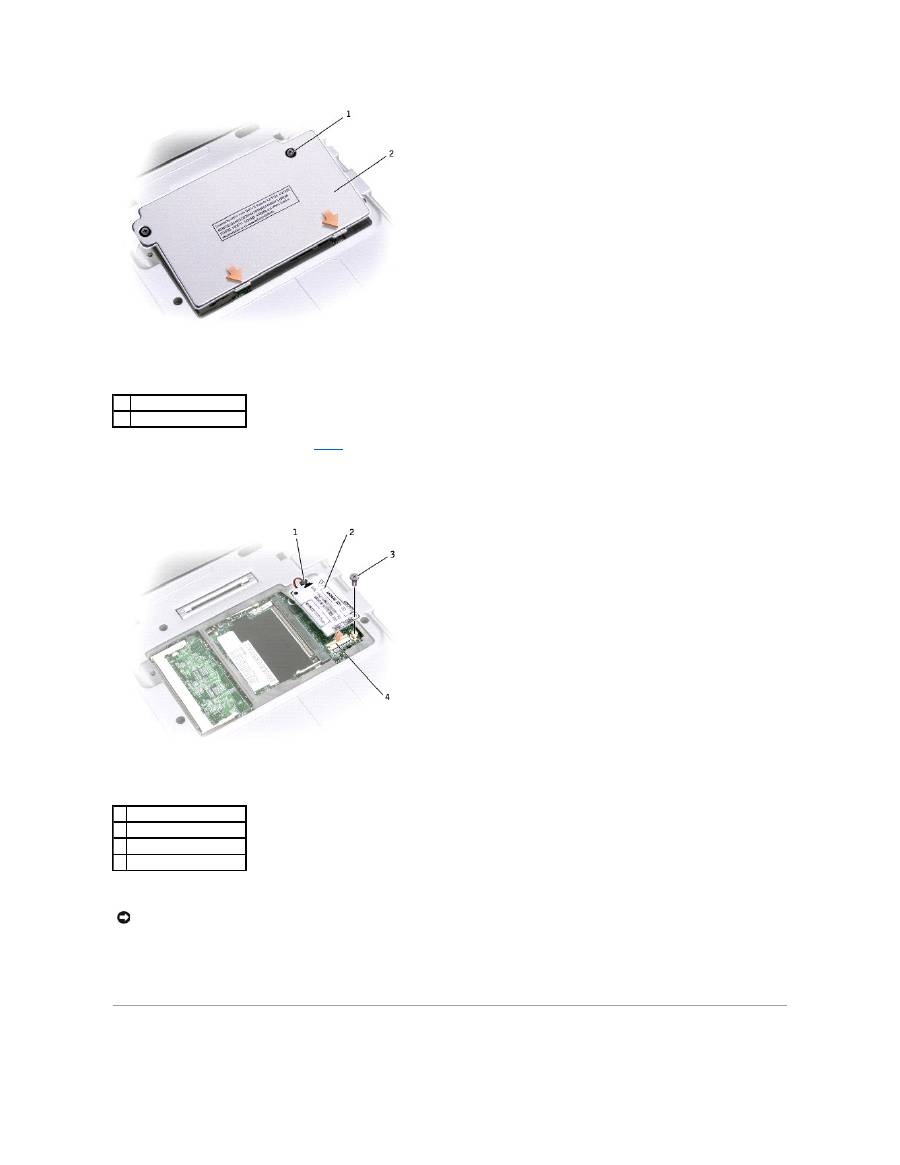
1. If you are replacing a modem, remove the existing modem:
a.
Remove the screw securing the modem to the system board, and set it aside.
b.
Pull straight up on the attached pull-tab to lift the modem out of its connector on the system board, and disconnect the modem cable.
9.
Connect the modem cable to the modem.
10.
Align the modem with the screw hole and press the modem into the connector on the system board.
11.
Install the screw to secure the modem to the system board.
12.
Replace the cover.
Adding a Mini PCI Card
1
captive screw (2)
2
cover
1 modem cable-connector
2 modem
3 modem screw
4 system board connector
NOTICE:
The connectors are keyed to ensure correct insertion. If you feel resistance, check the connectors and realign the card.
If you ordered a Mini PCI card with your computer, the car is already installed.
1.
Ensure that the work surface is flat and clean to prevent scratching the computer cover.
2.
Save and close any open files, exit any open programs, and shut down the computer.
3.
If the computer is connected to a media base (docked), undock it. See the documentation that came with th media base for instructions.
4.
Disconnect the computer from the electrical outlet.
5.
Wait 10 to 20 seconds and then disconnect any attached devices.
6.
Remove any installed PC Card, battery, and devices.
7.
Turn the computer over, and loosen both the captive screw(s) from the Mini PCI card cover and remove the cover.
8.
If a Mini PCI card is not already installed, go to
step 9
. If you are replacing a Mini PCI card, remove the existing card:
a.
Disconnect the Mini PCI card from the attached cables.
CAUTION:
FCC rules strictly prohibit users from installing 5 GHz (802.11a, 802.11a/b, 802.11a/b/g) Wireless LAN Mini PCI cards. Under no
circumstances should the user install such a device. Only trained Dell service personnel are authorized to install a 5 GHz Wireless LAN Mini PCI
card.
If you are removing and/or installing a 2.4 GHz (802.11b, 802.11b/g) Mini PCI Card, please follow the instructions noted below. Only products
approved for use in your portable computer may be installed. Approved Mini PCI Cards may be purchased only from Dell.
NOTE:
2.4 GHz Wireless LAN PC Cards may be removed and installed by the user.
CAUTION:
Before working inside your computer, read the safety instructions in your
System Information
Guide
.
NOTICE:
Handle components and cards by their edges, and avoid touching pins and contacts. Ground yourself by touching a metal connector on the
back of the computer. Continue to ground yourself periodically during this procedure.
1
captive screw (2)
2
cover

b.
Release the Mini PCI card by spreading the metal securing tabs until the card pops up slightly.
c.
Lift the Mini PCI card out of its connector.
9.
To replace a MiniPCI card, align the card with the connector at a 45-degree angle, and press the Mini PCI card into the connector.
1
cable connector (2)
NOTICE:
To avoid damaging the Mini PCI card, never place cables on top of or under the card.
