Dell LATITUDE D400 – страница 5
Инструкция к Ноутбуку Dell LATITUDE D400
Оглавление
- Dell™ Latitude™ CS/CS Portable Computers User's Guide
- AC Adapter: Dell™ Latitude™ CS/CS x Portable Computers User's Guide

Docking IRQ
tells the computer which interrupt request (IRQ) to assign to the docking station or replicator during the boot sequence. If
Docking
IRQ
is set to
Optimized
, the docking station or replicator is assigned a dedicated IRQ during the boot sequence. Select
IRQ11
if a peripheral
device requires the use of the dedicated IRQ.
Docking Status
Docking Status
shows whether the computer is attached to a Dell Latitude C/Port Family APR or C/Dock Family Expansion Station. No user-
selectable settings are available for this option.
External Hot Key
External Hot Key
lets you use the <Scroll Lock> key on the external keyboard the same way you use the <Fn> key on the computer's keyboard.
Set this option to
Scroll Lock
(the default) if you are using an external keyboard. Set this option to
Not Installed
to disable this function on the
external keyboard.
External Media Bay
External Media Bay
identifies the type of device
—
Diskette
Drive
,
CD-ROM
Drive
,
DVD-ROM Drive
, or
LS-120 Disk Drive
—
installed in the
external media bay. If the external media bay does not contain a device or is not attached, this option reads
Not Installed
. No user-selectable
settings are available for this option.
Infrared Data Port
Infrared Data Port
is available only when the computer is docked; otherwise, this option is blue or dimmed. This option allows you to avoid
resource conflicts by disabling or remapping the address of the infrared port on the Dell Latitude C/Port Family APR or C/Dock Family Expansion
Station. The
COM1
,
COM2
,
COM3
, and
COM4
settings allow you to take advantage of the computer's infrared support.
Settings for this option are:
l
Disabled
—
Disables the infrared data port and makes the direct memory access (DMA), IRQ, and I/O resources available for another serial
device to use
l
COM1
—
Maps the infrared data port to COM1
l
COM2
—
Maps the infrared data port to COM2
l
COM3
(the default)
—
Maps the infrared data port to COM3
l
COM4
—
Maps the infrared data port to COM4
For a change to
Infrared Data Port
to take effect, you must reboot your computer.
Infrared Mode
Infrared Mode
is visible only when the computer is docked and
Infrared Data Port
is enabled.
Infrared Mode
manages the infrared resources of
the computer and the external devices you use with it. This option lets you select
Fast IR
(the default) or
Slow IR
to use with an infrared device.
For a change to
Infrared Mode
to take effect, you must reboot your computer.
Internal Cache
Internal Cache
displays the amount of internal cache your computer has. No user-selectable settings are available for this option.
Keyboard Click
Keyboard Click
lets you choose whether the computer's keyboard makes audible clicking sounds.
Click Volume
must be enabled for
Keyboard
Click
to function. The volume of the simulated key clicks is controlled by the
Click Volume
setting.
Settings for this option are
Disabled
(the default) and
Enabled
.

A change to
Keyboard Click
takes effect immediately (rebooting is not required).
Microprocessor
Microprocessor
displays the type and speed of the microprocessor installed on your computer's system board. No user-selectable settings are
available for this option.
Parallel Mode
Parallel Mode
controls whether the computer's integrated parallel port acts as a Personal System/2 (PS/2)-compatible (
Bidirectional
) port,
Advanced Technology (AT)-compatible (
Normal
) port, or Extended Capabilities Port (
ECP
)-compatible port. The default for
Parallel Mode
is
ECP
.
The Microsoft
®
Windows
®
95 and Windows 98 operating systems use ECP protocol automatically if it detects an ECP-compatible device.
Set this option according to the type of device connected to the parallel port. To determine the correct mode to use, see the documentation that
came with the device.
Setting
Parallel Mode
to
Disabled
disables the parallel port and its assigned LPT address, freeing its interrupt for another device to use.
For a change in
Parallel Mode
to take effect, you must reboot your computer.
Pointing Device
Pointing Device
enables and disables the computer's touch pad.
Settings for this option are:
l
Touch Pad-PS/2 Mouse
(the default)
l
Serial Mouse
—
Disables the touch pad and allows you to use a mouse connected to the serial connector on the I/O port
If you want to use a serial mouse, you must first set the
Pointing Device
option to
Serial Mouse
.
For a change in
Pointing Device
to take effect, you must reboot your computer.
Power Management
Power Management
(Page 4 of the System Setup screens) allows you to enable or disable power conservation features when the computer is
being powered by a battery or AC power.
If you want to use any of the time-out options while using battery power, set
Battery
to
Enabled
. If you want to use the time-out options while using
AC power, set
AC
to
Enabled
.
A change to
Power Management
takes effect immediately (rebooting is not required).
Primary Hard Drive
Primary Hard Drive
displays the capacity of your computer's hard-disk drive. No user-selectable settings are available for this option.
Primary Password
Primary Password
displays the current status of the primary password and allows you to assign or change this password.
Settings for this option are:
l
Disabled
(the default)
—
Indicates that no primary password is assigned
l
Enabled
—
Indicates that a primary password is currently assigned
NOTE: The
ECP
setting also works for most software written for the AT and PS/2 modes. Devices that use
ECP
mode may come with
special drivers that need to be installed in order to use these modes.

If you assign a primary password, the computer prompts you for the password each time you boot the computer.
NOTICE:
The password features provide a high level of security for the data in your computer. However, they are not foolproof. If
your data requires more security, you should obtain and use additional forms of protection, such as data encryption programs or PC
Cards with encryption features.
Ring/Event Resume
Ring/Event Resume
lets you determine if the computer exits suspend mode when an installed modem PC Card receives an incoming call. This
feature must be supported by your modem PC Card and your operating system.
Settings for this option are:
l
Enabled
(the default)
—
Resumes normal operation when the computer detects a modem ring
l
Disabled
—
Keeps the computer in suspend mode when the computer detects a modem ring
A change to
Ring/Event Resume
takes effect immediately (rebooting is not required).
S2D Time-out
S2D Time-out
lets you determine how long your computer remains idle (no I/O activity) before activating suspend-to-disk (S2D) mode to conserve
battery power.
S2D Time-out
settings for the
AC
and
Battery
options are:
A change to
S2D Time-out
takes effect immediately (rebooting is not required).
If you are not in the System Setup program and your computer is running in Advanced Power Management (APM) mode, you can activate S2D
mode at any time by pressing <Fn><a>. Press the power button to resume operation from S2D mode.
Serial Port
Serial Port
allows you to disable or remap the address of the serial port on the Dell Latitude C/Port Family APR or C/Dock Family Expansion
Station. When the computer is undocked, this option is blue or dimmed and has no user-selectable settings.
Settings for this option are:
l
COM1
(the default)
—
Maps the serial port to COM1
l
COM2
—
Maps the serial port to COM2
l
COM3
—
Maps the serial port to COM3
l
COM4
—
Maps the serial port to COM4
l
Disabled
—
Disables the serial port and its assigned COM address, freeing that interrupt for another device to use
NOTES: Dell recommends that you set
Ring/Event Resume
to
Disabled
when an external serial device,
other than a modem
, is
connected to your computer.
For
Ring/Event Resume
to work properly, this feature must be enabled in the device driver for your modem PC Card. All drivers
supplied by Dell with your computer are configured to allow the computer to resume normal operation when a modem receives an
incoming call. If you use a PC Card that you did not receive from Dell, check the card's documentation to make sure that this feature is
set to
Enabled
.
l
Disabled
l
30 Minutes
l
1 Hour
l
2 Hours
l
3 Hours
l
4 Hours
l
6 Hours
l
8 Hours (default)
l
12 Hours

For a change to
Serial Port
to take effect, you must reboot your computer.
Service Tag
Service Tag
displays the computer's alphanumeric service code, which was programmed into NVRAM by Dell during the manufacturing process.
Be prepared to supply this identification during technical assistance or service calls. The service tag is also accessed by certain Dell support
software, including diagnostics. No user-selectable settings are available for this option.
Smart CPU Mode
Smart CPU Mode
allows the computer to slow down the microprocessor automatically if it is not being actively used.
Settings for this option are:
l
Enabled
(the default)
—
Allows the computer to slow down the microprocessor when it is inactive
l
Disabled
—
Keeps the microprocessor running at its normal operating speed regardless of microprocessor inactivity
When
Smart CPU Mode
is set to
Enabled
and the microprocessor is inactive, the computer slows the microprocessor to save power.
A change to
Smart CPU Mode
takes effect immediately (rebooting is not required).
Suspend Time-out
Suspend Time-out
lets you determine how long your computer remains idle before activating suspend mode to conserve battery power.
Suspend Time-out
settings for both
AC
and
Battery
options are:
To increase battery operating time, set
Suspend Time-out
to a lower number of minutes.
A change to
Suspend Time-out
takes effect immediately (rebooting is not required).
If you are not in the System Setup program, you can activate suspend mode at any time by pressing <Fn><Esc>. The computer resumes normal
operation automatically when you press the power button.
System Memory
System Memory
displays the total amount of synchronous dynamic random-access memory (SDRAM) installed in your computer. No user-
selectable settings are available for this option. The amount of memory displayed changes if you install or remove a memory module.
NOTE: Convert the service tag number into an express service code when prompted to do so the first time you turn on the computer (or
use the program in the
Dell Accessories
folder). Keep the code handy in case you call Dell for technical assistance. The code helps
Dell's automated support telephone system direct your call more efficiently.
NOTES: Some communications software may not work properly when
Smart CPU Mode
is enabled. Dell recommends that you set
Smart CPU Mode
to
Disabled
if you are using communications software.
Interactive application programs should function well when
Smart CPU Mode
is set to
Enabled
. (Examples of interactive programs
include spreadsheet, text editor, graphics design, entertainment, educational, and utility programs.) If your computer runs slowly while
performing such tasks as recalculating large spreadsheets, redrawing screens, or testing the microprocessor, set
Smart CPU Mode
to
Disabled
.
l
Disabled
l
1 Minute
l
2 Minutes
l
3 Minutes
l
4 Minutes
l
5 Minutes
l
10 Minutes (default)
l
15 Minutes
l
30 Minutes
l
1 Hour
NOTE: Set
Suspend Time-out
to
Disabled
if using it causes compatibility problems with your software.

System Primary
System Primary
displays the current status of the primary hard-disk drive password and allows you to assign or change this password.
Settings for this option are:
l
Disabled
(the default)
—
Indicates that no primary hard-disk drive password is assigned
l
Enabled
—
Indicates that a primary hard-disk drive password is currently assigned
NOTICE:
The password features provide a high level of security for the data in your computer. However, they are not foolproof. If
your data requires more security, you should obtain and use additional forms of protection, such as data encryption programs or PC
Cards with encryption features.
Time
Time
resets the time on the computer's internal clock. Time is kept in a 24-hour format (hours:minutes:seconds).
A change to
Time
takes effect immediately (rebooting is not required). However, you must reboot to make the change apparent to the operating
system.
Universal Connect
The
Universal Connect
option functions with the Dell Latitude C/Port Family APR and/or C/Dock Family Expansion Station if the computer uses
Windows 95 or Windows 98.
Set this option to
Enabled
(the default) if you often use more than one C/Port APR and/or C/Dock Expansion Station and want to minimize the
initialization time when you connect an APR or expansion station to the computer. With
Universal Connect
set to
Enabled
, the system creates
only one profile for each docking station family. If this option is set to
Disabled
, an APR or expansion station is reinitialized each time it is
connected to the computer, and a different docking profile is created each time.
Video Memory
Video Memory
displays the amount of video memory installed on the system board. No user-selectable settings are available for this option.
Back to Contents Page
NOTE:
If a network server controls the time reflected by the
Time
option, changing this option has no effect.

Back to Contents Page
Technical Specifications: Dell™ Latitude™ CS/CS x Portable Computers User's Guide
Chip Set and Bus
Keyboard
PC Cards
Battery
Memory
AC Adapter
Connectors
Physical
Audio
Environmental (Computer)
Video
Touch Pad
Display
Chip Set and Bus
Microprocessor
Intel
®
Mobile Pentium
®
II for the Latitude CS;
Intel Mobile Pentium III for the Latitude CS
x
System chip set
Intel Mobile 440 BX PCIset
Microprocessor data bus width
64 bits
DRAM bus width
64 bits
Address bus width
32 bits
Flash EPROM
4 Mbits
AGP bus
66 MHz
PCI bus
33 MHz
PC Cards
CardBus controller
Texas Instruments PCI 1225 CardBus controller
PC Card slots
two (supports type I and type II cards in any combination; type III cards can be used
only in the lower slot; the upper slot supports ZV cards on computers running the
Microsoft
®
Windows
®
95 or Windows 98 operating system)
Cards supported
3.3-V and 5-V
PC Card connector size
68 pins
Data width (maximum):
PCMCIA
16 bits
CardBus
32 bits
Memory
Architecture
SDRAM
Memory module sockets
two (one is customer-accessible for performing memory upgrades)
Memory module capacities and type
32-, 64-, 128, and 192-MB 3.3-V SDRAM
1
modules (the 192-MB module cannot be
installed in the memory upgrade socket)
Standard RAM
one 64-MB memory module
Maximum RAM
320 MB
Memory clock speed
66 MHz
Memory access time
CL2 or CL3 (Note: CL3 indicates a CAS latency of 3 clocks)
BIOS address
F000:0000-F000:FFFF

Connectors
Parallel
one unidirectional, bidirectional, or ECP connector
IDE
IDE connector for external media bay
Video
SVGA connector
PS/2
mini-DIN connector
Audio
microphone-in jack;
headphones/speakers jack
USB
USB-compliant connector
Docking
connector for the C/Port Family Advanced Port
Replicator or C/Dock Family Expansion Station
Audio
Audio type
Sound Blaster (software emulation-capable)
Audio controller
NeoMagic MagicMedia 256 ZX
Stereo conversion
16 bit (analog-to-digital and digital-to-analog)
Interfaces:
Internal
PCI bus/AC97
External
microphone-in minijack;
headphones/speakers-out minijack
Speaker
2.5-ohm speaker
Internal speaker amplifier
500 mW
Controls
volume can be controlled through key combinations, application program menus, or
the
Speaker
window in the Dell Control Center (Windows 95 only)
Video
Video type
256-bit hardware-accelerated
Data bus
AGP
Video controller
NeoMagic
MagicMedia 256 ZX
Video memory
4.0 MB
Display
Type
active-matrix color (TFT)
Dimensions (active area):
Height
214.9 mm (8.46 inches)
Width
270.3 (10.64 inches)
Diagonal
337.8 mm (13.3 inches)
Maximum resolution/colors
1024 x 768 pixels; 65,536 colors
Response time (typical)
50 ms
Operating angle
0° (closed) to 180°
Viewing angles:
Horizontal
±
40°
Vertical
+20°/–30°
Dot pitch
0.26 mm
Power consumption:

Panel (typical)
800 mW
Backlight (medium brightness)
3.7 W
Controls
brightness can be controlled through a key combination
Keyboard
Number of keys
87 (U.S., Canada, Korea, Thailand, and locations that use traditional Chinese);
88 (Europe);
90 (Japan)
Key travel
2.7 to 2.9 mm (0.106 to 0.114 inch)
Key spacing
19.05 mm
±
0.3 mm (0.75 inch
±
0.012 inch)
Battery
Type
lithium ion
Dimensions:
Height
16.3 mm (0.64 inch)
Depth
84.05 mm (3.31 inches)
Width
205.5 mm (8.09 inches)
Weight
0.306 kg (0.67 lb) for standard battery; 0.494 kg (1.09 lb) for high-capacity battery
Voltage
11.10 VDC for standard battery; 14.4 for optional high-capacity battery
Capacity
34 WH for standard battery; 46 WH for high-capacity battery
Charge time (approximate):
2
Computer on
1.5 hr for standard battery; 1 hr, 50 minutes for high-capacity battery
Computer off
About 1 hour
Life span (approximate)
2
350 discharge/charge cycles
Battery life
2
From 2.5 to 3 hours for fully charged standard battery; up to 50 percent more time for
fully charged high-capacity battery
Temperature range:
Charge
0° to 35°C (32° to 95°F)
Storage
–20° to 60°C (–4° to 140°F)
AC Adapter
Input voltage
90 to 135 VAC and 164 to 264 VAC
Input current (maximum)
1.5 A
Input frequency
47 to 63 Hz
Output current
4.5 A (maximum at 4-second pulse);
3.51 A (continuous)
Rated output voltage
20.0 VDC
Height
22.94 mm (1.1 inches)
Width
58.42 mm (2.3 inches)
Depth
133.35 mm (5.25 inches)
Weight (with cables)
0.4 kg (0.9 lb)
Temperature range:

Operating
0° to 35°C (32° to 95°F)
Storage
–20° to 60°C (–4° to 140°F)
Physical
Height
29.0 mm (1.14 inches)
Width
306.0 mm (12.05 inches)
Depth
246.0 mm (9.69 inches)
Weight
Configurations from 1.95 kg (4.3 lb)
4
and up
Environmental (Computer)
Temperature:
Operating
0° to 35°C (32° to 95°F)
Storage
–20° to 60°C (–4° to 140°F)
Relative humidity (maximum):
Operating
10% to 90% (noncondensing)
Storage
5% to 95% (noncondensing)
Maximum vibration:
Operating
0.9 GRMS using a random-vibration spectrum that simulates truck shipment
Storage
1.3 GRMS using a random-vibration spectrum that simulates air/truck shipment
Maximum shock:
3
Operating
152.4 cm/sec (60.0 inches/sec)
(less than or equal to a pulse width of 2 ms)
Storage
203.2 cm/sec (80 inches/sec)
(less than or equal to a pulse width of 2 ms)
Altitude (maximum):
Operating
–
18 to 3048 m (
–
59 to 10,000 ft)
Storage
–
18 to 10,600 m (
–
59 to 35,000 ft)
Touch Pad
Interface
PS/2 (compatible with Microsoft mouse driver)
X/Y position resolution
Minimum 40 points/mm (1000 points/inch) (graphics tablet mode)
Size:
Thickness
0.71
±
0.15-mm (0.028
±
0.006-inch) printed-circuit board (PCB) thickness (including
mylar cover)
2.50-mm (0.098-inch) PCB at highest component
Width
83.0
±
0.3-mm (3.268
±
.012-inch) rectangle
62.5-mm (2.461-inch) maximum bezel opening
Height
66.4
±
0.3-mm (2.61
±
0.012-inch) rectangle
46.5-mm (1.831-inch) maximum bezel opening
Weight
8.2
±
0.5g (.289
±
0.018 oz)

Back to Contents Page
Power:
Supply voltage
5 V
±
10%
Supply current
4.0 mA (nominal operating)
ESD
15 kV applied to front surface (when properly mounted)
NOTES:
1
The Dell Latitude CS/CSx portable computer does not support some memory modules from older models of Dell portable computers,
such as the Latitude CP, XP, XPi CD, or LM. It only supports SDRAM modules and does not support EDO memory modules.
2
Battery performance features such as charge time and life span can vary according to the conditions under which the computer and
battery are used.
3
Measured with the hard-disk drive in head-parked position.
4
Latitude CS system with standard battery

Back to Contents Page
Setup and Operation: Dell™ Latitude™ CS/CS x Portable Computers User's Guide
Back to Contents Page
AC Adapter
Batteries
Display
Media Options
Keyboard
PC Cards
Touch Pad
Securing Your Computer
Connecting External Devices
Back to Contents Page
Touch Pad: Dell™ Latitude™ CS/CS x Portable Computers User's Guide
Using the Touch Pad
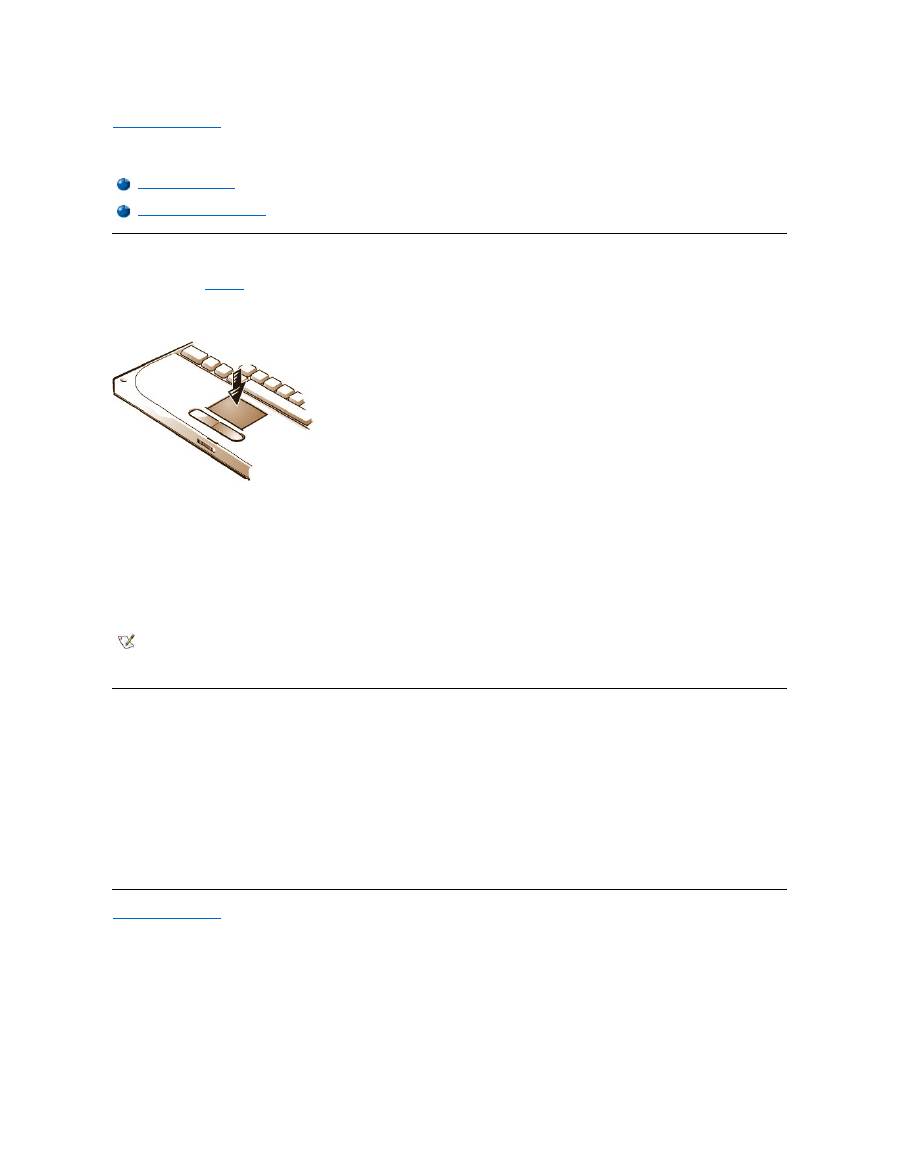
The touch pad (see
Figure 1
) detects the position of your finger over a touch-sensitive area and provides the computer full mouse functionality. The
touch pad
’
s two buttons correspond to the left and right buttons on a standard mouse.
Figure 1. Touch Pad
To best use the touch pad, follow these techniques:
l
To move the cursor, lightly slide your finger over the smooth sensor area.
l
To select an object, gently tap once on the surface of the touch pad.
l
To select and move (or drag) an object, position the cursor on the object and tap down-up-down on the touch pad. On the second down
motion, leave your finger on the touch pad and move the selected object by sliding your finger across the surface.
l
To double-click an object, position the cursor on the object and then tap twice.
Customizing the Touch Pad
To customize the touch pad, perform the following steps:
1. Click the
Start
button, point to
Settings
, and click
Control Panel
.
2. Double-click the
Mouse
icon to open the
Mouse Properties
window and click the
Touch
tab.
3. Select the settings that work best for you and click
Apply
.
4. Click
OK
to save the settings and close the window.
You can also click the touch pad icon on the taskbar and click
TouchPad Properties
to open the
Mouse Properties
control panel.
Back to Contents Page
Using the Touch Pad
Customizing the Touch Pad
NOTES: When enabled, the touch pad uses interrupt request (IRQ) 12. No other device can use IRQ12 while the touch pad is
enabled.
When you attach an external PS/2 mouse to the computer, the touch pad is automatically disabled.

Back to Contents Page
Traveling With Your Computer: Dell™ Latitude™ CS/CS x Portable Computers User's Guide
Identifying Your Computer
As an antitheft measure, assign a primary password and a hard-disk drive password to prohibit unauthorized access to the computer.
Dell recommends that you follow these precautions before you travel with your computer:
l
Write down your
service tag
and put it in a safe place separate from the computer or carrying case. If the computer is lost or stolen, use the
service tag number when reporting to law enforcement officials and to Dell.
l
Use the
Asset Tag utility
to place an owner tag in the computer. In the owner tag, you may want to include your name or your company's name
and a contact number or electronic mail address that can be used to reach you.
l
Use a text editor (such as Microsoft
®
Windows
®
Notepad) to create a file called
if_found
in your root directory. Place information such as
your name, address, and telephone number in this file. (For instructions on using the appropriate text editor, see the documentation that
came with your operating system.)
l
Attach your business card or other name tag to the computer.
l
Contact your credit-card company and ask if it offers coded identification tags that allow your property to be returned to you without the risk of
revealing your name, address, or telephone number.
l
Use a permanent marking or stenciling device to write your driver
’
s license number or some other unique identifying mark on the computer. If
a lost or stolen computer is recovered, such marking identifies the computer as your property.
Service Tag
The service tag is an alphanumeric sequence on a bar code label located on the bottom of the computer. The service tag is unique to your
computer and allows Dell technical assistance personnel to identify the computer and its configuration quickly if you call for assistance.
If Your Computer Is Lost or Stolen
If your computer is lost or stolen, Dell suggests that you perform the following steps:
1. Call a law enforcement agency to report the lost or stolen computer.
Include the service tag in your description of the computer. Ask that a case number be assigned, and write it down. Also write down the
name, address, and telephone number of the law enforcement agency. If possible, obtain the name of the investigating officer.
If you know where the computer was lost or stolen, call a law enforcement agency in that area. If you do not know, call a law
enforcement agency where you live.
2. If the computer belongs to a company, notify the security office of the firm.
3. Call Dell technical assistance to report the missing computer.
Provide the computer
’
s service tag, the case number, and the name, address, and telephone number of the law enforcement agency to
which you reported the missing computer. If possible, give the name of the investigating officer.
The Dell support technician will log your report under the computer
’
s service tag and flag the computer as missing or stolen. If someone
calls Dell for technical assistance and gives your service tag, the computer is identified automatically as missing or stolen. The
technician will attempt to get the phone number and address of the caller. Dell will then contact the law enforcement agency to which
you made the report of the missing or stolen computer.
Preparing Your Computer for Travel
To prepare your computer for travel, perform the following steps:
1. Detach any external devices attached to the computer, and store them in a safe place. If a diskette is in the diskette drive, remove it. Remove
any cables attached to installed PC Cards (you do not have to remove the PC Cards themselves).
Identifying Your Computer
Preparing Your Computer for Travel
Travel Tips

2. To maximize battery life, check the charge on your battery. Then fully charge the battery and any spares you plan to carry with you. For more
information, see "
Batteries
."
3.
Turn off the computer or press <Fn><a> to enter suspend
-to-disk mode. (On a French keyboard, press <Fn><q>.)
NOTICE: When you disconnect the AC adapter from the computer, grasp the adapter cable's connector, not the cable itself, and pull
gently but firmly to avoid damaging the cable.
4. Disconnect the AC adapter.
NOTICE: When the display is closed, items left on the keyboard could damage the display.
5. Make sure that there is nothing on the keyboard and palmrest that can damage the display when you close it. Then close the display.
6. Pack all your computing accessories.
With the optional Dell carrying case, you can pack the computer and its accessories together.
Accessories
You may want to take some of the following accessories with you when you travel:
l
Spare batteries
l
Cables for PC Cards (such as modem and network cards)
l
AC adapter and AC power cable
l
Power adapters for foreign electrical outlets and modem cable adapters
for foreign telephone networks
l
Appropriate printer driver files if you will be using a printer
l
External media bay and its cable
l
Diskette drive
l
Backup diskettes
l
Additional storage devices
Traveling by Air
You may want to take the following precautions when you are traveling by air with your computer:
l
Notify airport security in advance that you are bringing a portable computer.
l
Be sure to have a charged battery or the AC adapter and power cable available in case you are asked to turn on the computer.
l
Do not check the computer as baggage.
NOTICE: Have airport security personnel check the computer by hand. If the computer passes through a metal detector, data loss
may occur. If you must pass the computer through a metal detector, first remove the hard-disk drive.
l
Do not put the computer through a metal detector. (The computer can safely go through an airport X-ray security machine.)
l
Before you use the computer on an airplane, check the in-flight magazine or ask the flight crew to verify that such use is permitted. Some
airlines forbid the use of electronic devices during the flight. All airlines forbid the use of electronic devices during takeoff and landing.
l
Use a carrying case (available from Dell) to protect the computer and accessories during travel.
l
If you pack the computer in a suitcase, do not pack so tightly that the computer display breaks or so loosely that the computer slides around.
l
Avoid packing the computer with items such as shaving cream, colognes, perfumes, or food.
l
Protect the computer, the battery, and the hard-disk drive from hazards such as extreme temperatures; overexposure to sunlight; and
exposure to dirt, dust, or liquids.
l
Pack the computer so that it does not slide around in the trunk of your car or in an overhead storage compartment.
l
If you are carrying a second hard-disk drive separately, protect the drive from exposure to static electricity by placing it in the case you
received it in or in an antistatic bag, or wrapping it in a nonconductive fabric.
NOTE: Follow the travel tips and take special precautions if you are planning to travel by air.

Travel Tips
l
Consider changing the settings of your power management options to maximize battery life if you will be using battery power for extended
periods.
l
If you are traveling internationally, carry proof of ownership to speed your passage through customs. If the computer is provided by your
employer, carry documentation of your right to use the computer. Investigate the customs regulations of the countries you plan to visit, and
consider acquiring an international
carnet
from your government if you travel through many different countries.
l
Power interruptions can occur frequently in some countries. Always have a charged battery available if traveling abroad.
l
Credit card holders should check with their credit card companies for information about the kinds of emergency travel assistance they offer
to users of portable computers. Many companies provide services that help you solve problems, such as quickly locating 3.5-inch diskettes
or providing a direct-dial telephone line for your modem connection.
NOTICE: Do not use the CD-ROM, DVD-ROM, or LS-120 drive while the computer is in motion. Doing so could interrupt the flow of
data to and from the CD-ROM, DVD-ROM, or LS-120 drive and the hard-
disk or diskette drive.
Carnet
A carnet is an international customs document (also known as a
merchandise passport
) that facilitates temporary imports into foreign countries
and is valid for up to 1 year.
Back to Contents Page

Back to Contents Page
Troubleshooting Your Computer: Dell™ Latitude™ CS/CS x Portable Computers User's Guide
Back to Contents Page
Dell Diagnostics
Error Messages and Flash Codes

Back to Contents Page
Installing the Microsoft ® Windows ® 95 and Windows 98 Operating System Drivers: Dell™ Latitude™ CS/CS x Portable Computers User's Guide
Overview
Dell provides software utilities and drivers that help you control certain features of your computer.
This section explains how to reinstall utilities and drivers on your Dell computer with the Microsoft
®
Windows
®
95 or Windows 98 operating
system.
Before proceeding, print the following procedures.
Use the program diskette set you made when you received your computer or the diskette set you received separately from Dell.
NOTICE: Do not dock the computer before turning it on the first time.
Installing Docking Drivers
To install the C/Port Family APR or C/Dock Family Expansion Station drivers, perform the following steps:
1.
If the computer has never been turned on
, turn it on now while it is undocked and complete the operating system setup. Then go to step 2.
If you have completed the operating system setup
, turn on the computer and go to step 2.
For setup instructions, see the Dell-supplied operating system
Setup Guide
that came with the computer.
2. Dock the computer.
The operating system creates a hardware profile for the C/Port APR or the C/Dock Expansion Station.
3. To load the appropriate drivers from the CD that came with your C/Port Family APR or C/Dock Family Expansion Station, follow the
instructions on the display. When prompted, restart the computer.
4. If you intend to connect to a network, you must install the appropriate drivers to use with a network expansion card in the C/Port Family APR
or C/Dock Family Expansion Station. See the documentation for your docking option for more information.
Installing Video Drivers for Windows 95
Video drivers control features such as screen resolution and the number of screen colors.
To install the video drivers for Windows 95, perform the following steps:
1. Save your work in all open application programs, because you will need to restart your computer at the end of this procedure to complete the
Overview
Installing Software Wavetable
Installing Docking Drivers
Installing Touch Pad Drivers
Installing Video Drivers for Windows 95
Installing MS-DOS CD-ROM Drivers
Installing Video Drivers for Windows 98
Installing Infrared Drivers (Windows 95 Only)
Installing Audio Drivers
Enabling Microsoft Infrared Support (Windows 95 and Windows
98)
NOTES: If your computer uses Windows 95 or Windows 98, the computer is already configured to work with the Dell Latitude C/Port
Family Advanced Port Replicator (APR) or C/Dock Family Expansion Station.
For more information on using the operating system installed on your computer by Dell, see the operating system user's guide that
came with your computer. You can also access system tools and documentation from Dell's technical support page
(
http://support.dell.com
). To do so, click
Support Your Dell
, enter your
service tag
, and click
Submit
.
NOTE: If you need to use extended video modes, check the documentation that came with the application program to determine if the
drivers are provided. If not, contact the software manufacturer to get the necessary drivers.

installation.
2. Insert the video drivers
diskette into the diskette drive.
3. Click the
Start
button, point to
Settings
, and then click
Control Panel
.
The
Control Panel
window appears.
4. Double-click the
Display
icon.
The
Display Properties
window appears.
5. Click the
Settings
tab.
6. Click
Advanced Properties
.
The
Advanced
Display Properties
window appears.
7. Click the
Adapter
tab and then click
Change...
.
The
Select Device
window appears.
8. Click
Have Disk...
.
9. Verify that
a:\
is displayed in the
Install from Disk
field, and then click
OK
.
10. When the
Select Device
window appears, verify that the
NeoMagic MagicMedia 256ZX
option is highlighted, and then click
OK
.
A progress bar is shown while the driver files are copied to your hard-disk drive.
After the drivers are successfully installed, the
Advanced Display Properties
window appears.
11. In the
Advanced Display Properties
window, click
Apply
and
OK
.
12. Click
Close
in the
Display Properties
window.
13. To activate the drivers, remove the diskette from the diskette drive, and restart your computer.
After installing the video drivers and restarting your computer, set the display parameters by performing the following steps:
1. Click the
Start
button, point to
Settings
, and then click
Control Panel
.
The
Control Panel
window appears.
2. Double-click the
Display
icon.
The
Display Properties
window appears.
3. Click the
Settings
tab.
4. Change the
Color
palette
option from
256 colors
to
True Color (24 bit)
.
5. Set the
Desktop
area for your display to
1024 x 768
.
6. Click
Apply
.
Installing Video Drivers for Windows 98
Video drivers control features such as screen resolution and the number of screen colors.
To install the video drivers for Windows 98, perform the following steps:
1. Save your work in all open application programs, because you will need to restart your computer at the end of this procedure to complete the
installation.
2. Insert the video drivers diskette into the diskette drive.
3. Click the
Start
button, point to
Settings
, and then click
Control Panel
.
The
Control Panel
window appears.
NOTE: If you need to use extended video modes, check the documentation that came with the application program to determine if the
drivers are provided. If not, contact the software manufacturer to get the necessary drivers.

4. Double-click the
Display
icon.
The
Display Properties
window appears.
5. Click the
Settings
tab and then click
Advanced...
.
6. Click the
Adapter
tab and then click
Change...
.
7. When the
Update Driver Wizard
appears, click
Next>
.
8. Select
Display a list of all the drivers in a specific location
, and click
Next>
.
9. When prompted for the location of the drivers, click
Have Disk...
.
10. In the
Install from Disk
window, verify that
a:\
is displayed in the
Install from Disk
field, and click
OK
.
The
Select Device
window appears.
11. Make sure that
NeoMagic MagicGraph 256ZX
is highlighted, and click
OK
.
12. In the
Update Device Driver Wizard
window, click
Next>
to begin copying the files, and then click
Finish
.
13. Close the
Display Properties
window.
14. When prompted to restart the computer, remove the diskette and then click
Yes
.
After installing the video drivers and restarting your computer, set the display parameters by performing the following steps:
1. Click the
Start
button, point to
Settings
, and then click
Control Panel
.
The
Control Panel
window appears.
2. Double-click the
Display
icon.
The
Display Properties
window appears.
3. Click the
Settings
tab.
4. Change the
Color
palette
option from
256 colors
to
True Color (24 bit)
.
5. Set the
Desktop
area for your display to
1024 x 768
.
6. Click
Apply
.
Installing Audio Drivers
Dell provides audio drivers so that you can customize the audio features of yoru computer. To install the audio drivers, perform the following steps:
1. Save your work in all open application programs, because you will need to restart your computer at the end of this procedure to complete the
installation.
2. Insert the audio driver diskette into the diskette drive.
3. Click the
Start
button, then click
Run...
.
The
Run
dialog box appears.
4. Type
a:\setup
, and then click
OK
or press <Enter>.
5. Follow the instructions on your display.
6. After the files are copied to your hard-disk drive, click
Finish
.
Installing Software Wavetable
The software wavetable allows you to customize certain audio features. To install the software wavetable, perform the following steps:
1. Save your work in all open application programs, because you will need to restart your computer at the end of this procedure to complete the
installation.
2. Insert the first software wavetable diskette into the diskette drive.

3. Click the
Start
button, and then click
Run...
.
The
Run
dialog box appears.
4. Type
a:\setup
, and then click
OK
or press <Enter>.
5. Follow the instructions on your display.
6. After the installation is complete, remove the final diskette from the diskette drive and restart your computer to use the software wavetable.
Installing Touch Pad Drivers
Touch pad drivers and associated utilities allow you to use and customize the integrated touch pad or an external mouse. To install the touch pad
drivers, perform the following steps:
1. Save your work in all open application programs, because you will need to restart your computer at the end of this procedure to complete the
installation.
2. Insert the touch-pad drivers diskette into the diskette drive.
3. Click the
Start
button, and then click
Run...
.
The
Run
dialog box appears.
4. Type
a:\setup
, and then click
OK
or press <Enter>.
5. Restart your computer to activate the drivers.
Installing MS-DOS ® CD-ROM Drivers
CD-ROM drivers must be installed in order to use the MS-DOS CD-ROM utility. To install the CD-ROM drivers, perform the following steps:
1. Save your work in all open application programs, because you will need to restart your computer at the end of this procedure to complete the
installation.
2. Insert the CD-ROM drivers diskette into the diskette drive.
3. Click the
Start
button, and then click
Run...
.
The
Run
dialog box appears.
4. Type
a:\setup
, and then click
OK
or press <Enter> to install the utility on your hard-disk drive.
5. Follow the instructions on your display, and when prompted, restart your computer to activate the drivers.
Installing Infrared Drivers (Windows 95 Only)
An infrared port lets you transfer files from your computer to another infrared-compatible device without using cable connections. If your computer
is running the Microsoft Windows 95 operating system, install the infrared drivers by performing the following steps:
1. Make sure that the computer is docked and that a diskette drive is connected to the computer's media bay connector or parallel port.
2. Save your work in all open application programs, because you will need to restart your computer at the end of this procedure to complete the
installation.
3. Insert the infrared drivers diskette into the diskette drive.
4. Click the
Start
button, point to
Settings
, and then click
Control Panel
.
5. Double-click the
System
icon.
The
System Properties
dialog box appears.
NOTES: Although your Latitude CS/CSx portable computer does not include an infrared port, the computer supports the infrared ports in
the C/Port Family APR and C/Dock Family Expansion Station.
To use the infrared port, Windows 95 users must install the infrared drivers and then enable them. Windows 98 already includes the
necessary drivers; Windows 98 users need only
enable
the infrared support.
