Dell LATITUDE D400 – страница 4
Инструкция к Ноутбуку Dell LATITUDE D400
Оглавление
- Dell™ Latitude™ CS/CS Portable Computers User's Guide
- AC Adapter: Dell™ Latitude™ CS/CS x Portable Computers User's Guide

The operating system automatically detects a PC Card and opens the
Add New Hardware
menu from the
Control Panel
. For information, see
the PC Card operating system documentation.
Back to Contents Page

Back to Contents Page
Powering Your Computer: Dell™ Latitude™ CS/CS x Portable Computers User's Guide
Back to Contents Page
AC Adapter
Power Management Settings
Batteries

Back to Contents Page
Preface: Dell™ Latitude™ CS/CS x Portable Computers User's Guide
About This Guide
This guide is intended for anyone who uses the Dell Latitude CS/CS
x
portable computers. It can be used by both first-time and experienced
computer users who want to learn about the features of the computer. This guide also provides basic troubleshooting procedures and instructions
for using the Dell Diagnostics to test your computer and its components. The sections are summarized as follows:
l
"
Introduction
"
—
overview of the computer features and available upgrades
l
"
Setup and Operation
"
—
instructions on operating your computer
l
"
Powering Your Computer
"
—
instructions and options on how to power your computer
l
"
Traveling With Your Computer
"
—
suggestions on how to travel safely with your computer
l
"
Drivers
"
—
instructions on how to install driver software on your computer
l
"
Customizing Your Computer
"
—
instructions on accessing the System Setup program, power management software, and the Suspend-to-
Disk utility, all of which allow you to change system settings affecting your computer's power conservation features
l
"
Removing and Replacing Parts
"
—
instructions on how to remove and install hard-disk drives and memory modules
l
"
Troubleshooting Your Computer
"
—
initial checks and procedures that can be used to solve basic computer problems, general guidelines
on analyzing software problems, messages, and beep codes
l
"
Technical Specifications
"
—
reference material about the details of your computer
l
"
Getting Help
"
—
help tools Dell provides to assist you if you have a problem with the computer and explains how and when to call Dell for
technical assistance.
Warranty and Return Policy Information
Dell Computer Corporation ("Dell") manufactures its hardware products from parts and components that are new or equivalent to new in
accordance with industry-standard practices.
For information about the Dell warranty and return policy, see your Dell Latitude
System Information
guide.
Other Documents You May Need
Besides this
User's Guide
, the following documentation is included with your computer.
l
The operating system
Setup Guide
, which describes how to set up the Dell-installed operating system on your computer.
l
Microsoft
®
Windows 95
®
, Windows 98, and Windows NT
®
operating system documentation is included if you ordered your operating
system from Dell. This documentation describes how to configure and use your operating system software.
l
Documentation is included with any options you purchase separately from your computer. This documentation includes information that you
need to configure and install these options in your Dell computer.
l
"Readme" files may be installed on your hard-disk drive to provide last-minute updates about technical changes to your computer or
advanced technical reference material intended for experienced users or technicians.
About This Guide
Notational Conventions
Warranty and Return Policy Information
Typographical Conventions
Other Documents You May Need
NOTE: Documentation updates are sometimes included with your computer to describe changes to your computer or software. Always
read these updates
before
consulting any other documentation because the updates contain the latest information.

Notational Conventions
The following subsections list notational conventions used in this document.
Notes, Notices, and Cautions
Throughout this guide, blocks of text may be accompanied by an icon and printed in bold type or in italic type. These blocks are notes, cautions,
and warnings, and they are used as follows:
Typographical Conventions
The following list defines (where appropriate) and illustrates typographical conventions used as visual cues for specific elements of text throughout
this document:
l
Interface components
are window titles, button and icon names, menu names and selections, and other options that appear on the monitor
screen or display. They are presented in bold.
Example: Click
OK
.
l
Keycaps
, the labeling that appears on the keys on a keyboard, are enclosed in angle brackets.
Example: <Enter>
l
Key combinations
are series of keys to be pressed simultaneously (unless otherwise indicated) to perform a single function.
Example: <Ctrl><Alt><Enter>
l
Commands
presented in lowercase bold are for reference purposes only and are not intended to be typed at that particular point in the
discussion.
Example: "Use the
setup
command to . . . ."
In contrast, commands presented in the Courier New font are intended to be typed as part of an instruction.
Example: "Type
format a:
to format the diskette in drive A."
l
Filenames
and
directory names
are presented in lowercase bold.
Examples:
autoexec.bat
and
c:\windows
l
Syntax lines
consist of a command and all its possible parameters. Commands are displayed in lowercase bold; variable parameters
(those for which you substitute a value) are displayed in lowercase italics; constant parameters are displayed in lowercase bold. The
brackets indicate items that are optional.
Example:
del
[
drive
:
] [[
path
]
filename
] [
/p
]
l
Command lines
consist of a command and may include one or more of the command's possible parameters. Command lines are
presented in the Courier New font.
Example:
del c:\myfile.doc
l
Screen text
is text that appears on the screen of your display or external monitor. It can be a system message, for example, or it can be text
that you are instructed to type as part of a command (referred to as a
command line)
. Screen text is presented in the Courier New font.
Example: The following message appears on your screen:
No boot device available
l
Variables
are symbols for which you substitute a value. They are presented in italics.
Example: module
n
(where
n
represents the memory module number)
Back to Contents Page
NOTE: A NOTE indicates important information that helps you make better use of your computer.
NOTICE: A NOTICE indicates either
potential damage to hardware or loss of data and tells you how to avoid the problem.
CAUTION: A CAUTION indicates the potential for bodily harm and tells you how to avoid the problem.
Back to Contents Page
Removing and Replacing Parts: Dell™ Latitude™ CS/CS x Portable Computers User's Guide
Replacing a Primary Hard-Disk Drive
NOTICE: To prevent data loss, turn off your computer before you remove the hard-disk drive. Do not remove the hard-disk drive if
the computer is in suspend (or standby) mode or if the drive access indicator is lit. Removing the drive under these conditions will
lead to loss of data.
NOTICE: Hard-
disk drives are extremely fragile and must be handled carefully to avoid damage. Follow these guidelines:
l
The primary hard-disk drive is installed in a metal carrier to protect the drive and make installation easier. When you remove and
install hard-disk drives, handle the drive carrier, not the drive itself.
l
Never press down on the top of the drive.
l
Do not drop the drive. Even a slight jar or bump can damage the drive heads and spinning plates, thus rendering the drive
inoperable.
To replace a primary hard-disk drive, perform the following steps:
1.
Save any open files, turn off the computer, and remove any installed batteries.
NOTICE: To avoid scratching the top of the computer, make sure that your work surface is clean. You may want to put down a
protective mat before turning over the computer.
2.
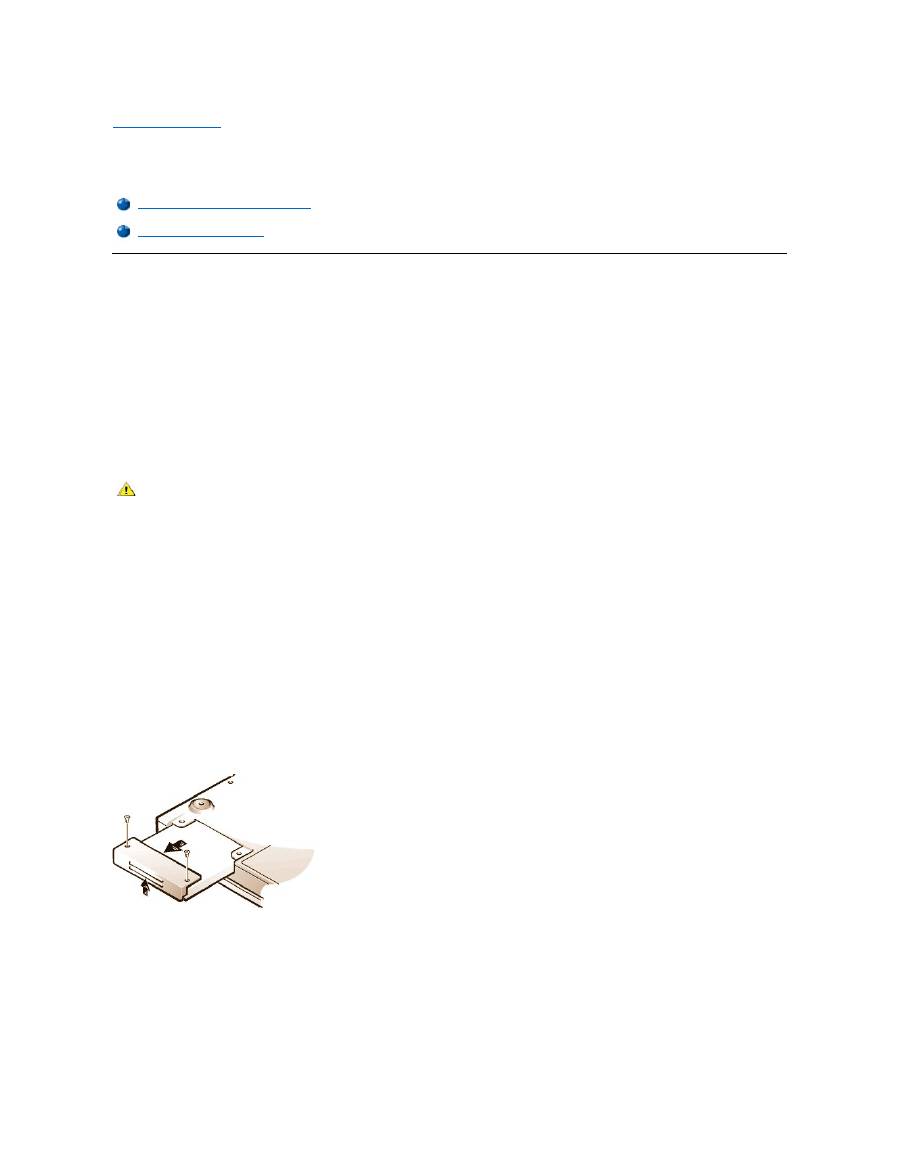
Remove the old hard-disk drive from the drive bay.
Close the display and turn the computer over. Using a #0 (very small) Phillips-
head screwdriver, remove the two screws in the hard
-
disk drive door (see Figure 1). Save the screws for use later in this procedure.
With the computer still upside-down, press upward on the hard-disk drive door until it feels loose; then grasp the door and pull it and the
drive straight out from the side of the computer.
When the hard-disk drive is not in the computer, protect the drive from exposure to static electricity.
Figure 1. Removing a Hard-Disk Drive
3.
Remove the new hard-disk drive assembly from its packaging.
Save the original packaging to use when you store or ship the hard-disk drive.
NOTICE: If the hard-disk drive assembly does not slide in easily, pull it out and try again. To avoid damage, do not force the drive
assembly into the bay.
4.
Install the new hard-disk drive in the computer.
Insert the drive, connector first and label facing down, into the drive bay. Holding the drive door up slightly, push the drive all the way into the
Replacing a Primary Hard-Disk Drive
Installing a Memory Module
CAUTION: The primary hard-disk drive may be hot to the touch under extreme environmental conditions. If the drive is hot,
allow it to cool before you replace it.

bay. Then press down and in on the drive door until it snaps into position, flush with the computer case.
5.
Replace the screws you removed in step 2. Be careful not to overtighten the screws.
If you have installed a new hard-disk drive, follow the directions that came with the drive to partition and logically format the drive and to create an
S2D partition.
Preparing a New Primary Drive
Every primary hard-disk drive must be physically formatted, partitioned, and logically formatted before it can be used to store data. Every primary
hard-disk drive from Dell is physically formatted before it is sent to you. Use the program(s) provided by your operating system to partition and
logically format the hard-disk drive.
For more information, see both your operating system and your drive documentation
.
Installing Memory Modules
Your system's factory-installed memory can range from 64 megabytes (MB) to a system maximum of 320 MB. Depending on the memory already
installed, you may be able to increase memory by installing a 32-, 64-, or 128-MB synchronous dynamic random-access memory (SDRAM) small-
outline dual-inline memory modules (SODIMMs) in the memory upgrade socket. The maximum achievable memory for your system depends on the
system's original memory configuration.
NOTICE: Dell Latitude CS/CS
x
portable computers support only SDRAM SODIMMs. Extended-data out (EDO) memory modules are
not supported.
To upgrade computer memory, you can install or replace a memory module through the memory module cover on the underside of the
computer.
To prepare the computer for the removal or installation of a memory module, perform the following steps.
NOTICE: Ground yourself by touching an unpainted metal surface of a connector on the back of the computer. While you work,
periodically touch the connector to dissipate any static electricity that might harm internal components.
1.
Turn off the computer and any attached devices.
Do not install memory modules while the computer is in suspend, standby, or suspend-to-disk mode.
2.
If the computer is docked, undock it.
3.
Disconnect the computer and peripherals from their electrical outlets to reduce the potential for personal injury or shock.
4.
Disconnect any telephone or telecommunication lines from the computer.
5.
Remove the battery from the battery bay.
To remove or install a memory module, perform the following steps.
NOTICE: To avoid scratching the top of the computer, make sure that your work surface is clean. You may want to put down a
protective mat before turning over the computer.
1.
Close the display, turn the computer upside down, and remove the memory module cover (see Figure 2).
Use a #1 Phillips-head screwdriver to remove the two screws securing the memory module cover. When the memory module cover pops up
slightly, lift it up and remove it to expose the memory socket or installed memory module beneath.
Figure 2. Removing the Memory Module Cover
2.
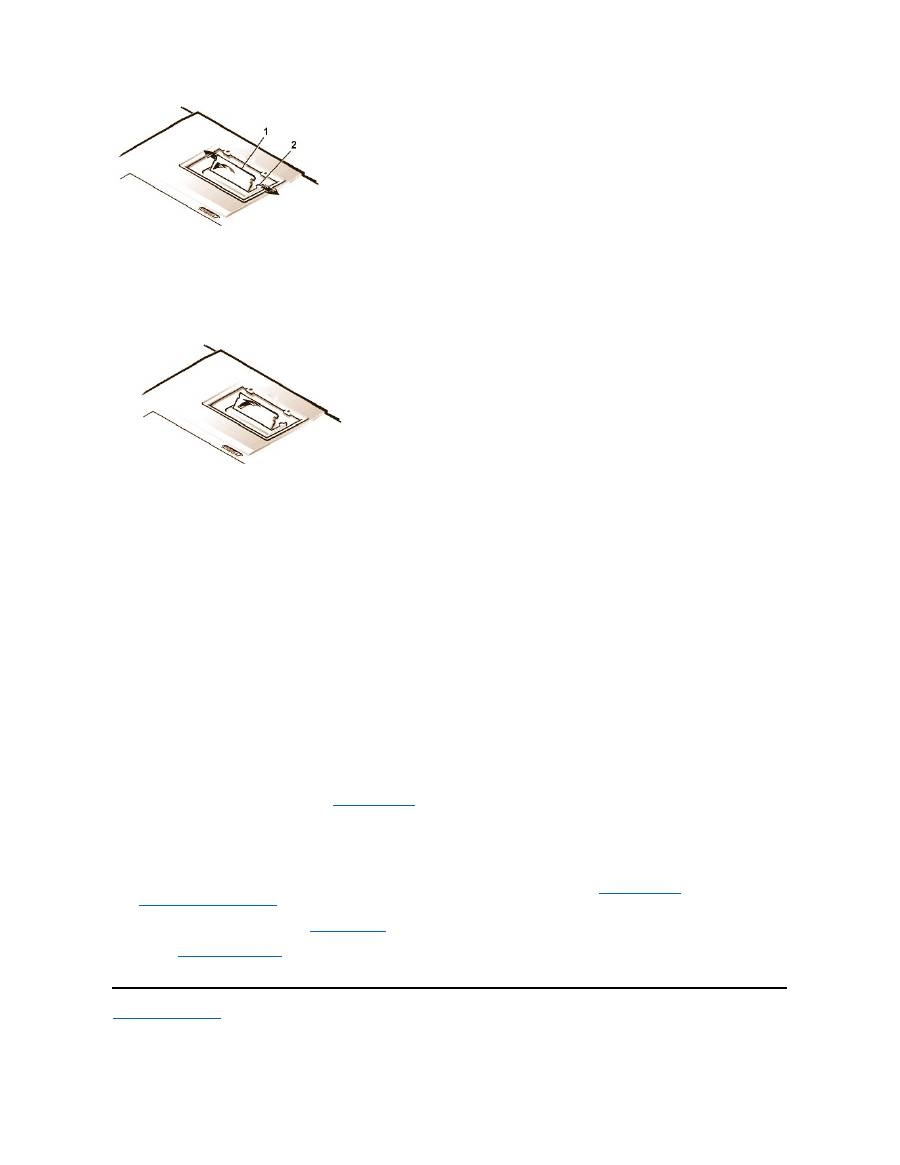
If you are replacing a memory module, remove the old one.
Carefully spread apart the inner metal tabs of the memory module socket just far enough for the memory module to disengage from the
socket (it should pop up slightly). Then lift the memory module away from the socket (see Figure 3).
Figure 3. Removing a Memory Module
NOTE:
If necessary, print these instructions for reference before proceeding.
3.
Ground yourself and unpack the new memory module from the upgrade kit.
4.
Install the new memory module in the socket (see Figure 4).
Figure 4. Installing a Memory Module
Memory modules are
keyed
, or designed to fit into their sockets in only one direction. The socket is notched so that the memory module can
be seated only one way as follows:
a.
Align the memory module
’
s edge connector with the slot in the center of the memory module socket.
b.
With the module at a 45-degree angle, press the memory module
’
s edge connector firmly into the memory module socket.
c.
Pivot the memory module down until it clicks into place.
If you do not hear a click as each end of the memory module snaps into the metal tabs, remove the memory module and reinstall it.
5.
Replace the memory module cover as follows:
a.
Set the memory module cover into the opening, aligning the tabs on one side with the slots in the computer cover.
b.
Press the cover down and replace the screws you removed in step 1.
NOTICE: After installation, if the memory module cover does not fit or is difficult to close, you may have installed the memory module
improperly. Remove the module and reinstall it. Do not force the memory module cover to close because you may damage your
computer.
6.
Reconnect your computer and devices to their electrical outlets and turn them on.
As the computer boots, it detects the presence of additional memory and automatically updates the system configuration information.
7.
In one of the following ways, verify that the
System Memory
option in the System Setup program reflects the newly installed memory:
l
Click the
Start
button, point to
Settings
, click
Control Panel
, and click the
System
icon. The amount of memory installed in the
computer is displayed in the lower-right corner of the
General
tab window.
l
In the System Setup program, the
System Memory
option appears in the lower-right corner of pages 1, 2, and 4.
If the system memory total is incorrect, the memory module(s) may not be installed properly. Repeat
preparatory steps
1 through 5 and
removal and installation steps
1 through 7 until the memory total is correct.
8.
Run the
System Memory
test of the
Dell Diagnostics
to confirm that all installed memory modules are operating correctly.
9.
Use the
Suspend-to-Disk utility
to update the S2D partition on your hard-disk drive. The S2D partition stores system data while the computer
is in S2D mode.
Back to Contents Page
1
Memory module
2
Metal tabs (2)

Back to Contents Page
Suspend-to-Disk Utility: Dell™ Latitude™ CS/CS x Portable Computers User's Guide
Suspend-to-Disk Utility
The Suspend-to-Disk (S2D) utility allows you to manage the S2D partition in your file system as your computing needs change. For instance, you
can remove the S2D partition if you need the space on the hard-disk drive for other purposes, or you can use the S2D utility to create the partition
if you have removed it.
Removing the S2D Partition
If you want to use the S2D partition on your hard-disk drive for another purpose (for instance, if you are running out of file space), perform the
following steps to remove the partition:
1. At an MS-DOS
®
prompt, type
cd c:\dell\util
and press <Enter> to change to the directory on your hard-disk drive that contains the
S2D utility files.
If you are using an operating system that is not compatible with MS-DOS, see the
readme.s2d
file for instructions.
2. Type
rms2d
and press <Enter>.
Status messages appear on the display as the removal process progresses. When the S2D partition has been removed, the following
message appears:
The S2D partition was successfully removed.
Creating the S2D Partition
The
mks2d.exe
file creates the S2D partition the computer uses to store the system data that is saved when you put the computer in S2D mode.
Use the
mks2d.exe
file to create a new S2D partition in the following cases:
l
If Dell did not install MS-DOS on your hard-disk drive
l
If you increase the amount of system memory by adding a memory module
l
If you used the
rms2d.exe
file to remove the original S2D partition and now want to recreate the partition
l
If your hard-disk drive becomes corrupted
l
If you install a new hard-disk drive
l
If you received the system utilities separately on diskette or if you deleted the S2D utility from your hard-disk drive
To create an S2D partition, perform the following steps.
1. At an MS-DOS prompt, type
cd c:\dell\util
and press <Enter> to change to the directory on your hard-disk drive that contains the
S2D utility files.
2. Type
mks2d
and press <Enter>.
As the utility builds the partition, status messages appear on the display. If an error message appears, it provides information about
which steps to take to continue building the partition.
When the S2D partition has been built and verified, the following message appears:
Suspend-to-Disk Utility
Removing the S2D Partition
Creating the S2D Partition
NOTE: After you remove the S2D partition, the computer cannot enter S2D mode until you recreate the partition. If you try to enter S2D
mode and receive the message
No Suspend-To-Disk partition available
, you must create an S2D partition.
NOTE: If you are creating the partition on a new hard-disk drive, if Dell did not install MS-DOS on your hard-disk drive, or if you are
using an operating system that is not compatible with MS-DOS, read the
readme.s2d
file before performing the following procedure.

The S2D partition was successfully created.
Back to Contents Page

Back to Contents Page
Securing Your Computer: Dell™ Latitude™ CS/CS x Portable Computers User's Guide
About Passwords
A primary password prevents unauthorized access to the computer at start-up. An administrator password can be used in place of the primary
password. A hard-disk drive password helps prevent the unauthorized access of data on the hard-disk drive, even when the device is placed into
another computer.
NOTICE: The password features provide a high level of security for the data in your computer or hard-disk drive. However, they are
not foolproof. If your data requires more security, you should obtain and use additional forms of protection, such as data encryption
programs or PC Cards with encryption features.
If you forget any of your passwords,
call Dell
. For your protection, Dell
’
s technical support staff will ask you for proof of your identity to make sure
that an unauthorized person is not trying to use the computer.
Using a Primary Password
The primary password allows you to protect the computer from unauthorized access.
After assigning a primary password, you must enter it each time you turn on your computer. The following message appears at the bottom of the
screen each time you turn on the computer:
Please type in the primary or administrator password and press <Enter>.
To continue, type your password and press <Enter>.
If you have assigned an administrator password, you can use it instead of the primary password. The computer does not specifically prompt you
for the administrator password.
NOTICE: If you disable the administrator password, the primary password is also disabled.
Using an Administrator Password
The administrator password is designed to give system administrators or service technicians in large companies access to computers for repair
or reconfiguration. The administrators or technicians can assign identical administrator passwords to groups of computers as they are unpacked
and configured, leaving the primary password free to be assigned by the user.
When you set an administrator password, the
Configure Setup
option becomes available in the System Setup program. The
Configure Setup
option allows you to restrict access to the System Setup program in the same way a system password restricts access to the system.
The administrator password can be used in place of the primary password. Whenever you are prompted to enter the primary password, you can
enter the administrator password instead.
If you forget the primary password and do not have an administrator password assigned, or if you have both a primary and an administrator
password assigned but forget them both,
call Dell
.
NOTICE: If you disable the administrator password, the primary password is also disabled.
About Passwords
Using a Hard-Disk Drive Password
Using a Primary Password
Physically Securing the Computer
Using an Administrator Password
Asset Tag Utility
NOTES: All three passwords are disabled when you receive your computer. You need to assign those passwords if you require
password security for your computer. Some companies may assign any or all of these passwords before distributing the computer.
Use the
System Setup program
to assign all passwords.
NOTE: If no password is entered within 2 minutes, the computer returns to its previous state.
NOTE: The administrator password provides access to the system, but it does not provide access to the hard-disk drive when it is
protected by a password.

Using a Hard-Disk Drive Password
The hard-disk drive password helps protect the data on your hard-disk drive from unauthorized access. You can also assign a password for the
modular hard-disk drive (if one is being used) that can be the same as or different from the password for the primary hard-disk drive.
After assigning a hard-disk drive password, you must enter it each time you turn on the computer and each time you resume normal operation from
suspend mode or standby mode.
If the hard-disk drive password is enabled, the following message appears at the bottom of the screen each time you turn on the computer:
Please type in the hard-disk drive password and press <Enter>.
To continue, enter the hard-disk drive password. Press <Esc> to return the computer to its previous state
—
suspend, standby, or off.
If you enter the wrong password, the following message appears:
Invalid password
[Press Enter to retry]
If the correct password is not entered in three attempts, you receive a message stating that the hard-disk drive cannot be found. If the hard-disk
drive is inaccessible and the
boot options
in the System Setup program are set to allow booting from another device, the computer tries to boot
from another device. If all boot attempts are unsuccessful, the computer prompts you to enter the System Setup program and modify the boot
options.
Physically Securing the Computer
To prevent unauthorized removal of the computer, you can use a security cable to attach the computer to an immovable object. Your computer has
a security cable slot located on the left side of the computer near the back (
see Figure 1
).
Description of Security Cable Slots
The security cable slot allows you to attach a commercially available antitheft device to the computer. Antitheft devices for portable computers
usually include a segment of metal-stranded cable with an attached locking device and associated key. You can use a security cable on your
computer when it is undocked and also when it is docked in a Dell Latitude C/Port Family Advanced Port Replicator (C/Port APR) or a C/Dock
Family Expansion Station.
Basic Instructions for Using Security Cable Slots
To prevent unauthorized removal of your computer, loop the cable around an immovable object, insert the locking device into either of the security
cable slots, and lock the device. See Figure 1 for an example of how to secure your computer. Complete instructions for installing this kind of
antitheft device are usually included with the device.
Figure 1. Securing the Computer
NOTE: Hard-disk drives that are not purchased from Dell for use with Latitude C-Family computers may not support the hard-disk drive
password option.
NOTE: If no password is entered within 2 minutes, the computer returns to its previous state.
NOTES: If the hard-disk drive password, the modular hard-disk drive password, and the primary password are the same, you are
prompted only for the primary password. If the hard-disk drive password is different from the primary password, you are prompted for
both. Two different passwords provide greater security.
The administrator password provides access to the system, but it does not provide access to the hard-disk drive when it is protected by a
password.
NOTE: Antitheft devices are of differing designs. Before purchasing such a device, make sure that it will work with the security cable slot
in your computer.

Asset Tag Utility
Dell has installed the Asset Tag utility on your computer. The Asset Tag utility allows you to perform the following actions:
l
View the computer's service tag
The non-modifiable service tag, which is viewable in the System Setup program, is set by Dell at the factory. It is used to identify your
computer to Dell for service and warranty purposes.
l
Set, view, and modify the computer's asset tag
The asset tag, which can be set by you or your company, is optional and is not required or used by Dell. The asset tag can be used in any
way desired; typically it is used by a company to differentiate and identify multiple computers that use an internally assigned identifier.
l
Set, view and modify the computer's owner tag
The owner tag, which can be set by you or your company, is optional and is not required or used by Dell. It can be used in any way desired.
Typically, it is used by a company to identify the computer as belonging to the company; it might contain a telephone number that can be
used to help return a unit to its owner. This tag is displayed on the system log-on screen and on the screens that prompt for the primary and
hard-disk drive passwords.
Viewing Existing Asset, Service, and Owner Tags
To view existing asset, service, and owner tags, perform the following steps:
1. Click the
Start
button, point to
Programs
, and click
MS-DOS Prompt
.
2. Type
cd c:\Dell\Util
and press <Enter>.
3. Type
asset
and press <Enter>.
Assigning an Asset Tag
An asset tag can have up to ten characters; any combination of characters is valid except those that begin with a forward slash (/) or a question
mark (?). Spaces count as characters. To assign or change an asset tag, perform the following steps:
1.
Click the
Start
button, point to
Programs
, and click
MS-DOS Prompt
.
2.
Type
cd c:\Dell\Util
and press <Enter>.
3. Type
asset
and a space followed by the new tag, and press <Enter>.
For example, type the following command line and press <Enter>:
asset 1234 $AB&C
4.
When the computer prompts you to verify that you want to change the asset tag, type
y
and press <Enter>.
The computer displays the new or modified asset tag and the service tag.
Deleting an Asset Tag
To delete the asset tag without assigning a new one, perform the following steps:
1.
Click the
Start
button, point to
Programs
, and click
MS-DOS Prompt
.
2.
Type
cd c:\Dell\Util
and press <Enter>.
3.
Type
asset /d
and press <Enter>.
Assigning an Owner Tag
An owner tag can have up to 48 characters, including spaces. Any combination of characters is valid except those that begin with a forward slash
(/) or a question mark (?). To assign an owner tag, perform the following steps:
1.
Click the
Start
button, point to
Programs
, and click
MS-DOS Prompt
.
2.
Type
cd c:\Dell\Util
and press <Enter>.
3.
Type
asset /o
and a space followed by the new owner tag, and press <Enter>.
For example, type the following command line and press <Enter>:
NOTE: For security reasons, you cannot set, change, or delete the asset tag if either the primary or the administrator password is set.
asset /o ABC Company
4.
When the computer prompts you to verify that you want to change the owner tag, type
y
and press <Enter>.
The computer displays the new owner tag.
Deleting an Owner Tag
To delete the owner tag without assigning a new one, perform the following steps:
1.
Click the
Start
button, point to
Programs
, and click
MS-DOS Prompt
.
2.
Type
cd c:\Dell\Util
and press <Enter>.
3.
Type
asset /o /d
and press <Enter>.
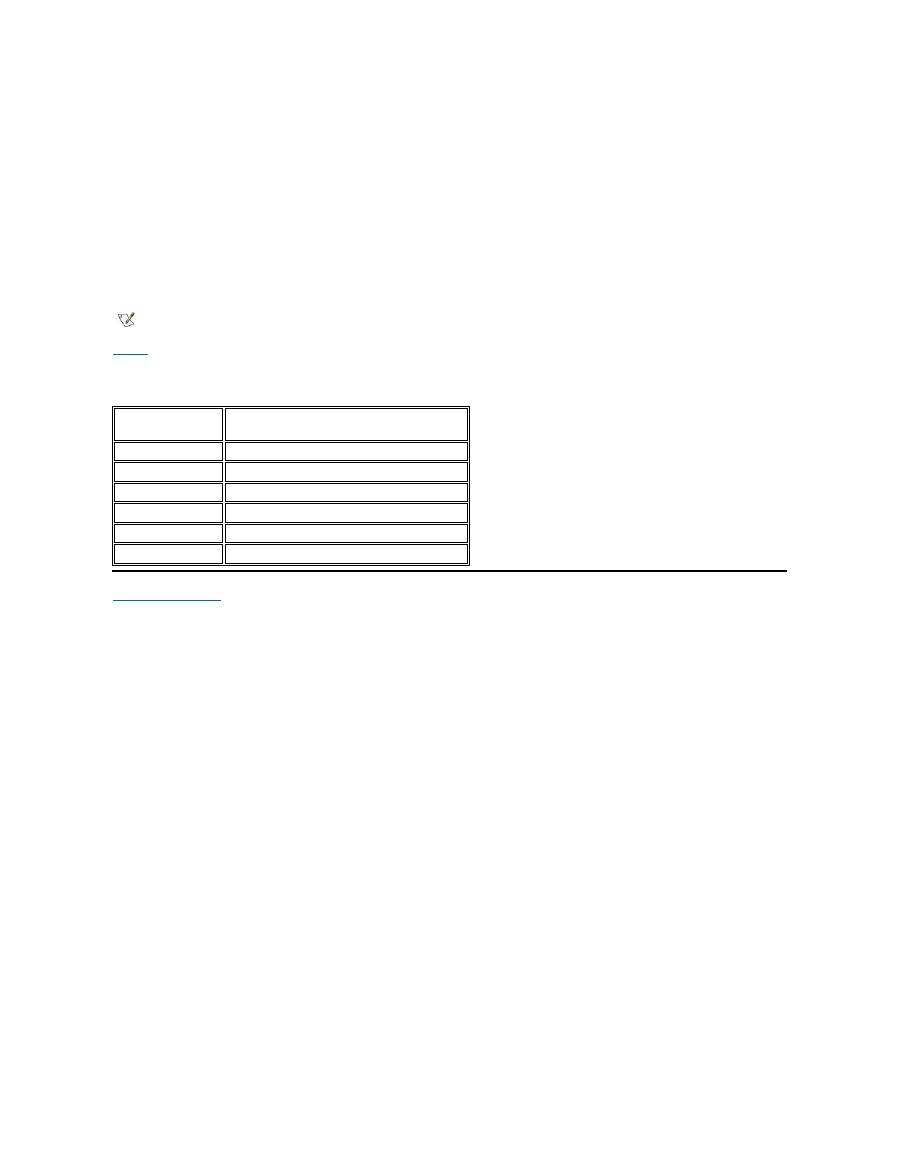
Table 1
lists the command-line options you can use with the Asset Tag utility. To use one of these options, open an MS-DOS
®
prompt, type
asset
and a space followed by the option, and then press <Enter>.
Table 1. Asset Tag Utility Commands
Back to Contents Page
NOTE: For security reasons, you cannot set, change, or delete the owner tag if either the primary or the administrator password is set.
Asset Tag
Command
Function
asset
Displays the asset, service, and owner tags
asset <
tag
>
Sets a new asset tag
asset /d
Deletes the asset tag
asset /o
<tag>
Sets a new owner tag
asset /o /d
Deletes the owner tag
asset /?
Displays the
Asset Tag
utility help screen

Back to Contents Page
Using the System Setup Program : Dell™ Latitude™ CS/CS x Portable Computers User's Guide
Overview
Each time you turn on your computer, it compares the installed hardware with the system configuration information stored in nonvolatile random-
access memory (NVRAM). If the system detects a discrepancy, it generates an error message for each incorrect configuration setting. You can
use the System Setup program to adjust the configuration settings.
You can use the System Setup program as follows:
l
To set or change user-selectable features
—
for example, your password or power management features
l
To verify information about your computer's current configuration, such as the amount of system memory
For some setup options, you must reboot the computer before any changes take effect. Changes for other options take effect immediately.
After you set up your computer, run the System Setup program to familiarize yourself with your system configuration information and optional
settings. Dell recommends that you write down the information for future reference.
For more information, see "
System Setup Options
."
Entering the System Setup Program
To enter the System Setup program, press <Fn><F1> at any time on the computer keyboard (or press <Scroll Lock><F1> on an external keyboard
if the
External Hot Key
option is enabled). To open the System Setup program directly to the
Battery Status
screen, press <Fn><F3> on the
computer keyboard (or press <Scroll Lock><F3> on an external keyboard if the
External Hot Key
option is enabled).
To exit the System Setup program, press <Esc>. If you change the setting of an option that requires rebooting to take effect, exit the operating
system
before
rebooting. (The
Help
text in the upper-right corner of System Setup screens 1, 2, and 4 tells you if the computer must be rebooted.)
For more information, see "
System Setup Options
."
Using the System Setup Program
The System Setup screens display the current setup and configuration information and optional settings for your computer. Information on the
screens is organized in five boxed areas:
l
Title
The box at the top of all screens lists the page number, system name, and version number of the basic input/output system (BIOS).
l
Options
The box on the left half of screens 1, 2, and 4 lists options that define the installed hardware in your computer and the power conservation
Overview
Entering the System Setup Program
Using the System Setup Program
NOTE:
If you change an option that is activated by rebooting, the System Setup program displays the setting you selected rather than
the setting currently in effect. You
must
reboot for the new setting to take effect.
NOTES: If the computer uses the Microsoft
®
Windows
®
95 operating system, you can also use the Dell Control Center to view and
change the system configuration. Access the Dell Control Center from the
Dell Accessories
folder.
If the computer uses the Microsoft Windows NT
®
4.0 or Windows 98 operating system, you must use the System Setup program to view
and change your system configuration.
NOTE: If the System Setup program is running when the computer enters suspend mode, the computer exits the System Setup
program and then enters suspend mode.

and security features for your computer.
Fields next to the options contain settings or values. You can change those values that appear white on the screen. Options or values that you
cannot change (because they are determined or calculated by the computer) appear dimmed or blue, depending on your display.
l
Help
The box on the upper-right half of screens 1, 2, and 4 displays help information for the option with a currently highlighted field.
l
Computer data
The box in the lower-right corner of screens 1, 2, and 4 displays information about your computer.
l
Key functions
The line of boxes across the bottom of all screens lists keys and their functions within the System Setup program.
For more information, see "
System Setup Options
."
Back to Contents Page
Back to Contents Page
System Setup Options: Dell™ Latitude™ CS/CS x Portable Computers User's Guide
AC
AC
, an option under
Power Management
, allows you to set different time-outs for the following options when you operate your computer from AC
power:
Display Time-out, Disk Time-out, Suspend Time-out, S2D Time-out, Smart CPU Mode
, and
Brightness
.
A change to the
AC
option takes effect immediately (rebooting is not required).
Admin Password
Admin Password
displays the current status of your administrator password and allows you to assign or change this password. Settings for this
option are:
l
Disabled
(the default)
—
Indicates that no administrator password is assigned
l
Enabled
—
Indicates that an administrator password is currently assigned
The administrator password is designed for use by system administrators and service technicians in corporate environments. If an administrator
password is assigned, you can use it to access the computer even if you do not know the primary password.
NOTICE:
The password features provide a high level of security for the data in your computer. However, they are not foolproof. If
your data requires more security, you should obtain and use additional forms of protection, such as data encryption programs or PC
Cards with encryption features.
Alarm Resume
Alarm Resume
directs the computer to resume normal operation when it is in suspend mode and detects an alarm from the real-time clock
(RTC). Such alarms can be set through various application programs. For the alarms in these programs to work,
Alarm Resume
must be set to
Enabled
.
AC
Disk Time-Out
Parallel Mode
Admin Password
Diskette Drive A
Pointing Device
Alarm Resume
Diskette Drive B
Power Management
Asset Tag
Diskette Reconfig
Primary Hard Drive
Audio Mode
Display Close
Primary Password
Battery
Display Time-out
Ring/Event Resume
Battery Status
Docking Ethernet
S2D Time-out
BIOS Version
Docking IRQ
Serial Port
Boot First Device
Docking Status
Service Tag
Boot Second Device
External Hot Key
Smart CPU Mode
Boot Third Device
External Media Bay
Suspend Time-out
Boot Speed
Infrared Data Port
System Memory
Brightness
Infrared Mode
System Primary
Click Volume
Internal Cache
Time
Configure Setup
Keyboard Click
Universal Connect
Date
Microprocessor
Video Memory

Settings for this option are:
l
Enabled
(the default)
—
Resumes normal operation when the computer detects an alarm
l
Disabled
—
Keeps the computer in suspend mode even if the computer detects an alarm
A change to
Alarm Resume
takes effect immediately (rebooting is not required).
Asset Tag
Asset Tag
displays the asset tag code if you or your organization assigned one to your computer.
For more information, see "
Asset Tag Utility
.
"
Audio Mode
Audio Mode
manages the audio resources of the computer and the external devices you use with it. This option is set to
Full Duplex
, which
allows the computer's audio system to play and record sounds simultaneously.
No user-selectable settings are available for this option.
Battery
Battery
, an option under
Power Management
, allows you to set different time-outs for the following options when you operate your computer from
battery power:
Display Time-out
,
Disk Time-out
,
Suspend Time-out
,
S2D Time-out
,
Smart CPU Mode
, and
Brightness
.
A change to
Battery
takes effect immediately (rebooting is not required).
Battery Status
Battery Status
(page 3 of the System Setup screens) is a graphical representation of the approximate amount of charge left in the battery. No
user-selectable settings are available for this option. If a battery is not installed, the battery gauge illustration indicates
Battery Status: Not
Installed
.
If you are not in the System Setup program, you can see the battery gauge illustration at any time by pressing <Fn><F3>.
BIOS Version
BIOS Version
displays the version number and release date of the basic input/output system (BIOS) in your computer. A service technician may
ask you for this version number if you call Dell for technical assistance.
Boot First Device
Boot First device
determines which disk device your computer uses to find the software needed to start the operating system.
The term
boot
refers to the computer's start-up procedure. When you turn on the computer, it "bootstraps" itself into an operational state by loading
into memory a small program, which in turn loads the necessary operating system.
Boot First device
tells the computer where to look first for the
files that it needs to load.
Settings for this option are:
l
Diskette Drive
(the default)
—
Causes your computer to attempt first to boot from a bootable diskette
l
Internal HDD
—
Causes your computer to attempt first to boot from the hard-disk drive
l
CD-ROM/DVD-ROM Drive
—
Causes your computer to attempt first to boot from a bootable CD
l
Ext Media Bay HDD
—
Causes your computer to attempt first to boot from the second hard-disk drive installed in the external media bay
l
PCI Slot NIC
—
Causes your computer to attempt first to boot from a network interface controller (NIC) PC Card
NOTE: Dell may periodically offer revisions of the BIOS that add features or solve specific problems. Because the BIOS for your
computer is stored on a reprogrammable flash-memory chip, you can use the Flash BIOS Update program to update your computer's
BIOS entirely through software.

l
Dock II/Port II NIC
—
Causes your computer to attempt first to bootfrom a NIC cardinstalled in the C/Port Family APR or C/Dock Family
Expansion Station
l
None
For a change to
Boot First device
to take effect, you must reboot your computer.
Boot Second Device
If the computer cannot find the software it needs to start the operating system on the drive identified in
Boot First device
, it will search the device
named in
Boot Second device
.
Settings for the option are:
l
Internal HDD
(the default)
—
Causes your computer to attempt to boot from the hard-disk drive
l
Diskette Drive
—
Causes your computer to attempt to boot from the diskette drive
l
CD-ROM/DVD-ROM Drive
—
Causes your computer to attempt to boot from a bootable CD
l
Ext Media Bay HDD
—
Causes your computer to attempt to boot from the second hard-
disk drive installed in the external media bay
l
PCI Slot NIC
—
Causes your computer to attempt to boot from a NIC PC Card
l
Dock II/Port II NIC
—
Causes your computer to attempt to boot from a NIC cardinstalled in the C/Port Family APR or C/Dock Family
Expansion Station
l
None
For a change to
Boot Second device
to take effect, you must reboot your computer.
Boot Third Device
If the computer cannot find the software it needs to start the operating system on the drive identified in
Boot Second device
, it will search the
device named in
Boot Third device
.
Settings for the option are:
l
None
(the default)
l
Internal HDD
—
Causes your computer to attempt to boot from the hard-disk drive
l
Diskette Drive
—
Causes your computer to attempt to boot from the diskette drive
l
CD-ROM/DVD-ROM Drive
—
Causes your computer to attempt to boot from a bootable CD
l
Ext Media Bay HDD
—
Causes your computer to attempt to boot from the second hard-disk drive installed in the external media bay
l
PCI Slot NIC
—
Causes your computer to attempt to boot from a NIC PC Card
l
Dock II/Port II NIC
—
Causes your computer to attempt to boot from a NIC cardinstalled in the C/Port Family APR or C/Dock Family
Expansion Station
For a change to
Boot Third device
to take effect, you must reboot your computer.
Boot Speed
Boot Speed
allows you to choose between the computer's processing speed (the default) and
Compatible
, a slower compatibility speed. The
compatibility speed varies, depending on the configuration of your computer.
When you change the setting of
Boot Speed
, the System Setup program stores and continues to display the new setting even if you do not reboot
your computer when you exit the System Setup program. If you start the System Setup program again during your current work session, the
processing speed displayed for
Boot Speed
may not match the actual speed at which your computer is running.
For a change to
Boot Speed
to take effect, you must reboot your computer.

Brightness
Brightness
allows you to specify the brightness of the display when the computer is operating on battery power. Use the left- and right-arrow keys
to change the brightness of the display. When the computer is powered by a battery, the default is
Minimum
. If the computer is using AC power,
the default is
Maximum
.
A change to
Brightness
takes effect immediately (rebooting is not required).
Click Volume
Click Volume
allows you to disable or adjust the volume of the keyboard clicks if
Keyboard Click
is enabled. The default is
Maximum
.
A change to
Click Volume
takes effect immediately (rebooting is not required).
Configure Setup
Configure Setup
allows you to restrict access to the System Setup program in the same way a system password restricts access to the system.
Only available when you set the administrator password.
Date
Date
resets the date on the computer's internal calendar.
Your computer automatically displays the day of the week corresponding to the settings in the three fields that follow (
month
,
day-of-the-month
,
and
year
).
A change to
Date
takes effect immediately (rebooting is not required). However, you must reboot to make the change apparent to the operating
system.
To change the date, press the right-arrow key to increase the number in the highlighted field, or press the left-arrow key to decrease the number. If
you prefer, you can type numbers in the
month
and
day-of-the-month
fields.
Disk Time-out
Disk Time-out
lets you determine how long your hard-disk drive remains idle before the drive motor turns off to conserve battery power.
The
AC
option is set to
Disabled
. No user-selectable settings are available for this option. Settings for the
Battery
option are:
If the computer is powered by a battery, the default is
3 Minutes
. To increase battery operating time, set
Disk Time-out
to a lower number.
However, if your software requires frequent hard-disk drive accesses, using a higher time-out setting may save battery power and time by
minimizing the number of times the hard-disk drive must power up.
A change to
Disk Time-out
takes effect immediately (rebooting is not required).
If you are not in the System Setup program, you can turn off the hard-disk drive immediately by pressing <Fn><h>. The drive resumes normal
operation automatically when it is accessed by the microprocessor.
Diskette Drive A
l
Disabled
l
15 Seconds
l
1 Minute
l
2 Minutes
l
3 Minutes
l
4 Minutes
l
5 Minutes
l
10 Minutes
l
15 Minutes
l
30 Minutes
l
1 Hour
NOTE: Set
Disk Time-out
to
Disabled
if using it causes compatibility problems with your software.

Diskette Drive A
identifies the location of the 3.5-inch diskette drive:
External Media Bay
,
Parallel Port
, or
Not Installed
. No user-selectable
settings are available for this option.
Diskette Drive B
Diskette Drive B
identifies the location of a second 3.5-inch diskette drive:
External Media Bay
,
Parallel Port
, or
Not Installed
. No user-
selectable settings are available for this option.
Diskette Reconfig
Diskette Reconfig
allows hot plugging of a diskette drive and allows application programs that access the diskette drive to run at their optimum
speed. Settings are
At Reboot Only
and
Any Time
.
When
Diskette Reconfig
is set to
Any Time
(the default), you do not have to reboot after you install a diskette drive in the external media bay or
attach a diskette drive to the parallel connector on the back of the computer. However, when this option is set to
Any Time
, some application
programs (such as virus scans) that access the diskette drive will run very slowly if no diskette drive is attached to the computer or installed in the
docking option. When
Diskette Reconfig
is set to
At Reboot Only
, such application programs run at normal speed, but you must reboot after
installing or attaching a diskette drive.
Display Close
Display Close
lets you determine whether your computer enters suspend mode when the display is closed or whether only the display is turned
off.
l
Suspend
(the default) —
Allows the computer to enter suspend mode when the display is closed
l
Active
—
Turns off the display, but does not put the computer into suspend mode
Display Time-out
Display Time-out
lets you decide how long the computer operates with no input/output (I/O) activity before turning off the display to conserve
battery power.
Settings for this option in both
AC
and
Battery
are:
The default is
4 Minutes
. To increase battery operating time, set
Display Time-out
to a lower number of minutes.
A change to
Display Time-out
takes effect immediately (rebooting is not required).
If you are not in the System Setup program, you can turn off the display immediately by pressing <Fn><d>. The display resumes normal operation
automatically when you press a key, move the cursor, or press the power button.
Docking Ethernet
Docking Ethernet
enables and disables the internal ethernet controller in the Dell Latitude C/Port Family Advanced Port Replicator (APR) or
C/Dock Family Expansion Station. A change to this option takes effect when you reboot.
Docking IRQ
l
Disabled
l
1 Minute
l
2 Minutes
l
3 Minutes
l
4 Minutes
l
5 Minutes
l
10 Minutes
l
15 Minutes
l
30 Minutes
l
1 Hour
NOTE:
Set
Display Time-out
to
Disabled
if using it causes compatibility problems with your software.
