Dell Latitude D530 – страница 5
Инструкция к Ноутбуку Dell Latitude D530
Оглавление

• A wireless network card for each computer that you want to connect to
your WLAN
• A network cable with a network (RJ-45) connector
Checking Your Wireless Network Card
Depending on what you selected when you purchased your computer, the
computer has a variety of configurations. To confirm that your computer has
a wireless network card and to determine the type of card, use one of the
following:
•The
Start
button and the
Connect To
option
• The order confirmation for your computer
Start Button and Connect To Option
In Microsoft Windows XP, click Start→ Connect To→ Show all connections.
NOTE: If your computer is set to the Classic Start menu option, click Start
→
Settings
→
Network Connections to view your network connections.
In Microsoft Windows Vista, click → Connect To→ View network
computers and devices.
If Wireless Network Connection does not appear under LAN or High-Speed
Internet, you may not have a wireless network card.
If Wireless Network Connection appears, you have a wireless network card. To
view detailed information about the wireless network card:
1
Right-click
Wireless Network Connection
.
2
Click
Properties
.
The
Wireless Network Connection Properties
window appears. The
wireless network card’s name and model number are listed on the
General
tab.
NOTE: If Wireless Network Connection does not appear, you may not have a
wireless network card.
The Order Confirmation for Your Computer
The order confirmation that you received when you ordered your computer
lists the hardware and software that shipped with your computer.
Setting Up and Using Networks 81

Setting Up a New WLAN Using a Wireless Router and a Broadband
Modem
1
Contact your Internet service provider (ISP) to obtain specific information
about the connection requirements for your broadband modem.
2
Ensure that you have wired Internet access through your broadband
modem before you attempt to set up a wireless Internet connection (see
"Connecting a Network or Broadband Modem Cable" on page 79).
3
Install any software required for your wireless router. Your wireless router
may have been shipped with an installation CD. Installation CDs usually
contain installation and troubleshooting information. Install the required
software according to the instructions provided by the router
manufacturer.
4
Shut down your computer and any other wireless-enabled computers in
the vicinity through the
Start
or menu.
5
Disconnect your broadband modem power cable from the electrical outlet.
6
Disconnect the network cable from the computer and the modem.
7
Disconnect the AC adapter cable from your wireless router to ensure that
there is no power connected to the router.
NOTE: Wait for a minimum of 5 minutes after disconnecting your broadband
modem before you continue with the network setup.
8
Insert a network cable into the network (RJ-45) connector on the
unpowered broadband modem.
9
Connect the other end of the network cable into the Internet network (RJ-
45) connector on the unpowered wireless router.
10
Ensure that no network or USB cables, other than the network cable
connecting the modem and the wireless router, are connected to the
broadband modem.
NOTE: Restart your wireless equipment in the order described below to prevent a
potential connection failure.
11
Turn o n
only
your broadband modem and wait for at least 2 minutes for
the broadband modem to stabilize. After 2 minutes, proceed to step 12.
12
Turn on your wireless router and wait for at least 2 minutes for the wireless
router to stabilize. After 2 minutes, proceed to the step 13.
82 Setting Up and Using Networks

13
Start your computer and wait until the boot process completes.
14
See the documentation that came with your wireless router to do the
following in order to set up the wireless router:
• Establish communication between your computer and your wireless
router.
• Configure your wireless router to communicate with your broadband
router.
• Find out your wireless router’s broadcast name. The technical term for
the name of your router’s broadcast name is Service Set Identifier
(SSID) or network name.
15
If necessary, configure your wireless network card to connect to the wireless
network (see "Connecting to a WLAN" on page 83).
Connecting to a WLAN
NOTE: Before you connect to a WLAN, ensure that you have followed the
instructions in "Wireless Local Area Network (WLAN)" on page 80.
NOTE: The following networking instructions do not apply to internal cards with
®
Bluetooth
wireless technology or cellular products.
This section provides general procedures for connecting to a network using
wireless technology. Specific network names and configuration details vary.
See "Wireless Local Area Network (WLAN)" on page 80 for more information
about how to prepare for connecting your computer to a WLAN.
Your wireless network card requires specific software and drivers for
connecting to a network. The software is already installed.
NOTE: If the software is removed or corrupted, follow the instructions in the user
documentation for your wireless network card. Verify the type of wireless network
card installed in your computer and then search for that name on the Dell™ Support
website at support.dell.com. For information on the type of wireless network card
that is installed in your computer, see "Checking Your Wireless Network Card" on
page 81.
Determining the Wireless Network Device Manager
Depending on the software installed on your computer, different wireless
configuration utilities may manage your network devices:
• Your wireless network card’s client utility
Setting Up and Using Networks 83

• The Windows XP or Windows Vista operating system
To determine which wireless configuration utility is managing your wireless
network card in Windows XP:
1
Click
Start
→
Settings
→
Control Panel
→
Network Connections
.
2
Right-click the
Wireless Network Connection
icon, and then click
View
Available Wireless Networks
.
If the Choose a wireless network window states Windows cannot configure
this connection, the wireless network card’s client utility is managing the
wireless network card.
If the Choose a wireless network window states Click an item in the list
below to connect to a wireless network in range or to get more information,
the Windows XP operating system is managing the wireless network card.
To determine which wireless configuration utility is managing your wireless
network card in Windows Vista:
1
Click
→
Connect To→ Manage wireless networks.
2
Double-click a profile to open the wireless network properties screen.
For specific information about the wireless configuration utility installed on
your computer, see your wireless network documentation in Windows Help
and Support (see "Windows Help and Support" on page 18).
Completing the Connection to the WLAN
When you turn on your computer and a network (for which your computer is
not configured) is detected in the area, a pop-up appears near the network
icon in the notification area (in the lower-right corner of the Windows
desktop).
Follow the instructions provided in any utility prompts that appear on your
screen.
Once you have configured your computer for the wireless network that you
selected, another pop-up notifies you that your computer is connected to that
network.
Thereafter, whenever you log on to your computer within the range of the
wireless network that you selected, the same pop-up notifies you of the
wireless network connection.
84 Setting Up and Using Networks

NOTE: If you select a secure network, you must enter a WEP or WPA key when
prompted. Network security settings are unique to your network. Dell cannot
provide this information.
NOTE: Your computer can take up to 1 minute to connect to the network.
Enabling/Disabling the Wireless Network Card
NOTE: If you are unable to connect to a wireless network, ensure that you have all
the components for establishing a WLAN (see "What You Need to Establish a WLAN
Connection" on page 80), and then verify that your wireless network card is enabled
by pressing <Fn><F2>.
You can turn your computer’s wireless networking function on and off by
pressing the <Fn><F2> key combination.
Monitoring the Status of the Wireless Network Card Through Dell QuickSet
The wireless activity indicator provides you with an easy way to monitor the
status of your computer’s wireless devices. To turn the wireless activity
indicator on or off, click the QuickSet icon in the taskbar and select Hotkey
Popups. If Wireless Activity Indicator Off is not checked, the indicator is on.
If Wireless Activity Indicator Off is checked, the indicator is off.
The wireless activity indicator displays whether your computer’s integrated
wireless devices are enabled or disabled. When you turn the wireless
networking function on or off, the wireless activity indicator changes to
display the status.
For more information about the Dell QuickSet wireless activity indicator,
right-click the QuickSet icon in the taskbar and select Help.
Mobile Broadband/Wireless Wide Area Network
(WWAN)
A Mobile Broadband network, also known as a Wireless Wide Area Network
(WWAN), is a high-speed digital cellular network that provides Internet
access over a much wider geographical area than a WLAN, which typically
covers only from 100 to 1000 feet. Your computer can maintain Mobile
Broadband network access as long as the computer is within a cellular-data
coverage zone. Contact your service provider for coverage of a high-speed
digital cellular network.
Setting Up and Using Networks 85

NOTE: Even if you are able to make a call from your cellular phone in a specific
geographical location, that location may not necessarily be within a cellular-data
coverage zone.
What You Need to Establish a Mobile Broadband Network Connection
NOTE: Depending on your computer, you can use either a Mobile Broadband
ExpressCard or Mini-Card, but not both, to establish a Mobile Broadband network
connection.
To set up a Mobile Broadband network connection, you need:
• A Mobile Broadband ExpressCard or Mini-Card (depending on your
computer’s configuration)
NOTE: For instructions on using ExpressCards, see "Using Cards" on page 89.
• An activated Mobile Broadband ExpressCard or activated Subscriber
Identity Module (SIM) for your service provider
• The Dell Mobile Broadband Card Utility (already installed on your
computer if you purchased the card when you purchased your computer, or
on the CD that accompanied your card if purchased separately from your
computer)
If the utility is corrupted or deleted from your computer, see the Dell
Mobile Broadband Card Utility user’s guide for instructions. The user’s
guide is available through Windows Help and Support (see "Windows
Help and Support" on page 18) or on the CD that accompanied your card
if you purchased it separately from your computer.
Checking Your Dell Mobile Broadband Card
Depending on what you selected when you purchased your computer, the
computer has a variety of configurations. To determine your computer
configuration, see one of the following:
• Your order confirmation
• Microsoft Windows Help and Support Center
To check your Mobile Broadband card in the Windows Help and Support
Center:
1
Click
Start
→
Help and Support
→
Use Tools to view your computer
information and diagnose problems
.
86 Setting Up and Using Networks
2
Under
Tools
, click
My Computer Information
→
Find information about
the hardware installed on this computer.
On the My Computer Information - Hardware screen, you can view the type
of Mobile Broadband card installed in your computer as well as other
hardware components.
NOTE: The Mobile Broadband card is listed under Modems.
Connecting to a Mobile Broadband Network
NOTE: These instructions only apply to Mobile Broadband ExpressCards or Mini-
Cards. They do not apply to internal cards with wireless technology.
NOTE: Before you connect to the Internet, you must activate Mobile Broadband
service through your cellular service provider. For instructions and for additional
information about using the Dell Mobile Broadband Card Utility, see the user's guide
available through Windows Help and Support (see "Windows Help and Support" on
page 18). The user's guide is also available on the Dell Support website at
support.dell.com and on the CD included with your Mobile Broadband card if you
purchased the card separately from your computer.
Use the Dell Mobile Broadband Card Utility to establish and manage a
Mobile Broadband network connection to the Internet:
1
Click the
Dell Mobile Broadband Card Utility icon
on the Windows
desktop, to run the utility.
2
Click
Connect
.
NOTE: The Connect button changes to the Disconnect button.
3
Follow the instructions on the screen to manage the network connection
with the utility.
Or
1
Click
Start
→
All Programs
→
Dell Wireless
.
2
Click
Dell Wireless Broadband
and follow the instructions on the screen.
®
®
Microsoft
Windows
Firewall
Windows Firewall provides basic protection from unauthorized access to your
computer while it is connected to the Internet. Windows Firewall is
automatically enabled when you run the Network Setup Wizard.
Setting Up and Using Networks 87

When Windows Firewall is enabled for a network connection, the firewall
icon appears with a red background in the Network Connections section of
the Control Panel.
NOTE: Enabling Windows Firewall does not reduce the need for virus-checking
software.
For more information, click
Start
→
Control Panel
→
Security
→
Windows
Firewall
, or see "Windows Help and Support" on page 18
88 Setting Up and Using Networks

9
Using Cards
Card Types
See "Specifications" on page 151 for information on supported PC Cards.
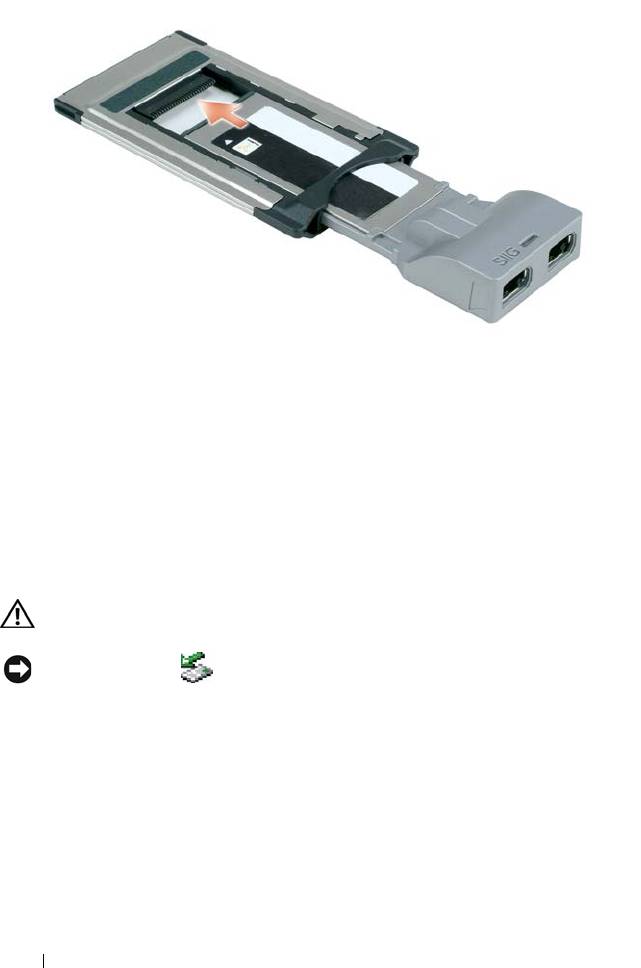
1 32
1 54-mm ExpressCard (not
2 34-mm ExpressCard
supported by your
(supported, with an
computer)
adapter)
3 PC Card (supported by
your computer)
NOTE: A PC Card is not a bootable device.
The PC Card slot has one connector that supports a single Type I or Type II
card. The PC Card slot supports CardBus technology and extended PC
Cards. Ty p e of card refers to its thickness, not its functionality.
Using Cards 89

Card Blanks
Your computer shipped with a plastic blank installed in the card slot. Blanks
protect unused slots from dust and other particles. Save the blank for use
when no card is installed in the slot; blanks from other computers may not fit
your computer.
To remove the blank, see "Removing a Card or Blank" on page 92.
Extended Cards
An extended card (for example, a wireless network adapter) is longer than a
standard card and extends outside the computer. Follow these precautions
when using extended cards:
• Protect the exposed end of an installed card. Striking the end of the card
can damage the system board.
• Always remove an extended PC Card before you pack the computer in its
carrying case.
Installing a PC Card or ExpressCard
You can install a PC Card or a 34-mm ExpressCard (with an adapter) in the
computer while the computer is running. The computer automatically
detects the card.
Cards are generally marked with a symbol (such as a triangle or an arrow) to
indicate which end to insert into the slot. The cards are keyed to prevent
incorrect insertion. If card orientation is not clear, see the documentation that
came with the card.
CAUTION: Before you begin any of the procedures in this section, follow the
safety instructions in the
Product Information Guide
.
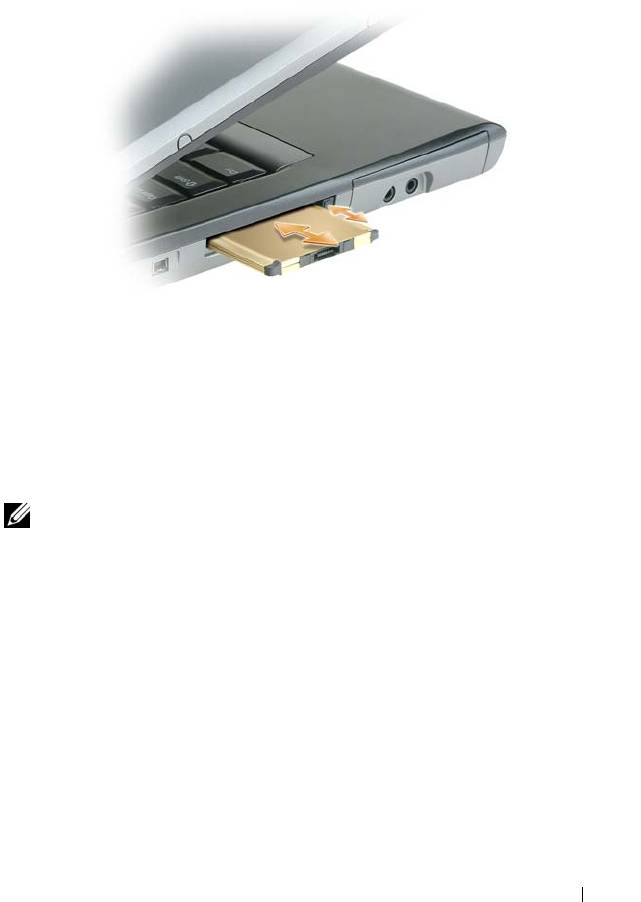
To install a PC Card:
1
Hold the card with its orientation symbol pointing into the slot and the
top side of the card facing up. The latch may need to be in the
in
position
before you insert the card.
2
Slide the card into the slot until the card is completely seated in its
connector.
90 Using Cards
If you encounter too much resistance, do not force the card. Check the
card orientation and try again.
The computer recognizes most PC Cards and automatically loads the
appropriate device driver. If the configuration program tells you to load the
manufacturer's drivers, use the floppy disk or CD that came with the PC
Card.
To install an ExpressCard:
NOTE: Your computer supports a 34-mm ExpressCard only with the use of an
adapter. Your computer does not support the use of 54-mm ExpressCards.
1
With the 34-mm ExpressCard inserted into its adapter, hold the card with
its orientation symbol pointing into the PC Card/ExpressCard slot and the
top side of the card facing up. The latch may need to be in the
in
position
before you insert the card.
Using Cards 91
2
Slide the adapter into the card slot until the adapter is completely seated
in its connector.
If you encounter too much resistance, do not force the adapter. Check the
ExpressCard and adapter orientation and try again.
The computer recognizes most cards and automatically loads the appropriate
device driver. If the configuration program tells you to load the
manufacturer's drivers, use the floppy disk or CD that came with the card.
Removing a Card or Blank
CAUTION: Before you begin any of the procedures in this section, follow the
safety instructions in your
Product Information Guide
.
NOTICE: Click the icon in the taskbar to select a card and stop it from
functioning before you remove it from the computer. If you do not stop the card in
the configuration utility, you could lose data. Do not attempt to eject a card by
pulling its cable, if one is attached.
Press the release latch and remove the card or blank. For some release latches,
you must press the latch twice: once to pop the latch out, and then a second
time to pop the card out.
Save a blank to use when no PC Card is installed in a slot. Blanks protect
unused slots from dust and other particles.
92 Using Cards
10
Securing Your Computer
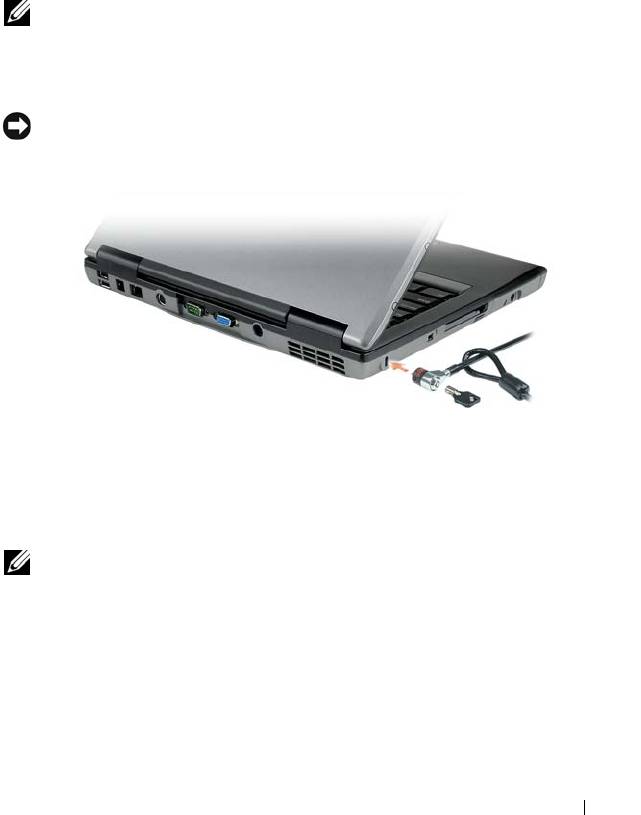
Security Cable Lock
NOTE: Your computer does not ship with a security cable lock.
A security cable lock is a commercially available antitheft device. To use the
lock, attach it to the security cable slot on your Dell™ computer. For more
information, see the instructions included with the device.
NOTICE: Before you buy an antitheft device, ensure that it will work with the
security cable slot on your computer.
Passwords
About Passwords
NOTE: Passwords are disabled when you receive your computer.
A primary (or system) password, an administrator password, and a hard drive
password all prevent unauthorized access to your computer in different ways.
The following table identifies types and features of passwords available on
your computer.
Securing Your Computer 93

Type of Password Features
Primary (or system)
• Protects the computer from unauthorized access
Administrator
• Gives system administrators or service technicians
access to computers for repair or reconfiguration
• Allows you to restrict access to system setup in the same
way a primary password restricts access to the computer
• Can be used instead of the primary password
Hard drive
• Helps protect the data on your hard drive or external
hard drive (if one is being used) from unauthorized
access
NOTICE: Passwords provide a high level of security for data in your computer or
hard drive. However, they are not foolproof. If you require more security, obtain and
use additional forms of protection, such as smart cards, data encryption programs,
or PC Cards with encryption features.
NOTE: Some hard drives do not support hard drive passwords.
When using passwords, observe the following guidelines:
• Choose passwords that you can remember, but not ones that are easy to
guess. For example, do not use the names of family members or pets for
passwords.
• It is recommended that you do not write down passwords. If you do write it
down, however, ensure that the password is stored in a secure place.
• Do not share passwords with other people.
• Ensure that people are not watching you when you type your password(s).
If you forget any of your passwords, contact Dell (see "Contacting Dell" on
page 149). For your protection, Dell technical support staff will ask you for
proof of your identity to ensure that only an authorized person can use the
computer.
Using a Primary (or System) Password
The primary password allows you to protect the computer from unauthorized
access.
When you first start your computer, you must assign a primary password at
the prompt.
94 Securing Your Computer

If you do not enter a password within 2 minutes, the computer returns to its
previous operating state.
NOTICE: If you disable the administrator password, the primary password is also
disabled.
To add or change passwords, access User Accounts from the Control Panel.
If you have assigned an administrator password, you can use it instead of the
primary password. The computer does not specifically prompt you for the
administrator password.
Using an Administrator Password
The administrator password is designed to give system administrators or
service technicians access to computers for repair or reconfiguration. The
administrators or technicians can assign identical administrator passwords to
groups of computers, allowing you to assign a unique primary password.
To set or change administrator passwords, access User Accounts from the
Control Panel.
When you set an administrator password, the Configure Setup option
becomes available in system setup. The Configure Setup option allows you to
restrict access to system setup in the same way that a primary password
restricts access to the computer.
The administrator password can be used instead of the primary password.
Whenever you are prompted to enter the primary password, you can enter the
administrator password.
NOTICE: If you disable the administrator password, the primary password is also
disabled.
NOTE: The administrator password provides access to the computer, but it does
not provide access to the hard drive when a hard drive password is assigned.
If you forget the primary password and do not have an administrator password
assigned, or if you have both a primary and an administrator password
assigned but forget them both, contact your system administrator or contact
Dell (see "Contacting Dell" on page 149).
Securing Your Computer 95

Using a Hard Drive Password
The hard drive password helps protect the data on your hard drive from
unauthorized access. You can also assign a password for an external hard drive
(if one is being used) that can be the same as or different from the password
for the primary hard drive.
To assign or change a hard drive password, enter system setup (see "System
Setup Program" on page 123).
After assigning a hard drive password, you must enter it each time you turn on
the computer and each time you restore the computer to normal operation
from standby mode.
If the hard drive password is enabled, you must enter it each time you turn on
the computer: A message appears asking for the hard drive password.
To continue, enter your password (with no more than eight characters) and
press <Enter>.
If you do not enter a password within 2 minutes, the computer returns to its
previous operating state.
If you enter the wrong password, a message tells you that the password is
invalid. Press <Enter> to try again.
If you do not enter the correct password in three attempts, the computer tries
to start from another bootable device if the Boot First Device option in
system setup is set to allow start-up from another device. If the Boot First
Device option is not set to allow the computer to start from another device,
the computer returns to the operating state it was in when you turned it on.
If the hard drive password, the external hard-drive password, and the primary
password are the same, the computer prompts you only for the primary
password. If the hard drive password is different from the primary password,
the computer prompts you for both. Two different passwords provide greater
security.
NOTE: The administrator password provides access to the computer, but it does
not provide access to the hard drive when a hard drive password is assigned.
Trusted Platform Module (TPM)
NOTE: Computers shipping into China and Russia are not equipped with the TPM
feature.
96 Securing Your Computer

NOTE: The TPM feature supports encryption only if the operating system supports
TPM. For more information, see the TPM software documentation and the help files
that came with the software.
TPM is a hardware-based security feature that can be used to create and
manage computer-generated encryption keys. When combined with security
software, the TPM enhances existing network and computer security by
enabling features such as file protection capabilities and protected e-mail.
The TPM feature is enabled through a system setup option.
NOTICE: To secure your TPM data and encryption keys, follow the backup
procedures documented in the Broadcom Secure Foundation Getting Started
Guide. In the event of these backups being incomplete, lost, or damaged, Dell will
be unable to assist in the recovery of encrypted data.
Enabling the TPM Feature
1
Enable the TPM software:
a
Restart the computer and press <F2> during the Power On Self Test
to enter the system setup program.
b
Select
Security
→
TPM Security
and press <Enter>.
c
Under
TPM Security
, select
On
.
d
Press <Esc> to exit the setup program.
e
If prompted, click
Save/Exit
.
2
Activate the TPM setup program:
a
Restart the computer and press <F2> during the Power On Self Test
to enter the system setup program.
b
Select
Security
→
TPM Activation
and press <Enter>.
c
Under
TPM Activation
, select
Activate
and press <Enter>.
NOTE: You only need to activate the program once.
d
Once the process is complete, the computer either restarts
automatically or prompts you to restart your computer.
Security Management Software
The security management software is designed to utilize four different
features to help you secure your computer:
Securing Your Computer 97

• Log-in management
• Pre-boot authentication (using a fingerprint reader, smart card, or
password)
•Encryption
• Private information management
Activating the Security Management Software
NOTE: You must first enable the TPM in order for the security management
software to have full functionality.
1
Enable the TPM feature (see "Enabling the TPM Feature" on page 97).
2
Load the security management software:
a
Turn on (or restart) your computer.
b
When the DELL™ logo appears, press <F2> immediately. If you wait
too long and the Windows logo appears, continue to wait until you see
the Windows desktop. Then shut down your computer and try again.
c
In the drop-down menu, select
Wave EMBASSY Trust Suite
and press
<Enter> to create the icons for the software components on the
computer desktop.
d
Press <Esc> to exit the setup program.
e
If prompted, click
Save/Exit
.
Using the Security Management Software
For information about how to use the software and the different security
features, see the Getting Started Guide for the software:
Click Start
→
All Programs
→
Wave EMBASSY Trust Suite
→
Getting Started
Guide
.
Computer Tracking Software
Computer tracking software may enable you to locate your computer if it is
lost or stolen. The software is optional and may be purchased when you order
your Dell™ computer, or you can contact your Dell sales representative for
information about this security feature.
NOTE: Computer tracking software may not be available in certain countries.
98 Securing Your Computer

NOTE: If you have computer tracking software and your computer is lost or stolen,
you must contact the company that provides the tracking service to report the
missing computer.
If Your Computer Is Lost or Stolen
• Call a law enforcement agency to report the lost or stolen computer.
Include the Service Tag in your description of the computer. Ask that a
case number be assigned and write down the number, along with the
name, address, and phone number of the law enforcement agency. If
possible, obtain the name of the investigating officer.
NOTE: If you know where the computer was lost or stolen, call a law enforcement
agency in that area. If you do not know, call a law enforcement agency where you
live.
• If the computer belongs to a company, notify the security office of the
company.
• Contact Dell customer service to report the missing computer. Provide the
computer Service Tag, the case number, and the name, address, and phone
number of the law enforcement agency to which you reported the missing
computer. If possible, give the name of the investigating officer.
The Dell customer service representative will log your report under the
computer Service Tag and record the computer as missing or stolen. If
someone calls Dell for technical assistance and gives your Service Tag, the
computer is identified automatically as missing or stolen. The representative
will attempt to get the phone number and address of the caller. Dell will then
contact the law enforcement agency to which you reported the missing
computer.
Securing Your Computer 99

100 Securing Your Computer
