Dell Latitude D530 – страница 2
Инструкция к Ноутбуку Dell Latitude D530
Оглавление
2
About Your Computer
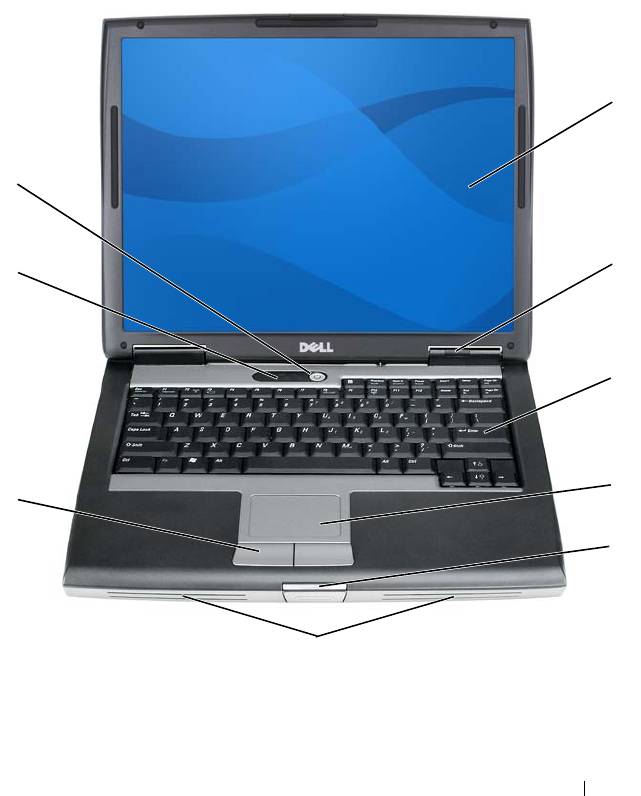
Front View
1
9
2
8
3
4
7
5
6
About Your Computer 21
1 display 2 device status lights
3 keyboard 4 touch pad
5 display latch 6 speaker
7 touch pad buttons 8 keyboard status lights
9 power button
DISPLAY — For more information about your display, see "Using the Display" on
page 53.
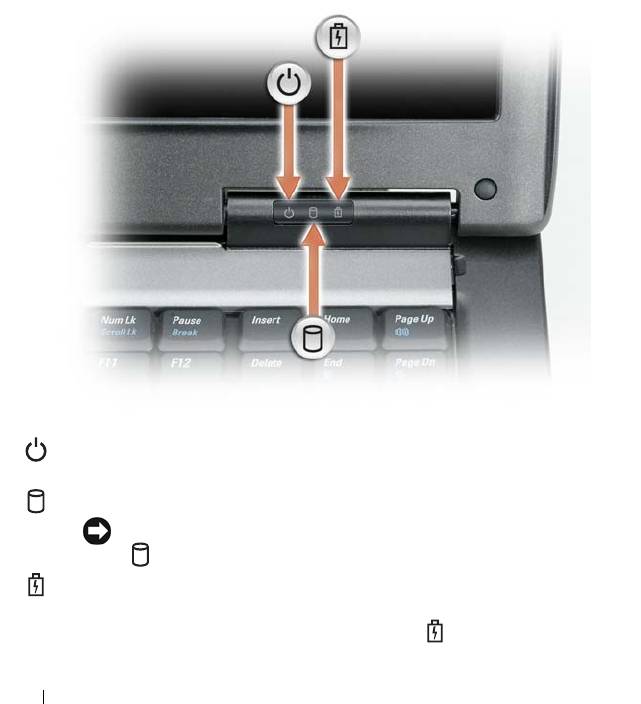
DEVICE STATUS LIGHTS
Turns on when you turn on the computer and blinks when the computer is
in a power management mode.
Turns on when the computer reads or writes data.
NOTICE: To avoid loss of data, never turn off the computer while the
light is flashing.
Turns on steadily or blinks to indicate battery charge status.
If the computer is connected to an electrical outlet, the light operates as follows:
22 About Your Computer

– Solid green: The battery is charging.
– Flashing green: The battery is almost fully charged.
– Off: The battery is adequately charged (or external power is not available to charge
the battery).
If the computer is running on a battery, the light operates as follows:
– Off: The battery is adequately charged (or the computer is turned off).
– Flashing orange: The battery charge is low.
– Solid orange: The battery charge is critically low.
KEYBOARD — The keyboard includes a numeric keypad as well as the Windows logo
key. For information on supported keyboard shortcuts, see "Using the Keyboard" on
page 47.
TOUCH PAD — Provides the functionality of a mouse (see "Touch Pad" on page 51).
DISPLAY LATCH — Keeps the display closed.
SPEAKER — To adjust the volume of the integrated speaker, press the volume control
buttons, mute button, or volume-control keyboard shortcuts (see "Key Combinations"
on page 48").
TOUCH PAD BUTTONS — Use these buttons much like the buttons on a mouse when
you use the touch pad to move the cursor on the display (see "Touch Pad" on page 51).
About Your Computer 23
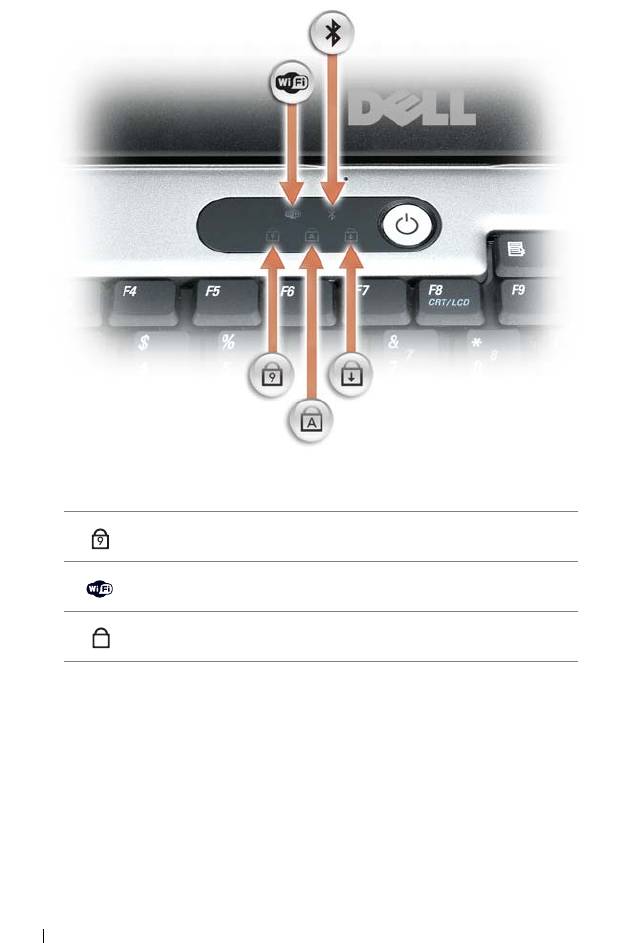
KEYBOARD STATUS LIGHTS
The green lights located above the keyboard indicate the following:
9
Turns on when the numeric keypad is enabled.
Turns on when wireless devices are enabled.
A
Turns on when the uppercase letter function is enabled.
24 About Your Computer
®
Turns on when Bluetooth
wireless technology is
enabled. To enable or disable Bluetooth
wireless
technology or other wireless devices, press
<Fn><F2>.
NOTE: Bluetooth wireless technology is an optional
feature on your computer, so the icon turns on only if
Bluetooth wireless technology is installed on your
computer.
For more information, see the documentation that came
with your Bluetooth wireless technology.
Turns on when the scroll lock function is enabled.
POWER BUTTON — Press the power button to turn on the computer or exit a power
management mode (see "Power Management Modes" on page 43).
®
NOTICE: To avoid losing data, turn off your computer by performing a Microsoft
®
Windows
operating system shutdown rather than by pressing the power button.
If the computer stops responding, press and hold the power button until the computer
turns off completely (which may take several seconds).
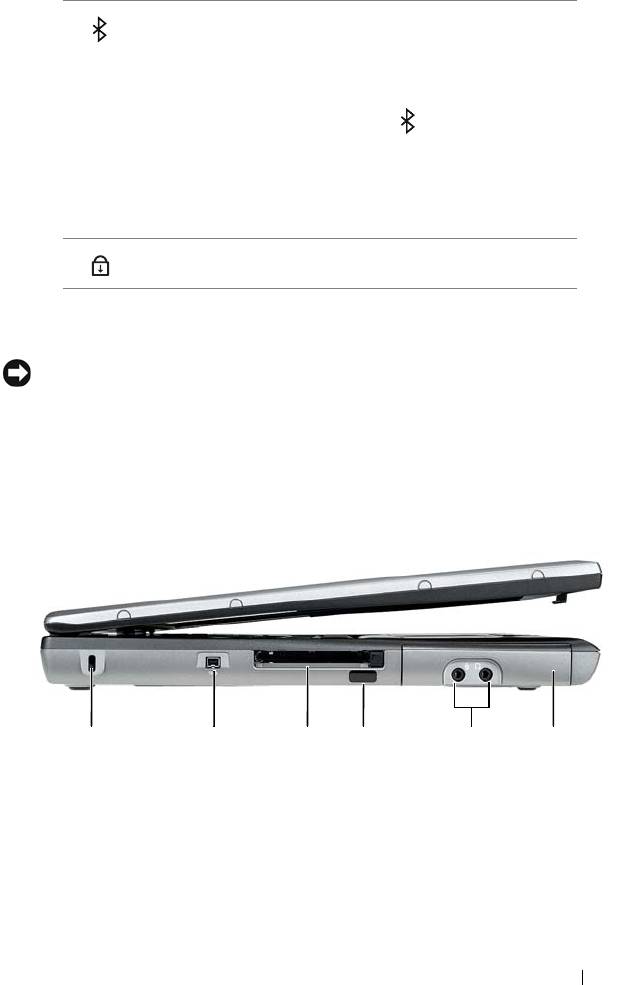
Left Side View
352 41 6
1 security cable slot 2 IEEE 1394 Connector
3 PC Card/ExpressCard slot 4 infrared sensor
5 audio connectors (2) 6 hard drive
SECURITY CABLE SLOT — Lets you attach a commercially available antitheft device
About Your Computer 25
to the computer (see "Security Cable Lock" on page 93).
IEEE 1394 C
ONNECTOR — Connects devices supporting IEEE 1394 high-speed
transfer rates, such as some digital video cameras.
PC C
ARD/EXPRESSCARD SLOT — Supports one PC Card, such as a modem or
network adapter, or an ExpressCard (with a PCMCIA adapter). The computer ships
with a blank installed in the slot to prevent foreign matter from entering the computer
interior when a card is not installed (see "Card Types" on page 89).
INFRARED SENSOR — Lets you transfer files from your computer to another infrared-
compatible device without using cable connections. When you receive your computer,
the sensor is disabled. You can use the system setup program (see "System Setup
Program" on page 123) to enable the sensor. For information on transferring data, see
Windows Help, the Help and Support Center, or the documentation that came with
your infrared-compatible device.
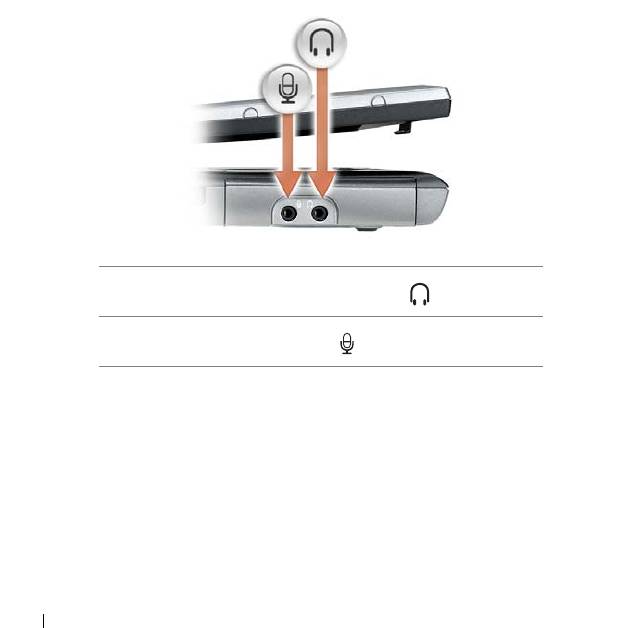
AUDIO CONNECTORS
Attach headphones or speakers to the connector.
Attach a microphone to the connector.
HARD
DRIVE — Stores software and data.
26 About Your Computer
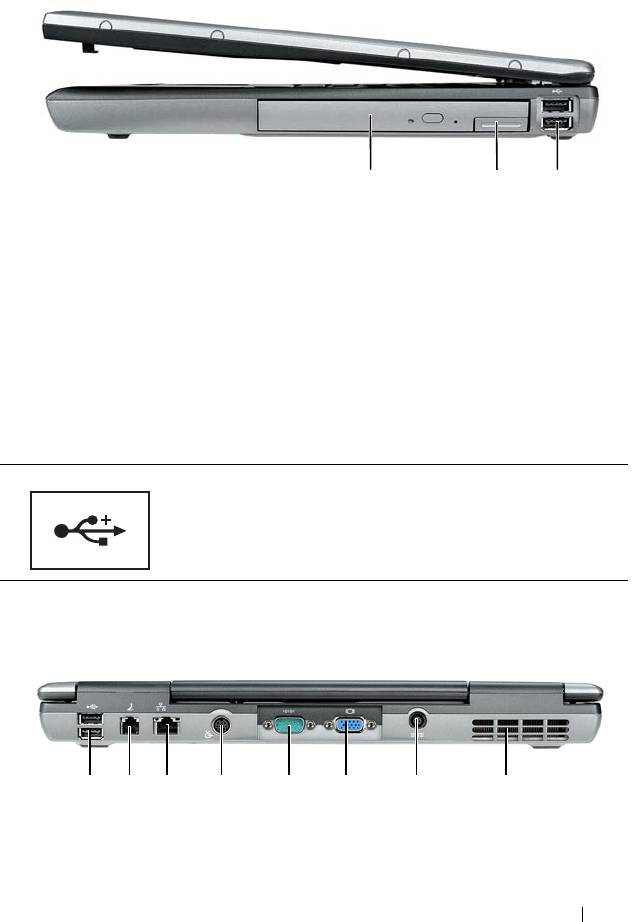
Right Side View
1 23
1 media bay 2 device latch release
3 USB connectors (2)
MEDIA BAY — You can install devices such as an optical drive, second battery, or a
Dell TravelLite™ module in the media bay.
DEVICE LATCH RELEASE — Press the latch release to eject any device installed in the
media bay.
USB
CONNECTORS
Connect USB devices, such as a mouse, keyboard, or
printer.
Back View
8123 4 5 6 7
About Your Computer 27
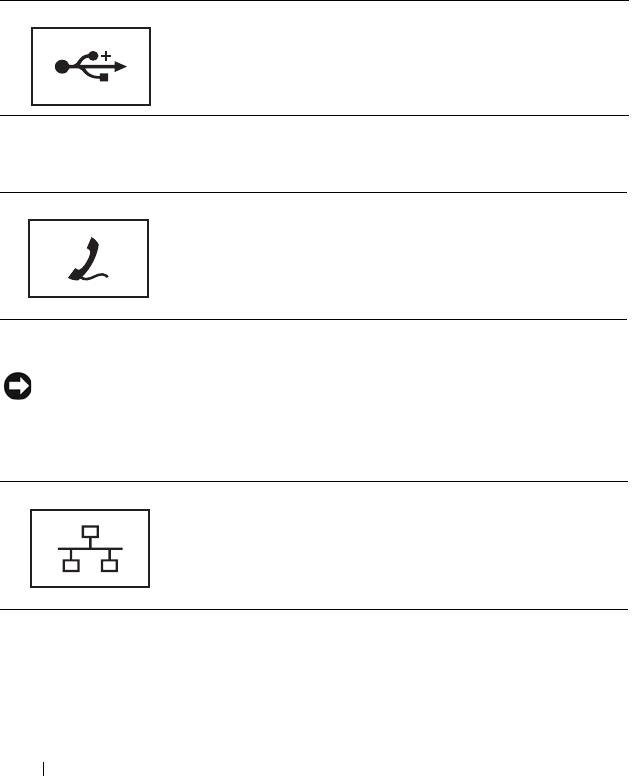
1 USB connectors (2) 2 modem connector (RJ-11)
3 network connector (RJ-45) 4 S-video TV-out connector
5 serial connector 6 video connector
7 AC adapter connector 8 air vents
USB CONNECTORS
Connect USB devices, such as a mouse, keyboard, or
printer.
MODEM CONNECTOR (RJ-11)
If you ordered the optional internal modem, connect the
telephone line to the modem connector.
For information on using the modem, see the online
modem documentation supplied with your computer (see
"Finding Information" on page 13).
NETWORK CONNECTOR (RJ-45)
NOTICE: The network connector is slightly larger than the modem connector. To
avoid damaging the computer, do not plug a telephone line into the network
connector.
Connects the computer to a network. The two lights next
to the connector indicate status and activity for wired
network connections.
For information on using the network adapter, see the
device user’s guide supplied with your computer.
28 About Your Computer
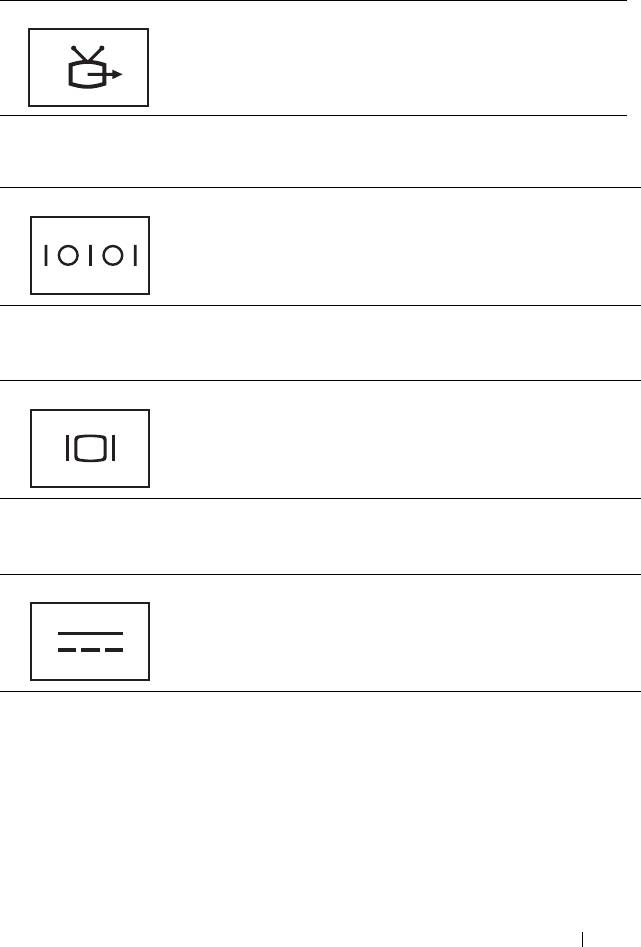
S-VIDEO TV-OUT CONNECTOR
Connects your computer to a TV. For more information,
see "Connecting Your Computer to a TV or Audio Device"
on page 62.
SERIAL
CONNECTOR
Connects serial devices, such as a mouse or handheld device.
VIDEO
CONNECTOR
Connects video devices, such as a monitor.
AC ADAPTER CONNECTOR
Connects an AC adapter to the computer.
About Your Computer 29
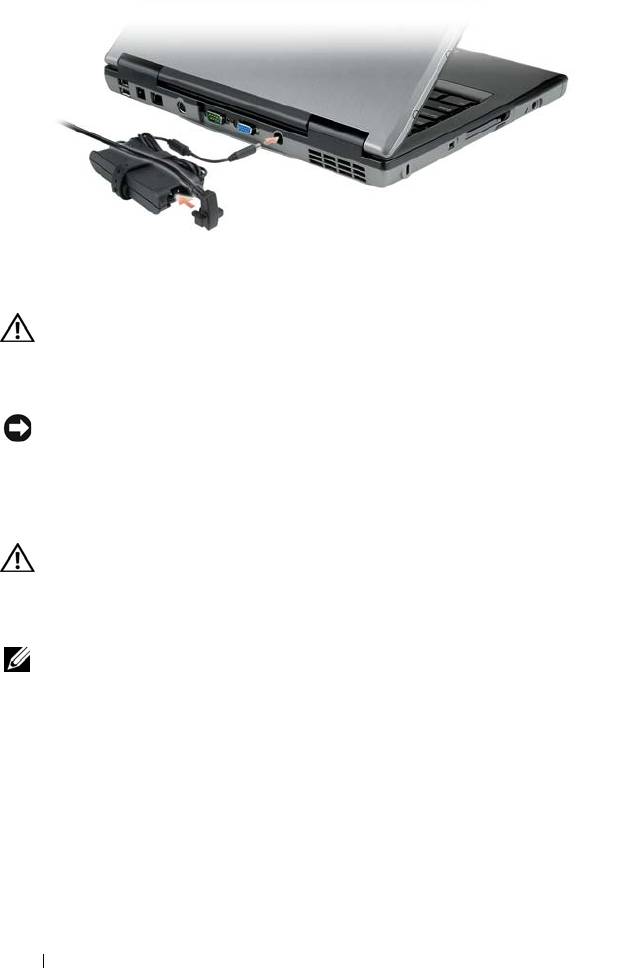
The AC adapter converts AC power to the DC power required by the computer. You
can connect the AC adapter with your computer turned either on or off.
CAUTION: The AC adapter works with electrical outlets worldwide. However,
power connectors and power strips vary among countries. Using an incompatible
cable or improperly connecting the cable to the power strip or electrical outlet
may cause fire or equipment damage.
NOTICE: When you disconnect the AC adapter cable from the computer, grasp the
connector, not the cable itself, and pull firmly but gently to avoid damaging the
cable.
AIR VENTS — The computer uses an internal fan to create airflow through the vents,
which prevents the computer from overheating.
CAUTION: Do not block, push objects into, or allow dust to accumulate in the air
vents. Do not store your computer in a low-airflow environment, such as a closed
briefcase, while it is running. Restricting the airflow can damage the computer or
cause a fire.
NOTE: The computer turns on the fan when the computer gets hot. Fan noise is
normal and does not indicate a problem with the fan or the computer.
30 About Your Computer
Bottom View
1
2
3
7
4
6
5
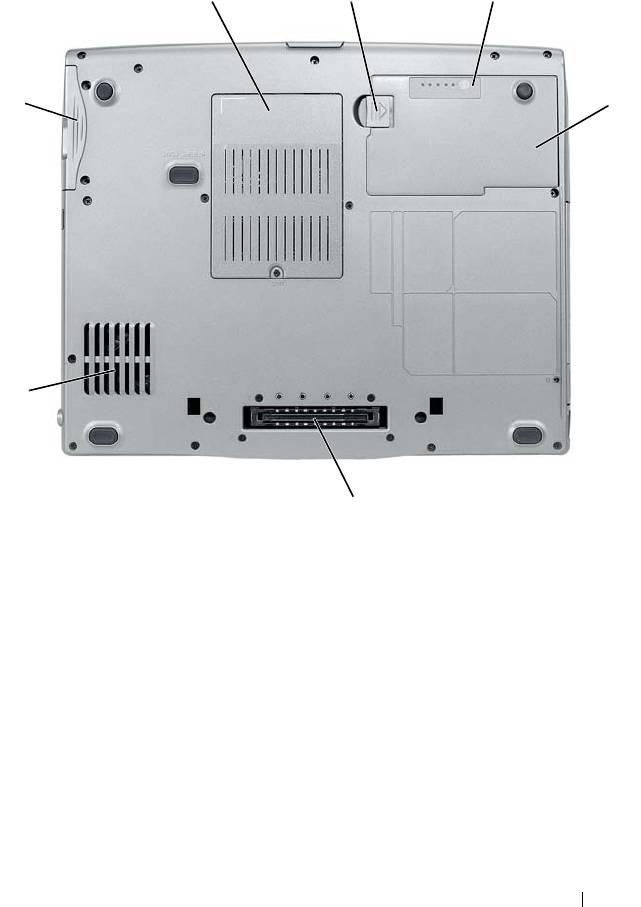
1 memory
2 battery-bay latch release
module/modem/WLAN
Mini-Card/coin-cell battery
cover
3 battery charge
4 battery
gauge/health gauge
5 docking-device connector 6 air vents
7 hard drive
MEMORY MODULE/MODEM/WLAN MINI-CARD/COIN-CELL BATTERY COVER —
Covers the compartment that contains one memory module, the modem, the WLAN
Mini-Card, and the coin-cell battery.
About Your Computer 31

BATTERY-BAY LATCH RELEASE — Release the battery.
BATTERY CHARGE GAUGE/ HEALTH GAUGE — Provides information on the battery
charge (see "Checking the Battery Charge" on page 40).
BATTERY — When a battery is installed, you can use the computer without
connecting the computer to an electrical outlet (see "Using a Battery" on page 39).
DOCKING-DEVICE CONNECTOR — Lets you attach your computer to a docking device.
See the Dell documentation that came with your docking device for more
information.
NOTICE: Your computer features Undock & Go™ technology that allows you to
undock your computer without going into standby mode. Because the computer
may not automatically go into standby mode when it is undocked, be sure the
settings in the Power Options control panel do not prohibit the computer from going
into standby mode. If you change the Power Options control panel to prohibit the
computer from going into standby mode, you greatly increase the chances of
causing your battery to wear down quickly or causing your computer to overheat.
AIR VENTS — The computer uses an internal fan to create airflow through the fan air
vents, which prevents the computer from overheating.
NOTE: The computer turns on the fan when the computer gets hot. Fan noise is
normal and does not indicate a problem with the fan or the computer.
CAUTION: Do not block, push objects into, or allow dust to accumulate in the air
vents. Do not store your computer in a low-airflow environment, such as a closed
briefcase, while it is running. Restricting the airflow can damage the computer or
cause a fire.
HARD DRIVE — Stores software and data.
32 About Your Computer

3
Setting Up Your Computer
Transferring Information to a New Computer
You can use your operating system wizards to help you transfer files and other
data from one computer to another—for example, from an old computer to a
new computer. For instructions, see the following section that corresponds to
the operating system that your computer is running.
®
®
Microsoft
Windows
XP
The Microsoft
Windows XP operating system provides the Files and Settings
Transfer Wizard to move data from a source computer to a new computer.
You can transfer data, such as:
• E-mail messages
• Toolbar settings
•Window sizes
• Internet bookmarks
You can transfer the data to the new computer over a network or serial
connection, or you can store it on removable media, such as a writable CD,
for transfer to the new computer.
NOTE: You can transfer information from an old computer to a new computer by
directly connecting a serial cable to the input/output (I/O) ports of the two
computers. To transfer data over a serial connection, you must access the Network
Connections utility from the Control Panel and perform additional configuration
steps, such as setting up an advanced connection and designating the host
computer and the guest computer.
For instructions on setting up a direct cable connection between two computers,
see Microsoft Knowledge Base Article #305621, titled How to Set Up a Direct Cable
Connection Between Two Computers in Windows XP. This information may not be
available in certain countries.
Setting Up Your Computer 33

For transferring information to a new computer, you must run the Files and
Settings Transfer Wizard. You can use the optional Operating System media
for this process or you can create a wizard disk with the Files and Settings
Transfer Wizard.
Running the Files and Settings Transfer Wizard With the Operating System Media
NOTE: This procedure requires the Operating System media. This media is optional
and may not be included with certain computers.
To prepare a new computer for the file transfer:
1
Open the Files and Settings Transfer Wizard: click
Start
→
All Programs
→
Accessories
→
System Tools
→
Files and Settings Transfer Wizard
.
2
When the
Files and Settings Transfer Wizard
welcome screen appears,
click
Next
.
3
On the
Which computer is this?
screen, click
New Computer
→
Next
.
4
On the
Do you have a Windows XP CD?
screen, click
I will use the wizard
from the Windows XP CD
→
Next
.
5
When the
Now go to your old computer
screen appears, go to your old or
source computer. Do
not
click
Next
at this time.
To copy data from the old computer:
1
On the old computer, insert the Windows XP
Operating System
media.
2
On the
Welcome to Microsoft Windows XP
screen, click
Perform
additional tasks
.
3
Under
What do you want to do?
, click
Transfer files and settings
→
Next
.
4
On the
Which computer is this?
screen, click
Old Computer
→
Next
.
5
On the
Select a transfer method
screen, click the transfer method you
prefer.
6
On the
What do you want to transfer?
screen, select the items you want to
transfer and click
Next
.
After the information has been copied, the
Completing the Collection
Phase
screen appears.
7
Click
Finish
.
To transfer data to the new computer:
34 Setting Up Your Computer

1
On the
Now go to your old computer
screen on the new computer, click
Next
.
2
On the
Where are the files and settings?
screen, select the method you
chose for transferring your settings and files and click
Next
.
The wizard reads the collected files and settings and applies them to your
new computer.
When all of the settings and files have been applied, the
Finished
screen
appears.
3
Click
Finished
and restart the new computer.
Running the Files and Settings Transfer Wizard Without the Operating System
Media
To run the Files and Settings Transfer Wizard without the Operating System
media, you must create a wizard disk that will allow you to create a backup
image file to removable media.
To create a wizard disk, use your new computer with Windows XP and
perform the following steps:
1
Open the Files and Settings Transfer Wizard: click
Start
→
All Programs
→
Accessories
→
System Tools
→
Files and Settings Transfer Wizard
.
2
When the
Files and Settings Transfer Wizard
welcome screen appears,
click
Next
.
3
On the
Which computer is this?
screen, click
New Computer
→
Next
.
4
On the
Do you have a Windows XP CD?
screen, click
I want to create a
Wizard Disk in the following drive
→
Next.
5
Insert the removable media, such as a writable CD, and click
OK
.
6
When the disk creation completes and the
Now go to your old
computer
message appears,
do not
click
Next
.
7
Go to the old computer.
To copy data from the old computer:
1
On the old computer, insert the wizard disk.
2
Click
Start
→
Run
.
3
In the
Open
field on the
Run
window, browse to the path for
fastwiz
(on
the appropriate removable media) and click
OK
.
Setting Up Your Computer 35

4
On the
Files and Settings Transfer Wizard
welcome screen, click
Next
.
5
On the
Which computer is this?
screen, click
Old Computer
→
Next
.
6
On the
Select a transfer method
screen, click the transfer method you
prefer.
7
On the
What do you want to transfer?
screen, select the items you want to
transfer and click
Next
.
After the information has been copied, the
Completing the Collection
Phase
screen appears.
8
Click
Finish
.
To transfer data to the new computer:
1
On the
Now go to your old computer
screen on the new computer, click
Next
.
2
On the
Where are the files and settings?
screen, select the method you
chose for transferring your settings and files and click
Next
. Follow the
instructions on the screen.
The wizard reads the collected files and settings and applies them to your
new computer.
When all of the settings and files have been applied, the
Finished
screen
appears.
3
Click
Finished
and restart the new computer.
NOTE: For more information about this procedure, search support.dell.com for
document #154781 (What Are The Different Methods To Transfer Files From My Old
®
®
Computer To My New Dell™ Computer Using the Microsoft
Windows
XP
Operating System?).
NOTE: Access to the Dell™ Knowledge Base document may not be available in
certain countries.
®
Microsoft Windows Vista
1
Click the Windows Vista Start button , and then click
Transfer files
and settings
→
Start Windows Easy Transfer.
2
In the
User Account Control
dialog box, click
Continue
.
3
Click
Start a new transfer
or
Continue a transfer in progress
.
36 Setting Up Your Computer

Follow the instructions provided on the screen by the Windows Easy Transfer
wizard.
Turning Off Your Computer
NOTICE: To avoid losing data, save and close all open files and exit all open
programs before you turn off your computer.
1
Shut down the operating system:
a
Save and close all open files and exit all open programs.
®
®
b
In the Microsoft
Windows
XP operating system
, click
Start
→
Shut
Down
→
Shut down
.
®
In the Microsoft Windows Vista
operating system,
click the Windows
Vista Start button , click the arrow in the lower-right corner of the
Start menu as shown below, and then click
Shut Down
.
The computer turns off after the operating system shutdown process
is complete.
2
Ensure that the computer and all attached devices are turned off. If your
computer and attached devices did not automatically turn off when you
shut down your operating system, press and hold the power button for
about 4 seconds to turn them off.
Setting Up Your Computer 37

38 Setting Up Your Computer

4
Using a Battery
Battery Performance
NOTE: For information about the Dell warranty for your computer, see the Product
Information Guide or separate paper warranty document that shipped with your
computer.
For optimal computer performance and to help preserve BIOS settings,
operate your Dell™ portable computer with the main battery installed at all
times. One battery is supplied as standard equipment in the battery bay.
NOTE: Because the battery may not be fully charged, use the AC adapter to
connect your new computer to an electrical outlet the first time you use the
computer. For best results, operate the computer with the AC adapter until the
battery is fully charged. To view battery charge status, check the Power Meter in
Power Options (see "Accessing Power Options Properties" on page 44).
Battery operating time varies depending on operating conditions.
Battery operating time varies depending on operating conditions. You can
install an optional second battery in the media bay to significantly increase
operating time.
NOTE: Battery operating time (the time the battery can hold a charge) decreases
over time. Depending on how often the battery is used and the conditions under
which it is used, you may need to purchase a new battery during the life of your
computer.
NOTE: It is recommended that you connect your computer to an electrical outlet
when writing to a CD or DVD.
Operating time is significantly reduced when you perform operations
including, but not limited to, the following:
•Using optical drives.
• Using wireless communications devices, PC Cards, Express Cards, media
memory cards, or USB devices.
• Using high-brightness display settings, 3D screen savers, or other power-
intensive programs such as complex 3D graphics applications.
Using a Battery 39

• Running the computer in maximum performance mode. See "Configuring
Power Management Settings" on page 44 for information about accessing
Windows Power Options Properties or Dell QuickSet, which you can use
to configure power management settings.
You can check the battery charge before you insert the battery into the
computer. You can also set power management options to alert you when the
battery charge is low.
CAUTION: Using an incompatible battery may increase the risk of fire or
explosion. Replace the battery only with a compatible battery purchased from
Dell. The battery is designed to work with your Dell computer. Do not use a battery
from other computers with your computer.
CAUTION: Do not dispose of batteries with household waste. When your battery
no longer holds a charge, call your local waste disposal or environmental agency
for advice on disposing of a lithium-ion battery. See "Battery Disposal" in the
Product Information Guide
.
CAUTION: Misuse of the battery may increase the risk of fire or chemical burn.
Do not puncture, incinerate, disassemble, or expose the battery to temperatures
above 65°C (149°F). Keep the battery away from children. Handle damaged or
leaking batteries with extreme care. Damaged batteries may leak and cause
personal injury or equipment damage.
Checking the Battery Charge
The Dell QuickSet Battery Meter, the Microsoft Windows Power Meter
window and battery meter icon ( or ), the battery charge gauge and
health gauge, and the low-battery warning provide information on the battery
charge.
Dell™ QuickSet Battery Meter
If Dell QuickSet is installed, press <Fn><F3> to display the QuickSet
Battery Meter. The Battery Meter displays status, battery health, charge level,
and charge completion time for the battery in your computer.
For more information about QuickSet, right-click the QuickSet icon in the
taskbar, and click Help.
40 Using a Battery
