Beurer BM 90: LCD display signal
LCD display signal: Beurer BM 90
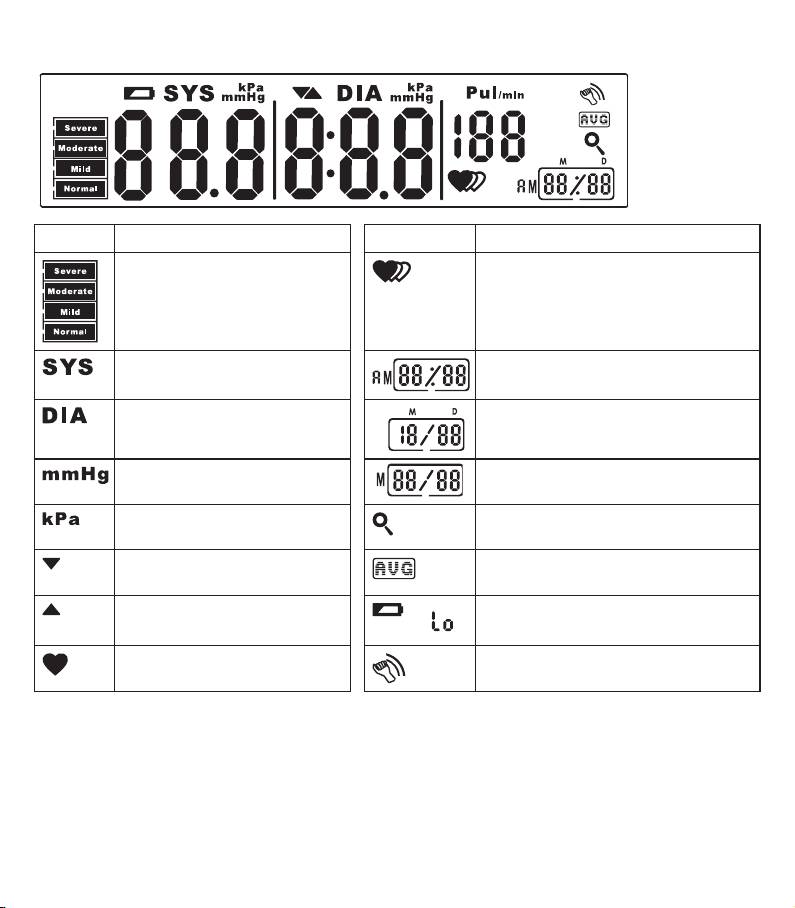
Information on the display
18
LCD display signal
Display Meaning Display Meaning
Classification of blood pressure
Cardiac arrhythmia symbol
measurements
Systolic pressure Hour format (24h/12h)
Diastolic pressure
Date (month/day)
Measurement unit Memory display: memory space number/
total memory spaces occupied
Measurement unit (1kPa = 7.5
Memory display mode
mmHg
Release air Memory display: average value of all
memory spaces
Inflating Low battery indicator
Pulse symbol Movement sensor: warning of restless
behaviour during measurement
5. Preparing the measurement
To use your new Beurer BM90 Internet blood pressure monitor, you require a broadband router with an LAN con-
nection. To start-up the device, please carry out the following steps in the sequence shown:
•
Visit our website: www.beurer-connect.com
•
Register
•
Enter the wireless box activation code. You will find this on the underside of the wireless box.
•
Using the LAN cable connect the wireless box to your router.
•
To prevent possible damage to the device, the wireless box must only be used with the mains part included in
delivery.
Insert the mains part into the connection provided for this purpose on the top of the wireless box. Then insert
the mains plug of the mains part into the mains socket.
•
You can see if the wireless box is ready by the ‚traffic light‘ function: green – ready for use (connection to the
server established).
•
Now select the “blood pressure monitor” option on the website and enter the activation code of your blood
pressure monitor. You will find this on the underside of the blood pressure monitor.
•
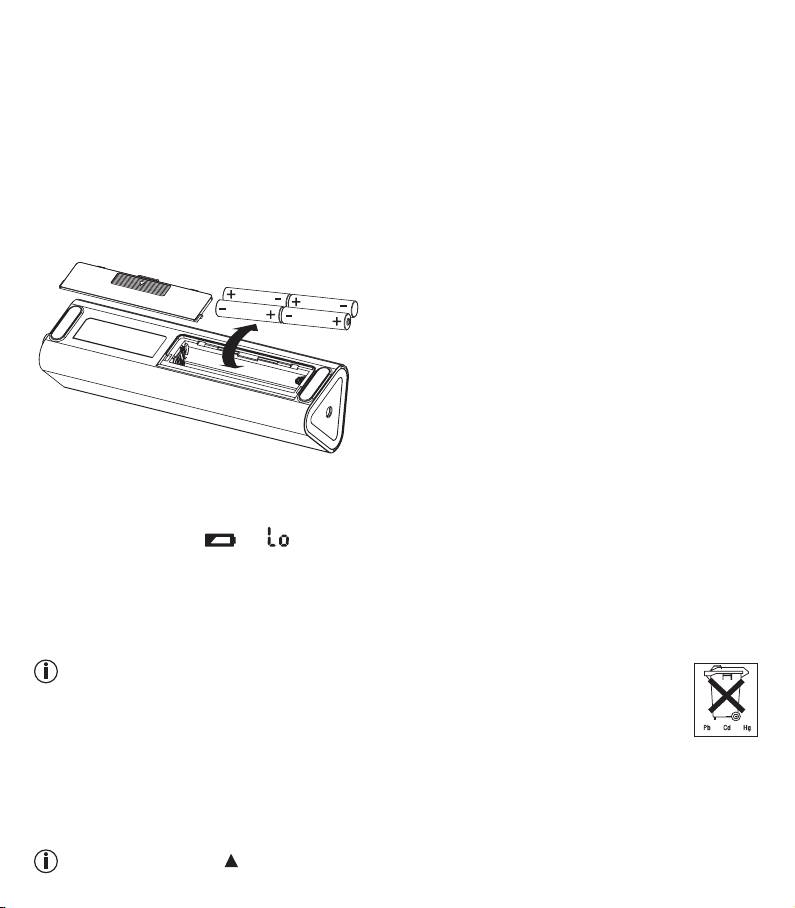
Open the battery compartment lid on the blood pressure monitor.
•
Insert four 1.5V AAA (alkaline type LR 03) batteries. Make sure that the batteries are inserted the correct way
round.
Do not use rechargeable batteries.
•
Subsequently close the battery compartment lid carefully.
•
Carry out a measurement and assign the result to your profile.
Replacing the batteries
If the low battery indicator and are displayed, you can no longer perform any measurements and must
replace the batteries. Once the batteries have been removed from the device, the current date and time are de-
leted. The saved measurements are retained.
Used batteries should not be disposed of in normal household waste. Dispose of them via your electronics retai-
ler or your local recycling point. You are legally obligated to do so.
The codes below are printed on batteries containing harmful substances:
Pb: battery contains lead,
Cd: battery contains cadmium,
Hg: battery contains mercury.
Setting the date and time
•
If there is an existing connection to the server, the date and time will be automatically retrieved by the server.
•
If there is no connection to the server, you will be sent directly to the date/time settings mode.
It is essential to set the date and time. Otherwise, when you reconnect to the server, your measurements will
not be transferred, stored and later retrieved with the correct date and time.
If you press and hold the MEM button, you can set the values more quickly.
19
•
When switched off, press the SET button for approx. three seconds. The year display will start to flash. Set
the year with the MEM button and confirm with the SET button.
•
Then set the month, day, time format (24h/12h), hour, minutes and measurement unit (mmHg/kPa) and confirm
each setting with the SET button.
•
After you have performed all the settings, appears on the display and the device automatically switches
off.
Operating the blood pressure monitor with a mains part
You can also operate this blood pressure monitor with a mains part. When doing so, there must not be any bat-
teries in the battery compartment. The mains part can be obtained from specialist retailers or from the service
address using order number 071.50.
•
To prevent possible damage to the device, the blood pressure monitor must only be used with the mains part
described here.
•
Insert the mains part into the connection provided for this purpose on the right-hand side of the blood pressure
monitor.
The mains part must only be connected to the mains voltage that is specified on the type plate.
•
Then insert the mains plug of the mains part into the mains socket.
•
After using the blood pressure monitor, unplug the mains part from the mains socket first and then disconnect
it from the blood pressure monitor. As soon as you unplug the mains part, the blood pressure monitor loses the
date and time setting but the saved measurements are retained.
6. Measuring blood pressure
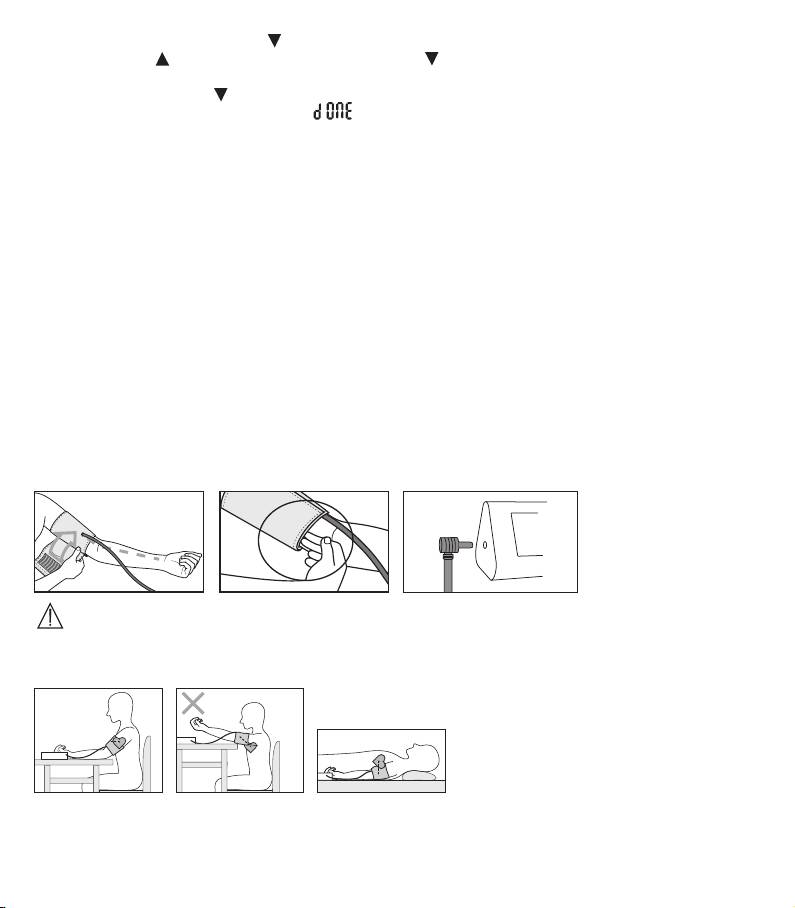
Ensure the device is at room temperature before measuring.
Attach the cuff
The unit may only be operated with the original cuff. The cuff is for an arm circumference of 22 to 42 cm.
Adopt the correct posture
•
Before every measurement, relax for about five minutes. Otherwise deviations can occur.
•
You can perform the measurement while sitting or lying. Make sure that the the cuff is at heart level.
20
•
To carry out a blood pressure measurement, make sure you are sitting comfortably, with your arms and back
leaning on something. Do not cross your legs. Place your feet flat on the ground.
•
To avoid falsifying the measurement, it is important to remain still during the measurement and not to speak!
Performing the blood pressure measurement
•
As described before, attach the cuff and adopt the posture in which you want to perform the measurement.
•
Start the blood pressure monitor with the START/STOP button. • After the self test, during which all display el-
ements are displayed, measurement begins. The cuff pumps itself up automatically. The measurement is taken
during the pump operation.
Measuring can be cancelled at any time by pressing the START/STOP button.
•
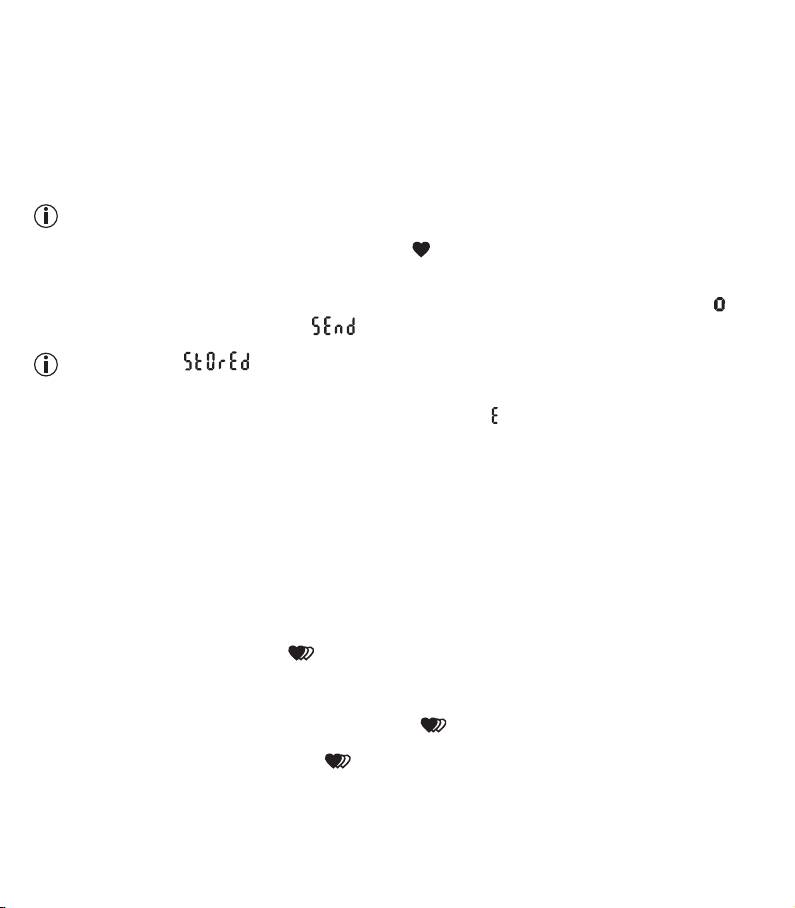
As soon as a pulse is detected, the pulse symbol flashes .
•
When the measurement has been taken, the pressure dissipates very quickly. The pulse, the systolic blood
pressure and diastolic blood pressure are shown on the display.
•
The measurements are automatically transferred to your profile. This is shown on the display by a rolling .
•
The successful transfer is signalled when is shown on the display.
If the transfer fails, is shown on the display. In this event, the measurements are stored on the
blood pressure monitor and will be transferred once the server connection is re-established.
• If the blood pressure measurement has not been performed properly, appears on the display. Observe the
chapter on error messages/troubleshooting in these instructions for use and repeat the measurement.
• In addition to the transfer of the measurements to your Beurer Connect profile, the device has 60 memory
spaces available. The measurement is automatically stored.
• To switch off the device, press the START/STOP button. If you forget to turn off the device, it will switch off
automatically after approx. 1 minute.
Wait at least 5 minutes before taking another measurement!
7. Evaluating results
Cardiac arrhythmia:
This unit can identify potential disruption of the heart rhythm when measuring and if necessary, indicates this
after the measurement with the symbol . This can be an indicator for arrhythmia. Arrhythmia is an illness in
which the heart rhythm is abnormal because of flaws in the bioelectrical system that regulates the heartbeat. The
symptoms (skipped or premature heart beats, pulse being slow or too fast) can be caused by factors such as
heart disease, age, physical make-up, excess stimulants, stress or lack of sleep. Arrhythmia can only be deter-
mined through an examination by your doctor. If the symbol is shown on the display after the measurement
has been taken, it should be repeated. Please ensure that you rest for 5 minutes beforehand and do not speak or
move during the measurement. If the symbol appears frequently, please consult your doctor. Self-diagnosis
and treatment based on the measurements can be dangerous. Always follow your GP‘s instructions.
21
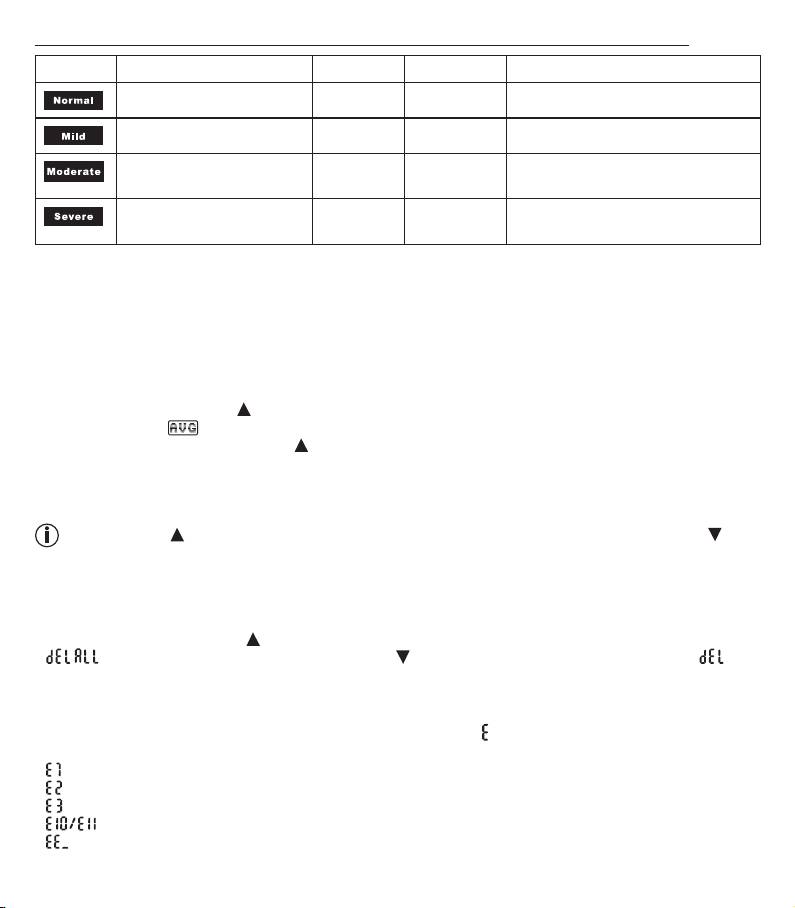
Table for the classification of blood pressure values (measurement unit, mmHg) for adults:
Display Category Systole Diastole Action
Normal range < 140 < 90 Self-monitoring
Grade 1: mild hypertension 140 - 159 90 - 99 regular monitoring by doctor
Grade 2: moderate hyper-
160 - 179 100 - 109 seek medical attention
tension
Grade 3: severe hyperten-
> = 180 > = 110 seek medical attention
sion
8. Saving, displaying and deleting measurements on the device
Saving measurements
•
The results of every successful measurement are automatically stored together with the date and time. If there
are more than 60 measurements, the oldest measurements are lost.
Displaying measurements
•
When switched off, press the MEM button. Firstly, the average value of all values stored will be displayed.
This is denoted by in the display.
•
If you press the memory button, MEM again, further individual measurements are displayed – beginning with
the value measured most recently. The individual values are denoted by the memory space numbers 1 to 60.
The date of each measurement is displayed after approx. 4 seconds and after about a further 4 seconds the
time is also displayed.
By pressing the MEM button, the most recent measurements are displayed; by pressing the SET but-
ton, the oldest are displayed.
•
Turn off the device using the START/STOP button or it will turn off automatically after approx. 1 minute.
Deleting measured values from the device
•
To clear the memory, press the MEM button for approx. 3 seconds when switched off.
•
flashes on the display; confirm using the SET button. When the values have been deleted, is
shown on the display and the device turns off automatically.
9. Error message/troubleshooting
If the blood pressure measurement has not been performed properly, appears on the display.
Error messages may appear if:
• : the cuff is fastened too loosely,
• : the cuff is fastened too tightly,
• : the pump pressure is too high,
• : you move or speak during the measurement,
• : there is a system or unit error.
22
In such cases, repeat the measurement. Ensure that the cuff line is correctly attached and that you do not move
or speak. If necessary, reinsert or replace the batteries.
10. Cleaning and storing the unit
•
Clean your blood pressure monitor carefully using a slightly damp cloth only.
•
Do not use any cleaning agents or solvents.
•
Under no circumstances should you hold the unit under water, as this can cause liquid to enter and damage
the unit.
•
When you store the unit, no heavy objects should be placed on top of it. Remove the batteries. The cuff line
should not be bent sharply.
11. Technical specifications
Model no. BM 90
Measurement method Oscillometric, non-invasive blood pressure measurement on the upper
arm
Measurement range Cuff pressure 0–300 mmHg, systolic 30–280 mmHg, diastolic 30–280
mmHg, pulse 40–199 beats per minute
Display accuracy systolic ± 3 mmHg/diastolic ± 3 mmHg/
pulse ± 5% of the value shown
Measurement inaccuracy max. permissible standard deviation according to clinical testing:
systolic 8 mmHg/diastolic 8 mmHg
Memory 60 memory spaces
Dimensions L 140 mm x W 60 mm x H 56 mm
Weight Approximately 471 g (without batteries)
Cuff size 22 to 42 cm
Permissible operating conditions +5°C to +40°C, ≤ 80% relative humidity (non-condensing)
Permissible storage conditions -20°C to +60°C, < 10–93% relative humidity
Ambient pressure: 800–1050 hPa
Power supply 6V
(4x 1.5V AAA)
Battery life For approx. 120 measurements, depending on levels of blood pressure
and pump pressure
Radio frequency RF 868MHz
Protection class Internal supply, IPX0, no AP or APG, continuous operation
Classification Application part type B
23
Mains part for wireless box
Model No. AMS47-0501000FV
Input 100–240V~, 50/60Hz, 0,2A
Output 5V
1,0A, only in connection with Beurer wireless connect box
Manufacturer Amigo (Global Yeou Diann Electric Industrial Co., Ltd.)
This device is double insulated / equipment class 2
Housing and pro-
Equipment enclosed to protect against contact with live parts, and with parts
tective cover
which can become live (finger, pin, hook test).
Mains part for blood pressure monitor
Model No. UE 08 WCP-060100SPA
Input 100–240V~, 50–60 Hz
Output 6V DC
, 400 mA, only in conjunction with the Beurer BM 90 blood
pressure monitor
Manufacturer Fuhua Electronic Co., Ltd.
Protection The device is double protected and has a primary-side cutout switch
which disconnects the device from the mains in case of malfunction.
Ensure that you have removed the batteries from the battery compart-
ment before you use the mains part.
Insulated/protection class 2
Housing and protective cover The housing of the mains part protects users from touching live parts or
parts that could be live (for example with finger, needle, checking hook).
The user may not touch the patient and the output connector of the AC
mains part at the same time.
Technical information is subject to change without notification to allow for updates.
•
We hereby guarantee that this product complies with the European R&TTE Directive 1999/5/EC.
Please contact the specified service address to obtain further information, such as the CE Declaration of Con-
formity.
•
This device complies with European Standard EN 60601-1-2 and is subject to particular precautions with re-
gard to electromagnetic compatibility. Please note that portable and mobile HF communication systems may
interfere with this unit. More details can be requested from the stated Customer Service address or found at the
end of the instructions for use.
24

•
This device is in line with the EU Medical Devices Directive 93/42/EC, the „Medizinproduktegesetz“ (Ger-
man Medical Devices Act) and the standards EN1060-1 (non-invasive sphygmomanometers, Part 1: General
requirements), EN1060-3 (non-invasive sphygmomanometers, Part3: Supplementary requirements for electro-
mechanical blood pressure measuring systems) and IEC80601-2-30 (Medical electrical equipment – Part 2-30:
Particular requirements for basic safety and essential performance of automated non-invasive sphygmoma-
nometers).
•
The accuracy of this blood pressure monitor has been carefully checked and developed with regard to a long
useful life.
If using the device for commercial medical purposes, it must be regularly tested for accuracy by appropriate
means. Precise instructions for checking accuracy may be requested from the service address.
25

FRANÇAIS
Chère cliente, cher client,
Nous vous remercions d’avoir choisi l’un de nos produits. Notre société est réputée pour l’excellence de ses
produits et les contrôles de qualité auxquels ils sont soumis. Nos produits couvrent les domaines de la chaleur,
du poids, de la pression sanguine, de la température corporelle, de la thérapie douce, des massages et de l’amé-
lioration de l’air.
Lisez attentivement cette notice, conservez-la pour un usage ultérieur, mettez-la à disposition des autres utilisateurs et
suivez les consignes qui y figurent.
Sincères salutations,
Votre équipe Beurer
1. Présentation
Le tensiomètre connecté à Internet est conçu pour la mesure non invasive et la surveillance des valeurs de ten-
sion artérielle des personnes adultes.
Il vous permet de mesurer rapidement et facilement votre tension. Les valeurs de mesure sont automatiquement
transmises au site web Beurer Connect. Vous pouvez le consulter via votre navigateur Internet ou une application
(iOS ou Android). Les valeurs calculées sont classées selon les directives de l’OMS et évaluées sous forme gra-
phique. Vous pouvez visualiser l’évolution ainsi que la moyenne des valeurs mesurées. Vous êtes averti en cas
d’éventuels troubles du rythme cardiaque.
2. Contenu de la livraison
Reportez-vous à la description de l’appareil et des accessoires, p. 29.
• Tensiomètre de bras
• Manchette
• Boîte de connexion
• Adaptateur secteur de la boîte de connexion
• Câble LAN
• Pochette de rangement
• 4 piles 1,5V AAA
• Guide de démarrage rapide
• Le présent mode d’emploi
Prérequis système
Routeur large bande avec prise LAN
Navigateurs pris en charge au moment de la publication
Windows ® Internet Explorer ® Version 9.0, Mozilla ® Firefox ® 11.0, Safari 5 pour Mac, Google Chrome™
18.0, Opera for computers 11.0
26
3. Conseils importants
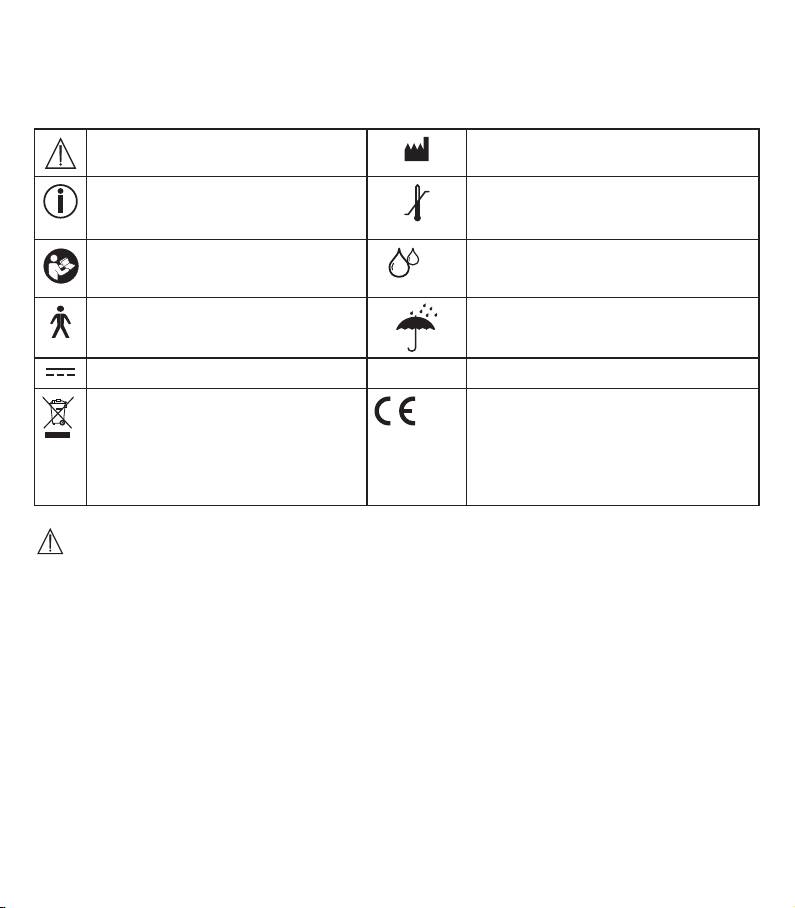
Symboles utilisés
Les symboles suivants sont utilisés sur le mode d’emploi, sur l’emballage et sur la plaque signalétique de l’appa-
reil et des accessoires:
Attention:
Fabricant
Remarque
60°C
Température de conservation admissible
Ce symbole indique des informations
-20°C
importantes.
Respectez les consignes du mode
Taux d’humidité admissible pour la conser-
d’emploi
vation
RH 10-93%
Appareil de type B
Protéger contre l‘humidité
Courant continu
SN
Numéro de série
Élimination conformément à la directive
Le sigle CE atteste
européenne 2002/96/EC - WEEE (Waste
0123
de la conformité aux exigences
Electrical and Electronic Equipment)
fondamentales de la directive
relative aux déchets d’équipements élec-
93/42/CEE relative aux dispositifs médi-
triques et électroniques
caux.
Conseils d’utilisation
•
Mesurez toujours votre tension au même moment de la journée afin que les valeurs soient comparables.
•
Avant toute mesure, reposez-vous environ 5minutes!
•
Attendez 5minutes entre deux mesures!
• Évitez de manger, boire, fumer ou d’exercer des activités physiques pendant au moins 30minutes avant la
mesure.
•
Effectuez une nouvelle mesure si vous avez un doute sur les valeurs mesurées.
•
Les mesures que vous avez établies servent juste à vous tenir informé de votre état- elles ne remplacent pas un
examen médical!
Parlez-en avec votre médecin, vous ne devez prendre aucune décision d’ordre médical sur la base de ces
seules mesures (par ex. choix de médicaments et de leurs dosages)!
• N’utilisez pas le tensiomètre sur des nouveaux-nés, des femmes enceintes et les patientes atteintes de pré-
éclampsie.
•
Une pathologie du système cardiovasculaire peut entraîner des erreurs de mesure et altérer la précision de
mesure de l’appareil, de même qu’une très faible tension artérielle, un diabète, des troubles de la circulation
sanguine et du rythme cardiaque ou encore en cas de frissons ou de tremblements.
•
Le tensiomètre ne doit pas être utilisé parallèlement à un appareil chirurgical haute fréquence.
27

•
Utilisez uniquement l’appareil sur des personnes dont le périmètre du bras correspond à celui indiqué pour
l’appareil.
•
Veuillez noter que la fonction du membre concerné peut être entravée lors du gonflage.
•
Il ne faut pas bloquer la circulation sanguine plus longtemps que nécessaire au cours de la prise de tension. Si
l’appareil ne fonctionne pas bien, retirez la manchette du bras.
•
Évitez de presser, d’aplatir ou de plier le tuyau de la manchette en le manipulant.
•
Évitez des mesures trop fréquentes ou une pression continue de la manchette. Elles entraînent une réduction
de la circulation sanguine et constituent un risque de blessure.
•
Veillez à ne pas placer la manchette sur un bras, dont les artères ou les veines sont soumises à un traitement
médical, par exemple en présence d’un dispositif d’accès intravasculaire destiné à un traitement intravasculaire
ou en cas de shunt artérioveineux.
•
N’utilisez pas la manchette si vous avez subi une mastectomie.
•
La manchette ne doit pas être positionnée sur des plaies, cela pourrait les aggraver.
•
Vous pouvez utiliser le tensiomètre avec des piles ou un adaptateur secteur. Notez que la transmission et
l’enregistrement des données n’est possible que si votre tensiomètre est alimenté. Dès que les piles sont usées
ou que l’adaptateur secteur est débranché, le tensiomètre perd la date et l’heure configurées.
•
L’arrêt automatique permet de faire passer le tensiomètre en mode économie d’énergie lorsqu’aucune touche
n’est manipulée pendant un délai d’une minute.
•
L’appareil est conçu pour l’utilisation décrite dans ce mode d’emploi. Le fabricant ne peut être tenu pour res-
ponsable des dommages causés par une utilisation inappropriée ou non conforme.
Consignes de rangement et d’entretien
•
Le tensiomètre est constitué de composants de précision et électroniques. La précision des valeurs mesurées
et la durée de vie de l’appareil dépendent d’un maniement soigné:
– Protégez l’appareil contre les chocs, l’humidité, les saletés, les fortes variations de température et l’ensoleille-
ment direct.
– Ne laissez pas tomber l’appareil.
– N’utilisez pas l’appareil à proximité de champs électromagnétiques puissants, tenez-le éloigné des installa-
tions de radio et des téléphones mobiles.
– Utilisez-le uniquement avec les manchettes fournies ou de rechange originales. Sinon, des valeurs de mesure
fausses sont transmises.
•
N’appuyez sur aucune touche tant que la manchette n’est pas placée.
•
Si l’appareil n’est pas utilisé pendant une période prolongée, il est recommandé de retirer les piles.
Consignes à propos des piles
•
Les piles sont extrêmement dangereuses si elles sont avalées. Conservez donc les piles et les produits hors
de portée des enfants en bas âge. En cas d’ingestion d’une pile, il faut immédiatement faire appel à une assis-
tance médicale.
•
Les piles ne doivent être ni rechargées, ni réactivées par d’autres méthodes, ni démontées, ni jetées au feu, ni
court-circuitées.
•
Sortez les piles de l’appareil quand elles sont usées ou si vous n’utilisez plus l’appareil pendant un moment.
Vous évitez ainsi les dommages dus à des fuites. Changez toujours toutes les piles en même temps.
•
N’utilisez pas de types, de
marques ou de capacités de piles différentes.
Utilisez de préférence des piles alcalines.
28
Consignes de réparation et d’élimination
•
Les piles ne doivent pas être jetées avec les ordures ménagères. Veuillez jeter les piles usées dans les points
de collecte prévus à cet effet.
•
N’ouvrez pas l’appareil. Le non-respect de cette consigne annulera la garantie.
•
Vous ne devez pas réparer ou ajuster l’appareil vous-même. Le bon fonctionnement de l’appareil n’est plus
garanti si tel était le cas.
•
Seul le service client Beurer ou un opérateur autorisé peut procéder à une réparation. Cependant, avant toute
réclamation, veuillez contrôler au préalable l’état des piles et les remplacer le cas échéant.
•
Veuillez éliminer l’appareil conformément à la directive européenne 2002/96/EC – WEEE (Waste Elec-
trical and Electronic Equipment) relative aux appareils électriques et électroniques usagés. Pour toute
question, adressez-vous aux collectivités locales responsables de l’élimination et du recyclage de ces
produits.
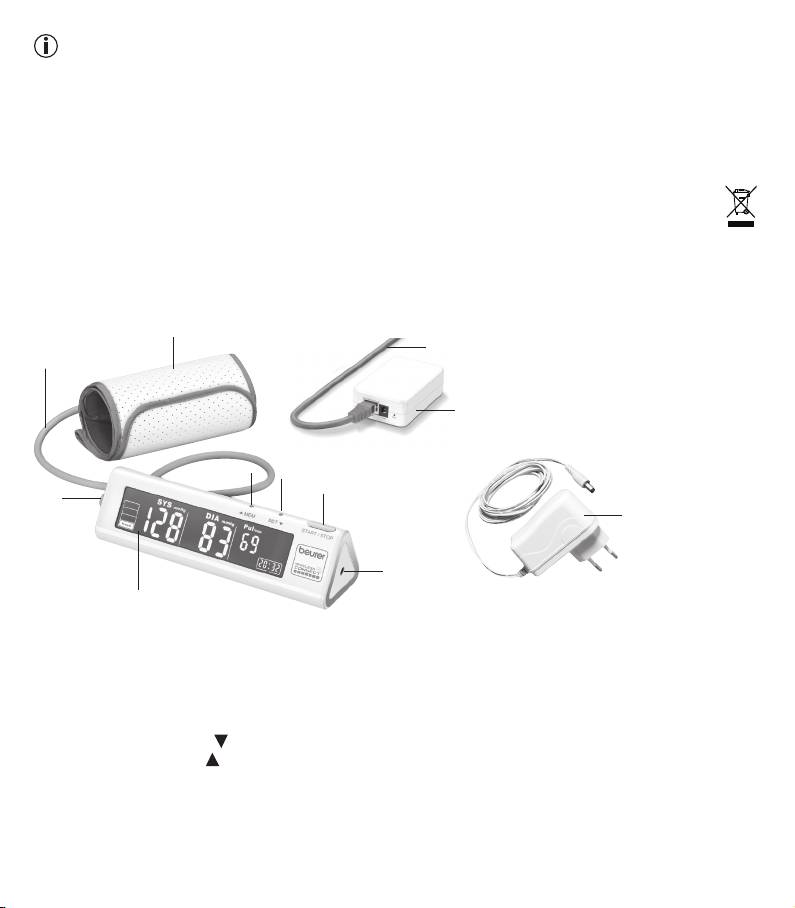
4. Description de l’appareil
1
10
2
9
8
7
6
3
11
5
4
1. Manchette
2. Tuyau de manchette
3. Prise pour la connexion à la manchette (côté gauche)
4. Écran
5. Prise pour l’adaptateur secteur
6. Touche MARCHE/ARRÊT
7. Touche de fonction SET
8. Touche mémoire MEM
9. Boîte de connexion
10. Câble LAN
11. Adaptateur secteur de la boîte de connexion
29
