Beurer BM 85: ENGLISH
ENGLISH: Beurer BM 85
ENGLISH
Dear Customer,
The recorded values are classified according to the WHO
Thank you for choosing one of our products. Our name stands
guidelines and evaluated graphically.
for high-quality, thoroughly tested products for applications in
This blood pressure monitor also has a haemodynamic stability
the areas of heat, weight, blood pressure, body temperature,
display, which is referred to as a resting indicator throughout
pulse, gentle therapy, massage and air. Please read these
these instructions for use. This shows whether you, and con-
instructions for use carefully and keep them for later use, be
sequently your circulatory system, are sufficiently at rest when
sure to make them accessible to other users and observe the
the blood pressure measurement is being taken and is there-
notes they contain.
fore a more precise indicator of your resting blood pressure.
Read more about this in section 6.
With kind regards,
Store these instructions for use for future reference and make
Your Beurer team
them accessible to other users.
1. Getting to know your instrument
2. Important notes
Check that the packaging of the Beurer BM85 blood pressure
Signs and symbols
monitor has not been tampered with and make sure that all the
required contents are present. Before use, ensure that there
The following symbols are used in these instructions for use,
is no visible damage to the device or accessories and that all
on the packaging and on the type plate for the device and the
packaging material has been removed. If you have any doubts,
accessories:
do not use the device and contact your retailer or the specified
Attention
Customer Services address.
The upper arm blood pressure monitor is used to carry out
non-invasive measurement and monitoring of the arterial blood
Note
pressure values in adults.
Note on important information
This allows you to quickly and easily measure your blood pres-
sure, save the measurements and display the development and
Observe the instructions for use
average values of the measurements taken.
You are also warned of possible existing cardiac arrhythmia.
19
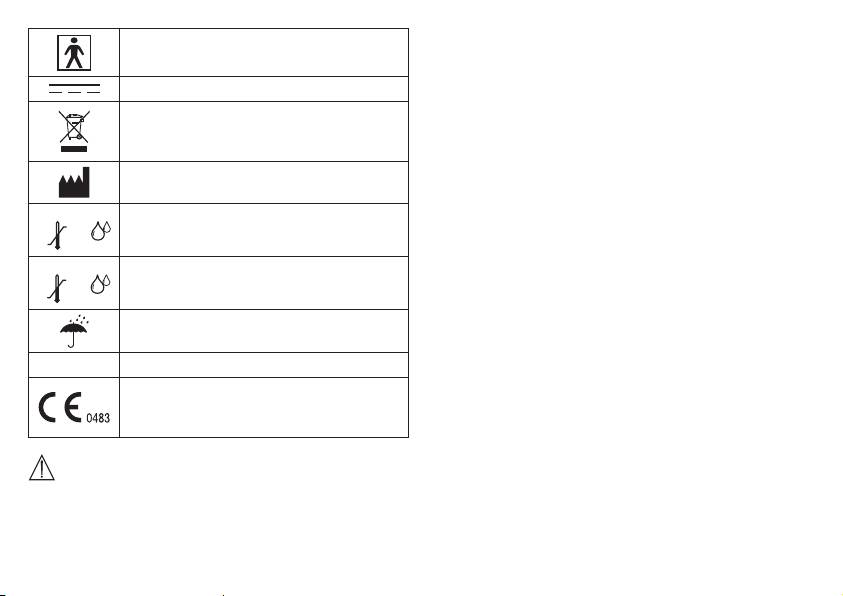
Application part, type BF
Direct current
Disposal in accordance with EC Directive
WEEE (Waste Electrical and Electronic
Equipment)
Manufacturer
20
Storage
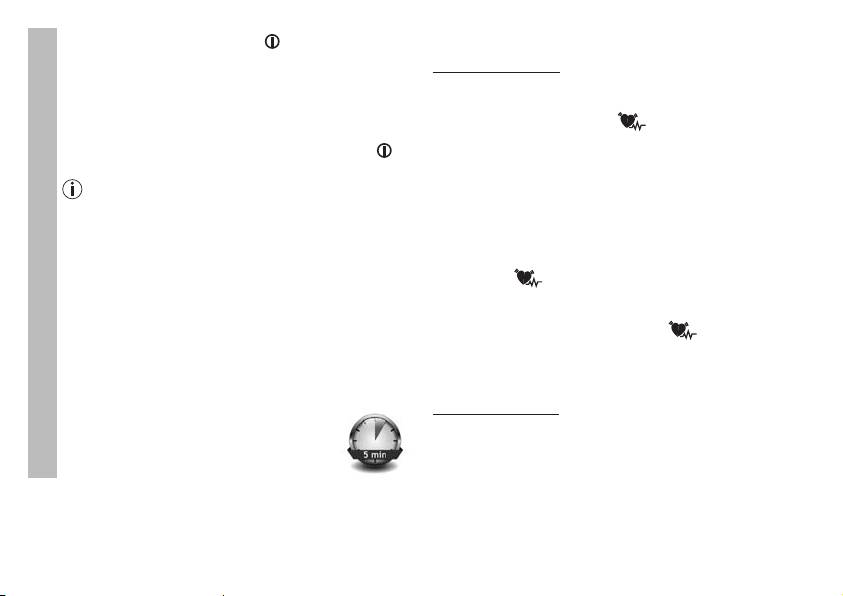
•
If you want to perform several measurements on the same
person, wait five minutes between each measurement.
•
Do not take a measurement within 30 minutes of eating,
drinking, smoking or exercising.
•
Repeat the measurement if you are unsure of the measured
value.
•
The measurements taken by you are for your information
only – they are no substitute for a medical examination!
Discuss the measurements with your doctor and never base
any medical decisions on them (e.g. medicines and their
administration)!
Permissible storage temperature and humi-
55°C
•
Do not use the blood pressure monitor on newborns or
dity
-20°C
RH ≤90%
patients with preeclampsia. We recommend consulting a
doctor before using the blood pressure monitor during preg-
Operating
Permissible operating temperature and
40°C
nancy.
humidity
10°C
RH ≤90%
•
Cardiovascular diseases may lead to incorrect measure-
ments or have a detrimental effect on measurement ac-
Protect from moisture
curacy. The same also applies to very low blood pressure,
diabetes, circulatory disorders and arrhythmias as well as
SN Serial number
chills or shaking.
•
The blood pressure monitor must not be used in connection
The CE labelling certifies that the product
with a high-frequency surgical unit.
complies with the essential requirements of
•
Only use the unit on people that have the specified upper
Directive 93/42/EEC on medical products.
arm measurement for the unit.
•
Please note that when inflating, the functions of the limb in
Notes on use
question may be impaired.
•
During the blood pressure measurement, the blood circula-
•
In order to ensure comparable values, always measure your
tion must not be stopped for an unnecessarily long time. If
blood pressure at the same time of day.
the device malfunctions remove the cuff from the arm.
•
Before every measurement, relax for about five minutes.
•
Avoid any mechanical restriction, compression or bending of
– Do not use the device in the vicinity of strong electromag-
the cuff line.
netic fields and keep it away from radio systems or mobile
•
Do not allow sustained pressure in the cuff or frequent meas-
telephones.
urements. The resulting restriction of the blood flow may
– Only use the cuff included with the delivery or original
cause injury.
replacement parts. Otherwise incorrect measurements will
•
Make sure that the cuff is not placed on an arm in which the
be recorded.
arteries or veins are undergoing medical treatment, e.g. in-
•
Do not press the buttons before the cuff is placed on the arm.
travascular access or intravascular or therapy, or an arterio-
Notes on batteries
venous (AV) shunt.
•
Do not use the cuff on people who have undergone a mas-
•
Swallowing batteries can be extremely dangerous. Keep the
tectomy.
batteries and products out of the reach of small children. If a
•
Do not place the cuff over wounds as this may cause further
battery has been swallowed, seek medical attention immedi-
injury.
ately.
•
Please note that data transfer and data storage is only pos-
•
Batteries must not be taken apart, thrown into an open fire or
sible when your blood pressure monitor is supplied with
short circuited.
power. As soon as the battery is empty, the blood pressure
monitor loses the date and time setting.
The codes below are printed on batteries
•
To conserve the battery, the blood pressure monitor switches
containing harmful substances:
off automatically if you do not press any buttons for 3 minutes.
Pb: battery contains lead,
•
The device is only intended for the purpose described in
Cd: battery contains cadmium,
these instructions for use. The manufacturer is not liable for
Hg: battery contains mercury.
damage resulting from improper or careless use.
Instructions for repairs and disposal
Instructions for storage and maintenance
•
Do not repair or adjust the device yourself. Proper operation
•
The blood pressure monitor is made from precision and elec-
can no longer be guaranteed in this case.
tronic components. The accuracy of the measurements and
•
Repairs must only be carried out by Customer Services or
service life of the device depend on its careful handling:
authorised suppliers.
– Protect the device from impacts, humidity, dirt, marked
•
Do not open the device, except during disposal. In this case,
temperature fluctuations and direct sunlight.
remove the installed battery. Failure to comply will invalidate
– Do not drop the device.
the warranty.
21
•
Batteries must not be disposed of with household waste.
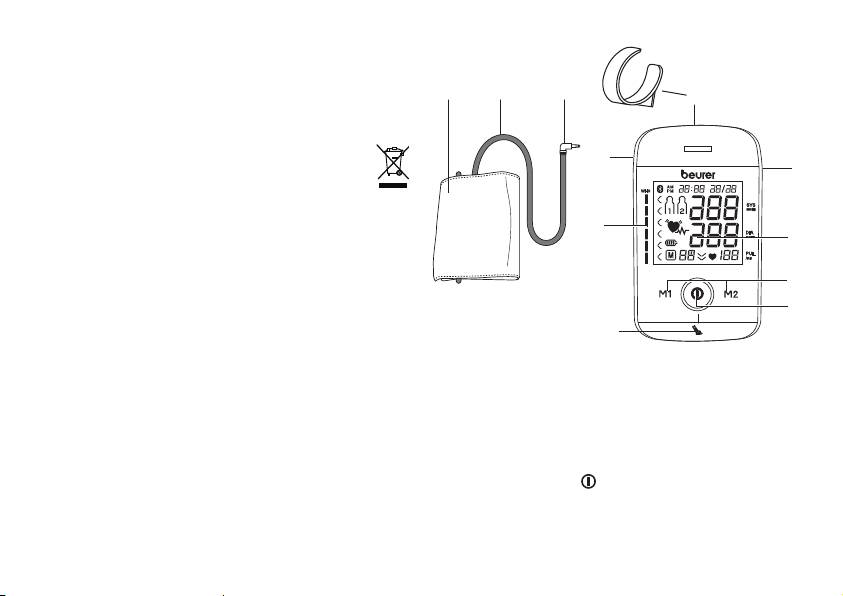
3. Unit description
Please dispose of batteries at the collection points intended
for this purpose.
•
Remove the battery before disposing of the device. Undo the
1 2 3
4
four, round rubber covers on the rear of the device to remove
the battery. Unscrew the housing. Remove the battery and
dispose of it correctly.
•
Please dispose of the device in accordance with EC
11
5
Directive – WEEE (Waste Electrical and Electronic
Equipment).
If you have any queries, please contact the appropriate local
authorities.
10
6
7
8
9
1. Cuff
2. Cuff line
3. Cuff connector
4. Cuff holder
5. USB interface
6. Display
7. Memory buttons M1/M2
8. START/STOP button
9. Resting indicator display
10. WHO scale
11. Connection for cuff connector (left-hand side)
22
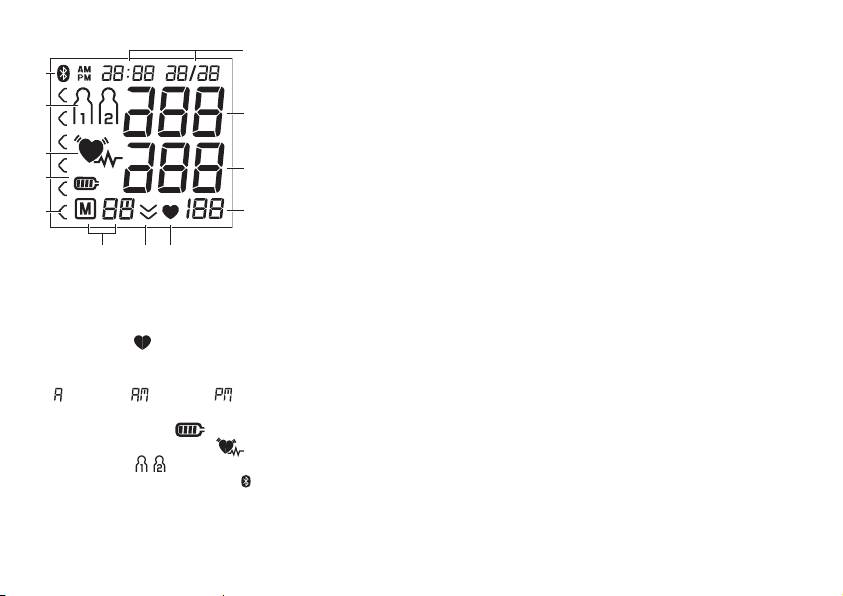
Information on the display:
USB interface
1
The blood pressure monitor also allows you to transfer your
12
measured values to the PC.
To do this you require a commercially available USB cable
11
(included in delivery) and the Beurer “HealthManager” PC
2
software.
The software can be downloaded free of charge from the
10
download area under Service at www.beurer.com.
3
9
System requirements for the Beurer “HealthManager” PC
software.
8
4
1. Supported operating systems:
• Windows XP SP3
567
• Windows Vista SP1 or later
1. Time/date
• Windows 7
2. Systolic pressure
• Windows 7 SP1
3. Diastolic pressure
• Windows 8
4. Calculated pulse value
2. Supported architectures:
5. Pulse symbol
• x86 (32 bit)
6. Release air (arrow)
• x64 (64 bit)
7. Number of memory space/memory display average value
3. Hardware requirements:
( ), morning ( ), evening ( )
• Recommended: at least Pentium 1 GHz or faster with at
8. WHO classification
least 1 GB RAM
9. Battery level symbol
• Free memory on the primary partition of at least:
10. Cardiac arrhythmia symbol
– x86 – 600 MB
11. User memory
– x64 – 1.5 GB
12. Symbol for Bluetooth® transfer
• Graphic resolution from: 1024 x 768 pixels
• USB port 1.0 or later
23
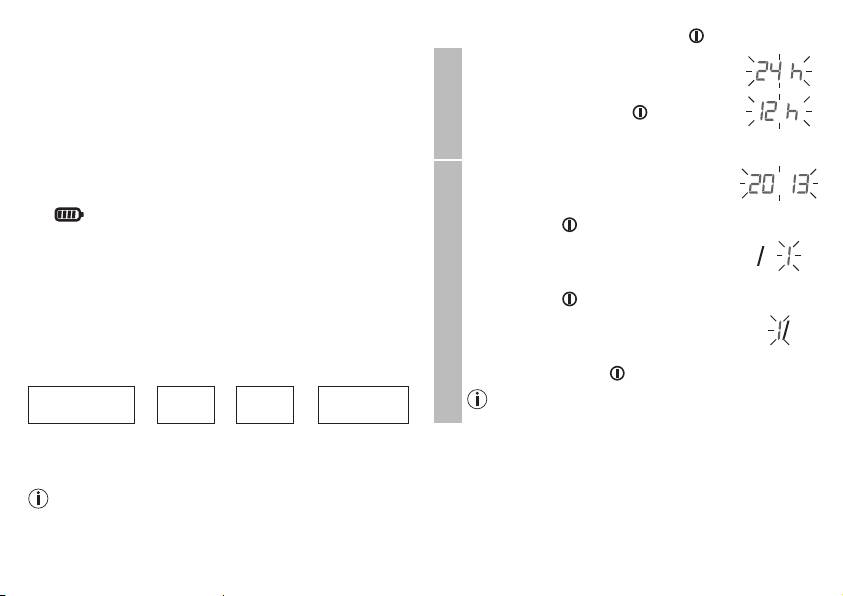
4. Preparing for the measurement
Press and hold the START/STOP button
for 5 seconds.
Completely charge up the blood pressure monitor before ta-
The hour format now flashes on the display.
king your first measurement:
•
Select the desired hour format using the
•
Using a PC:
M1/M2 memory buttons and confirm with
Insert the USB cable into the USB interface on the device
the START/STOP button .
and directly connect it to your PC.
Hour format
•
Using the mains part
Insert the USB cable into the blood pressure monitor and
The year flashes on the display.
connect it to mains supply using the enclosed USB mains
•
Select the year using the M1/M2 memory
part.
buttons and confirm with the START/
The symbol is shown once the device is fully charged.
STOP button
.
Charge the battery if the battery level symbol flashes. If the
The month flashes on the display.
device's battery has been completely drained and you are
•
Select the month using the M1/M2 mem-
unable to switch it on again, you must reset the date, time and
ory buttons and confirm with the START/
®
Bluetooth
settings. In this process, any saved measurements
Date
STOP button .
are retained.
The day flashes on the display.
® settings
Set the hour format, date, time and Bluetooth
•
Select the current day using the M1/M2
The following section describes the functions and settings
memory buttons and confirm with the
available on the blood pressure monitor.
START/STOP button .
®
Bluetooth
If you have set the 12h hour format, the month is
Hour format
➔
Date
➔
Time
➔
settings
displayed before the day.
It is essential to set the correct date and time. Otherwise, you
will not be able to save your measured values correctly with a
date and time and access them again later.
If you press and hold the M1 or M2 memory button, you
can set the values more quickly.
24
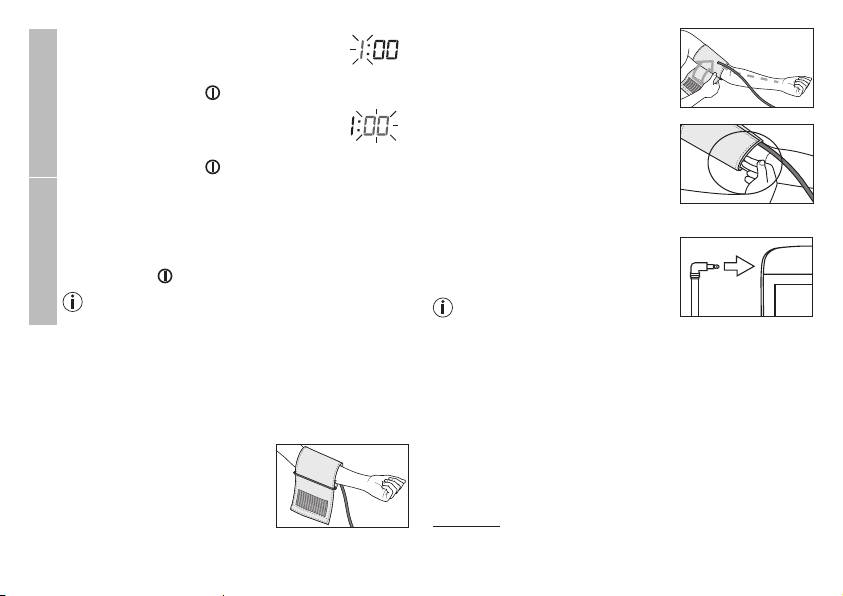
The cuff must be placed on the upper
The hours flash on the display.
arm so that the bottom edge is
•
Select the current hours using the M1/
positioned 2 – 3 cm above the elbow
M2 memory buttons and confirm with the
and over the artery. The line points to
START/STOP button .
the centre of the palm.
Time
The minutes flash on the display.
•
Choose the current minutes using the M1/
Now tighten the free end of the cuff,
M2 memory buttons and confirm with the
but make sure that it is not too tight
START/STOP button .
around the arm and close the hook-
®
and-loop fastener. The cuff should be
The Bluetooth
symbol flashes on the display.
fastened so that two fingers fit under
•
Use the M1/M2 memory buttons to choose whether
®
the cuff.
automatic Bluetooth
data transfer is activated (Blue-
settings
®
®
tooth
symbol flashes) or deactivated (Bluetooth
Now insert the cuff line into the
®
symbol is not shown) and confirm with the START/
connection for the cuff connector.
STOP button .
®
Bluetooth
transfers will reduce the battery capacity.
If the measurement is performed
Bluetooth
on the right upper arm, the line
should be located on the inside of
5. Measuring blood pressure
your elbow. Ensure that your arm is
Please ensure the unit is at room temperature before measu-
not pressing on the line.
ring.
Blood pressure may vary between the right and left arm, which
The measurement can be performed on the left or right arm.
may mean that the measured blood pressure values are diffe-
Attaching the cuff
rent. Always perform the measurement on the same arm.
Place the cuff on to the bare left upper
If the values between the two arms are significantly different,
arm. The circulation of the arm must
please consult your doctor to determine which arm should be
not be hindered by tight clothing or
used for the measurement.
similar.
Important:
The unit may only be operated with the original cuff.
The cuff is suitable for an arm circumference of 22 to 36 cm.
25
A larger cuff for upper-arm circumferences of 35 to 44 cm
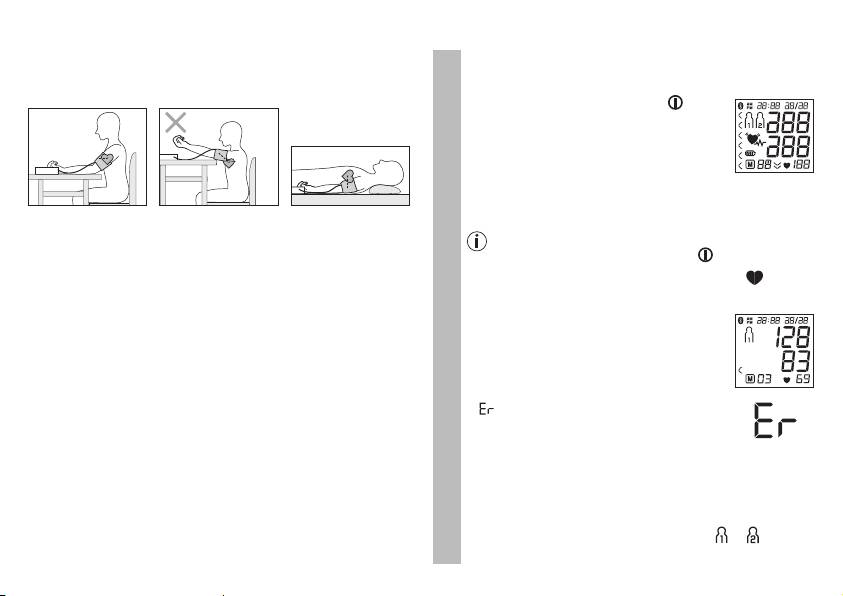
Performing the blood pressure measurement
can be obtained from specialist retailers or from the service
As described above, attach the cuff and adopt the po-
address using order number 163.387.
sture in which you want to perform the measurement.
Adopting the correct posture
•
Press the
START/STOP button to start
the blood pressure monitor.
All display elements are briefly displayed.
The blood pressure monitor will begin the
measurement automatically after 3 se-
conds. The measurement is taken during
the inflation phase.
•
Before every measurement, relax for about five minutes. Oth-
erwise deviations can occur.
You can cancel the measurement at any time by
•
You can take the measurement while sitting or lying. Make
pressing the START/STOP button .
sure that the cuff is at heart level.
As soon as a pulse is found, the pulse symbol
is
•
To take your blood pressure, make sure you are sitting com-
displayed.
fortably with your arms and back leaning on something. Do
•
Systolic pressure, diastolic pressure and
not cross your legs. Place your feet flat on the ground.
pulse readings are displayed. The resting
•
To avoid falsifying the measurement, it is important to remain
Measurement
indicator display (see section 6) illumi-
still during the measurement and not to speak.
nates in accordance with the positive or
negative classification.
•
appears if the measurement could not
be performed properly (see section 10
“Error messages/troubleshooting”). Re-
peat the measurement.
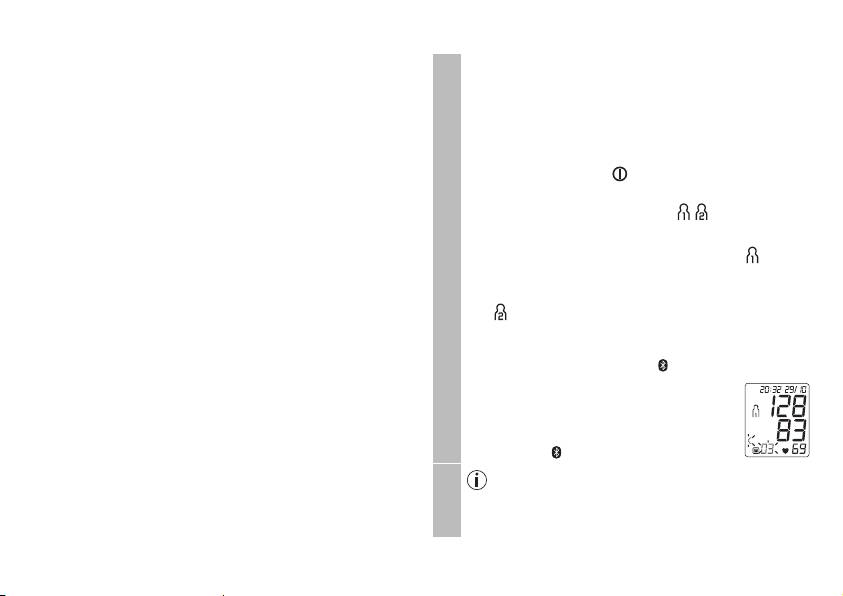
•
Now select the desired user memory by pressing the
M1 or M2 memory buttons. If you do not select a user
memory, the measurement is stored in the most re-
cently used user memory. The relevant or symbol
appears on the display.
26
6. Evaluating results
•
Press the START/STOP button to switch off the
blood pressure monitor. The measurement is then
Cardiac arrhythmia:
stored in the selected user memory.
This unit can identify potential disruptions of the heart rhythm
If Bluetooth® data transfer has been activated, data is
when measuring and if necessary, indicates this after the
transferred after having confirmed the user memory. The
measurement with the symbol
.
®
blood pressure monitor shows the Bluetooth
symbol
This can be an indicator for arrhythmia. Arrhythmia is a condi-
during data transfer. Press the START/STOP button
tion in which the heart rhythm is abnormal because of flaws in
once again to switch off the blood pressure monitor.
the bioelectrical system that regulates the heartbeat. The sym-
Please note that you must add the blood pressure
ptoms (skipped or premature heart beats, pulse being slow or
monitor in “My devices” in the Beurer “HealthManag-
too fast) can be caused by factors such as heart disease, age,
er” app to enable data transfers. The Beurer “Health-
physical make-up, excess stimulants, stress or lack of sleep.
Manager” app must be active to allow data transfers.
Arrhythmia can only be determined through an examination by
If the current data is not displayed on your smart-
your doctor.
phone, repeat the transfer as described in Chapter 8.
If the symbol is shown on the display after the measure-
Measurement
If you forget to turn off the blood pressure monitor, it will
ment has been taken, it should be repeated. Please ensure that
switch off automatically after approximately 3 minutes. In
you rest for 5 minutes beforehand and do not speak or move
this case too, the value is stored in the selected or most
during the measurement. If the symbol appears frequent-
recent user memory and the data is transferred if Blue-
ly, please consult your doctor.
®
®
tooth
data transfer has been activated. The Bluetooth
Self-diagnosis and treatment based on the measurements can
symbol appears on the blood pressure monitor display
be dangerous. Always follow your GP’s instructions.
during data transfer.
WHO classification:
•
Wait at least 5 minutes before taking an-
In accordance with the guidelines/definitions of the World
other measurement!
Heath Organization and the latest findings, the measurements
can be classified and assessed according to the following
table.
However, these standard values serve only as a general
guideline, as the individual blood pressure varies in different
people and different age groups etc.
27

It is important to consult your doctor regularly for advice. Your
Resting indicator measurement (using HSD diagnostics)
doctor will tell you your individual values for normal blood
The most frequent error made when measuring blood pressure
pressure as well as the value above which your blood pressure
is taking the measurement when not at rest (haemodynamic
is classified as dangerous.
stability), which means that both the systolic and the diastolic
The classification on the display and the scale on the unit
blood pressures are incorrect in this case. While measuring the
show which category the recorded blood pressure values fall
blood pressure, the device automatically determines whether
into. If the values of systole and diastole fall into two different
you are at rest or not. If there is no indication that the circula-
WHO categories (e.g. systole in the 'High normal' category and
tory system is not sufficiently at rest, the
symbol (haemo-
diastole in the 'Normal' category), the graphical WHO classifi-
dynamic stability) lights up green and the measurement can be
cation on the device always shows the higher category; for the
recorded as a reliable blood pressure at rest value.
example given this would be 'High normal'.
GREEN: haemodynamically stable
Blood pressure
Systole
Diastole
Measurement of the systolic and diastolic pressure is increa-
Action
value category
(in mmHg)
(in mmHg)
sed when the circulatory system is sufficiently at rest and is a
very reliable indicator of resting blood pressure.
Grade 3:
seek medical at-
However, if there is an indication that the circulatory system
severe hyper-
≥ 180 ≥ 110
tention
is not sufficiently at rest (haemodynamic instability), the
tension
symbol lights up red.
Grade 2:
seek medical at-
In this case, the measurement should be repeated after a pe-
moderate hyper-
160 – 179 100 – 109
tention
riod of physical and mental rest. The blood pressure measure-
tension
ment must be taken when the patient is physically and mental-
Grade 1:
regular monitoring
ly rested, as it will be the basis for a diagnosis and regulation of
mild hyperten-
140 – 159 90 – 99
by doctor
the patient’s medical treatment.
sion
RED: lack of haemodynamic stability
regular monitoring
High normal 130 – 139 85 – 89
by doctor
It is very probable that the systolic and diastolic blood pres-
sures have not been measured whilst the patient is at rest and
Normal 120 – 129 80 – 84 self-monitoring
the resting blood pressure measurement has therefore been
Optimal < 120 < 80 self-monitoring
distorted.
Source: WHO, 1999 (World Health Organization)
Repeat the measurement after a rest and relaxation period of
at least five minutes. Go to a sufficiently quiet and comfortable
28
spot and remain there calmly; close your eyes, breathe deeply
7. Displaying and deleting measurements
and evenly and try to relax.
The results of every successful measurement are stored
If the next measurement also shows insufficient stability, you
together with the date and time. The oldest measurement
can repeat the measurement after another resting period. If the
is overwritten in the event of more than 60 measure-
measurements continue to show some instability, identify the-
ments.
se blood pressure measurements as having been taken when
the circulatory system had not been sufficiently rested.
•
To access memory recall mode, the blood pressure
In this case, nervousness or inner anxiety may be the cau-
monitor must first be started. To do this press the
se and this cannot be cured by brief periods of rest. Existing
START/STOP button .
cardiac arrhythmias may also prevent a stable blood pressure
•
Within 3 seconds of the full-screen display appearing,
measurement.
select the desired user memory ( ) with the M1 or
A lack of resting blood pressure can have various causes,
M2 memory button.
such as physical or mental strain or distraction, speaking or
–
To view the measurements for user memory , press
experiencing cardiac arrhythmias during the blood pressure
the M1 memory button.
measurement.
In an overwhelming number of cases, the HSD diagnosis will
User memory
–
To view the measurements for user memo-
give a very good guide as to whether the circulatory system
ry , press the M2 memory button.
is rested when taking the measurement. Certain patients
Your last measurement will appear on the
suffering from cardiac arrhythmia or chronic mental condi-
display.
tions can remain haemodynamically unstable in the long-term,
®
If Bluetooth
is activated (the symbol
something which persists even after repeated periods of rest.
appears on the display), measurements are
The accuracy of the resting blood pressure results is redu-
automatically transferred.
ced in these users. Like any medical measurement method,
Press the M1/M2 button to cancel data
the precision of the HSD diagnosis is limited and can lead to
transfer. The device will show average
incorrect results in some cases. The blood pressure measure-
values. The symbol is no longer shown.
ments taken when the circulatory system was at rest represent
Press the M1 memory button if you have selected
particularly reliable results.
user memory 1.
P
ress the M2 memory button if you have selected
user memory 2.
29
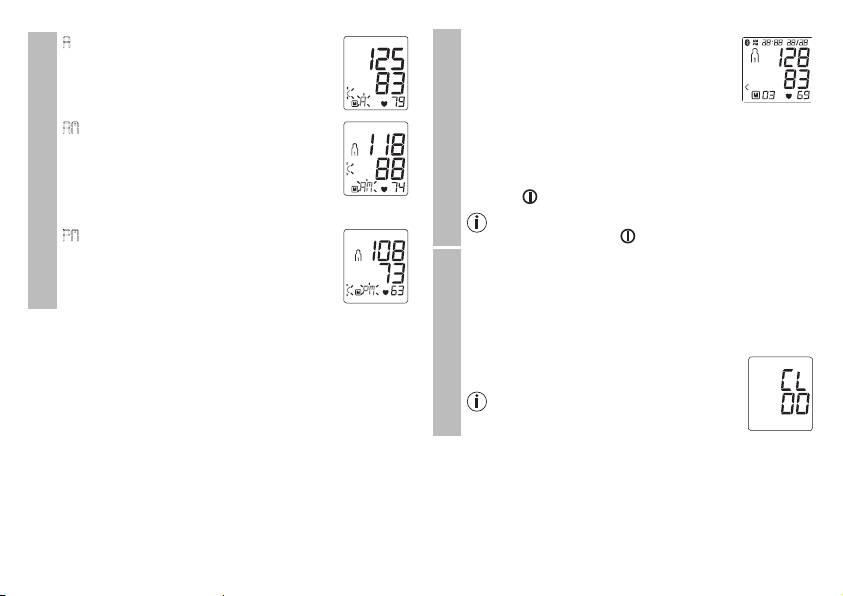
A
flashes on the display.
•
When the relevant memory button (M1 or
The average value of all saved measured
M2) is pressed again, the last individual
values in this user memory is displayed.
measurement is displayed (in this example,
measurement 03).
•
When the relevant memory button (M1 or M2) is
AM
flashes on the display.
pressed again, you can view your individual measure-
The average value of the morning measure-
ments.
ments for the last 7 days is displayed (mor-
ning: 5.00 a.m. – 9.00 a.m.).
•
To switch the device off again, press the START/STOP
button .
Average values
•
Press the relevant memory button (M1 or M2).
Individual measured values
You can exit the menu at any time by pressing the
PM
flashes on the display.
START/STOP button .
The average value of the evening measure-
•
To clear the memory of the relevant user memory, you
ments for the last 7 days is displayed (eve-
must first select a user memory.
ning: 6.00 p.m. – 8.00 p.m.).
•
Start individual measurement access.
•
Press and hold the M1/M2 memory buttons for 5 sec-
onds.
All the values in the current user memory are
deleted.
It is not possible to delete individual
measurements.
Deleting measured values
30
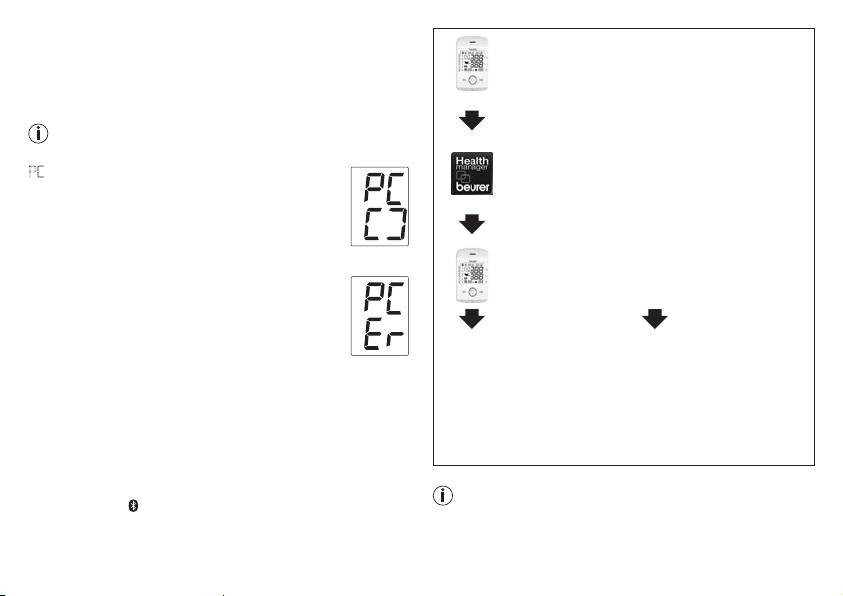
8. Transferring measurements
Step 1: BM 85
®
Transfers using the USB interface
activate Bluetooth
on your device (see section
4 “Preparing for the measurement, Blue-
Connect the blood pressure monitor to your PC using the USB
®
tooth
”).
cable.
No data transfer may be launched whilst performing a
measurement.
Step 2: Beurer “HealthManager” app
In the Beurer “HealthManager” app, add the
PC
is shown on the display.
BM 85 under “Settings/My devices”.
Begin the data transfer in the “HealthManager” PC
software. During the data transfer, an animation is
shown on the display. A successful data transfer is
displayed as in figure 1. If the data transfer is
f
ig. 1
Step 3: BM 85
unsuccessful, an error message appears as in
figure 2. In this case, interrupt the PC connection
take a measurement.
and start the data transfer again.
After 30 seconds of not being in use or if communi-
cation with the PC is interrupted, the blood pressu-
Step 4: BM 85
Step 4: BM 85
re monitor switches itself off automatically.
f
ig. 2
data transfer immediately
Data transfer at a later point:
®
Bluetooth
Smart transfers
following measurements.
•
go to memory mode
It is also possible to transfer the measured values saved on the
•
Select the desired user
(chapter 7). Select the
®
®
device to your smartphone using Bluetooth
Smart.
memory. Start Bluetooth
desired user memory.
®
You will need the Beurer „HealthManager“ app for this. The
data transfer (chapter 5)
Bluetooth
data transfer
app is available from the App Store.
starts automatically.
Proceed as follows to transfer values:
®
data is transferred if Bluetooth
has been activated in the set-
The Beurer “HealthManager” app must be active to allow
tings menu. The symbol appears in the top left of the display
data transfers.
(see section 4 “Preparing for the measurement”).
31
®
If your smartphone has a protective cover, remove this to ensu-
• the data could not be sent via Bluetooth
(
).
re that there is no interference during the transfer. Begin the
In such cases, repeat the measurement and/or the data trans-
data transfer in the Beurer “HealthManager” app.
fer. Ensure that the cuff line is correctly attached and that you
9. Cleaning and storing the unit
do not move or speak during the measurement.
•
Clean the unit and cuff carefully using a slightly damp cloth
Technical alarm – description
only.
Should the recorded blood pressure (systolic or diastolic) lie
•
Do not use any cleaning agents or solvents.
outside the limits specified in the section “Technical specifica-
•
Under no circumstances should you hold the unit under wa-
tions”, the technical alarm will appear on the display indicating
ter, as this can cause liquid to enter and damage the unit.
either “
” or “ Lo ”. In such cases, you should seek medical as-
•
If you store the unit, no heavy objects should be placed on
sistance and check the accuracy of your procedure.
top of it. The cuff line should not be bent sharply.
The limit values for the technical alarm are factory set and can-
not be adjusted or deactivated. These alarm limit values are
1
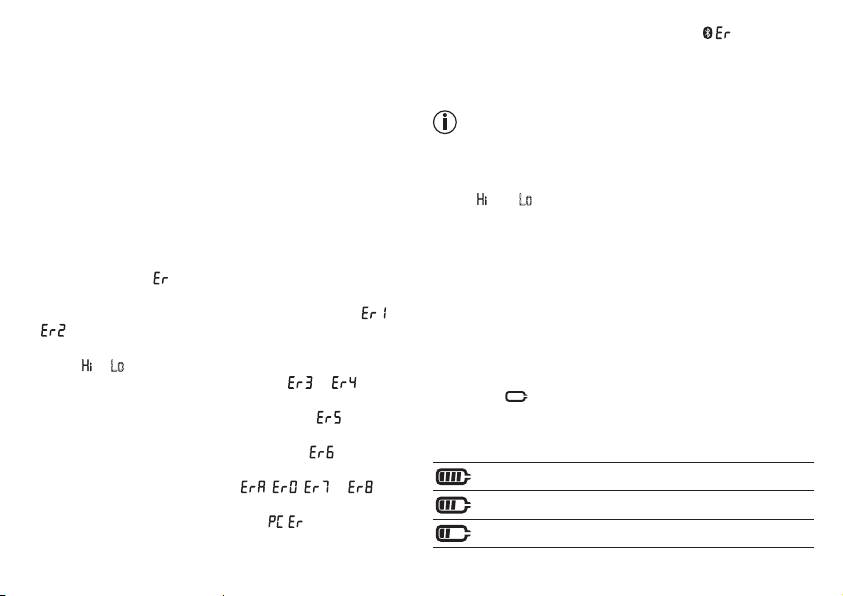
0. Error messages/trouble-shooting
accorded second priority under the standard IEC 60601-1-8.
In case of faults, the _ message appears in the display.
The technical alarm is a non-locking alarm and must not be
Error messages may appear if:
reset. The signal shown on the display will disappear automati-
•
systolic or diastolic pressure could not be measured ( or
cally after about 8 seconds.
appears on the display)
•
systolic or diastolic pressure was outside the measurement
11. Battery
range ( or Lo appears on the display)
The BM 85 is equipped with a lithium ion battery (3.7V/400
•
the cuff is fastened too tightly or loosely ( or appears
mAh). If the symbol flashes, you must charge the battery
on the display)
for a minimum of two hours using the enclosed cable. Rechar-
•
the pump pressure is higher than 300 mmHg ( appears
ge the battery to between 50 and 75 % of its capacity at least
on the display)
twice a year to achieve a maximum battery service life.
•
pumping up takes longer than 160 seconds ( appears on
the display)
Device charged (75% - 100%)
•
there is a system or device error ( , , or ap-
pears on the display)
Device charged (50% – 75%)
•
the data could not be sent to the PC ( appears in the
Device charged (25% - 50%)
display).
32
< 25%
Cuff size 22 to 36 cm
Permissible operating
+ 10 °C to + 40 °C, ≤ 90 % relative humi-
You can take a maximum of 10 measurements
conditions
dity (non-condensing)
(flashes)
Permissible storage
-20 °C to + 55 °C, ≤ 90 % relative humi-
®
conditions
dity, 800 –1050 hPa ambient pressure
The Bluetooth
word mark and logos are registered trademarks
®
owned by Bluetooth
SIG, Inc. and any use of such marks by
Power supply DC 5 V
600mA lithium ion battery
Beurer GmbH is under license. Other trademarks and trade
3.7 V/400mAh
names are those of their respective owners.
Battery life For approx. 50 measurements, depen-
ding on levels of blood pressure and
12. Technical specifications
pump pressure
Model no. BM 85
Accessories Cuff, cuff holder, instructions for use,
Measurement me-
Oscillometric, non-invasive blood pres-
USB mains part, USB cable, storage
thod
sure measurement on the upper arm
pouch
Measurement range Cuff pressure 0 – 300 mmHg,
Classification Internal supply, IPX0, no AP or APG,
systolic 60 – 260 mmHg,
continuous operation, application part
diastolic 40 – 199 mmHg,
type BF
pulse 40 –180 beats /minute
Data transfer via
The blood pressure monitor uses Blue-
Display accuracy Systolic ± 3 mmHg,
Bluetooth® wireless
tooth® Smart (low energy),
diastolic ± 3 mmHg,
technology
2.4 GHz frequency band,
pulse ± 5 % of the value shown
Compatible with Bluetooth 4.0 smart-
phones/tablets
Measurement inac-
Max. permissible standard deviation
curacy
according to clinical testing:
List of supported smartphones/tablets
systolic 8 mmHg /
diastolic 8 mmHg
Memory 2 x 60 memory spaces
Dimensions L 180 mm x W 99 mm x H 40 mm
Weight Approximately 317 g (without cuff)
33
Technical information is subject to change without notification
1
3. Mains part
to allow for updates.
Model No. OH-1048A0500600U2 VDE
•
This device complies with European Standard EN60601-
Input 100 – 240 V AC, 50 – 60 Hz; 120-60 mA
1-2 and is subject to particular precautions with regard to
Output 5 V DC, 600 mA, in conjunction with Beurer
electromagnetic compatibility. Please note that portable and
blood pressure monitors only
mobile HF communication systems may interfere with this
Manufac-
Dongguan Oriental Hero Ele. Co., LTD.
unit. More details can be requested from the stated Custom-
turer
er Services address or found at the end of the instructions
for use.
Protection The device is double protected and has a pri-
•
This device corresponds to the EU Medical Devices Directive
mary-side cutout switch which disconnects the
93/42/EC, the German Medical Devices Act (Medizinproduk-
device from the mains in case of malfunction.
tgesetz) and the standards EN1060-1 (non-invasive sphyg-
Polarity of the the DC voltage connection
momanometers, Part 1: General requirements), EN1060-3
(non-invasive sphygmomanometers, Part 3: Supplementary
Insulated / protection class 2
requirements for electro-mechanical blood pressure measur-
Housing and
The housing of the mains part protects users
ing systems) and IEC80601-2-30 (Medical electrical equip-
protective
from touching live parts or parts that could be
ment – Part 2 – 30: Particular requirements for the basic
covers
live (for example with their fingers, or with a
safety and essential performance of automated non-invasive
needle or checking hook).
sphygmomanometers).
The user must not touch the patient and the
•
The accuracy of this blood pressure monitor has been care-
output connector of the AC mains part at the
fully checked and developed with regard to a long useful
same time.
life. If using the device for commercial medical purposes, it
must be regularly tested for accuracy by appropriate means.
Precise instructions for checking accuracy may be requested
from the service address.
•
We hereby guarantee that this product complies with the
European R&TTE Directive 1999/5/EC.
Please contact the specified service address to obtain fur-
ther information, such as the CE Declaration of Conformity.
34
