Asus P5W – страница 9
Инструкция к Материнской Плате Asus P5W
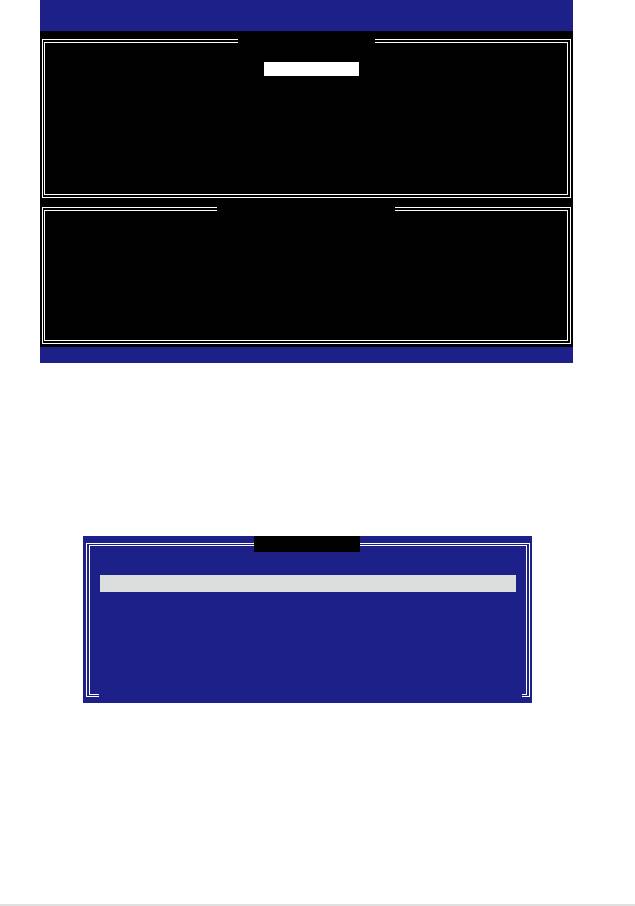
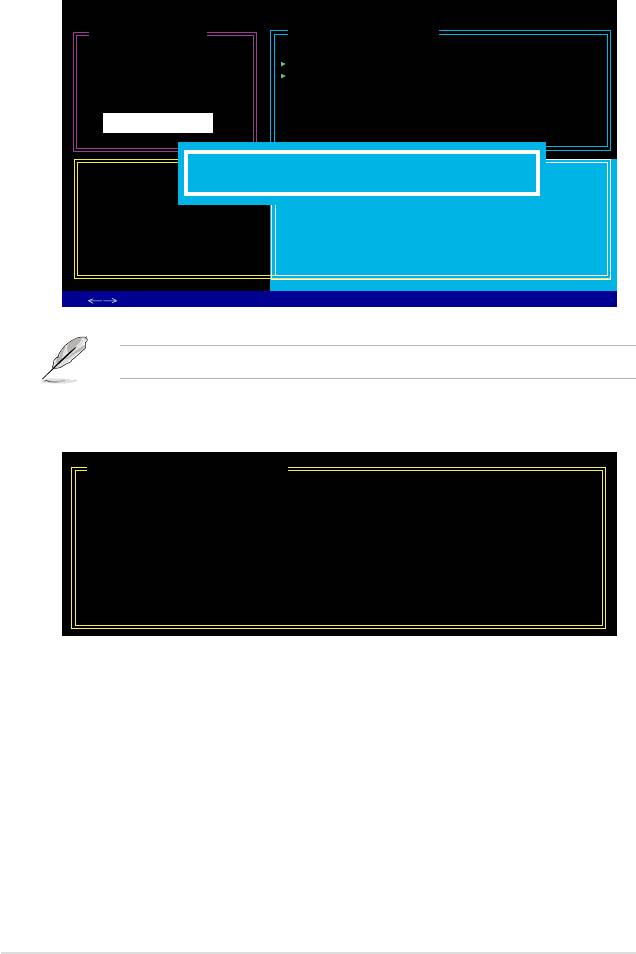
Intel(R) Matrix Storage Manager Option ROM v5.0.0.1032 ICH8R wRAID5
Copyright(C) 2003-05 Intel Corporation. All Rights Reserved.
[ CREATE ARRAY MENU ]
Name:
Volume0
RAID Level:
RAID0(Stripe)
Disks:
Select Disks
Strip Size:
128KB
Capacity:
0.0 GB
Create Volume
[ DISK/VOLUME INFORMATION ]
Enter a string between 1 and 16 characters in length that can be used
touniquelyidentifytheRAIDvolume.Thisnameiscasesensitiveand
cannot contain special characters.
[↑↓]-Change [TAB]-Next [ESC]-Previous Menu [Enter]-Select
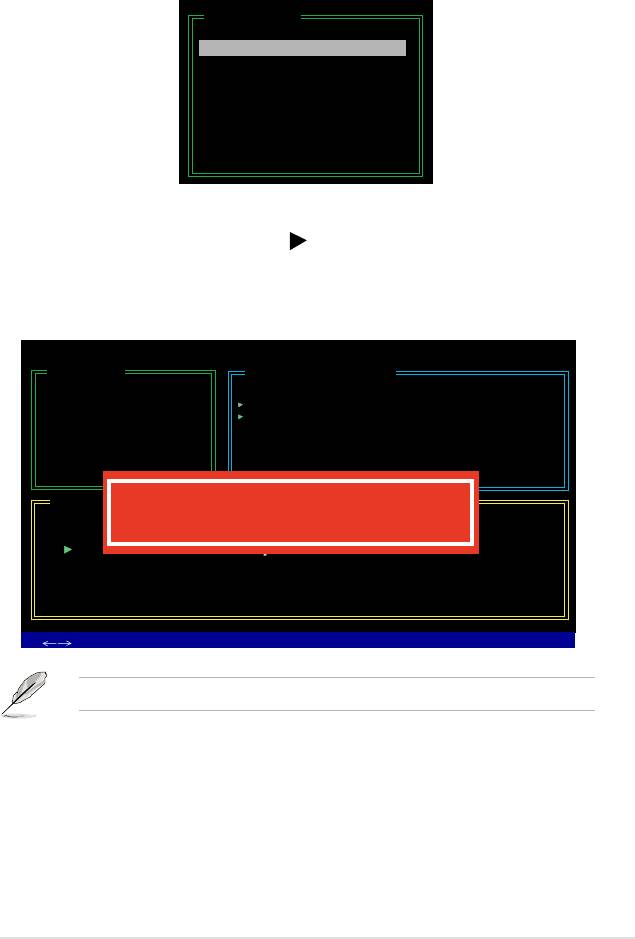
[ SELECT DISKS ]
Port Drive Model Serial # Size Status
0 XXXXXXXXXXXX XXXXXXXX XX.XGB Non-RAID Disk
1 XXXXXXXXXXXX XXXXXXXX XX.XGB Non-RAID Disk
2 XXXXXXXXXXXX XXXXXXXX XX.XGB Non-RAID Disk
3 XXXXXXXXXXXX XXXXXXXX XX.XGB Non-RAID Disk
Select 2 to 4 disks to use in creating the volume.
[↑↓]-Previous/Next [SPACE]-Selects [ENTER]-Selection Complete
5-37

WARNING: ALL DATA ON SELECTED DISKS WILL BE LOST.
Are you sure you want to create this volume? (Y/N):
5-38

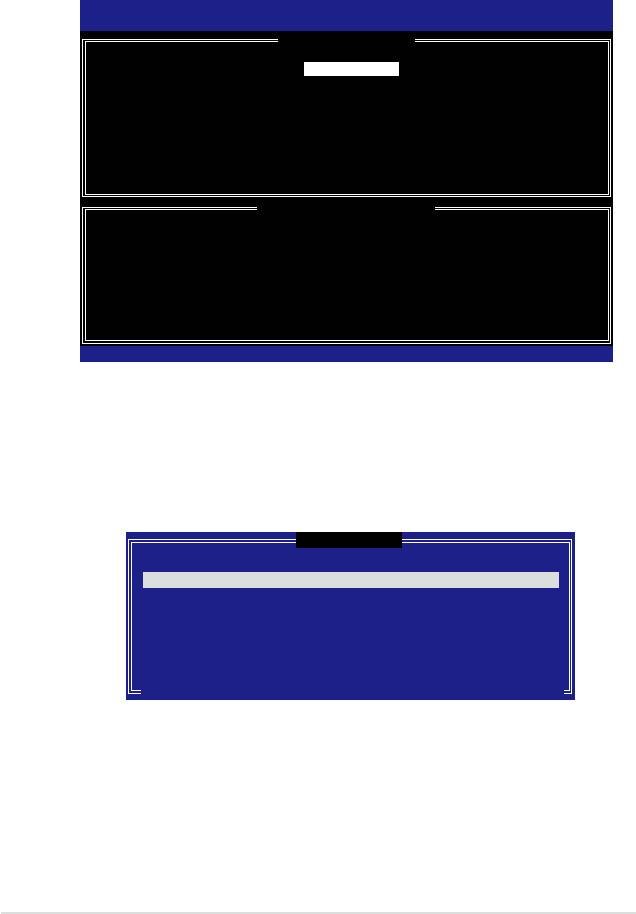
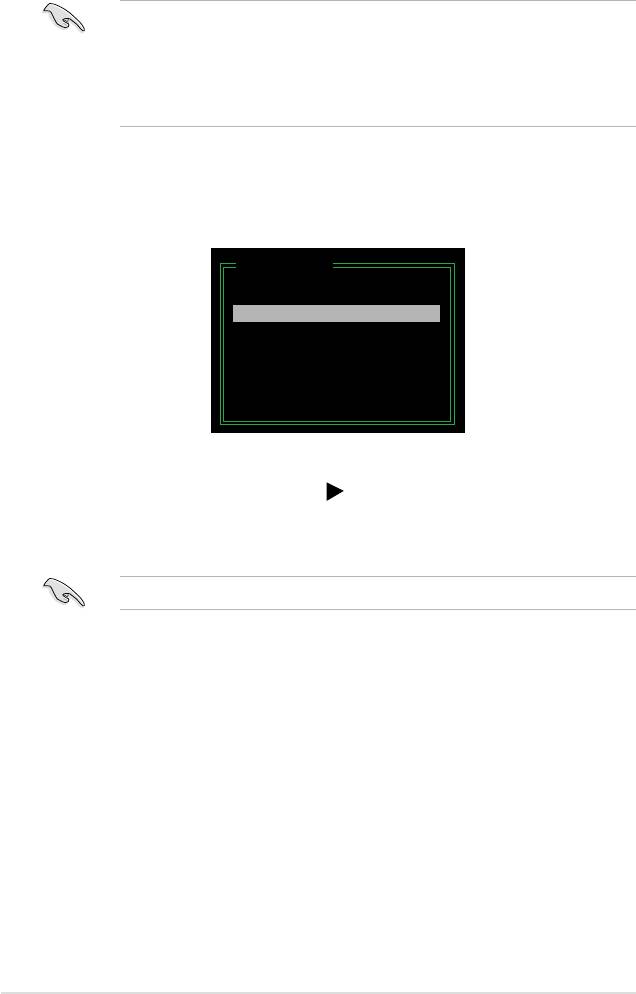
Intel(R) Matrix Storage Manager Option ROM v5.0.0.1032 ICH8R wRAID5
Copyright(C) 2003-05 Intel Corporation. All Rights Reserved.
[ CREATE ARRAY MENU ]
Name:
Volume1
RAID Level:
RAID1(Mirror)
Disks:
Select Disks
Strip Size:
N/A
Capacity:
XX.X GB
Create Volume
[ DISK/VOLUME INFORMATION ]
Enter a string between 1 and 16 characters in length that can be used
touniquelyidentifytheRAIDvolume.Thisnameiscasesensitiveand
cannot contain special characters.
[↑↓]-Change [TAB]-Next [ESC]-Previous Menu [Enter]-Select
WARNING: ALL DATA ON SELECTED DISKS WILL BE LOST.
Are you sure you want to create this volume? (Y/N):
5-39
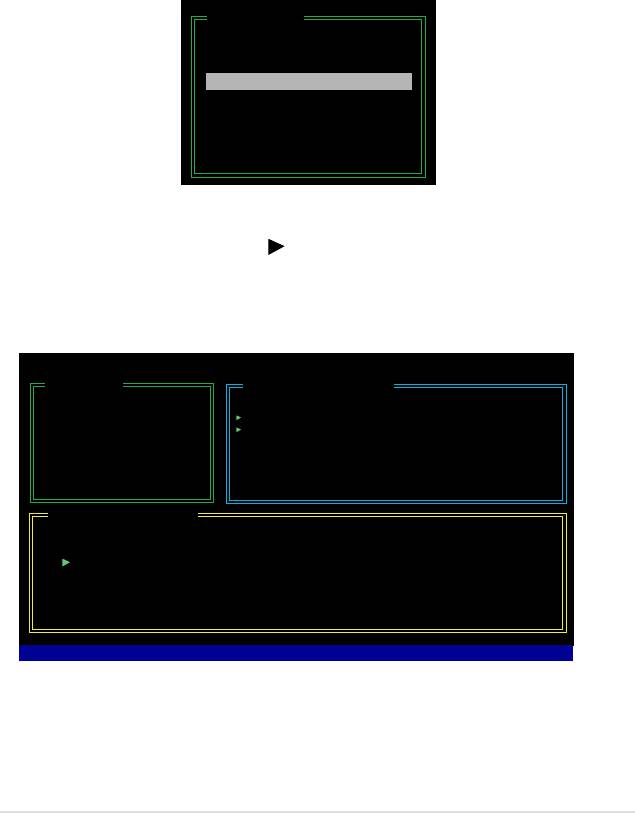
Intel(R) Matrix Storage Manager Option ROM v5.0.0.1032 ICH8R wRAID5
Copyright(C) 2003-05 Intel Corporation. All Rights Reserved.
[ CREATE ARRAY MENU ]
Name:
Volume5
RAID Level:
RAID5(Parity)
Disks:
Select Disks
Strip Size:
64KB
Capacity:
0.0 GB
Create Volume
[ DISK/VOLUME INFORMATION ]
Enter a string between 1 and 16 characters in length that can be used
touniquelyidentifytheRAIDvolume.Thisnameiscasesensitiveand
cannot contain special characters.
[↑↓]-Change [TAB]-Next [ESC]-Previous Menu [Enter]-Select
[ SELECT DISKS ]
Port Drive Model Serial # Size Status
0 XXXXXXXXXXXX XXXXXXXX XX.XGB Non-RAID Disk
1 XXXXXXXXXXXX XXXXXXXX XX.XGB Non-RAID Disk
2 XXXXXXXXXXXX XXXXXXXX XX.XGB Non-RAID Disk
3 XXXXXXXXXXXX XXXXXXXX XX.XGB Non-RAID Disk
Select 2 to 4 disks to use in creating the volume.
[↑↓]-Previous/Next [SPACE]-Selects [ENTER]-Selection Complete
5-40

WARNING: ALL DATA ON SELECTED DISKS WILL BE LOST.
Are you sure you want to create this volume? (Y/N):
5-41

Intel(R) Matrix Storage Manager Option ROM v5.0.0.1032 ICH7R wRAID5
Copyright(C) 2003-05 Intel Corporation. All Rights Reserved.
[ DELETE VOLUME MENU ]
Name Level Drives Capacity Status Bootable
Volume0 RAIDX(xxxxx) X XXX.XGB Normal Yes
[ HELP ]
Deleting a volume will destroy the volume data on the drive(s) and
cause any member disks to become available as non-RAID disks.
WARNING: EXISTING DATA WITHIN THIS VOLUME WILL BE LOST AND NON-RECOVERABLE.
[
↑↓
]-Select [<ESC>]-Previous Menu [<Del>]-Delete Volume
[ DELETE VOLUME VERIFICATION ]
ALL DATA IN THE VOLUME WILL BE LOST!
Are you sure you want to delete volume “VolumeX”? (Y/N):
5-42

[ RESET RAID DATA ]
Resetting RAID data will remove internal RAID structures
from the selected RAID disks. By removing these structures,
the drive will revert back to a non-RAID disk.
WARNING: Resetting a disk causes all data on the disk to be lost.
Port Drive Model Serial # Size Status
0 XXXXXXXXXXXX XXXXXXXX XX.XGB Member Disk
1 XXXXXXXXXXXX XXXXXXXX XX.XGB Member Disk
Select the disks that should be reset.
[
↑↓
]-Previous/Next [SPACE]-Selects [ENTER]-Selection Complete
[ CONFIRM EXIT ]
Are you sure you want to exit? (Y/N):
5-43

5-44
[
RESET RAID DATA
]
Resetting RAID data will remove the internal RAID structures
from the selected RAID disks. By removing these structures
the drive will revert back to a Non-RAID disk.
WARNING: Resetting a disk causes all data on the disk to be lost.
Port Drive Model Serial # Size Status
0 STXXXXXXXXX XXXXXXXX XX.0GB Member Disk
1 STXXXXXXXXX XXXXXXXX XX.0GB Member Disk
Select the disk that should be reset
[ ]-Previous/Next [Space]-Selects [Enter]-Selection Complete
Phoenix-Award BIOS CMOS Setup Utility
Advanced
OnboardDeviceConguration
Select Menu
IDE Function Setup
ItemSpecicHelp
Serial-ATAConguration
�SBConguration
Press [Enter] to set
Onboard 1394 Controller [Enabled]
Onboard 1st nVidia LAN [Enabled]
Onboard 2nd nVidia LAN [Enabled]
Onboard LAN Boot ROM [Disabled]
Primary Display Adapter [PCI-E slot]
HD Audio [Auto]
Front Panel Support Type [AC97]
JMicron SATAII Controller [RAID]
Serial Port1 Address [3F8/IRQ4]
Parallel Port Address [378/IRQ7]
Parallel Port Mode [EPP]
x ECP Mode Use DMA 3
F1:Help
↑↓:
Select Item -/+: Change Value F5: Setup Defaults
ESC: Exit
→←:
: Select Menu Enter: Select Sub-menu F10: Save and Exit
5-45

JMicron Technology Corp. PCI-to-SATA II/IDE RAID Controller BIOS v0.97
Copyright (C) 2004-2005 JMicron Technology http://www. jmicron.com
HDD0 : HDS722516VLSA80 164 GB Non-RAID
HDD1 : HDS722516DLA380 164 GB Non-RAID
Press <Ctrl-J> to enter RAID Setup Utility...
JMicron Technology Corp. PCI-to-SATA II/IDE RAID Controller BIOS v0.97
[Main Menu]
[Hard Disk Drive List]
Create RAID Disk Drive
Model Name Capacity Type/Status
Delete RAID Disk Drive
HDD0: HDS722516VLSA80 164 GB Non-RAID
Revert HDD to Non-RAID
HDD1: HDS722516DLA380 164 GB Non-RAID
SolveMirrorConict
Rebuild Mirror Drive
Save and Exit Setup
Exit Without Saving
[RAID Disk Drive List]
[
TAB]-Switch Window [
↑↓
]-Select Item [ENTER]-Action [ESC]-Exit
[Main Menu]
Create RAID Disk Drive
Delete RAID Disk Drive
Revert HDD to Non-RAID
SolveMirrorConict
Rebuild Mirror Drive
Save and Exit Setup
Exit Without Saving
5-46
[Create New RAID]
[Create New RAID]
Name : JRAID
Name : JRAID
Level: 0-Stripe
Level: 1-Mirror
Disks: Select Disk
Disks: Select Disk
Block: 128 KB
Block: N/A
Size : 319 GB
Size : 159 GB
ConrmCreation
ConrmCreation
[Hard Disk Drive List]
Model Name Capacity Type/Status
HDD0: HDS722516VLSA80 XXX GB Non-RAID
HDD1: HDS722516DLA380 XXX GB Non-RAID
[Create New RAID]
Name : JRAID
Level: 0-Stripe
Disks: Select Disk
Block: 128 KB
Size : 319 GB
ConrmCreation
5-47
JMicron Technology Corp. PCI-to-SATA II/IDE RAID Controller BIOS v0.97
[Create New RAID]
[Hard Disk Drive List]
Name: JRAID
Model Name Available Type/Status
Level: 0-Stripe
HDD0: HDS722516VLSA80 164 GB Non-RAID
Disks: Select Disk
HDD1: HDS722516DLA380 164 GB Non-RAID
Block: 128 KB
Size : 319 GB
ConrmCreation
[RAID Disk Drive List]
Create RAID on the selected HDD (Y/N)? Y
CONFIRM RAID CREATION
ALL DATA ON THE SELECTED HARD DISK
WILL BE LOST WHEN EXIT WITH SAVING
[
TAB]-Switch Window [
↑↓
]-Select Item [ENTER]-Action [ESC]-Exit
[RAID Disk Drive List]
Model Name RAID Level Capacity Status Members(HDDx)
RDD0: JRAID 0-Stripe XXX GB Normal 01
5-48
[Main Menu]
Create RAID Disk Drive
Delete RAID Disk Drive
Revert HDD to Non-RAID
SolveMirrorConict
Rebuild Mirror Drive
Save and Exit Setup
Exit Without Saving
JMicron Technology Corp. PCI-to-SATA II/IDE RAID Controller BIOS v0.97
[Main Menu]
[Hard Disk Drive List]
Create RAID Disk Drive
Model Name Capacity Type/Status
Delete RAID Disk Drive
HDD0: HDS722516VLSA80 164 GB RAID Inside
Revert HDD to Non-RAID
HDD1: HDS722516DLA380 164 GB RAID Inside
SolveMirrorConict
Rebuild Mirror Drive
Save and Exit Setup
Exit Without Saving
[RAID Disk Drive List]
ALL DATA ON THE RAID WILL BE LOST!!
Model Name RAID Level Capacity Status
ARE YOU SURE TO DELETE (Y/N)? Y
Members(HDDx)
RDD0: JRAID 0-Stripe XXX GB Normal 01
[
TAB]-Switch Window [
↑↓
]-Select Item [ENTER]-Action [ESC]-Exit
5-49
[Main Menu]
Create RAID Disk Drive
Delete RAID Disk Drive
Revert HDD to Non-RAID
SolveMirrorConict
Rebuild Mirror Drive
Save and Exit Setup
Exit Without Saving
5-50
[Main Menu]
Create RAID Disk Drive
Delete RAID Disk Drive
Revert HDD to Non-RAID
SolveMirrorConict
Rebuild Mirror Drive
Save and Exit Setup
Exit Without Saving
JMicron Technology Corp. PCI-to-SATA II/IDE RAID Controller BIOS v0.97
[Main Menu]
[Hard Disk Drive List]
Create RAID Disk Drive
Model Name Capacity Type/Status
Delete RAID Disk Drive
HDD0: HDS722516VLSA80 164 GB RAID Inside
Revert HDD to Non-RAID
HDD1: HDS722516DLA380 164 GB RAID Inside
SolveMirrorConict
Rebuild Mirror Drive
Save and Exit Setup
Exit Without Saving
[RAID Disk Drive List]
Model Name RAID Level Capacity Status
Members(HDDx)
RDD0: JRAID 1-Mirror XXX GB Rebuild 01
Rebuilding...01%,pleasewait...
5-51
[Main Menu]
Create RAID Disk Drive
Delete RAID Disk Drive
Revert HDD to Non-RAID
SolveMirrorConict
Rebuild Mirror Drive
Save and Exit Setup
Exit Without Saving
JMicron Technology Corp. PCI-to-SATA II/IDE RAID Controller BIOS v0.97
[Main Menu]
[Hard Disk Drive List]
Create RAID Disk Drive
Model Name Capacity Type/Status
Delete RAID Disk Drive
HDD0: HDS722516VLSA80 164 GB RAID Inside
Revert HDD to Non-RAID
HDD1: HDS722516DLA380 164 GB RAID Inside
SolveMirrorConict
Rebuild Mirror Drive
Save and Exit Setup
Exit Without Saving
[RAID Disk Drive List]
Model Name RAID Level Capacity Status
Members(HDDx)
RDD0: JRAID 1-Mirror XXX GB Rebuild 01
Rebuilding...01%,pleasewait...
5-52

5-53
5-54
5-55
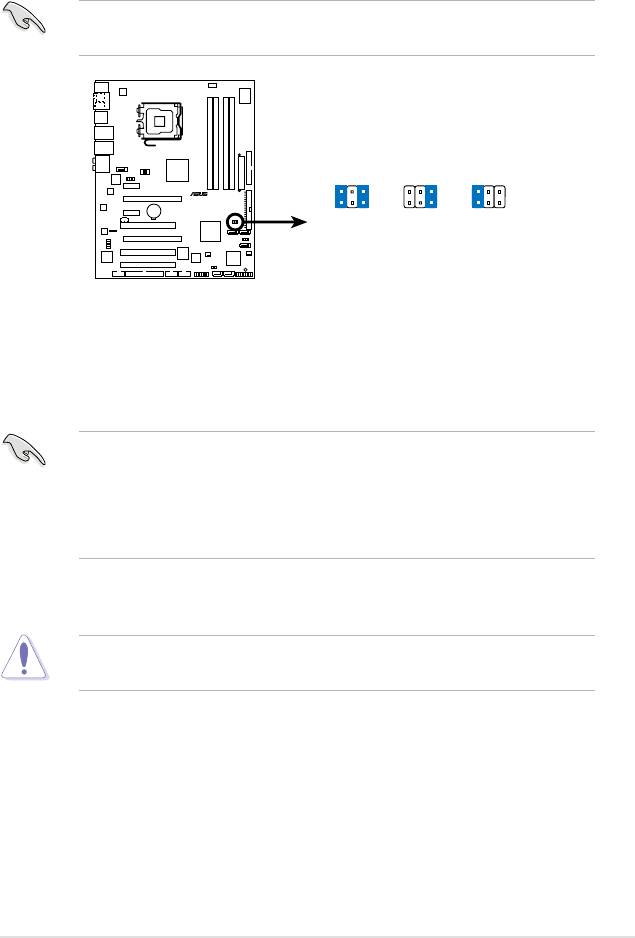
P5W
RAID_SEL
®
1
1
1
RAID1
BIG
RAID0
[Safe mode]
mode
[Fast mode]
(Default)
P5W RAID Setting
EZ Backup RAID Mode will change.
Press F1 to continue.
5-56
