Asus P5W DH Deluxe: Chapter 3
Chapter 3: Asus P5W DH Deluxe

Chapter 3
This chapter provides information on how
to set up the WiFi-AP Solo in your home or
ofce network.
Setting up
3-1

3.1 About the setup utilities
After you have installed the WiFi-AP Solo drivers and utilities to your system, you
are now ready to setup the WiFi-AP Solo in your network.
Make sure that you have selected the most appropriate conguration for your
wireless network before you proceed. Refer to section 1.4 for details.
Make sure you have connected the supplied antenna to the antenna connector
on the motherboard, or the WiFi-AP Solo may not be able to detect other
wireless devices in your environment.
The WiFi-AP Solo provides two conguration approaches: the setup wizard and the
setup utility. The former scheme provides an easy approach to the most frequently
used functions while the latter allows conguring all the functions, including the
advanced settings.
For normal users, the setup wizard helps to:
1. congure the WiFi-AP Solo as an access point, or wireless station.
For advanced users, the setup utility helps to:
1. congure the WiFi-AP Solo as an access point, or wireless station;
2. enable or disable the WiFi-AP Solo; and
3. show statistics.
3-2
3.2 Setting up with WiFi-AP Solo Wizard
You can create your own wireless local area network (WLAN) in your home using
the WiFi-AP Solo Access Point Mode (AP Mode) feature. Create your own WLAN
if:
1. your computer is connected to the Internet; and
®
2. the operating system of your computer is Windows
XP/ XP 64-bit/ Server
2003/ Server 2003 64-bit.
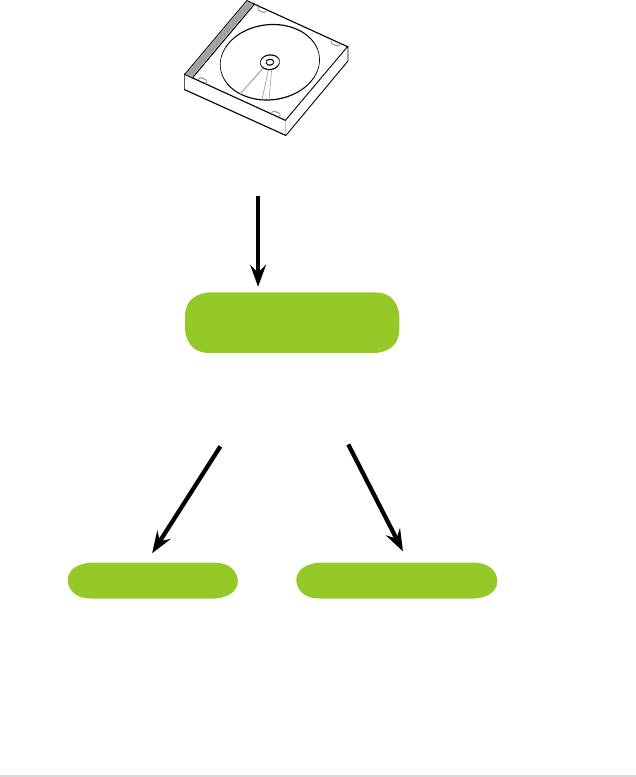
Install the WiFi-AP Solo software from the
support CD.
WiFi-AP Solo
Setup Wizard
After completing the installation, the WiFi-
AP Solo Setup Wizard will run automatically.
AP Mode
Station Mode
To use AP Mode, refer to
To use Station Mode, refer to
Section 1.4.1.
Section 1.4.2.
3-3
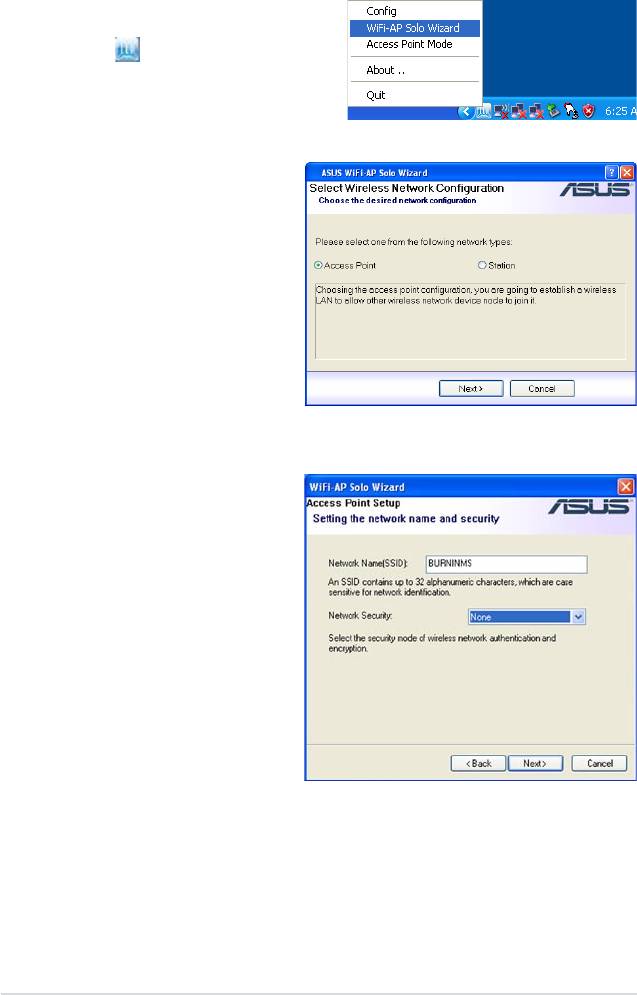
3.2.1 Setting up the AP Mode
1. To launch the WiFi-AP Solo setup
wizard, right-click the system tray
icon and select
WiFi-AP Solo
Wizard
.
2. Select
Access Point
and
click
Next
.
3. The system automatically
generates an SSID for the AP
mode. You can rename the
SSID, if desired.
4. Select a Network Security
level for your AP mode. The
congurable options are
None
,
Share-WEP
,
WPA-
PSK,
and
WPA2-PSK
. Refer
to section 3.4 for detailed
security information. Select
an appropriate level and click
Next
.
3-4
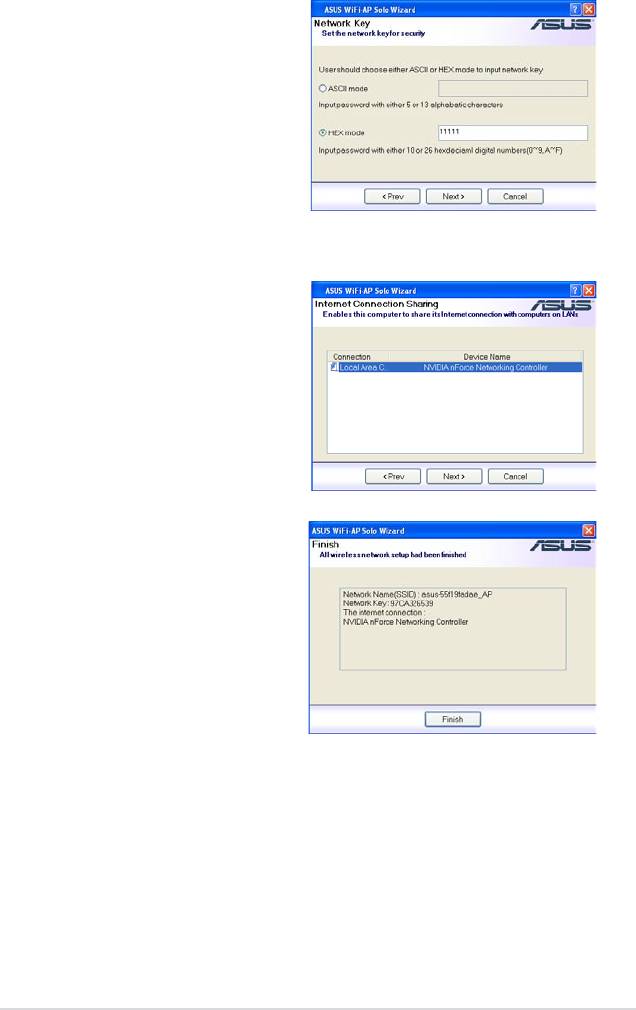
5. If you select
Share-WEP
,
WPA-
PSK, or WPA2-PSK
in Step
4, you are required to input a
password. You can choose to
congure the password in either
ASCII or HEX mode. If you
choose HEX mode, input 10 hex
digits for 64-bit encrytion, or 26
hex digits for 128-bit encryption.
Click
Next
to continue.
6. Select your Internet connection
and click
Next
.
7. The AP mode conguration is
complete. Record the setup
information on your note and
click
Finish
to quit the ASUS
WiFi-AP Solo wizard.
3-5
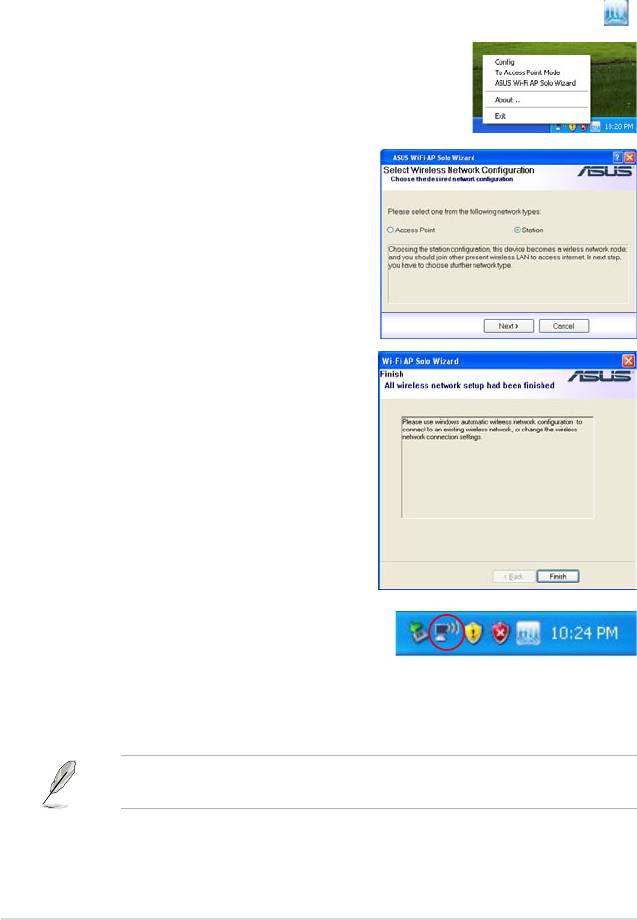
3.2.2 Setting up the station mode
In the Infrastructure mode, you can connect to the LAN or Internet, or both, through
a wireless AP.
1. To launch the WiFi-AP Solo setup wizard, right-click the system tray icon
and select
ASUS
WiFi-AP Solo Wizard
.
2. Select
Station
and click
Next
.
3. Click
Finish
.
3. Double-click the wireless icon
on the task bar to congure
®
the Windows
Wireless Zero
Conguration.
Refer to Section 3.3.4 S
etting up the station mode
for how to use the
®
Windows
Wireless Zero Conguration.
3-6
3.3 Setting up via setup utility
3.3.1 How to launch Wi-AP Solo utility
®
You can launch
Wi-AP Solo
either from the Windows
Program menu or the tray icon.
The tray icon is an optional quick launch to be enabled by a user.
®
Windows
Program Menu
It is the absolute way to launch the
WiFi-AP Solo
from the program folder.
We recommend that you uninstall the WiFi-AP Solo utility by clicking
Start >
Control Panel > Add or Remove Programs
.
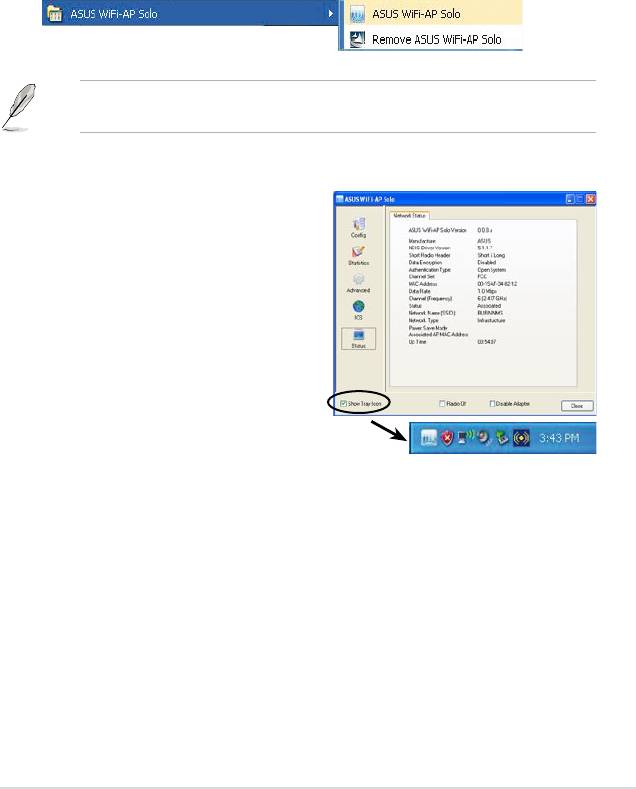
Tray Icon
The tray icon will be not be shown until you
enable the
Show Tray Icon
from the WiFi-AP
Solo. When the WiFi-AP Solo icon is shown on
the system tray, you could double-click the icon to
launch the
WiFi-AP Solo Wizard
.
3.3.2 Utility Windows
•
Global Control Bar
Each control items on the Global Control Bar directly affects the adapter of
the management GUI.
•
Show Tray Icon
When this item is checked, the WiFi-AP Solo icon will appear on the system
tray located at the right and lower corner of your Windows screen.
3-7
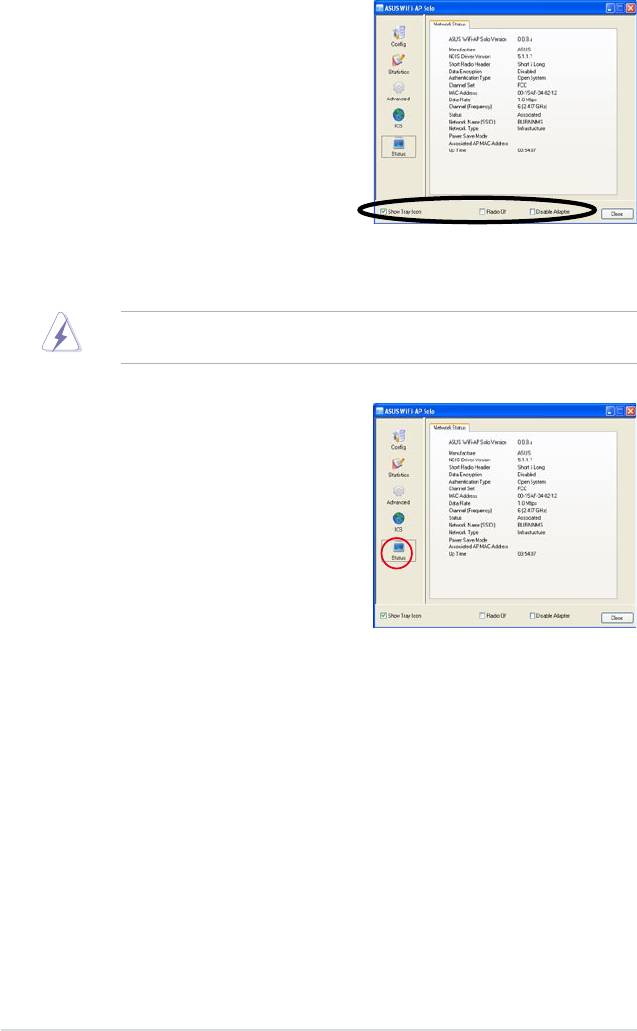
•
Radio Off
When this item is checked, the radio
is turned off to save power. When the
radio is off, the links with other wireless
network nodes are disconnected.
•
Disable Adapte
r
When this item is checked, the wireless
LAN adapter is disabled to increase
performance in terms of better system
resource management and CPU
utilization.
If the wireless conguration is in AP mode, checking
Radio Off
will cause the
sub-network belonging to the AP to disconnect with the Internet/intranet.
Status page
• Manufacturer: ASUS
• NDIS Driver Version
• Short Radio Header
• Data Encryption: Current encryption
mode.
• Authentication: authentication state
• Channel Set: selected channel plan
currently. Please reference Appendix-A
with the detail comparisons.
• MAC Address: MAC address of this adapter.
• Data Rate: wireless LAN transition speed
• Channel (Frequency): current channel number
• Status: wireless network status
• Network Name (SSID): name of connecting access point
• Basic Service Set Identication (BSSID)
• Network Type: indicate current network conguration type
• Power Save Mode: current setting power save mode
• Associated AP MAC: MAC address of connecting access point
• Associated AP IP: IP address of connecting access point
3-8
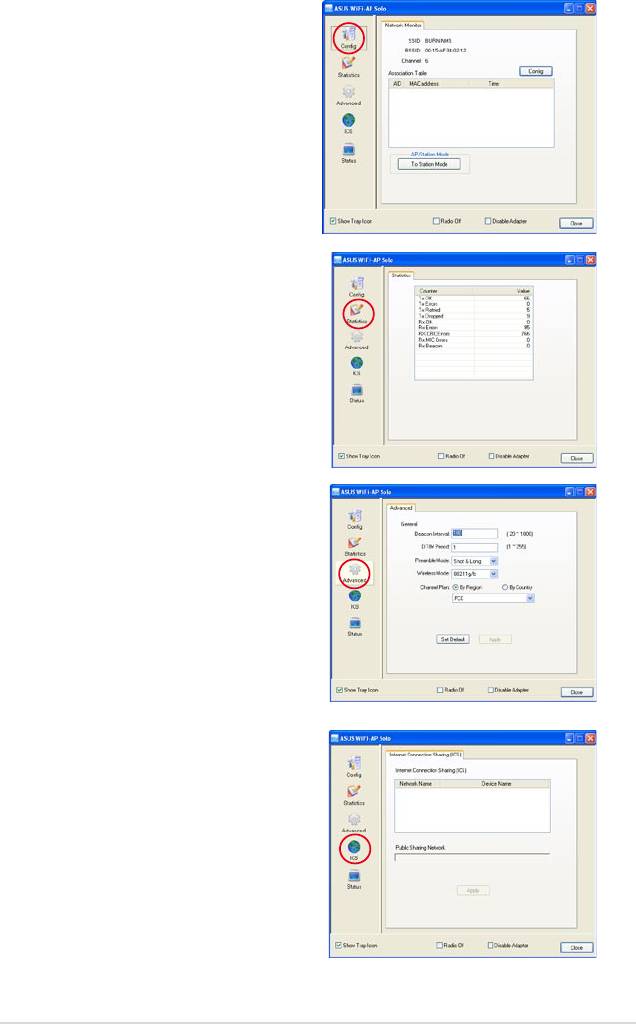
• Up Time
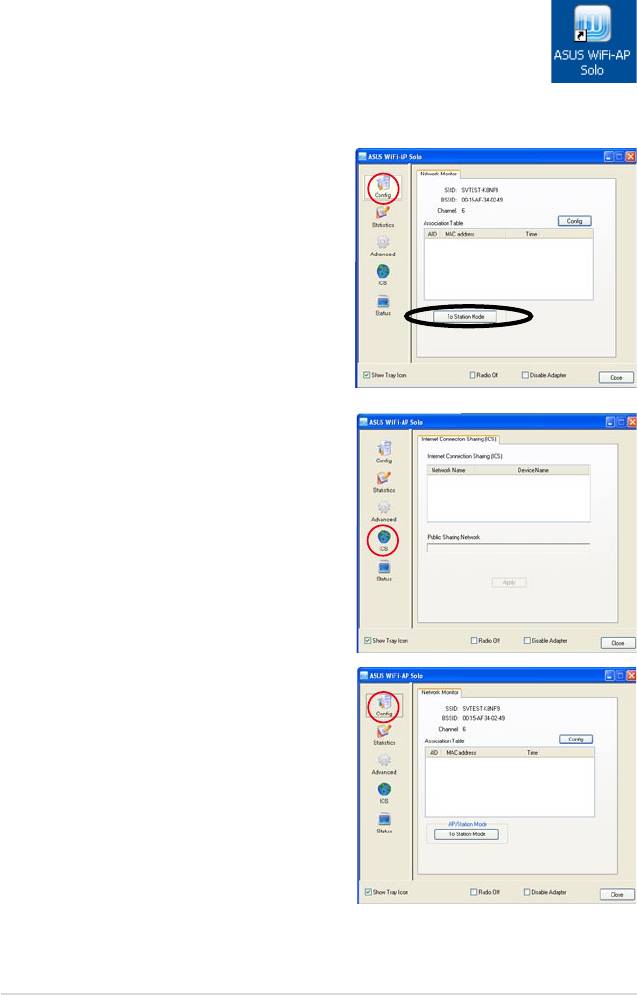
Cong page
This page displays the basic information of
the WiFi-AP Solo:
Statistics page
You could watch the Tx/Rx status of current
wireless connection. It provides a statistic
analysis of packet transition.
Advanced page
This page presents all the access points in
the system.
Internet Connection Sharing (ICS)
page
This page is enabled when the WiFi-AP Solo
is switched to AP mode. This page allows
you to congure your Internet connection
which you wish to share.
3-9
3.3.3 Setting up AP Mode
Open the setup utility by double-clicking the utility icon on the
desktop. The setup utility contains six buttons - Status, Cong,
Survey, Statistics, Advanced and ICS in the left column. The Survey
button is greyed out in AP mode and the ICS button is disabled
when in the station mode.
1. Open the setup utility and click
Cong
button. Click the
AP/
Station Mode
switch button -
To
Access Point Mode
. The WiFi-
AP Solo is switched to AP mode
in several seconds.
2. Click
ICS
button to congure your
Internet connection which you
wish to share. Select the correct
connection and click
Apply
button.
3. Click
Cong
button and enter
the
Network Monitor
tab. Click
Cong
button to enter the
Wireless Network Properties
page of the AP mode.
3-10
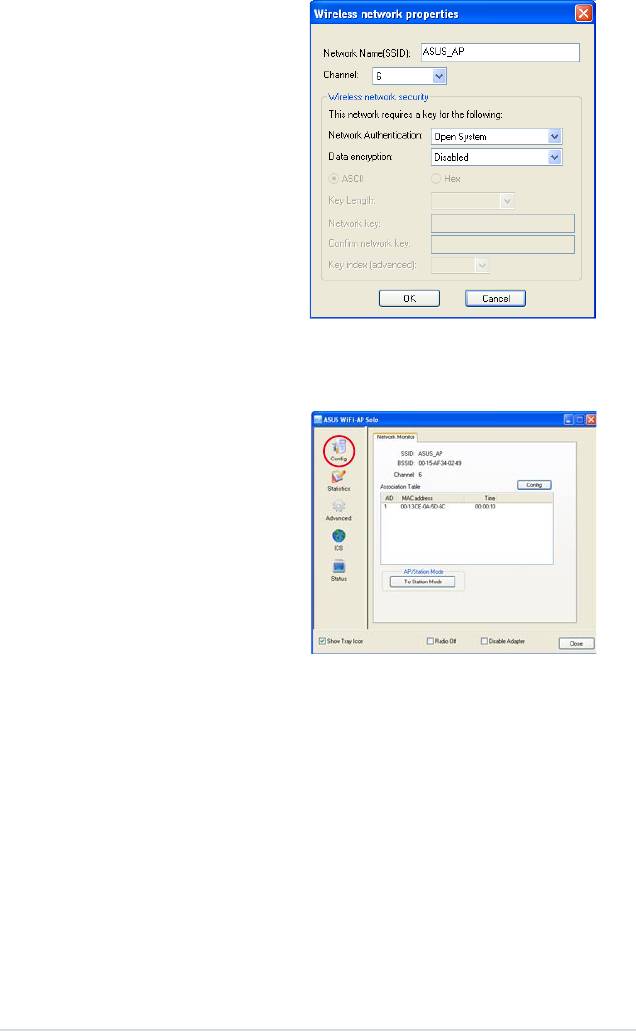
4. You are directed to the
Wireless
Network Properties
page to set
up the AP mode. In this page,
you can change the SSID, select
the communication channel and
specify the network security. When
conguration is complete, click
OK
to apply the settings and return to
the setup wizard.
5. The AP mode conguration is
nished. You can view in the
Association Table
of the Cong
page all the wireless stations that
have connected to the WiFi-AP
Solo (AP mode).
3-11
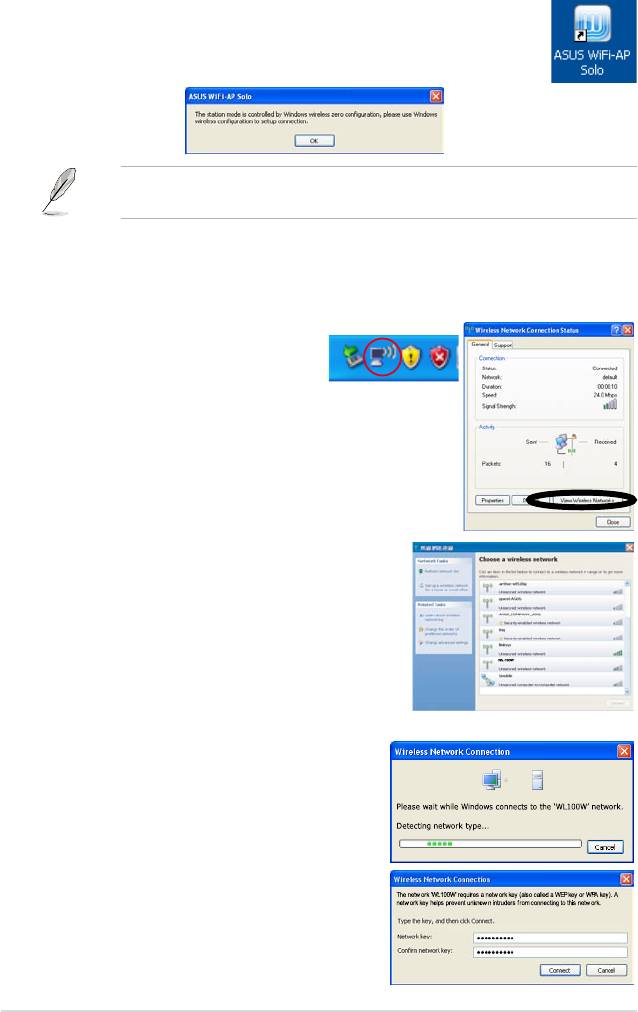
3.3.4 Setting up the station mode
Open the setup utility by double-clicking the utility icon on the desktop. A
®
message pops up asking you to set up the station mode via the Windows
Wireless Zero Conguration (WZC) service.
®
The actual screens of Windows
Wireless Zero Conguration service may differ
according to the Operating System (OS) of your computer.
®
To congure the Windows
Wireless Zero Conguration (WZC) service, follow the
instruction below to make the settings.
1. Double-click the wireless network
icon on the task bar to view
available networks.Select the AP
and click
Connect
.
2. A window prompts out asking
you for the key if you have set
up encryption on your wireless
router, input the keys and click
Connect
. The connection is
complete.
3-12
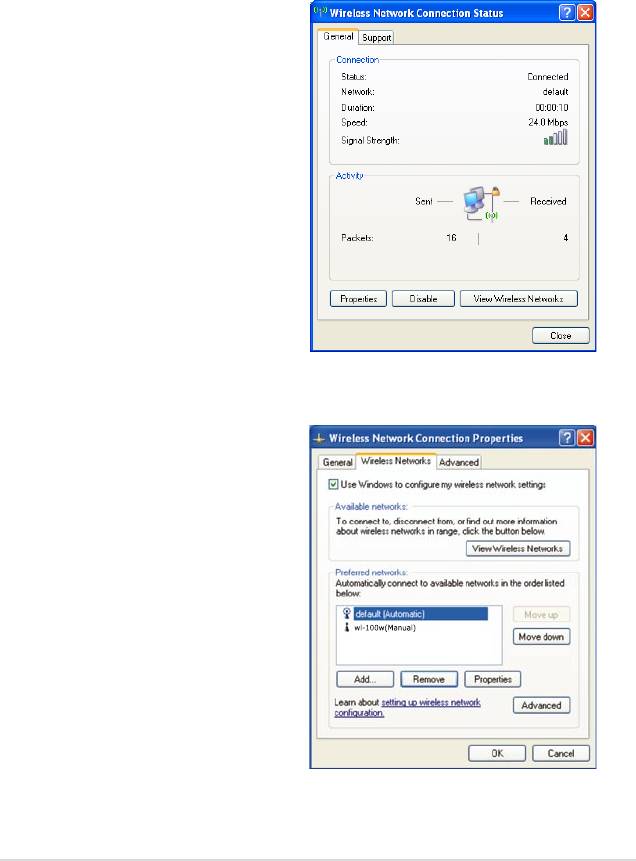
To set up the wireless connection properties, right-click the wireless icon on the
task bar and select
Open Network Connection
. Then right-click the network
connection icon and select
Properties
to open the Wireless Network Connection
Status page.
1. The
General
page shows status,
duration, speed, and signal
strength. Signal strength is
represented by green bars with
5 bars indicating excellent signal
and 1 bar meaning poor signal.
2. Select “Wireless Networks” tab
to show
Preferred networks
.
Use the
Add
button to add the
“SSID” of available networks and
set the connection preference
order with the
Move up
and
Move down
buttons. The radio
tower with a signal icon identies
the currently connected access
point. Click
Properties
to set the
authentication of the wireless
connection.
3-13
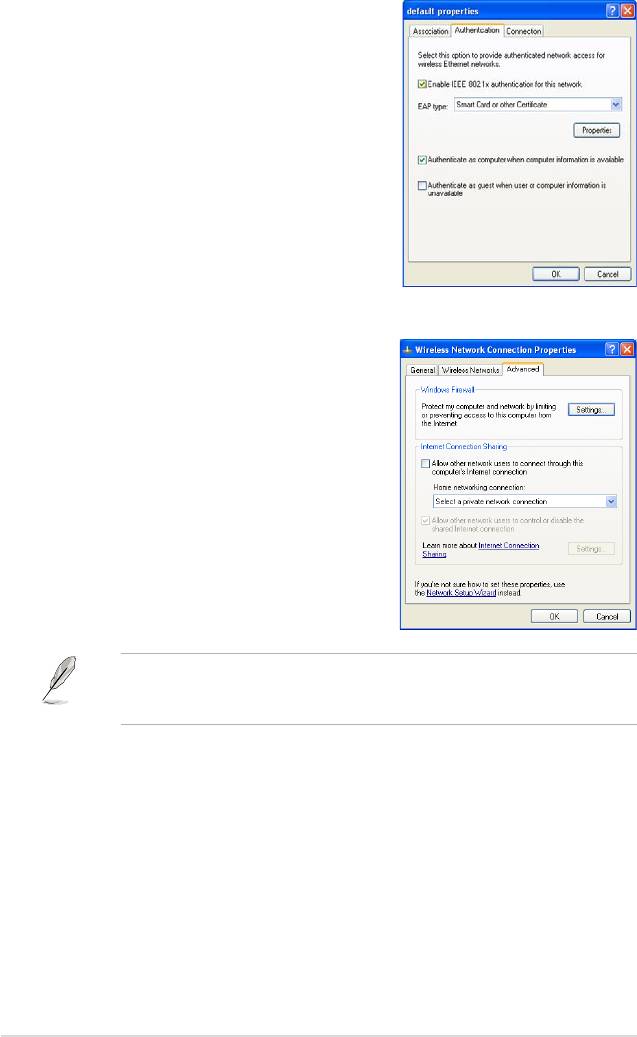
3. The
Authentication
page allows
you to add security settings.
Read Windows help for more
information.
4. The
Advanced
page allows
you to set rewall and sharing.
Read Windows help for more
information.
®
In the station mode, the Windows
Zero Conguration does not support WPA2
PSK and cannot connect the access point with WPA2 PSK. Visit the Microsoft
download center to download the WPA2 package.
3-14

3.4 Setting up wireless security
To protect your wireless network, you need to setup a security mechanism on your
WiFi-AP Solo. Under AP mode, only Open, Shared, and WPA-PSK are supported.
Under Station mode, all the security modes listed below are supported.
Network authentication
Network authentication uses certain types of mechanism to identify authenticated wireless
clients. WiFi-AP Solo supports the following authentication methods:
Open:
This option disables authentication protection for your wireless network.
Under the Open mode, any IEEE802.11b/g wireless client can connect to
your wireless network.
Shared:
Shared means using the same WEP keys for authentication and encryption.
802.1X:
802.1X uses RADIUS (Remote Access Dial-Up User Service) server to
authenticate wireless clients with a user name and password. It can
authenticate user with different levels of access right.
WPA:
WPA stands for WiFi-Protected Access. WPA provides two security
modes for Home/SOHO user and enterprise network. The former solution
adopts Pre-Shared Key for authentication, and the later uses the existing
802.1X RADIUS server in the enterprise network to process the
authentication requests.
WPA - PSK:
WPA-PSK (Pre-Shared Key) is the solution for home and SOHO
users who have no 802.11X authentication server within the
LAN. To setup WPA-PSK, you need to input a passphrase and let
the system generate the key. Combination of letters, numbers and non
alphnumeric charecters is recommended for ensuring security.
3-15

Encryption
Encryption is used to convert plain text data into unreadable codes with certain
type of algorithm before capsulation for wireless transmission. WiFi-AP Solo
supports the following encryption methods:
WEP:
WEP stands for Wired Equivalent Privacy. It uses 64 or 128-bit
static keys. You can let the system generate the WEP keys by inputting a
Passphrase.
TKIP:
Temporal Key Integrity Protocol (TKIP) dynamically generates unique
keys to encypt every data packet in a wireless session.
AES:
Advanced Encryption Standard (AES) is a dependable encryption
adopted in WPA2 or IEEE802.11i standard. It offers stronger protection
and greatly increases the complexity of wireless encryption.
TKIP + AES:
For a network where WPA clients (using TKIP encryption) and WPA2
clients (using AES encryption) co-exit. Select this option to enable both.
3-16
