Asus P5W DH Deluxe: Chapter 2
Chapter 2: Asus P5W DH Deluxe

Chapter 2
This chapter provides step by step
instructions on installing the WiFi-AP Solo
drivers and utilities to your computer. This
part also provides information on installing
the antenna.
Installation
2-1
2.1 Installation
2.1.1 System requirements
Before installing the WiFi-AP Solo drivers and utilities, make sure that your system
meets the following requirements.
• ASUS motherboard with WiFi-AP Solo onboard solution
®
• Intel
Pentium™ 4
• Minimum 128MB system memory
®
• Operating system: Windows
XP/ XP-64bit/ Server 2003/
Server 2003 64-bit
• Optical drive for utilities and driver installation
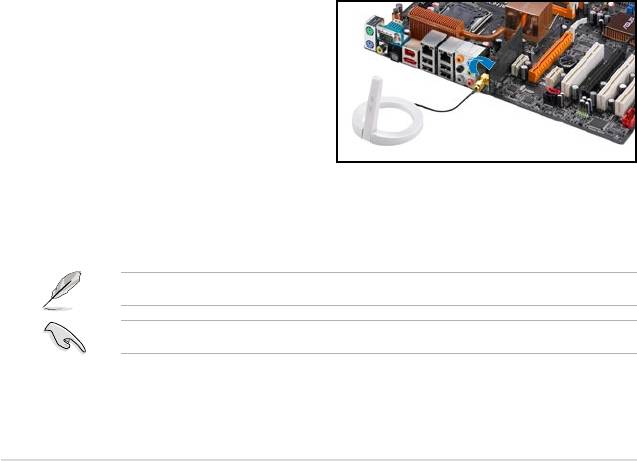
2.1.2 Installing the antenna
The WiFi-AP Solo wireless solution comes with an omni-directional and moveable
antenna to maximize the WiFi-AP Solo coverage.
To install the antenna:
1. Locate the wireless LAN antenna
port on the motherboard rear
panel.
2. Connect the antenna twist-
on connector (female) to the
wireless LAN antenna port
(male).
3. Place the antenna at an elevated location to enhance your wireless LAN
coverage.
The antenna may differ depending on the model.
Do not place the antenna under your table or in a closed compartment.
2-2

2.1.3 Signal range
The signal range of WiFi-AP Solo depends on the operating environment.
Obstacles such as walls and metal barriers could reect or absorb radio signals.
Devices such as microwave stove can also greatly interfere with the wireless
network.
Signal range:
802.11g: Indoor 80ft (30m), outdoor (LOS, Light-Of-Sight) 200ft (60m)
802.11b: Indoor 130ft (40m), outdoor (LOS, Light-Of-Sight) 1000ft (310m)
By default, the device automatically adjusts the data rate and the closer the
wireless station is, the better signal and transmit speed it receives. To improve your
wireless transmission, move your wireless stations closer to the WiFi-AP Solo.
2-3

2.2 Driver and utilities installation
• The contents of the motherboard support CD are subject to change without
notice. Visit the ASUS website for driver/utilities updates.
®
• If you use a Windows
operating system, your computer auto-detects the
WiFi-AP Solo when system boots and displays an
Add New Hardware
Wizard
window. Click
Cancel
then proceed with the following instructions.
To install the WiFi-AP Solo driver and utilities:
1. Place the motherboard support CD to the optical drive.
2. The CD automatically displays the
Drivers
menu if Autorun is enabled in your
computer. Click the wireless driver and follow screen instructions to install the
WiFi-AP Solo driver.
3. Select the
driver / utility
menu in the support CD and click to install the WiFi-
AP Solo utility.
If Autorun is disabled in your computer, locate the
Wireless
folder under the
root directory of the support CD, then double click the
Setup.exe
le to begin
installation.
To use soft AP function, you may need to install Ethernet adapter driver.
2-4
