Asus P5QLD PRO: Software
Software: Asus P5QLD PRO
This chapter describes the contents
of the support CD that comes with the
motherboard package.
Software
5
support

Chapter summary
5
5.1 Installing an operating system ................................................... 5-1
5.2 Support DVD information ............................................................
5-1
5.3 Software information .................................................................
5-10
ASUS P5QLD PRO
5.1 Installing an operating system
®
This motherboard supports Windows
XP/Vista operating systems (OS). Always
install the latest OS version and corresponding updates to maximize the features
of your hardware.
• Motherboard settings and hardware options vary. Use the setup
procedures presented in this chapter for reference only. Refer to your OS
documentation for detailed information.
®
• Ensure that you install the Windows
XP Service Pack3 or later versions
before installing the drivers for better compatibility and system stability.
5.2 Support DVD information
The support DVD that came with the motherboard package contains the drivers,
software applications, and utilities that you can install to avail all motherboard
features.
The contents of the support DVD are subject to change at any time without
notice. Visit the ASUS website at www.asus.com for updates.
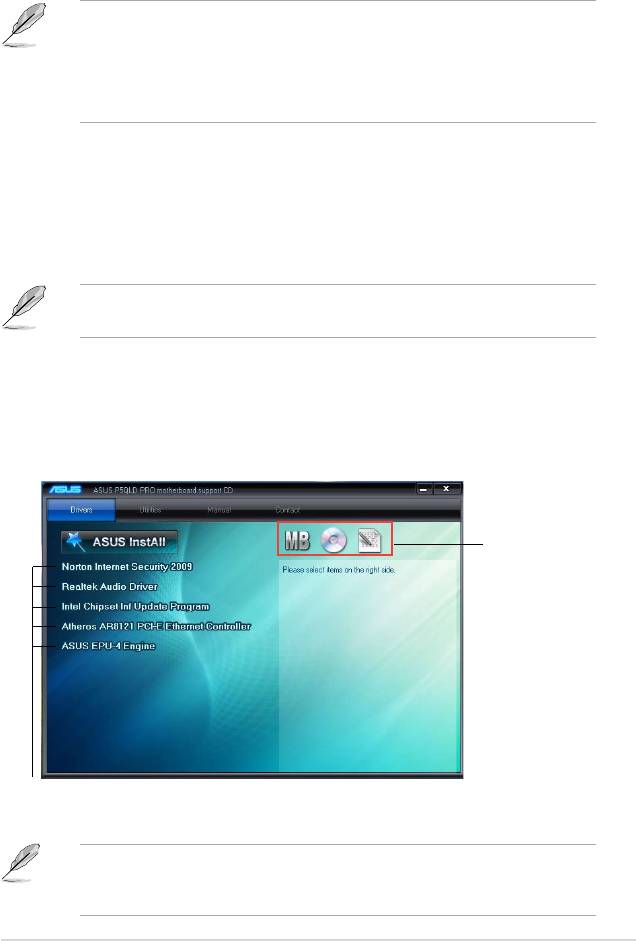
5.2.1 Running the support DVD
Place the support DVD to the optical drive. The DVD automatically displays the
Drivers menu if Autorun is enabled in your computer.
Click an icon to
display support
DVD/motherboard
information
Click an item to install
If Autorun is NOT enabled in your computer, browse the contents of the support
DVD to locate the le ASSETUP.EXE from the BIN folder. Double-click the
ASSETUP.EXE to run the DVD.
ASUS P5QLD PRO 5-1

5.2.2 Drivers menu
The Drivers menu shows the available device drivers if the system detects
installed devices. Install the necessary drivers to activate the devices.
ASUS InstAll
Installs the ASUS InstAll - Installation wizard for drivers.
Norton Internet Security 2009
Installs the Norton Internet security 2009.
Realtek Audio Driver
®
Installs the Realtek
ALC1200 audio driver and application.
Intel Chipset Inf Update Program
®
Installs the Intel
chipset Inf update program.
Atheros AR8121 PCI-E Ethernet Controller
Installs the Atheros AR8121 PCI-E Ethernet controller.
ASUS EPU-4 Engine
Installs the ASUS EPU-4 Engine.
5-2 Chapter 5: Software support

5.2.3 Utilities menu
The Utilities menu shows the applications and other software that the
motherboard supports.
ASUS InstAll - Installation Wizard for Utilities
Installs all of the utilities through the Installation Wizard.
ASUS PC Probe II
This smart utility monitors the fan speed, CPU temperature, and system voltages,
and alerts you of any detected problems. This utility helps you keep your computer
in healthy operating condition.
ASUS Update
The ASUS Update utility allows you to update the motherboard BIOS in a
®
Windows
environment. This utility requires an Internet connection either through a
network or an Internet Service Provider (ISP).
ASUS AI Suite
The ASUS AI Suite is an innovative application to do overclocking, fan control,
power saving and quiet thermal control.
Adobe Reader 8
®
Installs the Adobe
Reader that allows you to open, view, and print documents in
Portable Document Format (PDF).
ASUS P5QLD PRO 5-3

Microsoft DirectX 9.0c
®
®
Installs the Microsoft
DirectX 9.0c driver. The Microsoft DirectX
9.0c is a
®
multimedia technology that enhances computer graphics and sound. DirectX
improves the multimedia features of you computer so you can enjoy watching
TV and movies, capturing videos, or playing games in your computer. Visit the
Microsoft website at http://www.microsoft.com for updates.
ASUS Express Gate Installer
Allows you to install or update Express Gate functions.
Atheros Ethernet Utility
Installs the Atheros Ethernet utility.
5-4 Chapter 5: Software support
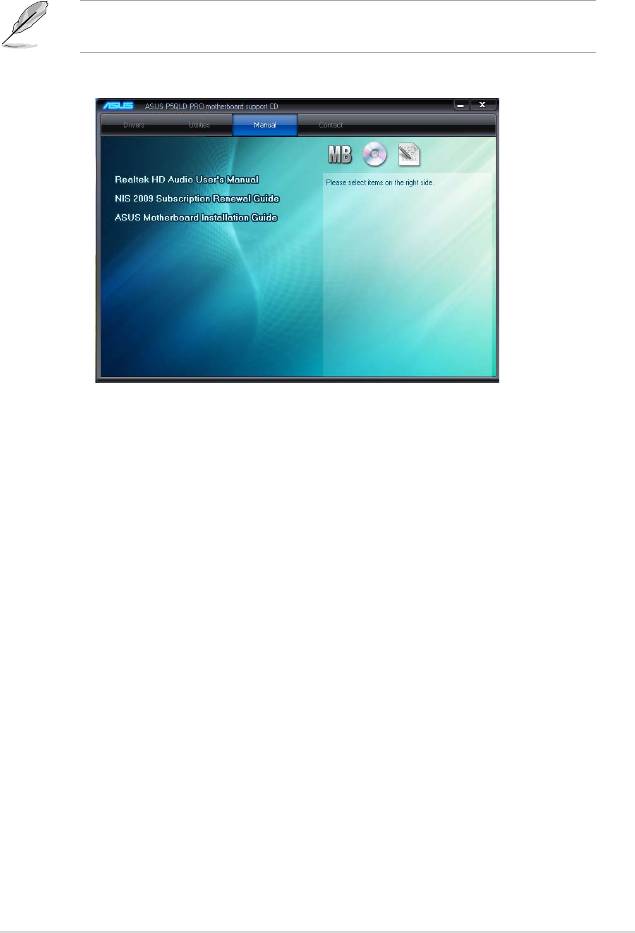
5.2.4 Manual menu
The Manual menu contains a list of supplementary user manuals. Click an item to
open the folder of the user manual.
Most user manual les are in Portable Document Format (PDF). Install the
®
Adobe
Reader from the Utilities menu before opening a user manual le.
Realtek HD Audio User’s Manual
Allows you to open the Realtek HD Audio User Manual.
NIS 2009 Subscription Renewal Guide
Allows you to open the NIS 2009 Subscription Renewal Guide.
ASUS Motherboard Installation Guide
Allows you to open the ASUS Motherboard Installation Guide.
ASUS P5QLD PRO 5-5

5.2.5 ASUS Contact information
Click the Contact tab to display the ASUS contact information. You can also nd
this information on the inside front cover of this user guide.
5-6 Chapter 5: Software support
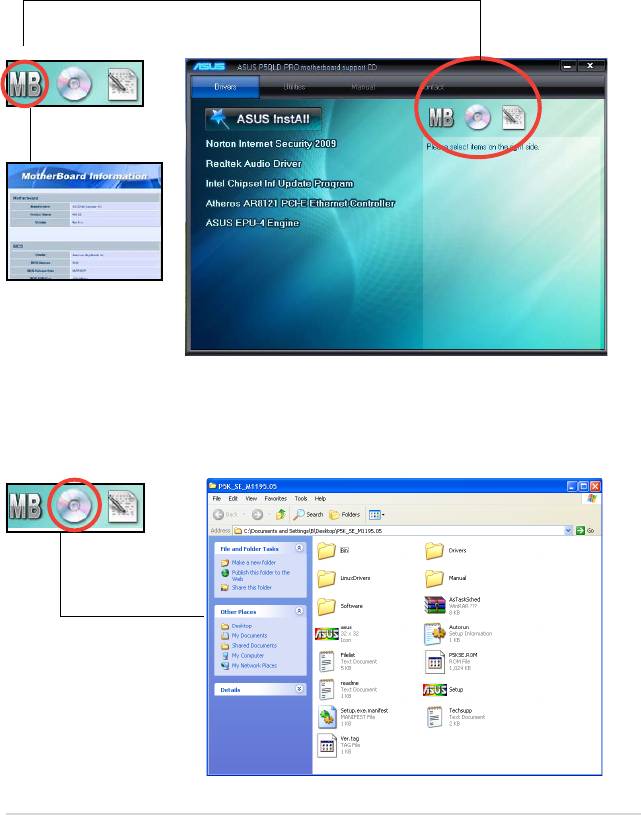
5.2.6 Other information
The icons on the top right corner of the screen give additional information on the
motherboard and the contents of the support DVD. Click an icon to display the
specied information.
Motherboard Info
Displays the general specications of the motherboard.
Browse this DVD
Displays the support DVD contents in graphical format.
ASUS P5QLD PRO 5-7
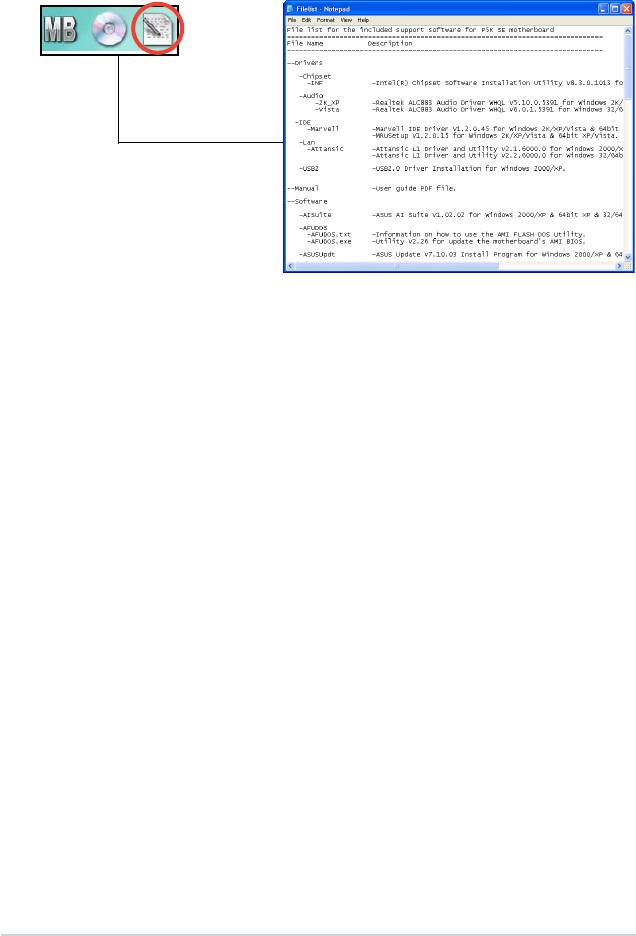
Filelist
Displays the contents of the support DVD and a brief description of each in text
format.
5-8 Chapter 5: Software support
5.3 Software information
Most of the applications in the Support DVD have wizards that will conveniently
guide you through the installation. View the online help or readme le that came
with the software application for more information.
5.3.1 ASUS MyLogo2™
The ASUS MyLogo2™ utility lets you customize the boot logo. The boot logo is the
image that appears on screen during the Power-On Self-Tests (POST). The ASUS
MyLogo2™ is automatically installed when you install the ASUS Update utility from
the Support DVD. See section “5.2.3 Utilities menu” for details.
• Before using the ASUS MyLogo2™, use the AFUDOS utility to make a copy
of your original BIOS le, or obtain the latest BIOS version from the ASUS
website. See section “4.1.4 AFUDOS utility”.
• Ensure that the BIOS item
Full Screen Logo is set to [Enabled] if
you want to use ASUS MyLogo2. See section 4.7.2 Boot Settings
Conguration.
• You can create your own boot logo image in GIF, or BMP le formats.
• The le size should be smaller than 150 K.
To launch the ASUS MyLogo2™:
1. Launch the ASUS Update utility. Refer to section “4.1.1 ASUS Update utility”
for details.
2. Select
Options from the drop down menu, then click Next.
3. Check the option
Launch MyLogo to replace system boot logo before
ashing BIOS, then click Next.
4. Select
Update BIOS from a le from the drop down menu, then click Next.
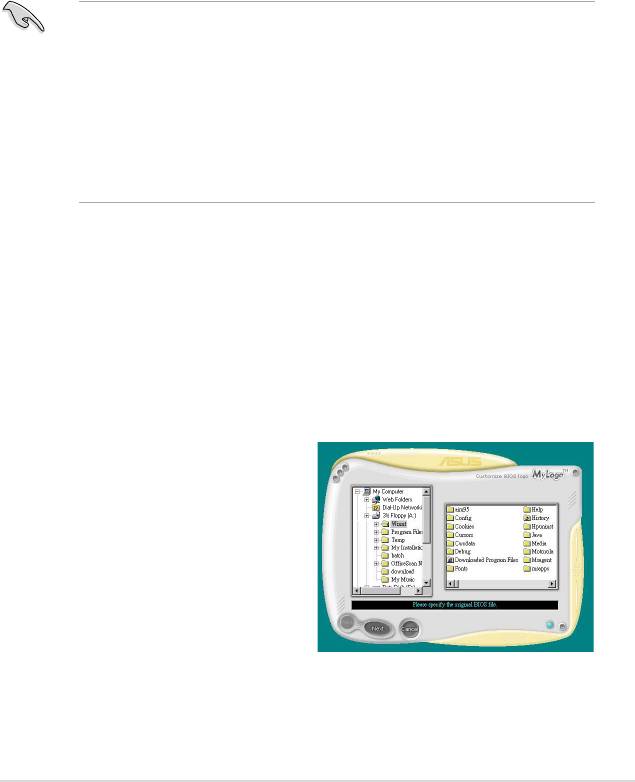
5. When prompted, locate the new
BIOS le, then click Next. The ASUS
MyLogo window appears.
6. From the left window pane, select the
folder that contains the image you
intend to use as your boot logo.
ASUS P5QLD PRO 5-9

7. When the logo images appear on the
right window pane, select an image to
enlarge by clicking on it.
8. Adjust the boot image to your desired
size by selecting a value on the Ratio
box.
9. When the screen returns to the ASUS Update utility, ash the original BIOS to
load the new boot logo.
10. After ashing the BIOS, restart the computer to display the new boot logo
during POST.
5-10 Chapter 5: Software support
5.3.2 Audio congurations
The Realtek® ALC1200 audio CODEC provides 8-channel audio capability to
deliver the ultimate audio experience on your computer. The software provides
Jack-Sensing function, S/PDIF Out support, and interrupt capability. The ALC1200
also includes the Realtek® proprietary UAJ® (Universal Audio Jack) technology for
all audio ports, eliminating cable connection errors and giving users plug and play
convenience.
Follow the installation wizard to install the Realtek® Audio Driver from the Support
DVD that came with the motherboard package.
If the Realtek audio software is correctly installed, you will nd the Realtek HD
Audio Manager icon on the taskbar.
From the taskbar, double-click on the SoundEffect
icon to display the Realtek HD Audio Manager.
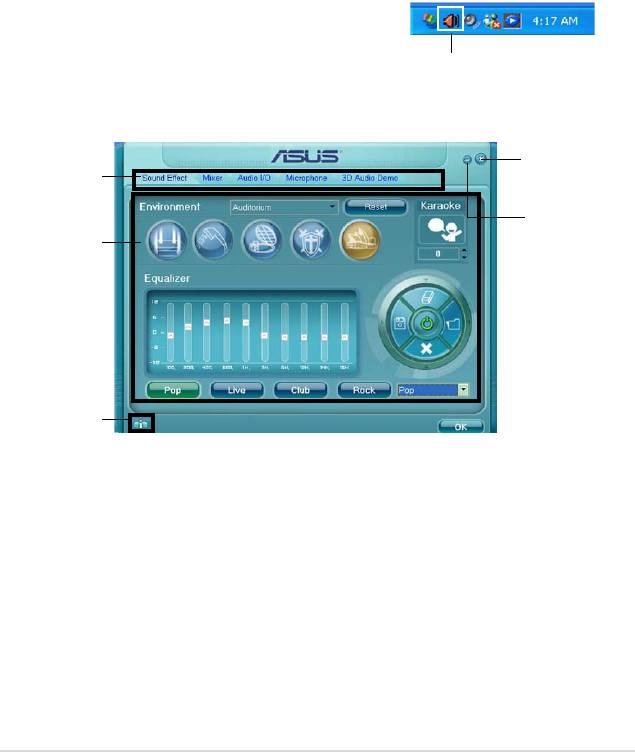
Realtek HD Audio Manager
Realtek HD Audio Manager
Exit button
Conguration
options
Minimize
button
Control settings
window
Information
button
ASUS P5QLD PRO 5-11

Information
Click the information button ( ) to
display information about the audio driver
version, DirectX version, audio controller,
audio codec, and language setting.
Minimize
Click the minimize button ( ) to minimize the window.
Exit
Click the exit button ( ) to exit the Realtek HD Audio Manager.
Conguration options
Click any of the tabs in this area to congure your audio settings.
Sound Effect
The Realtek® ALC1200 Audio CODEC
allows you to set your listening
environment, adjust the equalizer, set
the karaoke, or select pre-programmed
equalizer settings for your listening
pleasure.
To set the sound effect options:
1. From the Realtek HD Audio
Manager, click the Sound Effect
tab.
2. Click the shortcut buttons or the drop-down menus for options on changing
the acoustic environment, adjust the equalizer, or set the karaoke to your
desired settings.
3. Click
to effect the Sound Effect settings and exit.
5-12 Chapter 5: Software support
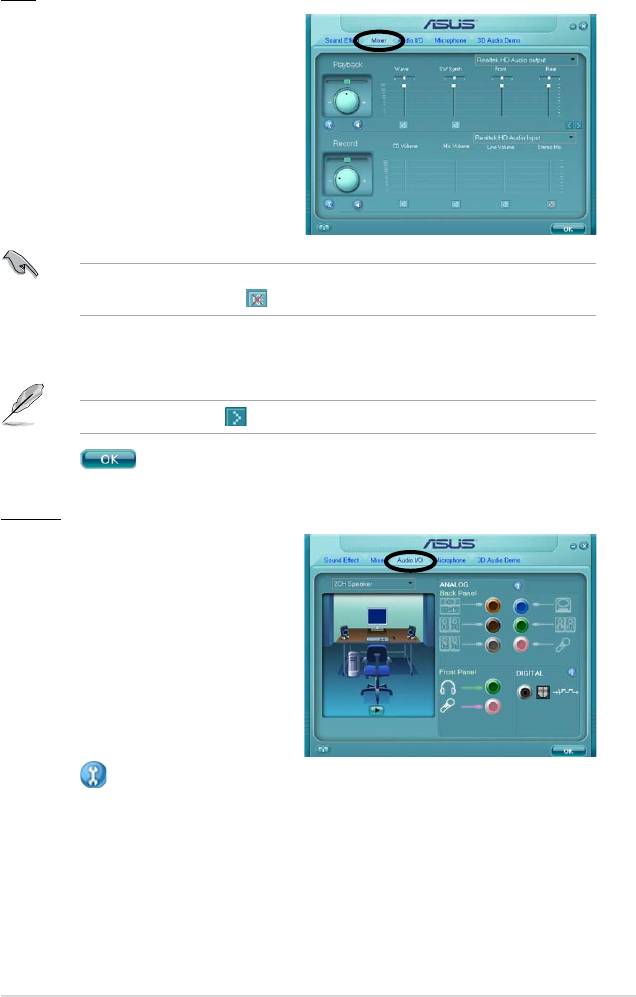
Mixer
The Mixer option allows you to
congure audio output (playback)
volume and audio input (record)
volume.
To set the mixer options:
1. From the Realtek HD Audio
Manager, click the Mixer tab.
2. Turn the volume buttons to adjust
the Playback and/or Record
volume.
The Mixer option activates voice input from all channels by default. Make sure to
set all channels to mute ( ) if you do not want voice input.
3. Make adjustments to Wave, SW Synth, Front, Rear, CD volume, Mic volume,
Line Volume, and Stereo mix, etc. by clicking the control tabs and dragging
them up and down until you get the desired levels.
Click the next button ( ) to display more menu options.
4. Click to effect the Mixer settings and exit.
Audio I/O
The Audio I/O option allows you congure
your input/output settings.
To set the Audio I/O options:
1. From the Realte k HD Audi o
Manager, click the Audio I/O tab.
2. Click the drop-down menu to select
the channel conguration.
3. The control settings window displays
the status of connected devices.
Click for analog and digital options.
4. Click <OK> to effect the Audio I/O settings and exit
ASUS P5QLD PRO 5-13
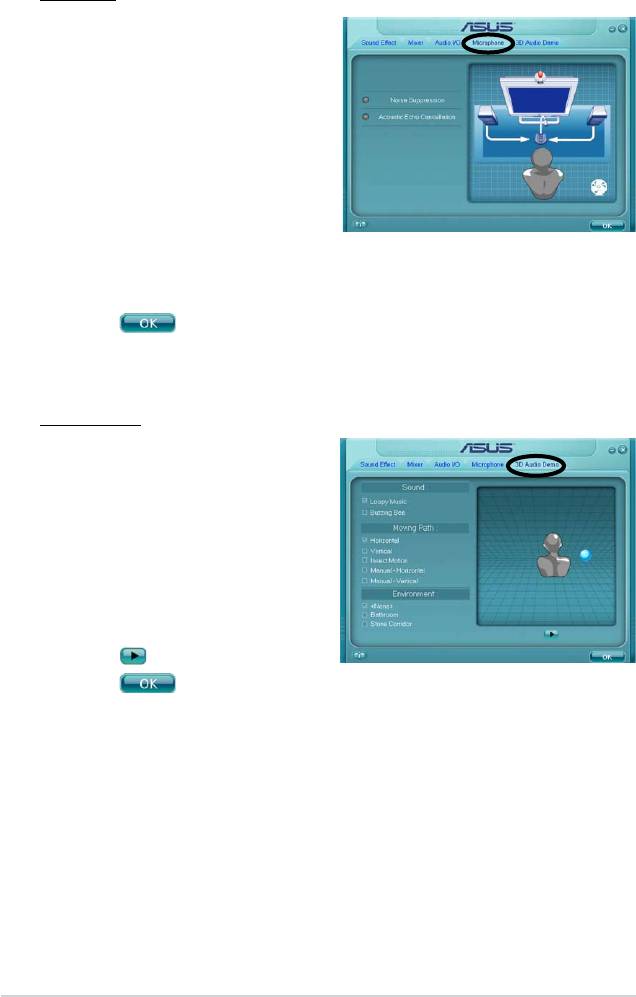
Microphone
The Microphone option allows you
configure your input/output settings
and to check if your audio devices are
connected properly.
To set the Microphone options:
1. From the Realtek HD Audi o
Manager, click the Microphone
tab.
2. Click the Noise Suppression option
button to reduce the static background noise when recording.
3. Click the Acoustic Echo Cancellation option button to reduce the echo from the
front speakers when recording.
4. Click
to effect the Microphone settings and exit.
3D Audio Demo
The 3D Audio Demo option gives you a
demonstration of the 3D audio feature.
To start the 3D Audio Demo:
1. From the Realtek HD Audio Manager,
click the 3D Audio Demo tab.
2. Click the option buttons to change
the sound, m o v i n g path, o r
environment settings.
3. Click
to test your settings.
4. Click
to effect the 3D Audio Demo settings and exit.
5-14 Chapter 5: Software support
5.3.3 ASUS PC Probe II
PC Probe II is a utility that monitors the computer’s vital components, and detects
and alerts you of any problem with these components. PC Probe II senses fan
rotations, CPU temperature, and system voltages, among others. Because PC
Probe II is software-based, you can start monitoring your computer the moment
you turn it on. With this utility, you are assured that your computer is always at a
healthy operating condition.
Installing PC Probe II
To install PC Probe II on your computer:
1. Place the Support DVD to the optical drive. The Drivers installation tab
appears if your computer has an enabled Autorun feature.
If Autorun is not enabled in your computer, browse the contents of the Support
DVD to locate the setup.exe le from the ASUS PC Probe II folder. Double-click
the setup.exe le to start installation.
2. Click the Utilities tab, then click ASUS PC Probe II.
3. Follow the screen instructions to complete installation.
Launching PC Probe II
You can launch the PC Probe II right after installation or anytime from the
®
Windows
desktop.
®
To launch the PC Probe II from the Windows
desktop, click Start > All Programs
> ASUS > PC Probe II > PC Probe II v1.xx.xx. The PC Probe II main window
appears.
®
After launching the application, the PC Probe II icon appears in the Windows
taskbar. Click this icon to close or restore the application.
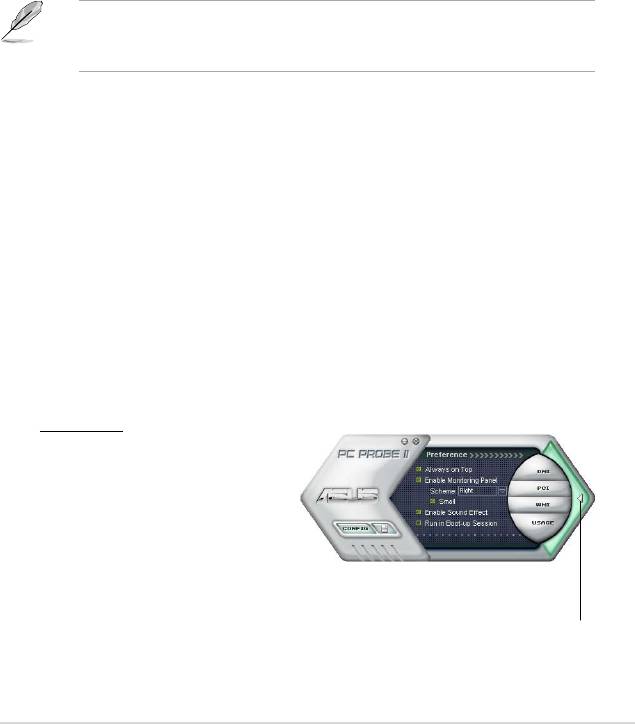
Using PC Probe II
Main window
The PC Probe II main window
allows you to view the current
status of your system and change
the utility conguration. By
default, the main window displays
the Preference section. You can
close or restore the Preference
section by clicking on the triangle on the main window right handle.
Click to close the
Preference panel
ASUS P5QLD PRO 5-15

Button Function
Opens the Conguration window
Opens the Report window
Opens the Desktop Management Interface window
Opens the Peripheral Component Interconnect window
Opens the Windows Management Instrumentation window
Opens the hard disk drive, memory, CPU usage window
Shows/Hides the Preference section
Minimizes the application
Closes the application
Sensor alert
When a system sensor detects a problem, the main window right handle
turns red, as the illustrations below show.
When displayed, the monitor panel for that sensor also turns red. Refer to the
Monitor panels section for details.
5-16 Chapter 5: Software support

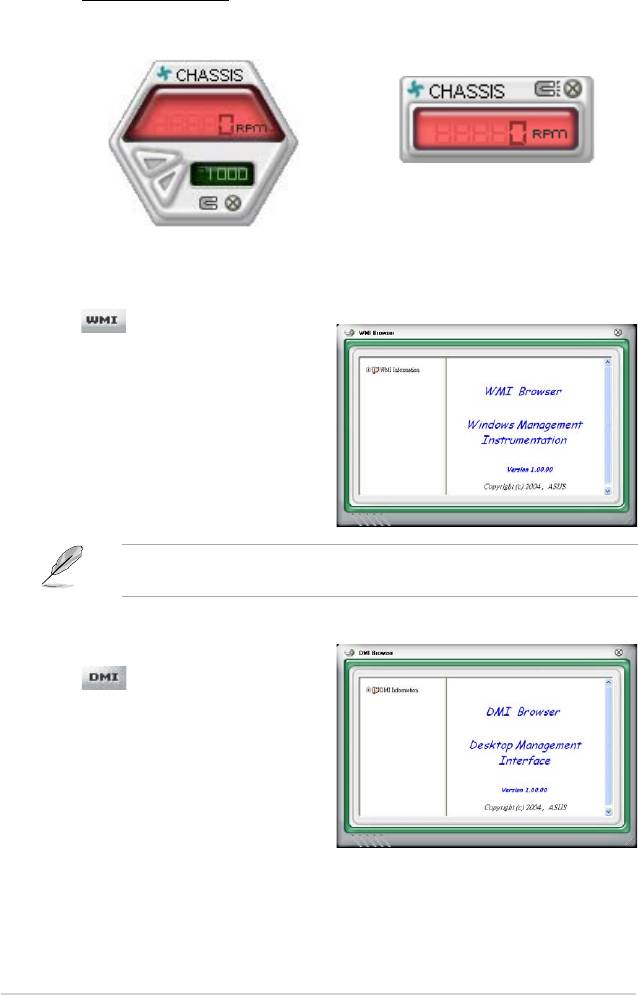
Hardware monitor panels
The hardware monitor panels display the current value of a system sensor such as
fan rotation, CPU temperature, and voltages.
The hardware monitor panels come in two display modes: hexagonal (large) and
rectangular (small). When you check the Enable Monitoring Panel option from the
Preference section, the monitor panels appear on your computer’s desktop.
Small display
Large display
Changing the monitor panels position
To change the position of the monitor panels in the desktop,
click the arrow down button of the Scheme options, then select
another position from the list box. Click OK when nished.
Moving the monitor panels
All monitor panels move together using a magnetic effect. If
you want to detach a monitor panel from
the group, click the horseshoe magnet
icon. You can now move or reposition the
panel independently.
Adjusting the sensor threshold value
You can adjust the sensor threshold
value in the monitor panel by
Click to
clicking the or buttons. You can
increase
also adjust the threshold values
value
using the Cong window.
Click to
You cannot adjust the sensor
decrease
threshold values in a small
value
monitoring panel.
ASUS P5QLD PRO 5-17
Monitoring sensor alert
The monitor panel turns red when a component value exceeds or is lower
than the threshold value. Refer to the illustrations below.
Small display
Large display
WMI browser
Click to display the
WMI (Windows Management
Instrumentation) browser. This
browser displays various Windows®
management information. Click an
item from the left panel to display on
the right panel. Click the plus sign (+)
before WMI Information to display the
available information.
You can enlarge or reduce the browser size by dragging the bottom right corner
of the browser.
DMI browser
Click to display the DMI
(Desktop Management Interface)
browser. This browser displays various
desktop and system information.
Click the plus sign (+) before DMI
Information to display the available
information.
5-18 Chapter 5: Software support
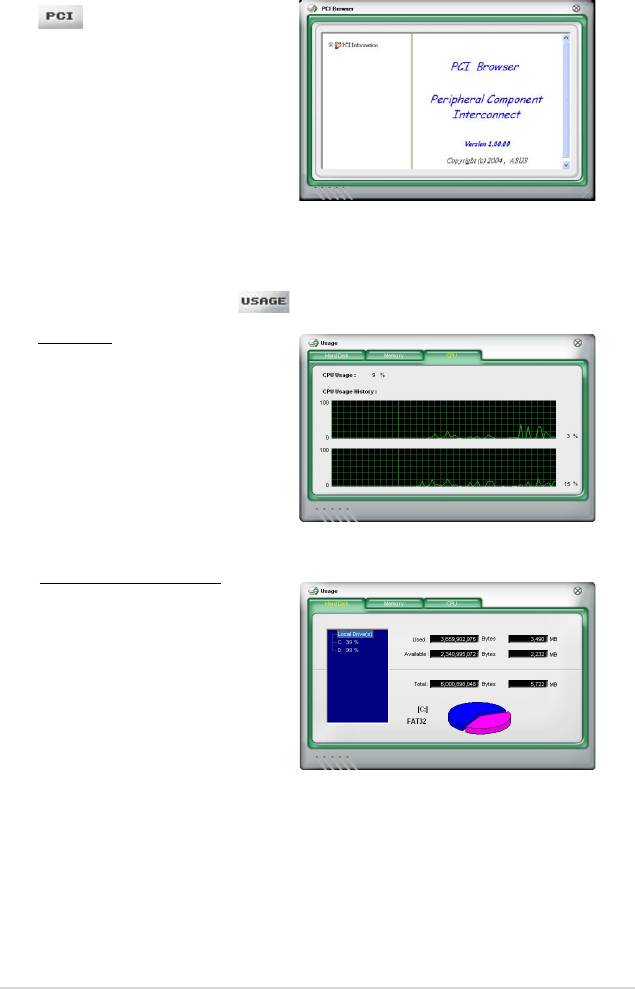
PCI browser
Click to display the PCI
(Peripheral Component Interconnect)
browser. This browser provides
information on the PCI devices installed
on your system. Click the plus sign
(+) before the PCI Information item to
display available information.
Usage
The Usage browser displays real-time information on the CPU, hard disk drive
space, and memory usage. Click to display the Usage browser.
CPU usage
The CPU tab displays real-
time CPU usage in line graph
representation. If the CPU has
an enabled Hyper-Threading,
two separate line graphs display
the operation of the two logical
processors.
Hard disk drive space usage
The Hard Disk tab displays the
used and available hard disk
drive space. The left panel of the
tab lists all logical drives. Click
a hard disk drive to display the
information on the right panel.
The pie chart at the bottom of
the window represents the used
(blue) and the available HDD
space.
ASUS P5QLD PRO 5-19
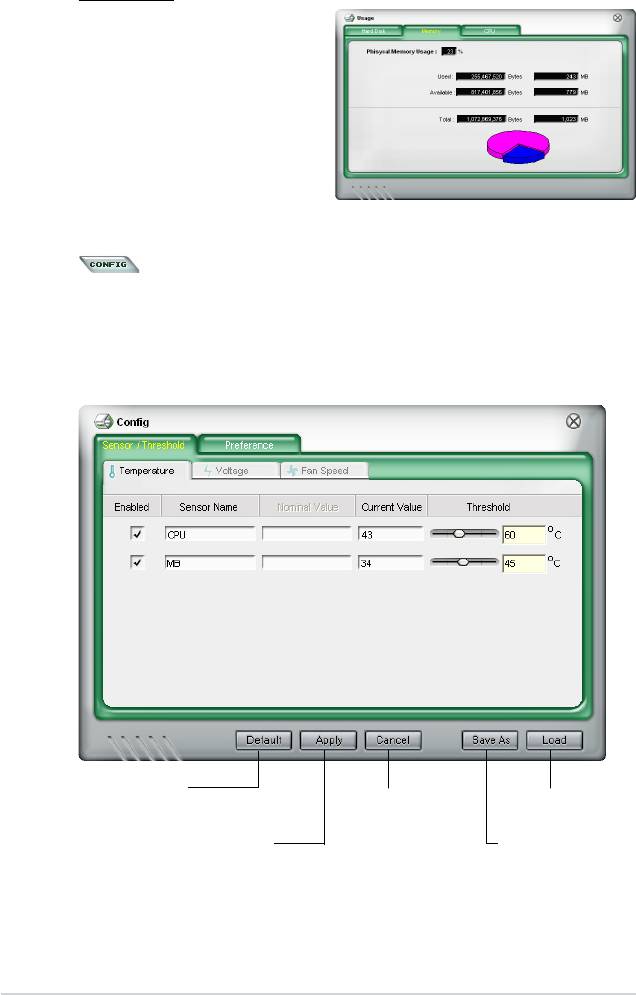
Memory usage
The Memory tab shows both
used and available physical
memory. The pie chart at the
bottom of the window represents
the used (blue) and the available
Conguring PC Probe II
Click to view and adjust the sensor threshold values.
The Cong window has two tabs: Sensor/Threshold and Preference. The Sensor/
Threshold tab enables you to activate the sensors or to adjust the sensor threshold
values. The Preference tab allows you to customize sensor alerts, or change the
temperature scale.
Loads the default
threshold values for
Cancels or
Loads your saved
each sensor
ignores your
conguration
changes
Applies your
Saves your
changes
conguration
5-20 Chapter 5: Software support
5.3.4 ASUS AI Suite
ASUS AI Suite allows you to launch AI Booster, AI Nap, and Fan Xpert utilities
easily.
Installing AI Suite
To install AI Suite on your computer:
1. Place the support DVD to the optical drive. The Drivers installation tab
appears if your computer has an enabled Autorun feature.
2. Click the Utilities tab, then click
AI Suite.
3. Follow the screen instructions to complete installation.
Launching AI Suite
®
You can launch AI Suite right after installation or anytime from the Windows
desktop.
®
To launch AI Suite from the Windows
desktop, click Start > All Programs >
ASUS > AI Suite > AI Suite v1.xx.xx. The AI Suite main window appears.
®
After launching the application, the AI Suite icon appears in the Windows
taskbar.
Click this icon to close or restore the application.
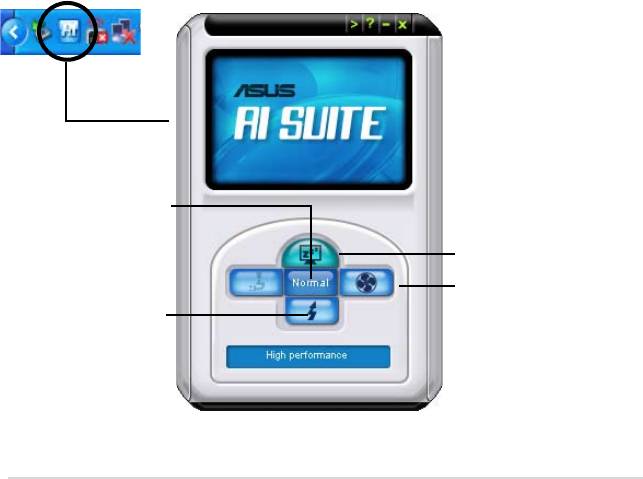
Using AI Suite
Click the AI Nap, AI Booster, or Fan Xpert icon to launch the utility, or click the
Normal icon to restore the system to normal state.
Press to restore to normal
Press to launch AI Nap
Press to launch Fan
Xpert
Press to launch AI Booster
ASUS P5QLD PRO 5-21
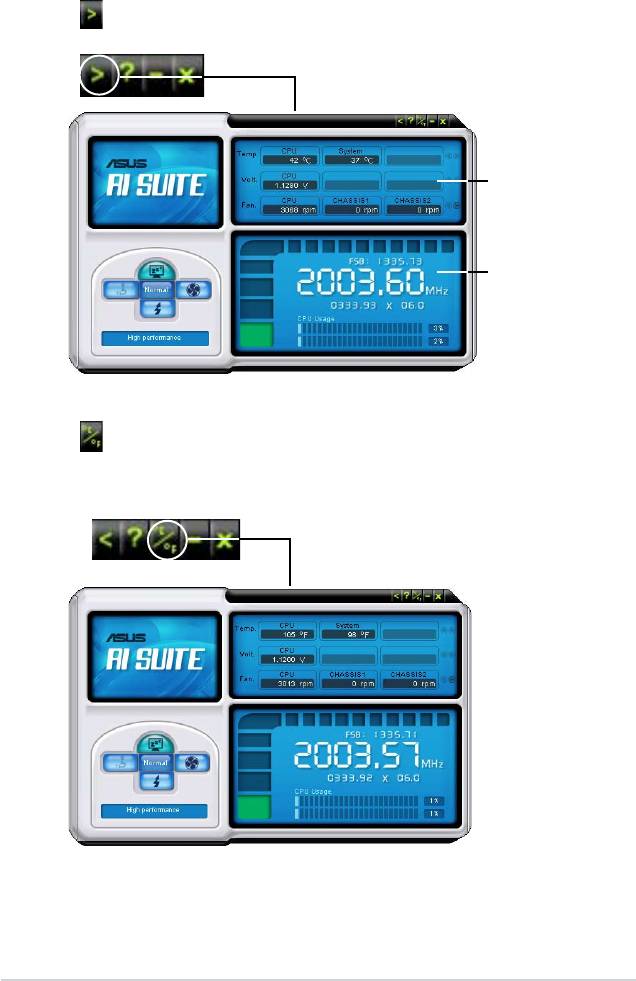
Other feature buttons
Click on right corner of the main window to open the monitor window.
Displays the CPU/
system temperature,
CPU/memory/PCIE
voltage, and CPU/
chassis fan speed
Displays the FSB/CPU
frequency
Click on right corner of the expanded window to switch the temperature from
degrees Centigrade to degrees Fahrenheit.
5-22 Chapter 5: Software support
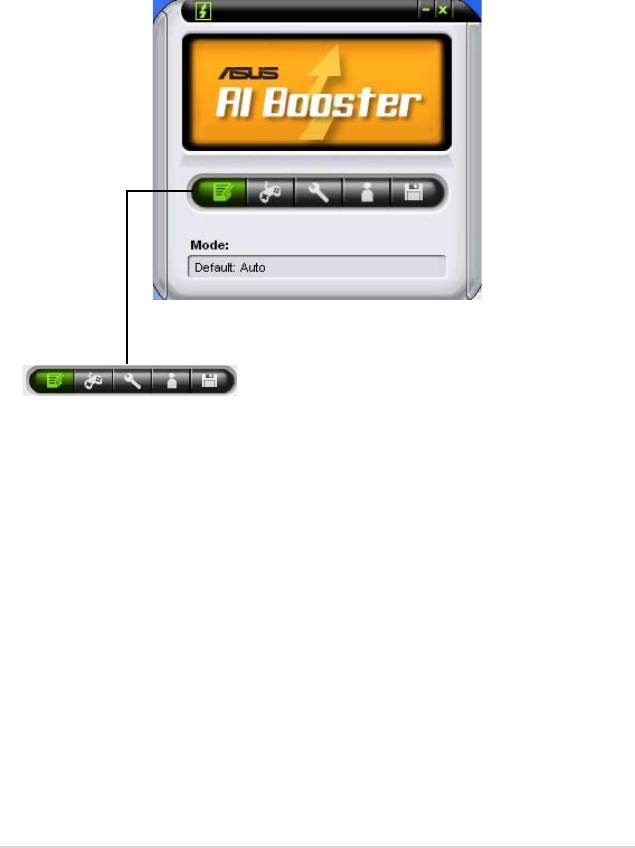
5.3.5 ASUS AI Booster
The ASUS AI Booster application allows you to overclock the CPU speed in
®
WIndows
environment without the hassle of booting the BIOS.
After installing AI Suite from the bundled support DVD, you can launch the utility
®
by double-clicking the AI Suite icon on the Windows
OS taskbar and click the AI
Booster button on the AI Suite main window.
The options on the taskbar allow you to use the default settings, adjust CPU/
Memory/PCI-E frequency manually, or create and apply your personal overclocking
congurations.
ASUS P5QLD PRO 5-23
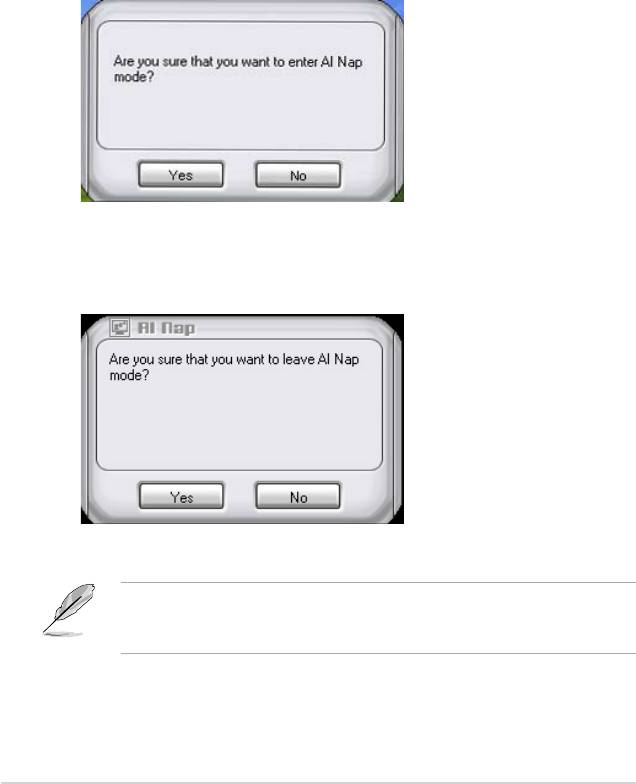
5.3.6 ASUS AI Nap
This feature allows you to minimize the power consumption of your computer
whenever you are away. Enable this feature for minimum power consumption and
a more quiet system operation.
After installing AI Suite from the bundled support DVD, you can launch the utility by
double-clicking the AI Suite icon on the Windows OS taskbar and click the AI Nap
button on the AI Suite main window.
Click Yes on the conrmation screen.
To exit AI Nap mode, press the system power or mouse button then click Yes on
the conrmation screen.
To switch the power button functions from AI Nap to shutting down, just right
click the AI Suite icon on the OS taskbar, select AI Nap and click Use power
button. Unclick the item to switch the function back.
5-24 Chapter 5: Software support
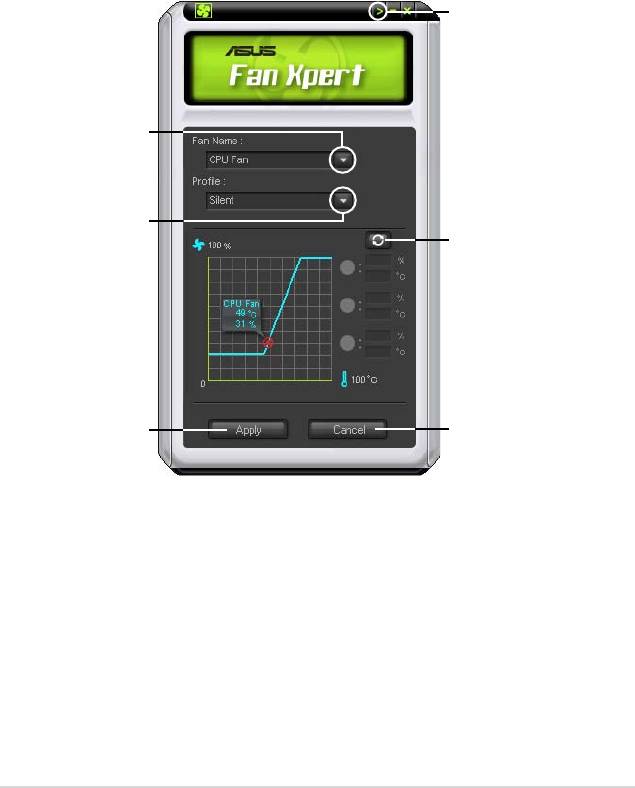
5.3.7 ASUS Fan Xpert
ASUS Fan Xpert intelligently allows you to adjust the CPU fan speed according
to different ambient temperatures caused by different climate conditions in
different geographic regions and your PC’s system loading. The built-in variety
of useful proles offer exible controls of fan speed to achieve a quiet and cool
environment.
Install AI Suite from the bundled support DVD. To launch the ASUS Fan Xpert
®
utility, double-click the AI Suite icon on the Windows
notication bar and click
the Fan Xpert button on the AI Suite main window.
Click to open the
Calibration window
Dropdown list button
Click to display
the dropdown list
Click to display
and select a fan
the current CPU
prole mode
temperature and the
fan speed ratio
Click to cancel the
Click to save the setup
Fan Xpert utility
ASUS P5QLD PRO 5-25

5.3.8 ASUS EPU-4 Engine
ASUS EPU-4 Engine is an energy-efcient tool that satises different computing
needs. This utility provides three modes that you can select to enhance system
performance or save power. Selecting Auto mode will have the system shift modes
automatically according to current system status. You can also customize each
mode by conguring settings like CPU Loadline, vCore Voltage Downgrade, and
Fan Control.
Installing 4 Engine
To install 4 Engine on your computer:
1. Place the support DVD to the optical drive. The
Drivers menu appears if
Autorun is enabled on your computer.
2. Click
ASUS EPU-4 Engine.
3. Follow the screen instructions to complete installation.
Launching 4 Engine
Launch 4 Engine by double-clicking the 4 Engine
®
icon on the Windows
notication area.
The rst time you launch 4 Engine,
the following message will appear,
asking you to run Calibration rst.
Running calibration allows the
system to detect CPU properties to
optimize power management.
Click Run Calibration and wait for a few seconds. Then, the 4 Engine main menu
appears.
5-26 Chapter 5: Software support
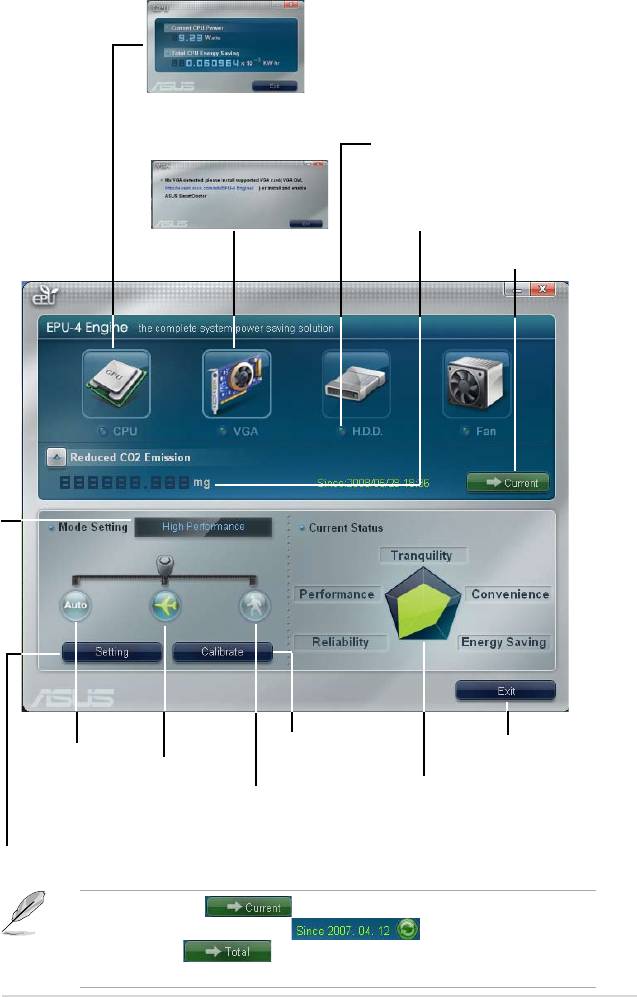
4 Engine main menu
Displays CPU Power and
Total CPU Energy Saving
Displays the following
message if no VGA power
Lights up when power
saving engine is detected.
saving engine is activated
Displays the
amount of CO2
*Shifts between
reduced
the display of Total
and Current CO2
reduced
Displays
current
mode
Runs calibration
Exits the utility
Auto Mode
High Performance Mode
Displays the system
Max. Power Saving Mode
properties of each
mode
Settings for each mode (refer to the next page for further information)
*• Click Current to show the CO2 that has been reduced since
you click the Renew button .
*• Click Total
to show the total CO2 that has been reduced
since you launched 4 Engine.
ASUS P5QLD PRO 5-27
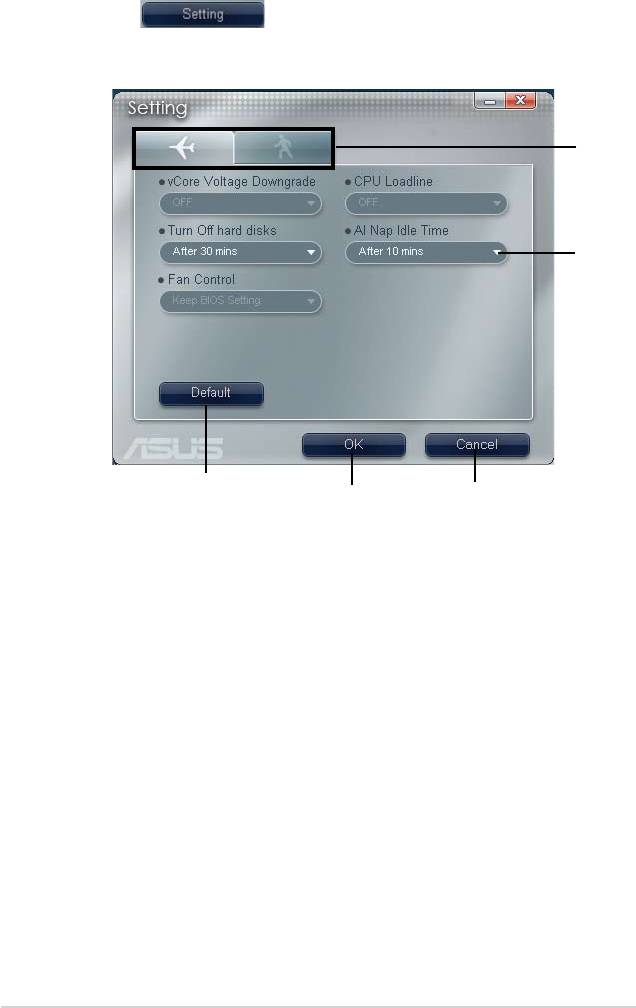
Setting menu
Click Setting ( ) from the 4 Engine main menu to display
conguration options in each mode. Some options in certain modes are dimmed,
meaning that they are not available.
Click to select
a mode
Click the arrow
to see more
options
Restore default
Click to apply
Click to abort
settings
settings
settings
Conguration options in Setting menu
The following lists the conguration options and their denitions in Setting menu.
• vCore Voltage Downgrade:
Lowers CPU vCore voltage.
• High: Downgrades voltage to the highest level for CPU power saving.
• Medium: Downgrades voltage to the medium level.
• Small:
Downgrades voltage to the minimum level.
• Turn Off hard disks:
Turns off hard disk drives when they are not accessed
after a certain time.
• CPU Loadline:
Sets up the CPU loadline to manage CPU power saving.
• Light: Saves CPU power to the minimum level.
• Medium:
Saves CPU power to the medium level.
• Heavy:
Saves CPU power to the highest level.
5-28 Chapter 5: Software support

• Fan Control:
Adjusts fan speeds to reduce noise and save system power.
• Quiet:
Lowers CPU fan speed and shuts off two chassis fans.
• Slow:
Lowers CPU fan and two chassis fan speeds.
• AI Nap Idle Time:
Enters AI Nap mode after a certain time during system idle
process.
Refer to the following table for the conguration options in each mode.
Conguration
Turbo Mode High
Medium Power
Maximum
options
Performance
Saving Mode
Power Saving
Mode
Mode
vCore Voltage
N/A N/A Small/Medium/
Small/Medium/
Downgrade
High
High
Turn Off
Never/After 3
Never/After 3
Never/After 3
Never/After 3
hard disks
mins–After 5
mins–After 5
mins–After 5
mins–After 5
hours
hours
hours
hours
CPU Loadline N/A N/A Light/Medium/
Light/Medium/
Heavy
Heavy
Fan Control N/A N/A Keep Bios
Keep Bios
Setting/Slow
Setting/Quiet
AI Nap
Never/After 3
Never/After 3
Never/After 3
Never/After 3
Idle Time
mins–After 5
mins–After 5
mins–After 5
mins–After 5
hours
hours
hours
hours
ASUS P5QLD PRO 5-29
5.3.9 ASUS Express Gate
ASUS Express Gate is an instant-on environment that gives you quick access to
the Internet. Within a few seconds of powering on your computer, you will be at the
Express Gate menu where you can start the web browser, Skype, or other Express
Gate softwares.
Installing ASUS Express Gate
• ASUS Express Gate supports installation on SATA HDDs in IDE mode only.
• ASUS Express Gate supports HDDs connected to
motherboard chipset-
controlled onboard SATA ports only. All onboard extended SATA ports
and external SATA ports are NOT supported. See chapter 2 for the exact
location of onboard SATA ports.
• ASUS Express Gate supports installation on USB HDDs and Flash drives,
but the software performance may be slower than installed on SATA HDDs.
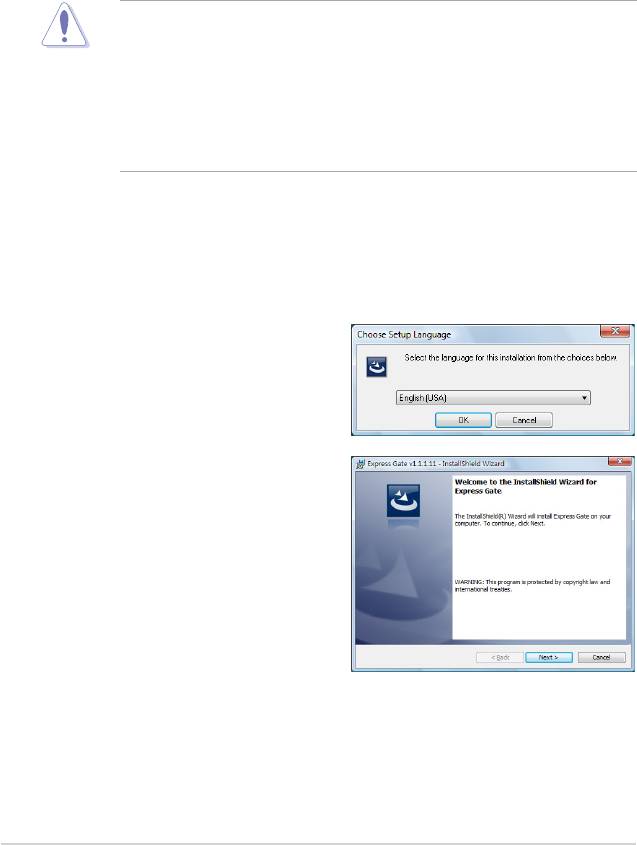
To install Express Gate on your computer
1. Place the Support DVD to the optical drive. The
Drivers installation tab
appears if your computer has enabled Autorun feature.
2. Click the
Utilities tab, then click ASUS Express Gate Installer.
3. Select the language for installation
and click OK.
4. The InstallShield Wizard for
Express Gate appears. Click Next
to continue.
5-30 Chapter 5: Software support
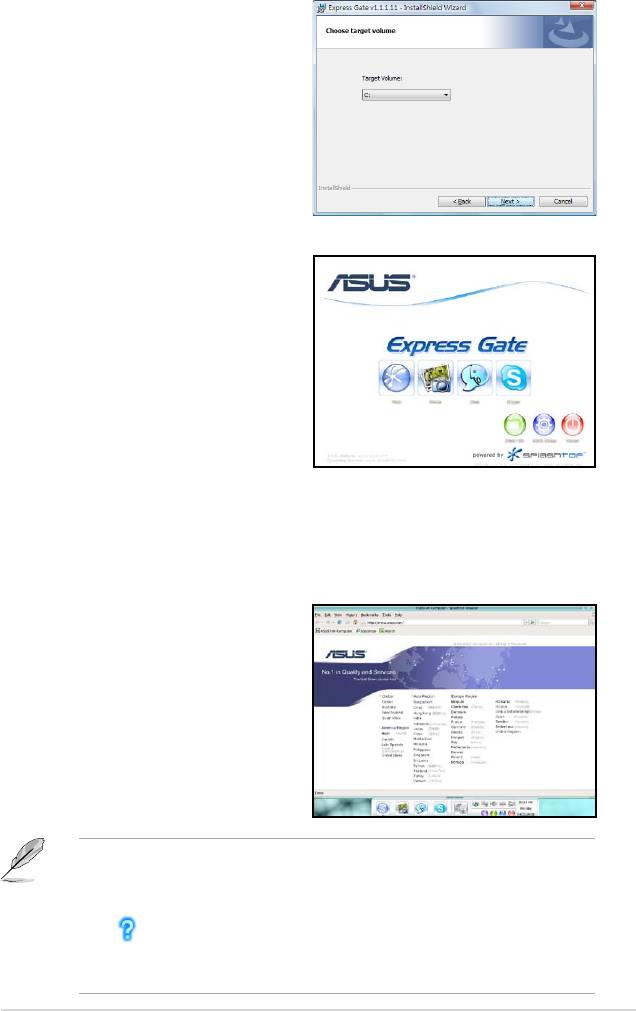
5. Select the target disk volume for
you to install Express Gate. If you
have multiple volumes and OS
installed in your hard drive, it is
recommended to install Express
Gate in Volume C. Click Next to
continue.
6. Follow the screen instructions to
complete installation.
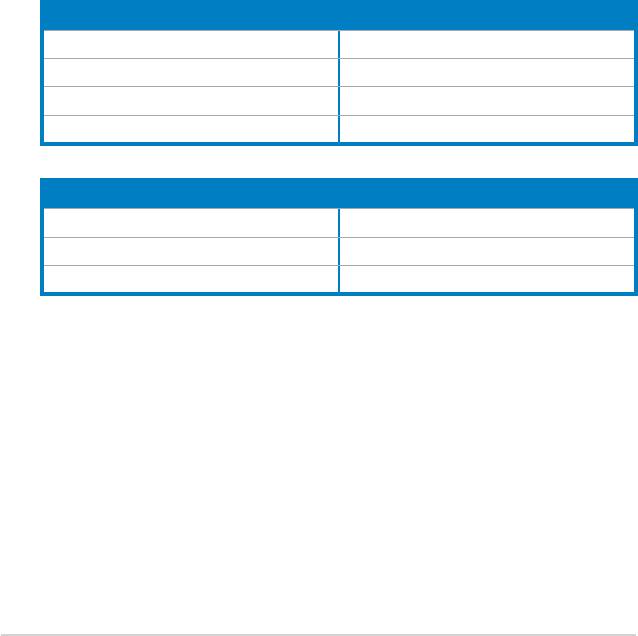
The First Screen
Express Gate’s rst screen appears
within a few seconds after you power
on the computer. From here, you can
immediately start the web browser or
Skype.
You can also choose to continue booting
normally (e.g. to your installed OS such
as Windows), enter BIOS setup, or power
off.
If you don’t make any selection, Express
Gate will automatically exit and boot to your normal OS after a certain amount of
time. The timer countdown is shown on-screen inside the “boot to OS” button. As
you move the mouse or type a key, the countdown stops and the timer disappears,
so you can take your time to make a selection.
The Express Gate Environment
The very rst time you enter the Express
Gate environment (by launching either
web or Skype from the rst screen), a
rst time wizard will guide you through
basic Express Gate congurations. Basic
congurations include language, date
and time and screen resolution.
• To enter the motherboard BIOS setup program, click Exit on the Express
Gate First Screen, and then press the <Del> key during POST.
• See the software manual in the bundled motherboard support DVD or click
in the Express Gate environment for detailed software instructions.
• Express Gate complies with the OpenGL standard. Refer to http://support.
asus.com for Express Gate source codes.
ASUS P5QLD PRO 5-31
Once inside the Express Gate environment, click on the icons on the LaunchBar,
by default at bottom of the screen, to launch or switch between softwares. You
can re-arrange, re-size and move windows. Bring a window to the foreground
by clicking within it or by clicking on its corresponding software icon. Re-size a
window by dragging any of its four corners. Move a window by dragging its title bar.
Besides using the LaunchBar, you can also switch between softwares by pressing
<Alt> +<Tab> on the keyboard. You can also right-click anywhere on the desktop
to bring up a menu of softwares.
The red triangle on an software icon in the LaunchBar denotes that the software is
already running. This means that you can switch to it without any delay. In the rare
case where an software stops responding, right-click on its icon to force close it.
Knowing the Express Gate hot-keys
Here is a list of common-used hot-keys for Express Gate.
In the First Screen:
Key Function
PAUSE/BREAK Power-off
ESC Continue to boot OS
DEL Enter BIOS setup
F8 Enter Boot selection pop-up
In the Express Gate Environment:
Key Function
<Alt> + <Tab> Switch between softwares
<Ctrl> + <Alt> + <Del> Bring up Power-Off dialog box
<Ctrl> + <Alt> + <Print Screen> Save screen snapshot as picture to le
5-32 Chapter 5: Software support
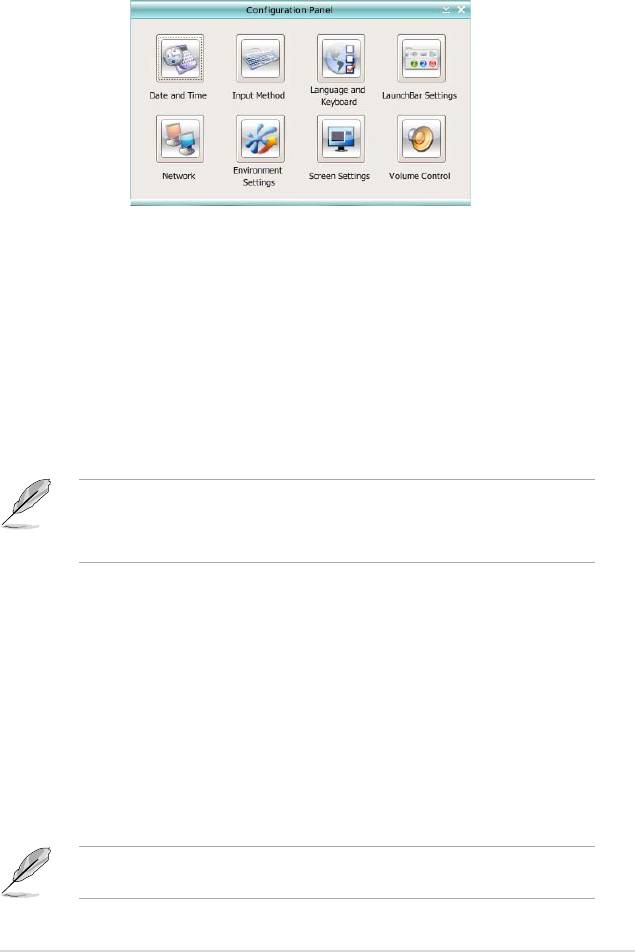
Using the Conguration Panel
Use the conguration panel to change various Express Gate settings.
Click on an icon to open a particular conguration tool. The following tools are
available:
• Date and Time:
set current date and time as well as time zone.
• Input Method:
choose your preferred input language and method.
• Language and Keyboard:
choose your language and keyboard preferences.
• LaunchBar Settings:
customize your LaunchBar (where it docks, whether it
auto-hides, etc.)
• Network:
Specify how your computer connects to the Internet. Enable all
the network ports that you may use (LAN1, LAN2, and/or wireless [optional]).
LAN1 and LAN2 refer to the two RJ-45 network ports on your computer.
• The number of the LAN ports may differ from motherboards.
• You can connect the LAN cable to either port, and Express Gate will
automatically use the connected port.
Also specify whether each port uses DHCP (most common) or static IP. For
PPPoE and wireless (optional), set the login credentials (user name, password,
SSID, etc.) as well.
• Environment Settings:
This function allows you to clear the Express Gate
settings, as well as any personal information stored by the web browser
(Bookmarks, Cookies, History, etc.). The user data will be reset to the original
default conguration.
After you click
Restore System, a conrmation dialog box will open. If you click
“Yes” in the conrmation dialog box, your system will immediately restart and
then re-enter Express Gate to nish clearing the settings. This is also useful in
the rare case where settings might become corrupted.
The rst-time Wizard will run again when you enter the Express Gate
environment after clearing its settings.
ASUS P5QLD PRO 5-33
• Screen Settings: Choose the most optimal screen resolution for your display.
• Volume Control:
Control the volume for your speaker output, microphone
input, etc.
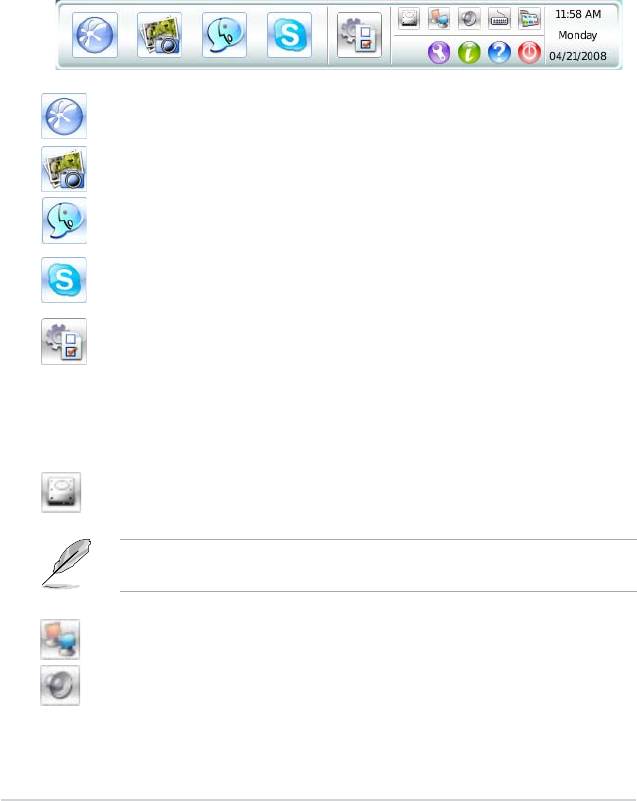
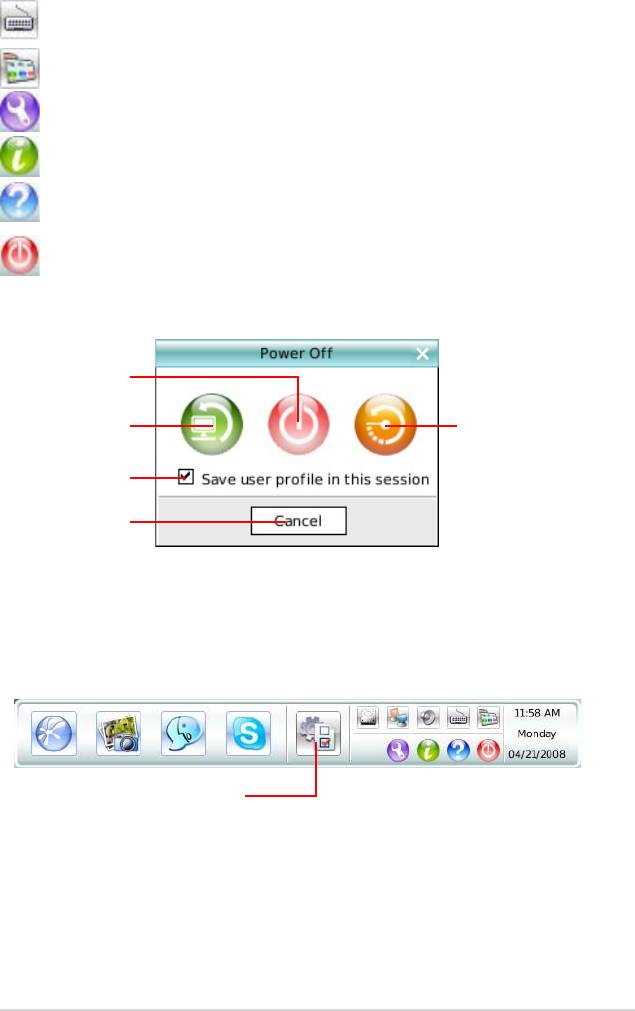
Using the LaunchBar
The LaunchBar has several system icons that show you various system statuses
and let you congure individual Express Gate settings. The LaunchBar can be
congured to auto-hide, if you want more screen space for the softwares. It can
also be congured to dock on any of the four sides of the screen.
Starts the Web Browser for quick access to the World Wide Web.
Starts the Photo Manager album / organizer tool.
Starts the Chat instant messaging tool.
Starts the Skype software, which lets you call other people on Skype
for free, as well as offering affordable, high quality voice communications
to phones all over the world.
Opens Conguration Panel, which lets you specify network settings
and other preferences.
In the rare case that one of the above softwares stops responding, you can right-
click on its icon and then select Close to force it to close.
The smaller icons on the right side of the LaunchBar are:
Click on this icon to open the File Manager window, which lets you
conveniently access the les on a USB drive. If a USB device is
detected, the icon contains a green arrow.
ASUS Express Gate supports le uploading from SATA HDDs, ODDs and USB
drive and downloading to USB drives only.
Shows network status; click to congure network.
Shows mute status; click to change volume.
5-34 Chapter 5: Software support
Click to choose input language and method as well as keyboard
shortcuts (Ctrl-Space by default).
Click to change LaunchBar options (auto-hide, docking position, etc).
Click to show the ASUS Utility panel.
Click to show About Express Gate.
Click to open Express Gate Help.
Click to bring up power options window to boot to OS, restart or power
down. This window is also shown when you press Ctrl-Alt-Del on the
keyboard.
Power off
Enter OS
Restart
Check to save
user prole
Cancel and return to
Express Gate
How Do I Get on to the Internet
If Internet doesn’t seem to be working in the Express Gate environment, check the
following:
1. Open the Conguration Panel.
Open Conguration Panel
ASUS P5QLD PRO 5-35

2. Open Network.
Network
3. Make the proper network congurations.
Each network interface is enabled immediately when you check the box next
to it.
• If you use a network cable connected to a home router (which is then
connected to your DSL/cable modem), enable both LAN1 and LAN2. Express
Gate will automatically use whichever port (LAN1 or LAN2) is connected.
If you plug the network cable into a different port while Express Gate is running
(e.g. move the cable from LAN1 to LAN2), you may need to press the “Refresh”
button to detect the change.
• The most common scenario is for your computer to automatically obtain
network settings (i.e. DHCP). If this is the case, you don’t need to click Setup
for any LAN port. If this is not the case, click Setup to congure the static IP
settings manually.
5-36 Chapter 5: Software support
• If you have wireless network, click Setup for the WiFi option. In the WiFi tab of
the Advanced Network Settings box, enter the name of your wireless access
point in the SSID eld. If your wireless access point has security enabled,
select the corresponding security algorithm from the drop-down list (e.g.
WEPAUTO) in the Encryption Type eld, and enter the password.
Click
OK to enable WiFi and establish the wireless connection.
• If you use a network cable connected directly to your DSL/cable modem (no
router in between), click Setup for xDSL/cable dial-up. This method is also
referred to as PPPoE. Choose whether the DSL/cable modem is connected
to your computer’s LAN port. Then enter the username and password for your
dial-up account.
Click
OK to enable xDSL/cable dial-up and establish the PPPoE connection.
When PPPoE is enabled, the port it uses will automatically be unchecked and
grayed out.
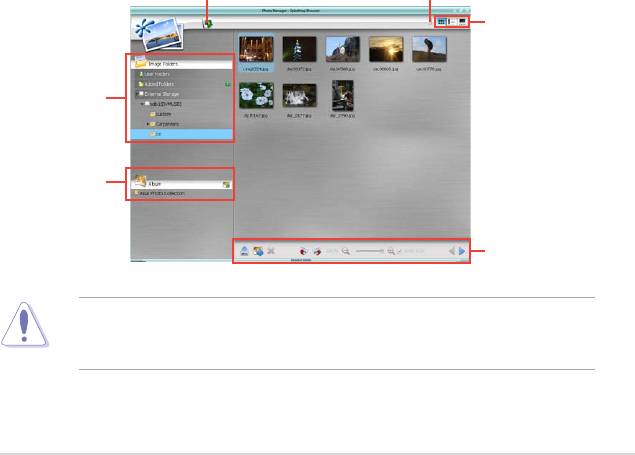
Using the Photo Manager
Express Gate provides a easy-to-use Photo Manager that allows you to view
pictures stored in your hard drive or external storage devices (such as USB
dongles, card readers, or optical disks). You can view pictures in thumbnail view;
in an enlarged view individually; in a lename/data list view; or play them in a
slideshow with background music and fancy transition effects. JPEG, GIF, BMP,
and PNG formats are supported. Refer to the on-line Help for detailed software
operation.
HelpPhoto slideshow
View mode
selection
Shows
the image
folder(s)
found in your
hard drive
or external
devices
Shows user-
created image
album(s)
Image
control bar
ASUS Express Gate supports HDDs connected to motherboard chipset-
controlled onboard SATA ports only. All onboard extended SATA ports and
external SATA ports are NOT supported.
ASUS P5QLD PRO 5-37

Conguring Express Gate in BIOS Setup
Enter BIOS setup by pressing DEL key after powering on or by clicking on the
BIOS setup icon on Express Gate’s rst screen. Express Gate conguration
options are under the Tools menu.
BIOS SETUP UTILITY
Main Ai Tweaker Advanced Power Boot Tools Exit
Press ENTER to run
ASUS EZ Flash 2
the utility to select
and update BIOS.
Express Gate [Enabled]
This utility doesn't
Enter OS Timer [10 Seconds]
support :
Reset User Data [No]
1.NTFS format
Updating Express Gate
You may update your existing Express Gate software to new versions. New
versions of the Express Gate software will be released regularly, adding
renements or new applications. You can nd original version of the software on
the support DVD or download new versions from the ASUS support website.
To update Express Gate
1. Double-click the Express Gate setup
le to start software update.
2. A software update conrmation
dialog box appears. Click Yes to
continue.
3. The InstallShield Wizard for Express Gate appears. Click
Next to continue.
4. Follow the screen instructions to complete the installation.
Repairing Express Gate
In case Express Gate cannot start normally, you can repair Express Gate by
reinstalling the software or using the repairing utility.
To repair Express Gate
• Click
Start > All Programs > Express
Gate > Express Gate Installer >
Repair this software.
OR
• Double click the Express Gate setup
le, choose Repair, and click Next to
continue.
5-38 Chapter 5: Software support
