Asus BM6835 – страница 2
Инструкция к Компьютеру Asus BM6835
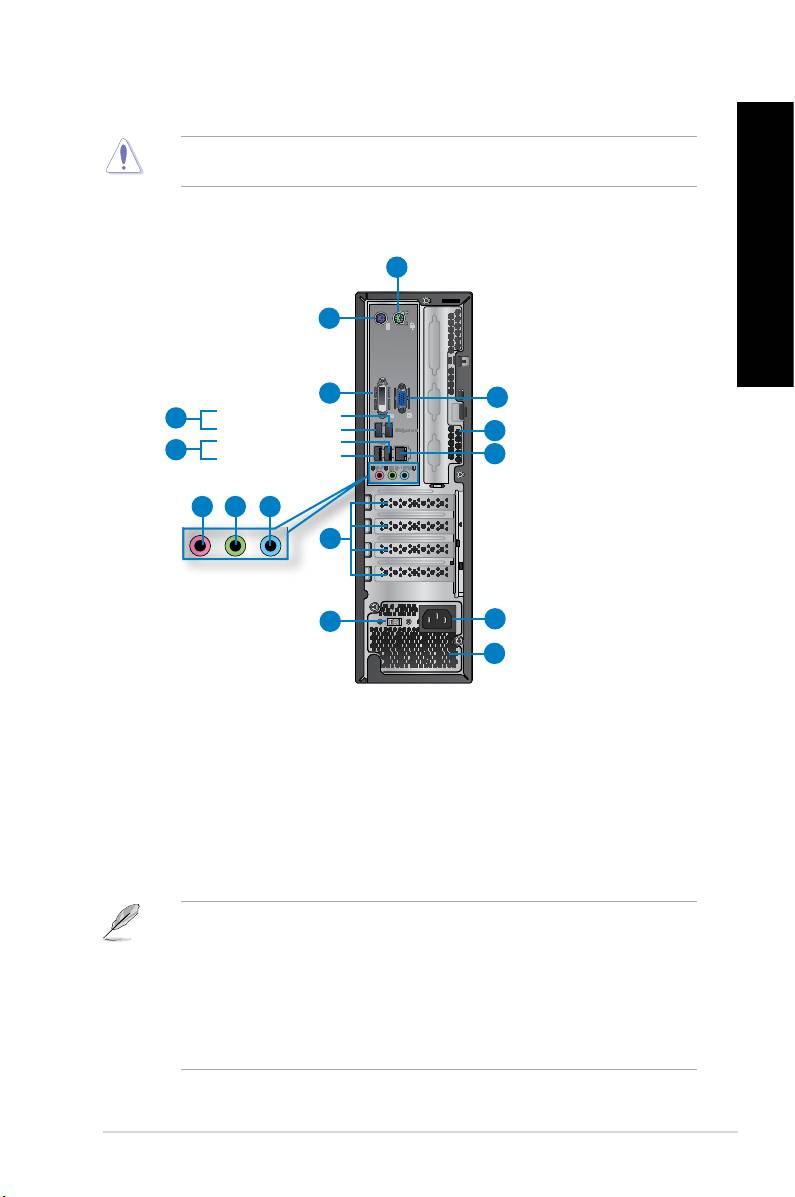
14 These vents allow air ventilation.
DO NOT block the air vents on the chassis. Always provide proper ventilation for your
computer.
This port is for VGA-compatible devices such as a VGA monitor.
1
2
3
14
4
11
5
13
6 7 8
9
10
12
11
BP6335(SD560)
1. . This port is for a PS/2 mouse.
2. . This port is for a PS/2 keyboard.
This port is for any DVI-D compatible device and is HDCP compliant
allowing playback of HD DVD, Blu-ray, and other protected content.
These Universal Serial Bus 3.0 (USB 3.0) ports connect to USB 3.0
devices such as a mouse, printer, scanner, camera, PDA, and others.
®
• DO NOT connect a keyboard / mouse to any USB 3.0 port when installing Windows
operating system.
®
• Due to USB 3.0 controller limitation, USB 3.0 devices can only be used under Windows
OS environment and after the USB 3.0 driver installation.
• USB 3.0 devices can only be used as data storage only.
• We strongly recommend that you connect USB 3.0 devices to USB 3.0 ports for faster
and better performance for your USB 3.0 devices.
ENGLISH
ENGLISH
ENGLISH
ENGLISH
ASUS BM6635(MD560), BM6835, and BP6335(SD560) 19
These Universal Serial Bus 2.0 (USB 2.0) ports connect to USB 2.0
devices such as a mouse, printer, scanner, camera, PDA, and others.
ENGLISH
This port connects to a microphone.
This port connects to a headphone or speaker. In a 4, 6, or
8-channel conguration, the function of this port becomes Front Speaker Out.
This port connects to a tape, CD, DVD player, or other audio
sources.
ENGLISH
Refer to the audio conguration table below for the function of the audio ports in the 2, 4, 6,
or 8-channel conguration.
Light Blue (Rear panel) Line In Rear Speaker Out Rear Speaker Out Rear Speaker Out
Lime (Rear panel) Line Out Front Speaker Out Front Speaker Out Front Speaker Out
Pink (Rear panel) Mic In Mic In Bass/Center Bass/Center
Lime (Front panel) - - - Side Speaker Out
Remove the expansion slot bracket when installing an
expansion card.
Use this switch to select the appropriate system input voltage
according to the voltage supply in your area. If the voltage supply in your area is 100-
127V, set the switch to 115V. If the voltage supply in your area is 200-240V, set the
switch to 230V.
Setting the switch to 115V in a 230V environment or 230V in a 115V environment will
seriously damage the system!
11. These vents allow air ventilation.
DO NOT block the air vents on the chassis. Always provide proper ventilation for your
computer.
Plug the power cord to this connector.
This port allows Gigabit connection to a Local Area Network (LAN)
through a network hub.
SPEED
LED
LED
OFF No link OFF 10Mbps connection
ORANGE Linked ORANGE 100Mbps connection
BLINKING Data activity GREEN 1Gbps connection
This port is for VGA-compatible devices such as a VGA monitor.
20 Chapter 1: Getting started
ENGLISH
ENGLISH
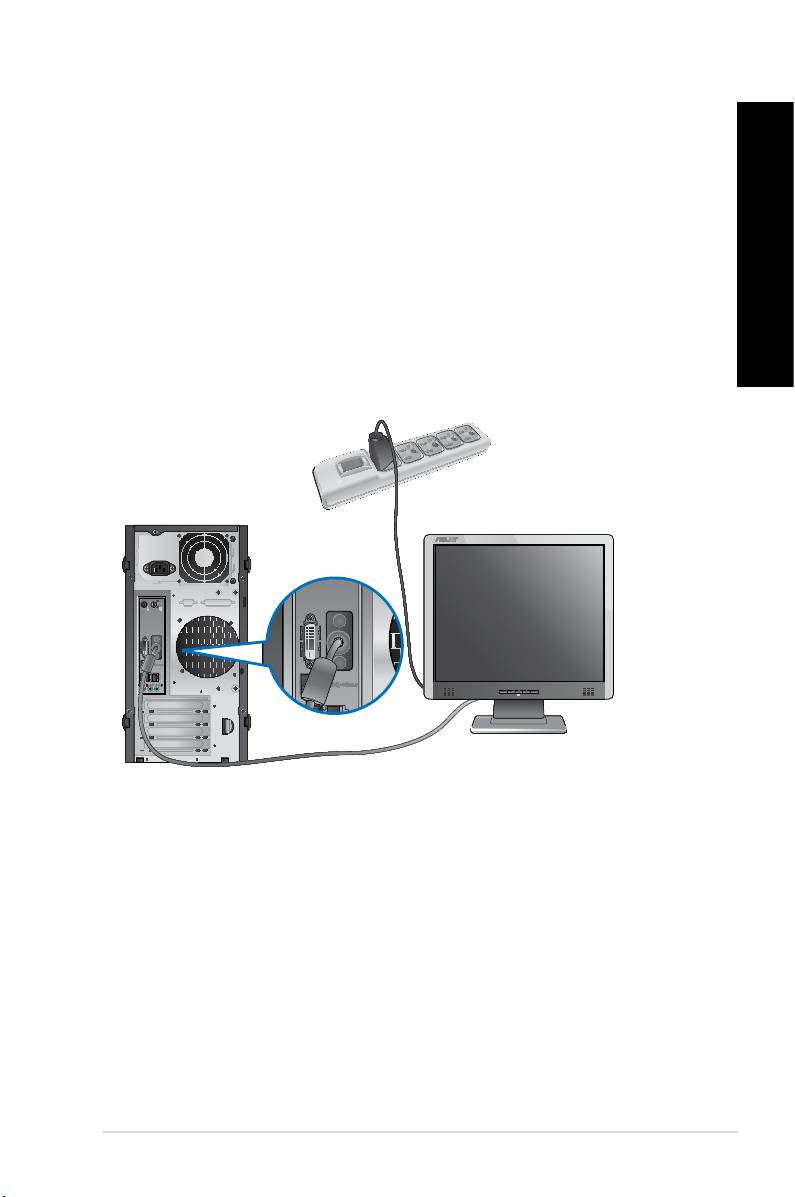
This section guides you through connecting the main hardware devices, such as the external
monitor, keyboard, mouse, and power cord, to your computer.
Connect your monitor to the onboard display output port.
1. Connect your monitor to the VGA port, DVI-D port, or display port of your computer.
2. Plug your monitor to a power source.
BM6635(MD560)
ENGLISH
ENGLISH
ENGLISH
ENGLISH
ASUS BM6635(MD560), BM6835, and BP6335(SD560) 21
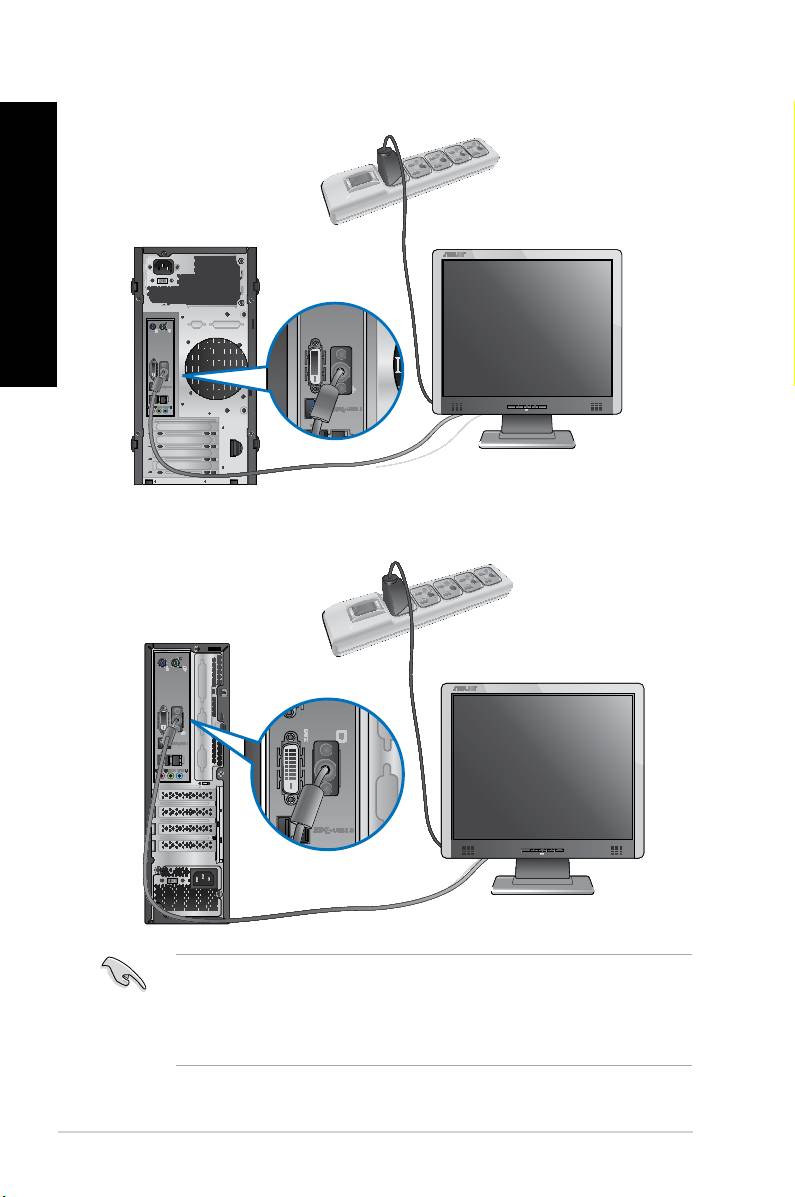
BM6835
ENGLISH
ENGLISH
BP6335(SD560)
• If your computer comes with an ASUS Graphics Card, the graphics card is set as the
primary display device in the BIOS. Hence, connect your monitor to a display output port
on the graphics card.
• To connect multiple external monitors to your computer, refer to
in Chapter 3 of this user manual for details.
22 Chapter 1: Getting started
ENGLISH
ENGLISH
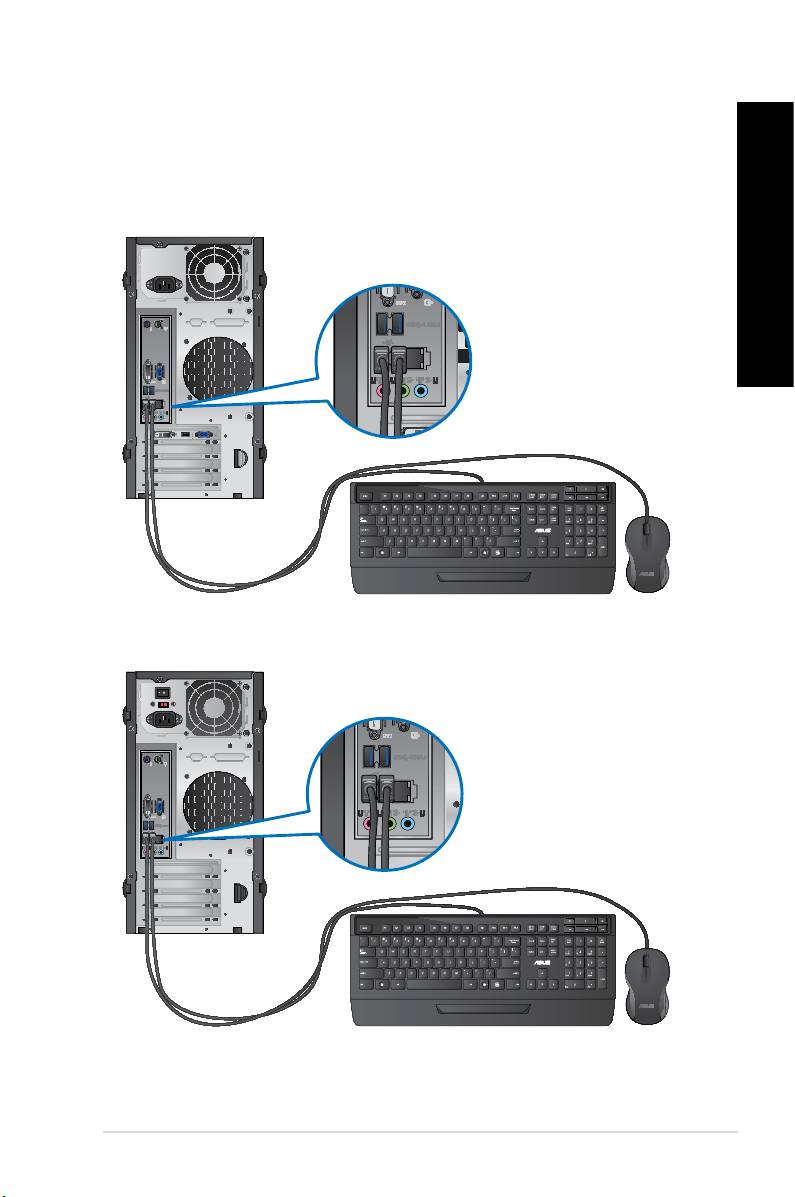
Connect a USB keyboard and a USB mouse to the USB ports on the rear panel of your
computer.
BM6635(MD560)
BM6835
ENGLISH
ENGLISH
ENGLISH
ENGLISH
ASUS BM6635(MD560), BM6835, and BP6335(SD560) 23
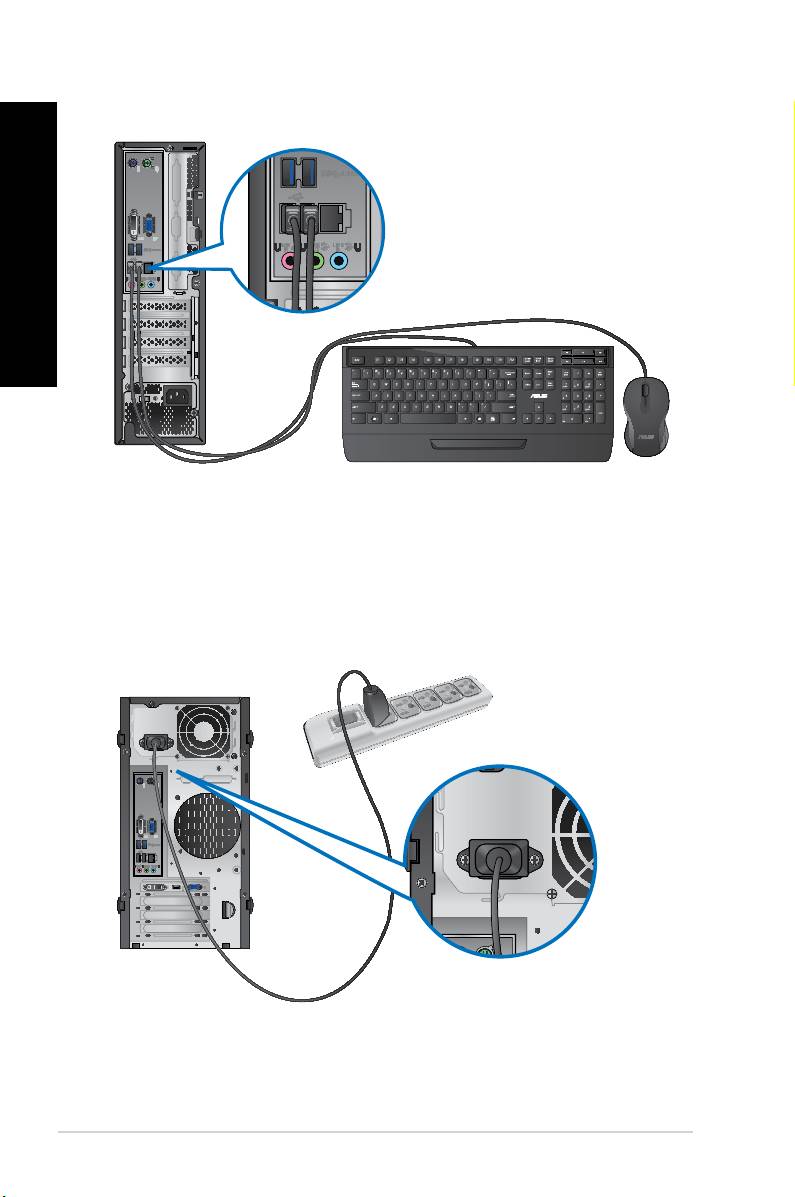
BP6335(SD560)
ENGLISH
ENGLISH
Connect one end of the power cord to the power connector on the rear panel of your
computer and the other end to a power source.
BM6635(MD560)
24 Chapter 1: Getting started
ENGLISH
ENGLISH
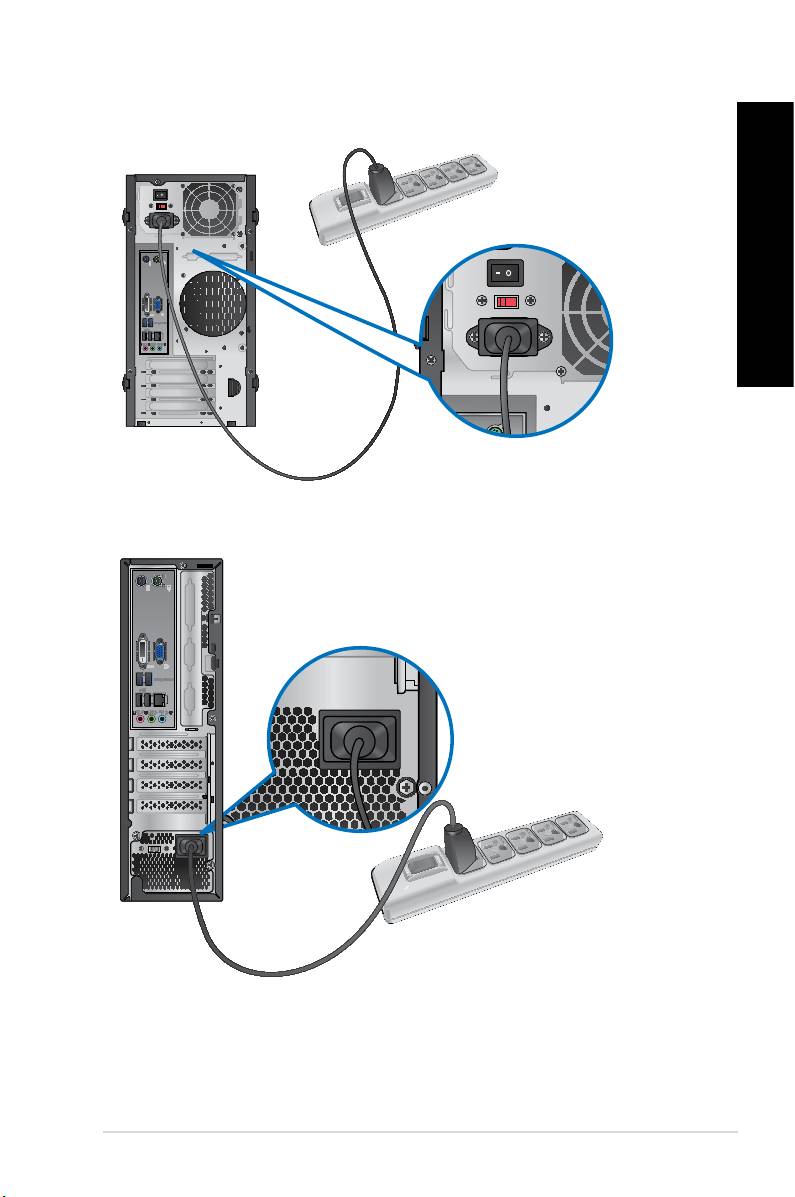
BM6835
BP6335(SD560)
ENGLISH
ENGLISH
ENGLISH
ENGLISH
ASUS BM6635(MD560), BM6835, and BP6335(SD560) 25
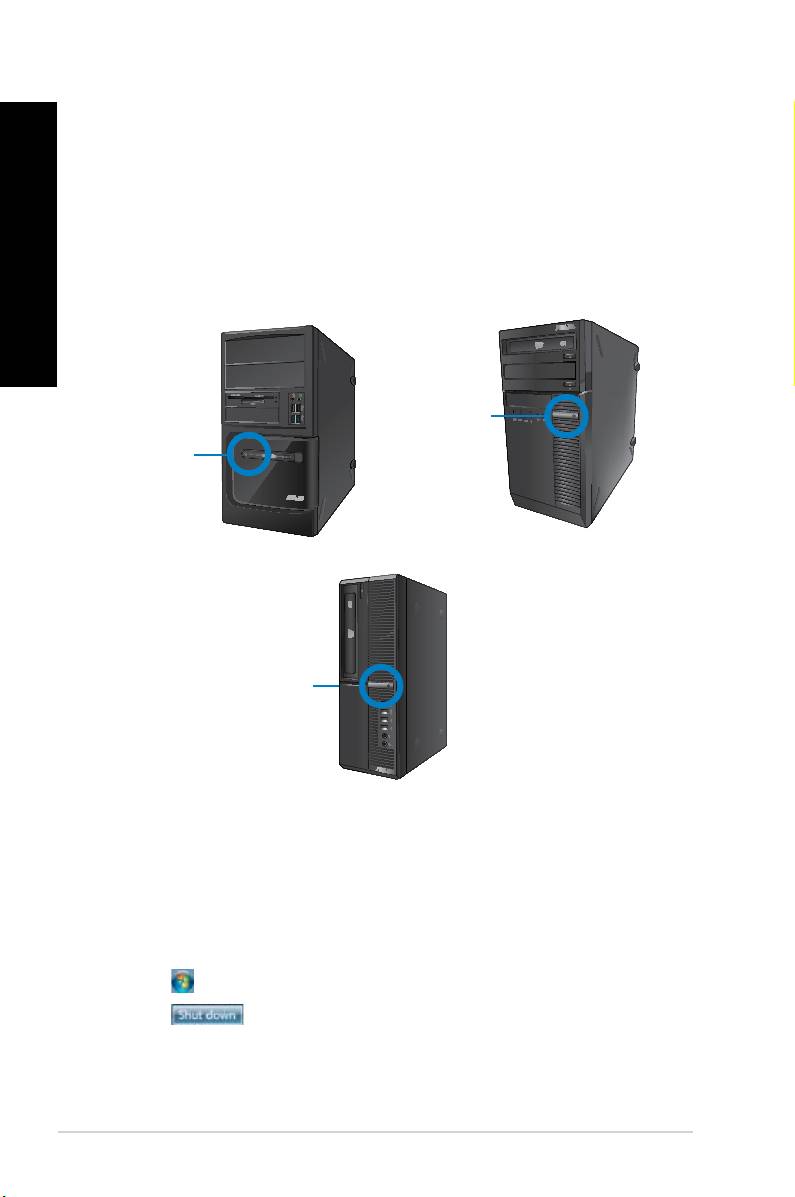
This section describes how to turn on/off your computer after setting up your computer.
ENGLISH
1. Turn your monitor ON.
2. Turn the power switch ON (for BM6835 only).
ENGLISH
3. Press the power button on your computer.
BM6835
BM6635(MD560)
BP6335(SD560)
4. Wait until the operating system loads automatically.
1. Close all running applications.
®
2. Click on the Windows
desktop.
3. Click to shut down the operating system.
26 Chapter 1: Getting started

ENGLISH
®
Using Windows
7
ENGLISH
When you start your computer for the rst time, a series of screens appear to guide you in
®
conguring the basic settings of your Windows
7 operating system.
1. Turn your computer on. Wait for a few minutes until the screen
appears.
2. From dropdown list, select your language, then click .
3. From the dropdown lists, select your , , and
, then click .
4. Key in uniques names for the and , then click .
5. Key in the necessary information to set up your password, then click . You may
also click to skip this step without entering any information.
If you want to set up a password for your account later, refer to the section
in this chapter.
6. Carefully read the license terms. Tick and click .
7. Select or to set up the
security settings for your computer. To skip this step, select .
8. Review your date and time settings. Click . The system loads the new settings and
restarts. You may now start using your computer.
ASUS BM6635(MD560), BM6835, and BP6335(SD560) 27
ENGLISH
ENGLISH
®
28 Chapter 2: Using Windows
7
ENGLISH
ENGLISH
®
Using Windows
®
Click the Start icon > Help and Support to obtain more information about Windows
7.
The Start menu gives you access to programs, utilities, and other useful items on your
computer. It also provides you with more information about Windows 7 through its
feature.
®
1. From the Windows
taskbar, click the Start icon .
2. From the Start menu, select the item that you want to launch.
You may pin programs that you want constantly displayed on the Start menu. For more
details, refer to the section on this
chapter.
The item on the Start menu contains information about some basic tasks
®
such as personalizing Windows
, adding new users, and transferring les to help you to
®
familiarize yourself with using Windows
7.
®
1. From the Windows
taskbar, click the Start icon to launch the Start menu.
2. Select . The list of available tasks appears.
3. Select the task that you want to do.
The taskbar allows you to launch and manage programs or items installed on your computer.
®
• From the Windows
taskbar, click an icon to launch it. Click the icon again to hide the
program.
You may pin programs that you want constantly displayed on the taskbar. For more details,
refer to the section on this chapter.

ENGLISH
ENGLISH
ENGLISH
When you right-click an icon on the taskbar, a jumplist launches to provide you with quick-
access to the program’s or item’s related links.You may pin items on the jumplist such as
favorite websites, often-visited folders or drives, or recently played media les.
1. From the taskbar, right-click an icon.
ENGLISH
2. From the jumplist, right-click the item that you want to pin, then select .
1. From the taskbar, right-click an icon.
2. From the jumplist, right-click the item that you want to remove from the jumplist, then
select .
®
1. From the Windows
taskbar, click the Start icon to launch the Start menu.
2. Right-click the item that you want to pin on the Start menu or taskbar.
3. Select or .
You may also right-click on the icon of a running program on the taskbar, then select Pin
.
®
1. From the Windows
taskbar, click the Start icon to launch the Start menu.
2. From the Start menu, right-click the program that you want to unpin, then select
.
1. From the taskbar, right-click the program that you want to remove from the taskbar,
then select .
ASUS BM6635(MD560), BM6835, and BP6335(SD560) 29
ENGLISH
ENGLISH
®
30 Chapter 2: Using Windows
7
ENGLISH
ENGLISH
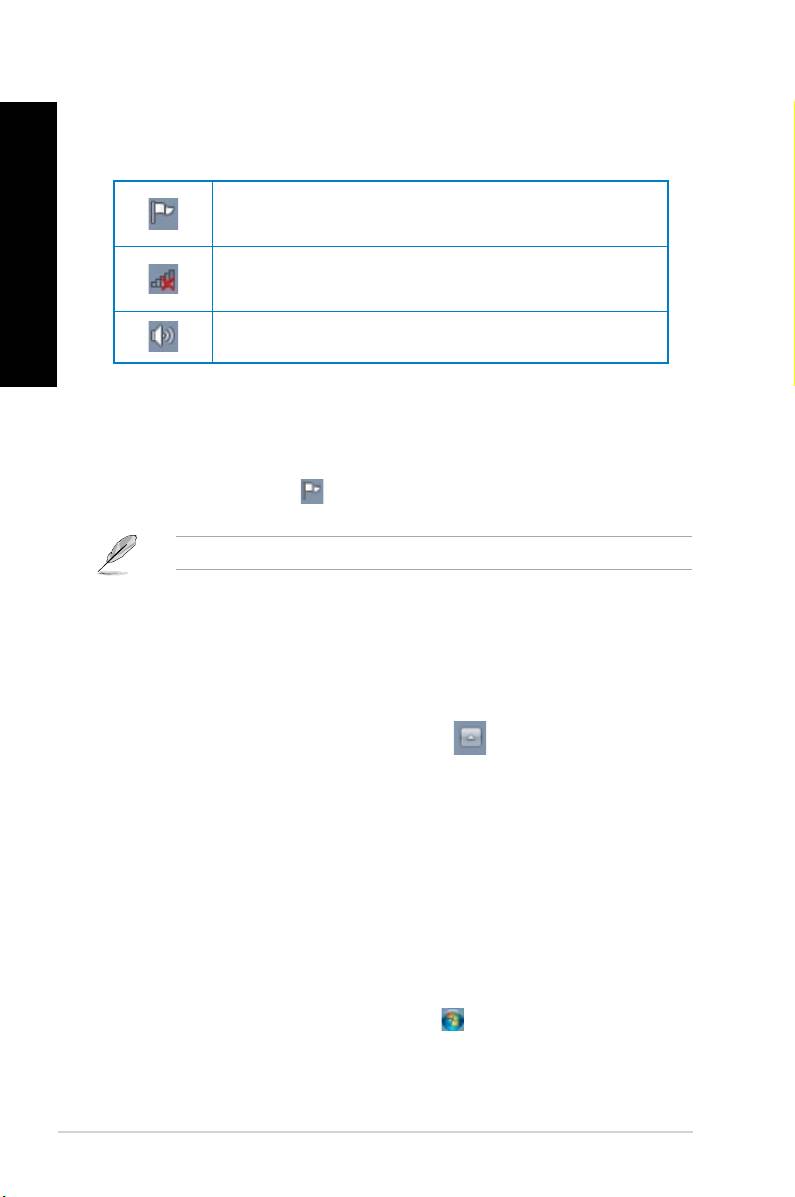
By default, the notication area shows these three icons:
®
Click this icon to display all the alert messages/notications and launch the Windows
Action Center.
This icon displays the connection status and signal strength of the wired or wireless network
connection.
Click this icon to adjust the volume.
• Click the Notication icon , then click the message to open it.
®
For more details, refer to the section Using Windows
in this chapter.
You may choose to display or hide the icons and notications on the taskbar or on the
notication area.
1. From the notication area, click on the arrow icon .
2. Click .
3. From the dropdown list, select the behaviors for the icons or items that you want to
customize.
®
Using Windows
®
Windows
Explorer allows you to view, manage, and organize your les and folders.
®
®
1. From the Windows
taskbar, click the Start icon to launch the Start menu.
2. Click to launch Windows Explorer.

ENGLISH
ENGLISH
ENGLISH
®
1. Launch Windows
Explorer.
2. From the navigation or view pane, browse for the location of your data.
3. From the breadcrumb bar, click the arrow to display the contents of the drive or folder.
ENGLISH
1. Launch Windows Explorer.
2. From the navigation pane, select the location of your data.
3. From the toolbar, click the View icon .
4. From the View menu, move the slider to select how you want to view the le/folder.
You may also right-click anywhere on the View pane, click , and select the view type
that you want.
1. Launch Windows Explorer.
2. From the eld, click to display the dropdown list.
3. Select your preferred arrangement type.
1. Launch Windows Explorer.
2. Right-click anywhere on the View pane.
3. From the menu that appears, select , then select your preferred sorting type.
1. Launch Windows Explorer.
2. Right-click anywhere on the View pane.
3. From the menu that appears, select , then select your preferred grouping
type.
ASUS BM6635(MD560), BM6835, and BP6335(SD560) 31

ENGLISH
ENGLISH
®
32 Chapter 2: Using Windows
7
ENGLISH
ENGLISH
1. Launch Windows Explorer.
2. From the toolbar, click .
3. Key in a name for the new folder.
You may also right-click anywhere on the View pane, click > .
1. Click >> > .
2. Click . Click .
3. Select your backup destination. Click .
4. Select or
.
If you select , Windows will not back up your programs, FAT-
formatted les, Recycle Bin les, or temporary les that are 1GB or more.
5. Follow the onscreen instructions to nish the process.
®
The Windows
System Restore feature creates a restore point where the computer’s system
settings are stored at certain time and date. It allows you to restore or undo changes to your
computer’s system settings without affecting your personal data.
1. Close all running applications.
2. Click >>>>.
3. Follow the onscreen instructions to complete the process.
ENGLISH
ENGLISH
ENGLISH
®
Using Windows
®
Windows
7 Action Center provides you with alert notications, security information, system
maintenance information, and the option to automatically troubleshoot and x some common
computer problems.
ENGLISH
You may customize the notications. For more details, refer to the previous section
in this chapter.
®
®
1. To launch Windows 7 Action Center, click the Notication icon , then click
.
2. From Windows 7 Action Center, click the task that you want to do.
®
Using Windows
Windows Update allows you to check and install the latest updates to enhance the security
and performance of your computer.
®
®
®
1. From the Windows
taskbar, click the Start icon to launch the Start menu.
2. Select > .
3. From the Windows Update screen, click the task that you want to do.
You may create user accounts and passwords for people who will use your computer.
®
1. From the Windows
taskbar, click > > .
2. Select .
3. Select .
4. Key in the name of the new user.
5. Select either or as the user type.
6. When done, click .
ASUS BM6635(MD560), BM6835, and BP6335(SD560) 33
ENGLISH
1. Select the user that you would like to set a password.
2. Select .
3. Key in a password and conrm it. Key in your password’s hint.
4. When done, click .
ENGLISH
Trend Micro Internet Security is pre-installed on your computer. It is a third-party anti-virus
software protecting your computer from virus. It is purchased separately. You have a 30-day
trial period after activating it.
1. Run the Trend Micro Internet Security application.
2. Carefully read the license terms. Click.
3. Input your e-mail address and select your location. Click .
4. Click Finish to complete the activation.
®
®
Windows
Help and Support provides you with guides and answers in using the applications
®
in Windows
7 platform.
®
To launch Windows
Help and Support, click >.
®
Ensure that you are connected to the Internet to obtain the latest Windows
online help.
®
34 Chapter 2: Using Windows
7
ENGLISH
ENGLISH
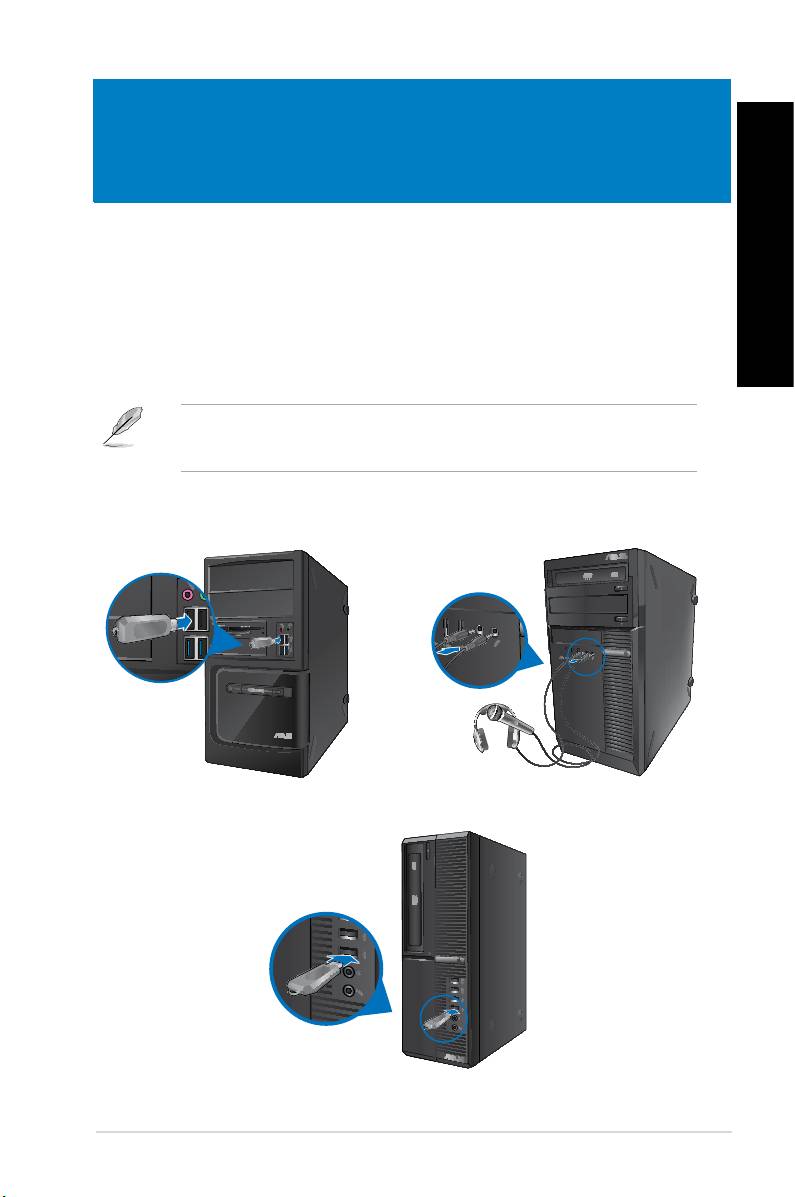
This desktop PC provides USB 2.0/1.1 and USB 3.0 ports on both the front and rear panels.
The USB ports allow you to connect USB devices such as storage devices.
• Insert the USB storage device to your computer.
You can enable or disable the front and rear USB 2.0 and USB 3.0 ports individually from
the BIOS Setup. Refer to the section in
Chapter 6 of this user manual for details.
BM6835BM6635(MD560)
BP6335(SD560)
ASUS BM6635(MD560), BM6835, and BP6335(SD560) 35
ENGLISH
BM6635(MD560)
ENGLISH
BM6835
BP6335(SD560)
36 Chapter 3: Connecting devices to your computer
ENGLISH
ENGLISH
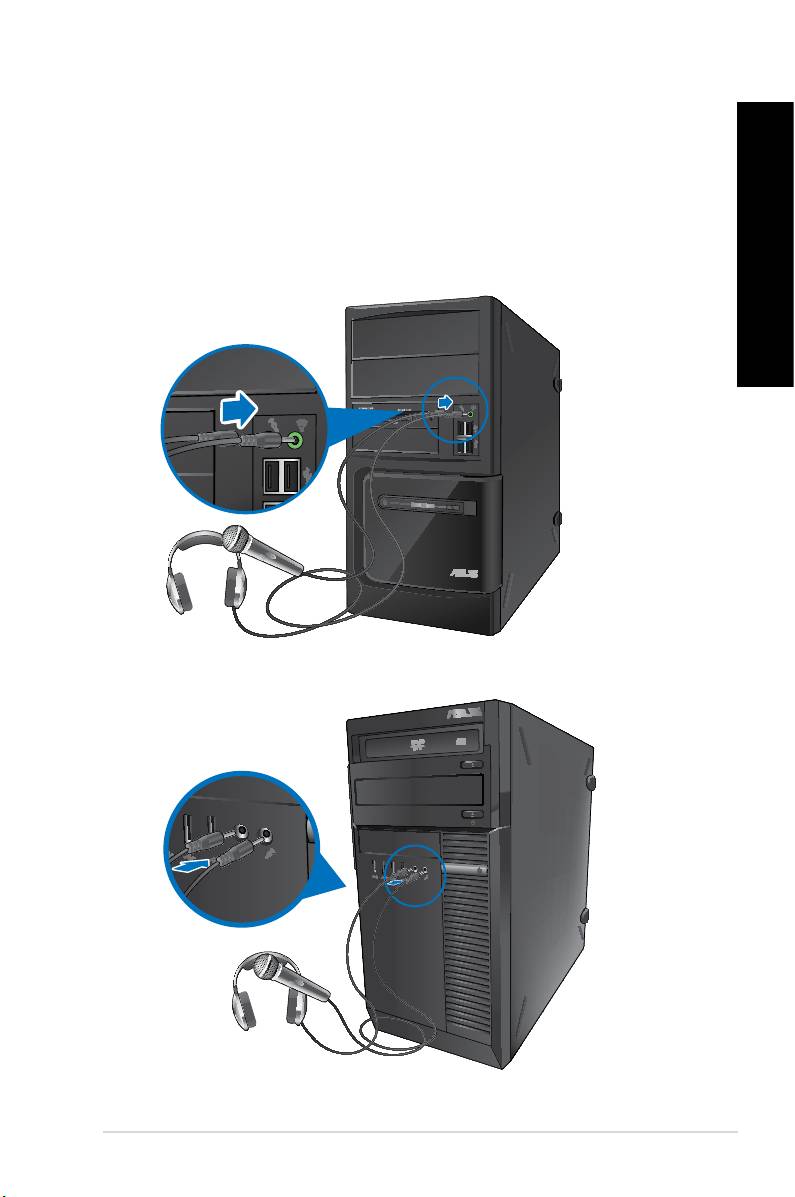
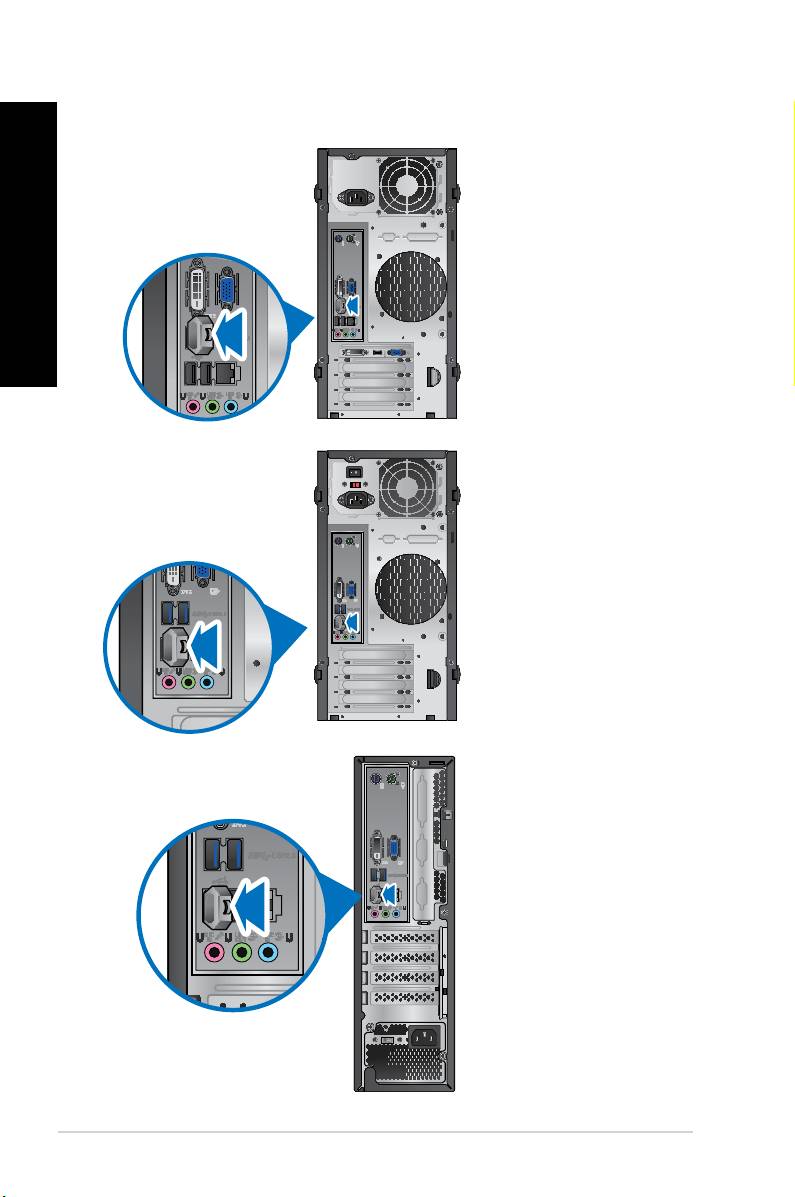
This desktop PC comes with microphone ports and speaker ports on both the front and
rear panels. The audio I/O ports located on the rear panel allow you to connect 2-channel,
4-channel, 6-channel, and 8-channel stereo speakers.
BM6635(MD560)
BM6835
ENGLISH
ENGLISH
ENGLISH
ENGLISH
ASUS BM6635(MD560), BM6835, and BP6335(SD560) 37
BP6335(SD560)
LINE OUT
ENGLISH
ENGLISH
38 Chapter 3: Connecting devices to your computer
ENGLISH
ENGLISH
